Overview
This guide outlines major mechanics for Monster Crown! Look no further to learn everything you need to know on your adventure.
Introduction
Monster Crown is a Monster Taming game focused on breeding and battling. All monsters can be crossed together to create true and interesting crossbreed forms. This guide is intended to provide information on game mechanics for player reference. The guide has been organized into several sections that can be quickly navigated to via the sidebar. Please enjoy the guide and let me know if you see any outdated/incorrect information.
NOTE: Monster Crown is currently in Early Access and subject to change. I will update the guide over time, but I can’t guarantee that updates will promptly follow all content updates. Check the version number below to see when the guide was last updated.
Guide Updated: Monster Crown Content Pack 6 (0.1.583)
Game Options
The Options Menu can be accessed from the Main Menu or from the Pause Screen during gameplay. The options are shown screen by screen:

- Party Exp: Toggles whether or not experience points are distributed throughout your party after battle.
- Button Map: Allows you to customize the button layout for controller or keyboard.
- Soft Reset: Resets the game to the title screen without requiring a full restart.
- Quit Game: Exits the game to the OS.
⠀
- Resolution: Sets the display resolution for the game.
- Scanlines: Toggles a grid-overlay on the screen.
- HUD Clock: Toggles an in-game clock on the HUD.
- HUD Inventory: Toggles a display of certain inventory items on the HUD (gold and pacts).
- HUD Party: Toggles a display of current party composition on the HUD.
⠀
- Music Vol: Sets the in-game music volume.
- SFX Vol: Sets the in-game sound effects volume.
⠀
⠀
⠀
⠀
⠀
⠀
- Difficulty: Toggles between Normal and Easy Difficulty. On Easy Difficulty: Healing is free, items are not lost on whiteout, chiefs don’t take a monster on loss, 100% chance to flee from wild monsters.
Monster Types

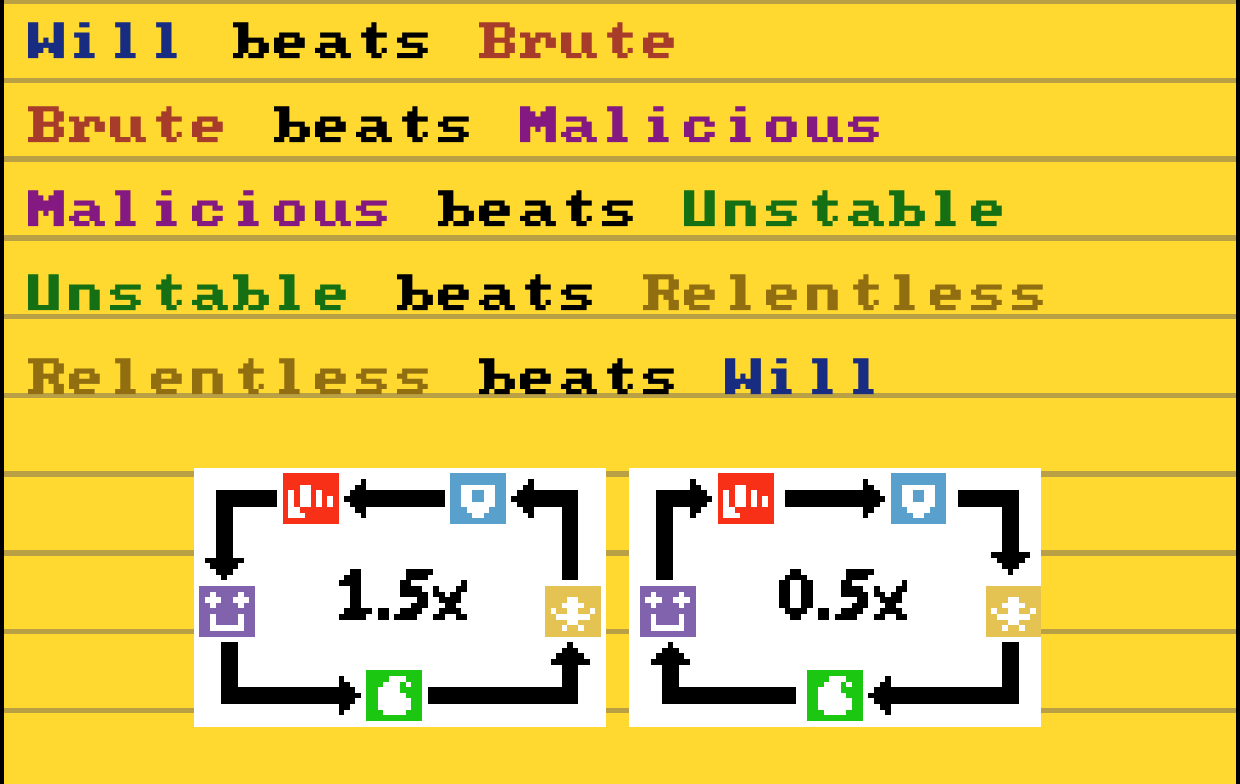
Each move also has a type.
Monster Information
The Stats screen is pictured here:
Monster stats include (as shown on stats screen from left to right):
- Health – Determines life total
- Attack – Physical attack damage
- Magic – Determines magic attack damage
- Speed – Determines movement order in battle
- Defense – Defense against physical attacks
- Magic Resist – Defense against magical attacks
- Growth Rate – Determines how much stat gain monsters get per level (Growth rate x Base stats)
Type is shown via the symbol to the right of the stats panel.
Experience progress to the next level is shown via the orange/red bar below Health. Known moves are listed to the left of the stats display.
You can toggle between base stats and actual stats with the button prompt on the bottom right. Base stats allow comparison between monsters of different levels, as they don’t change with leveling up. 
⠀
Damaging moves can either be physical attacks or magical attacks. Move power, effects, type, and category can be shown. Physical attacks are denoted by the dagger symbol and Magical attacks are denoted by the energy symbol.
Battling
Upon encountering a wild monster in the Overworld or starting a tamer battle, you will encounter the battle screen. The battle screen is shown below with the different options explained.
⠀
- The number of monsters in your party are shown via the pact icons. If a monster is incapacitated, then the corresponding icon will be greyed out.
- This button allows you to select an item to use in battle.
- Synergy Gauge: This will be filled when you switch out or defend yourself, and will be emptied when you next attack or a monster is incapacitated.
- Your monster.
- Enemy monster.
- Attack: This option allows you to select a move to use in battle.
- Offer: This option allows you to offer a pact to the monster in order to add it to your collection.
- Switch: This option allows you to switch monsters with another in your party.
- Escape: This allows you to attempt to flee from wild monsters.
- Forfeit: Allows you to forfeit the battle.
- Defend: This allows your monster to defend itself to reduce incoming damage and charge the Synergy Gauge.
The Overworld
There are several game mechanics in the Overworld.
Your monster can be commanded to sit or scout, depending on which option you have enabled. If sitting, you can pick up pumpkins and other fruit to feed your monster and restore its Health. You can reactivate the sit button to return it to your side.
If scout is enabled, your monster will attack monsters you aim at. This will damage and sometimes outright defeat the monster, making grinding easier.
Wild monsters will roam in the Overworld. If you run into a wild monster, you will be sent to the battle screen.
Items, eggs, and npcs can spawn in locations throughout the overworld. NPCs can offer trades or battles, and will not reset until you soft reset/hard reset the game. Spawn locations are rerolled upon entering buildings or battles.

⠀
⠀
⠀
⠀
⠀
⠀
⠀
⠀

Breeding
Breeding allows you to create completely custom monsters with their own stats, types, moves, and appearances. Breeding is unlocked as part of the normal story progression (you won’t miss it if you progress). There are several different components that affect the breeding system which are outlined below.
The Breeding screen is shown here:
- Mon Box: Allows you to access monster storage.
- Breed/Hot Breed: You can toggle this option from left to right to switch between regular breeding or high temperature breeding. After setting the parents, use this button to complete the breeding.
- Code: This allows you to input special codes released by the developers in order to receive a monster.
- Set Gene: This allows you to set the current inheritance chromosome as customized in the gene lab.
- Exit: Exits breeding menu.
- Plus Icon: This is where you can set the primary parent from your party monsters.
- Minus Icon: This is where you can set the secondary parent from your party monsters.
To breed, you must set a primary and secondary parent.
The Primary Parent determines :
- Species (Sprite)
- Attack
- Defense
- Speed
The Secondary Parent determines:
- Color
- Palette
- Health
- Magic
- Magic Resist
If bred normally, an egg will be produced that will hatch into a level 4 monster.

This type of breeding is useful for quickly comparing base stats without waiting for an egg to hatch.
The Gene Lab allows you to further customize inheritance and breeding to achieve your desired results. After traveling to the gene lab, you will notice many machines lined up in a row. These machines each have a symbol which denotes what they affect, as well as a plus or a minus which determines either primary or secondary parent. Thus, if you put a plus on the Health machine, the primary parent will pass down its health when using that chromosome and so on.
The order of the machines from left to right is Health, Attack, Magic, Speed, Magic Resist, Defense, Monster Species, Color Palette, Type, and Growth Rate.
After configuring the machines to your preferences, you can save this configuration as a chromosome with the far right computer. Now, you’ll be able to choose to use this chromosome, which determines exactly what parent passes down what trait, in the breeding facility.
Forms Compendium
DISCLAIMER: Much of the fun of this game is to be had in discovering alternate forms for yourself. This list of sprites will show you exactly what forms each monster can breed into, but I’d advise you to explore this for yourself before viewing this portion of the guide. However, this is here for those who want it or need a quick reference!
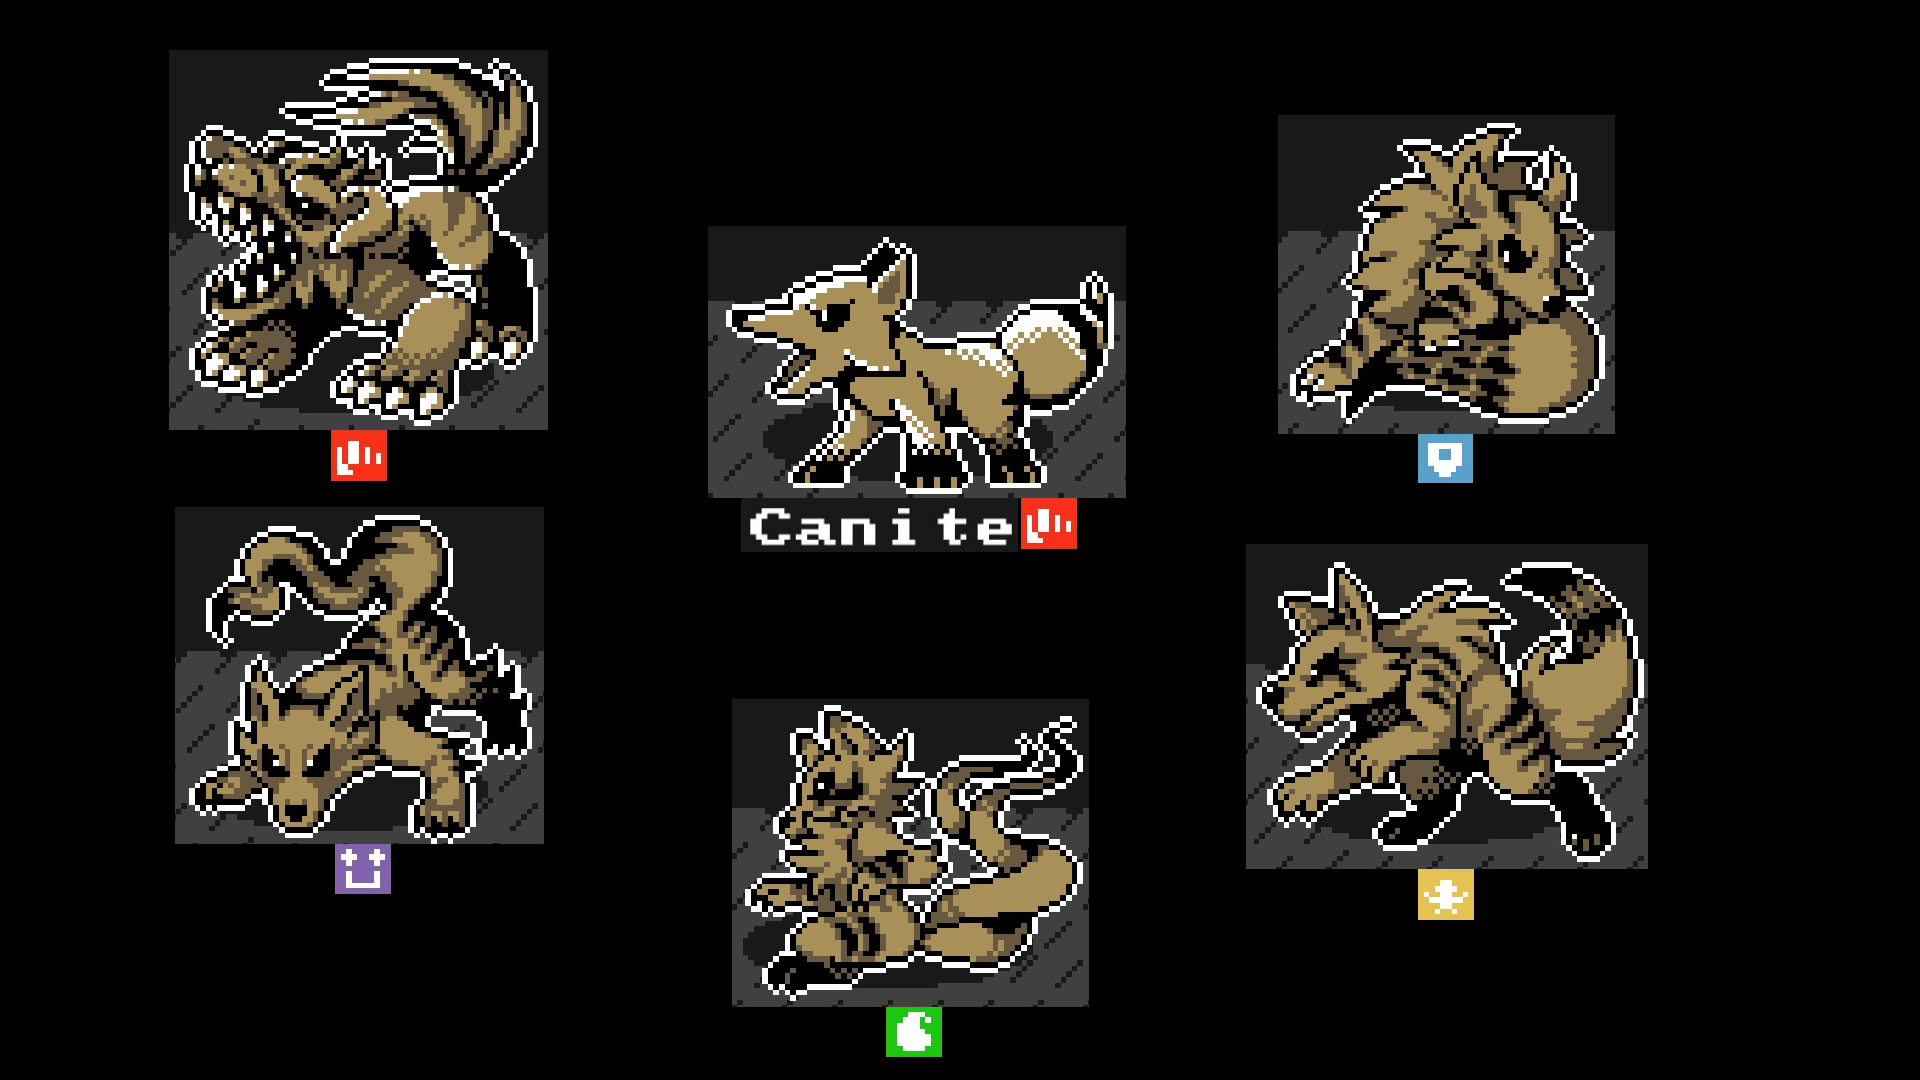
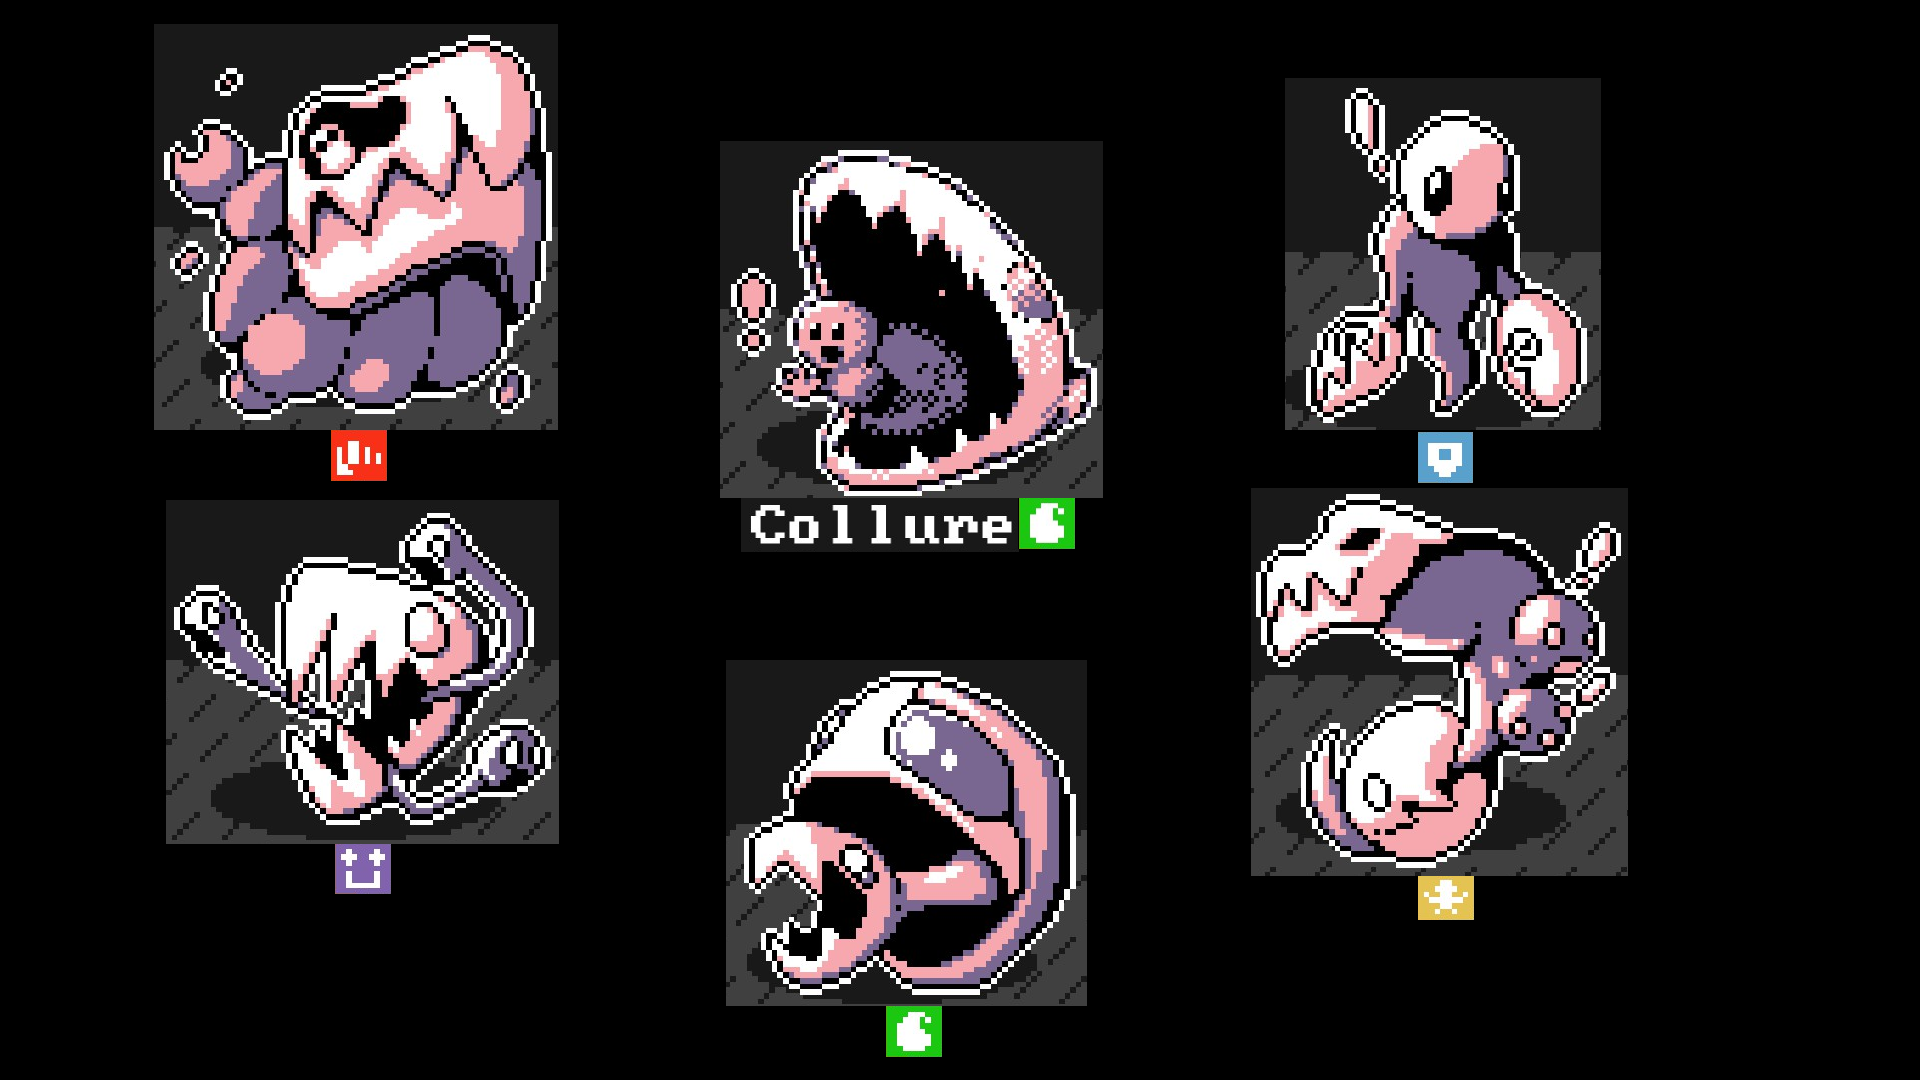
The image format has the wild form monster in the center, with each alternate type form arranged around it. The symbol below each picture denotes what type each form is. This list is arranged in alphabetical order based on the base monster’s name. Additionally, each form is shown in the base monster color palette.
This is a work in progress, as I must collect each base monster in game before updating the guide. If you don’t see a monster here, it should be added eventually!
Apo

Canite

Collure

Drangus

Gorgem

Harveskin

Hyna

Laz

Rodask

Seycret

Teedon

Trove
Credits
Gym Leader Ed’s videos pointed me in the right direction several times throughout the guide making process. Check out https://www.youtube.com/channel/UCS8eZV4T-G3I7McyiR9Vlhw on YouTube for Monster Crown and more!
This wiki[crownsgame.me] is the most up-to-date online resource I have found so far. This may change, but for now I’d recommend it if you need something you don’t see in the guide.


