
Overview
This Guide Contains some reference material for “ancestors the humankind odyssey” on certain aspects of the vanilla version of the game. You can click on any image in the guide to view them in fullscreen mode.the guide is being wrote as both a Book/Guide meaning that each section will flow into the next allowing you to have at your disposal a full in depth game manual explaining anything of major importance. however should you require more specific instructions on dedicated aspects jumping sections will avoid possible unwanted spoilers.HOWEVER… Please be advised that the guide explains most of the mechanics of the game which will remove most of the trial and error so spoilers are present throughout the entire guide. It was made to help the most confused players, so that the game hopefully gets less negative reviews and/or helps prevent them from writing it off as a bad experience…The guide covers the following…Basic Game MechanicsCharacters, Crafting, Walkthroughs
Senses & Intelligence
Your senses of both hearing and smell combined with your apes intelligence make up the knowledge base of your ape. In turn effecting your groups perception of the world and its ability to survive easier as they evolve.
Firstly lets take a look at your two primary senses, Smell & Hearing…
(click to enlarge images)

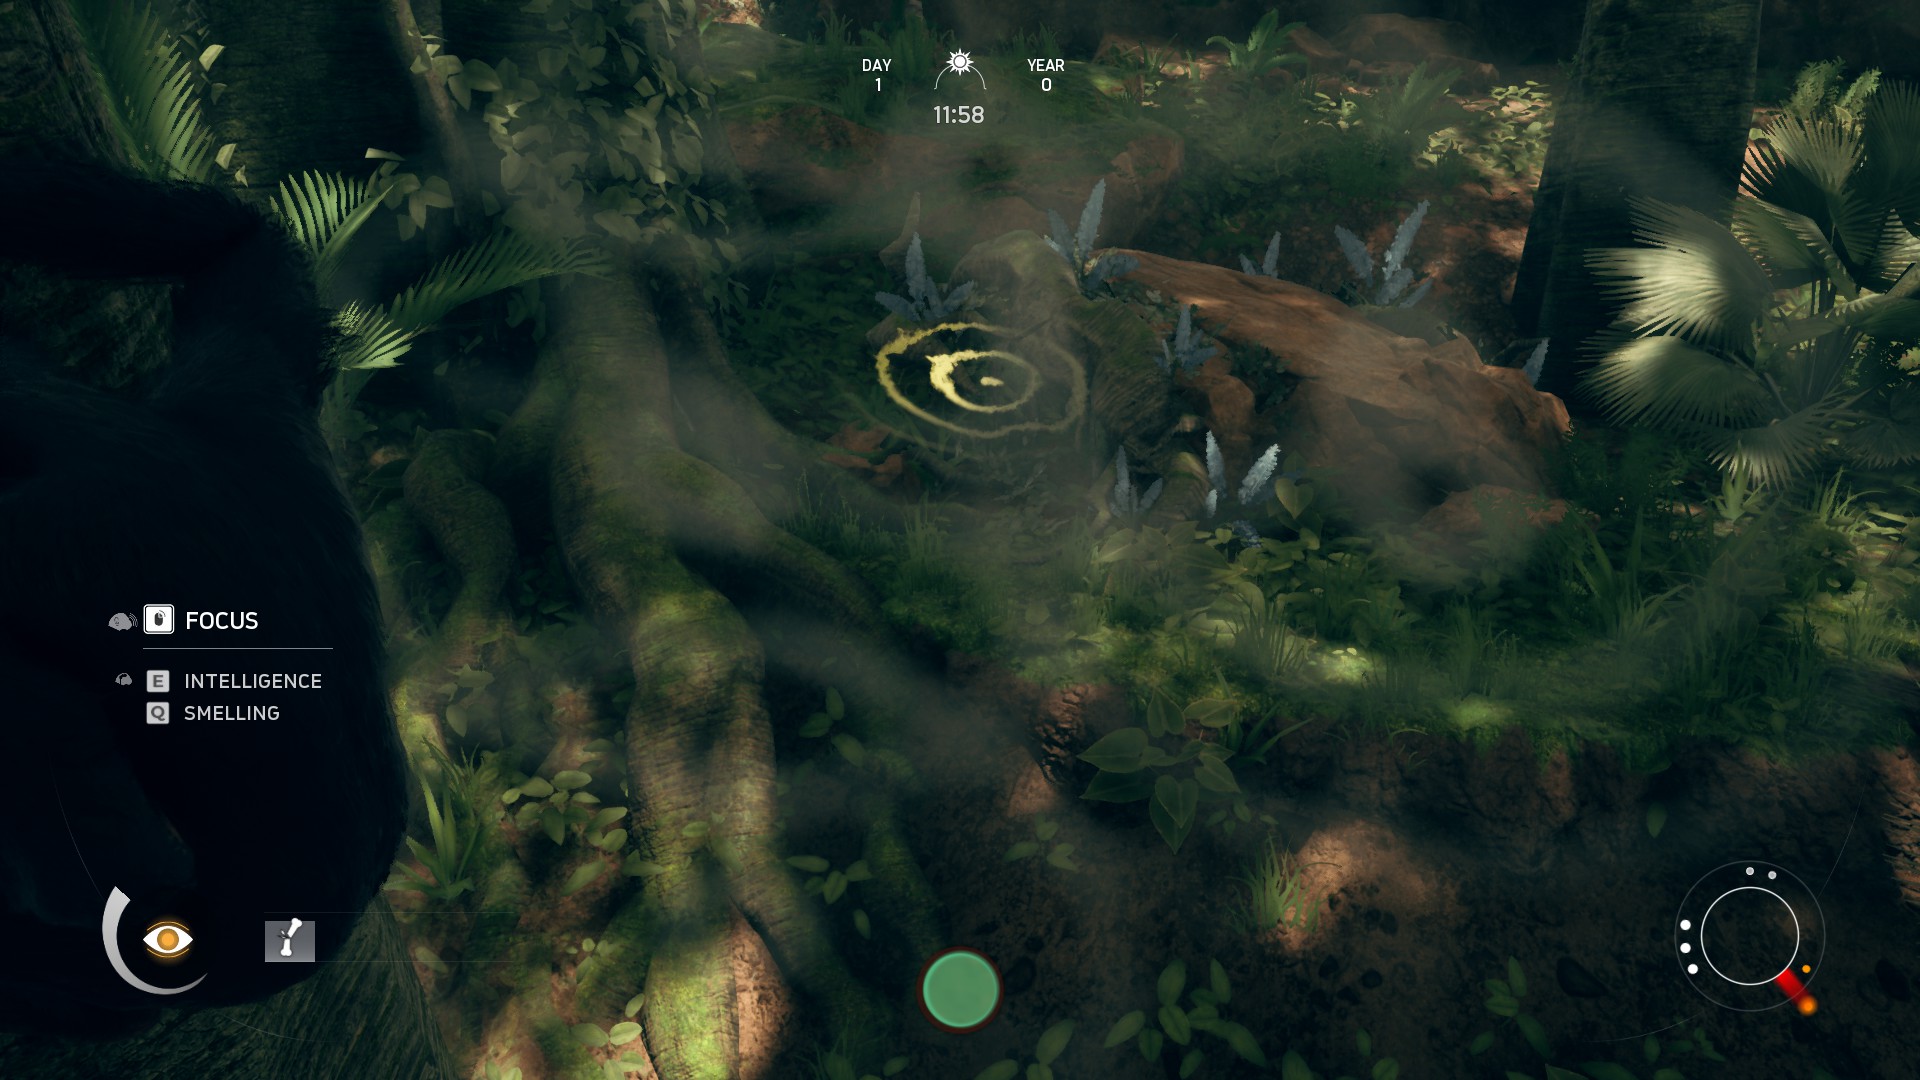
this is done by tapping the ‘E~Key…

At the start of the game you will be controlling a infant who is scared and only concern is to locate a hiding spot. you will not have access to all the senses only the infants intelligence, so unable to defend yourself, tap ‘E’ and look around for a square POI
To represent the state of mind, of the scared infant your screen will have a fear of the unknown filter, which is discussed later in the guide.
(click to enlarge images)

With the “Intelligence” view active, look around for a square marker. then click/hold the relevant button/key. Whilst the “square POI object” is dead centre of the screen, this will then focus on the object, by releasing the LMB The objects identity will be revealed, in this case a Hiding spot…
(click to enlarge images)


This covers the basic mechanics behind your sense, its talked about more indepth as required in later sections of this guide.
Navigation & Perception
Between the constant usage of your senses, and the apes intelligence you will begin to develop a perception of the world around you. From vital resources, to dangerous wildlife.
Using your senses, focus in on object markers, which if have never been discovered or encountered by any previous generations of your ancestors will become marked with a question mark.
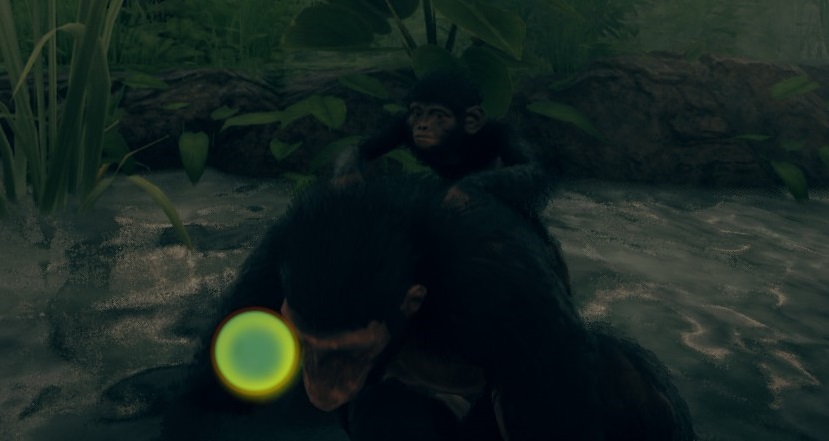
you can also remember the location of any object/marker by holding down the E~key whilst focused on the object, this will then make the remembered item remain visible outside of your intelligence function.


in order to further investigate the object, pick it up and hold down the Q~key. then the next time you use your intelligence the object will show with the correct icon and its learnt usages if focused on. In addition to this the next time the same item is focused on, your apes will know its smell or its sound and correctly mark them.


As you continue to Discover, Inspect and use each item, your apes intelligence remembers it all, and you begin to uncover the world around you and what each item does.

In the above picture you can see in the centre of the screen a diamond shaped icon, with a settlement logo on it, no matter where you decide to settle this icon will always represent your current home, from anywhere on the map you can press E~Key and focus in on this and remember its position, to help you navigate back to your settlement.

This is also true of any required item, so be sure to uncover as much as the world around you as possible, then if you suffer an injury and require a particular resource, simply by entering your Intelligence Function, you can always quickly find it.
Healthcare & Reproduction
As your group continues to expand its knowledge of the world around them, you will also begin to learn how to use each given resource. for example the horsetail can be eaten to help heal a broken bone, broken down into a paste to prevent bleeding using a grinding stone, and so forth…

But you can also use them to provide a protection against injury, so eating horsetail with no injury will show a protective icon for that type of injury at the lower left of the screen…

All of this exploration and learning is wasted without any neuronal activity which is gained by carrying infant/child apes around and passing on the knowledge to the next generation of your linage.
so, lets talk about how to reproduce…
assuming you opted to start with a male ape at the start of the game, you will walk around the other members of your clan and Analze them. your looking for another adult female to breed with. Anyone already coupled up with another ape is not a wise choice.
Anyone is Family Related is also not a wise choice, and of course infants/elders cant breed…
so, find yourself a single female (who is fertile) shown by a white fertile circle.

Bond with her, by holding down the LMB and releasing it when you hear a audio chime, and also a purple visual marker around the edges of your screen, build a sleep spot and call your mate over, follow the instructions on the left side to produce two children.
you dont have to wait for the birth you can skip time by pressing the correct key also displayed on the layout tooltip on the left side of your screen, once you have repeated this process for the entire tribe, and conceived the maximum amount of children your clan can produce, ensure that your character ape is always carrying two infants around with them.
this will be explained in greater detail later in the guide, but try not to do anything in this game other than bonding/mating without infants in tow.
Note:
Not all females will be fertile at the same time and so check regular and also the amount of children your group can produce can increase by enlisting the help of outsiders found around the map.

These outsiders when found using your senses, will join your tribe if you can meet their needs, from giving them food, to medications. If the needs are met they will join your tribe. Once you have escorted them back to your settlement your clan numbers increase, as does the amount of children born into each generation…
Education & Neuronal Activity
Early stages almost every action you take, and anything you discover will generate neuronal energy. This can only be achieved by carrying around infants, and is spent as ingame currency to unlock nodes in your apes mind (think of this as a upgrade system) via the development menu which is accessed at any sleep spot.
Over time the required tasks to unlock more nodes in the neuronal menu will require more and more training, for example walking on two legs, or in shallow water. So later game you start spending more time with each generation.
You can view what action is required by highlighting your cursor over a locked node, these are dark and black dormant spots. This will help you understand what type of action is required to progress further.
In addition to this at the bottom right of the screen you will see activity on the minimap when the current action being preformed is contributing towards your progress.if the minimap is not showing any neuronal activity then something else is required like a genetic mutation for example.
The large bright white circle in the centre on the minimap/radar shows your current stocks of neuronal energy levels which has a limit. Orange dots represent apes with mutations…


If a mutation is required, You can also see this information from the neuronal development menu, again by hovering your mouse over each node. The displayed tooltip will inform you if one is required. Mutations are random, and are gained via child birth…

All that remains now is to constantly check against what you feel is the best course of action you wish to take against what stems are possible to progress along. Also the stems directions dictate what type of lessons are being trained,
example:
stems flowing of to the right are generally sensory related stems. Because the development menu is basically the inside of your apes mind…
Evolution & Generations
Now that we understand how to explore the world around us, and the vital importance of carrying infants to produce neuronal energy, the next most important aspect is knowing when to change to a new generation and when is the best time to evolve your linage.

Create a sleep spot, lay down and access the development menu by pressing the E~Key, from here you will have access to the neuronal, generations, and evolution functions.


Whilst carrying children, you will create neuronal Activity, which can be used to to make the next generation a tiny bit smarter than the last. this is spread over many generations of apes, and millions of years bringing you closer to ape-man.
However if you simply just learn a ton of things with a single generation, when it comes time to move to the next generation your new family of apes will lose almost all that knowledge, Each new generation can only retain a small amount of passed down knowledge from their ancestors.
This capacity is handled by your infant count, each infant is one reinforcement point.
Note:
In addition to each infant being worth a single reinforcement point, finding a meteorite fragment will grant the current clan a +2 score
So, if your current clan has a grand total of six infants, once you have unlocked six nodes, secure what you have learnt using the generations menu. By skipping to the next generation the new clan wont have to spend precious neuronal energy on the same tasks again.


This will in turn directly affect whether or not your advancing faster/slower than science predictions on the timeline of evolution.
Moving into evolution terms…
As you continue to skip generations remember to maintain your infant count. Over time these births will generate some random mutations which are vital to unlocking later nodes.

In the above example unlocking this particular skill wont automatically grant your apes the ability to eat meat, it needs training after unlocking. So you would have to eat meat until your ape gets sick, and repeat that until they begin to become immune,.. Some unlocks are instant, but a few skills such as omnivore require training from a evolution stance.
In addition to this the mutations are also going to dictate when its time to evolve along the timeline…
As you swap generations
- Infants will become adults,
- Adults will become elders,
- and Elders will die.
If your development menu says that you have several mutations that will become active upon the next evolution. And the host apes holding these mutations in their DNA are majority speaking elders, its time to evolve because if you skip a generation the unlocked mutations stored in the elders will die alongside them.
But by Evolving, you lock in the mutations:
Example:

This is why when possible you want to trigger an evolution when the mutation is held by the elders. because they next stage of life is actually death. meanwhile this also means by leaving evolution jumps as long as possible they are more locked in per jump.
It also means the jump will be far more profitable because chances are you have unlocked more evolution feats, giving you a better score all round when you evolve meaning you stay ahead of science.
Note…
When you preform a evolution jump any mutations stored in a infants DNA will be lost.
so sometimes you may feel it better to allow other mutations that are not yet required to die with their elders in order to mature a more important one. by skipping a generation to force a infant becoming a adult to mature the required mutation.
Thus hoping/gambling a later newborn brings the other mutations at the right time. You will have to decide which is best for your own game state, so…
Conclusions: changing generations locks in learning, and evolving locks in mutations…
Crafting & Resoures
As mentioned earlier in the guide, when you focus on a resource from the intelligence view, you will see some icons that represent what you have learnt about each given resource/item. And what they can be used for.
in the terms of horsetail:
Eating the plant in its natural form will heal/protect against broken bones. However once you have learnt “item manipulation” you can strip the leaves of the plant to create “Horsetail Leaves” which can rubbed onto your ape, to stop/prevent bleeding
some resources are required to craft tools, in order to expose the final usage of certain items…
to learn the third usage, you will need to expand your crafting knowledge, so a “granite rock” smashed against another “granite rock” will create a “Granite Grinder”
this can then be used in conjunction with the horsetail leaves to create a more effective paste to stop/prevent bleeding. And the next time you focus on horsetail from the intelligence function all three usages will be displayed on the icons.

Now i do not wish to spoil the entire game, but you are going to have to learn by trail and error to know what can be crafted from each resource/item. Or you can use some of the other guides for a full list of crafting items.
The basic principle is the same for all types of crafting in this game. and its not too in depth either if they are no icons displayed then the resource cannot be used in crafting terms.
Wildlife & Survival
Items that cannot be used in crafting mostly speaking will be food related items, which leads onto your apes health circle (lower centre) whenever you exert your character the large green circle will begin to shrink in size. periodically standing still for a second will recuperate energy.
The circle directly represents a mixture of your hunger, thirst and exhaustion levels…
Whilst under normal conditions you cannot tell which is required the most, there are times its made clear. but the apes mannerism provide clues as well. if the circle has a pulsating yellow ring whilst eating then the ape is still receiving a benefit from eating, same principle for drinking and resting.
Your group will only rest, eat and drink when you do, whilst in close proximity. So its not wise to dine alone, whilst you can potentially risk a overnight excursion alone.
Always bear that in mind…
Working your ape hard, (carrying items, climbing, etc) can result in the health circle flashing red, you should seek to stop all activity immediately if this happens.
Once you have recovered energy the green part of the circle may be extremely small, so now is the time to attend to injurys, eat, drink and rest to maintain a higher level of life expectancy.
Another threat to your survival is of course the local wildlife, some more dangerous than others…

The battle system in Ancestors, uses a action upon release system, attacks, counter attacks and dodging attacks all work on the same mechanic. Holding/Releasing the space bar when you hear audio chimes.
Doing this whilst holding a weapon, and pushing towards the enemy target will force an attack/counter attack. repeating the above but holding a directional button away from the enemy target will result in dodging the attacks.
Whenever any threat is close to your location, the apes emotional status will change/flash represented on the lower left of your screen along with your dopamine meter. the apes emotional state will change accordingly. unless manually being altered…

You can also In edition to fighting try and herd animals towards others, and let them wipe each other out. Another option at your disposal is to intimidate the wildlife and hopefully successfully scare it away from the immediate area avoiding any battles.


Overall however, survival as your linage evolves and learns new tasks becomes easier, as it should due to unlocks, it all remains the same on principle just becomes easier and thus more effective through training to match the larger animals you encounter later on…
venturing deeper into the map at some stage you will enter a unknown area, this border once crossed places your ape into a frightened state. represented by a “fear of the unknown” filter being applied to the screen.

Elders may enter this with less to no impact, since they fear less things than infants/adults. Also carrying precious stones reduces the apes fear levels. Once you have entered the zone, your dopamine levels begin to drop. If they reach zero you will lose control of your ape.
Once that happens you have a random percentage chance of either losing the ape, or it running back to your active settlement.
To prevent that from happening whilst trying to conquer the zone, you can exit the area back to safe surroundings by running towards a large white ball of light and eating to refill your dopamine.
Or you start using your senses and intelligence to familiar yourself with the surroundings.
This will also take care of your dopamine levels…

Once you have rationalised with your surroundings, a message will appear lower left of your screen, and you will begin to see white dots/lines moving into a specific direction. They look similiar to how star trek movies represent light speed.


Simply follow the direction until you reach a white ball, and conquer the zone. As long as your following the lightspeed direction the objective marker will begin to appear as you get close.
if at anytime you need to top up on dopamine simply scan another set of POI instead of retreating…
Tribe, Landmarks & Settlements
Continued expansion will allow you to discover new landmarks, which count as evolution feats, in addition to herd kills also counting towards this score, so its well worth while doing in terms of game objectives. In addition to this you uncover new oasis, which can become your new home when your evolve your group.
> insert LM picture
Whenever you decide to evolve your group, your settlement location will change, sometimes you may wish to move your settlement further down the map to avoid longer walking distances. This is because the location is randomly chosen for you. And at times against your plans revert you to a location that is not desired.
In turn sometimes making it harder to progress along the apes mind stems. But its also possible to take the safety of knowing where you are to train stems that benefit from your location.
If you move locations at times you may get attacked, forget a member of the group, if this happens you will have a limited time to locate them and bring them to the new location. you can tell it has happened by looking at the minimap at the lower right of the screen.
Using your hearing sense, backtrack your steps to locate the missing member(s)


If any dots appear outside the circle once you have ended an expedition…
this indicates you have a lost ape…
You can also tell its lost because it has no line connected to the dot which represents that member of the group is currently following you. In addition to this whilst on group expeditions any attacked/injured/distressed member will be highlighted in red on the minimap.
As you continue to evolve, you will adapt to the ever changing environment, leaving the safety of the treetops acting like true apes, to the coast lines acting more like man. The first milestone along this timeline is the “Millenium Man” stage.

This species unlocks the ability to control your apes emotions.
The emotions are…


The default state is calm, but holding down either the [left shift] or [left Ctrl] keys will toggle between the other two states.
- When in Alert Mode your ape will make louder noises and attract more attention but move faster, and intimidate will have a greater effect. (compiled in groups)
- Whilst in Vigilant Mode, your ape will be quiet and able to sneak around predators, however will also move slower. (compiled with mud)