
Overview
This guide is a documentation of my efforts to change the various backgrounds, loading screens, etc. in the game. Ever since some update happened, there are changes that make previous mods useless. This is supposed to help fix that.
Requirements
Before starting to mod anything, you may want to understand how to mod this game in general. There are quality guides on that matter (1), (2), though they may be outdated in parts, as the structure of used files changed with some updates in our case. To make it short, you need GCFScape[nemesis.thewavelength.net] to open .vpk files and extract their content and VTFEdit[nemesis.thewavelength.net] to work with .vtf and .vmt files.
With these, you navigate into the directory of your game where the necessary .vpk files are stored. These are basically compressed files, which contain the various game files. Models, textures, animations, sounds, etc. can all be found inside these. For our purpose here, we want to find the backgrounds and loading screens. Confusingly, you will find more of them than are actually used by the game right now, as old versions are still in the game files and you need to change those used, not the unused ones.
Depending on where you installed your game (C:, D:, etc.), you’ll have to look for your Steam directory. From there, the .vpk files we want can be found in:
Steamsteamappscommoninsurgency2insurgency
Note, that mods are saved somewhere else. There are three locations where (downloaded) mods can be found, those are:
Steamsteamappsworkshopcontent222880
… for mods that are newer.
Steamsteamappscommoninsurgency2insurgencycustomworkshop
… for mods that are older.
Steamsteamappscommoninsurgency2insurgencycustom
…for your own mods, loaded before the game starts.
Normally, mods are loaded after the game starts, more on that later. If you want some things to take effect immediately, you have to put those files into the custom folder.
The Starting Screen
The first thing that shows up when you start the game is the starting screen with the developers logo. As I just mentioned, mods are loaded after the game has started (reached the main menu), so in order to change this screen on startup you need to put the mod file into the custom folder, else it will load the change after the screen already disappeared.

This file is basically a texture and thus part of the materials package (insurgency_materials_dir.vpk), which can be found in:
Steamsteamappscommoninsurgency2insurgency
Inside that .vpk file it can be found under:
rootmaterialsvguibackgroundsbackground01_widescreen.vtf
You will notice that there is a similar file, called background01_widescreen.vmt, in the same directory. The .vtf files are the texture, while the .vmt files appear to tell the game how to use the texture and what effects to apply to them. For now, we only want to replace the .vtf texture.
The steps to change a file are always the same. You know the location of the original file (here: screen) you want to replace, so you get an image of preferably the same dimensions (2048×1024), import it into VTFEdit (File>Import, or CTRL+I), then just press OK, let it load. It now converted the image (.jpg, .png, whatever you used) into a .vtf file. Now just save it (File>Save As…, or CTRL+SHIFT+S) inside the folder you work on your mods and name it the same as the original file is called (here: background01_widescreen.vtf). Done.
What is left to do now is to make a mod file that uses your new image. That’s quite simple. Make a folder structure that is identical (!) to the location you found in the .vpk file where the original texture is found. Typos anywhere will make your mod useless, as the game won’t find the new file where it is looking, so pay attention. In this case, it means you create a folder for your mod (like “My Mod”) and then insert the folders required inside them:
My Mod\materialsvguibackgrounds
And inside this folder you place your new background01_widescreen.vtf file. Now you open another window and go into:
Steamsteamappscommoninsurgency2bin
There you will find the vpk.exe, on which you drop the “My Mod” folder with the directory and your file inside it. A small black window (console) will pop up and pack your folder into a .vpk mod file, located into the same directory as where the folder is in. Done.
You now have a functional mod file that you can put inside your custom folder. Copy it there, start the game and enjoy your new starting screen. You can also upload this mod file ingame and make it available to other people.
Important: The following changes of files will follow this exact procedure, with the exception that we’ll want to put them all into one mod file for most purposes. So we don’t drag and drop each single change onto the vpk.exe, but include all the other changes into the same “My Mod” folder, each file in their respective directory as found in the original .vpk you opened in GCFScape.
The Main Menu
Next up after the starting screen comes the main menu. This one is a bit tricky. You may assume that the background of the main menu is just another .vtf texture (image), which it actually was up until some patch changed this circumstance. It didn’t replace the old background or anything trivial, no. It actually put an overlay (the grey wall you see) over the old background, which is still hidden underneath it and with a screen resolution of 1920×1080 still shows in borders at the top and bottom. So when you just change the background image of the main menu, it will blink up shortly before being completely covered by this wall.
This wall however is no ordinary .vtf texture (image) itself, no. This wall actually is a 3D object, utilizing a series of effects on top of it. So even if you were to make the wall go away, you would still have other effects applied to your background, which is already hidden quite a bit due to the new cluttery menu. But let us sort this out now:
The original background was this following .vtf image:

It’s thus a material and can be found inside:
rootmaterialsvguigameuibackground_default.vtf
Along with its accompanying .vmt file. That’s right, it is not inside the backgrounds folder. Don’t ask me why. Changing this image will, as I already mentioned, make your new background blink up shortly before being covered by the wall overlay. So what exactly is this wall?
It’s a 3D object, thus found inside the insurgency_models_dir.vpk, not the materials .vpk file!
rootmodelsmenuprop_menuwall.dx90.vtx
rootmodelsmenuprop_menuwall.mdl
rootmodelsmenuprop_menuwall.vvd
The first one appears to be the object, with the other two being accompanying files, similar to the .vmt files of .vtf files. As usual for 3D objects, they use textures. And those are .vtf (images) again, thus materials. So we check the materials .vpk again and go into:
rootmaterialsmodelsmenuprop_menuwall.vmt
rootmaterialsmodelsmenuprop_menuwall.vtf
rootmaterialsmodelsmenuprop_menuwall_n.vtf


Now you may ask: why are there two .vtf files? Well, it turns out this game uses alpha channel (transparency) in order to display reflectivity of light (bump map, which leads to glowing red/green/etc. colours for night sights, etc.), so you can’t just make the whole texture of this 3D object transparent, as that won’t make it transparent ingame. The prop_menuwall_n.vtf is for giving the original texture some reflectivity play. What does it reflect? Well, I did mention some additional effects, didn’t I? They are three in total, as it seems.
The first effect is the radiant shining light you see at the top of the screen. The second is an upwind of fire sparks coming from the bottom of the screen. The third is actually a detail, which can be found inside prop_menuwall.vmt as “$detail” “detailplaster_detail_01”, so we go into:
rootmaterialsdetailplaster_detail_01.vtf

And there it is. An overlay on top of an overlay on top of our original background image. The good side of it is though that this effect enables you to use another image in the main menu, as the background_default.vtf is also used as the loading screen (see: The Loading Screen).
I haven’t yet found the directory of the spark and light effects. They may be in another .vpk file, as they are neither textures (materials) or models. I assume they are inside the insurgency_particles_dir.vpk, which also has a menu.pfc file.
So, how to change our main menu background image now? The method employed by Killeurzombi7 is to simply replace the prop_menuwall.vtf with a different image and let all the other affects (plaster, light, sparks) still be applied to it. That is an acceptable result and quite feasible, so I’d recommend you to do that for now.
Once we figured out how to completely disable the wall (to show the original background image) and remove the other effects, it would probably be an even more improved result. I assume that will require one to simply replace the respective files with empty effects and textures (no transparent ones though!), so they do get displayed but are basically showing nothing. I haven’t experimented with that though, so I can’t give any recommendations.
Note though, that this will make the main menu background image and the loading screen image identical, as they use the same file!
Besides the background, there’s also two icons here (and later on in one case) that can be changed:
rootmaterialsvguigameuitier_bronze.vtf
rootmaterialsvguigameuitier_silver.vtf
rootmaterialsvguigameuitier_gold.vtf
These designate your current rank in the character section. Furthermore, you’ll find:
rootmaterialsvguigameuifac_sec.vtf
rootmaterialsvguigameuifac_ins.vtf
… which designate the faction (security, insurgents) emblems.
The Loading Screen
Following the main menu we encounter the loading screen. This again is a simple .vtf image and seems to be identical to the old background image used in the main menu, as it is found under:
rootmaterialsvguigameuibackground_default.vtf
Simply replacing this file will work. On that same screen two further files are used, which are found in the same directory:
rootmaterialsvguigameuiicon_loading.vtf
rootmaterialsvguigameuiicon_loading_fill.vtf
These two make up the loading icon in the bottom right corner of the screen. When exporting them from VTFEdit in .jpg format, they appear as white squares. Killeurzombi7’s mods successfully replace them though, so it should be no problem.
Important! The folder:
rootmaterialsvguiloading_screens
… and its contained files are apparently no longer used ingame!
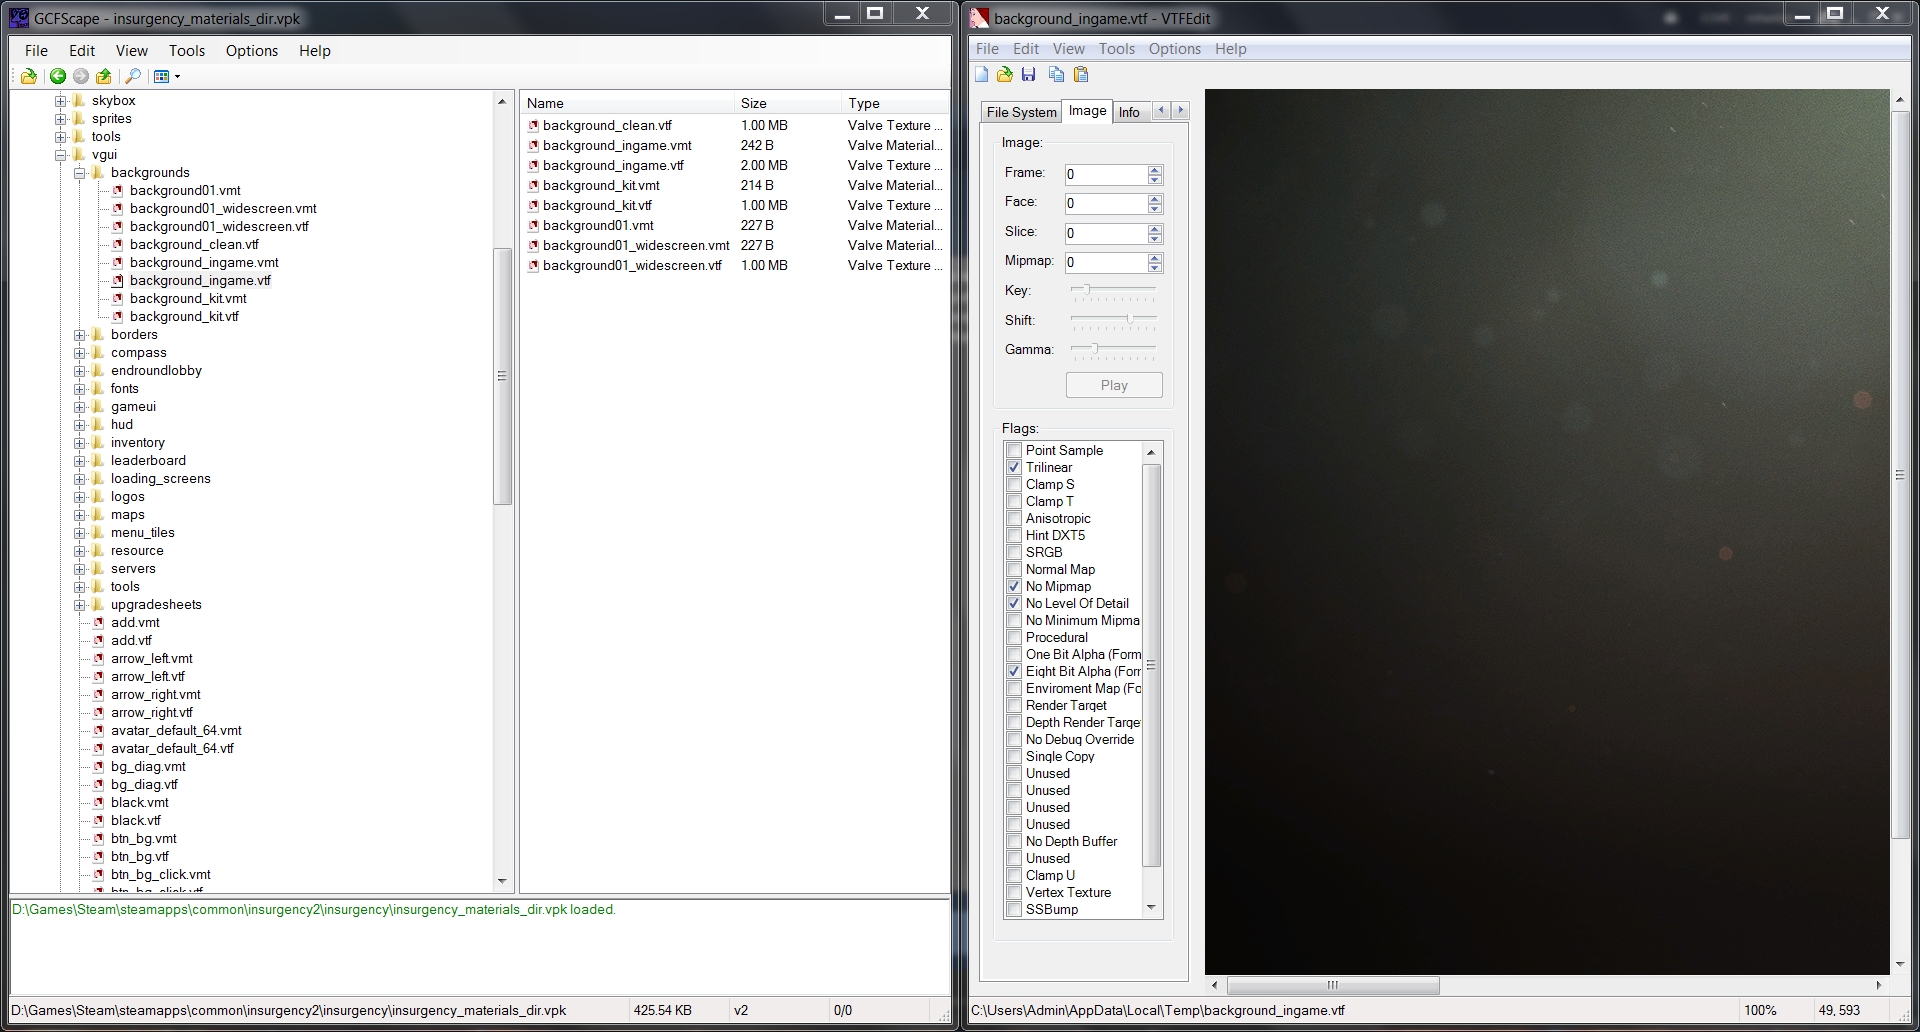
The Ingame Background
Once you entered a map, you’ll find the ingame background.

It is generally covered on the left side by the map overview in the loading screen (rootmaterialsoverviews) or the minimap when ingame (not found yet).
This one is the second still used file from the backgrounds folder we encountered earlier and can be found inside:
rootmaterialsvguibackgroundsbackground_ingame.vtf
background_kit.vtf and background_clean.vtf seem to be unused.
Furthermore, we find two icons used ingame, those being for the supply and voice chat:
rootmaterialsvguigameuiicon_supply.vtf
rootmaterialsvguigameuiicon_say.vtf
For a complete overhaul of the interface you may want to change those too.
Commentary
Some final words for now: I am not a professional modder, though I have done this before a few times. I’m just fiddling with the files and see what I can turn up. Thanks to Killeurzombi7 for providing valuable insight in how she changed the screens, especially the main menu.
I haven’t used the SDK for Insurgency so far, but I downloaded it and will see what I can make of it. I hope this guide will enable modders and curious people to replace the custom background screens ingame without having to figure out what files are used and which aren’t on their own.
I will see that I update this guide accordingly whenever new insight comes up. Feel free to comment if I got something wrong or you see something missing. Constructive feedback is always appreciated. Have a nice one. Ehehehehehe.