
Overview
I think Rise of Venice is a very good game but unlike Patrician 4, this game do not have detailed guides or charts about production and other aspects of the game. So i’ve decided to write one which includes charts, tips, info and that kind of stuff. By the way “troublmaker” made an excellent job with his campaing walkthrough, here is the link https://steamcommunity.com/sharedfiles/filedetails/?id=182576718Hope you enjoy(Trust me, i’m a logistics engineer 😉 )
Ships Chart

- As you can see Fluyt is the best ship for cargo transporting with 3 stowage cap per gold. Fluyt’s are the backbone of your fleets but only Genoesse cities can build them. So build large shipyards in Genoesse cities as soon as possible for easy access to them. So the main tip is “Fluyts, Fluyts and more Fluyts”
- If you don’t have access to Fluyts, use Dhow’s instead. But know these, they are slower (10 knots instead of 12) and less efficient than Fluyts (2,7 Stowage/Upkeep Ratio instead of 3,0)
- For battle ships, I use Carrack’s like most of you, you can either go with “moderate firepower but high maneuverability” or vice versa.
- Speed of the ships also affects route time. Route time is calculated based on “the slowest ship” in your fleet.
- Ships do not cost any upkeep as long as they are not part of a convoy. You can built them and left them at the harbor for later usage.
- Gallesas’ use galley slaves, they are faster than other ships when sailing against the wind
City Production Chart
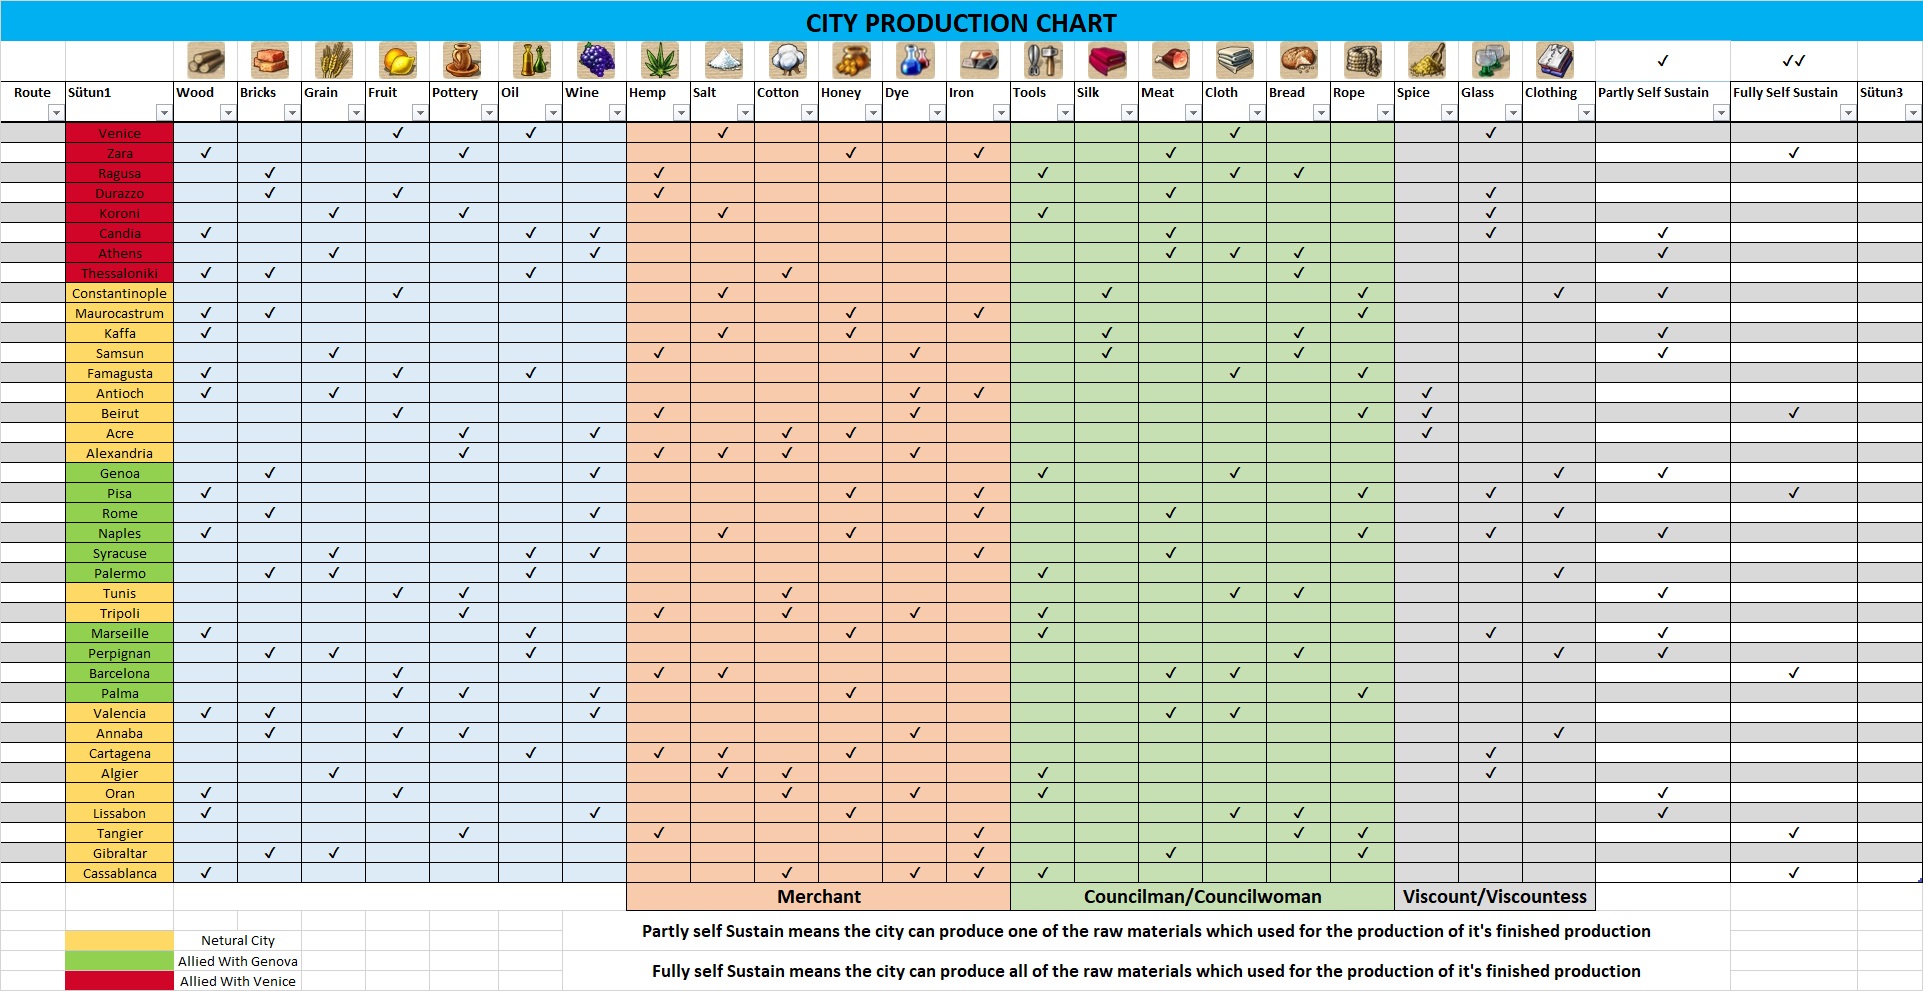
I created a chart which shows which city produces (on default settings) but unlike Patrician and Port Royale series, you can’t trade with every good at the beginning of the game. Here is a table showing which rank is required for trading certain goods:
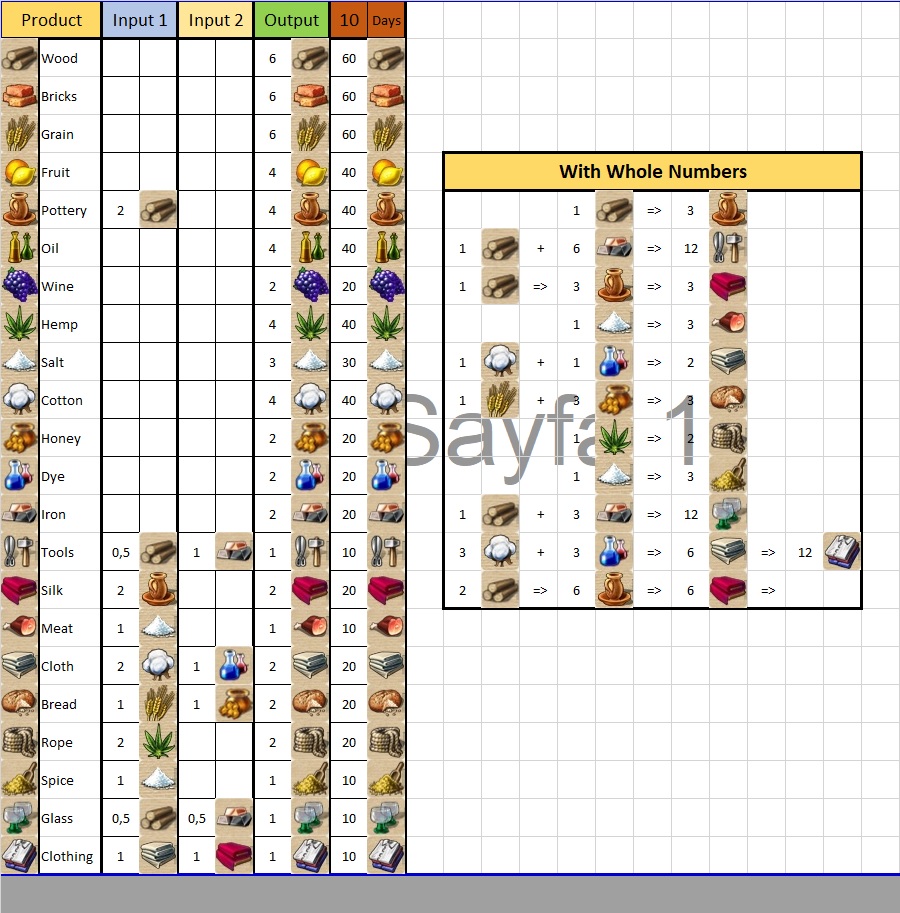
Also the production chain (the table on the right shows the amount of “factories”, not goods for example you need 1 hemp plantation to supply 2 ropeyards):
And here are some production tips:
- A general rule of thumb: Try to produce finished goods in the cities which also have access to it’s raw material. My production chart shows which city is fully self sustained and partly self sustained. Prioritize on fully ones.
- Zara is the best pottery producer (it has wood)
- Beirut and Tangier produces ropes and hemp. (My advice: Utilize Beirut as spice producer)
- Pisa produces glass, wood and raw iron.
- Cassablanca produces wood, raw iron and iron goods and it is “the best self sustaining city”. It produces 4 raw materials and 1 finished good (Iron toons) and it can produce both of it’s finished good’s raw materials. The other two raw materials it produces are cotton and dyes (another golden combo).
- Barcelona produces meat and salt.
- Even with the “random production” settings, silk and spice producers won’t change. They are “regional goods” and fixed.
And here is the chart shows required materials for production (excluding self sustained ones).

Trading Tips (especially at the beginning)
In previous chapter, i’ve added the “needs chart”. Later stages of the game, you will try to supply every city with every good but at the beginning you will trade goods. Here are some trading tips i think they will come in handy for a new player.
SOME LUCRATIVE TRADE TIPS
- Your initial City Venice and all cloth producers require “huge” amounts of cotton and dye. Biggest consumers are Venice and Genoa. Genoa also uses cloth as a raw material for clothing production. That means Genoa usually have more cloth factories than Venice.
Tripoli, (Oran and Cassablanca with the dlc) produces both. At the beginning buying cotton and dyes and selling them to Genoa, Venice and the other cloth producers (Ragusa etc) will make you a good profit
- Silk producers (İstanbul, Samsun and Kaffa) requires pottery. The closest supplier is Koroni but Zara is a safer choice.
- Southeastern cities (Famagusta, Antioch, Beirut, Acre, Alexandria) can’t produce bricks, iron tools, meat, bread, clothing and glass. At the beginning, you can buy (or produce) bricks from Thessaloniki and sell these to them. Later on, you can (and should) supply them with all of these goods.
- Clothing producers require silk and cloth, at the beginning biggest producer is Genoa but Genoa also produces cloth. You can buy silk from Black Sea cities and sell it to Genoa, Rome and Palermo (Perpingan and Annaba with the DLC).
So another lucrative trade strategy is buy silk from Constantinople, Samsun, Kaffa —> Sell it to Genoa, Rome and Palermo —> Buy Cloth from Genoa (also Venice if you want) —> Sell Cloth to Rome, Palermo, and Constantinople
- Spice producers need salt. The closest supplier is Alexandria, the easiest supplier is Venice (you begin the game with the building licence)
You can add more to them, i’ve just covered some, with the “City Needs Chart” i’ve put here you can easily see which city supplies where
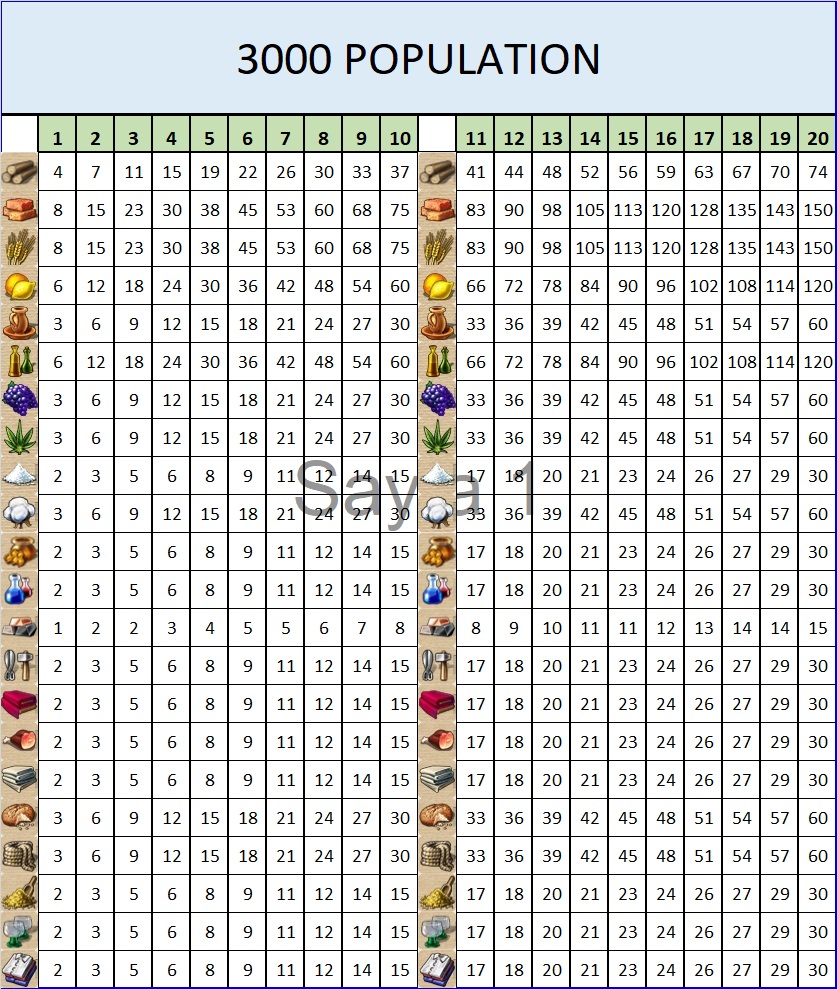
City Consumption Data
No matter what the city produces, what the city consumes or city’s population, there is a relativity between city’s “BASE” consumption data. By base i mean “no factories”. If you just look at the “city info” screen, you can easily tell that.
Here is the coefficients:

You can easily calculate a city’s “base” consumption by just knowing one value. The only thing you must consider is “do not pick a raw material the city uses in production”, ( i mean don’t pick cotton for Venice for example, because Venice produces cloth and requires cotton).
Just pick an finished product (like iron tools, glass, clothing etc) or a low tier good which is not used for production (bricks, oil, wine etc)
Lets make an example:
Lets pick a city and look at it’s info. For example it says the city consumes “12” barrels of spice in 10 days .
- 12 = 2x —> x = 6
- 1x goods ? Iron. Consumption = 6
- 2x goods ? Salt, Dye, Iron Tools, Silk, Meat, Cloth, Spice, Glass, Clothing. Consumption = 2x = 12
- 4x goods ? Pottery, Wine, Hemp, Cotton, Bread, Rope. Consumption = 4x = 24
- 5x goods ? Wood. Consumption = 5x = 75
Note: Wood consumption value is interesting. In game it shows 74 instead of 75. I think its about the game’s math.
- 8x goods ? Fruits, Oil. Consumption = 8x = 120
- 12x goods ? Bricks, Grain. Consumption = 12x = 150
You can calculate every data you need for your routes by just looking at the city info screen and doing some math 😉
But, for saving you a lot of calculations (for creating this guide i’ve done “tons” of calculations and charts, thank you Microsoft Excel) i put the charts here 😀
- I mention this again, this calculations will give you the “base” consumptions, for calculating for example Venice’s cotton consumptions, you need to add the amount of cloth factories into consideration.
There is a very good calculator for this created by Scalito, here is the link: [link]
Sadly for me, i’ve found this “after” i’ve done all the math XD if i had this before, it will save a ton of time.
and

Suppliying Cities
In this part i will talk about the question of How many factories do i need for suppliying my cities without overflowing ?
- This part is important. Like Patrician IV, PEOPLE CONSUMES A LITTLE MORE THAN IT PRODUCES
Now whats that mean.
Lets pick a city with 6000 population. The amount of needed goods and the factories to product them is shown below
(supply factories is the factories whose product is consumed by also factories not the people itself. For example Wood factories. 1,3 base factories are suppliying the city’s population. On the other hand 1,4 supply factories are suppliying the pottery, iron goods and glass factories)

Lets analyze the numbers:
6000 population creates a workforce for 60 factories but the city’s consumptions can be produced by 63 factories. Also add the disaster events, building buildings, ordering ships, church donations, senate/family missions and that kind of stuff. These are all consuming goods.
- Lets return to the How many factories do i need for suppliying my cities without overflowing ?question.
The answer is: Every 2000 people requires 1 set of factories (22) to supply them.
- Every city produces 5 types of product. For example Venice, Venice will supply itself with Fruits, Oil, Salt, Cloth and Glass. The other 17 goods are your responsibility (and also fill your pockets). Lets assume that Venice has 6000 population.
(6000/2000) = 3 of each factories will supply Venice.
- With this information you can easily calculate the amount of factories needed in your route to supply every city. But since production is not evenly distributed, you have to plan your production first. I mean don’t fill your only spice producing city with grain farms. (Later on Cathedrals remove the population and business cap which gives you nearly unlimited radius of action.)
- This one is important. Consumption and production data is dependent on population not the number of cities your convoy visits. You can create 5-6 city routes including every good and still can make “huge” profits with supplying 25-30k populated mega-cities
Route Planning and Warehouse Trading
- My first advice in this topic is try to make your route durations are multiples of 10. 10, 20, 30 day routes are easier to work with in terms of calculations. Yes you may want to use calculators, notes and spreadsheets (i use them extensively as you can see 😀 ) but don’t make yourself suffer with micromanaging every aspect of a 17 day route. It’s a game after all, have fun. Don’t turn it into a “Microsoft Excel Spreadsheet Festival”
- Try to cover all goods. More goods at your disposure = bigger market = more money. More money is good.
- If you are a beginner, use 10 day routes.
- At first your convoys will buy cheap goods and sell them for profit on the market
- Second, your convoys will load from your warehouses and sell them on the market in the not producing cities.
- Third, your convoys will load from a warehouse of a producing city and unload to another warehouse of not proucing city . Your stewards will do the selling. Congrulations, now you’ve started to playing Rise of Venice 😀
Here is 2 of my example routes i use.
- Both routes are 20 day routes with a captain with 5 Navigation Skill (It affects route time), Carrack’s as escort ships and Fluyt’s as main bulk carriers. Also covers all goods
- With the DLC the number of cities are increased to 38. You can also create routes covering these cities, but know that silk and spice transportation may be a problem. You can solve it by creating a loop covering Western cities (20 goods) and another route for loading silk and spice from the east and unload it to a city which is in your loop (Annaba for example) and use this city as a semi-hub city.
I don’t know why but Rise of Venice’s Steward Trading is inferior than Patrician IV’s Administrator Trading in some ways. Yes there are improvements like “keep raw materials” function and believe me its a very good improvement, but “buy goods” feature is a complete failure. In Patrician IV, you can tell your administrator “what” good he should buy for “how much”. If it was also present in Rise of Venice you could tell your Steward that “Buy 200 salt for 100 for each maximum, only salt. No fruit, no oil. Just salt. And also 200 salt. Not 234962”. If you somehow put a check mark on “buy goods” the steward will fill your warehouse with whatever he will find in the market.
- My advice: Don’t use “Buy Goods” feature. You may use this for the beginning for easy access to cheap goods but believe me don’t use that. You won’t regret. Use steward as an autoseller.
- For selling price, you can use whatever you seem fit like 140% setting, 195% setting (i’ve used it, on long term, it causes an overflowing of items because your competitors will sell cheaper while your steward waits a shortage of goods for selling. It seems like its ok at the first glance, “this city consumes 120 grains in 10 days. I unload 120 grain to my warehouse every 10 days and my steward will sell it at 195% price” but what actually happens is while your steward waits, your competitors sell their grain while yours just sit in the warehouse. Yes your profits will be lower but it’s better than overflowing of goods.
There are different approachs on the route planning, like central hub’s, small pockets, port to port long routes and much more. You can create your routes whichever you like. For beginners, lets explain and compare them briefly.
Alot of advanced players use this method, you have central HUBs like Candia, Syraccuse etc. This are your centers. Everything collected from cities around the HUB and dumped in the HUB, then, redistributed to the cities around. There are also convoys transporting goods from HUB to HUB.
For example you picked Syracuse and Candia as HUB cities, Adriatic coast and eastern cities dumps everything to Candia (lets call this area Cania HUB), Western Italy and Northwest Africa dumps everything to Syracuse (Syracuse HUB) . You’ll have small routes like
Candia-Alexandria
Candia-Constantinople
Syracuse-Genoa
Syracuse-Tripoli etc, etc. Shortly 2 city routes.
And what this route does ?
- Picks everything produced in Alexandria and transports them to Candia.
- After that, picks what Alexandria need from Candia and transports them to Alexandria
And HUB to HUB convoys ?
- Picks silk and spice from Candia and transports them to Syracuse for distributing to the cities receive from Syracuse HUB. You’ll need to calculate how much of these goods will be needed in the western cities.
- I don’t need to mention that, your HUB cities will need huge amounts of storage space.
Port to Port is the basic route, the examples i’ve write are port to port routes (7 cities all goods do you remember).
- Plan your route, for example 9 cities, 17 days.
- At the beginning, your convoys will buy and sell in the cities. Later on, the convoy will load everyhting the city produces and unload 17 days of goods to the city.
You can also hybrid these 2 approachs and create your own pocket routes like
-1 Route starts from Candia and covers Black Sea
-1 Route starts from Candia and covers Adriatic Sea
-1 Route starts from Candia and covers Eastern Mediteranian.
There is a central HUB (Candia) but also a Port to Port route.
- (+) Risk of overflowing is considerably smaller, like if an overflowing of a good happens in Candia-Alexandria Route, it won’t affect Candia-Famagusta Route.
- (+) If you like micromanaging, you’ll enjoy this method
- (-) Your convoys will be more susceptible to raids, since you can’t give escorts to all of them (you can but with huge maintenance, you can place strong patrol convoys to the choke points.)
- (-) Since you’ll need more convoys than Port to Port Routes, you won’t be able to use this system early on.
- (+) Escorting is easier. A convoy’s maximum ship limit is 50. You can escort 47 trade ships with 3 warships (I assume you are using 3 escort ships for your convoys). That means comparing to the HUB system, escort maintenance is considerably lower
- (+) You can cover a great amount of area with 1-2 convoys.
- (-) Later on, the numbers will become too big, it is kinda tiring to calculate with these big numbers. My 50 ship convoys are consisting of 3 carracks and 47 fluyts, a total capacity of 29.400
- (-) An overflowing of goods (even 1 commodity is enough to cause that), can easily cripple the entire route. Imagine that you are transporting 18.789 cottons in that route accidentaly. 63% of your convoy cap is blocked.
There is another alternative which i haven’t tested it yet but i’ll try.
An Alternative Supplying Method
Like i said I haven’t tested it yet, but i’ll test it in Rise of Venice, Patrician IV and Port Royale 3. I’ve allways wanted to supply the entire map, but due to the huge micromanaging, i’ve allways hesitated.
There is the approach
- Plan the route and Pick a HUB, your route will be a port-to-port, not a HUB-city-HUB.
- Load X amount for everything. You can (and will) the amount of commodities.
- This part is important and key of this method. Make your steward lock Y amount of commodities from “convoy” usage, not city. Like “lock 500 of everything from convoy use”. You can adjust them, if a commodity is used in production, you can make that 500 to 2000. Later on these numbers will increase naturally.
- City I: Unload max (yes) —> Load max.
It doesn’t make sense at the first glance, but with your steward settings, it actually works in theory. With this way your convoy is making sure that there is always a fixed amount (your decision, 500, 1000, whatever you like) of commodities in every city and replenishing constantly.
- City II: Unload max —> Load max. And it goes on
- And finally the HUB city: Unload max —> Load max.
With this method you don’t have to monitor your routes with every 10 minutes. You can focus on the other aspects of the game like quests, pirate hunting, increasing prosperity, tavern etc.
The Risk: The HUB city may get itself overflowed. But we can always dump the excess amount for quests, or sell them to a city.
Ranks and Senate
The ranks and what do they mean:
- For advance in ranks, you need to have a certain amount of wealth, storage cap (either warehouse or convoy) and workers/sailors. You can learn that from the blue bar just below the minimap. After that, you’ll give your application and The Senate votes. You also need at least 5 of the 10 votes. From Councilman/Councilwoman on, you’ll need 4 out of 9 votes.
The Senate
These are the “Big Boyz” of Venice. Below each of them you can see your reputation. Your reputation with them slowly degrades with time. For getting an approval from a member requires around 55% reputation. (60% and above is a guaranteed “yes”. Between 45%-55% they may give an abstaining vote”, below %45 means “F**k You”)
- Each member of The Senate has a character. You can learn that in the Member Overview screen (Just click a senate member).
For example “Cosmopolitan” trait, Every warehouse you build in a city will increase your reputation with this family. Or “Cultivated” trait, Every school you build in a city will increase your reputation with this family.
You can use this traits for your advantage to gain reputation.
- You have 3 competitors and each will have a seat in council. These are total douchebags and your reputation with them can dip easily.
- You cannot rapidly increase in ranks. There is a “30 days” cooldown.
- Bribing a member will increase his opinion towards you.
- “Diplomat” family member can increase a member’s reputation with you by 10, useful before advancement voting. That family member is extremely useful, use him/her whenever possible.
- Destroying pirate convoys will give you 2% popularity with all members.
- Destroying pirate hideouts also give you popularity with all members.
- If your competitor’s reputation with you drops below (around i believe) 40%, they will start to sabotage you.
- Always have an eye on The Senate for missions and checking your reputation. Even when you’ve maxed your rank (To prevent sabotages). With completing these missions, you may advance to the highest rank and even win the doge election without spending a single coin to bribes.
- Looting trade convoys will lower your reputation with “all members” of The Senate. Think twice before doing “i will be a pirate, yey…”.
Naval Combat and Dealing With The Pesky Pirates
Rise of Venice’s naval combat is fairly simple (but fun i think) here are some tips:
- Use flaming oil alot. They are a little expensive (2.000 each) but they work wonders. They burn the sails of enemy convoys only (no friendly fire, i don’t know how and i don’t know why)
Burned sails —> No maneuverability, No maneuverability —> That ship is ready to be get fu, ehem boarded/sunk.
- Try to position your ship in a parallel line with the enemy ship but slightly ahead. This way The enemy ship will be in your firing range but your’s aren’t his. After positioning, sail with a “S” shaped route. shoot —> drive an S while reloading —> shoot again and go on. Enemy AI always falls for this.
- You can capture only “1” of the enemy ships. Pick the biggest one. After that, sell it, use it, do whatever you want with it. Capturing and selling pirate ships is a rather easy source of money and obtaining higher tier ships than you can buy/build (plus reputation bonus)
- Chainshot damages sails, Grapeshot kills crew. A typical approach to the naval battle is,
1. Damage the sails with burning oil + chainshots
2. Soften the crew with grapeshot
3. Board the ship.
- When the battle starts use burning oil with “all of” your ships. Just click these 1-E-2-E-3-E. Thats it. This way, 3 of your ships will release burning oil and that devastates the enemy ships mostly. I use this tactic every time. Not very complex nor creative, but it works.
- Maximum convoy strength i’ve ever got is 138 (5 skills captain, 3 carracks, max crew, max swords, pistols, frying pans, stacked Nasus etc etc) Pirates won’t touch (afraid of) strong convoys.
- Galleasses are very good at the lower ranks because of their maneuverability and speed, they use galley slaves and they are way faster than the other ships when sailing against the wind.
- When the enemy ship’s sails are completely out of use, you can approach them from the bow and leave an explosive barrel. Explosive barrels are the quickest way of damaging hull.
Burn the sails –> blow them with explo-barrels.
Becoming Doge
You have to need run for office for the next election to became Doge. For becoming Doge, You’ll have to get 6 votes out of 10. The way to becoming Doge is prettystraightforward actually.
Increase your reputation –> Run for the office –> Voila !
- When you get elected, The Senate gives you a fleet of 3 ships with full crew. You can do whatever you want with this fleet, trade, missions, hunting pirates etc.
- There are also “Doge missions”. You will need to protect Venetian cities from blockades from Ottoman fleets, invasions of Genoese fleets, destroy Genoese pirates and that kind of missions. Keep an eye of these missions
- Unlike the family, city or senate missions, there is a penalty for failure in the Doge Missions. For example, if you fail to protect a Venetian city from Genoese invasion, the city you’ve failed to protect will ally itself to Genoa. It may actually be useful (at least for me) for mass produce Flutys since they can only be constructed in Genoese cities. But know this, you’ll have to pay to get a trading licence for this city. (not building licence, your buildings and building licence will be untouched.)
- For keeping the title as Doge, you can use the Denunciator in the Tavern. You can sabotage your competitor’s reputation.
Bank, Tavern and Church
- Unlike Patrician IV, Bank is actually useful here. You can get yourself a nice profit from lending your money. Rarely, the borrower becomes insolvent (10% chance), but i think it is worth a shot.
- Briber: I don’t use him. He just revokes one of the competitors harbor permit i na given city. Hurts him financialy but like i’ve said, i don’t find him useful.
- Thief: This dude is rather more useful. He steals a percentage (50% or 80%) of the stock of your competitor in a given city. You can also buy these goods in the black market. Sadly i don’t use this dude too.
- Denunciator: At first sight, you may think like “man, why do i want to sabotage the reputation of my competitor, how does that help me”, but believe me, this guy is the most useful of the three. The answer is simple: Doge Election. By sabotaging your competitor’s reputation, you can guarantee that you can make yourself re-elected forever. Just sabotage your competitor before ellections.
Aaaah, the church, we even use the holy church for profit. Here is how:
- A city without church is limited to 30 houses and businesses. To increase this cap, you’ll have to build a church (60 houses and businesses) and later on, upgrade it to a cathedral (No limit).
- Upgrading a church to a cathedral requires donations. There are 5 construction stages for expanding to a cathedral and each of them requires:
-100 wood
-200 bricks
-50 iron tools
-50 ropes.There is also a time interval between the construction stages. You can make this easier by locking these goods in the warehouse trade screen. After expansion, you may want to unlock these goods.
- After lots of donations, the church will give you a title which is “Fidei Defensor”. Your donation’s effect on piety will be doubled.
- After metric tons of donations you will become “Blessed”. This will give you an immunity to excommunication. None of the cities you have a warehouse in will become excommunicated. (excommunicated cities won’t get a influx of workers.)
House and missions
In the House screen, you’ll see your family tree. Some of your members have a profession and actually have some usefulness.
- Captains: Simple, these are captains. Their only difference from regular captains are they start with some skills. (not much but eh, skill is skill)
- Missionary: You can send a missionary to a city in which you have a trading licence. After a few days, your popularity will increase by 30% for a period of 3 weeks. Useful for getting a building licence easier. Later on, cities will require 100% popularity for giving a building licence.
- Priest: You can send a priest to a city in which you have a warehouse. This dude will prevent prosperity from dropping below 60%. Useful for preventing migrations and worker shortages.
- Doctor: Stops epidemics and plagues. Nothing more.
- Advocate: My personal favorite. Advocates increases your reputation with a family by 10%. Extremely usefull for promoting and Doge elections. Use advocates whenever possible.
- You can also marry. For marriage you’ll need a high reputation with a family (not competitors). After that, that family may offer you a marriage mission. All you have to do is gather some goods for your wedding fest (Fruits, meat, bread and wine). After you marry, your family tree will be expanded.
- You can send your wife/husband on a journey but there is a chance that he will not return. You’ll be able to marry again. (There is an achievement)
You can get missions from your family members, senate members, cities and Doge Office.
- City missions are the easiest ones. Gather X ammount of Y and sell these to the city. Reward: Popularity and some gold.
- Family and Senate missions have more diversion. I will explain the tricky ones. The others are simple like Find my X, Gather some Y, Escort Z to W.
- The tournament mission (Senate) are by far the hardest one. You’ll have to fight 10 battles consecutively. Burning oils and explosive barrels are your best friends.
- Reducing population (Senate): You’ll have to reduce the city’s prosperity for a long time. This will cause a migration. A rather expensive mission. The easiest method is blockading the city and buying every good (especially food) in the market. After some time the city’s prosperity will sink like a stone. But beware, there will be fighting convoys. The city’s allies will send convoys to break your blockade. Blockade isn’t a must, but makes it easier.
- Reducing prosperity (House): It’s like the previous mission, blockading isn’t a must.
- Protecting Venetian fleets (Doge): You’ll see 3-4 ships with a star (indicating quest mark) top of them, you’ll need to destroy those ships. Engage them with a strong convoy because these fleets are strong (over 100 convoy power)
- Protecting Venetian cities (Doge): This time enemy ships (Generally Ottoman) blockades some Venetian cities, again, you’ll search ships with a star mark on top of them blockading Venetian cities. Your job is breaking the blockades. Again, these fleets are also strong.
More Tips
- Do not worry about making family members captains. Your captains will level up as the time passes.
- Depending on your playstile, you may want to prioritize a spesific skill over another.
My first priority is Navigation, then Eagle Eye. Navigation increases convoy speed and Eagle Eye increases the range of sight.
- When getting trading licence, prioritize Genoese cities first. Venetian cities are easy to get, but the fee you’ll have to pay for Genoese cities increases exponentially. Building licence fee is capped but trading licence’s fee is not.
- When you get a building licence in a city, quickly build houses to the cap. Rental income will become a huge part on your finance. Don’t let your workers paying their rents to someone else, make them pay their salaries
- Cathedrals… Build them, later on you’ll need to remove the cap for producing rare goods, especially regional ones (silk, spice). Remember there are only 3 cities producing silk, and 3 cities producing spices. Don’t stall by the cap in a sole producer of a particular good for your route.
- Don’t forget that consumption is based on population, not the number of cities you cover with your routes. A 5 city route with 8-10 k population in each city yields a bigger profit than a 10 city route with 2 k population in each city.
- Overproducing a good can (and will if you don’t take action) make you bankrupt by overflooding your convoys. Make your calculations but also monitor your convoys. You can easily find your convoy filled with 8542 hemp carried over the Mediterenian. If such a situation happens, dumping (selling) the excess amount somewhere else is the easiest solution (preferably some city not covered by that particular route). Or increase your production which uses that overproduced good as a raw material, but calculate it well, you may end up with a overproducing cycle.
- When producing a good, lock some of it. For example Locking 1000 fruits in Venice (I assume you are producing fruits in Venice), this way, in times of need (quests etc) you’ll have a good amount allready stored ready to use.
- Locking wood and bricks are extremely beneficial. I usually lock 3000 of each in producing cities and 1000 of each in every other city. When mass building, this locked amount of goods saves a metric tons of time.
- I also lock feasting goods (bread, fruits, wine and meat) for church for quick prosperity boost and shipbuilding materials (Wood, ropes, cloth and metal goods) in cities with large shipyards.
- Prioritizing Genoese cities and upgrading shipyards to large shipyards in these cities (5.000 population requirement) will make you able to mass produce Fluyt’s. As i mentioned earlier, Fluyt’s are the best ships in terms of stowage per gold.
- Build hospitals and schools whenever possible, they are very useful and also provides reputation with the corresponding senate member.
Build 1 hospital and 1 school per 2.000 people.
- 1 set of each factory supplies 2.000 people.
- Keep an eye on the yellow dots in minimap. These are opportunities you may want to use like castaways (free sailors), black market (a great range of goods for cheap), settlement construction (you can dump your excess building materials), missionary (free piety), treasure, free commodities and so on.
- Keep one of your convoys for personal usage. Use this convoy for direct intervention like quests and urgent deliveries. I prefer mine consisting of minimum 10-15 ships, 3.000 sailors and 5.000 cargo cap. When mass constructing a city, i can quickly deliver 4.000-5.000 building materials and labor force.
- This one is just an interesting fact, although, cathedrals removes the building cap, you have “limited” carrying capacity. Since maximum number of convoys you can have is 100 (Prince/Princess Rank), your maximum carrying capacity is (100 convoys)x(50 ships per convoy)x(600 cap per ship) = 3.000.000 (well thats actually very high 😀 ) But even though 3.000.000 is a high cap, comparing it to the “infinite” capacity of the cities, there is actualy an “ending point”.
- No matter how much you try, pirates will resurface anyway. They do not raid strong convoys. 3 carracks with 600 sailors for your convoys and you are good to go.
- Schools and church meals increases the influx of citizens but the quickest way of dealing with the worker shortage is carrying them to one place of another. For example lets assume that Tripoli is in shortage of workers by 300, recurit 300 sailors from somewhere (more popularity + more population = more sailors) and release them in the city where you need workers.
- Unlike Partician IV or Port Royale 3, there isn’t much to do after becoming Doge (Being Doge is actually kinda dull, jsut repetitive quests with nothing to gain. In Patrician IV you can actually buy land and in Port Royale 3 you can conquer/takeover cities and being mayor has it’s own advantages. I think it’s for the historical accuracy since Venice was a republic compared to city states of Patrician IV and colonial towns of America)
- Unlike it’s predecessors, captains accumulate a total experience with their actions, you can get a full skilled captain even without fighting a single battle with him. Put a captain to a convoy, set the autotrade and you are good to go. After some time, your captain will level up, you can distribute the experience points as you like.
My strategy is after a captain is leveled up quite good with autotrading convoy, i switch captains. I take the skilled captain for my personal fleet, and put a fresh blood to the trading convoy.
Conclusion
I hope you’ve found this guide helpful. I apologise for grammar mistakes (English is not my native language). I’ll try to update this guide and add more content whenever possible.
Thanks for reading 😀