
Overview
This guide will explain the process required in order to get your multiplayer server to show up on the Steam server browser in game and also the different configuration options you can change on your server.
Introduction
In Flight Simualtor X: Steam Edition, they have brought back the dearly missed multiplayer component to the game. However, due to the nature of most multiplayer games, some setup is required before you can start playing with friends or hosting a server. This guide will cover the main steps of setting up a server and also act as a discussion area for those who are having troubles getting their multiplayer games to work. Before you start with this guide I reccomend you have a few peices of information handy.
- Your router make and model.
- Your router login information.
- The hosting PC / Machines local IP address.
Make sure you test to see if multiplayer hosting works before you follow this guide. If it works, then there is no need to change any of your router settings.
Forwarding Ports
Port forwarding varies between your make and model of your router. If you do not already know it, you will need to find out the make and model of your router now. You will also need the login information for your router. If you do not know your router login info, there is no way to complete the guide and you will not be able to run a server. If you have forgotten your login info then you may have to factory reset your router in order to continue the guide.
(Note: I will be using my make of router as an exaple. The choices you select depend on your router.)


Using one of the game guides (including the old Flight Simulator X one!) will mess up this guide.
Unfortuently this is one of those parts where it changes for each router but the guide should be able to get you to the port forwarding option. Once you get to your port forwarding screen, minimize the browser and follow the next step.
Unfortuently this bit I only know for windows users, but if you use something else then you may be able to google how to do it. If you already know your local IP address, skip to step
If not, go to your Windows search bar and type in ‘cmd’ and press enter. You should have something pop up. Type ‘ipconfig’ into the Window like shown in the first image. Then press enter again. Find the network adapter your currently using and write down the IPv4 address as shown in the 2nd image.


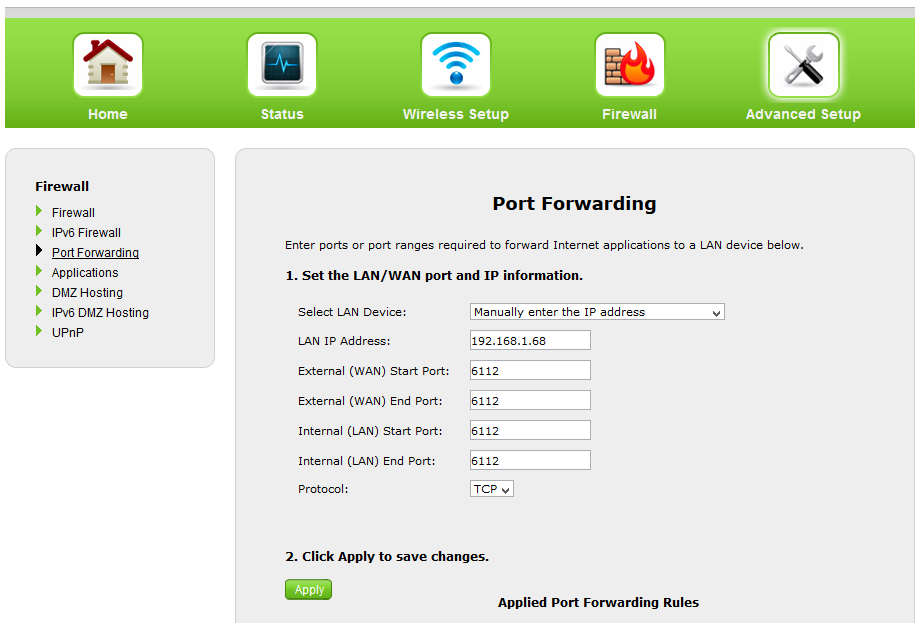
Reopen your router page that should be on the port forwarding tab / option. Then, following the steps on portforward.com, enter the IP address you found out in step 6. In the port tab type in 6112 as both start and the end port. If your router has an option for internal and external ports (like mine does), enter 6112 in both. Under protocal, if your router has an option for TCP and UDP, select that. If not, do one then repeat this step selecting the other option at the end. Make sure to click apply and wait for your router to say that it’s saved.

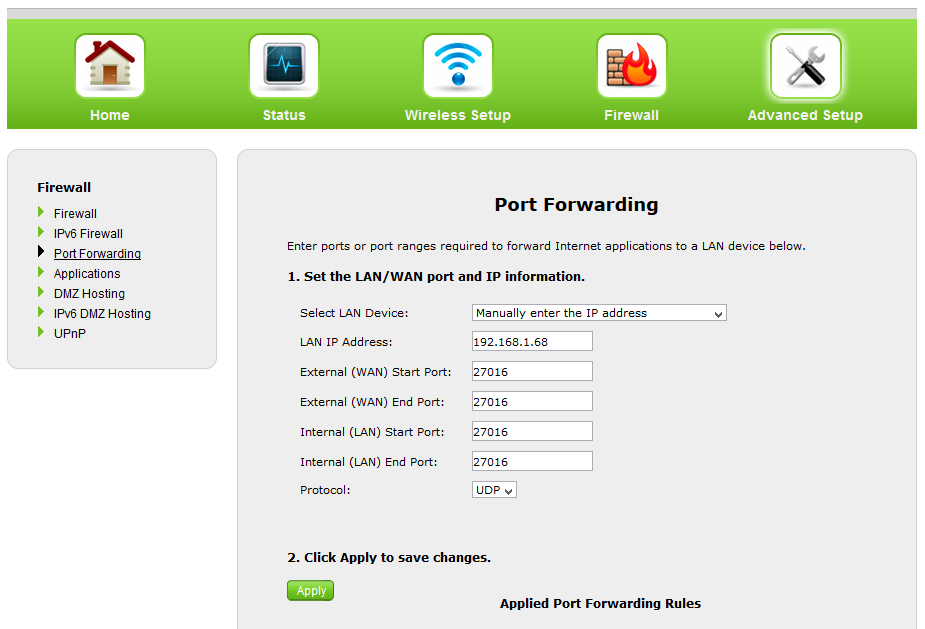
I’m not sure how much of a difference this step makes but the change log mentions something about a server list port so I added this one anyways. Follow all the steps from step 7 but instead of using port 6112, put in 27016.

That should be all you have to do for port forwarding. Double check your router settings to make sure both 6112 and 27016 have been forwarded on TCP and UDP. The next part of the guide will be explaining some of the options in game when setting up a server.

In Game Setup and Options
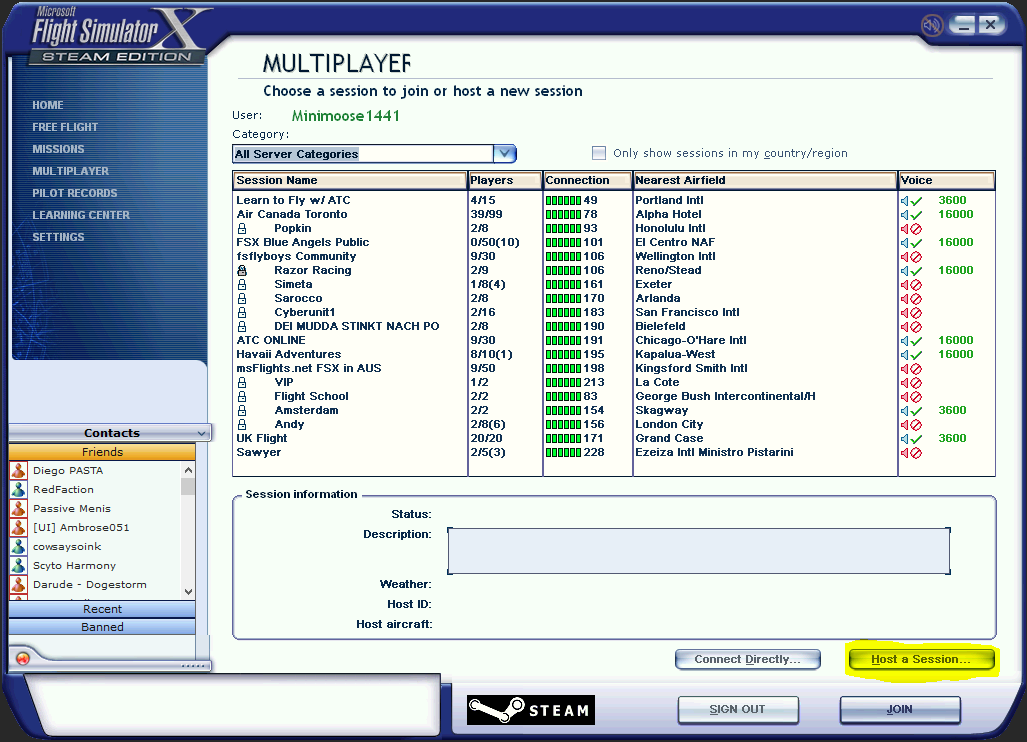
Now that your past the hard part, port forwarding, I’m going to explain some of the options and how to actually start a server. In order to start the server go to the multiplayer tab and log in. In the bottom right corner there should be a button that says ‘Host a session…’. Click on that.
Free flight: Do whatever you want, no objective flying. Most servers use this.
Mission: Choose from a mission that everyone will be participating in. Normally consists of races and other challenges. FSX:SE comes with about 15 of these.
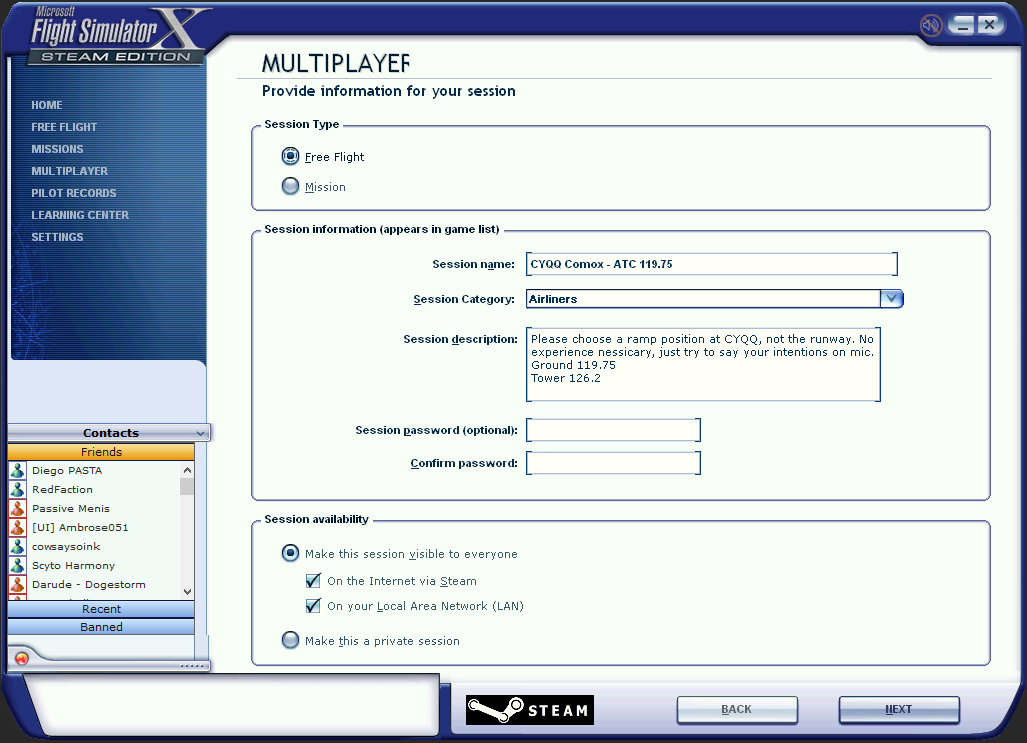
Session Name: Name of you server. This is how it will show on the server browser.
Session Catagory: Set to Free Flight if a Free Flight server. If not, choose the most appropriate option.
Session Description: Will show up once someone joins the game. Good for putting frequencies in and other important info.
Session Password and Confirm Password: Optional, if you want you server to be locked with a password.
Make this Session Visible to Everyone: If you want to show up on the server browser, choose ‘On the Internet Via Steam’. The ‘On Your Local Area Network (LAN)’ option allows people on your home network (another PC at your house, for example) to play on the server.
Make this a Private Session: Session will only be joinable by people on your Steam Friends list and wont appear in the server browser.
Click ‘Next’ once your happy with all your settings. This next page is your standard setup page. I will still go through the options avalible.

Select Role: Choose if you want to fly a plane or be a Air Traffic Controller. If you are hosting from a dedicated box and wont be playing while the server is online, I strongly suggest choosing ATC.
State Intentions to Other Players: Let other players in the server know what you plan on doing, where you plan on flying to, etc.
ATC Name: AKA, your callsign. Its what ATC will say when trying to contact you. For example, N15029 would be an example of an USA registered aircraft while C-GCYF would be a Canadian registered aircraft. For a full list of possibilities by country, see here. [link]
If ATC, leave this as the ATC tower. If a pilot, choose whatever varient of aircraft you want to be flying.


Real World Weather (Static): Takes the current conditions at the airport you selected and will not update those conditions throughout the game.
Real World Weather (Updated every 15 minutes): Takes the current conditions at the airport you selected and will update those conditions throughout the game every 15 minutes.
User-defined Weather: Lets you choose everything.
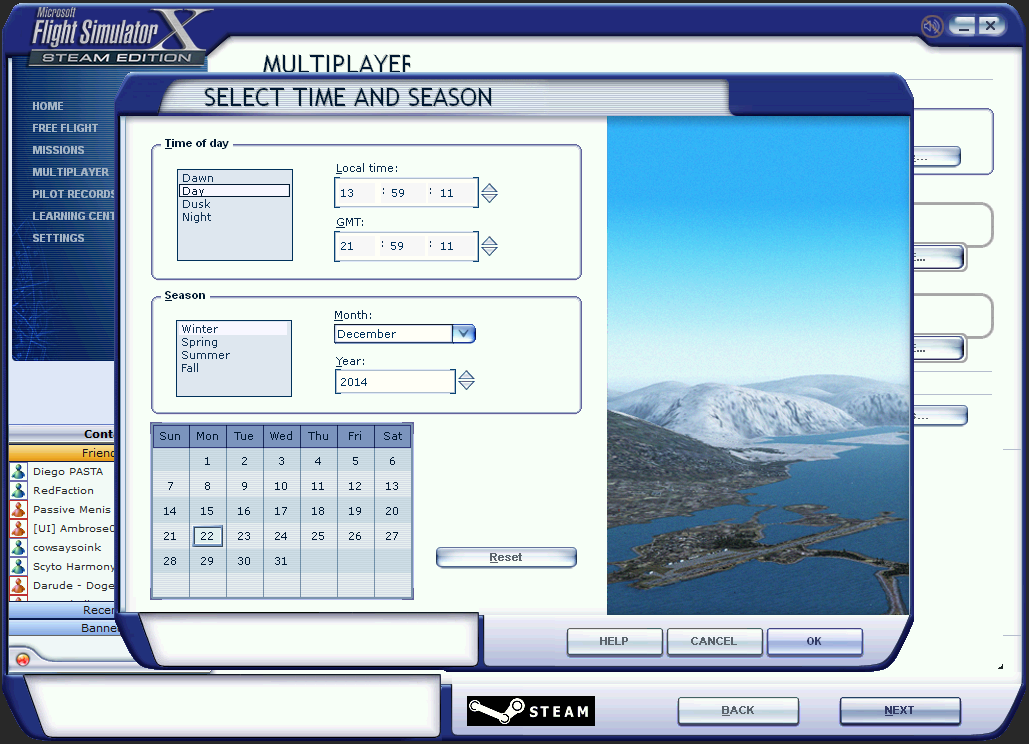
Click ‘Next’ once happy. This next page will be about server size and settings.
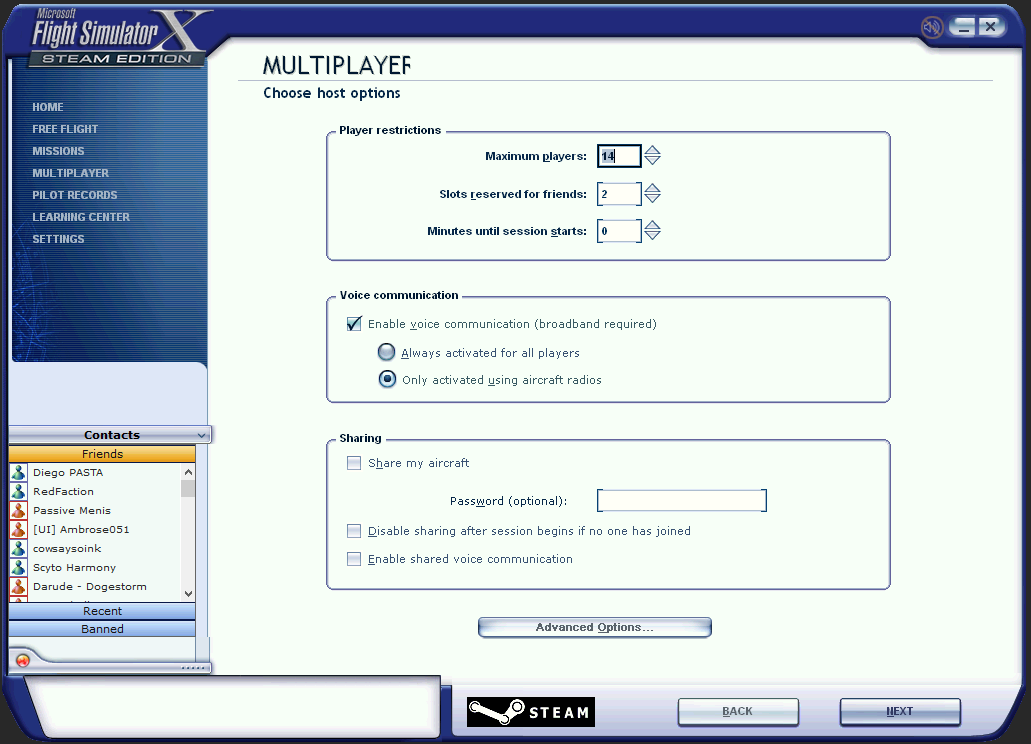
Maximum Players: Self explanitory really. I haven’t tested about 20 people but my PC had little to none performance issues with that.
Slots Reserved For Friends: The ammount of slots that will be saved for people on your friends list. Note: If you have a 12 slot max players, and 2 reserved slots, the ammount of players who are not your freinds who can join will be 10.
Minutes Until Session Starts: Puts a delay on the session allowing people to join the lobby before the game begins. Good for race missions.
Enable Voice Communications: Note: FSX:SE has a pretty bad built in voice chat. It normally has skips in the audio and can be hard to use at some points. If you can figure out how to do it, a replacement like TS3 may be a good idea. I would strongly reccomend making audio only activated by a radio for realism and mic spam reasons.
Share my Aircraft: Allows a passenger / copilot to join your aircraft. You can have a password by entering one in the text box below the option.
Disable Sharing After Session Begins: Stops people from joining your aircraft mid game.
Enable Shared Voice Communication: Allows passengers to hear your voice as though you were sitting next to them without using the push to talk key.
Now we will go onto some more advanced options on this page.

Players Can Change Realism Options: Allows players to use their configured realism options when enabled.
Players Can Change Location After Joining: Allows players to change to a different airport if they want to without having to disconnect completely.
Players Can Share Aircraft: Allows the aircraft sharing function as mentioned eariler.
Players Can Use Slew Mode: Slew mode is a 3 axis movemnt system that allows aircraft to defy physics and move a ludicous speeds. Disable this unless on a private server or unless you want things going to ♥♥♥♥.
Players Can Join During Session: When enabled, players can join mid way through a multiplayer game. Leave on if in free flight or no players will be able to join.
Players Can Pause Their Session: If enabled and a player presses ‘P’, their aircraft will freeze where it is. If host can pause session is on and he presses ‘P’, all aircraft and ATC will get paused.
Players Can Start at an Airport of Their Choice: Allows players to start anywhere in the world, not just near the host.
Players Can Start In the AIr Near the Host: Allows players to skip the take off and just start flying.
Players Can Start at the Airport Nearest to the Host: Gives players the option to start anywhere on the ground at the airport closest to the host. Good if your ATC and only want people around your airport.
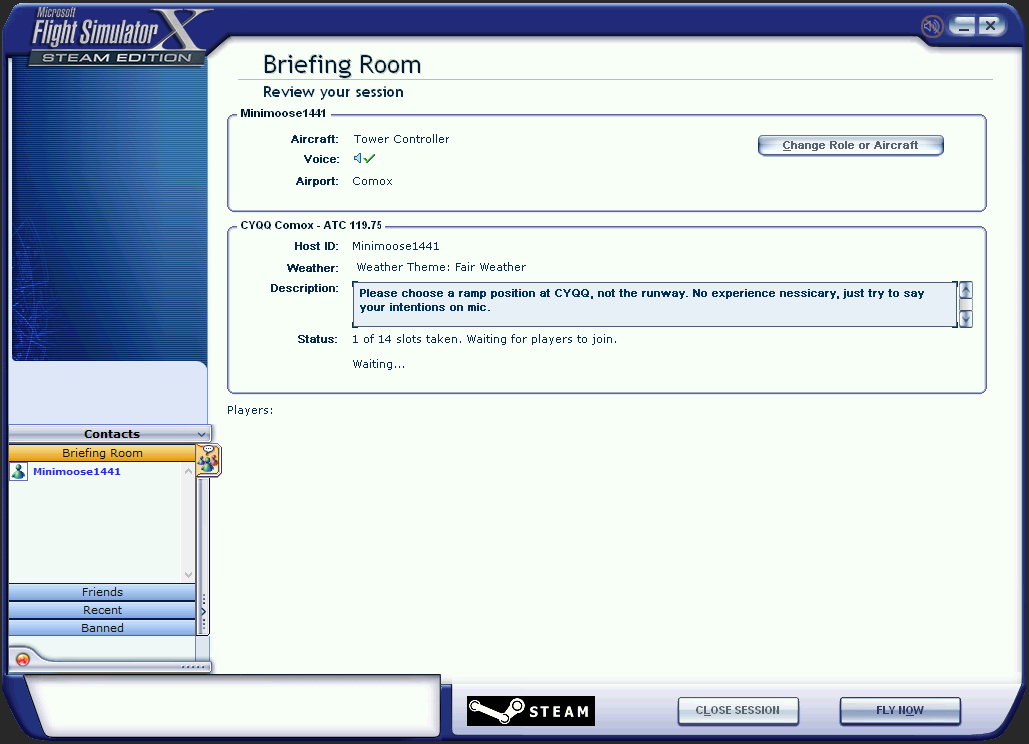
Once done, click next and your multiplayer game will start!
Click fly now and you will load into your session. Have fun!
In Conclusion…
Hopefully this guide helps. I had quite a few people asking me how to get a multiplayer server set up and this covers everything I did to get it working. If you have any suggestions or errors on my behalf, please leave a comment below and I will change the segment. In the future I plan to add a troubleshooting section for those who have issues. Feel free to directly contact me on steam as well if you have issues, but I would prefer you comment on this descussion first as it will help other players who may have the same issue. If your issue is port forwarding and you can’t figure it out from the guide, there is likely little I can do as it varies greatly from router to router.
Feel free to join my server whenever you see it up, I will most likely be acting as ATC with the same name and description as in this guide.
Happy flying!