Guide to getting all the achievements in the game Control. Including 2 DLC: The Foundations Altered World EventsThere are no missable achievements in the game. All intermediate achievements are omitted in this guide. For example, achievements for collecting 40/80/120 collectible materials. The guide will only describe the final achievement-achievement for 120 materials. To start playing DLC “The Foundations” complete the entire storyline. To start playing DLC “Altered World Events” and “Expeditions” you need to complete a 6 story mission in which you will get the ability to levitate.
Missions:
・Main Story Missions
・Side Missions
In the main story-line 18 side missions. To achieve this, it is enough to complete 15 of these missions. Additional missions open up as you progress in the story-line. The number of side missions also includes missions to obtain abilities. The underlined name of the mission to receive the abilities.
A Merry Chase
A Good Defense
A Captive Audience
Fridge Duty
Langston’s Runaways
Old Friend
Self-Reflection
What a Mess: Clear the Clog
What a Mess: Burn the Trash:
What a Mess: Talk to the Plants
What a Mess: Clear the Mold
What a Mess: Even More Mold
What a Mess: Take a Break
Mold Removal
Mr. Tommasi
A Matter of Time
The Enemy Within
Old Growth
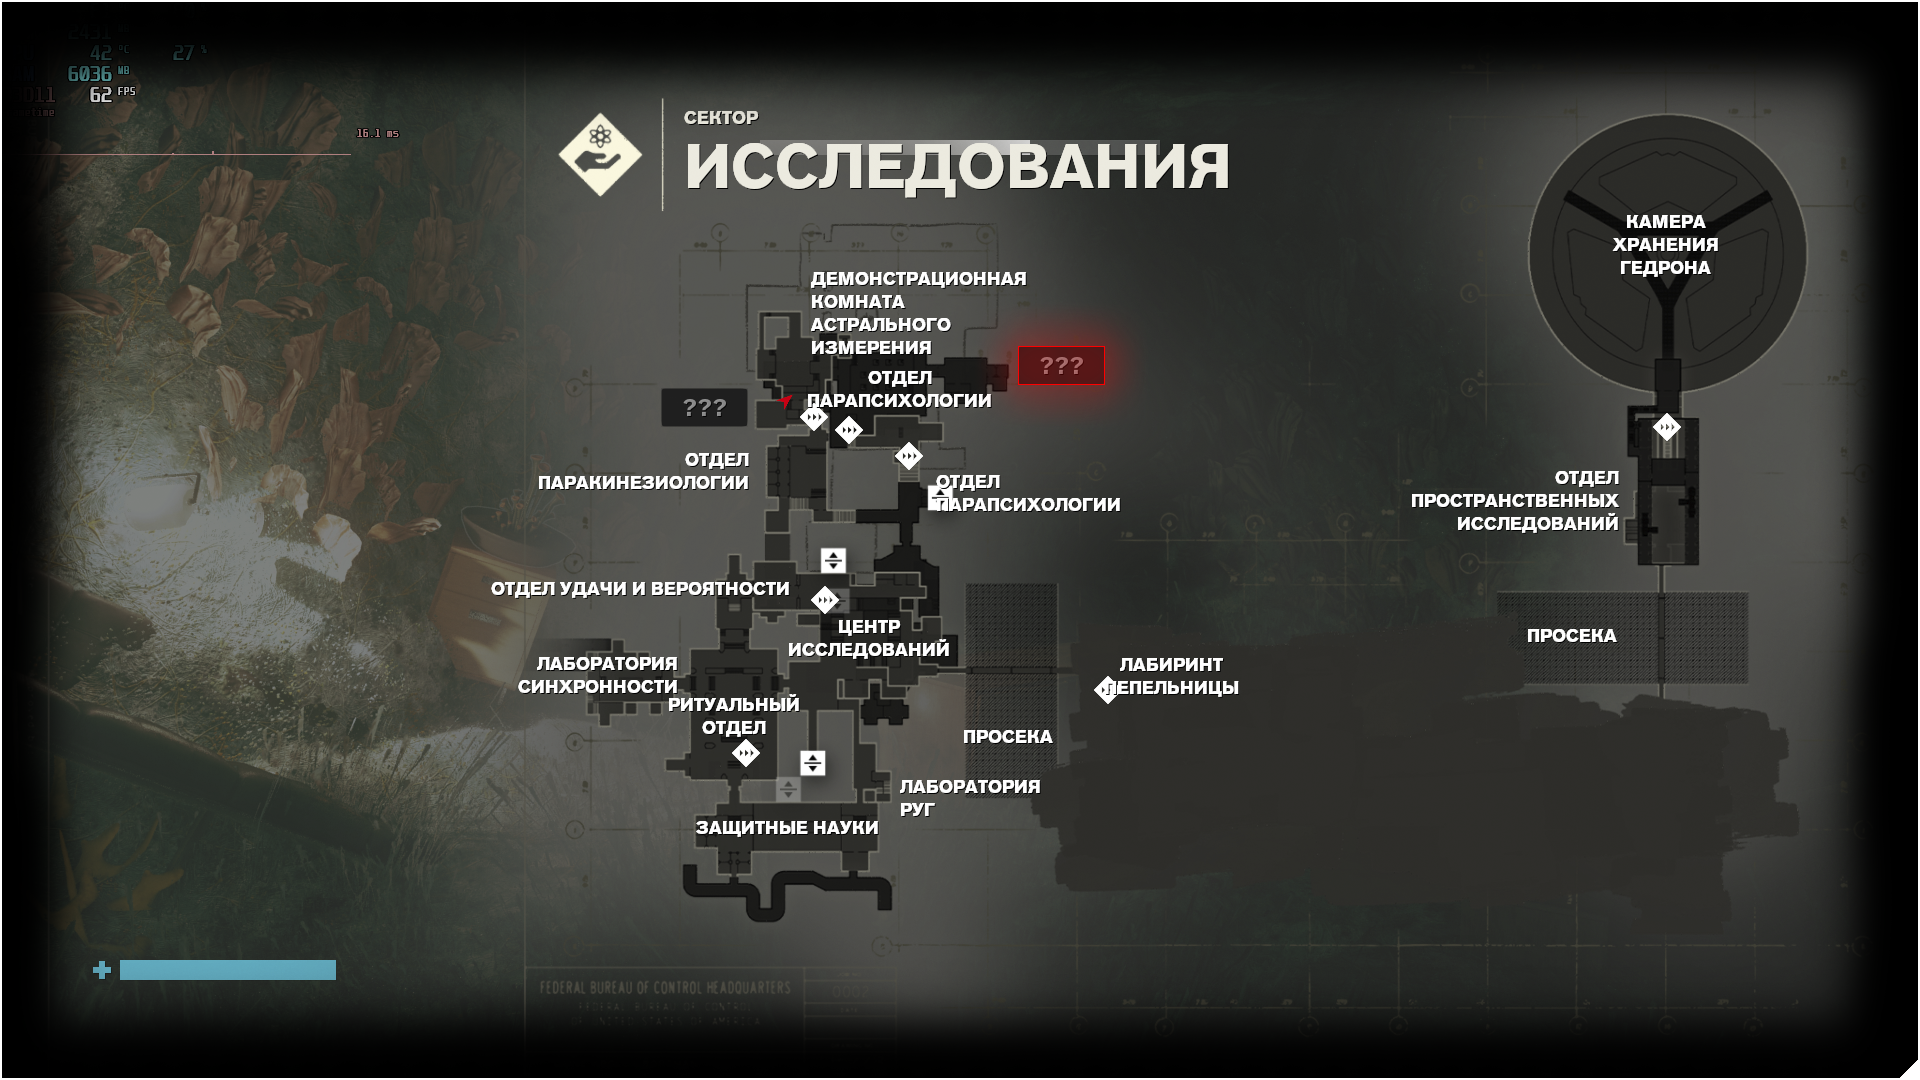
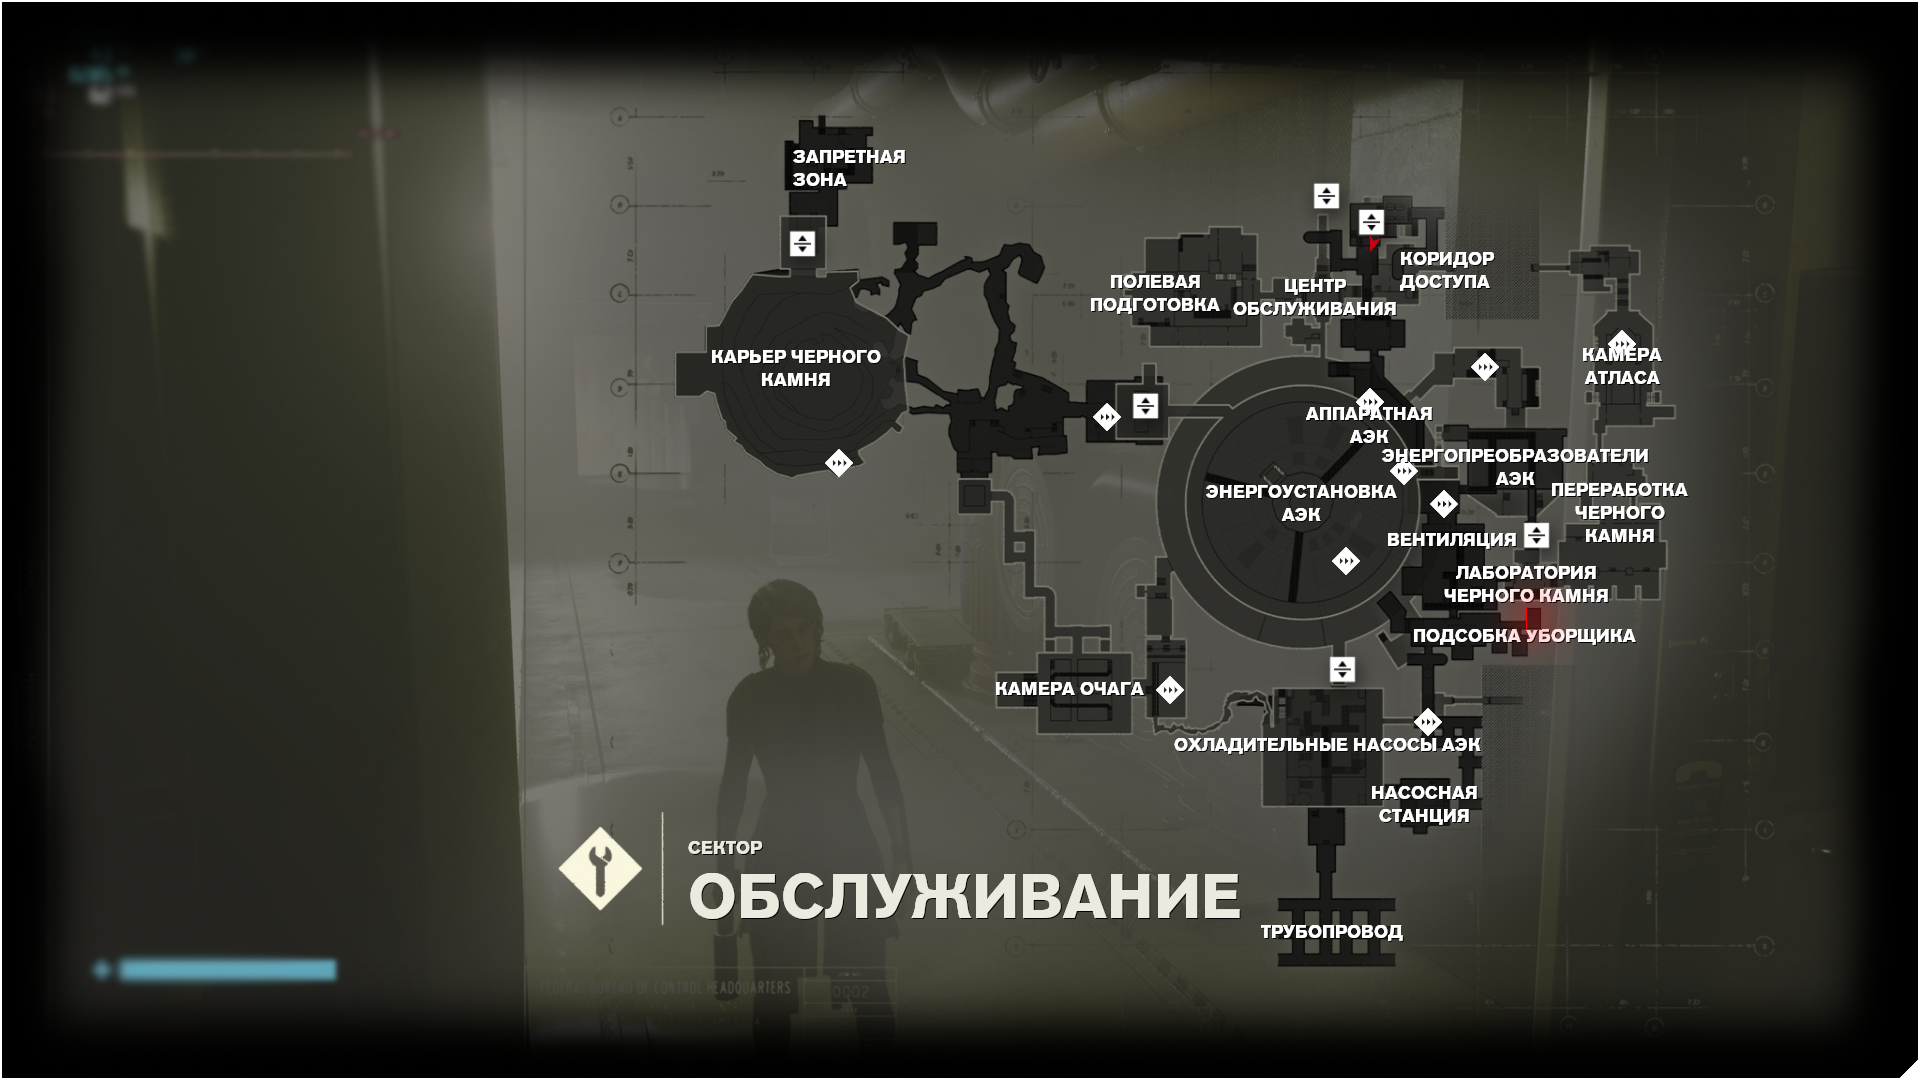
For completing all side missions of Ahti, You will get a cleaner’s costume. These quests can be obtained in the Janitor’s Office, in the Maintenance sector. A side mission is given by Phillip. You can find him in the research camera, on the fourth floor of the Panopticon in the Containment sector. The research camera is located nearby the control point, which is at top. Quest: “Fridge Duty”. The purpose of the mission: Defeat Former. Side Mission: “Self-Reflection”. To activate this mission, a level 6 clearance is required. The quest is activated in the synchronicity lab, Research sector. Find a mirror in the lab.
Opening a research camera with a mirror:
White – open the shutters;
Black – close the shutters;
After the research camera with the mirror opens, go through the looking glass. Go upstairs and check all the dummy cells. The third time the Boss will appear. After defeating the Boss, go back to the mirror and exit the looking glass. After completing the quest, the Asynchronous Suit will hang on one of the mannequins in the cell from which the Boss attacked. A side quest is given by Dr. Underhill – “Old Growth”. Mission objective: go down to the basement of the research sector and destroy the Mold. Dr.Underhill is in an underground laboratory in the research sector. You can get to the underground laboratory through the Central hall (left screenshot). First, you will need to collect the ingredients that you need to pass to the boss. The screenshot on the right shows these ingredients. Circle – the exact location, arrow-the passage to them (right screenshot).
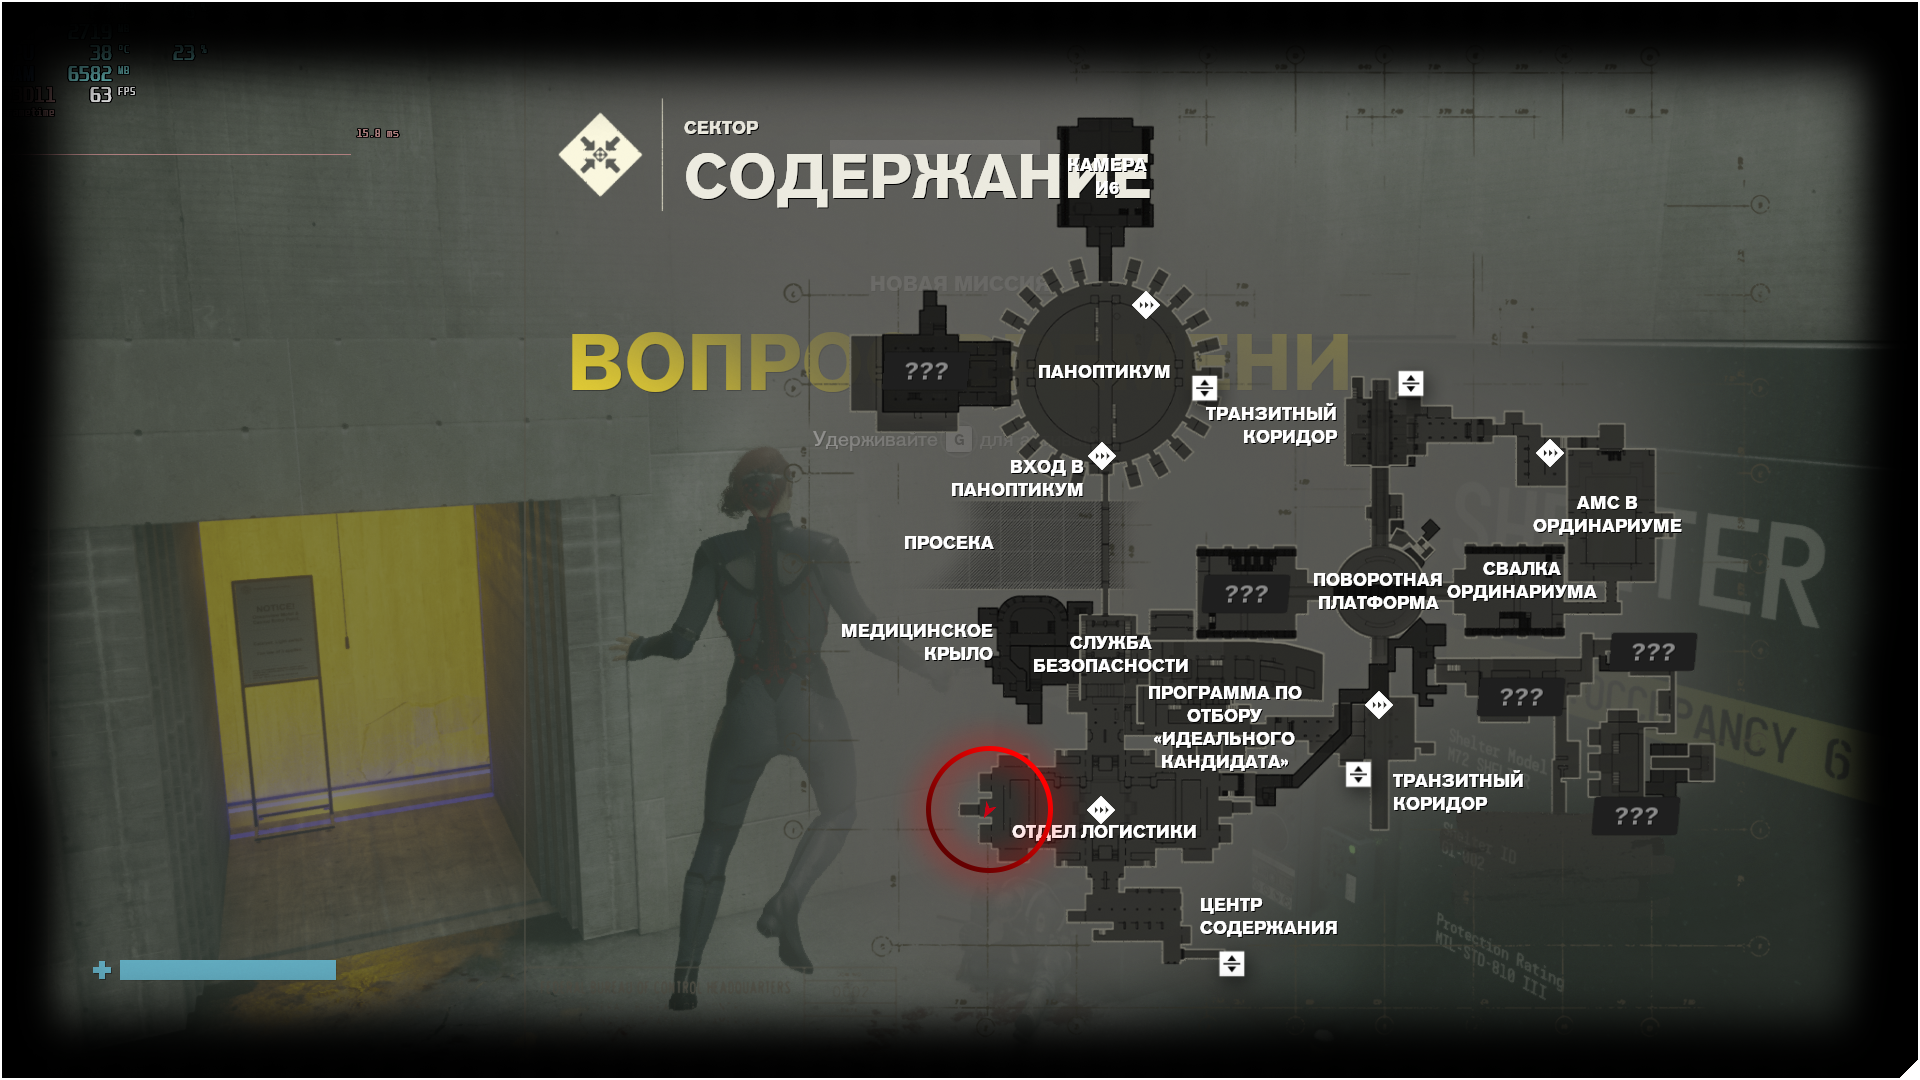
The side quest is given by Emily Pope. The quest is called “Mr. Tommasi”. Mission objective: kill an enslaved scientist in the Maintenance sector. The first quest is given by a wounded soldier in the logistics Department, Maintenance sector. His first quest is called “A Matter of time”. The second “The Enemy Within” quest is activated automatically after the first one is completed. Mission objective: Defeat the boss Anchor. You get 3 skill-points after complete it. Board Countermeasures are mini-challenges that are rewarded for completing. These challenges are taken at the control points. In total, you can take 3 challenges. You can cancel challenge at any time and then a new one will appear. The essence of challenges is to kill Hiss in a certain location with certain conditions. For example, kill an Hiss-sniper in the Research sector with a head shot, etc. Bureau Alerts – a completely random event in the game. The goal of the event: kill a group of Hiss or protect allies. All this takes 20 minutes.
Character:
・Abilities
Side quest “A Captive Audience”. It’s taken in the Hypnosis Lab, Research sector. Location of the quest on screenshot. Can be started only after meeting the Marshal. Side mission “A Merry Chase”. The quest must begin in the dining room, Maintenance sector. The screenshot shows the location of the side mission. You need a skill “Launch Explosives Ability”. To get an achievement, you need to grab a grenade with telekinesis and throw it at your enemies. Side quest “A Good Defense”. The quest must begin in the Field Training room, Maintenance sector. The screenshot shows the location of the side mission. You need the appropriate ability for shield. Deal damage to your enemies and then finish them off with your shield.
・Equipment
To unlock upgrade slots, you must spend at least 3 skill points. Mods are made from Sources (local currency) and consumables. Mods are created at the control point. Any mod or weapon form is created at the point of control. To create it, you need Sources (local currency) and consumable material. You can also find mods in boxes.
・Outfits
⠀⠀⠀⠀⠀⠀⠀⠀⠀⠀⠀⠀⠀⠀CANDIDATE P7
This costume can be found in a locker in the Department of the Prime Candidate Program in the Containment Wing (Containment Sector). The costume is located in the room “P7”, you will get there in the storyline in “Mission 7 – The Face of the Enemy”. To pick up a suit, go to the locker and pick up the suit. The suit can be picked up at any time. ⠀⠀⠀⠀⠀⠀⠀⠀⠀⠀⠀⠀⠀⠀GOLDEN SUIT
The puzzle is solved in the Research Sector, the “Luck and probability” Department. The 5th level of tolerance is required.
Turn on all the table lamps on the four tables in the roulette room
Transfer the clover from the computer room to the roulette room. Transplant to a flower pot by the TV
Interact with Newton balls (2) in the office with computers
Interact with the toy “white cat” on the table in the office with computers
Interact with roulette
The screenshot below shows all the objects that you need to interact with in the office with computers. ⠀⠀⠀⠀⠀⠀⠀⠀⠀⠀⠀⠀⠀⠀EXPEDITION GEAR
To get a suit, you need to complete 3 expeditions at different levels of difficulty. To activate the expedition, you need tokens. The first token is on the table, in a safe place at the control point. Subsequent tokens will need to be created for the source, earned in Board Countermeasures, Bureau Alerts, expeditions, or loot from dead enemies. The level of enemies increases with each level of the expedition. Therefore, it will not be possible to complete all 3 expeditions immediately after their discovery.
Tokens are used in the jukebox, the red arrow on the screenshot. Red circle – the first free token. Access to the expeditions is opened after receiving the levitation ability, i.e. after completing the sixth story mission. ⠀⠀⠀⠀⠀⠀⠀⠀⠀⠀⠀⠀EXTRADIMENSIONAL SUIT
Complete all arcade games. To unlock SHUM2 you need to complete the storyline and complete all side quests to kill bosses.
Shum: Crowd Control | Crowd Control (Challenge) | Deadline | Deadline (Challenge)
Shum 2: Former | The Anchor | Mold-1 | esseJ | Feedback Loop | Ashtray Maze
You can find an arcade machine in the location where you first met Hartman. You will get 2 more suits after completing all the side quests Ahti and after completing the side mission “Self-Reflection”. You will get the remaining 2 suits after completing the storyline – Director’s suit and the Secretary’s suit.
Collectible:
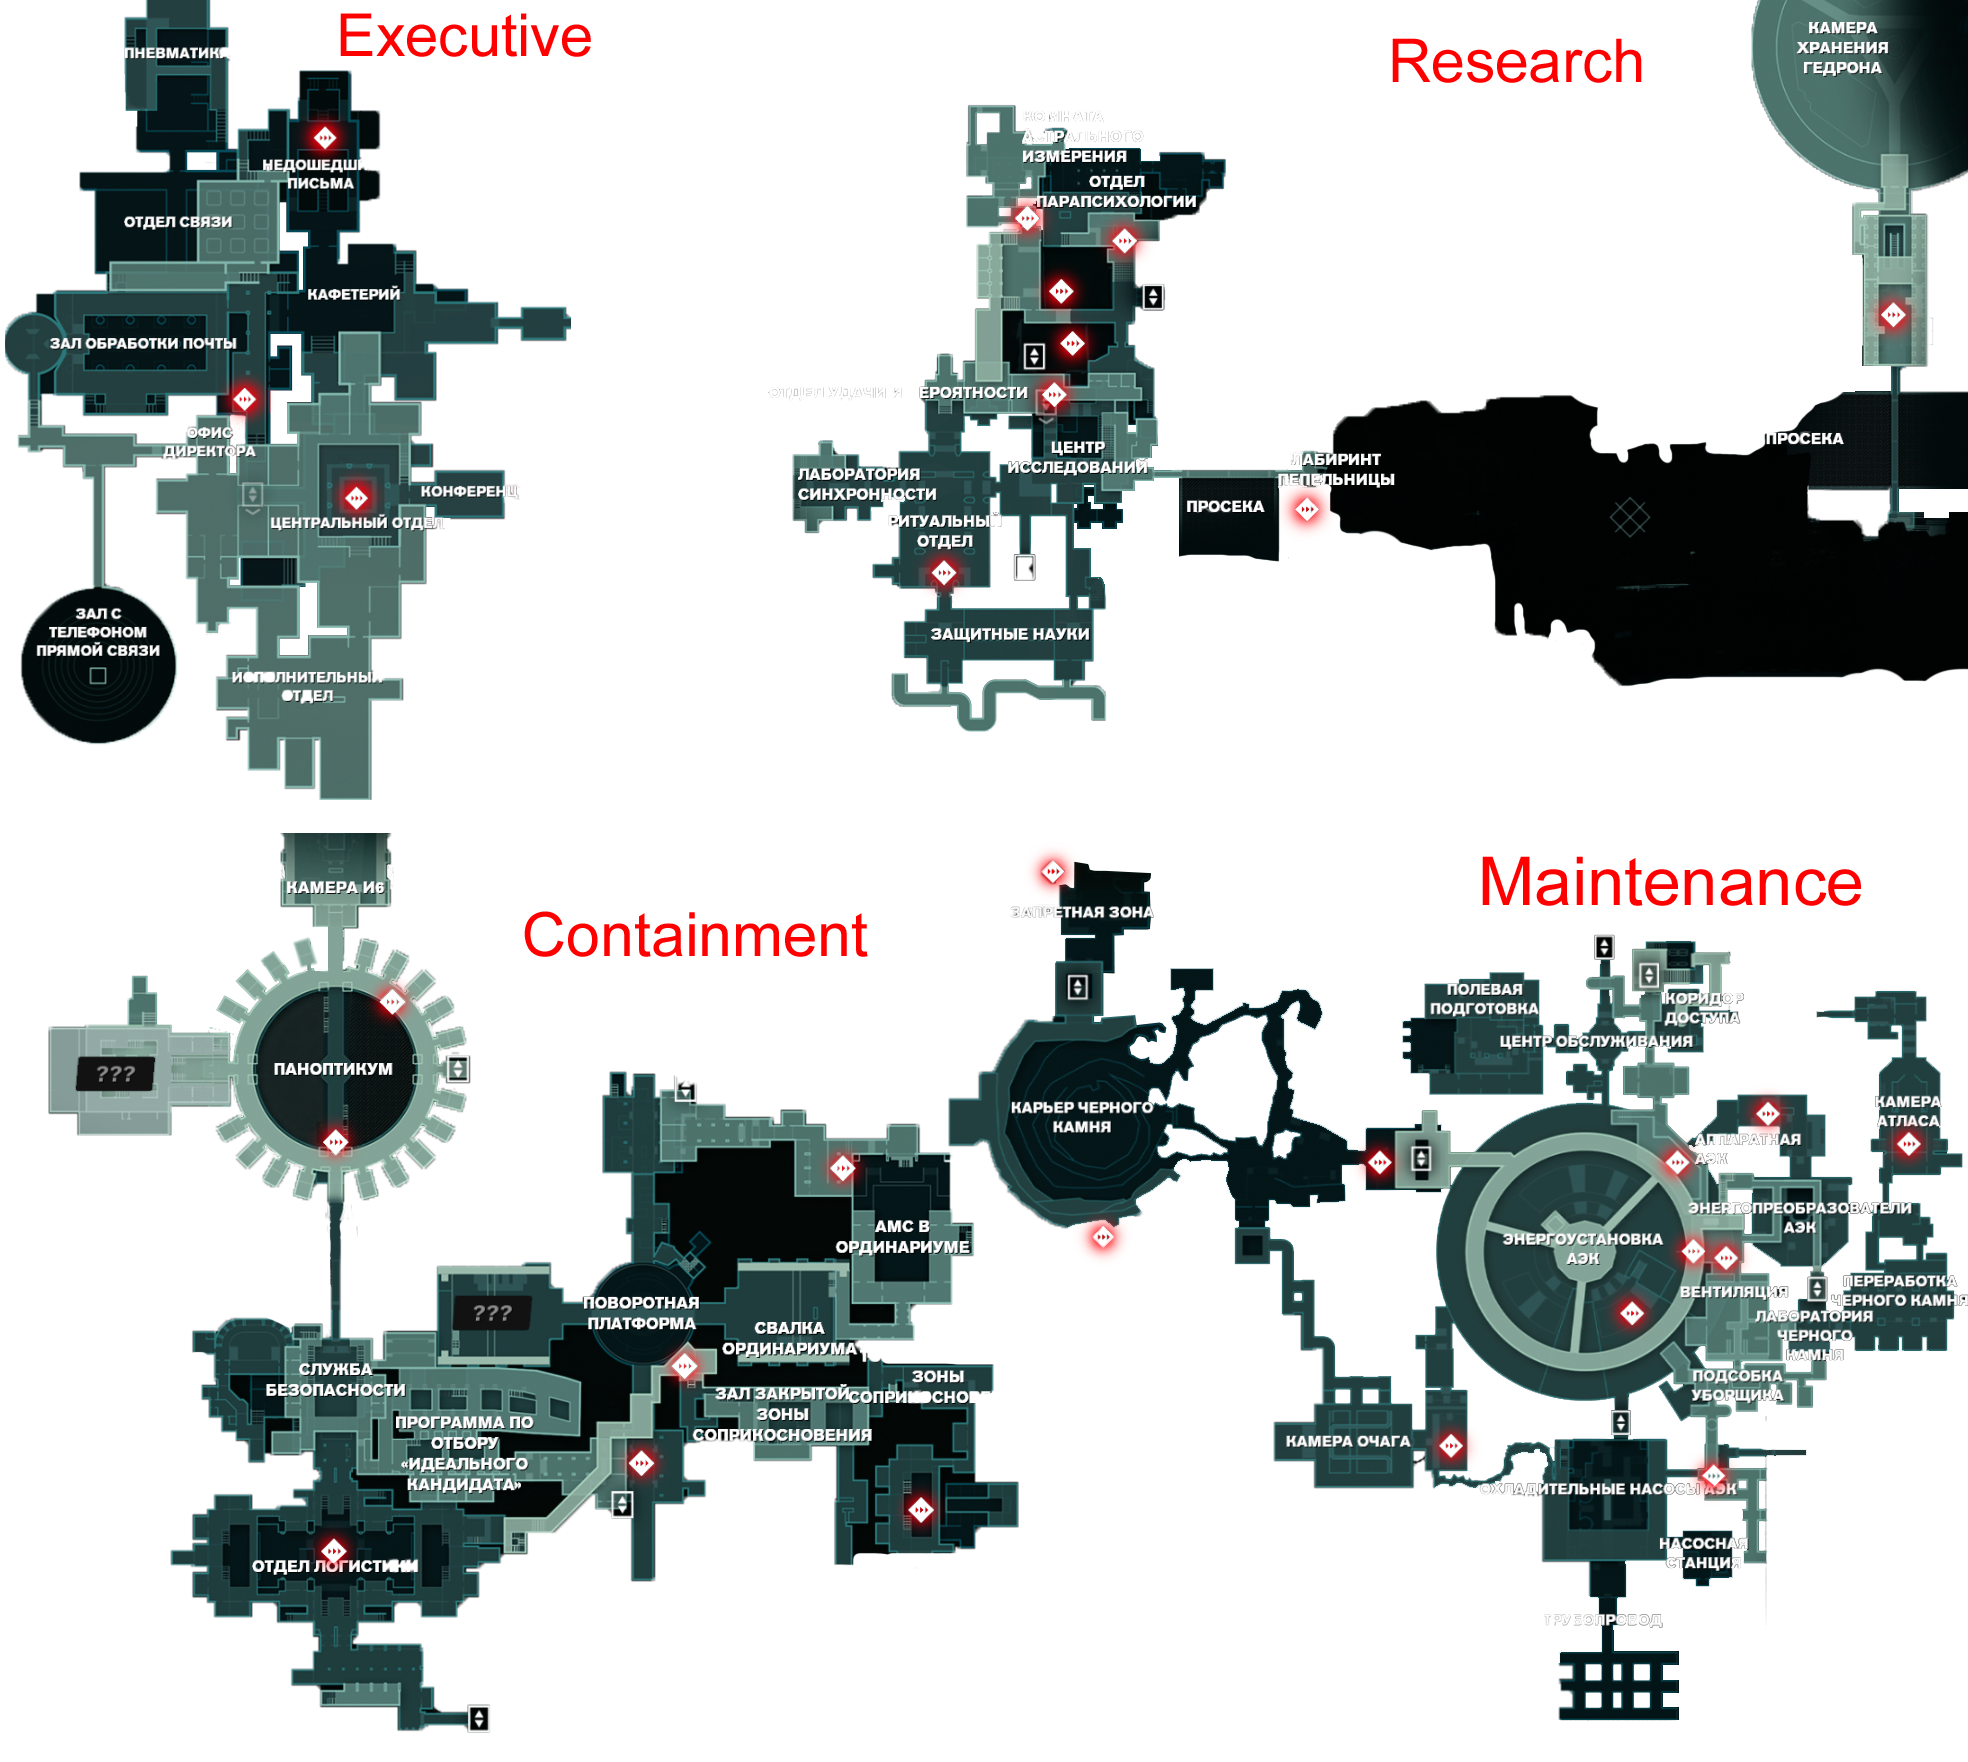
There are a total of 29 control points in the game (not counting DLS, control points from DLS do not need for achievement). Most locations will be closed, so you need to complete story and side missions to unlock them. The screenshots show all 29 control points in all sectors. 3 control points in the Executive sector. 11 control points in the Maintenance sector. 7 control points in the Containment sector. 8 control points in the Research sector.
For completing of the story-line, you will already have half collected. The second half will not be difficult to collect. The game has more collectible items than required. In the process of getting this achievement, you will also get intermediate achievements: “Strange collection” and “Record Keeper”.
・Hidden Locations
Amount of skill points spent affects the number of slots for weapons and character slots. In the process of obtaining this achievement, you will also receive the “Career Development” achievement.
3 spent skill points – Additional slot for weapon modification (required for another achievement).
15 spent skill points – an Additional slot for character modification (required for another achievement).
30 spent skill points – an Additional slot for character modification (required for another achievement).
Skill points are given for completing side missions and finding hidden loactions. For finding a gold suit give an additional 2 points.
The Foundation DLC:
Foundation (story quest);
The Nail (story quest);
Jesse Faden starring in “Swift Platform” (mission is activated in the department “Access to Transit” (on the map with access to secret places, the entrance to the department “Access to Transit” on marker #6));
The Pyramid (story quest);
Found Footage (in the Chasm area, turn on the generator. Near the switched-on generator, the passage is blocked by crystals. Shoot these crystals and jump into the pit. Side mission is activated automatically);
Pope’s Collection (mission will start after you find at least one ID card).
・Hidden Locations
For finding hidden locations give skill points. If after finding all hidden locations you were not given achievements, then so it should be. The remaining 3 hidden locations you will find by completing the achievement “One of Us”. Hidden locations are described in the section “One of Us”, № 2, 7, and 8.
In a department with offices. There are two secret rooms in this location. One is shown in the screenshot below. The second room in this location is described in the achievement “One of us”.
From the checkpoint “crossroads” go down the ledges in the mountain. There will be a secret passage boarded up. Break these boards.
Behind the Elevator in the warehouse. Sixth floor. Break the wall.
the Left arrow points to hidden location №6. Right to the hidden location №5, go through this door and start the Elevator. Quickly jump off the Elevator, there is a hidden location in the Elevator shaft.
Jump up in the room from the previous screenshot. Go through the double doors and you will find yourself in a room with an Elevator. Call and get in the Elevator.
Control point “Astral Tower of PW”. The white glow on the screenshot is a control point. Jessie’s location is the secret place itself.
・Pope’s Collection
A side quest that must be completed to collect all achievements (need for “One of us”). Completing this side quest will give you access to the underground complex at the Warehouse (required to achieve “One of us”). To activate the quest, you need to collect at least 1 of 5 ID-card. After collecting all 5 cards, you will have access to the 0th floor of the elevator in the Warehouse. All cards are located in the same location as the warehouse.
The first card in the yellow house. The outermost house. The second card is on the table in the lonely house. To the left of the warehouse entrance. The third card is on the iron structure on the other side of the warehouse entrance. You can get to the card by going around the warehouse to the left (on the left side of the Elevator exit). The next card is in the elevator shaft. You can get there by jumping on the sliding crystals in the mountain. The last ID-card is located at the emergency entrance to the warehouse. After collecting all 5 ID-cards, you need to place them in the correct order. In the location where the last card was located.
・”One of Us”
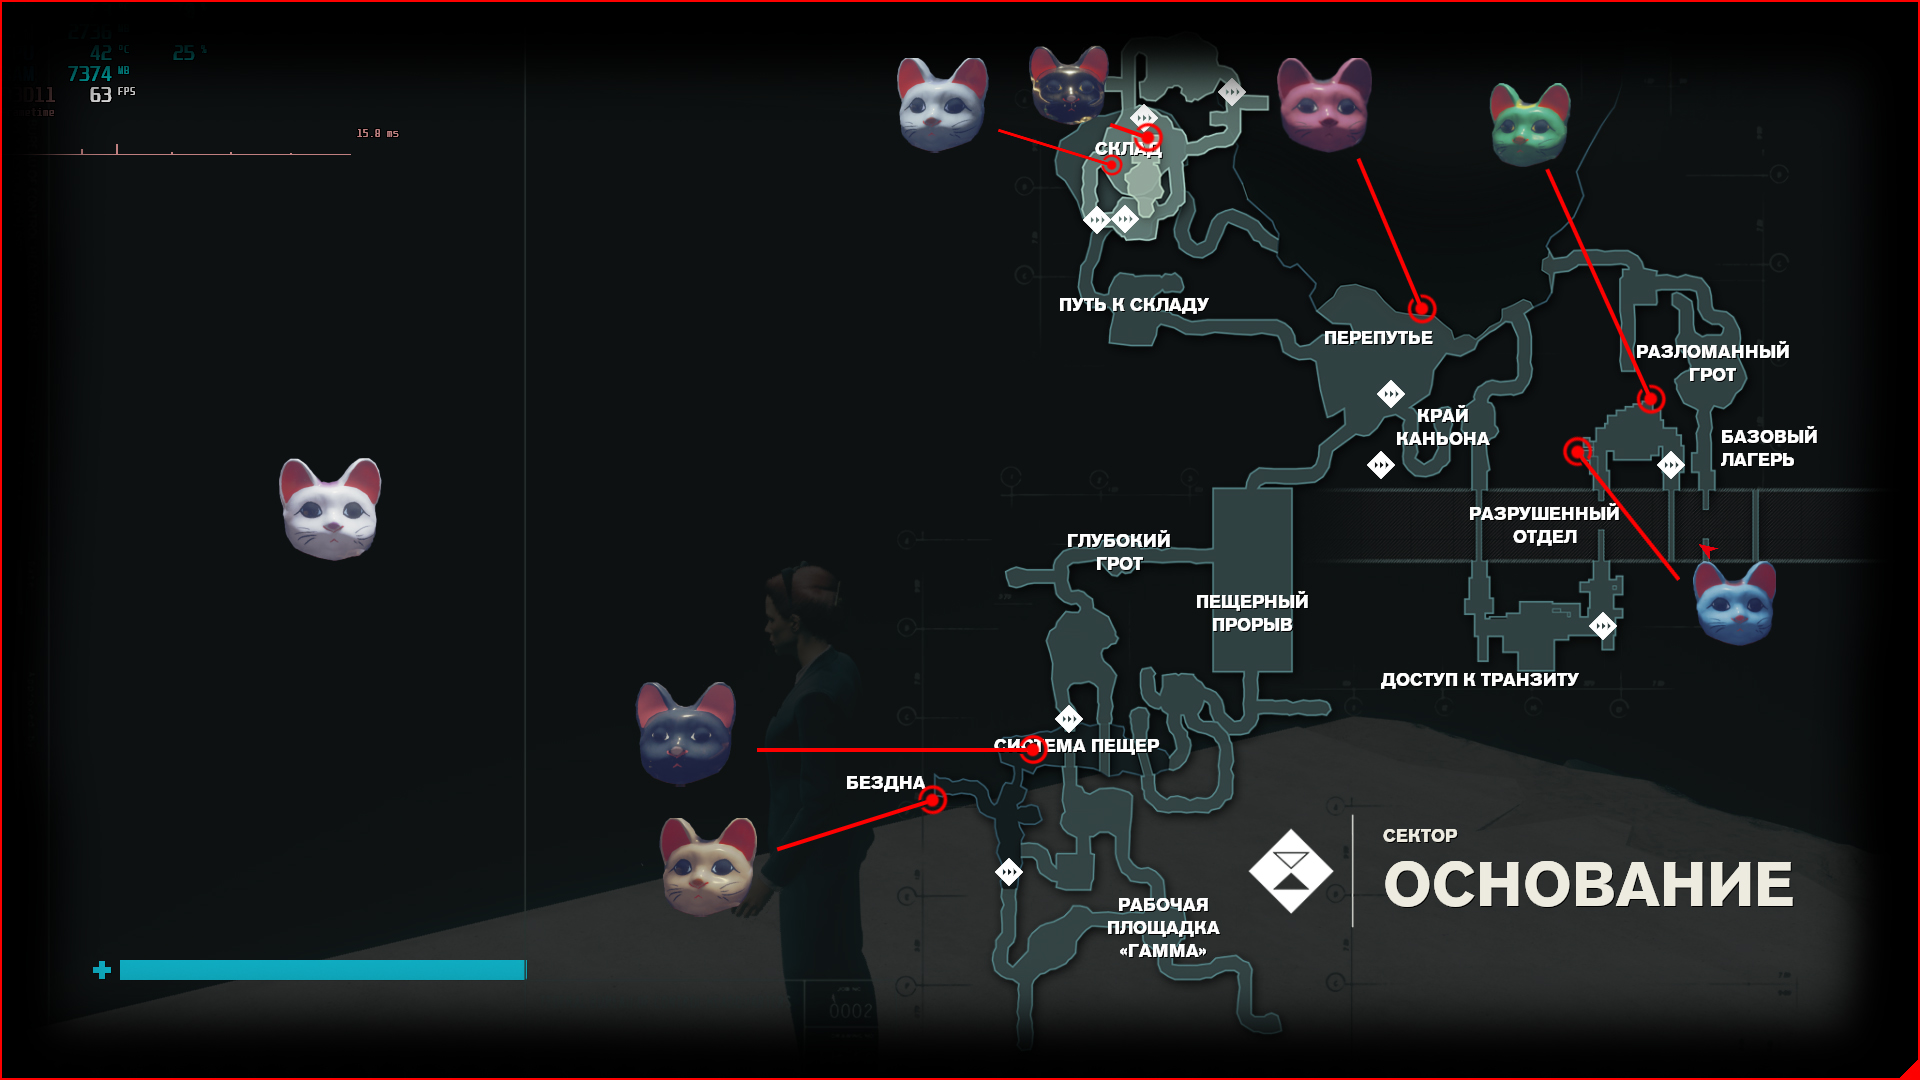
To get an achievement, you need to find all 8 statuettes of Maneki-nekos. You can view the collected statuettes in the “Firebreak”, where you can also pick up the award (a marker with Jesse’s location on the map, screenshot below). At the muzzle of a blue cat for collecting all 8 figurines, a secret room will open with an accessory for Jessie – cat ears. This accessory is compatible with all suits. #1. Light red cat. Location “Chasm”. Take a lantern with you at the entrance and go in the door (You left it in the side mission in this location). Jump over the Chasm with crystals, immediately after that you will go to a large cave. By the passage through which you came, there is a small cave filled with stones. In this cave you will find a statuette. #2. Black cat. First, collect all the cubes. 4 cubes at the top, 1 at the entrance to this location (on the side of the location with the “Chasm”). Arrange the cubes as shown in the screenshot below. To throw a cube with telekinesis, just change the mod of the gun, then Jesse will put the cube and not throw it with force. The secret room is located in one of the caves in the “Cave system” location, in the place Where you found the 4 cubes at the top. #3. The cat is white with pink spots. Move from the control point to the “Astral tower PW”. In front of you will be the platform as in the screenshot below. You need to get the cube from under the crystals on the floor and throw it into the cell. The cube and cell are located under the crystals. #4. White cat. After completing the “Pope’s Collection” ques, the warehouse will open access to the 0th floor of the elevator. Go down there and turn the valve. Then go up to the 1st floor and enter one of the yellow houses (the smallest). In this house, turn on the shower and then the statuette will appear. #5. The Golden cat. At the warehouse, go up to the 5th floor. You need to destroy 4 red cubes while taking the Elevator. The screenshot below shows the order in which the cubes appear. The numbering is relative to the Elevator control panel. You need to shoot down all 4 cubes at once. Cubes only appear between the 5th and 6th floor. Ride from the 5th to the 6th floor until you destroy all the cubes. To destroy the cubes, stand in the middle and hit the melee in time. If You did everything correctly, then on the 6th floor, right at the entrance to the Elevator will be a statuette of a cat. #6. The pink cat. There are ledges in the wall, jump on them to get to the statuette. #7. Cat green color and a hidden place. Location with offices, break the wall with the picture and there will be a hidden locations behind it. In this hidden locations, break another wall, the wall on the right. #8. Move to a point of control in the “Astral Collision” (screenshot left). And throw the cube in the bathroom stall. Fly to the booth to get to the hidden location. Go back to the restroom, in the department with offices. There will be a Golden cube, throw it into the cell and a cat statuette will appear. Going to the bathroom you will get the achievement “Astral Plumbing”.
Altered World Events DLC:
It is necessary to win in the arcade. You can find an arcade machine in the location where you first met Hartman.
・Altered Vending Machine
This is a cumulative achievement. You must destroy at least 4 vending machines. Shoot vending machine, if it turns red then destroy it. If the light inside the vending machine goes out, go to another one. After destroying all vending machines, go to the main menu and loading again to make vending machines respawn again. Repeat the operation until you get an achievement. You may get lucky and get several vending machines at a time. The same vending machine can attack multiple times.
・Hidden Locations
In all secret places, you need to break down the wall. Somewhere in the screenshot they are broken, and somewhere not.
Hidden location #5 – you need to break another wall in the room and get to the clock, then the secret place found.
![[Control] All achievements+DLC for Control Ultimate Edition](https://steamsolo.com/wp-content/uploads/2021/08/control-all-achievements-dlc-control-ultimate-edition.jpg)


 In a department with offices. There are two secret rooms in this location. One is shown in the screenshot below. The second room in this location is described in the achievement “One of us”.