
Overview
A comprehensive guide to the berserker perk, from basic fundamentals to advanced strategies/tactics such as melee locking.
Introduction
In this guide, you will learn how to effectively use the best perk in the game, pretty much. I’ll be going over basic fundamentals required to play a berserker well in both solo and cooperative environments, and the coverage of advanced strategies and tactics that will lead you to glory. Being level 6, all footage seen here will be done on hell on earth difficulty. Although this guide’s focus is solo, the skills learned here may be applied just as well to any team situation.
Killing Floor is a game of awareness, and that is especially true with the berserker, since you’re in melee range most of the time. Never let yourself get surrounded on all sides. If you’re roaming the map (as opposed to a camping strategy), make sure all or most of the zeds are coming at you from one direction only.
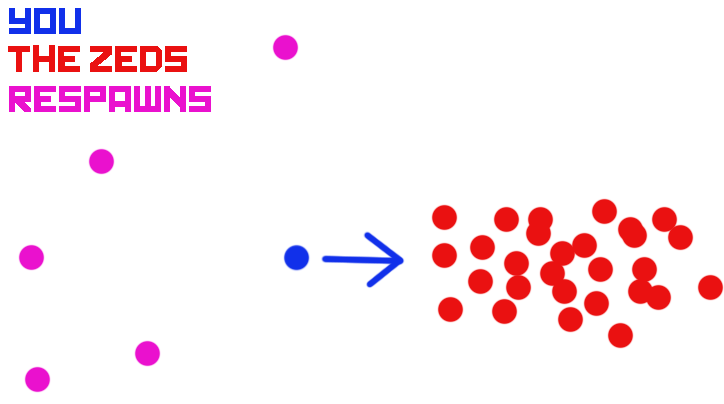
For those of you who may be new, the game by default, unless changed in sandbox mode, can only spawn 32 zeds on the map at one time. If you remember anything here, etch that into memory, because hardly anyone ever mentions it. This is important, because if there are more than 32 zeds remaining, the game will respawn the ones you kill. Behind you, most likely, or anywhere else beyond your line of sight.
When you start going higher in waves, you have to worry about where you are when you’re doing your thing, so that you don’t get an unlucky spawn around the corner as you’re kiting around the map.
Always remember:
- Constantly be aware of where the main number of zeds are coming from.
- Always be expecting an attack from behind or on the sides.
- Check your surroundings often, and pay attention to what you hear.
- Memorize what each zed sounds like.
Try to get to the point where you rarely get hit in melee anymore. This awareness will aid you greatly regarding Killing Floor in general, not just with the berserker.
Why Berserker?
- Not dependent on ammunition. Very nice when your team fails and you’re stuck cleaning house
- Resistant to damage (40% @ level 6), pretty much immune to bloat bile
- We run faster than everyone else. 30% speed increase @ level 6, and…
- We are the only perk that cannot be grabbed by clots. Meaning that even if you find yourself cornered, you can juke your way past the horde to freedom without being grabbed, depending on the map.
- We can solo scrakes and fleshpounds without taking damage (assuming your team leaves you alone).
- The best of us can solo the patriarch (or keep him melee-locked in place for our teams to destroy). More on that later.
Berserker is undoubtedly hardest perk to pick up, but it can be somewhat forgiving with its innate damage resistance. Those who take the time to master it will find it the most rewarding.
Weapons Overview
The following section will cover only the standard weapons that come with the game by default, so no DLC weapons will be analyzed (though the buzzsaw bow will be mentioned).
Machete: A stronger version of the knife. Great for early game, but not much use later. Level 5 bersekers spawn with one.
Katana: It’s fast and lightweight. Its speed makes it a good choice for dealing with trash. Spam-clicking a scrake with one of these can repeatedly interrupt its attack to the point where it can never harm you, granted your team doesn’t shoot it. If the scrake takes any damage from outside your blade, it can cause the scrake to get some attacks through. This only works on hard and easier difficulties. To actually stun a scrake (head drooping animation) on suicidal and hell on earth, you must use an axe or claymore.
Fire Axe: Slower than the katana, but more powerful, and cheaper. A fire axe, like the claymore, is the only way to stun a scrake on suicidal and hell on earth. This is my weapon of choice, despite it being slow. At level 6, you’ll spawn with this, but even if you don’t, it’s not as expensive as your other options, so you can get it much earlier on.
Claymore: A somewhat better fire axe, with longer reach. More expensive, but possibly worth upgrading your fire axe for. It’s one weight block heavier than the fire axe, which means you can’t carry a crossbow with it (why I prefer the axe). You can, however, carry the buzzsaw bow (DLC).
Lever Action Rifle (LAR): Useful to have for quickly dealing with crawlers, which will kill them instantly, even on 6-man HoE, with a body shot. The gun itself and ammo are very cheap.
Crossbow: Extremely nice to have for taking out sirens and husks from afar, and quickly, if you find yourself on a more open map like Farm or Mountain Pass. The buzzsaw bow (DLC) is a good alternative to the crossbow, however I find the scope on the crossbow makes for an easier time in landing those headshots (and I think the ammo might be cheaper than the buzzsaw’s, too).
Loadout
Solo
There’s little reason to keep a fire axe or claymore about, unless you want to kill faster. The main reason for a fire axe or claymore is so you can stun the scrake, but that’s not a problem on these difficulties, so pick up a katana first chance you get, accompanied by a LAR or crossbow, depending on your preference. If you find yourself having trouble with crawlers, pack a LAR. If husks and sirens are giving you grief choose the crossbow.
Team
Husks and sirens shouldn’t be a problem in a team situation (unless that team is dead), so I recommend a katana/LAR. Axe is optional.
Solo
If I’m playing solo, then I’ll pack an axe and crossbow, for dealing with husks and sirens quickly from afar.
Team
My go-to choices for team games is the axe/katana. Axe is obviously there to deal with the scrake. I use the katana primarily for its speed. It can be the difference between life and death should you find the need to slash your way past a large unavoidable group. Optionally I’ll carry a LAR should I require help with crawlers, but not typically so.
Zeds & Kill Priority
Clot: Weak damage, and grabs to hold you in place. Except, we can’t be grabbed and held in place, so they’re pretty worthless.
Crawler: Killing crawlers in melee is so easy, it can be done with a knife as a non-zerker. It’s hilarious how many guides out there overthink their approach here. SImply sidestep their attack, and hit them in their downtime.
Behold:
Gorefast: They’re fast, and will put quite a dent in your HP if you let them. Getting ambushed by a pack of these (newly spawned, for example) can mean death.
Stalker: Easily seen, despite their best efforts to cloak, and are heard just as easily. Slow attack speed, and do weak damage overall.
Bloat: Their melee attack is more of a threat to a berserker than its bile, which does next to no damage at all (at level 6, anyway). Like the clot, it’s pretty useless against a zerker.
Husk: The aimbot fireballing bastards that like to position themselves behind their zed brethren, making getting to them a chore. Line of sight is your friend.
Siren: About as annoying as the husk, but you can outrange their attacks, unlike the husk’s. Their scream does no damage to your armor. Line of sight is your friend. Or a crossbow.
User Sevmonster has noted the following regarding their screams: “you can interrupt siren screams by triggering another scream. sirens start another scream 0.5s after taking any damage, so shoot them repeatedly with a half second delay and they will be stuck in the scream windup until they die. you can use this when kiting to keep them from killing you”
Scrake: Taking care of these dudes is partly why we’re loved the way we are. Easy enough with the katana (easy/normal/hard), but it’s gonna take some practice to get your technique down when stunning with the axe or claymore (suicidal/hell on earth). The scrake’s head hitbox has always been atrociously bad, so feel free to hop in a test map with god mode enabled.
Fleshpound: Ideally on a team, berserkers should probably not be the ones to deal with fleshpounds, due to how long it can take, but they can if needed. When you’re ready to take one down, make sure you’re clear to do so and not surrounded by its chaps. The idea is to hit the fleshpound and back away out of its reach for three or so seconds, then repeat until it dies.
There are two triggers to invoke the wrath of the Fleshpound. The first is based on time, when a fleshpound fails to reach attacking range, and the player(s) stay within its line of sight for what seems like 10 to 15 seconds. The second is when the fleshpound takes too much damage within the scope of 3 to 5 seconds. According to the wiki, the approximate value is 320.
Continue kiting the beast around with this strategy until dead, always aiming for the head when you strike. Visit your nearest test map to practice.
The video below showcases the killing of a fleshpound without raging it, and then the two conditions of which a fleshpound will rage (about 15 seconds of chasing you, and taking too much damage within 3 or so seconds).
Patriarch: See Melee Locking.
- Gorefasts: Extremely fast (on HoE, at least), they do a lot of damage, and are often in your way when trying to dispatch other enemies.
- Stalkers, Crawlers: Are quick and often ahead of the pack; in your face.
- Husks, Sirens: If you can find an opportunity to dispatch them quickly, do so. Especially if you can catch them alone.
- Fleshpounds: Even when they aren’t enraged, they move quicker than most zeds, if not all. A lot of the time a fleshpound will naturally move to the front of the horde, leaving it open for attack. Be wary of husks shooting at you, however. When they take damage and start burning, that can add up with your own damage, leading to one very upset guy. Feel free to begin your attack if you aren’t in danger of being attacked by gorefasts, crawlers, husks, or sirens.
- Clots, Bloats, Scrakes: Slow moving targets that are pretty safe to ignore. If you need to get by a scrake and you know that they’ll hit you in the process, stun them with your axe.
Group Play
Commonly, the berserker is thought to be more of a solo artist scumbag than anything else. Not surprisingly so, as a lot of zerkers play this way, abandoning the team to go off and do their own thing. Nonetheless, a good berserker will prove themselves a greatly valued member of the team, and the naysayers shall be humbled by your godly prowess, and the peasants shall thenceforth go from your presence and be enlightened.
Playing on a team comes down to ultimately two strategies: camping or roaming.
When camping with the rest of your team, you’re gonna want to stay near them and keep the zeds from hitting them, if they get too close. This might get boring, but your primary goal here is to do that, and stun the scrakes, kite fleshpounds when able (depending on the map; Bio Labs would be much harder), and possibly save the day should your team start failing.
A competent sharpshooter can take out a scrake with two shots from your crossbow, however, on higher Hell on Earth waves, crossbow ammunition is precious indeed. And if your sharpshooter or support dies, berserker doesn’t require any ammo to take it down in their stead.
Fleshpounds can be taken down by well placed pipebombs and concentrated fire, however if there’s two or more, berserker is able to kite one around safely (depending on the map), without it raging, until it dies. Maps or areas without a lot of room will be much harder, of course, but it can be done.
Truth be told, there are better choices than a berserker on a camping team, but I like to play berserker if I feel my team is too incompetent to hole up somewhere so I have the freedom to solo the rest of the wave should they fail in their duties.
Ah, yes. Where the berserker truly shines. No roaming adventure is complete without at least one zerker. There are two types of roaming: alone, or with your team.
When roaming alone, this assumes that either:
A: Your team has died, leaving you in charge of saving the day, or that you’re assuming what I like to call a “filtering” tactic while the rest of your crew holes up elsewhere, or…
B: Your team is with you, running a preferred route around the map.
In the event that you’re roaming alone and your team assumes a camping strategy, you should be filtering. The idea behind filtering is to greatly reduce the stress on your team, who take a camping strategy. This involves the berserker placed somewhere other than where the team is, running around kiting slow-moving zeds such as clots, bloats and scrakes.
If done properly, this will greatly reduce the stress on your team, as they will have significantly less zeds to worry about. For example, if you keep 16 clots/bloats alive, chasing after you, your team will only need to worry about the other 16 that are able to spawn. This is really only useful if your team is somewhat incompetent and/or in need of relieving. You LoL-♥♥♥♥♥ out there may liken it to jungling, if it pleases you.
If (when?) your team dies, this is pretty self explanatory. Assuming you know your map well enough, pick a safe route to kite the zeds around until you wipe them all out. A good zerker will always have an emergency route to run and save the day should the rest of your team fall, and that is something typically only a berserker can do because their damage does not thrive on ammo. A medic could potentially do this if they were packing a melee weapon, but even then, they cannot stun scrakes, and clots could still grab them and ruin their day.
Melee Locking
Melee locking is the art of keeping the patriarch in place so he doesn’t move while you and/or your team bring down his HP. It’s worth noting this can be done as a non-berserker, but results will be far less reliable without the medic & berserker’s speed.
The basic idea is to:
1. Be as close to the patriarch as possible when he begins his attack
2. Back off out of his reach before his attack lands
3. Get up next to him again before his attack ends, and repeat
Below is an example of melee locking in action, used to solo the Patriarch on Hell on Earth.
Pulling this off can vary with latency. It’s not too difficult to understand, but it’s seldom discussed (if at all), so hardly anyone knows about it, or how it’s done. If you’re going to practice this, it’s imperative you visit the workshop and subscribe to a test map (which allows you to spawn the patriarch, instead of waiting until after wave 4, 7, or 10, to fight him). While practicing, press ` to enable the console and type in the following commands:
enablecheats
god
This will give you invulnerability (and prevent you from being knocked back) so you can just focus on getting your technique down.
Initiating the melee locking is far harder than keeping him locked in place. There are only really two ways to get this started:
- Run up to him, or
- Backpedal while he charges you
I prefer waiting for him to charge, and then backpedal. Sometimes he’ll hit you with his claw for reasons I do not know. I surmise this is because his charging speed is slightly randomized, and that his claw attack has a longer reach than his tentacle. Most of the time, he’ll miss, but sometimes his claw will send you flying.
Running up to him can work (even when he’s charging) but is less reliable than the former option, because sometimes he will continue to move as he’s attacking you. You’ll have to spend some time an experiment to determine what works best for you.
Whichever way you decide, move as close to his body as possible after his attack has missed you. This next part will require a lot of practice to get your timing down, and to memorize when his attacks begin and end.
To begin the melee locking process, you must be as close to him as possible (touching him) when he begins his attack. If there is any space between you, no matter how small, he will move forward while attacking, and you’re gonna have a bad time. Put your body up against his (wink), back away out of his reach so his attack misses, and then get up close to him again before his next attack begins, and there you have it: the melee lock.
If you’ve got your timing figured out, you can use this to prevent him from running off and healing. As he rises from his kneeling position, if you position yourself up next to him when he would normally start to run off, he’ll start to attack you, and then you can lock him. Sometimes he’ll get away anyway, but not usually.
If he manages to hit you, he will almost always pull this thing out. If you’re close enough to him, run up to his right side and do your best to stay behind him, moving in a counter-clockwise motion until he stops.
When he does stop, you can stay next to him to begin the lock again, or you can backpedal and wait for him to charge. The latter option is less reliable due to the way he can at times hit you with his claw swipe attack, so I recommend going for the lock immediately afterwards, since that’s more of a solid plan. Memorize the timing for when his chain-gun attack ends so you can more accurately anticipate when to dodge his melee attack.
Like the chain-gun, he’ll want to use this after he hits you (rarely, will usually pick the chain-gun) or when he’s a good distance away from you. If you happen to be right up next to him when he uses this, jump right before he fires it, and it should miss (similar to the way the husk’s fireball works). Note: it should miss; I’ve never had him hit me with one unless the rocket hits the ground or some kind of adjacent object. Actually, I’m not even sure jumping is required. I’ve never had the rocket hit me directly, but it could possibly happen.
In multiplayer is when it can start to get iffy, depending on your latency. Anything over 75 seems to screw with my game. When you’re on a team, you’ll want to announce your intentions to lock the patriarch, so your team can bring him down. During this time you should make it clear that no one should be using explosives, as this can cause him to flinch or move unexpectedly. Melee locking is a delicate process.
Additionally, you should tell them not to touch the patty until he’s locked in place, and also that they should not get close to the patriarch, as that could trigger the patty’s AoE melee attack.
- Mind your weight and HP; it affects your speed.
- Make sure there is NO SPACE between you and the patty, otherwise he will move and you’ll get hit.
- If your team aren’t doing their jobs, it’s every zerker for himself. Even if your whole team dies, you can always potentially solo him. Better that you live as long as possible rather than die needlessly trying to save a member of your team who couldn’t follow directions.
- When learning how to lock, just start out with a knife and concentrate on getting your technique down, without attacking him. When you feel comfortable enough, start attacking him.
- Ensure you always have some cover to run behind in an emergency when he switches to guns or rockets.
Closing
And there you have it. Go now, my children, with enlightened minds. Play well, and preach the gospel of the seldom-understood berserker. Do be kind and rate/share if this guide was useful to you, and don’t be afraid to comment below with any questions, concerns, or insight you might like to add.