Overview
This guide will show you how to setup your own custom binds so that with one press of a key, you can warn your team of incoming big guys, announce your current health status and more.
Introduction
This guide was created for the now disfunctional group Sykosis of which I was an owner. It was made in the hope that during the chaotic slash and gunfire battles, that the calling out of Scrakes, FPs and other in game functions be as easy (and perhaps more interesting) as a single press of a key.
While this is not an exhaustive guide, it does sufficiently cover the more basics of key binds and in a way that should be easy to understand.
NOTE: Since creating your own binds allows you to write what you like, please do keep in mind that the longer they are, the more annoying they are. Try to keep it short and simple and please don’t spam them.
Custom Text Binds
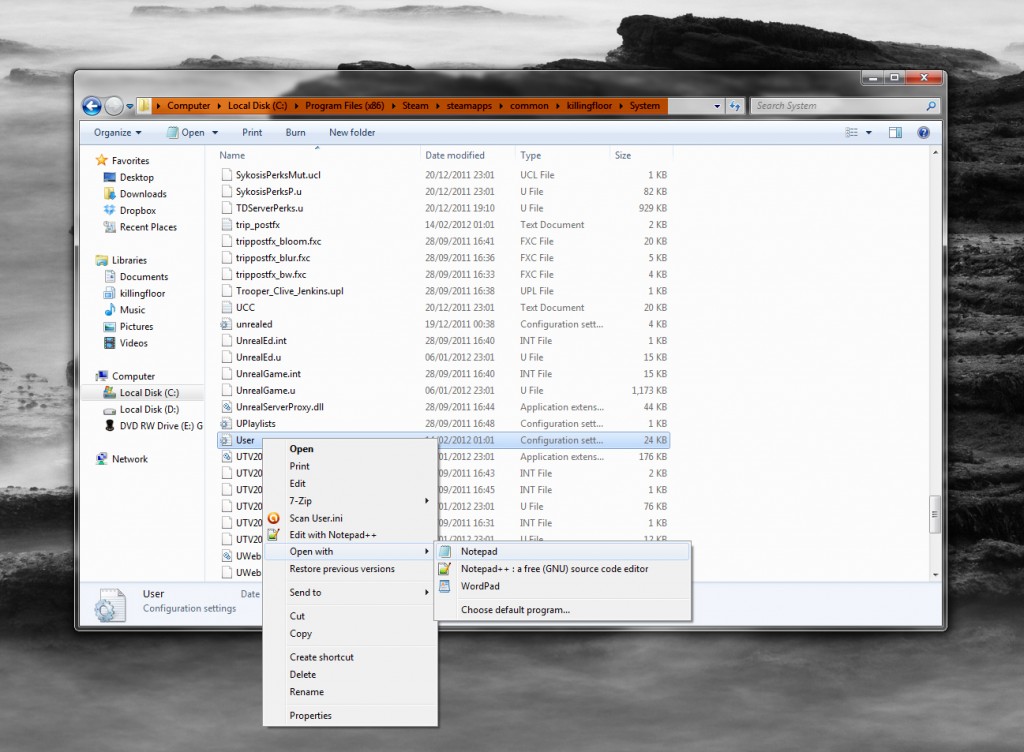
The first thing you’ll need to do is open your Killing Floor User.ini, which for Windows 7 64bit users (other Windows users, it will be located in a similar fashion) is located:
c:Program Files (x86) SteamsteamappscommonKillingFloorSystem
on Mac (someone correct me if this is not right – I’m clearly not a Mac user and had to take a guess from Mac threads):
/yourname/library/application support/killingfloor/system
on Linux show hidden file then go to
home/.killingfloor/system/user.ini
Open User.ini in Notepad (or similar), as shown in the screenshot. As I have not made any key binds myself, I can use my own User.ini as an example.
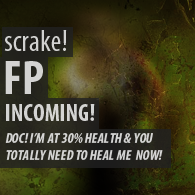
The heart of what this guide is about – the binds. You can say whatever you want to say through these key binds, but for my example, I’m going to use Scrake! and Fleshpound! and perhaps one for a bit of fun: OMG I’m dying!!!
Once you have your User.ini open, scroll down to NumLock= (or Ctrl + F to search for it). We’ll be using the NumPad for this example, but of course you can use any key you want to use. Let’s do our binds now. For whichever key you choose, after the equals (=), add say *your text* (eg say Scrake!). Make sure there is a space after “say”. If you really want it to stand out from trader messages, you could use teamsay, which will show up green rather than white (eg: teamsay Scrake!) instead, however, only the team can see this. But it’s up to you, I just prefer to use say.

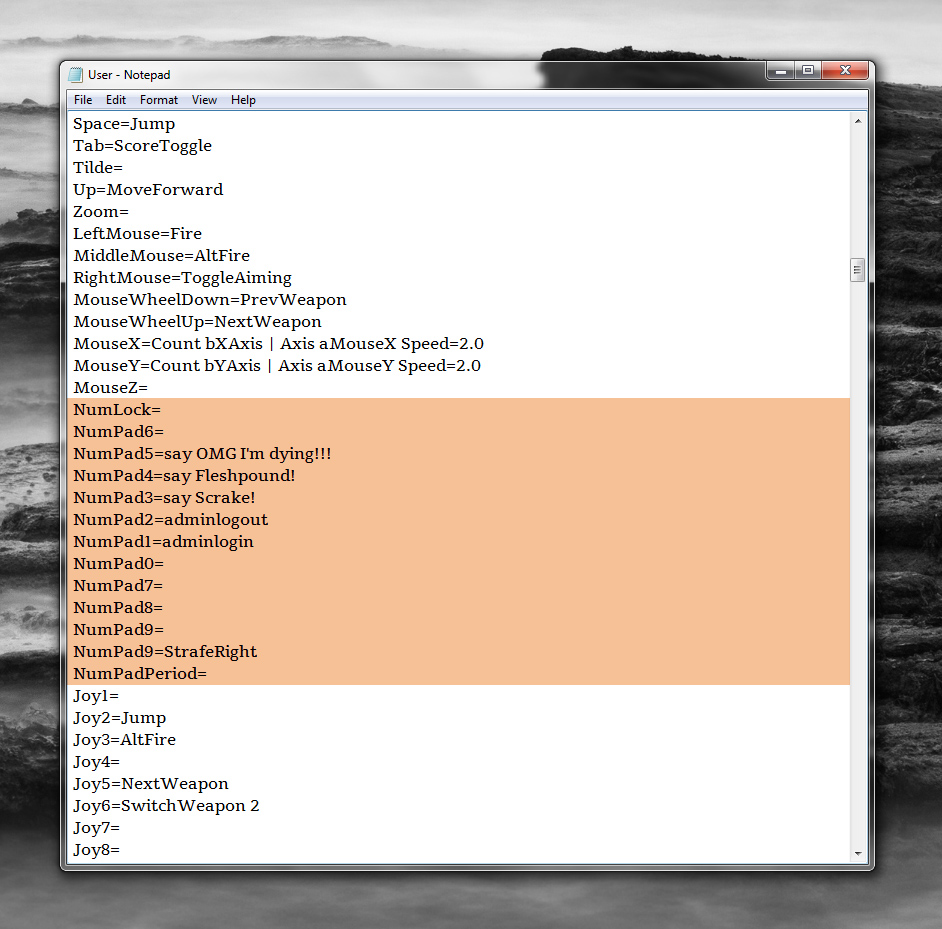

It’s really simple. Like I said previously, you don’t have to use the NumPad (use the F-keys if you like as some of those are free, or any other free key. Browse the User.ini to see other keys). Once you’ve added those binds, simply save the User.ini, fire up Killing Floor and give it a test by pressing the related key (3, 4, 5 on the NumPad in my example). Note: if you do use the NumPad, make sure NumLock is ON.
Binds With Auto Voice Commands
You can, of course, extend your binds even further by adding some voice commands to them. If you add a voice command to your Scrake bind, it will say Scrake plus the voice command for Scrakes (eg: A chainsaw? You have got to be kidding me, pal). All you need to do is add on to your bind like so:
Scrakes:
NumPad3=say Scrake! | Speech AUTO 14
Fleshpounds:
NumPad4=say Fleshpound! | Speech AUTO 12
Let’s set up a new one, say, for the Patriarch rockets (voice commands eg: Bleeding hell! Duck! or Rockets, too? Now he’s really taking the piss.):
NumPad6=say Look out! Rockets incoming! | Speech AUTO 10
You can remove the say *yourtext* and just have speech:
NumPad7=Speech AUTO 14
Below is a list of auto voice commands and an example or two. If you bind them to a key, it will cycle through them, though the same ones do tend to repeat a lot.
- 0= Welding:
eg: “No bastard’s comin’ through here!” … “That’ll keep the buggers out.” - 1= Unwelding:
eg: “I’m unwelding this one!” … “I’m cutting this one open!” - 2= Reloading:
eg: “Reloading!” … “I’m reloading. Cover me!” - 3= Out of ammo:
eg: “I’m out of ammo!” … “Me ammo’s all gone!” - 4= Dosh, money:
eg: “It’s raining money!” … “Who needed money?” - 5= Healing:
eg: “Stand still, will ya’? I’m tryin’ to heal ya.” … “I’m trying to heal you, not bloody tickle you.” - 6= Dying:
eg: “I’m dying! Do something!” … “I’m dying here! Help me!” - 7= Bloat sighting:
eg: “Oh God, don’t step in it!” … “Damn! That stuff looks nasty!” - 8= Patriarch cloaking:
eg: “Crap! That bastard vanished!” … “He goes bloody invisible too?” - 9= Patriarch chaingun:
eg: “Bloody nora, he’s got a machine gun!” … “A chaingun, you gotta be kidding!” - 10= Patriarch rockets:
eg: “What is this? Bloody Guy Fawkes?” - 11=Clot grab:
eg: “Christ, I can’t move! Get off me, you bloody nonce!” … “Let go, you bastard!” - 12= Fleshpound sighting:
eg: “Bloody hell, what’s he got on his arms?” … “Geez, that’s a big one.” - 13= Gorefast sighting:
eg: “He’s gonna hurt someone if he ain’t careful!” - 14= Scrake sighting:
eg: “Please tell me that is not a chainsaw he’s carrying!” - 15= Siren sighting:
eg: “Crap, she’s ugly! For God’s sake, don’t let her scream!” - 16= Siren heard:
eg: “Hell, she could hurt someone with that voice.” - 17= Stalker seen/heard:
eg: “I hear her, but where the hell is she?” - 18= Crawler sighting:
eg: “Ew, a bug! Someone step on it!” … “Oh bloody hell, they hop too!” - 19= Stalker kill (melee):
eg: “I don’t kiss dead tarts.” … “Kiss that!” - 20= Flamethrower kill:
eg: “Barbecue tonight?” … “Burn, you bastard! Burn!” - 21= Hunting Shotgun:
eg: “Boomstick time!” … “Both barrels for you, you bastards.” - 22= Dual Handcannons:
eg: “Yeah, one in each hand.” … “Two bloody great handfuls!” - 23= LAW:
eg: “This is a real weapon.” … “Now I am going to get serious.” - 24= Axe:
eg: “Stitch that, you arsehole!” … “In your face, pal!”
Miscellaneous But Useful Binds
For the following example binds the X key has been used. Use your key of choice in replace of the X.
This bind, when pressed, will remove all HUD items, then when the key is released, will take a screenshot and replace your HUD. Screenshots taken this way are stored in your killingfloor/ScreenShots as a bmp. If you ever find you’re left with no HUD, just type togglescreenshotmode in your console.
x=ToggleScreenshotMode | OnRelease shot | ToggleScreenshotMode
Use tosscash followed by an amount of money, so you can setup custom money. Maybe you want to throw all your money in one go: try tosscash 99999. The default throw amount is 50. Experiment and see what works for you.
x=tosscash 500
x=tosscash 99999
All the following can be shown when using teamsay. You can also show your current location with %l (if the map has been setup correctly, but this is auto when using teamsay anyway). The 3 commands you can enter are %w %h %s for Weapon/Health/Armor. It’s an S since UT2k4 uses Shield, not Armor and it will say Shield so I probably wouldn’t use %s.
You string these together in your binds wherever you would like the piece of information in your teamsay message. I generally only use the Weapon one as part of my throw weapon bind, which states what weapon is in my hands, then drops it.
x=teamsay Here, have a %W | ThrowWeapon
These can be handy with the some of the voice commands and quick text commands, for example.
The below will teamsay Need Heals with your Health status and your Armor status, then it will do the speech for Medic! (the same as through the commands menu).
x=teamsay Need Heals! %h %S | speech auto 6
Combining several commands into one single bind can be extremely useful for things like when you’re going to leave a server. The following bind will announce you’re leaving, drop your weapon and give ALL your cash:
x=teamSay I’m leaving, take my %W and dosh | ThrowWeapon | Tosscash 9999
Have you ever wanted your welder on 1 key?? Now, what if you can have that set as a quick key instead, similar to the quick self heal.
With the below you just press and hold x, it will switch to the welder and weld, until you release x, then it will change back to your last weapon.
x=getweapon Welder | Fire | OnRelease SwitchToLastWeapon
Conclusion
We hope you enjoyed this guide and found its contents useful. If you have any questions, feel free to ask and please don’t hesitate to share any extra tips you may have.