
Overview
Tutorial on how to use Xbox 360 Controller Emulator so you can use your arcade stick(s) or gamepad(s) with Killer Instinct. Useful for those who don’t have XInput controllers and want to use their DirectInput ones with the game.
TL;DR for those who know X360CE
Rename xinput1_3.dll to xinput9_1_0.dll inside KI folder.
Intro
There are 3 known solutions for this problem, which you should try in order:
1. Big Picture mode
2. Xbox 360 Controller Emulator
3. XOutput
For the first one, go to Steam menu -> Settings -> Controller -> GENERAL CONTROLLER SETTINGS and check “Generic Gamepad Configuration Support” in the options at the left; if you are using a PS4 controller, check the PS4 option instead. Your controller should be listed under “Detected Controllers”; press it and go to DEFINE LAYOUT to assign buttons and axis (unneeded with a PS4 controller).
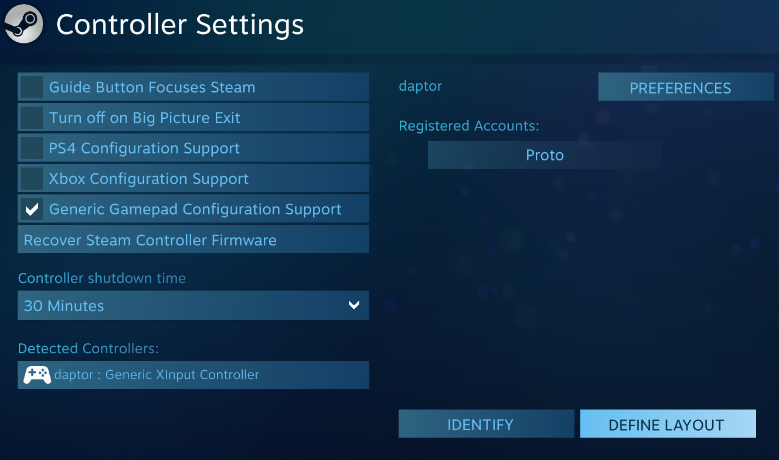
Unfortunately, the list of controllers Steam is able to detect is kind of short, and may have some problems. For me, it’s unable to consistently detect both of my arcade sticks connected at the same time, so I had to use the second solution, X360CE, which is what this guide focuses on, explaining step by step how to set it up.
However, if you use a PS3 fightstick or other controller which is not Windows-specific and could have driver problems, X360CE may still not be enough. For those cases the third solution, XOutput, will do, since it is based on SCP Driver, the best way to use PS3 controllers on PC. You can read a guide to set it up here:
Steps to getting XOutput to work with KI PC from killerinstinct
Let’s begin with the set up of X360CE.
Recommended hardware
One or two gamepads or arcade sticks with 8 action buttons + 2 function buttons (for Menu/Start and View/Back). While the game uses 6 attack buttons, some functions in the menus are bound to RT and specially LT, so it’s better to have those.
Downloading Xbox 360 Controller Emulator
Go to [link] and press “Download · for 64-bit games” at the top right of the page (32-bit will not work, KI is a 64-bit game). You should have now a file named “x360ce_x64.zip“. Uncompress its content into the game folder:
(Your Steam installation)steamappscommonKiller Instinct
Keep this folder open, we’ll need it later.
Setting up your controller
Execute the newly created “x360ce_x64.exe” in your KI folder. You must not put this executable anywhere else, or it will not work.
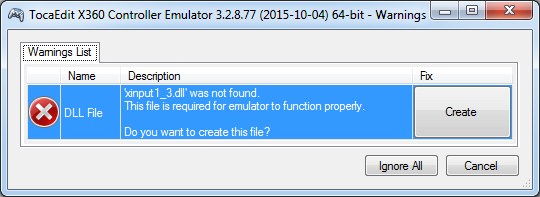
First thing it’ll ask is to create “xinput1_3.dll”; press Create.
Then, it will want to search for settings for your particular controller on the internet. Press Next.
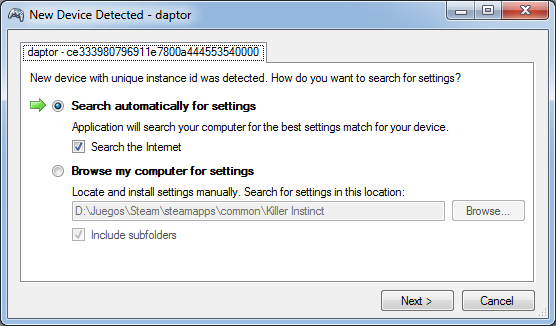
It should find some, but if it doesn’t, don’t worry, we’ll take care of that later. Press Finish.

If you have a second controller connected, it will repeat the last two steps, even if its the same type of controller. Just press Next and Finish again.
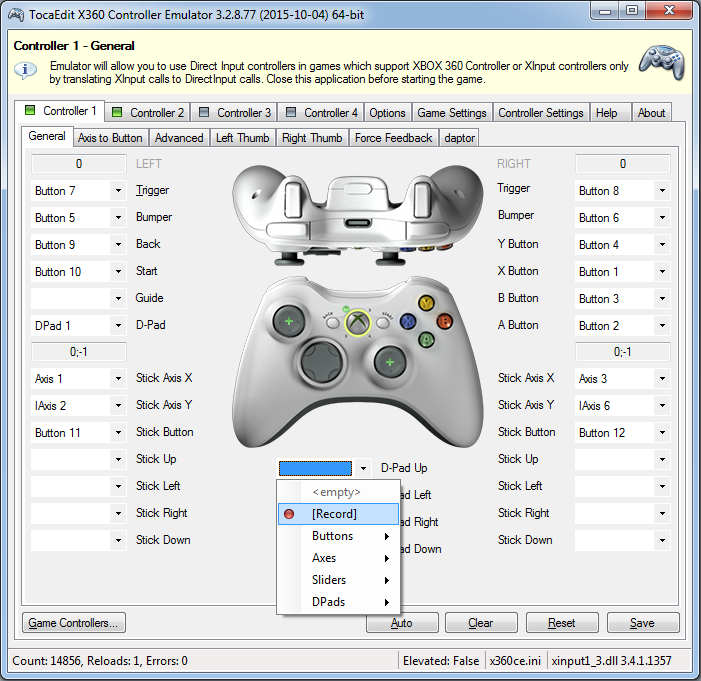
Then, you will be greeted with the following screen:
As you can see, in the tabs named Controller 1 to 4 the controllers you have connected appear with a green square instead of a grey one. Make sure you have selected the Controller 1 tab.
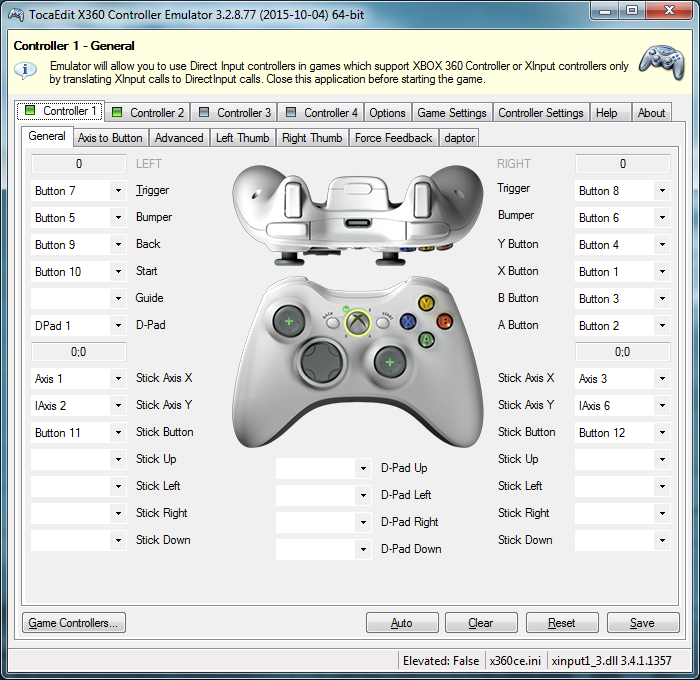
At this point, you should just move and press all buttons on your controller, and the Xbox 360 controller image should respond to your inputs. Make sure you have all buttons covered and in the right position for your controller. If you have an arcade stick, I recommend using the D-Pad instead of the left analog stick. If you are happy, press Save and jump directly to the section “Making sure the game gets your configuration“. If not, just keep reading.
For reference, these are the default assignments for an Xbox controller:
X = Light Punch
Y = Medium Punch
RB = Heavy Punch
A = Light Kick, Accept (in menus)
B = Medium Kick, Cancel (in menus)
RT = Heavy Kick
LB = All 3 punches
LT = All 3 kicks
Start = Menu*
Back = View*
*KI uses XBox One Controller buttons.
Repeat the testing with Controller 2 if you have to.
If there’s something off
If the application didn’t detect any setting, or if the buttons are missing or in the wrong position, you’ll have to fix them manually, which at least is easy.
For each button or axis, there’s a dropdown input. For any missing/incorrect one, press it and choose “Record“; then it will be expecting the correct input in the controller. Press it and the dropdown will show its new assignment. In the following example, I’m assigning the D-Pad Up input.
For KI, assigning the analog sticks is completely optional (fortunately for those with arcade sticks 🙂 ), but as I said, you’ll have to assign all the buttons + the D-Pad.
Once you finish with all the buttons/axis, check them again, pressing them all until you are happy with the result. Then, press Save.
Again, if you have a second controller, change to the Controller 2 tab and repeat everything.
Making sure the game gets your configuration
A very important step: minimize the Controller Emulator and, in the game folder, rename the newly created “xinput1_3.dll” to “xinput9_1_0.dll“. Without this, the controller(s) will not work.
Get back to the Emulator, and change to the “Game Settings” tab. Here, make sure that in “My Game Settings” the game appears, and when you select it, at “XInput Files” at the right, “64-bit v9.1” is checked.
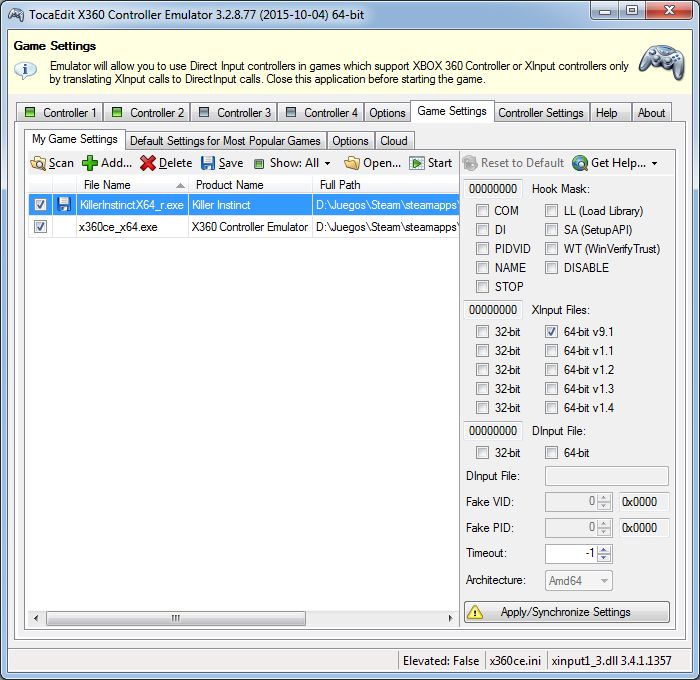
If it appears, press “Apply/Synchronize Settings” at the bottom (don’t worry if it doesn’t show up). If you did everything right, this should appear:

Press OK, close the Controller Emulator and start the game. A bell chiming at the Microsoft Studios logo is the proof that the Emulator is working. You are ready to play!
Conclusion
If you don’t hear the chime at the beginning, make sure you renamed the DLL correctly to:
…and not “xinput_910_.dll.dll” or something like that. If there’s no chime, there’s no DLL.
If you hear the bell and the game still does not recognize your inputs, you still can try XOutput. A guide to set it up is in the Intro section.
If you are bothered with that sound every time the game starts, you can disable it by unchecking “Use Init Beep” at the Options tab in the Emulator. Don’t do it right away though, it’s the best way to check if the emulator DLL is enabled or not.
Please comment if there are any unclear steps. FIGHT ON!
Edit 1: Thanks to Dan in the comments for his experience with XOutput; it’s been added.
Edit 2: TL;DR section added, clearer explanation (I hope) of Big Picture usage.