
Overview
Do the unforgiving Sunless Skies continue to claim the life of your poor sky captain? Scrive-Spinsters got you down? Terror and nightmares out of control? Or maybe your Blemmigan mascot just keeps looking at you funny? Then this guide is for you! We’ll take a look at some of the lore and philosophy of Sunless Skies and, more importantly, outline some hard-earned tips for easing the learning curve of the game and planning out your ambitions and your late game endeavors. Hopefully Sunless Seas veterans and newcomers to Fallen London can find something of use here.
Welcome to Fallen London!
So, first, a bit about me. I’ve got well over 200 hours in Sunless Skies at this point and have 25 of the 31 achievements. The ones I’m missing are mostly the alternate endings and couple grindy ones. I pretty much did everything in Sunless Sea (and Zubmariner) that there was to do. On PC and on iPad. I also mess around with Fallen London itself from time to time. So, yeah. I’m a fan.
As a frame of reference, this guide is being written in February 2019. The current version is 1.2.0.1 – basically we’re in the first month post-launch when they’re busily patching, fixing and balancing things. There have been announcements of even more content down the road and, judging by the positive reviews and financial success of the game, a full blown expansion seems likely. I’ll try to keep this guide updated as things move along. So let’s get to it.
What is Fallen London?

In short, Fallen London is a fictionalized alternate universe created by Failbetter Games (FG) circa 2009. I’ll delve into the lore in more detail below, but suffice to say that FG has released three games in this universe. The first, Fallen London, was released in 2009 and continues to be regularly updated with monthly content. It’s a a browser-based game that is purely text based. Think of the port areas of Sunless Sea or Sunless Skies without any of the pesky sailing around, but with almost a DECADE worth of content, choices, rewards, etc. It’s a very developed universe. The game itself is “energy” based in the sense that you have a slowly recharging pool of energy points which you use to do various activities. There are some light microtransactions you can use to increase your pool size and there’s an “uber” currency to buy various things like full pool recharges and the like. Similar to most games of its ilk it’s easy to pick up, fiddle with for half an hour, and then put down. It’s also the foundation of most of the lore in the Fallen London universe and many things in Sunless Sea and Sunless Skies find their origins there.

Sunless Sea released in 2015 with the expansion, Zubmariner, releasing in 2016. If you haven’t played it, it’s very similar to Sunless Skies as far as gameplay. You’ll feel right at home after you die horribly several times in your first hour of playing (sound familiar?). Instead of 4 smaller maps like our current game, Sunless Sea just has one very large one. But otherwise the mechanics are basically identical. Sunless Skies is a direct (although abstract) sequel to Sunless Sea and many of the locations in Sunless Skies (such as Avid Horizon) directly reference events in the previous game. Zubmariner was a clever expansion, in that it basically allowed your ship to go underwater and explore a new group of ports, with a host of new story lines and interactions. It’s still a blast to play and I highly recommend it if you haven’t.
“OK, swell. But what about THIS game?
Yeah, yeah, I’m getting there. So let’s do a quick primer on the lore. Note that this is VERY condensed. There are wikis and lots of other resources out there if you want to really dive in. This is intended as more of a light overview for anyone who is unfamiliar and is getting weirded out by how odd everything seems in this game.
So. Fallen London began on the same timeline as our own world. The year was 1861, and Queen Victoria had just been devastated by the loss of her beloved husband, Albert, to typhoid fever. In our world his death profoundly affected her for the rest of her life (and she would go on to reign for another 40 years). She became something of a recluse and almost always appeared in public wearing black as a sign of mourning from that day forward. The prestige of the monarchy took a bit of a hit as a result, but rebounded later in her life and she’s almost universally beloved in hindsight. But events in Fallen London took a much stranger turn…
Following Albert’s death, the Queen was approached by a group of odd folks in cloaks who spoke in shrill, shrieking voices. They offered her a bargain – the city of London in exchange for Albert’s life. She took the deal. In a single night, London was swallowed up by a huge cloud of bats and, somehow, (the details are murky) cast down a mile below the surface of the Earth. It came to rest in a large cavern called the Neath (roughly the size of Europe itself) on the shore of a vast subterranean ocean – the Unterzee. There were two major continents – a western one (where London was located) and a southern one (called the Elder Continent). The zee itself was also home to a large number of islands of various sizes. As London began to get a feel for its new situation, a number of things became apparent.
First, London itself was now home to a new district of black spires covered in strange symbols – the Echo Bazaar. This district, it was quickly learned, was the home of these weird folks in the long cloaks. They called themselves the “Masters.” Little was known about them. Although, at least in theory, the government of London was still free to function normally the reality was that the Masters had effective control over anything and everything. This control, however, was rarely utilized. Mostly it was a means for them to regulate certain goods and activities they deemed dangerous. The Masters themselves were clearly merchants of a sort, and players in Sunless Sea could freely trade with them and get bits and pieces of lore. In Sunless Skies, as you may have noticed, they’ve spread themselves out a bit and you get to interact with a number of them.
One of the other interesting discoveries was that London was not the first city to have this happen. There were, apparently, 4 before it. What happened to these cities is not entirely clear although they all appeared in the same location (London literally landed on top of the 4th city). It is known that the 4th city was Karakorum, the capitol of the Mongols in the 1200s C.E.. The Mongols, having had centuries to explore the Neath, had expanded greatly by the time of London’s fall. They had established their own empire on the far side of the Unterzee – the Khanate (which plays an important role in Sunless Sea) and also exists in the Sunless Skies as well as Eagle’s Empyrean. Not much is known about the 3rd city or the 1st city. The 2nd city may have been Rome but, whatever its identity, the Masters clearly do NOT remember it fondly and get cranky when it is brought up.
Londoners themselves, as one might expect, were not particularly happy with their new predicament. The Queen herself bottled up her family in Kensington Palace and forbid any use of her name. She is usually referred to by her formal title – “Her Enduring Majesty” – or, by the unhappier factions, “The Traitor Empress.” Dissent and revolution are always boiling just below the surface and play a major role in Sunless Sea and Sunless Skies.
As you’ve probably noticed, the setting of these games is something of a mixture of steampunk and gothic, Lovecraftian horror. One of the things discovered after the fall of London was the closeness of the dream world, an actual dimension of existence called Parabola. The “bleed-through” of Parabola’s inherent oddity is what gives Fallen London a lot of its otherwordly flair.
And then there were some other problems…

Also, there was Hell. Hell, as it turned out, wasn’t just a religious/theoretical institution – it was an actual place. A nation-state populated by devils. And it was right next to Fallen London. This, predictably, did not go well. There was almost immediately a war between London and Hell within several years of the fall (the infamous “Campaign of ’68”), which ended up being a disaster for London. There were a LOT of devils, as it turned out, and a large technology gap. We don’t know all the outcomes of the war, but it appears London was forced to normalize relations with Hell and officially permit the trading of certain commodities – such as souls. Hell also set up a formal diplomatic presence in London itself – the Brass Embassy – and London had to cope with Hell’s client state – the Iron Republic – to its south. Devils became a commonplace sight in London and trade between the two nations became commonplace as well. Surprisingly, Hell was not immune to the political changes taking place in Europe during the end of the 19th century and had a revolution of its own, resulting in a republic of sorts with a lot of bureaucracy layered on top. The monarchists and elites fled, and settled on an island called Mt. Palmerston. This division remains a prominent bone of contention among devils, particularly which side they fought on.
At this point the story gets a bit spoiler-y and also extremely convoluted since it’s tied to the events of Sunless Sea and Fallen London (the game). It’s pretty much a big soap opera. Here’s the executive summary (again, SPOILER ALERT). Stars, as it turns out, are actually god-like beings called “Judgements.” Their radiance is the “law” that governs how fundamental forces like gravity, energy, chemistry, etc. operate within their sphere of influence. But the catch is that in the Neath, their radiance (or the particular radiance of OUR sun, if you like) had limited effect. Again, this accounts for the general pervading weirdness. The Queen, thirsting for control, made an attempt to create a sun of her own in the Neath – the Dawn Machine – with disastrous results (she couldn’t control it and it enslaved a lot of her people). One of the other discoveries in the Neath, however, was a portal which led to outer space (sure, why not?). This portal was the Avid Horizon. Specifically, this portal led to the High Wilderness (and you probably see where this is going). Seeking a new start London invaded, apparently with much more success than their previous war against Hell. We see only the aftermath when Sunless Skies begins, but it would seem that the Queen successfully defeated the Judgement(s) of the High Wilderness and created a clockwork sun for her very own – this time semi-successfully.
Again, I’m glossing over a lot of detail here – entire YEARS of content in Fallen London deal with some of these events. Feel free to research on your own. This is just meant to give some context to the world you find yourself in when you start Sunless Skies. Speaking of which…

A Geography Guide to Sunless Skies
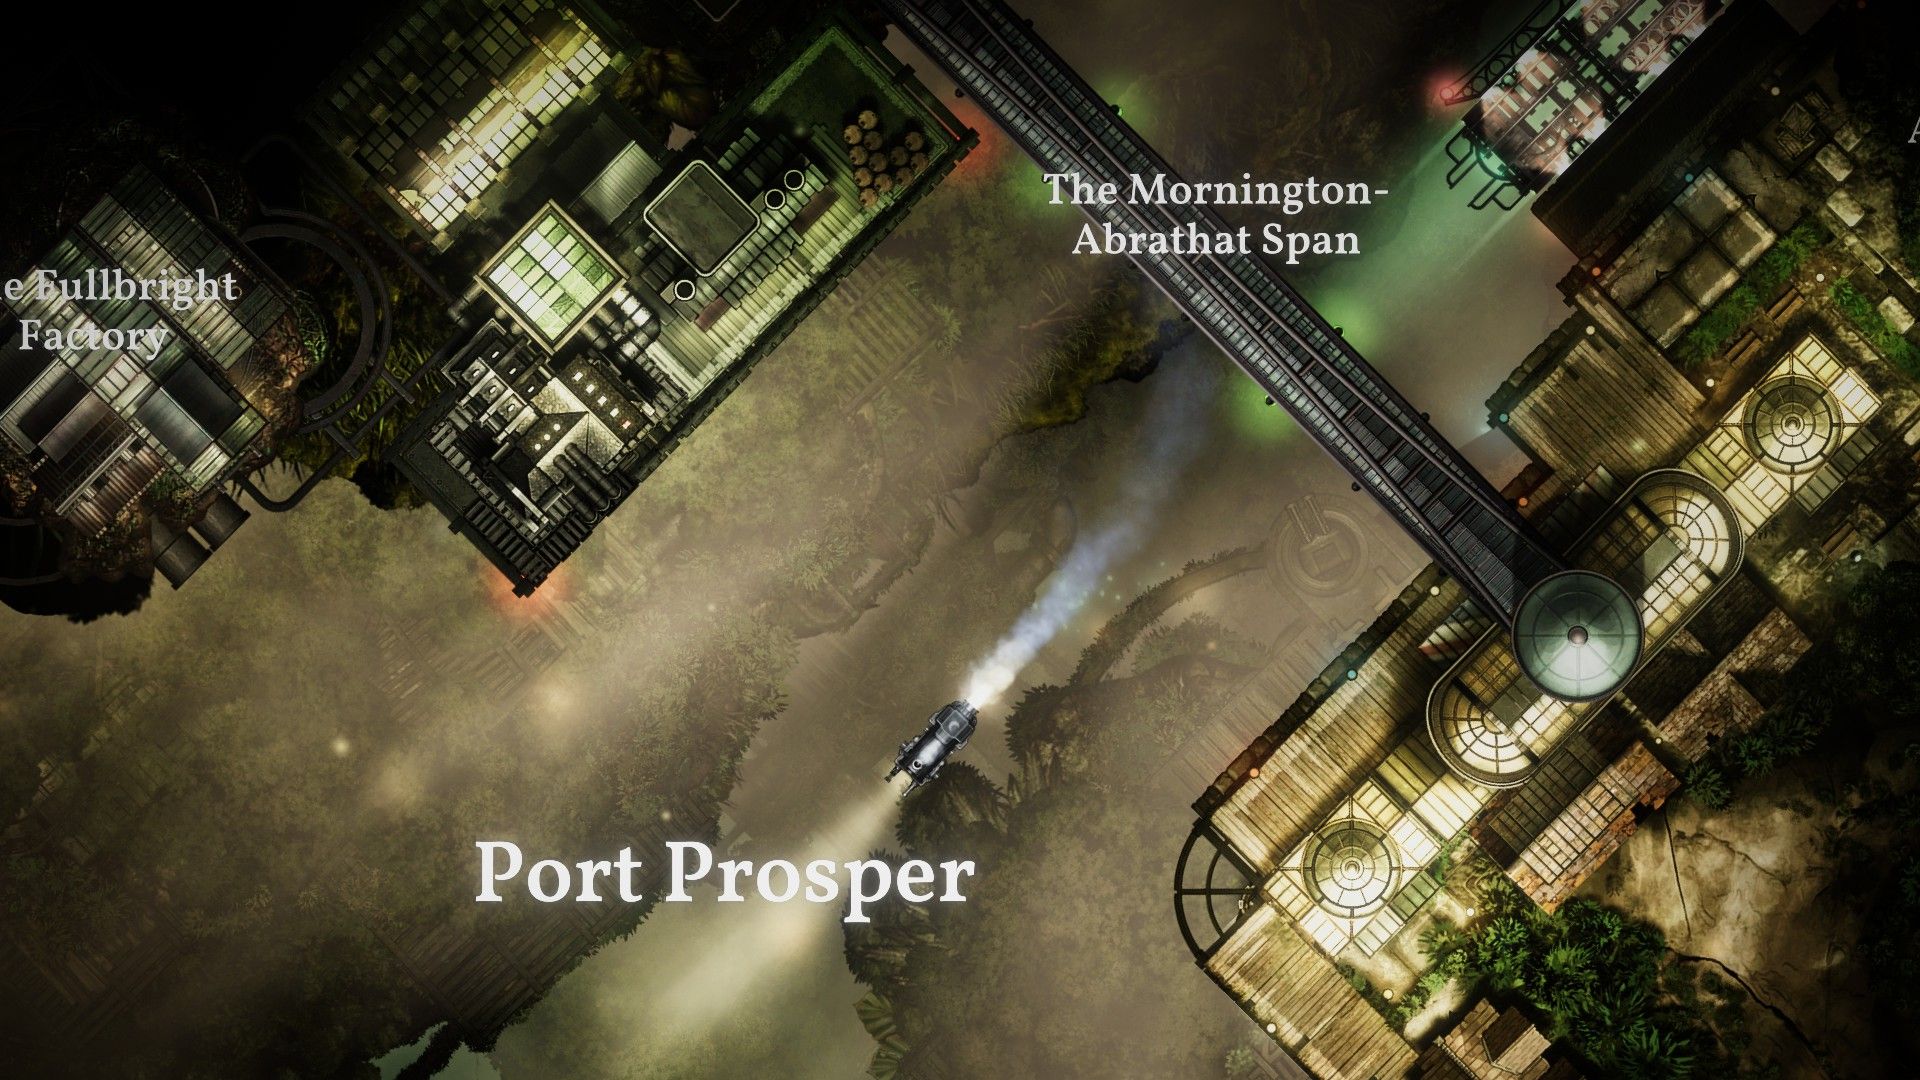
At least as of the writing of this guide, Sunless Skies comprises 4 different realms of space – The Reach (where you will begin), Albion, Eleutheria, and The Blue Kingdom. Each of these realms will “spawn” with the same ports and features whenever you start a new game, although those ports and features will be in different locations. However, there are some general geographical rules that they follow. It’s helpful to think of each realm as a “target” with a bullseye at the dead center, and then a middle ring surrounding that, and an outer ring around the perimeter. Ports will always spawn in the same ring, although not necessarily the same location. For example, New Winchester will always spawn roughly in the center of The Reach. Port Avon and Magdalene’s will always spawn in the inner ring. Port Prosper and Lustrum will always spawn in the outer ring. Knowing this will help you hunt for ports when you start a new game and are familiar with where things were in previous games. Here’s my map of The Reach from a recent playthrough as an example:

The 4 realms connect to each other via transit relays, although not each realm is connected. The easiest way to visualize this is by thinking of The Reach as a central hub, with 3 “spokes” (i.e. transit relays) that each connect to Albion, Eleutheria, and The Blue Kingdom. But those last 3 realms don’t connect to each other. Said differently, you generally have to pass through The Reach to get anywhere.
Let’s talk about each of the Realms, and some points of interest:
The Reach: You’ll start here when you begin your first game of Sunless Skies, limping your way from The Blue Kingdom transit relay. The Reach is a realm being colonized by Albion. Port Prosper is the end of the Isambard Line – London’s railway to the The Reach. New Winchester is also a London outpost. The Reach is in the midst of a power struggle between the Stovepipes (representatives of the Queen’s authority exercised through the Windward Company) and the Tacketies (disgruntled colonials fighting for self-governance). You’ll have the opportunity to pick a side (or try to stay in the good graces of both). While as deadly as anywhere else in Sunless Skies, The Reach is a bit more forgiving than other realms. Most (but not all) ports have fuel and supplies available, Magdalene’s serves as a ready location for eliminating terror. Moreover, the “tunnel” structure of The Reach helps with exploration – you’re not stuck picking a random direction and just going until you hit something across endless space.
Albion: You may start here in playthroughs with subsequent captains in legacy mode. London, as you would expect, sits at the center of the bullseye. Exploration is more challenging, because there is a lot more open space and some nasty new monster types. The Clockwork Sun can be found here (and has its own port), as can the Avid Horizon (through which Fallen London traveled to reach the High Wilderness). The Royal Society is worth seeking out – it’s a source of unique ship upgrades that you can’t get anywhere else and some of them are extremely useful.
It’s strongly recommended that you upgrade from your starter ship before journeying here.
Eleutheria: Not for the faint of heart, Eleutheria is a definite step up in difficulty. It’s also important to note that the entry transit relay from The Reach is ONE WAY (the text hints at this). You’ll need to cross all the way across the map to find the exit transit relay back to The Reach. At the center of Eleutheria lies Pan, its devilish heart. Somewhere on the opposite side of the map from the entry relay you’ll find Eagle’s Empyrean, the home of the Khanate in Sunless Skies and the only location where you can buy the Outrider – probably the best ship for the mid-late game.
The Blue Kingdom: It’s death to journey here. Literally, but almost certainly figuratively as well. The Blue Kingdom is the home of the dead, although actually more a way-station of sorts where the dead pass through and are judged before moving on to their final (heh heh) destination. It has a smaller number of ports. Unlike the other realms, the only consistent port will be Sky Barnet, which lies near the transit relay (although Death’s Door generally lies on the opposite edge of the map). This place is brutal and the enemies are unforgiving and relentless. You don’t actually HAVE to go here for either of the starter ambitions (wealth and song of the skies). Approach with extreme caution.
Tips, Tricks and Advice Part I
At this point, let’s get into some general thoughts. I’ve tried to organize these under various categories for reference purposes.

Character Creation
- Legacy mode v. Merciful Mode. When you die in legacy mode, there are some benefits to balance out the ironman brutality of it. You get to keep half your cash, everything in your Bank, your locomotive, certain story items, and your previous captain’s map. You also get to keep a certain amount of experience that is a rough formula of all your exploration experience plus one half of all other experience (from quests or whatnot). On a recent long playthrough where I was a Level 20 for some time, when I completed my ambition and retired I restarted at Level 15, for example. I got to immediately repick 15 levels of facets so it’s a huge head start on a new captain especially if you plan ahead before retiring and start stockpiling stuff in your Bank to immediately sell/re-equip on a new captain. I’d encourage you to give Legacy Mode a try (and there’s an achievement tied to it). Basically as long as you make incremental progress with each successor captain, you’re making each new start easier on yourself.
- Another unstated benefit of Legacy mode is that some (but not all) of your Officers keep their questlines completed. You just pick them up at their already maxed out +10 of their relevant skill bonus. This is a big deal because a number of the Officer questlines have choices that permanently decrease your skills. But if you get them back with their questlines completed, you don’t have to go through that penalty again with a new captain. You basically get all the benefits of the Officer with none of the drawbacks. Sweet.
- Each of your 4 core skills starts at 10 by default. Your background choice is going to add 15 to one of them and, optionally, +1 in one of the 4 affiliations. You then get to pick from a choice of 3 subgroups that basically give you +7 in one of the other skills. So your default starting values will always be 25, 17, 10 and 10, based on what you choose. Also note, your choice of background is not just flavor text – there are potentially interactions within the game itself based on your choice.
- All 4 of the skills obviously have their uses. But having done my first long playthrough where I completed a lot of The Blue Kingdom events, I’m going to strongly recommend that you focus on Hearts and make sure it’s one of your “75s.” On that playthrough I went heavy on Iron and Mirrors and Hearts was my “low” skill. It was below 50 for the entire game due to random bad events, and actually below 25 for a significant part of it. When I started a new legacy captain with high Hearts, the difference was immediately noticeable. First off, it just seems like there are more Heart challenges, period. In addition, most of the “dire situation” checks are Hearts based – like if you run out of supplies or fuel, or your terror gets maxed. Also, contrary to what you would expect, the best weapon in the game – the Wrath of Heaven – requires 75+ Hearts. I mean, look at this thing:
Trust me. You want one. - As far as ambitions, I would recommend (as the game does) taking Wealth or Song of the Skies and do both of those before you work on others. It’s perfectly viable (and maybe even advisable) to complete both of these without ever going to The Blue Kingdom.
- Facets, once you start leveling up, aren’t just flavor text either. Some of them have in game impacts/choices as well.

Skills
- Although decisions and events are decided against a “die roll” with the percentage chance of success tied to the level of the skill, skills are also tied to your ability to equip/use tiers of equipment on your locomotive. For example, anyone can use Tier 1 equipment regardless of level. Tier 2 equipment (green) requires level 25 in a skill. Tier 3 (blue) requires level 50, and Tier 4 (purple) requires level 75. The upshot of this is that you want to get skills to those thresholds – 25, 50, 75, but incremental amounts above that aren’t really going to make or break you. After all, how many times is a 51% chance of success going to matter more than 50%? I suppose the answer is 1 in a 100, right? When planning out your leveling, especially in a new captain in legacy mode when you get a bunch of facets to start, think things through.
- So let’s do some quick math. You start out with 40 skill points, 10 in each skill. Your choice of starting history and sub-history give you another 17. You’ve got 19 levels to go, and get another 8 skill points at each level. That’s 152. A fully upgraded Officer gives +10, and you can get 4 of those excluding the mascot. Finally, the “best” mascot (the Blemmigan) from a min/max standpoint is another 3. The grand total is 257. That means, setting aside any other potential bonuses or penalties (I’ll get to those next), you can feasibly have 3 stats at 75 and one at 32. Or 2 at 75, one at 57, and one at 50.
- The well rites are the only “skill buffs” in the game at present. At Old Tom’s Well you can get +10 Iron at the price of -2 Hearts and -3 Veils. At Well of the Wolf, you can get +10 Hearts at the expense of -3 Iron and -2 Mirrors. Well of Wonders recently added a rite as well in a patch but I haven’t activated it yet and don’t know what the bonus is (if someone posts in the comments I’ll update here). Presumably it’s Mirrors or Veils. Regardless, this is a net gain of +5 in a skill – well worth it (no pun intended). Plan accordingly. You can also renounce the well rite without consequence if you don’t want it anymore.
- There are NUMEROUS events/choices in the game that will permanently cost you skill points and it really, really sucks when it happens. Sometimes there is a warning or the overall importance of the choice seems to imply that there will likely be a skill point hit, but not always. Even worse, a lot of choices come up in the late game when you may have already reached Level 20, meaning that you’re not going to have an opportunity to increase skills again with facets. That shiny new weapon or piece of equipment that you love that requires 75+ Mirrors to use and that you spent half the game grinding to be able to equip? Sorry, chump – you’re now stuck at 74 for the rest of this game because of a random “bad choice.” Might as well stick it in the Bank. Booooo. Because…
- There seem to be very limited options to INCREASE a skill through a decision/choice. I’m aware of three. Stop reading now if you don’t want to know what they are – what follows is kind of spoilery. The first is not telegraphed at all (in fact, the choice states – lying – that you won’t get anything from choosing it), but it occurs randomly in the House of Days in The Blue Kingdom. If you “mingle with the crowds” you may get an option to help a stranger by giving him a Searing Enigma. If you do, you get some XP and +1 Mirrors. This is repeatable, but random. There is a second one in The White Well in The Blue Kingdom that you can get randomly from watching trials. It lets you trade a Testament of the Feather for +1 Heart. Again, repeatable but random.The third occurs when you find Hybras abandoned. You get the option to search a tower and, if you do, you get +1 Hearts (thanks to WonderGoth for pointing this one out). This one is not repeatable since the “Hybras abandoned” event does not reset with subsequent captains.
Tips, Tricks and Advice Part 2
Starting Out
- Your first short-term goal should be to upgrade your storage with the Tier 1 “Additional Cargo Bay” available in New Winchester. It’s 500 Sovereigns, but will pay for itself in no time. Your key concern early on is a lack of space for cargo, along with the fuel/supplies you’ve got to haul around with you. It’s not sexy, but it’s almost a 33% increase in your hold space. Target it first.
- On your first couple journeys, you want to try and find Port Avon (almost always the closest port to New Winchester), Polmear & Plenty’s Inconceivable Circus, Magdalene’s, and Titania. The other ports in The Reach tend to be outer ring and a bit more dangerous for you to locate at this point.
- Your primary source of initial income will be port reports (always worth 100 per report) and hauling goods. Take advantage of the bargains available at the start of the game. There is always a “tutorial” prospect requiring you to haul seeds from Port Avon to Titania. Do it. In fact, a good rule of thumb is to buy whatever bargain goods are available in a port, even if you don’t have a specific contract for them. You can ALWAYS sell them for a healthy profit at New Winchester. Your hold capacity will be limited at first, of course, and you’ll probably feel like you’re swimming upstream because you keep spending all your gold just to replenish your fuel/supplies. It gets better, I promise. Be careful with the initial “Fastidious Inspector” transport quest. You need to go to Port Prosper, which is in the outer ring and usually a dangerous trip for your first couple journeys. Wait until you’re a bit more prepared before seeking it out.
- Your starter ship, the “Spatchcock” might as well have aluminum foil for a hull and a potato gun for a weapon. You should be avoiding combat for the most part. Tacketies are OK (and will give you a chance to work on your dodge skills) and the smaller cantankerai and chorister bees are OK. Anything else you should probably think about running from. It’s not that you CAN’T beat these things, but you’ll spend a lot of time (and fuel, and supplies) doing it. The return isn’t worth it.
- Polmear and Plenty’s is worth visiting frequently and upgrading. It will take a couple trips before you can get behind the tents and start running the errands to get the circus running profitably, but the rewards are well worth it. The port is great at reducing terror and you can get Sky Stories and, later, Visions of the Heavens guaranteed with no die rolls. You can also buy fuel and supplies there. Make it a priority to keep upgrading and running the errands. It will take you between half a dozen and dozen trips to get everything fully operational but, again, worth it.
- Magdalene’s has a number of relatively cheap ways to reduce terror. Enjoy it while it lasts – the other realms aren’t so easy. Also, I usually get Stovepipes and Tacketies fighting it out near the port. Be a vulture if you like and wait until they whittle each other down – then sweep in for some easy kills. Be careful of the Dreadnaughts – they’ve got a 360 degree turret with good range that can put your lights out. Best wait until they’re smoking and almost dead before taking them on with your Spatchcock.
- Needless to say, take whatever Officers you can find and make sure to “activate” them on your ship. You don’t get the bonuses if they’re just along for the ride. Also, Officer quests tend to be some of the best quests in the game from a writing standpoint. Take the time to get to know their stories and enjoy spending time with them. They’ve all got interesting personalities.
- Hybras tends to be the most remote of The Reach’s ports, and is also always near the transit relay to Eleutheria. You’ve got no business going to Eleutheria, so don’t be in a huge hurry to find Hybras either.
- You should be working towards upgrading your starting locomotive to a Pellinore-class Trader. It’s pricey – 4000 Sovereigns less trade in value of your Spatchcock – but it’s a significant upgrade across the board in speed, hull, hold size, and upgrade slots. The two auxillary slots are the real prize, allowing you to equip a drill and a butcher station and make your journeys through space more profitable. I’m willing to be convinced otherwise, but the Parsival-class courser is barely an upgrade over the Spatchcock, and the Bedivere-class escort has less hold space and trades the auxillary slot for a plating slot, which isn’t nearly as versatile or useful.
- Don’t be in a rush to travel to Albion. There’s plenty to do in The Reach and money to be made there. I’d recommend waiting until you’ve got a couple quests that require you to go to London, a Pellinore-class locomotive with some upgrades, and a couple thousand sovereigns to spare. There’s a lot to do (and buy) in London. Make sure you’re able to take advantage of it when you get there.

General Exploration/Navigation
- Pay attention to geographic features. Many ports have a unique environment. For example, in The Reach, if everything gets snowy and icy all of a sudden you’re probably near Lustrum. There may also be musical/audio clues.
- Don’t go crazy with your scout, especially early on. They eat up supplies quicker than you think and your inventory is limited to start.
- Ports are generally spaced out from each other a bit. You’re usually not going to find one on top of another. Try to look in big chunks of unexplored space when searching for the last port or two in a realm.
- Terror generates whenever you’re flying but it generates at a much faster rate when you’re exploring new areas and pushing back the “fog.” If your terror level is getting out of control, try to stick to “lanes” of space you’ve already explored. This is also one of the reasons that realms get easier to travel across once you explore them – less terror accumulation.
- Explore! You never know what you might…OH MY DEAR LORD WHAT IS THAT?!?!?!?

Managing Terror
- Try to keep your terror below 50%. This isn’t always possible, of course, but that seems to be the threshold where events become more common on your ship and some of them are quite nasty.
- Discovering a port for the first time provides a nice reduction to terror. Visiting New Winchester (or the “hub” port in any realm) also provides a very, very large reduction. It’s not immediately repeatable, though – you need to go out on a trip before returning. You can’t just keep leaving and coming right back.
- You can reduce terror at Magdalene’s cheaply. Take advantage of it when you’re in the area.
- A single level of nightmares isn’t a huge deal, and even two levels doesn’t pop up too many events. More than that gets to be a problem though and you can get some nasty terror spikes if you’re unlucky.
- Some (but not all) ports have a one-time event when you dock there and sometimes it’s an opportunity to reduce terror. Make note of these – it’s a good habit to get into for when you start visiting other realms and terror is an ever present concern.
- There are locations (marked with a tentacle) called “horrors” that noticeably spike terror generation when near them. Avoid when possible, obviously. But there are also areas that reduce terror when you’re near them (called “wonders”). In The Reach, these are the Apoidean Gardens, the Memorial to the Unknown Rat, and the Regent’s Tears. the terror reduction is limited but can be helpful if you’re far from home and need some immediate relief.

Tips, Tricks and Advice, Part 3

Trading for Fun and Profit
- All trade goods that you buy at a bargain discount in a port will sell in a realm’s central hub for a healthy profit, but some are more profitable than others. Make a note of these (Bronzewood seems to always sell for a good price). You’ll constantly have to make decisions about what to haul around with you if you’re visiting multiple ports on a journey. Choose wisely.
- The prospects and bargains available to you are governed by your Affiliation ranks. The higher your ranks in the 4 Affiliations (Academe, Bohemia, Establishment, and Villainy), the more opportunities will be available to you. There doesn’t seem to be any downside to having higher Affiliation ranks, and they don’t seem to conflict with each other in any way, so you should increase them at every opportunity. Some Officers will give you increased ranks in a particular Affiliation.
- When you first get to London in Albion you’ll be given an opportunity to start smuggling. This is immensely lucrative, but comes with a couple warnings. You may get inspected whenever you go through a transport relay and your success at hiding your goods if you get inspected is determined by your Veils. You’ve also got a random chance of getting inspected in a realm’s major port hub (New Winchester, London, etc.). It’s best if you’re smuggling to go straight from point A to point B (your crew may also get tempted in a random event to “sample the merchandise.”) There are ship upgrades that give you hidden compartments, which make smuggling easier (think of the Millennium Falcon). However, you generally need to gear your ship’s design around them so that you’ve got between 5 and 10, or don’t bother with them at all. The upshot of all this is smuggling is either something you should lean into heavily or not bother with at all. It’s not worth the trouble to simply dabble in it.
- Some ship upgrades (particularly the ones from the Royal Society in Albion) will allow you to upgrade your hold using slots other than auxillary. Take advantage of this. More on the Royal Society below.
- Apart from trade goods, you’ll also accumulate “Possessions” throughout the game. Think of these as “spiritual currency.” They are grouped under the 4 Affiliations but don’t take up space in your hold. There is, generally speaking, a rarity level to these. For example, Tales of Terror (Villainy), Salon-Stewed Gossip (Establishment), Sky-Story (Bohemia) and Uncanny Specimens (Academe) are easy to come by and can be freely spent for the most part. On the other hand, things like Searing Enigmas, Moments of Inspiration, Royal Dispensations and Crimson Promises are much, much harder to come by. Unless farming is something you enjoy, hold onto these until you really need them for a quest or decision. Never, ever simply sell them for experience/sovereigns. They tend to be rewards for completing longer quest chains with multiple steps.
- In fact, when talking about Possessions, avoid spending all of them if possible. Always try to keep at least one on hand – you’ll never know when it will be needed to progress with a quest and nothing is more frustrating than realizing you sold your last one for some quick cash for no reason. This game rewards patience, and there are lots of other ways to make money.
- Once you reach mid-game and your cash flow has stabilized, start “stockpiling” trade goods in your Bank. Ideally, have a pile of 5 of each of the trade goods and keep the pile topped off if you take some out. The idea here is that it makes completing prospects much more straightforward. Just pick up the prospect in the realm’s hub, load the necessary goods from your Bank, and make the stops. #profit. You eliminate the pesky middle step of having to actually FIND the goods out in the wild. Also, you’re building up a nice reserve of cash for subsequent captains.

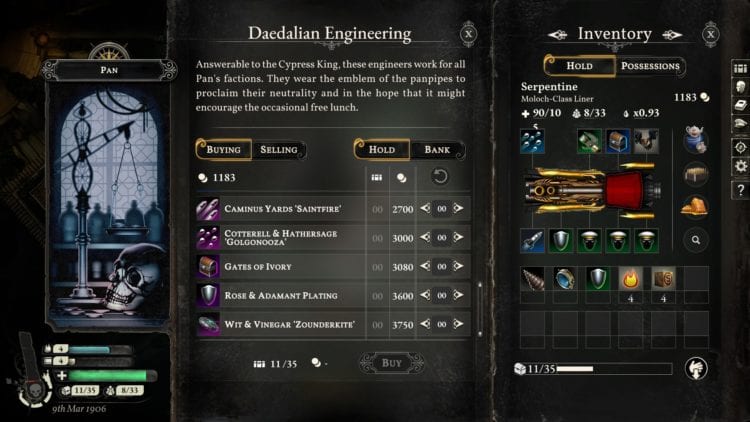
Locomotives and Upgrades
- The Altani-class Outrider is a great all around ship with 3 auxillary slots (the most of any ship in the game). It’s almost a mandatory upgrade from the Pellinore, The downside? You can only buy it in one place – Eagle’s Empyrean in Eleutheria. If you’ve got the cash, it’s worth making an early trip to Eleutheria just to pick one up, but be very, very careful. It’s pretty much guaranteed you’ll have to make a journey across the entire map, crossing through Pan in the middle, to get to Eagle’s Empyrean (which is also where the exit transport relay is) and Eleutheria is very dangerous. But it’s perfectly viable for you to use the Altani for the rest of the game (and future games with legacy captains) if you don’t want to upgrade to one of the massive end-game locomotives.
- “Standard” Tier 1, 2, 3, 4 modules are available in the major realm port hubs and follow the expected rules/slots and can be bought for cash. But the Royal Society in Albion has some very special and quirky modules that use different ship slots to provide different bonuses with combined effects. There are even better ones available from the Inscribed Tinkerer after you run an errand for her. These upgrades require a special currency, however, called “Experimental Modifications.” You can trade for these at the Royal Society but they cost various Possessions or trade goods, rather than sovereigns. Needless the say, these “super-modules” almost always require 50 or 75 in a particular skill so you’ll have to pick and choose which ones you want. In fact, you may end up planning your build around them since some of them are so darn useful. Also, whenever you leave the Royal Society make sure you slam into the wall in front of you. Actually, I don’t even need to tell you to do this – you’ll do it yourself every….darn…time.
- Standard weapons basically fall into 4 categories – single shot/long range/medium damage (like your starting weapon), shotgun/close range/high damage, machine gun/medium range/low damage, and mines (which do good damage but will also harm you if you’re in range). Some weapons also have a blast effect that you can detonate after firing. You’ll get a feel for what you like but if you’ve got two weapons slots on your ship, it’s a good idea to have a long range and short range weapon.
- There are some fun “exotic” weapons that you can construct/find out in the wild. By far, the best of these is the Wrath of Heaven which has great range/damage, a blast radius, reasonable steam requirements relative to the damage it does, and a nifty visual effect. The downside is you’ll have to kill a bunch of Scorn Flukes to unlock it and they’re tough buggers.
- Instead of trading in modules you’re no longer using for cash, consider just sticking them in your Bank. It will make life easier on subsequent legacy captains to have a wide assortment of modules/weapons immediately on hand for upgrades when your starting stats may not hit the 50/75 skill thresholds. This will also save you a huge amount of time (and Possessions) if you keep the ones from the Royal Society. At this point, on my 9th or 10th legacy captain, I’ve basically got all the RS modules in my own Bank and can swap them out as needed.
Tips, Tricks and Advice (you guessed it – Part 4)
Ports of Call
- Pretty much every port has more going on than meets the eye. Some of these, like Langley Hall or Perdurance, are actually elaborate puzzles for you to solve. Enjoy these and take your time, they’re some of the best writing in the game.
- Some ports have repeatable activities which can be quite dangerous – either overtly or more insidiously. For example, exploring the Sun-Shattered Dome in The Clockwork Sun can be lucrative but can also spike your terror by 50 points or more if things go badly. Spending lots of time in Langley Hall has its own addictive effects but these aren’t obvious until you’ve been away for a while.
- When in doubt, come back later. Some port activities don’t show up until you’ve visited a few times or until other events have happened.
- Once you start visiting Albion and Eleutheria, you’ll discover that some ports only sell fuel or supplies, but not both (or possibly neither). Make a note of the ones where you can buy both. You don’t want to barely make it to port just to discover that they don’t sell fuel there.
Some final, random thoughts
- Try to be efficient on your journeys. Hit multiple ports and, optimally, try to have multiple things that you need to do when you get there. Multitask!
- Moments of Inspiration are a particularly annoying Possession and are difficult to come by. They’re the only thing I’ve had to deliberately farm and there’s only one place to reliably do it. You’ll need them for several of your Officer quest lines. Be very careful about spending these and use other alternatives if they are available.
- Speaking of Officers, it is possible to lose some of them depending on choices you make. Also, as mentioned elsewhere, Officer quests are rife with choices that result in permanent skill decreases that are sometimes unavoidable. At least two of the Officers require you to visit The Blue Kingdom to finish their quest lines.
- You can play the middle when it comes to the internal struggles in some of the realms (Tacketies vs. Stovepipes, etc.) but it’s generally more worthwhile to simply pick a side and lean in. The rewards are greater and you’ll get to see the realm change in some interesting ways.
- Think of crew as a semi-disposable resource that can serve as a buffer against bad results. There’s certainly no reason you need to fly around with a full complement of crew (and the more you have, the more supplies they eat up). But flying around with only one or two crew will pop up a lot of bad events and flying around with none will almost certainly get you killed. I generally try and keep my crew level around 3/4 of my maximum complement.
- It is possible to simply miss out on certain opportunities through legacy mode and you’re simply stuck with the outcome indefinitely. This is a double-edged knife. It DOES save you having to redo everything from scratch with a new legacy captain, but it also means that some choices are irreversible.

OK, fine. Let’s talk a little bit about The Blue Kingdom
- If you’re not already frightened enough of this place, I haven’t done my job. Be forewarned, death lurks around every corner.
- You can give it a go in an Altani-class but be prepared to run a lot. Your best bet is to be in one of the end-game locomotives (I’m partial to the Moloch-class liner).
- The Land of the Dead, as it turns out, is just another large bureaucracy. This one, though, is a particular nuisance because some of the ports are basically closed off to you unless you’ve got the correct “status.” There are four – invisible, antedeceased, ephemeral, and yoked (you start as invisible by default the first time you go there). You can change between these at various ports in The Blue Kingdom but it can turn into a tedious exercise with multiple steps to try and complete even simple quests in ports. If you do visit, try and stay focused on what you are there for. Get in, get out. It’s not a place to hang out.
- The enemies are nasty and you’ll meet a new type – the logoi (seen in the picture above). Your status can render some of these non-hostile to you, but there are plenty of other things that want to kill you.
- Repair opportunities are few and far between. You’ll spend a lot of time flying around with hull damage.
- I spent most of the game thinking that there was only one Quartermaster Officer in the game (or that I must have missed one somewhere) but you get an opportunity to actually “make” one in The Blue Kingdom if you progress far enough in a certain quest line. It’s got some pretty hilarious interactions with your crew.
And that’s all I’ve got. Hopefully you found some of this helpful. Safe flying out there -stay alive. Stay frosty. Stay DELICIOUS.
For veteran Sky-Captains only! WARNING: HERE THERE BE SPOILERS

I wanted to finish off with a section geared towards sky-captains who have already completed one or two ambitions and are now looking to optimize and make the most of subsequent playthroughs. Obviously, this is spoiler-heavy and very “gamey” in a min/max sort of way. A lot of the fun in Sunless Skies is enjoying the stories as they unfold and dealing with the consequences of your choices. That said, there is obviously a lot of repetition involved in subsequent playthroughs and I wanted to give some tips on getting the most out of those.

Re-locating your Officers with a legacy sky-captain:
It’s always a nuisance rounding up your Officers when you start your new legacy sky-captain. This is where I’ve found mine. I’m not positive if this is locked in the same way for everyone and I’m not sure if it varies based on which “ultimate path” you took for your Officer in their questline. I’m going to list them below based on which “final” Officer I ended up with, where applicable. As always, comments are welcome.
- Analytical Princess: London
- Stalwart Navigator: Eagle’s Empyrian
- Clay Conductor: Brabazon Workworld (note, the Conductor appears to be the only Officer whose questline restarts with a new sky-captain. In other words, you get to do it from scratch each time).
- Your Revolutionary Aunt: Pan
- ________ Forged Companion: Forge of Souls (you have to create this again with every new sky-captain, but that also means you get to choose the skill it has again, too)
- Signs and Signals Omnibus: On your locomotive immediately
- Defiant Devil: Pan
- The Ratty Reunion: London
- Judicious Driver: Port Prosper
- Gentle Eccentric: Lustrum
- Mascots: All mascots are found in their usual places. I’ve yet to hatch Dilly (working on it now) and am not sure whether you get to keep it with a subsequent sky-captain but I’d assume no.

Soul Flaws
The Soul Flaw mechanic ties into a number of questlines – either having certain flaws, or not having them. Your sky-captain starts with 2 souls as determined by your starting facets (thanks for Mechalibur for pointing this out in the comments). You can always get flaws removed in Carillon through the Indulgence system via various skill checks. There are also opportunities to remove them in The Blue Kingdom but they cost skill points and are obviously not preferable for that reason. Below is a list (again, work in progress) of the ways to gain the seven flaws. Some of these are repeatable, and some are one-time only. This list is also handy if you’re going for the “A Soul the Devil Wouldn’t Touch” Achievement. Note that I’ve seen two or three people on Reddit mention that it’s possible to get every flaw in Piranesi through various choices, but I can’t confirm that (although it is definitely possible to get a couple there, per below). Also, having Cold or Lightless is going to significantly limit what you can do in Caduceus.
Cold: In Piranesi, there are two ways to get it. (1) Take a tour with the Grey Conformer and fail to convince the Brittle Servitor to change with a Hearts skill check. (2) You can also get a random event on finishing a tour where a formless spirit appears and asks for a story. Ignore it and refuse.
Lightless: (1) Strike a bargain with the Measurers in the Crossroads event in Eleutheria. Then select the “Chrysanthemum Price” when it’s time to pay up. (2) Digging at Death’s Door in The Blue Kingdom. (3) Run out of time during a tour of the Brabazon Workworld. (4) I’ve heard you can get this after getting imprisoned in Piranesi, but cannot confirm.
Curdled: (1) During a random event in Port Prosper, attend a parade and mingle with the West-Enders. (2) If you are siding with the Brazen Brigade faction in Pan, you get a mission to annoint the ruin of the Chorister saint in the Heart-Catcher Gardens. Doing so gets you this flaw.
Stained: (1) Ask the Presiding Deviless about the nature of souls when completing the Spirifier questline. (2) Kiss a rose during the Rites of the Rose in Caduceus.
Clear: (1) Burn the Wreck of the Parzival at the end of the questline. (2) Destroy the Chorister Hive in Titania. (3) During your first visit to Achlys, refuse to get involved in the fight. (4) After getting imprisoned in Piranesi, ask the warden to guide you out.
Fermented: (1) In the House of Rods and Chains, present tribute to the spire (I believe you do this with golden amber or a Searing Enigma) and then accept Mr. Barleycorn’s tattoo. (2) Also at the HORAC, Commingle the Choirs. (3) Choose to take Percy Blythe to Hybras at the end of the Parzival questline. (4) Burn the Midnight’s Favor vine thing during the dream sequence at the mansion.
Flickering: (1) Refuse to pay the price after striking a bargain with the Measurers during the Crossroads event (note, this will also cost you Hearts). (2) Choose to blackmail the Spirifier at the end of the questline in Carillon (note, this one goes hand in hand with getting the “stained” flaw, as discussed above, if you want both). (3) This is another one I’ve heard you can get after getting imprisoned in Piranesi, but cannot confirm.
Even more spoilers for veteran sky-captains…

Choices/events that result in skill point losses:
I’ll abbreviate this SPL from here on out. Note, this list is only concerned with “surprise” losses where the result isn’t telegraphed in the game. There are obvious ones where the game flat out tells you the price/choice costs skill points. I’m not listing those – you can (obviously) read. This is a work in progress, please add ones I’ve missed in the comments):
- The Reach
- (Traitor’s Wood) When doing the Regent’s Grave expeditions there are two possible losses. During the second expedition you’ve got a chance to go on alone or send your crew ahead. Choosing to go alone causes -1 to each skill. On the third expedition, failing to gag yourself and your crew, and/or messing with the barrow stones rather than going straight to the hole in the ground will cause -3 Hearts.
Albion
- (Worlbury-Juxta-Mere) Waiting around to watch the Incognito Princess at work during her questline. -1 Heart.
- (Well of the Wolf) Throwing the ring into the well during the Incognito Princess questline. -1 to each skill.
- (Avid Horizon) If you proceed with the Displeased faction you ultimately are ordered to kill the leader. Refusing to do so costs -3 Hearts. The Displeased will also ask you to sacrifice a year of your life, which costs -1 Iron.
- (London/Inconvenient Aunt) When visiting February during the Aunt’s questline, drinking the brandy costs -1 Hearts.
Eleutheria
- (Any location) If you become indebted to the Measurers during a Meeting at the Crossroads and then refuse to pay the price demanded you lose between -1 to -4 Hearts (it appears to be a sliding scale that varies based on how high your Heart skill is).
The Blue Kingdom
- (Forge of Souls/Clay Conductor) When creating the companion at the Forge of Souls, you’ll get the option to give it your voice, or use the Conductor’s. If you use your own, you get -5 Hearts. However, this loss is avoidable if you’ve practiced singing with the Clay Conductor multiple times (he stops you from giving your own voice after you make the choice to do so).
Miscellaneous (these can occur on your locomotive in any location, depending on circumstances)
- (Incautious Driver) Near the end of the questline you can choose to become a host. It causes -1 Iron if you do.
- (Nightmares) If you get to 2+ levels of nightmares, there is a choice that can pop up that requires you to get -1 in a stat, but you get to choose the stat (unfortunately, I only had this happen once early in my first playthrough and don’t remember the details).
BONUS SECTION: A guide to obtaining all Steam Achievements
For all you achievement hunters out there…

Just complete the “Wealth” ambition, probably the easiest ambition to complete. In theory, you don’t even need to go to Eleutheria or The Blue Kingdom to finish this. Completing this also unlocks a new facet for legacy captains.

Pretty easy – you’ll probably get this one without even trying with your first sky-captain who survives a couple hours.

Another easy one, but you have to be playing in legacy mode, obviously.

One of the more challenging achievements. You need to acquire all 7 of the possible soul flaws. Fortunately, I’ve got you covered earlier in this guide with tips for getting them all. Best done with a little planning with a new sky-captain. Note that a new sky-captain always starts with two soul flaws based on their starting facets, so you’re already partway there.

You need to get your “Reputation: The Windward Company” to 90 (or higher). Note that this is different than “Fortunes: Stovepipes,” although both generally raise with the same activities. Just turn in port reports to the Prudent Secretary and turn in Mangled Tackety Nameplates to the Parsimonious Chairman in Port Prosper and you’ll get there eventually. A word of warning, though. If you’re working on this achievement, it’s best to hold off on completing the Regent’s Grave questline since it will throw the balance of power and your reputations out of whack while you’re tending Traitor’s Grove for a year.

The inverse of the previous achievement. Just turn in port reports to the Indurate Veteran and Charred Nameplates to Sweet Jane in Lustrum. Same warning applies about Regent’s Grave.

Another one you’ll probably get without even trying. You don’t need to do anything in the four regions – the achievement will almost certainly pop the minute you zone into The Blue Kingdom for the first time (since it’s almost certainly the last of the 4 regions you’ll visit with a new captain).

It’s entirely possible to unlock this unintentionally on one of your first playthroughs (which is exactly how I got it). If you’re doing it deliberately, probably best do do it with a non-legacy captain. Remember you can dump cargo while traveling so just sail out of New Winchester, dump all your fuel and supplies, and let nature take its course.

Another one you may just unlock accidentally. You can anger The Storm That Speaks by entering its vortex in Albion and failing the initial Hearts check. You can anger The Waste-Waif by sailing off the edge of the map twice. You can anger The Burrower Below by taking from a signal box in The Reach and not replenishing or stealing from its shrine in Carillon. It also seems to sometimes get angry if you use transit-relays frequently.

You need to find, and then complete, the “Wreck of the Parzival” questline in The Reach. The ship spawns randomly in the outer ring. Note that you’ll accumulate 20-30 Terror doing this questline, so plan accordingly. It doesn’t matter which of the 4 endings you choose. The end of this questline is also a good opportunity to acquire certain soul flaws, if you’re working on “A Soul the Devil Wouldn’t Touch” achievement.

+1 Return of the Jedi reference. Similar to the previous achievement you need to find, and then complete, the “Wreck of the Berrenger” questline in Eleutheria. The ship spawns randomly in the outer ring here as well. Note that you’ll need to make a minimum of two visits to complete the questline, and some time has to pass between them.

I actually haven’t completed this one yet (it’s my current ambition) and will update if necessary. I know that you unlock this ambition by progressing the questline involving the Dismal Chamberlain in the The Most Serene Mausoleum in Albion to a certain point. I’ve also read that the end of this ambition involves a couple dice rolls and it is possible to just outright fail it and have to start again with a new sky-captain (that’s one of the reasons I’m saving it).

+1 English Folk Song reference, but that’s pretty much all that’s endearing about this d*mn achievement (which I still don’t have as of this writing). You need to grind Curator’s Eggs in Eleutheria and then let them sit in your hold until they hatch. You’ve got a random chance of getting the mascot “Dilly.” I’ve hatched 19 eggs at this point and still haven’t gotten it. Curator’s Eggs are an uncommon spawn (they look like a spider-web with an egg in the middle, if you’re not familiar). The most reliable location I’ve found is the Chagatai Expansion near Eagle’s Empyrean.

+1 Eminem reference (or not). Another one I haven’t gotten around to completing yet but seems fairly self-explanatory. Just park yourself over a horror and wait. Once your Terror gets high enough, you’ll get the event that allows you to cut your Terror in half by taking a level of Nightmares. Just keep doing this until you max out your nightmares and then wait for a Nightmare event that kills you, I’m guessing (I’ve yet to let my Nightmares get above 2, so I’m not sure what happens at higher levels).

Another one you may get unintentionally while learning the game with a new captain. Get your Terror to 100 and wait for the event to pop where your crew mutinies. Fail it and die.
BONUS SECTION: Steam Achievements, continued…

This questline does NOT reboot with subsequent legacy captains so I’ve only done it once. I followed instructions and delivered the black box to London and got the achievement. My understanding is that there are other ways this questline can play out if you open the box or fiddle with it too much so I assume there are other possible resolutions of the questline that award this achievement as well, but I can’t speak to those.

The first of the 4 “realm exploration” achievements. You need to discover London, The Brabazon Workworld, The Most Serene Mausoleum, Perdurance, Avid Horizon, the Clockwork Sun, The Floating Parliament, The Royal Society, and Wolebury-juxta-Mare. You do not need to “unlock” the Wit & Vinegar Lumbar Company as part of this achievement, if I recall correctly.

The second of the 4 “realm exploration” achievements. You need to discover The Toll Tower, Death’s Door, Wellmouth, The Stone-Faced Court, The Forge of Souls, The House of Days and The Shadow of the Sun.

The last 3 of these are scouts that you buy from Mr. Menagerie, and you start with the Diffident Bat for free in your first game. Scouts are kept across legacy captains, so you can just stick the ones you’re not using in the Bank until you’re ready to complete the achievement. You get the Inadvisably Big Dog through the random Lammas festival event in Port Prosper. You may have to come back a couple times. You get the Perfect Pangolin in Langley Hall in the Study. You get the Useless Cat in the Well of the Wolf in Albion (and they’re apparently happy to be rid of it). I guess the Blemmigan Voyager doesn’t count as an “animal” since you don’t need it for this achievement, and you don’t have to have Dilly to complete this either.

Another one you’ll probably trigger unintentionally just by doing stuff in The Reach. Note that this is slightly different from the two “Reach Reputation” achievements above because the “Fortunes” status levels are measuring the state of the war (rather than your relationship with the factions). However, you’ll generally raise the Windward Company’s fortunes by helping them, and the same for the Tacketies. For this achievement, though, you just need to cause one of them to leave New Winchester and move their headquarters to Port Prosper (Windward Company) or Lustrum (Tacketies). I believe this happens when one of them gets to 80 or above (Thriving) – the other one leaves New Winchester.

The third of the 4 “realm exploration” achievements. You need to discover New Winchester, Magdalene’s, Polmear & Plenty’s Inconceivable Circus, Port Avon, Titania, Caillon, Hybras, Leadbetter & Stainrod’s Nature Preserve, Lustrum, Port Prosper and Traitor’s Wood.

And, finally, the last of the 4 “realm exploration” achievements. You need to discover Pan, Achlys, Caduceus, Eagle’s Empyrean, The House of Rod and Chains, Langley Hall and Piranesi. I can’t remember if you also need to discover the four “faction” stations around Pan but, if so, you can add The Brazen Brigade, Heart-Catcher Gardens, Winter’s Reside and The Gentlemen to the list, but they’re all right around Pan.

Complete “The Truth” ambition. I won’t spoil it here but this ambition definitely goes places and is a lot of fun. Take the warning seriously before selecting this ambition – you’ll be spending a lot of time in The Blue Kingdom. Much easier with a legacy captain so you’ve got a head start on things.

Pretty easy. You just need to find and enter a weft in Albion and then manage to escape it.

Haven’t completed this one yet but I’ve gone right up to the edge. You’ll get there by working on the questline where you rescue the Industrialist’s lost love. You’ll be given a choice to cling to life, or to slip into the light. The game makes it clear that slipping into the light will end your game (and presumably award this achievement). I’ve read that it’s kind of an epic ending.

Find the Wreck of The Boatman in the outer ring of Albion, and then complete its questline. Like the Wreck of the Parzival, this is another one where you’ll get 20-30 Terror.

Only possible in legacy mode, obviously. Otherwise no real tricks here.

You need to sail off the edge of the map (in any realm). Best done somewhere near an outer ring port – you may be hurting when you come back. You’ll get the option to “venture in,” which is what you want to do. You’ll also anger the Waste-Waif by doing this (if you’re working on that achievement as well).

Self-explanatory. Just play the game.

You need to complete the “Fame” ambition, one of the two easier “starter” ambitions. PROTIP: Some of the cantos require you to have a “Momentous Exploit.” It took me an embarrassingly long amount of time to realize that you get these by going to your publisher and then “trading in” one of the dozen or so completed questlines which qualify. I kept flying all over creation waiting to get a Momentous Exploit as a quest reward and getting more and more angry that it never dropped, LOL. Live and learn.
BONUS SECTION: Steam achievements, finale…

So, to complete this you need to get the “Strength of the Sun” (SOTS) status to 90+. The main difficulty here is that this status is constantly degrading on its own over time, so you’re swimming upstream. It’s best if you’re going for this achievement to focus on it and nothing else until you complete it. There are a number of activities you can do in Albion that increase SOTS. As a general rule, doing things that assist the empire increase SOTS, and working against the empire decreases it.
Here are a couple repeatable quests that increase it:
- Turning in port reports to the Genial Auditor in London (+1)
- Completing quests for the Royal Horological Office in London after you become a member (+5)
- Repairing a weft with a Ravelling Jack, and then turning in your observations to the Royal Horological Office. Again, you need to be a member to do these. (+3)
- Delivering specified port reports to the Mellifluous President at the Royal Society. Specifically, he wants reports from Polmear & Plenty’s, the Clockwork Sun, and the House of Rods and Chains. (+5 per report)
- Complete orders for the Office of Works in London. (+10)
Again, avoid doing questlines that work against the empire’s interests until you’ve got this achievement finished. Do not assist the New Street Line and absolutely do not spark the rebellion on the Brabazon Workworld. The way I ultimately ended up doing this was planning ahead with a legacy captain and stockpiling a bunch of trade goods in my bank. When I started the new captain, I was immediately in a position to complete a bunch of orders for the Office of Works in London and got +50 to SOTS almost immediately. This repeatable quest is, by far, the easiest and most efficient way to increase SOTS and get the achievement.