
Overview
List of where I found all enemies, and information on missable enemies
Bestiary Information
There are 4 bestiary achievements. Bestiary and Augment achievements are going to drive you crazy if you miss a piece because you’ll have to go through an entire playthrough to try to get it again. Also, you will need to do at least two playthroughs to complete the entire bestiary. Luckily, information on the bestiary carries over in New Game+. And most importantly: You need to kill the enemy to receive bestiary credit. This means enemies who run away or self-destruct during battle won’t count. So if your bestiary is filled with all monsters but not complete it means you didn’t kill an enemy off. You’ll have to go through it and find an entry like this and make sure you kill the enemy
Here’s a list of the achievements:


Before I list the entire bestiary I need to bring to your attention important and very missable enemies in the game. Since there are areas you can’t revisit in the game or enemies that self-destruct you’re going to need to make sure you fill up your bestiary and kill everything on time.
Story – In Kaipo after taking Rydia to the Inn. Make sure you kill the General first before attacking the other enemies. If his soldiers are killed first then he will flee. I suggest you save once you get to the desert to ensure you get this entry.

Story – When Fabul is getting attacked. Same as the general, kill this enemy first for credit. I suggest saving after Mount Hobs/Before entering Fabul to ensure you get this entry.

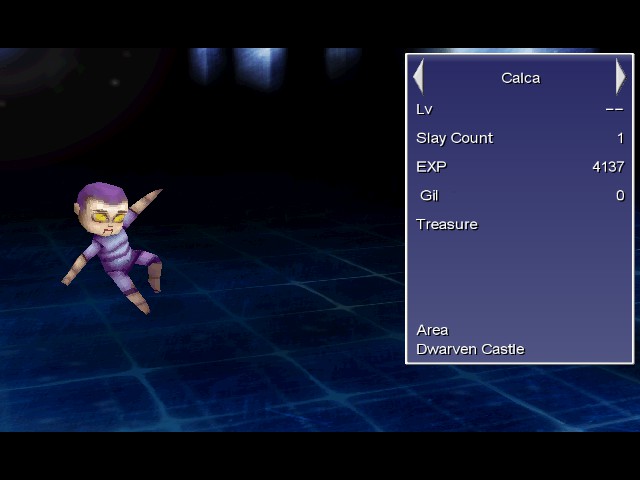
Story – When you arrive at Dwarven Castle’s gem room you’re going to be fighting six doll enemies. Make sure you kill one of each enemy before they combine into Calcabrina. I suggest you save once you land in the Underworld/Before enterting Dwarven Castle to ensure you get this entry.

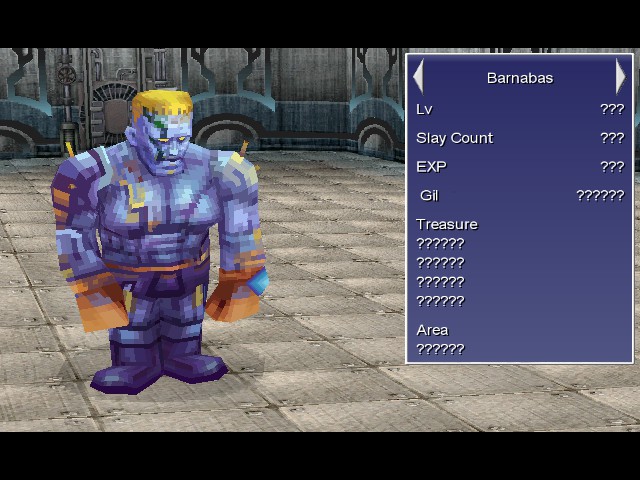
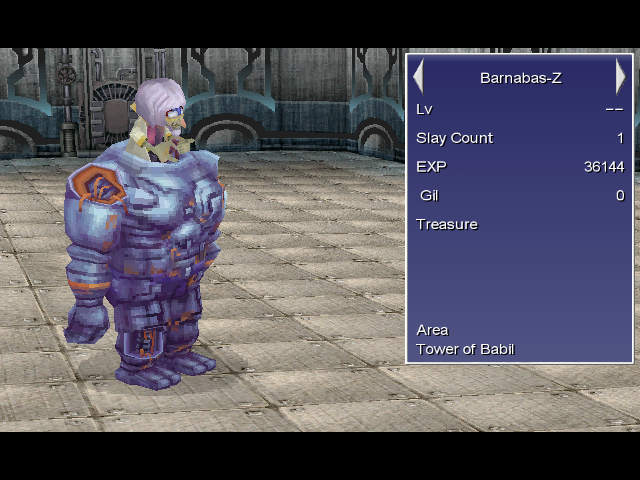
Story – This one’s going to be a pain to get. It’s impossible to get both the Doctor and Barnabas/Barnabas-Z in a single playthrough. I suggest starting doing Barnabas-Z first because this might take a few tries to complete. Make sure you have a save ready in the Tower of Babil in case you can’t get this one. When you reach the end of the Tower of Babil B8 you’ll have to fight Dr. Lugae and his robot Barnabas. You need to kill Barnabas first. While you try to kill Barnabas Dr. Lugae will try to heal him, but just make sure you kill Barnabas first. After Barnabas gets killed don’t attack Dr. Lugae until he takes over Barnabas and turns into Barnabas-Z. Quickly kill this version of Barnabas before Lugae self-destructs, because you won’t get the credit if he self-destructs. I suggest having Yang ready with three Focuses to ensure you can damage Barnabas-Z when it comes out.
On your 2nd playthrough you can just kill Dr. Lugae first. He won’t be hard, Barnabas also helps damage him, and if you do kill Dr. Lugae you’ll skip the entire Barnabas-Z battle.


You’ll find a lot of these throughout the game. They hatch different kinds of enemies, and the rarest ones to spawn would be dragons. You need to kill the egg before the enemy inside hatches. Also, keep in mind that Mystery Eggs absorb elemental damage so if you have elemental weapons you might have issues killing one.

To battle Proto-Babil you need to have Edge steal Dark Matter from Zeromus during the final battle. This item carries over to New Game+. Once you arrive on the moon on your second playthrough head to statue of a face on the ground to activate this boss. This is a very hard end game boss, so it’s a good idea to try to level up or find a good strategy guide.


That’s about it for single enemies. Here I’ll list dungeons that can’t be repeated. I won’t go in-depth of how to find these enemies since you can use the complete bestiary for that, so just be sure to note what dungeon you’re in so these entries don’t get missed.
- 57. Centaur Knight
- 58. Sorceress
- 59. Purple Bavarois
- 60. Gremlin
- 61. Black Knight
- 62. Frostbeast
- 63. Ice Lizard
- 64. Fell Turtle
- 65. Marionetteer
- 66. Marionette
- 67. Soldieress
- 89. Flamehound (Got it through a monster-in-a-box in 2F, but something else might spawn so try Tower of Babil if you can’t get it)
- 90. Flame Knight (Same with Flamehound)
- 83. Security Eye
- 84. Chimera
- 85. Black Lizard
- 86. Stone Golem
- 87. Naga
- 88. Evil Doll
- 89. Flamehound
- 90. Flame Knight
- 91. White Mousse
- 92. Medusa
- 93. Mystery Egg
- 94. Skuldier
- 95. Blood Bat
- 101. Mythril Golem
- 97. Coeurl
- 98. Sorcerer
- 99. Mad Ogre
- 100. Lamia Matriarch
- 101. Mythril Golem
- 102. Storm Anima
- 104. Ghost Knight
- 105. Balloon
- 106. Green Dragon (Hatched from an egg, but these can be found with sirens later)
- 132. Clockwork Soldier
- 133. Beam Cannon
- 134. Clockwork Dragon
- 135. Armor Construct
- 136. Searcher
- 137. Centaurion
In the next section I’m going to provide a complete bestiary. The complete bestiary is going to list where I found the enemies, but keep in mind of course that most enemies spawn in other areas.
Complete Bestiary (001-025)

[/tr]


North – B1


North – B1

North – B1

South B1

South B1

South B1

North – B1


In the room with the Lamia Harp chest


Complete Bestiary (026-050)


Complete Bestiary (051-075)


Complete Bestiary (076-100)


Ambusy by chest

treasure room in the east

hatched from Mystery Egg

Empty room in the far east

Summoned by Security Eye

treasure room in the east

Abush by Chest

Abush by Chest

treasure room in the east

room with Ice Armor


Bestiary Part 2 – 101-200
[link]
In order to make this guide loader faster, I’ve gotta upload the bestiary into two parts. Bestiary part will will cover enemies 101-200. Click here.