
Overview
A complete walkthrough for all the 3 different Dimensional Vortexes (12000 B.C., 1000 A.D. and 2300 A.D.) with the goal to be as precise and informative as possible while avoiding spoilers from those areas.
1.1 – Introduction
Greetings,
My name’s Shabadadu, just call me Shaba. I’m a big fan of old school JRPGs and Chrono is no exception for that, in this walkthrough I’ll guide you through all the optional sidequests known as Dimensional Vortexes. I’m writing this as I realized there aren’t many guides regarding this specific sidequest, and the ones that are out there aren’t as precise and/or complete for my completionist kink, so hopefully my guide can be useful for you and anyone else willing to adventure through this optional content.
That being said, this is my first written guide here on steam and english isn’t my native language so if you do find anything wrong with the guide, be it on the information I gave you or typos, feel free to message me so I can fix it asap.
Also, I know this guide isn’t all that great compared to the big ones but don’t post it in other places without giving due credit as I’m trying to make it to the best of my abilities. Don’t really need to message me, just make sure you don’t cut this introduction from it and I’ll be more than happy already 😀
If you want to talk about this guide with me you can contact me via steam or e-mail.
Steam: [link]
e-mail: [email protected]
1.2 Acronyms
DV(s) : Dimensional Vortex(es)
CT: Contain Treasures (I’ll be using that on the different map sequences you can get, so you know whether or not you should restart for a sequence reset)
NM: New Map (I’ll use NM and RM on the bookmarks in case you want to skip the Reused Maps)
RM: Reused Map
N: North
S: South
W: West
E: East
NW: Northwest
NE: Northeast
SW: Southwest
SE: Southeast
HP: Health Points
EXP: Experience
TP: Tech Points
G: Gold
1.3 – General Info
So, what are the Dimensional Vortexes?
There are a total of 3 Dimensional Vortexes, their sprites are similar to time portals that you find through the game, except they are purple and are in the world map. They spawn after you beat the game, and doesn’t go away if you choose to NG+. They appear in the following timelines: 12000 B.C., 1000 A.D. and 2300 A.D., as much as they are completely optional to the game all of them have precious treasures with super good equipments, on top of that they also unlock one of the optional endings of the game that is also a Steam achievement, so that’s enough reason to try and complete them.
To start with, all the vortexes have reused areas (RMs) from the original Chrono Trigger game and they work as following: everytime you enter a Dimensional Vortex you’ll be facing a sequence of map sections (a total of 5 screens) before you get to the Nameless Cave, from where you can then advance to the actual side-quest.
All 3 Nameless Caves are pretty much the same: you start in the south region, go north until you reach a fork, to East is a Save point, to West is a portal that will take you out of the DV and to North it’s the entrance to the vortex.
The sequences you can get are completely random, and they might change everytime you re-enter the Dimensional Vortex but they all end in the Nameless Cave. Using my guide you’ll know which sequence you got based on the first screen after entering the Dimensional Vortex.
You might be wondering why this is important and the answer is, on top of those reused screens there is a few new areas (NMs) for each vortex that isn’t used outside of it, and some of these NMs have treasures. That being said there is a chance you’ll get a sequence that DOESN’T have that, in which case I recommend saving your game before going inside the DV so if that happens you can reset the game and get a sequence that has the map you want. Or maybe you’re just lazy and want to avoid reused fights and maps by sprinting as fast as possible through them, for that reason I’ll organize all the possible sequences in order from the quickest to the most boring one (with unskippable fights and confusing maps), prioritizing maps with treasures.
Since most of what you’ll see on the first half of the DVs is pretty much reused content, I’ll split each vortex into different parts, one for each screen, you can skip anything you want as long as you keep in mind: NMs are New Maps you never saw outside of the DV, and CTs are maps that contain new important treasures, so make sure to check the bookmarks with (CT) on it to make sure you got all the treasures.
I’ll also refer to each of the vortexes by the timeline they are located in, those three being: Antiquity DV (12000 BC), Present DV (1000 AD) and Future DV(2300 AD).
1.4 – Layout
Just to briefly explain how I organized this guide:
1.x : is regarding some useful information before you read the guide itself.
The three different vortexes will be bookmarked with:
2.x (Antiquity)
3.x (Present)
4.x (Future)
Each of the vortexes will be divided into x.1 and x.2
x.1 will have nine sections each referring to the sequence and maps before the nameless cave in x DV.
x.2 will have only one section which will refer to the actual vortex side-quest.
Here’s a list of all the maps that HAVE missable stuff:
Antiquity DV:
2.1.1 (CT)
2.1.2 (CT)
2.2.1 (CT)
2.2.2 (CT)
Present DV:
3.1.1 (NM)
3.1.2 (NM)
3.2 (CT)
Future DV:
4.1.1 (CT)
4.1.2 (CT)
4.1.3 (NM) – P.S.: there are no treasure chests here BUT it’s an interesting new map, make sure to check it out!
4.2.1 (CT)
4.2.2 (CT)
End of Time:
5.1 (CT)
2.1.1 – Antiquity DV: Map Sequences
These are all the possibles sequence of screens you can get when you enter the Antiquity DV. As I mentioned in the general info section, I’m ordering them following a priority (from fastest to most boring, while also prioritizing the routes that contain treasures).
Pretty much every route that contains the NM with a treasure also has at least one awful map regarding encounters, so there isn’t much of a difference between all the possible routes in the Antiquity DV.
- Guardia Forest -> Strath -> Dactyl Nest -> Site 16 -> Manolia Cathedral (CT)
- Fiendlord’s Keep -> Sunken Desert -> Strath -> Manolia Cathedral -> Dactyl Nest (CT)
- Strath -> Manolia Cathedral -> Fiendlord’s Keep -> Mountain of Woe -> Guardia Forest (CT)
- Site 16 -> Fiendlord’s Keep -> Mountain of Woe -> Sunken Desert -> Strath (CT)
- Manolia Cathedral -> Site 16 -> Sunken Desert -> Strath -> Mountain of Woe (CT)
- Sunken Desert -> Guardia Forest -> Site 16 -> Dactyl Nest -> Fiendlord’s Keep
- Dactyl Nest -> Mountain of Woe -> Manolia Cathedral -> Guardia Forest -> Site 16
- Mountain of Woe -> Dactyl Nest -> Guardia Forest -> Fiendlord’s Keep -> Sunken Desert
2.1.2 – Antiquity DV: Strath (NM,CT)
Strath
Enemies:
That’s a new map added for this DV, follow me as I guide you through the treasure chests, from the beggining take the SE road and go straight down, you’ll be take out of your way to fight two imps, as soon as you finish fighting them, hug the E wall and go S to find a secret passage.
Open the chest for an Angel’s Tiara, the best headgear for female characters in the entire game. Go back through the hidden passage and follow the other path. It’s pretty straight forward, and as much as it looks like that there are other hidden passages in this map, the Angel’s Tiara was the only item in this screen so don’t worry, keep going S until you exit to another map.
This is the only map before the Nameless Cave of this DV that has treasures, so you can skip to “2.2 – Antiquity DV: The Actual Vortex (NM,CT)” in the bookmark if you wish to.
2.1.3 – Antiquity DV: Manolia Cathedral (RM)
Manolia Cathedral
Enemies:
This is the first “dungeon” in the game, so you’ll probably want to avoid as much battles as possible for the sake of your sanity. Go up the stairs and go W, go down the leftmost staircases, you’ll slide down through it, avoid the sleeping underling and enter the door, avoid the bats and ignore the switch as it’s a bait, go through the N door, you can avoid one battle here by hugging the S wall while you go E, go around the room avoiding the battles, soon you’ll find another room with one switch, press it. Keep going and go up the stairs back to the starting point, except now the center room will be accessible so enter it and play the organ to unlock another door on the lower part, so go down the stairs again (any of them will do) and go all the way to the new door to exit this map.
2.1.4 – Antiquity DV: Fiendlord’s Keep (RM)
Fiendlord’s Keep
Enemies:
The key to this room is that you don’t really need to go down the ladders to avoid the roundillos, as long as you’re standing still when they reach you, they’ll pass right through you, avoiding the battle. Keep doing that until you’re out to the next screen.
2.1.5 – Antiquity DV: Mountain of Woe (RM)
Mountain of Woe
Enemies:
Go down to the lower ground and up the chain as you fight the gargoyles and bomber birds, from there go E, follow the path and cross another chain. Now hug the S wall to avoid one fight and go all the way down and around the corner back N, go to the lower ground and then E, hugging the wall to your left to avoid another battle, go all the way S and down the chain to exit the map.
2.1.6 – Antiquity DV: Guardia Forest (RM)
Guardia Forest
Enemies:
From the start, go W and all the way S until you find the second group of three Amanitas (mushroom bois), you can avoid every battle in this section so just avoid them and go around the threes to your E then S to exit the map.
2.1.7 – Antiquity DV: Sunken Desert (RM)
Sunken Desert
Enemies:
This room is very small and all you need to do is go N to exit it but you’ll face multiples unavoidable encounters. Keep in mind the sand will be making you slide all over the place, try to keep as centered as possible while you’re going N to avoid the battle triggers in the corners of the screen.
2.1.8 – Antiquity DV: Dactyl Nest (RM)
Dactyl Nest
Enemies:
Fight the two Cave Apes and the Schist as you enter the map, climb through the rocks that were behind the Schist and go all the way N to climb another set of rocks, go around the W ledge and climb the rocks behind the rightmost schist, keep going N and fight the two Avian Rexes, climb the last set of rocks to exit the map.
2.1.9 – Antiquity DV: Site 16 (RM)
Site 16
Enemies: Floral Horror, Craters
Hug the W wall and go all the way N until you find one Floral Horror and three Craters, you can avoid them and go to E towards that running Rat, if any of the rats in here touch you they’ll steal a potion from you. Now follow the path trying to avoid the rats (or not, potions are cheap anyways). You can avoid triggering the fight with that Floral Horror by hugging the S wall and going around that section, eventually you’ll reach five craters which are also avoidable by simply not touching them, keep going and you’ll be out of this map.
2.2.1 – Antiquity DV: The Actual Vortex (NM,CT)
Enemies:
Finally after you went through the previous map sequences you arrive at the Nameless Cave, as I mentioned in the introduction of this guide, this area will be common to all three vortexes, and it’s pretty straight forward, there are only three ways you can go: To W you’ll leave the DV, to E there’s a save point, and to N you’ll continue through the DV. So use the save point if you want and then go N to the next screen.
You’ll be in a snowy area with an amazing music that is new and I love it, this place is called Frozen Cliffs and there are plenty of treasures to get here so follow me!
From the start, go E and you’ll be attacked by a bunch of imps, climb that cliff they just jumped from, those climb spots are kind of hard to see so keep an eye for it. After you climb it go straight N to climb another of those, now go W and down the rocks, open the chest for a megaelixir, you’ll be attacked by a Chaos Mage.
Now go climb back up and keep climbing through the rocks right in front of you until you see a trasure chest behind a tree to W, open it for a Lapis. Now go all the way E and climb the rocks twice to find a bunch of imps, you can avoid them and go W in this platform to climb up another set of rocks.
From here climb up twice and fight the four Bone Knights, go to East and descend twice through the rocks and open the chest for a Hi Potion. Now climb back up, it’s important to note that there is a small chance you’ll see a rock-like enemy in here, it’s the Wonder Rock, an enemy that yields the key item required to make the best piece of equipment for Lucca, he’s pretty hard to kill as it has a super high evasion and a lot of HP but you can easily charm the item instead of killing it. If you choose to try and kill him just make sure to use only high-damage techs.
Ok, now comes the puzzle part of this map, keep going E and eventually you’ll reach a path that goes down, as soon as you take this path you’ll slide to the next screen. In here, any movement that you do will start making you slide, your goal is to slide to those caves but the route I use to get all the treasure is:
On your first way down, press left and up (so you don’t slide) and go all the way to the W corner of the screen, go through that cave you just got to and climb down the rocks, open the chest for a Shadowplume Robe, the best chestpiece for Magus. Climb the rocks back up and fight the two Chaos Mages and the Bone Knight, now go down the rock they were guarding, you’ll notice it’s a one way as you can’t climb it back up but don’t worry, open the chest for one Elixir and go all the way E and climb yet another one way ladder. Keep going E until you see a long climbing spot, go up it and follow the path.
You’ll be back at those imps so go W and climb the rock, backtrack to the sliding puzzle screen. Once you’re here again, this time you’ll press right and up to go all the way to the E corner of the screen, then drop the buttons to slide down, go through the cave and drop down, fight the two Soul Stalkers and the Chaos Mage and go W, you’ll be in the winding passage.
Here there are a total of three hidden treasure chests, go just a little bit to W from the start and you should be able to see a room right below you, go around it hugging the S wall and you should be able to find the entrance. Open the chest for Venus Bow, the ultimate weapon for Marle. (it’ll always hit for 777 damage, so keep in mind that if she gets confused and attack an ally, it will hit for 777!)
Now keep going to W, eventually you’ll see yet another secret room, again, hug the wall and go around it and you’ll eventually find the secret entrance. Open the chest for a Megaelixir.
Now go all the way to the N corner of this map and then go E to the last room, which isn’t really that secret. Open the chest for a Turbo Ether and backtrack to the beggining of the cave, exit the place to be back at the frozen cliffs. Now drop down through the only possible way you can go and open the chest for a Hi Potion. Go all the way E fighting the Soul Stalker and Bone Knight along the way, drop down once more and go E. Instead of climbing the rocks back up, keep going E to enter the next screen.
Fight that Chaos Mage and the Bone Knight, now try to reach the SE corner of this section and you’ll see three shining dots on the ground, from here you can only reach one right now but we’ll get there, pick the one you can reach for a Magic Capsule. From here go straight N and you’ll find a Heckran-like creature called Snowbeast, it yields a very good EXP so fight it. Now go straight S to grab the Speed Capsule, go straight E from here and you’ll eventually reach a kind of hidden path, go S through it and then W while hugging the N barrier from this section to reach a Strenght Capsule.
From here go straight S until you fight another Snowbeast, now go E and open that chest for a Regal Gown, the best chestpiece armor for Marle and Ayla. From here go E all the way and you’ll eventually find a way to a lower ground, take it and you’ll fight another Snowbeast. To SW of that beast is the last chest of this DV so open it for one Elixir. From here go all the way E to the next screen.
2.2.2
In here you’ll fight two Snowbeasts at once, and they give awesome experience, you probably also realized that they attack mostly with ice and water magics so this is the best EXP farm in my opinion as you can equip blue vests and plates, berserker rings and/or any accessory with counter attack, and now all you have to do is go back and forth as your party kills the snowbeasts without any input while not taking any damage.
After you fight the two Snowbeasts, keep following the path and take the portal to the next place, the Twilight Grotto. Keep walking through the cave, use the save point if you want to and now is a good time to equip your main party with any Blue Vest/Plate that you have as the next boss will have a lot of ice based attacks. Also, it’s a good idea to have Ayla in your party as you can charm one Haste Helm from the boss, which is a decent accessory for most characters.
Keep going through the cave, ignore that first portal you see as it’ll take you out of the DV. Eventually you’ll reach a point where Marle will feel something calling for her, you’ll be forced to make a party with her as the leader. Watch the small cutscene as you now face the boss:
This boss fight is relatively easy, and it becomes stupid easy if you equipped the water/ice absorbing equipments I recommended. Fire techs hurt her a lot so if you have Lucca in your party you can take advantage of it, but even with physical attacks and other techs this fight really isn’t hard, just keep your party with at least 300 HP all time. Eventually she’ll start countering physical attacks and heal herself for a lot of HP, just try to outdamage the healing and you’ll take her down before you even notice it. Make sure to charm her before you defeat her to get that haste helm.
When the fight’s over, Marle’s evil clone will fuse with her, improving her stats of Speed (+2), Accuracy (+5) and Stamina (+5) permanently.
3.1.1 – Present DV: Map Sequences
These are all the possibles sequence of screens you can get when you enter the Present DV. As I mentioned in the general info section, I’m ordering them following a priority (from fastest to most boring, while also prioritizing the routes that contain treasures).
Since the present DV doesn’t have any new treasures pre-nameless cave this will be straight up the fastest (with most avoidable and/or escapeable fights).
- Hallowed Falls -> Black Omen -> Prison Towers -> Tyranno Lair -> Truce Canyon
- Black Omen -> Prison Towers -> Ocean Palace -> Abandoned Sewers -> Tyranno Lair
- Geno Dome -> Truce Canyon -> Tyranno Lair -> Prison Towers -> Black Omen
- Ocean Palace -> Tyranno Lair -> Hallowed Falls -> Truce Canyon -> Abandoned Sewers
- Abandoned Sewers -> Hallowed Falls -> Truce Canyon -> Geno Dome -> Prison Towers
- Tyranno Lair -> Ocean Palace -> Abandoned Sewers -> Black Omen -> Geno Dome
- Truce Canyon -> Abandoned Sewers -> Geno Dome -> Ocean Palace -> Hallowed Falls
- Prison Towers -> Geno Dome -> Black Omen -> Hallowed Falls -> Ocean Palace
3.1.2 – Present DV: Hallowed Falls (NM)
Hallowed Falls.
Enemies:
From the beggining go W and you’ll fight two Ogans Youth on the bridge, keep going left and you’ll find another ogan youth which is avoidable, go up the ladder and follow the path behind the waterfall right beside a sleeping Ogan Youth, which also is an avoidable fight. Go all the way E until you fight one Ogan Youth and one Ogan Chieftain, then go N to exit the map.
Since the other maps don’t have any treasure chests and you already know them, you may skip to the “3.2 – Present DV: The Actual Vortex (NM,CT)” section if you wish to, but I’ll leave all the map guides here together with some useful info as well.
3.1.3 – Present DV: Black Omen (RM)
Black Omen
Enemies:
From the beggining, turn the first left and you’ll face two Ghajs and two Narbles (you can avoid that fight by hugging the statue’s wall), keep following the path to see a fight with four nomads and one watcher, you can avoid them just by going through the middle but they give high TP if you still need to learn some techs. Keep going to fight two more Ghajs (this fight is avoidable by going through a very specific route, the following picture is in case you want to avoid it (but you can charm magic capsules from this fight so unless you’re maxed out I wouldn’t advice doing so):
If you’re playing on steam, this is definitely the BEST place in the entire game to farm for magic capsules, following this process:
Fight the first two Ghajs and two Narbles, charm them with Ayla (duo charm with Marle if you want higher chance), Luminaire them and then bookmark your game on the settings, the fights will reset so you can just “resume”, rinse and repeat. I maxed out a couple characters magic stats by doing this.
3.1.4 – Present DV: Abandoned Sewers (RM)
Abandoned Sewers
Enemies: Dondrago, Rat
From the beggining simply go E and follow along the path, keep in mind you can avoid every enemy simply by not touching any of the objects in the ground (including the save point).
3.1.5 – Present DV: Tyranno Lair (RM)
Tyranno Lair
Enemies:
On this room there are a lot of invisible teleporters that take you to another place in the room, there’s a path you can take to avoid all fights and teleports, which I recommend doing since there are no chests here to open anyways.
Just follow this path:

3.1.6 – Present DV: Prison Towers (RM)
Prison Towers
Enemies:
The guards here are avoidable by sneaking on them and attacking, I highly recommend doing so as the fights here give pitiful exp and TP and you get a mid-potion if you sneak on them too so there’s no reason to fight the guards if possible.
From the beggining, go right, sneak on the first guard, interact with his corpse to get a mid-potion, from here there’s a fork, you can either go right and sneak on the next guard for an extra mid-potion or go up and sneak on the other guard and then exit the place to the next map.
3.1.7 – Present DV: Truce Canyon (RM)
Truce Canyon
Enemies:
This is one of the first areas you ever been in chrono trigger, all enemies give pitiful EXP and TP so just avoid them all.
From the beggining, go W and up the ladder avoiding the only fight in this map, go all the way N, cross the bridge and then go down the ladder and immediatly to E to exit the map.
3.1.8 – Present DV: Geno Dome (RM)
Geno Dome
Enemies:
Press up, literally. You can charm elixirs from all enemies in here, they sell for 10k and are overall good items, do so if you want to.
3.1.9 – Present DV: Ocean Palace (RM)
Ocean Palace
Enemies:
This map is straight forward but has a lot of unavoidable enconters (you can escape all of them tho), just keep going down on the stairs as you fight/escape the enemies, you can technically avoid the four monks on the 2nd set of stairs but you can also run from their battle if you don’t need the exp nor TP, which I find easier to do. The other four monks on the next room are also avoidable by not touching them but keep in mind the statues will be shooting fire orbs at you that damage your party, but it’s not a big deal.
3.2 – Present DV: The Actual Vortex (NM, CT)
Enemies:
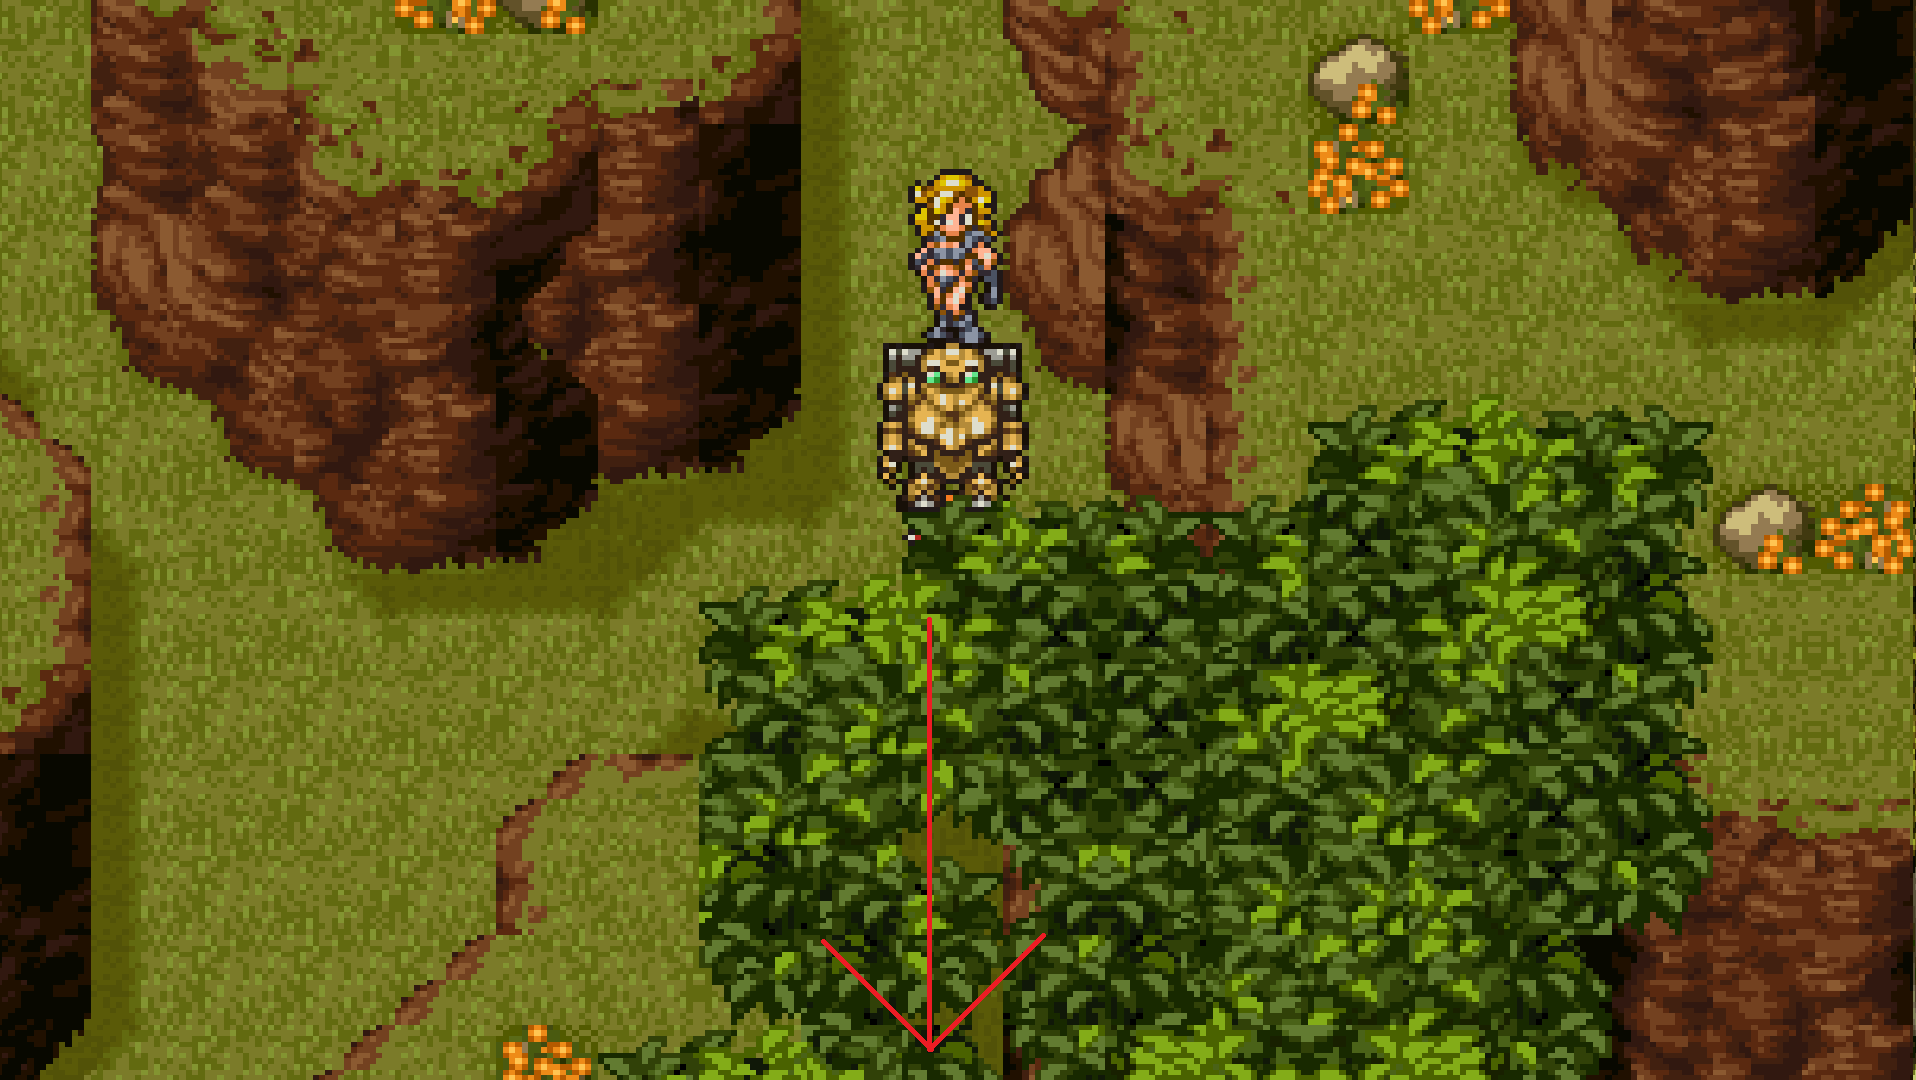
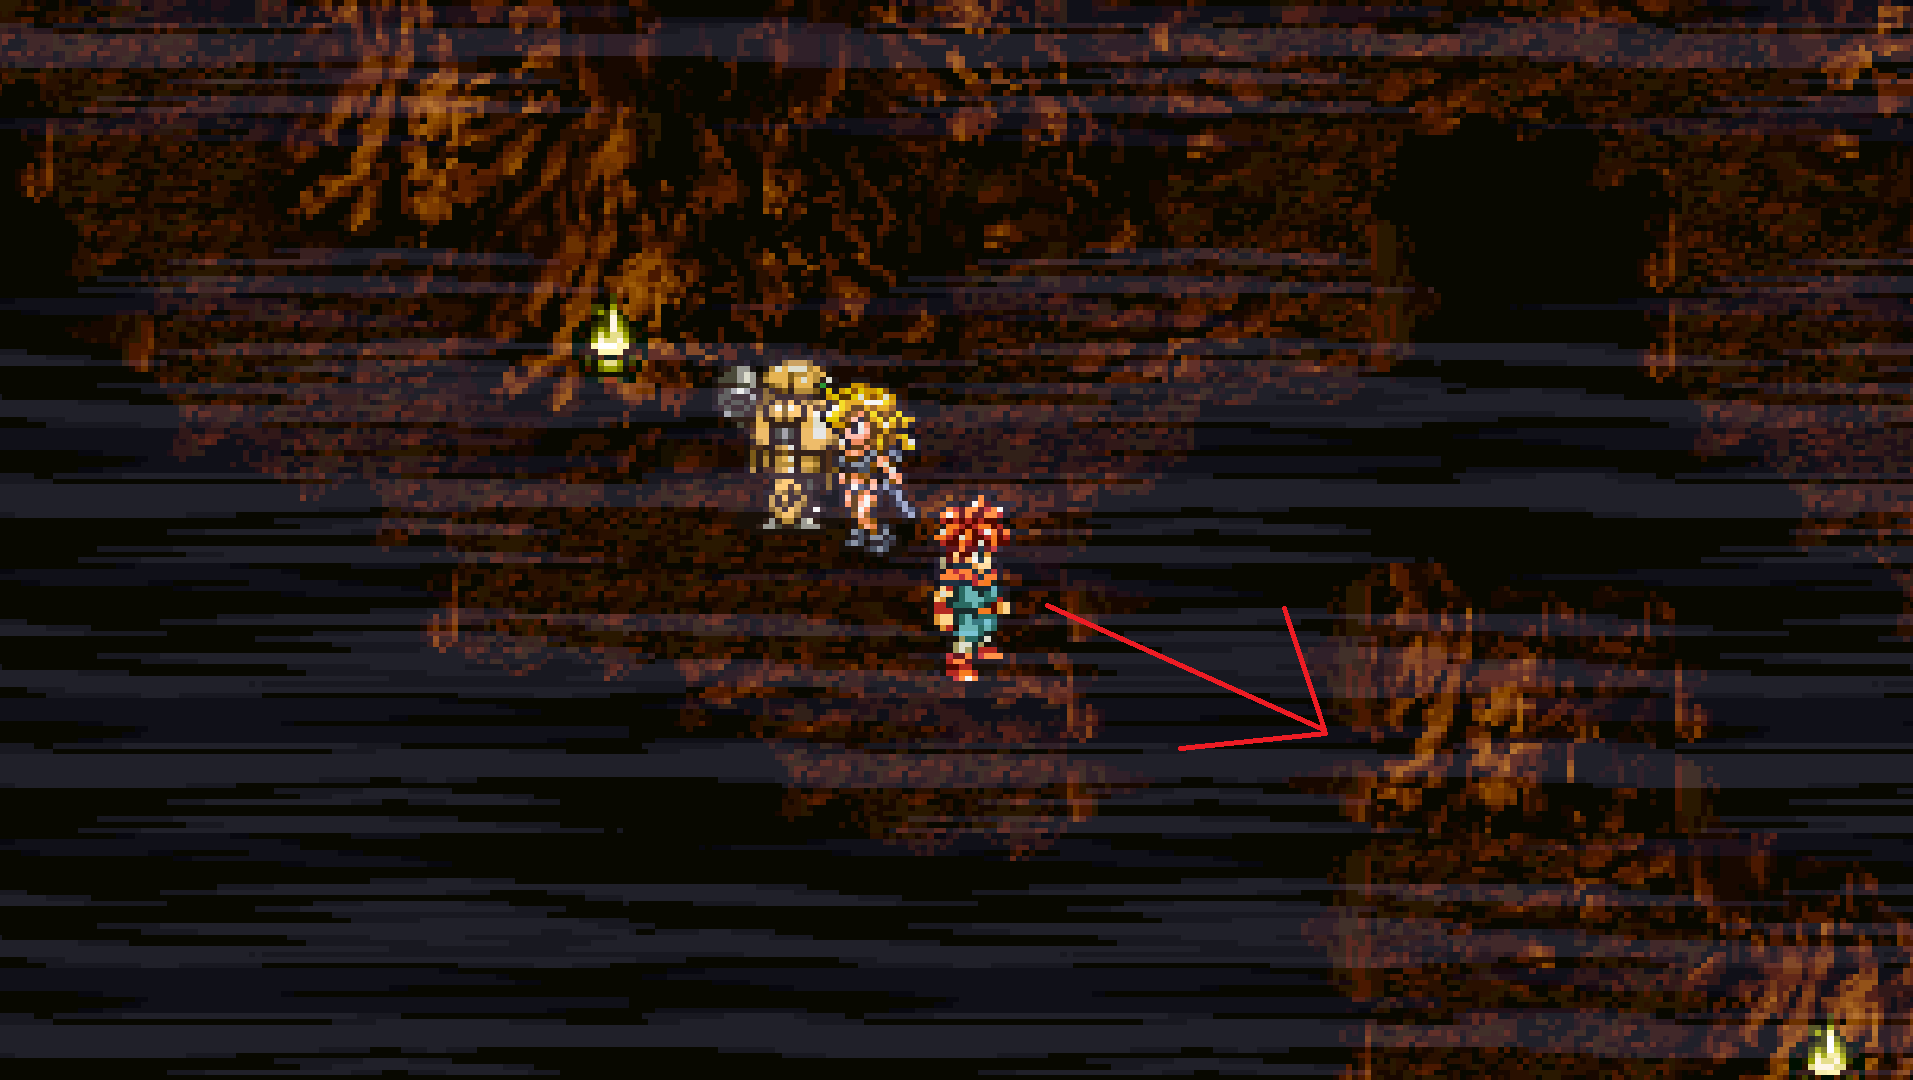
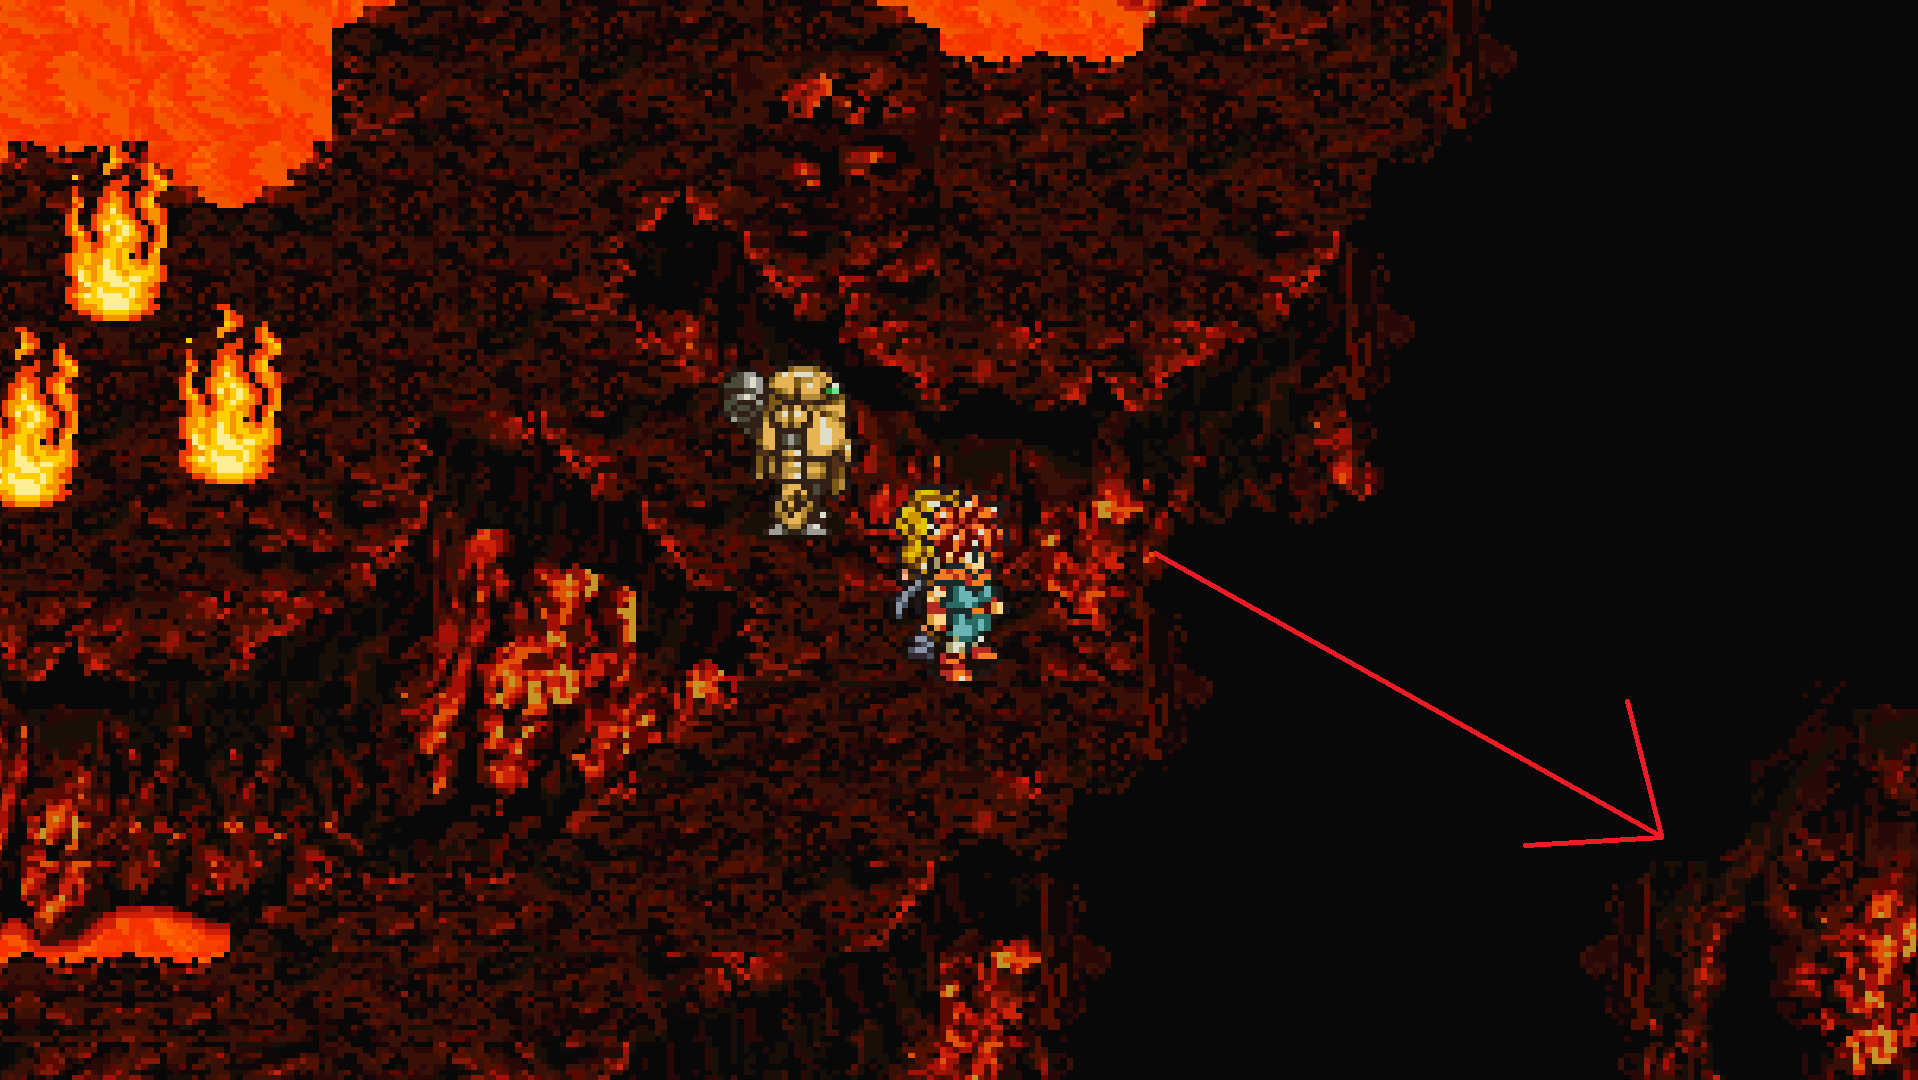
Once you go through the north teleport in the nameless cave you’ll appear inside of what seems to be a volcano. From here you can only go N for now, but keep in mind this lake of lava to the E of the screen will be a passage in a while.
So follow N to the next screen, here you’ll see three rats on a merry go round guarding a fork, you can choose to avoid them or fight them, regardless of what you choose your only option is to go E as the N side of the fork is a dead end for now.
Follow the path, fighting the fireball and two dire rats along the way, until you reach yet another fork, for this one take the W road and enter the cave, open the two chests for an Athenian Water and a Master’s Crown (the best male headgear in the entire game).
Backtrack to the fork in the previous screen and take the E road this time, as soon as you fight the Red Ghaj there’s a hidden path (just hug the W wall to find it), in here you’ll find a Strenght Capsule close to the lava, and to E there’s another hidden passage leading to a chest cointaining the ultimate weapon for Magus, the Dreamreaper.

Now go back to before the hidden path and go E to the next screen, from here follow the only path available, fight the two fireballs along the way (or avoid them), keep going through the path, fight the four dire rats that appear. Go down the two ladders to fight another Red Ghaj, finally, go down the last ladder, as soon as you see the three fireballs there’ll be a secret room on the SE of the screen so hug that E wall and slowly go down to find it, open the chest for the absolute best weapon for Lucca: the Spellslinger, this weapon changes it damage based on the last digit of Lucca’s MP so as long as you have it as 9 and don’t cast spells with her, she should be doing a whooping 2k damage with a non-crit attack!
Now go back to the fireballs and keep following the path and eventually you’ll reach the next screen.
In here, follow the path and go up the ladder, fight the two Deathcreepers, follow the only path available going up and down some ladders until you reach a fork with one ladder on W and one on E, first go up the West one to get a Strenght Capsule on the ground, go back and take the E one this time, fight the four Deathcreepers and go down the rightmost ladder to get an Elixir, go back up and take the center ladder to the next screen.
You’ll be in the very first screen of this vortex, activate the switch to drain some of the lava in the volcano, this will open two paths: the one in the first screen so now you have a shortcut, and the other one is that first fork being guarded by three dire rats, so that’s our goal.
After pushing the switch, go S and follow the path to the next screen with the three dire rats, this time you’ll take N in the fork, follow the path and go down the ladder that is now accessible, enter the cave and push yet another switch, this will spawn a ladder in the big room that you have to go around.
So after pressing the switch, go back to the merry go round and go E in the fork once again, fight your way to the next screen, follow the only available path until you fight four dire rats, this ladder close to where you are right now wasn’t here before so use it to go down, to the right there’ll be a hi-potion inside a chest, take it and enter the cave to your left.
Follow the only path available until you reach a portal, take it and you’ll be inside the Twilight Grotto, a place common to all three vortexes, follow the path to a save point, save and use a shelter if you need to. Keep following the path, you’ll see another portal that will take you out of the vortex but that’s not what we want so keep going through the cave, here, if you followed this guide you’ll fight a boss, to avoid spoilers I’ll only give his stats and the general strat to fight it (depending on which order you made the DVs this boss can be found in another DV).
The first half of the fight is easy, once the boss has less than half his HP he gets a boost and some of his attacks start doing party-wide damage rather than single target, but the fight is not really hard, just keep your HP over 300, especially if he’s close to dying as he has a low-damage party-wide damage that he’ll use as soon as he goes down. I really like Robo in this fight as he can keep everyone with good HP with heal beam. Sometimes the boss will counter with MP buster, a tech that steals all your mp so if you really want to play safe have one healer in your party designed only to heal and never attack him, that guarantees you’ll always have a healer in case you need him.
After you’re done with him, now it’s a good time to equip any White Vests/Plates if you have them as the next boss will have a ton of lightning based attacks, you can also go back to that save point to save and restore, I highly advice doing so. Keep following the path until Crono feels something calling for him, now, if you didn’t have Crono in your party you’re forced to do a party with him as the leader, I highly recommend having Ayla on the party as well as you definetely want to charm the next boss for a Prism Spectacles. Watch the small cutscene as you now face a boss.
This boss can hit REALLY hard with a skill name Scintillation, make sure everyone that doesn’t have a white plate/vest is with at least 500 HP all the time, he’ll counter every now and then with rend but it shouldn’t hurt that badly so just keep and eye for that big party-wide damage I mentioned, he’s also immune to light so don’t use magic with Chrono, probably your best bet is Frenzy, the boss is weak to Shadow damage so Magus is very strong here. Make sure to charm this boss for that sweet Prism Spectacles (a high damage boost in the form of an accessory).
After you beat the boss, he’ll empower Crono’s abilities, giving him a permanent boost of +1 speed, +5 strenght and +5 accuracy, you’ll be out of the vortex now, marking the end of the present DV.
4.1.1 – Future DV: Map Sequences
These are all the possibles sequence of screens you can get when you enter the Future DV. As I mentioned in the general info section, I’m ordering them following a priority (from fastest to most boring, while also prioritizing the routes that contain treasures).
- Ancient Keep -> Curious Village -> Denadoro Mountains -> Arris Dome -> Heckran Cave (CT)
- Arris Dome -> Heckran Cave -> Ancient Keep -> Denadoro Mountains -> Forest Maze (CT)
- Mudbeast Den -> Ancient Keep -> Curious Village -> Forest Maze -> Fiendlord’s Keep (CT)
- Fiendlord’s Keep -> Forest Maze -> Mudbeast Den -> Ancient Keep -> Curious Village (CT)
- Heckran Cave -> Fiendlord’s Keep -> Arris Dome -> Mudbeast Den -> Denadoro Mountains
- Curious Village -> Denadoro Mountains -> Fiendlord’s Keep -> Heckran Cave -> Arris Dome
- Forest Maze -> Mudbeast Den -> Heckran Cave -> Fiendlord’s Keep -> Denadoro Mountains
- Denadoro Mountains -> Arris Dome -> Forest Maze -> Curious Village -> Mudbeast Den
4.1.2 – Future DV: Ancient Keep (NM, CT)
Ancient Keep
Enemies:
This is the new map for this vortex, you’ll start at a fork, East is a dead end with a pointless battle so go West and fight you way through as you follow the only path available, when you reach a fork in the North part of the screen go East to fight the two Deathcreepers and open the chest for a Hi-Potion.
Go back to the fork and go S this time to get to another fork, go E avoiding the Bone Knight, as soon as you’re able to see a chest on what appears to be an out of bounds room, hug the wall to find a hidden passage, giving you access to the chest that contains one elixir.
Now go back to the fork just before the Bone Knight you avoided and go W this time, fight the two Bone Knights and keep following the path until you get to a room with access to two other rooms, take the rightmost one as the first room is a dead end with a pointless battle, now you’ll be in the center room of the area, from here go all the way E ignoring the staircase and going right through the wall to get to a chest cointaining a Master’s Crown (the best male headgear as I mentioned previously). Go back to the stairs and fight the last set of monsters to get out of this map.
4.1.3 – Future DV: Curious Village (NM)
Curious Village
Enemies: Nu
Now this is a map I loved, you can only go N and there’ll be some curious kids asking you questions about the game itself: “If you want to get through here, you’ll have to answer a question for me”. Were you to answer his question wrongly, you’ll be sent to the “hall of punishment”, where you’ll have to face multiple battles to get through the room you got the answer wrong.
A total of 4 questions will be asked randomly before you can exit the map, so this can either be the super quick and fun map or a ton of fights against Nus, which are enemies that either deal all your HP-1 of damage or 1 damage, if you’re unlucky enough they can easily kill you so it’s better to get those questions right isn’t it?
Well, fear not my dear time traveler for I am here to aid you. I’ll try to map all the questions you can possibly get right here, with spoiler tags just in case you want to put your knowledge about the Chrono Trigger universe to test.
I’ll try to keep the questions organized so here they are:
QUESTIONS ABOUT MAGUS
Q -> What is Magus’s true name?
A -> Janus.
Q -> What type of magic Magus uses?
A -> Shadow.
Q -> What is the name of the cat Magus had as a child?
A -> Alfador.
Q -> What is the name of Magus’s sister?
A -> Schala.
Q -> There is a statue behind Magus when you fight him in his keep. How many arms does this statue have?
A -> Four.
WHO IS THAT POKEMON? (What is the name of?)
Q -> What is Frog’s true name?
A -> Glenn. Fun fact, I usually name Frog as Glenn, so I got the question “What is Glenn’s true name?” LOL.
Q -> Princess Nadia is also known by what alias?
A -> Marle. Yet another question that depends on what you named your characters, I named Princess Nadia as… Well, Nadia, so princess Nadia is also known as Nadia.
Q -> What is the name of the Ioka Villager Ayla likes best?
A -> Kino.
Q -> Who is the Guru of Time?
A -> Gaspar.
Q -> Who is your opponent at the Site 32 bike race?
A -> Johnny.
Q -> What is the name of the giant skeletal monster that attacks Zenan Bridge in the Middle Ages?
A -> Zombor.
Q -> Who serves as Crono’s lawyer when he is placed on trial at Guardia Castle?
A -> Pierre.
Q -> What is the name of the pink robot who wears a ribbon?
A -> Atropos.
Q -> With whom can you practice your fighting skills at the End of Time?
A -> Spekkio. Fun Fact: Spekkio is pronounced the same as the word for mirror in italian, he is supposed to be the reflection of your party’s power and that’s why he changes forms based on your level. Apparently the all mighty form, capable of obliterating even the strongest parties with powerful magic is… a Nu?
Q -> Who is the leader of the reptites?
A -> Azala.
Q -> Who is the leader of Medina in 1000 A.D.?
A -> Ozzie XIII.
Q -> What is the name of the singing humanoid robot in Leene Square?
A -> Gato.
Q -> For whom does Flea harbor affections
A -> Magus.
GENERAL QUESTIONS
Q -> What was the final invention of Belthasar, the Guru of Reason?
A -> The Epoch.
Q -> What icon is displayed to indicate confusion status?
A -> A star.
Q -> What item can you obtain by trading fangs and petals at the trading hut in Ioka Village
A -> Ruby Gun.
Q -> What do Masa and Mune claim makes them unstoppable?
A -> Their brains and bravery.
Q -> What winged creatures must you ride in order to reach the Tyranno Lair?
A -> Dactyls.
Q -> The Epoch is also known as what?
A -> The Wings of Time.
Q -> Which of the following is not one of the racers in Leene Square?
A -> Catapult.
Q -> When did Lavos first arrive on the planet?
A -> Prehistory.
Q -> What does Dalton dub the upgraded Epoch?
A -> The Aero-Falton Imperial.
Q -> What is the name of the red stone needed to repair the Msamune?
A -> Dreamstone.
Q -> What is the name of Cyrus’s attack?
A -> Nirvana Strike.
Q -> To which of the following elements is the Dragon Tank’s head immune?
A -> Fire and light.
Q -> Which other tech has the same effect as Frog’s Frog Squash?
A -> Dino Tail. They both basically give more damage the lower Ayla’s and Frog’s HP are at the moment their respective spells are used.
Q -> What is the name of the device Lucca invented to stabilize Gates?
A -> The Gate Key.
I think those are all the questions, I resetted the game sooo many times to try and make sure I got all of them but in case you came across a question that is not listed here do tell me please! 😀
Well, that concludes the two NMs of that section, so if you wish to skip directly to past the Nameless Cave, you can use the bookmark to go to “Future DV: The Actual Vortex”!
4.1.4 – Future DV: Arris Dome (RM)
Arris Dome
Enemies:
As soon as you arrive you’ll be facing a fork, to E is some unnecessary encounters so just go N avoiding the Version 2.0, go up the stairs to get on top of the iron platform, go around the path until you find another Version 2.0, from here hug the W wall, going up the stairs and following the path to the exit.
If you remember it, this section has a panel you can input a password, this will give you access to the sealed door in the original game but here in the DV there’s no use for it so just ignore it completely.
4.1.5 – Future DV: Heckran Cave (RM)
Heckran Cave
Enemies:
As soon as you arrive you’ll face two underlings, kill them and just follow the only path available to the next screen, here go down the two sets of ladders and fight through another unskippable battle against one Djinn Bottle and three Cave Stalkers, keep in mind the Djinn Bottle has an absurd physical defense, so use magic to kill it.
4.1.6 – Future DV: Denadoro Mountains (RM)
Denadoro Mountains
Enemies:
Hug the W wall and go all the way N to avoid that sleeping Ogan. Go up the ladder and then E across the bridge, keep following the path, once you see another ladder slow down a bit as you can avoid the next battle by not touching the dashing Ogan and hugging the wall to climb up, now just keep going and you’ll exit this area.
4.1.7 – Future DV: Forest Maze (RM)
Forest Maze
Enemies:
Go up on that very first vine right in front of you, from there go all the way E while you hug the lower part of the screen, eventually you’ll be forced to go N, just follow the path until you’re back on the lower ground, follow the reptite footprints around until you find two sets of vine, climb them and follow the last set of footprints to exit the map.
4.1.8 – Future DV: Mudbeast Den (RM)
Mudbeast Den
Enemies:
From the start, go N and you’ll fight two mudbeasts, you can charm rainbow helms from them which you can then sell for 8000G, but nothing too big. On what seems to be a fork, the NE path is a dead end so just take NW and keep going N to fight two more mudbeasts. Go up the chains and you’ll be out of the map.
4.1.9 – Future DV: Fiendlord’s Keep (RM)
Fiendlord’s Keep
Enemies:
Just keep going N while fighting the unavoidable battles until you’re out of the map. The sorcerers absorb a lot of magic (all except Fire) so you’ll have to deal with them using physical attacks unless you have Lucca on your party.
4.2.1 – Future DV: The Actual Vortex (NM,CT)
Enemies:
Finally you arrived at the last Nameless Cave of this adventure, you’re probably hella tired of all those reused maps and weak enemies, you rush, excitedly, to the north teleporter of the cave and as you traverse this temporal passage you step in the final map reached through all your hard work, you keep going through the corridor and as you slowly open the iron door, you take a glimpse of a beautiful… Is that one of those fricking annoying Mazes? F.
Welcome to hell the temporal research lab.
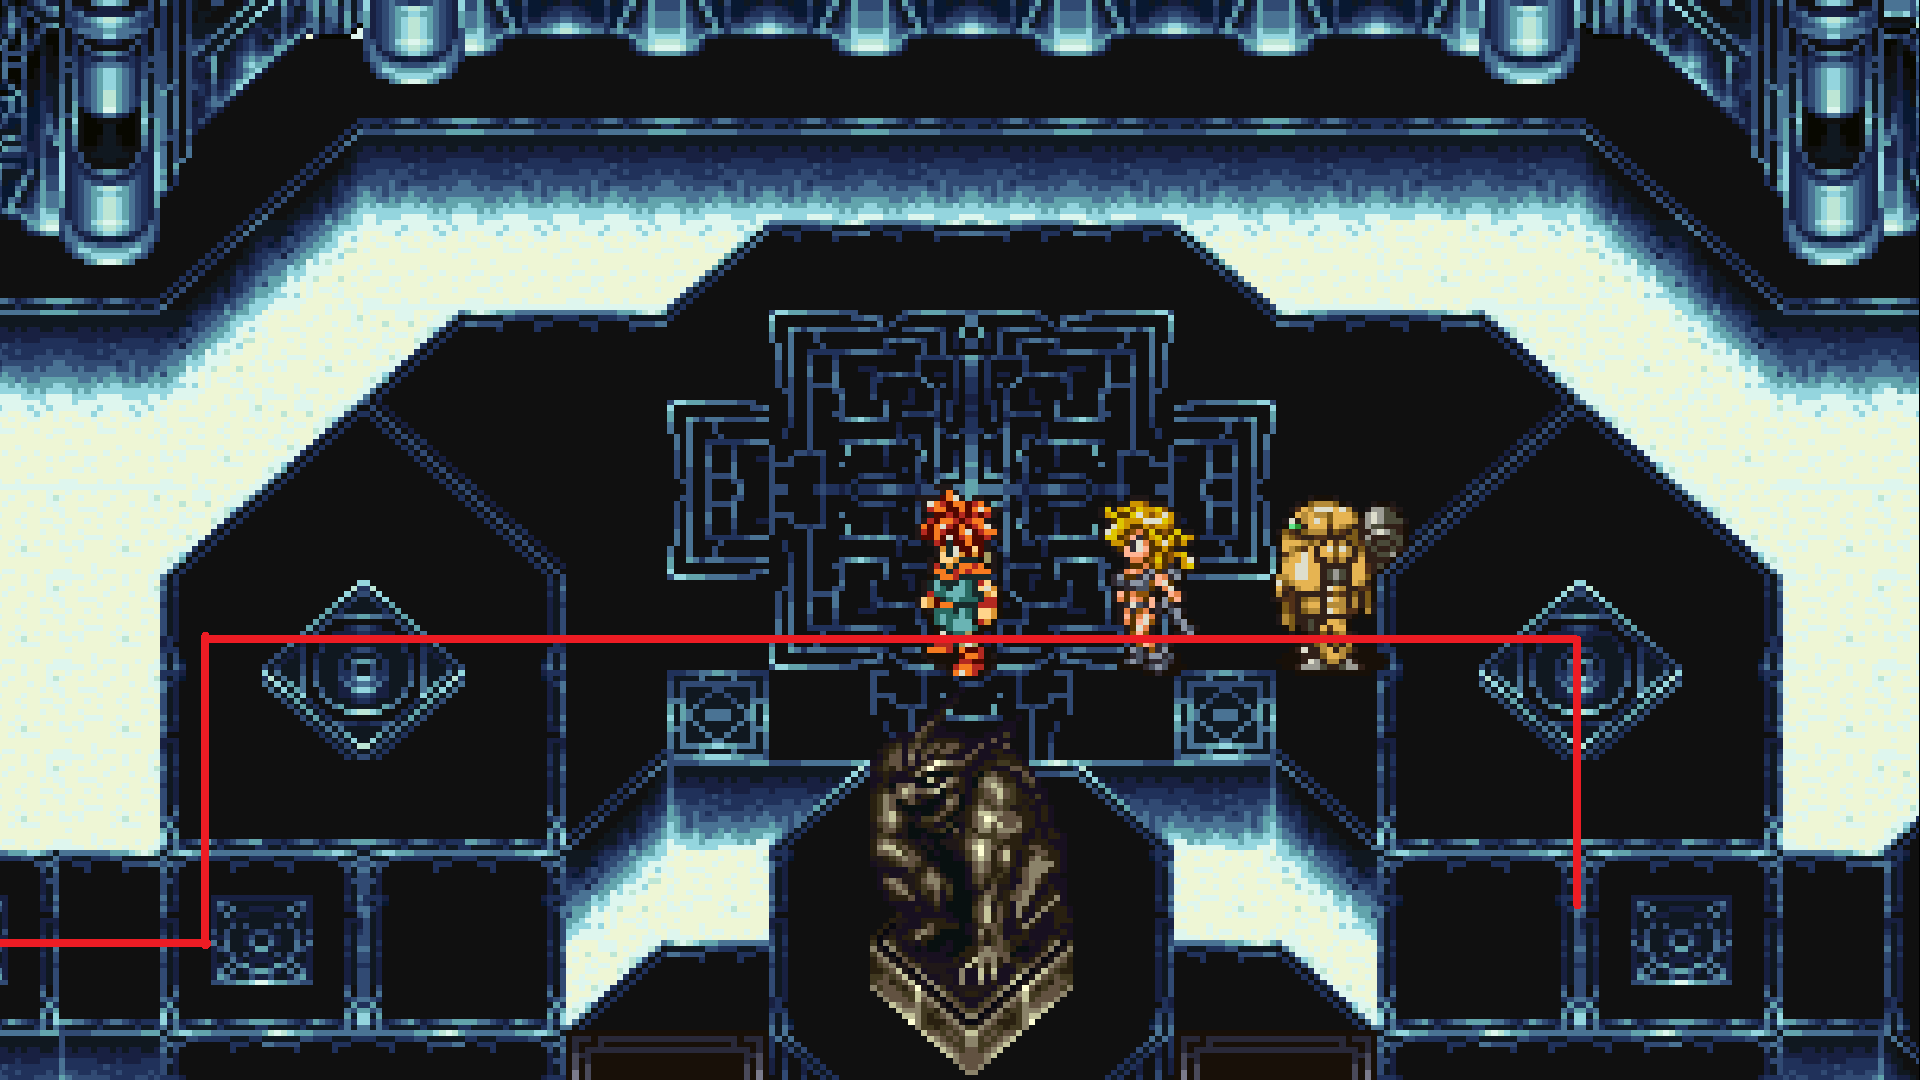
Now, really, this place isn’t that bad. You’re now on a room with three conveyor belts, to W and E they’re running toward you so you can’t take those for now, your only way out is the N conveyor belt so take it.
You’ll find a note in laying in the ground, basically says the creator of this place wrote the code on another note that is somwhere around this maze, the note also says he likes riddles.
Now, I did this vortex plenty of times on the steam version and all I ever got is the color riddle, but I’ve seen guides that doesn’t mention color but instead, reversed words (for instance, LLAB turning into BALL), since I never got anything different on the steam version I’ll assume they replaced it completely with the color riddle, but in case you come accross a different password riddle do let me know pretty please.
Ok, so from the place you just found the note about the riddle, follow these steps:
1 – Right (fight the Searcher)
2 – Down
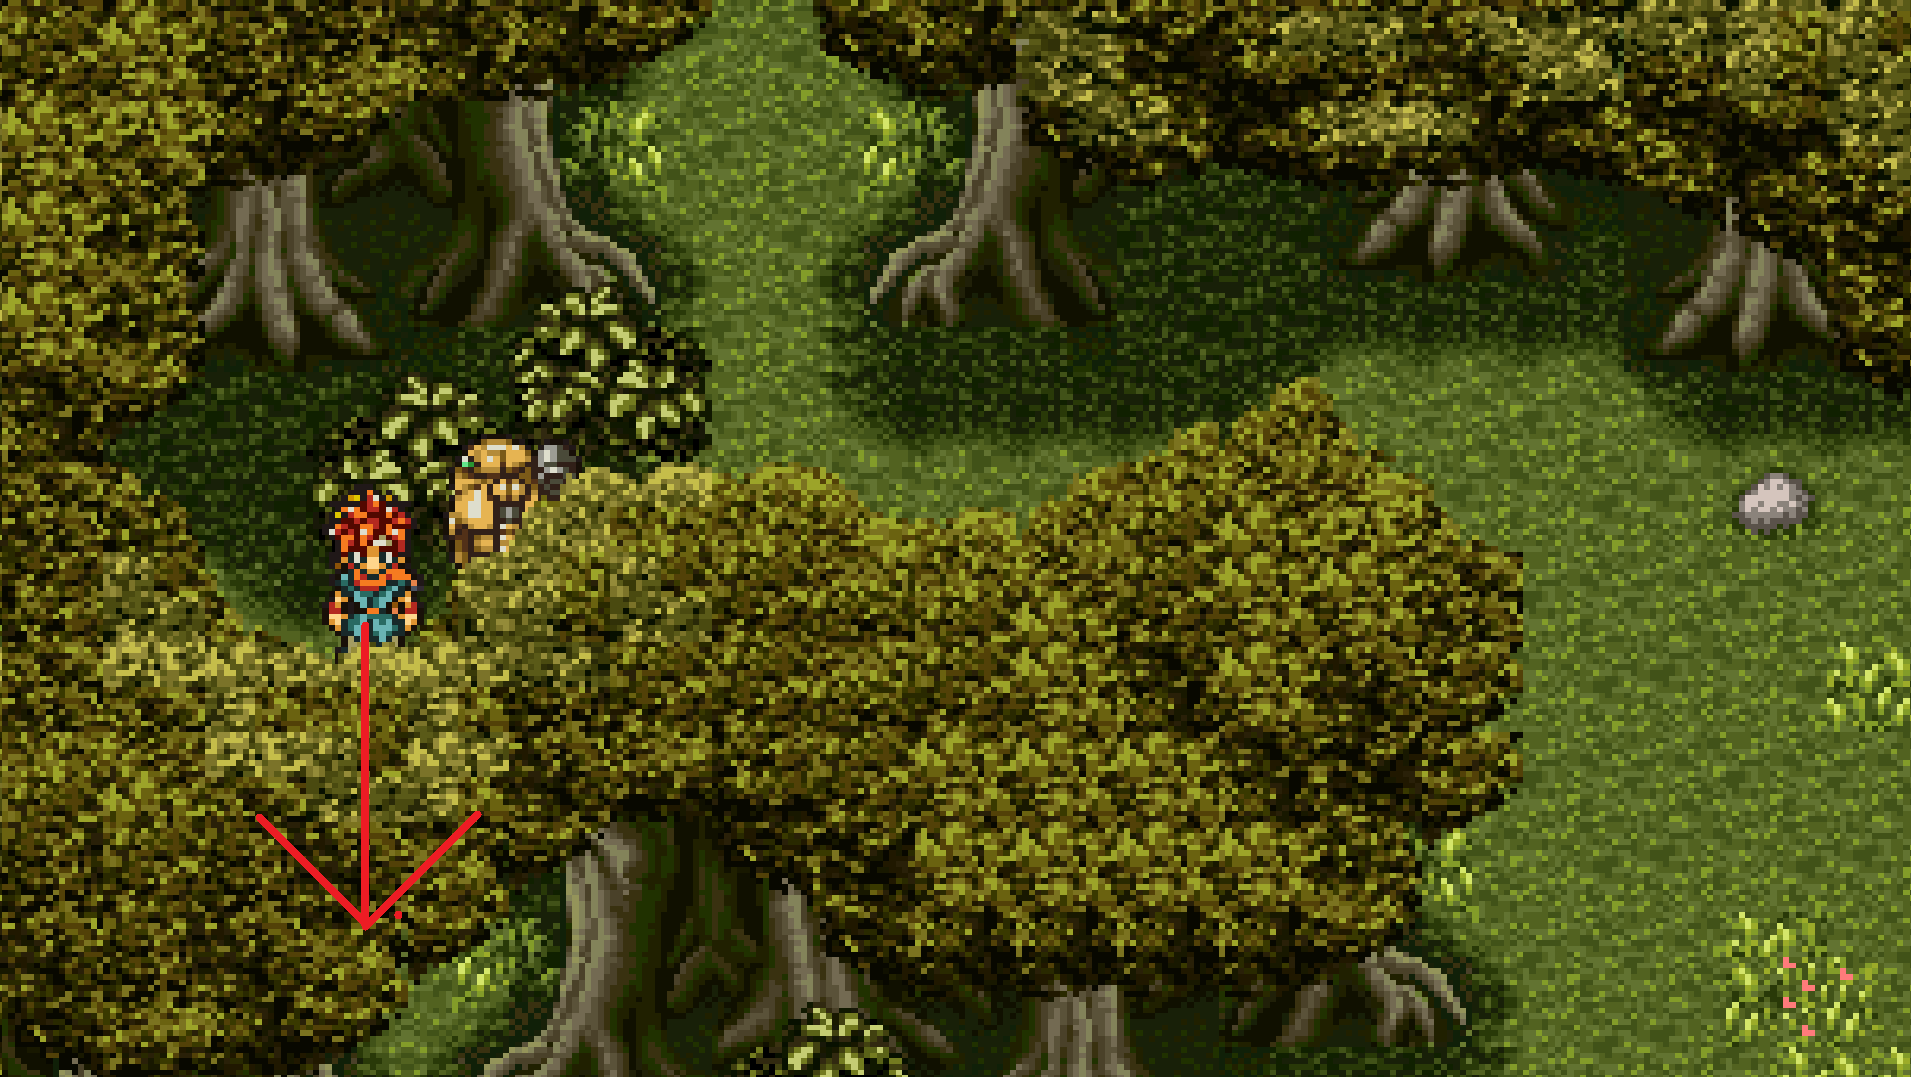
You’ll be on the SE section of the map, now hug the E wall and you’ll find a secret passage, go to the next screen and you’ll arrive at the Millennia Wood, you’ll be familiar to this place if you did the Lost Sanctum sidequest (I might consider adding a guide for that sidequest if people like my DVs guide).
From the start, go W and then S to find a secret passage inbetween the trees.
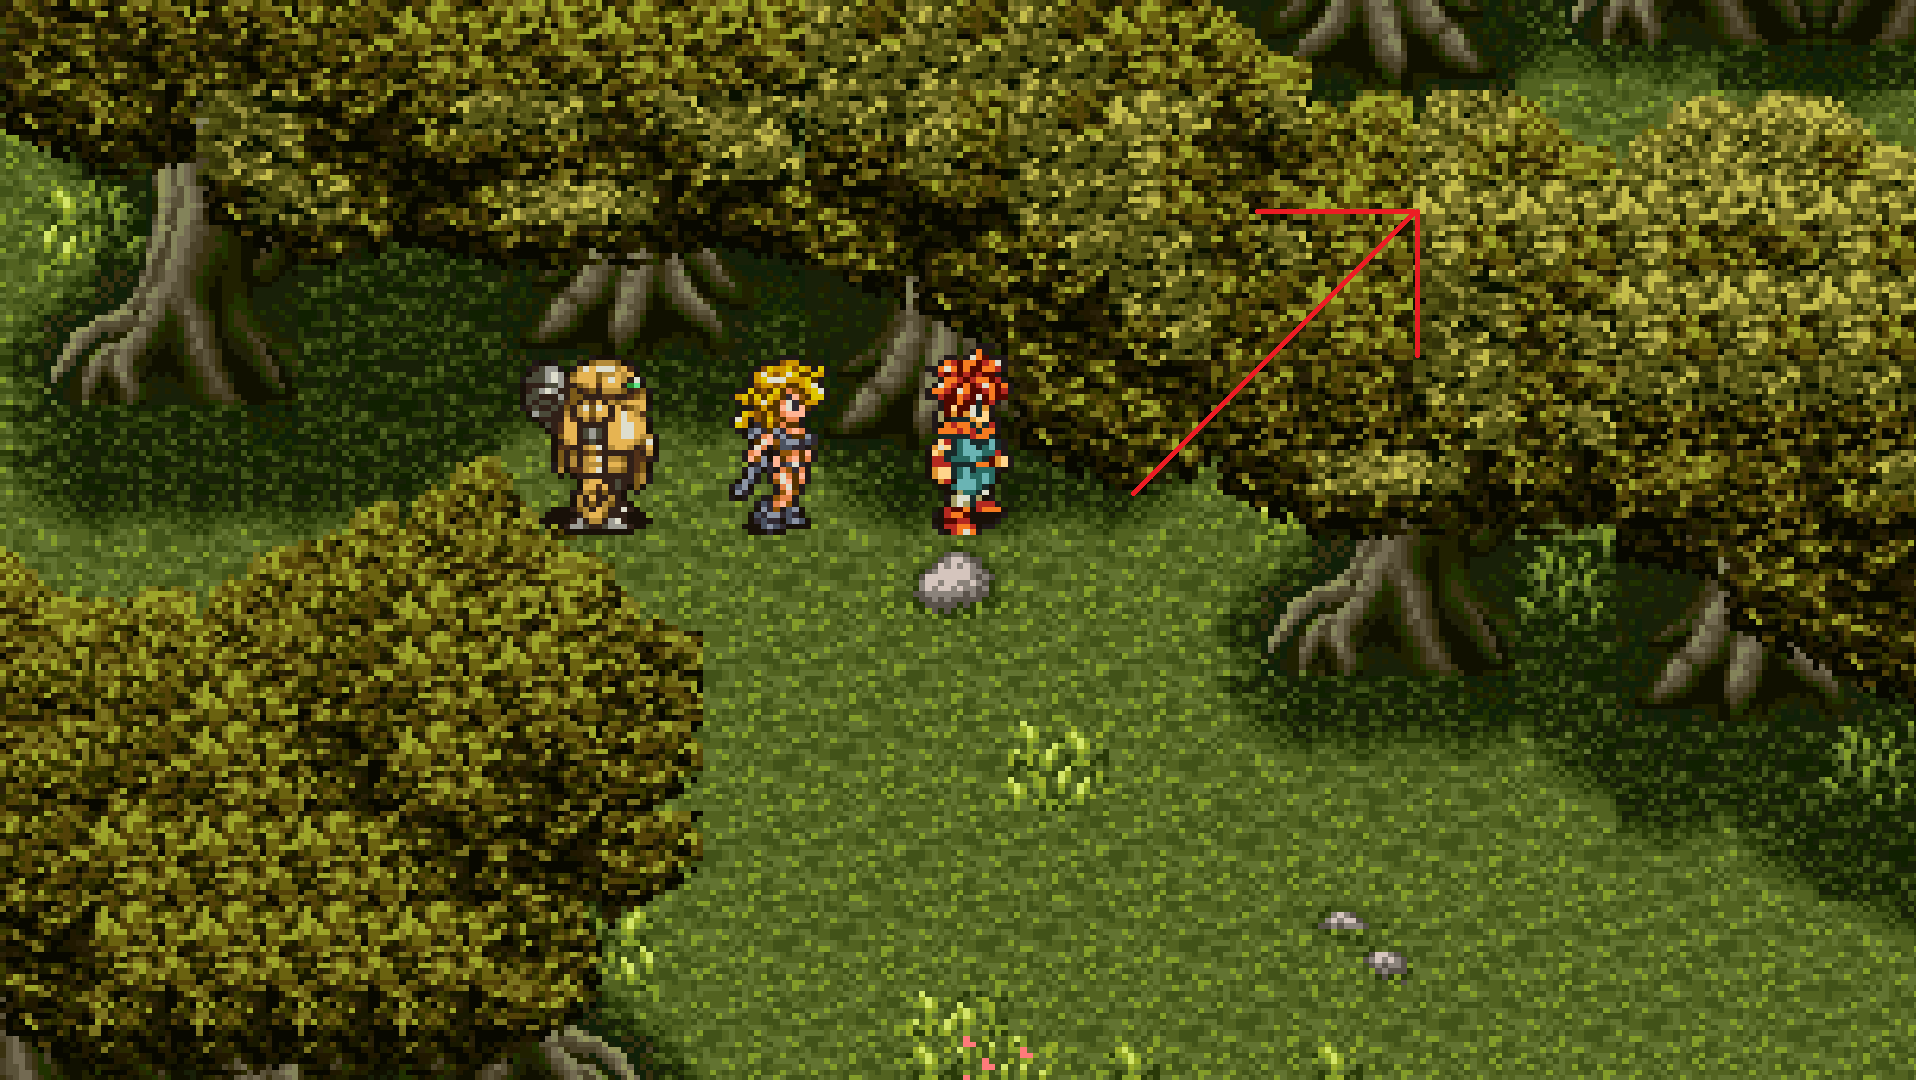
Open the chest for a Turbo Ether, go back to the beggining and this time hug the N walls and go E, you’ll find yet another hidden passage leading you to a chest with 50.000G!
Now go all the way S until you hit the bottom of the map, hug the S wall and go E, you’ll eventually find yet another secret passage, open the chest for an Apocalypse Arm (arguably the best weapon for Robo, it has extremely low attack power but if you crit it’ll hit for 9999, making it awesome if paired with a crit boosting accessory such as Dragon’s Tear).

Go back through the hidden passage and now go N, follow the path around as you get closer to the up part of the screen to find another chest containing a Megaelixir. Now backtrack to the bottom of the screen from where you just came from and go to the extreme SW portion of the map, from here go slightly N and you’ll find the last hidden chest in this area. Open it for another megaelixir.

This is all the treasures you can get from Millennia Wood in this DV. Now go back through the hidden passage and follow the N path back to the temporal research lab. From here, follow these steps, each direction meaning one conveyor belt you’ll take:
1 – Left
2 – Up (you’ll be back at the note room)
3 – Up
4 – Left
5 – Down
6 – Down
7 – Left
You’ll find yet another note laying on the ground, check it and you’ll see the password.
Again, I played through that DV multiple times on steam version and it seems it has only one outcome, if you come across another password do let me know.
“Security lock release code: Tomato.”
If you remember the very first note it says the password is related to color, well… Tomatoes are red so red is our password! Continuing, follow the steps:
1 – Up
2 – Up
3 – Right
4 – Up
5 – Left
In this room, enter the N door, here you’ll find a laser blocking one of your ways so go N for now, you’ll find a door which you can’t open, this door works kind like a checkpoint for the next section:
To W you’ll find a floor tile different from the one you’re used, on them there are a couple of robots looking around, what you’re supposed to do here is avoid that they look directly towards you, so sneak behind their back little by little, if you get caught you’ll be forced to fight against two prototypes, enemies that can only be hurt after you use light magic on them. After the fight you will be back at that door you couldn’t open.
Knowing that, go all the way W while avoiding getting caught, eventually you’ll reach a door in the NW section of the map, go through it and interact with the computer in the center of the room and choose to release the security locks, it’ll ask you the password, in case it was written tomato in the note you found through your playthrough, just click the red square.
Now go back to the previous screen and follow your way to the SE section again while avoiding the robots (you can also get caught if you want to as you’ll leave on that door, from there just go straight S). Watch the cutscene as you get close to the entrance of the room.
Well now that is different, if you’re like me you played most of the game with the characters you liked so all of sudden now you’re forced to have a completely different party, that being said, remember to equip your new party with new gears if you haven’t done so in a while.
With your new party, follow the steps through the conveyor belts:
1 – Down
2 – Right
3 – Up
4 – Right
5 – Right
If you explored this placed beforehand that door was locked, but since your other half of the party inserted the password on that computer, it’s now unlocked so go through it.
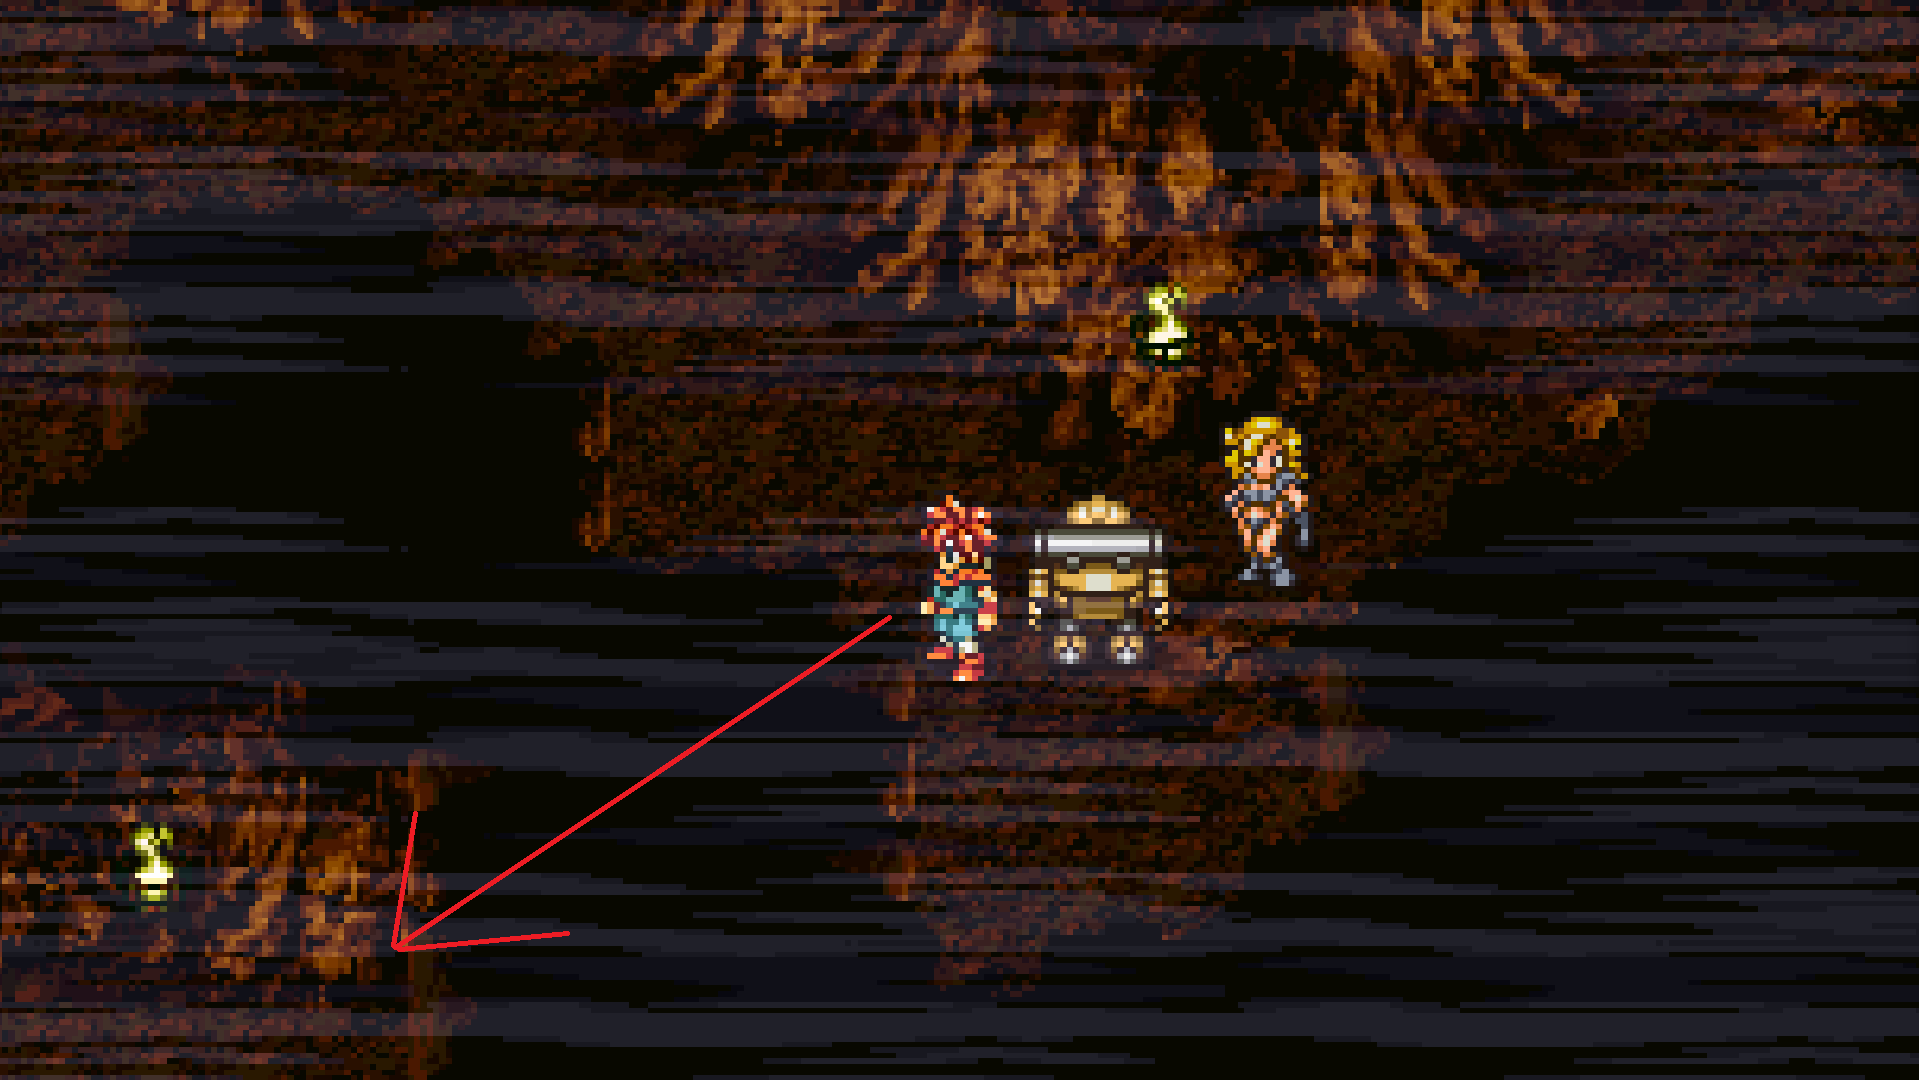
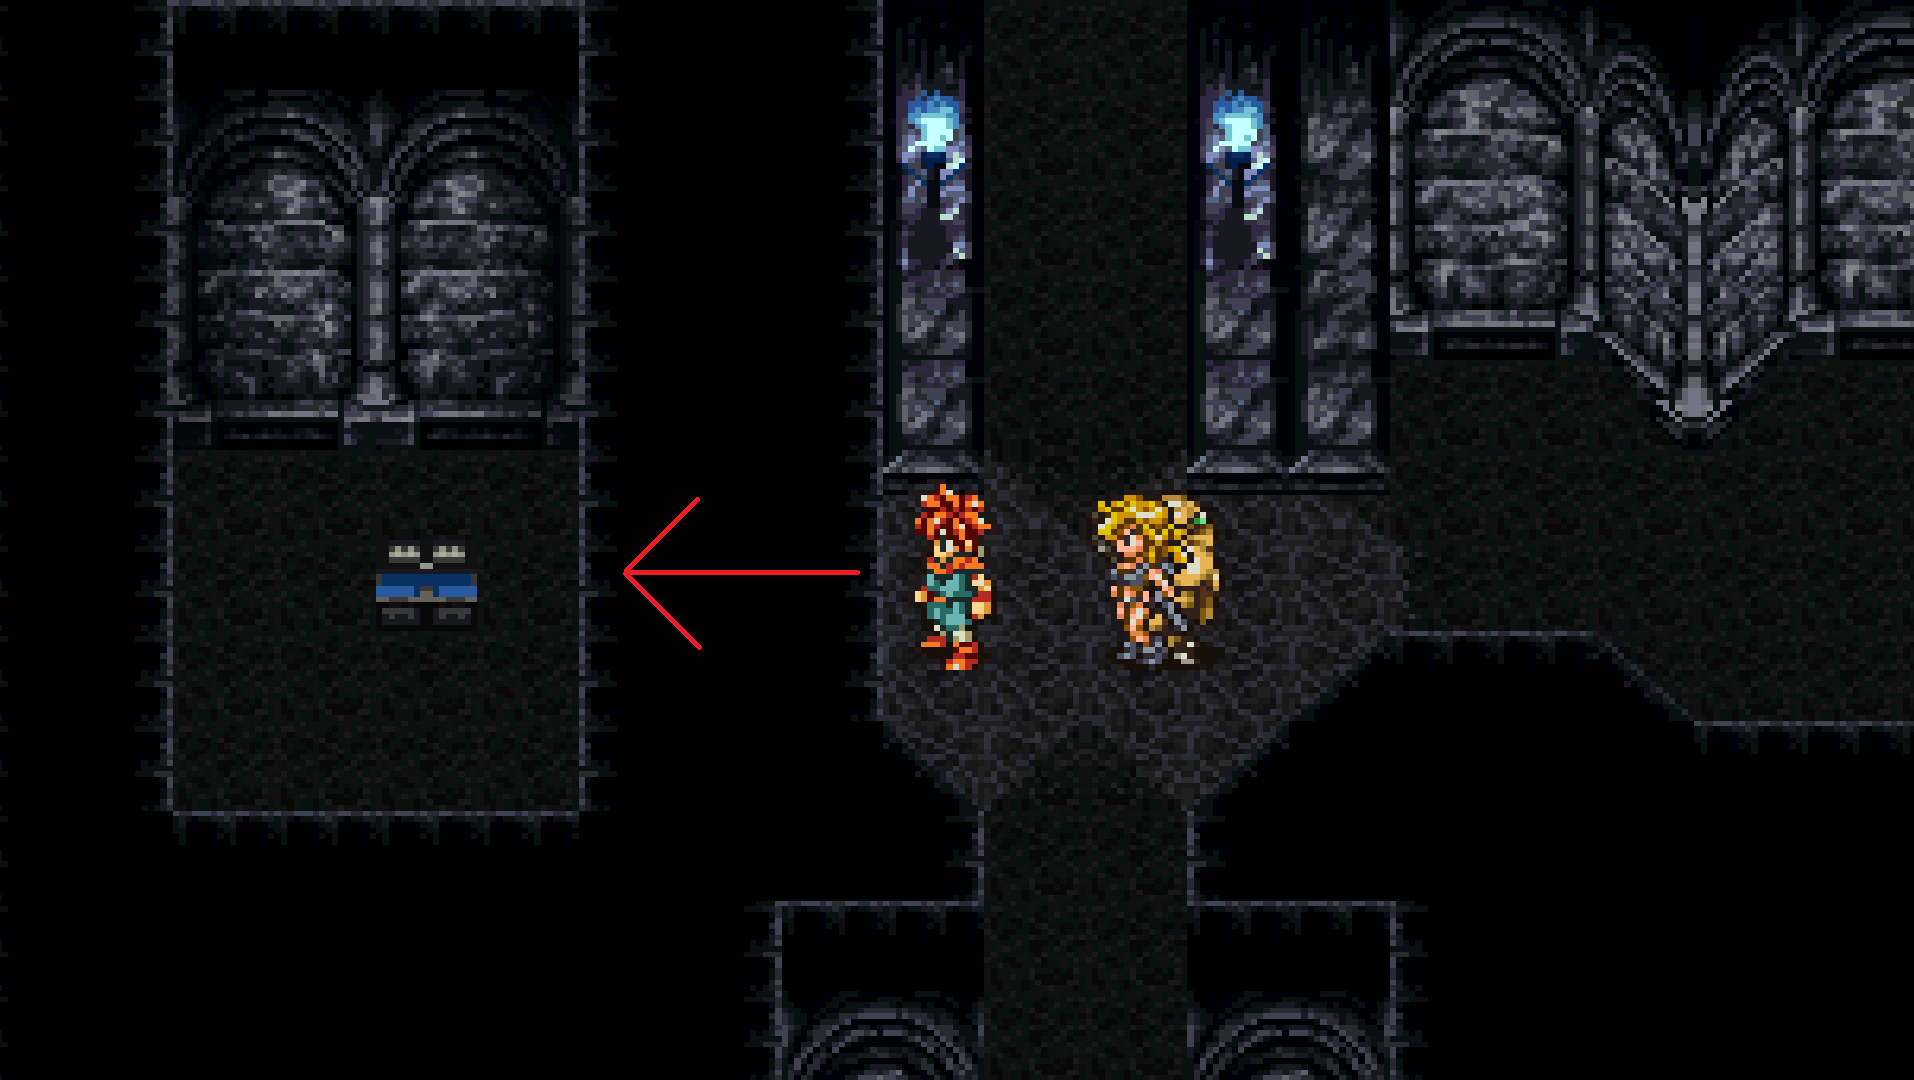
In this room you’ll see a glowing thing on the ground, those are teleports to other sections of this map, to get all the trasures I follow this path:
From the beggining, go N and take the teleporter, you’ll arrive at a room with three other teleporters, take the E one, this teleporter close to you is a trap so hug the N wall and go all the way E to find the right one, take it. From here take the S teleporter and then take the E teleporter, if you followed these steps correctly you should be at a chest containing a Regal Plate now, what I consider the best chestpiece for male characters! Keep going E to take the teleporter, take yet another two teleporters as it is the only option and you’ll be back at the room with three of them.
This time take the W one, you’ll see a less shiny thing on the ground, that’s a magic capsule so grab it and then take the only teleporter available. Once again backtrack to the three teleporter room, take E once again when you arrive there, hug the N wall and go all the way E to avoid that robot and take the rightmost teleport one more time, from there take S and then go straight up ignoring the teleporters.
4.2.2
Here you’ll fight five battles in total, some of them against prototypes, since you don’t have light magic right now your only way to hurt them is through magic so no physical attacks. As the fifth fight you’ll fight against an Iron Maiden, I had quite some problems fighting this enemy with my party as they were all magic focused, here’s what happens: this enemy is weak against magic but keep an eye cause they can use an ability where they power up and from that moment onwards it’ll absorb ANY magic, so start the fight casting heavy hitting magic on it and then stick to only attacking, if you’re suffering with this fight I highly advice having a designated healer to never attack the Iron Maiden as it counters by stealing mp, I always choose Marle as she has an awful attack but has great healing spells, frog is also good for that, or pick someone to item heal.
After you’re done there, go and interact with the computer, you’ll regain control of your other party, go W right where the lasers were deactivated, you’ll be through that same minigame that you have to sneak past the robot’s back, so do it all the way to a door that was previously locked.
You’ll be in a corridor with some lightning bolts, try to avoid them but they don’t hurt that badly (30 party-wide damage), you’ll be in another fight against an Iron Maiden, keep in mind the tips I just gave you, this is so much easier with your main party, isn’t it?
Keep going N while avoiding the lightning bolts and you’ll eventually fight two Iron Maidens at the same time, finally you’ll arrive at the Twilight Grotto. Just keep going through it, make sure to use the save point, now it’s a good time to equip your characters with red vests/plates if you have them, also, if you want to charm a Nova Armor, one of the best chestpieces for male characters, make sure you have Ayla on your main party. Well, you’re used to the DVs bosses at this point so you probably should be expecting the next boss. Ignore the portal that takes you out of the cave and keep going until Lucca feels something calling her, forcing you to make a party with her on it.
Watch the cutscene as you now face:
Lucca’s evil clone and an… Egg? N…NANI?!
Well, here’s the thing, the eggsterminator (spoopy name) heals both Lucca and himself so you’ll want to take care of it first, Lucca’s magic hurt SUPER hard if you didn’t equip the fire absorbing pieces I recommended earlier, so if you didn’t make sure to keep everyone at decent HP (400+). Funny enough, fire is the weakness of the egg so if you want to go ham with Flares go ahead, the boss will counter with osmose everytime tho so you’ll run out of mana quickly, try to burst it as fast as possible so he doesn’t heal too much. Once the egg is down you can focus Lucca, make sure to charm that Nova Armor but the rest of the fight is pretty easy as long as you keep everyone with good HP.
When you’re done, Lucca will have her abilities awakened, receiving a permanent boost in Speed (+3), Magic (+5) and Stamina (+5).
Well, that’s the end of all three vortexes… Or is it?
5.1 – Time’s Eclipse
Once you’re done with all the three vortexes, ride Epoch to the End of Time and speak to the Old Man there.
“Have you, by chance, observed any odd distortions in time’s fabric in recent days?”
Well, you did went through three dimensional vortexes with super weird stuff going on inside of them so… That’s definitely weird, the old man will note that the bucket that is supposed to take you to Day of Lavos in 1999 A.D. is different. It’s still connected to the same day but now he feels an even stronger presence in there, yet he also senses longing and loneliness.
What could this mean? Well, only one way to figure it out, save your game, make sure your party is geared (if you have any piece of equipment that protects you from status ailments I highly advice equipping it right now) and go interact with the bucket. If given the option, to continue this side-quest pick the “Time’s Eclipse”.
Watch the cutscenes and you’ll now be facing what I think is the coolest boss in Chrono Trigger:
Now, there are some different strategies to fight this boss but I’ll start with the less cheesy one so you can get a taste of the hardest boss in the entire game.
Strategy 1:
On the first half of the fight he’ll counter any physical attack with a tech that steals ALL of your MP, so make sure that you’re fighting him with strong magics such as Luminaires, Dark Matter, Flare and so on. He’ll also be using a lot of party-wide magic that hurts like hell so make sure your party is healthy all the time, for that I always pick a character to item/magic heal, Robo, Marle and Frog are good options for that. Try to bust out of phase one ASAP as the boss casts a tech that disables the status ailment protection, and this can turn the table real quickly once he gets to phase two. Keep following this strategy until he powers up (some dark and green orbs will flash around him).
This marks the beggining of the second phase, where he’ll start absorbing magic and stop counter attacking with the MP steal but rather he’ll counter attack with confusion, a party-wide damage that also applies confusion as the name says, if you didn’t equip your party with status ailments immunity equipment, make sure you have those Panaceas on point for that fight. Since now he only takes damage from physical attacks, make sure you’re using techs like Frenzy and Triple kick or simply attacking. This boss has some nasty hitting moves and insane speed so make sure your party is always healthy (at least 500 HP but I’d recommend they’re always at full HP unless you have some awesome gear going for you). Keep hitting him and eventually you’ll bring him down.
Strategy 2:
Ok so this is kind of a cheesy and weird strategy but not that much compared to the third one. So, as it’s shown in the boss table, it’s HP is 32000, that’s like, SUPER close to 32767 which is the signed 16-bit integer limit. It’s hard to explain how it works but I’ll put an explanation in the extras section, basically what you need to know to perform this strategy is: if you heal him past 32767 HP his HP will go negative and the game will consider the boss as dead.
So here’s what we have to do: after you get him to the second phase he’ll starts absorbing magic damage right? But he doesn’t aborb that much, here’s where two very specific parties come into play: Chrono, Lucca and Ayla OR Chrono, Marle and Ayla. Their triple tech (Gatling and Final kick) are sort of a mix of physical and magic damage, meaning it’ll hit the Dream Devourer super hard but with magic properties, so it’ll heal him for a lot!
Now, on the first phase this triple tech will still hit hard so use it 3~5 times and the boss should enter the 2nd phase (usually he enters it when you damage him for around 10k HP), after that just keep using the triple tech of your party of choice to heal him up and he’ll be dead in no time!
I believe this strategy is okayish because of the numbers you have to output: 10k damage to make the boss enter the 2nd phase and 11k healing to make him go over 32767, mening the boss will technically have 21k health rather than 32k.
Strategy 3:
This is the braindead strategy, make sure you have in your party either: Robo equipped with the Apocalypse Arm and a Dragon’s Tear (doable without it but it’s a nice accessory), or the much harder setup: Ayla at level 99 equipped with Valor Crest (doable without the Valor Crest but if you have Ayla at 99 you probably done everything this game has to offer lol).
The other two characters in your party can be anyone really but if you’re doing this strategy to have an easy fight then I recommend going the safe route and picking a healer (Robo if you’re using Ayla as the damage dealer, Marle or Frog otherwise) and a high damage character (Chrono or Magus).
Here’s how things will work: Robo (or Ayla) will always critical hit for 9999, if you equipped the accessories I told you they’ll have their crit rate boosted which makes it even easier so go ham and always attack with them. Meanwhile, have your other damage dealer using high damage magic such as Luminaire to make the boss drop to the second phase ASAP so you don’t get your status ailment protection nulified. Save the other character (healer) solely for healing your party whenever needed, with that setup you’re pretty much guaranteed to win as it’s super safe and if you get lucky with the crits you can down the boss with pretty much three normal attacks.
The End
Watch the cutscenes as the battle against Dream Devourer will be the last one of this side-quest, what an amazing boss isn’t it? Congratulations, you just beaten the hardest encounter the game can throw at you! Enjoy the alternative ending and your new Steam Achievement! After the cutscenes you’ll get the ultimate weapon for Crono: the Dreamseeker, on top of having a whooping 240 raw power it has a 90% critical hit rate! That’s amazing and it’ll definitely be useful if you’re playing through the game again.
6.1 – Extras
Finally you reached the end of the guide and of this sidequest, I appreciate the patience to read my guide and I hope you liked it! I’m making this section just to talk about some curious facts or random stuff that you might find interesting, hope you like it!
First, lets start with what I think people are the most curious about:
How the heck do you kill the Dream Devourer by HEALING HIM?
Dream Devourer 2nd Strategy explanation
So, when coding Chrono Trigger, the devs used the signed 16-bit integer computing to store the values of monsters HP, to start understanding what this means, basically you can store values on those bits, and since it’s a 16 bit integer you can store up to 2^16 on those, so in summary, you can store 65535 values on those. But here’s the thing, computers needed signed numbers, in case you want negative values, and the way they worked around it was to assign that very first bit to the negative/positive value.
What does that imply? Well, now you have half of the values to store but they can either be negative or positive, that means you can store values from -32768 all the way to 32767. Now here’s the deal, once you go over 32767, that very first bit changes to the negative value and now you reached a negative number according to this method, since the games reads this as “the boss HP reached a negative value” it counts as a kill!
Funny isn’t it? Now, why does that only works with this boss? Well, all monsters have a maximum HP, and you can’t heal them PAST their maximum HP (kinda like how you can’t go over 999 with your party), that being said since this boss has 32000 HP you can reach the value we want by healing only 767, the game would consider that you’re healing him past his maximum HP but since at this point the value already turned to a negative number, the boss is considered dead.
Technically you can kill anything by doing that as long as you can heal enough for the value + their maximum HP reach 32767, since the maximum healing you could possibly do is 9999, you could kill anything with 22768 HP or more, but the only monster that gets past this HP is the Dream Devourer itself unfortunately.
Phew, now that’s something isn’t it?
6.2 – Changelog
17/07/20 – Fixed an information in the introduction section regarding when the Dimensional Vortex becomes accessible in the game.
7 – Conclusion
Well, finally we reached the end, once again I thank you so so much for reading my guide, and hopefully it was useful for you! If you have any advices, questions, or if you found anything incorrect with my guide, be it informations I got wrong or even the smallest typo, do let me know! Hopefully we can make this guide even better with all your help!
Remember that if you want to post this guide somewhere else you don’t need my permission as long as you give due credits to me 😀
If you want to contact me about this guide my info is on the Introduction section but I’ll leave it here again just in case.
Contact:
Email: [email protected]
Steam ID: [link]
Again, thanks for reading all the way to here and take care!