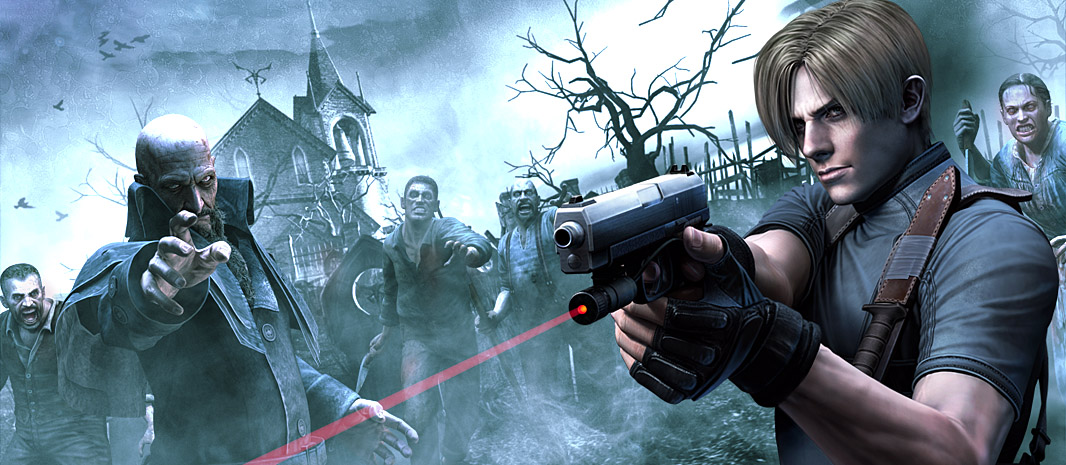
Overview
This is a guide that will give you a fairly detailed explaination on the main bosses of Resident Evil 4 and will provide tips on how to beat them.
Introduction
 I decided to make this guide fairly simple and straightforward as opposed to my other game guides because frankly, they took way too long to create. My guide will give you a fairly decent idea of what you’re up against as you face each boss, as well as tips on how to beat them. I personally have enjoyed playing Resident Evil 4 numerous times growing up and have enjoyed it each time as much as the last, the boss fights are well staged in my opinion so I thought it only fitting I make a guide about it. Not to mention, Leon is a total hottie… I hope you enjoy!
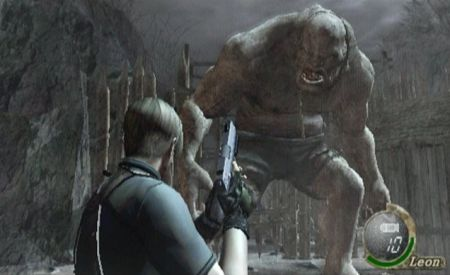
Chainsaw Ganado
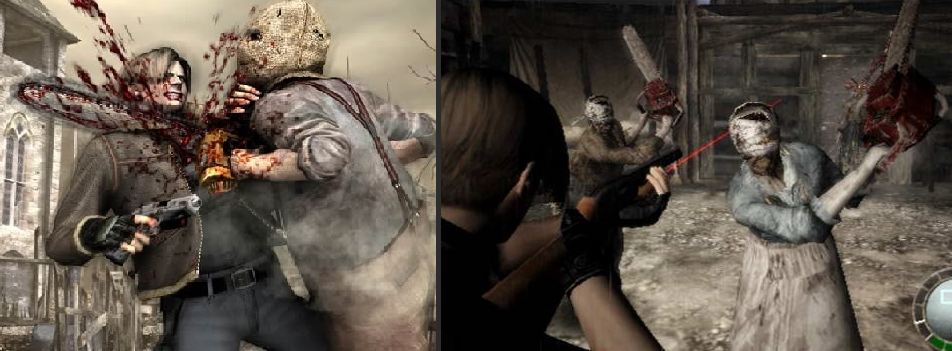 Okay, so this guy isn’t exactly a boss, but he is technically a ‘mini boss’. Or as I like to call him, “The Big Cheese” of the Village (no, not Bitores Mendez — although he IS the Bigger Cheese of the Village). Using the shotgun would be the most preferable approach when dealing with this psycho, and of course, aim for the face! But keep a good distance, these guys can instantly kill you! It should take roughly 4 or 5 head shots to take him/her out.
Del Lago
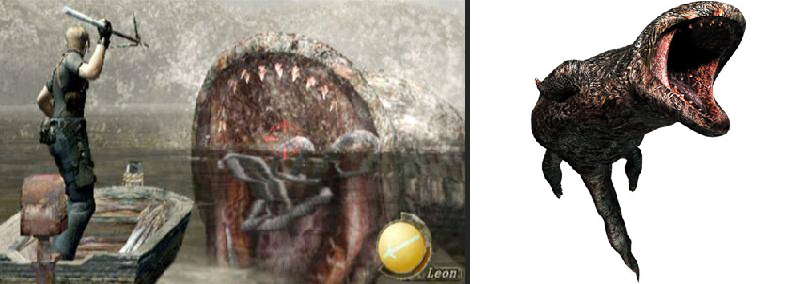 Oh boy, Leon has really put his foot in it with this one. The Del Lago (his name is Spanish for From the Lake) is a huge amphibious creature that has been infected with the Plaga. This fight is relatively simple, you’re trapped on your boat with a few harpoons (which seem to be in endless supply) and the Del Lago will drag your boat around the lake. The main focus is to throw as many harpoons at the monster as possible, while — with good timing, trying to not become his dinner. You should only attempt to throw the harpoons at Del Lago when he has his back to you, dragging you along. He will firstly (from my experience) attempt to lead you into a floating log which you can dodge by steering the boat away from it. Now and then he will stop pulling you and disappear into the water and then charge towards you when he reappears from a distance. You’ll know when he’s about to attempt this when the boat is immobolized and the water is deathly quiet. Steer the boat to the side again to dodge him. He will also sometimes disappear into the water and reappear from quite a close distance so be ready to dodge him. If he manages to make your boat capsize, you will be prompted to spam a button to swim back to your boat. But be wary that if your health bar is yellow or red, you will swim [/b]A LOT[/b] slower and may not make it in time, so try make sure your health stays in the green beforehand.
El Gigante
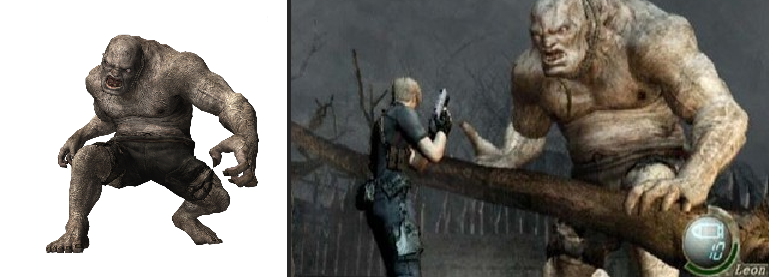 You will encounter this hulking mass just after you acquire the Round Insignia. The workaround for this guy is to make sure there is a lot of space between the two of you whilst shooting his exposed insect-looking spine when he isn’t within attacking distance. I also wouldn’t recommend trying to hide in any of the shacks because, despite how he looks, the El Gigante is smart enough to crush them with you inside. If you attempt to get too close to him, he will grab you and crush you with his hands which will deal a ridiculous amount of damage and will give you a QTE (Quick Time Event) prompt. Speaking of QTEs, there is a number of them popping up infrequently, where he will atempt to throw something big in your direction or charge into you so be wary of that. Eventually, El Gigante, after a number of bullets, will drop to his knees conveniently exposing the vulnerable parasite on his back. Run up to him and follow the button prompts to deal a massive amount of damage.
Remember that wolf at the very beginning that was stuck in a bear trap? Yeah, well if you were kind enough to release him from it, then your new canine pal will join in the fight about halfway into the boss fight. And if you didn’t? Too bad! Because he keeps the monster distracted while you are free to unload your bullets into him. Eventually you will bring him down.
Note: If you are really struggling with this guy, you can return to the Merchants little shop in the cave nearby and upgrade your weapons. Or, if he’s just unbearably tough and you’re unbearably rich, you could just buy a rocket launcher and kill El Gigante with one shot 😉
El Gigante (Again)
 Note: The paths split near the beginning of Chapter 2-3, you will only encounter El Gigante again if you choose the right-hand path.
Oh hey, it’s our old pal again! Although this time it’s not layed out much like a boss battle arena because you are given the option of running past him without letting off a single shot (don’t even think about it), or if once again, if you casually have a spare rocket launcher in your inventory, fire that thing at him and make off with the nice 15,000 PTAS surprise he leaves behind. However, I would recommend saving the Rocket Launcher for other boss fights.
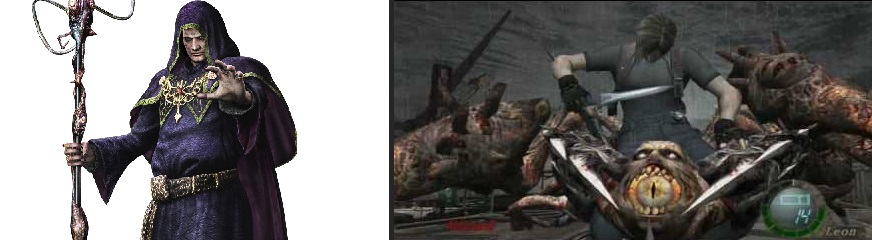
Chief Bitores Mendez
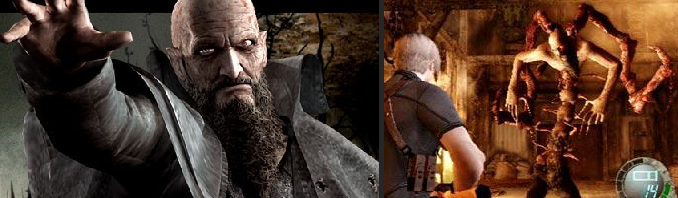 Time to bring the fight to the Big Cheese. This guy may be large in stature but he hits like a girl (oops), during the first half of the fight at least. Okay, I lied. This is a pretty challenging fight, especially on the highest difficulty. I’ll admit I always die a couple of times, but you will get the jist of it. Make sure to dodge his choke hold at the start of the fight otherwise he’ll snap you like a twig. Turn around and climb the ladder which will lead to the second floor of the barn. Position yourself so you can see down to the first floor where Mendez will mostly hang around. Get a few shots off before he can get too close then run to a different point and repeat. I would recommend using the shotgun, although you can get away with just using the handgun. Make sure you don’t stay in the same place for too long or Chief Cheese will get close enough to attack and will result in you taking a load of unnecessary damage. He moves relatively slow so you’re in no big hurry most of the time. If you do get a love tap from the big man, you’ll end up getting knocked down onto the floor below. Dust yourself off and get back up to the second floor pronto, before he goes in for round two. Basically just unload bullets into him, and if you can pump about 3 or 4 shots into him, he will be stunned for a few seconds which allows you to get in 1 or 2 more bonus shots.
Next, things are beginning to look like hentai, Mendez mutates and swings between beams like Tarzan, trying to get close enough to you so he can attack. Don’t let him. Every time he retreats to the rafter, use that moment as a chance to run to the other end of the barn. He’ll eventually drop down near your level and will swing towards you, now is a good time to get him to say hello to your little friend (no, not that friend, you pervert). Flash grenades also work well as they stun him which gives you a chance to unload more shells into him. From my experience, he just repeats this pattern, so you will eventually kill him.
Garrador
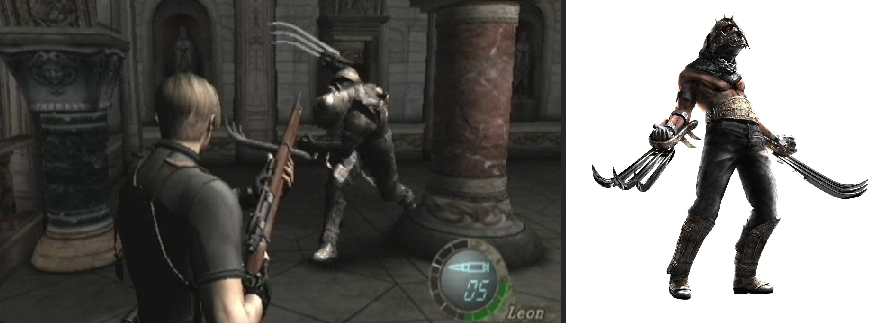 Wolverine, is that you? What happened to your eyes? Or are you Bronze Tiger…
No, Garrador is the name, and he packs a hell of a punch if you’re not careful! Although, unlike most bosses, you have quite the advatange, our little friend here is blind. Now before we begin preparations for hiring a guide dog, you should know that his hearing is scarily enhanced. DO NOT even consider running. He will swing his arms wildly in your direction, and you might lose an eye. He will also charge at you followed by a barrage of slashing, so watch out. As with most enemies his vulnerable point is the parasite on his back. To expose it, you will have to be quiet and stealthy. After awhile he will continue patrolling and forget you’re even there and his back will be exposed eventually. Once again, the shotgun will make short work of your enemies so I would recommend you fire some shells into his back but still keep your distance.
If you’re feeling strategic, you can make use of the two bells located on two opposite walls. If you shoot them from a distance with your pistol, Garrador will make a mad dash towards that direction, leaving his weak spot exposed. But bear in mind the bells can be destroyed by him.
Verdugo
 Salazar’s Right Hand man. Brace yourself, QTE’s are coming. After restoring power to the elevator, you are in a small, cramped area which makes it quite hard when facing this guy. You can run around in circles around the generator until the shutter door opens so you can escape without batting an eyelash because frankly, you’re better off saving your ammo. It’s a good idea to knock over the liquid nitrogen canisters lying around the area, which can temporarily freeze Verdugo when he approaches which will buy you some time. Otherwise, it’s open season if you want to use heavy/demolition weaponry on him (eg. rocket launcher, grenades, mine thrower). You will be handsomely rewarded with a rare ‘Crown Jewel’ treasure. You’re better off using one rocket launcher shot on him, rather than wasting ammunition from your other weapons.
Two El Gigante
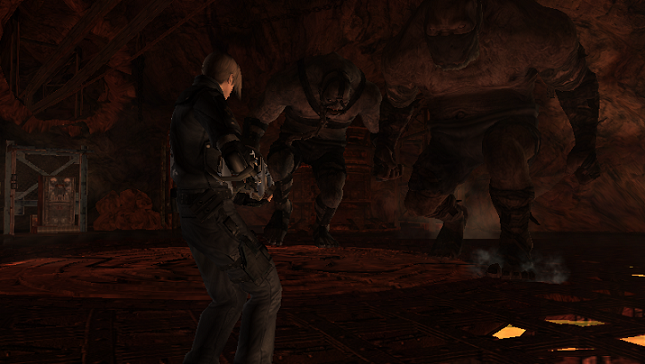 Yeap. Fighting two El Gigante. At the same time. Lucky for you there is an easy way out if you make use of the trapdoor in the middle of the room. SImply lure one of them over the hatch and flip the switch nearby and he will fall in, melting away into chocolatey goodness. However, you can say goodbye to a 15,000 PTAS reward and will be left with a grand total of 15,000 PTAs from his twin rather than 30,000 PTAS if you decide to fight the two of them fairly. Whether you are fighting one or two El Gigante, climb up the ladders to reach the high platforms to buy yourself some time to get some shots off, you can also use the ziplines to make for a quick escape should things turn ugly. Well, uglier. The El Gigante can shake the structure so try not to stay up there too long. The tactic for defeating these two is pretty much the same as when you first encountered El Gigante earlier in the game. Keep in mind that flash grenades are effective against El Gigante, stunning them momentarily so you can fire away. There is also the solution of using a rocket launcher on the both of them if they are in close proximity of each other but is sort of self defeating, since the rocket launcher costs roughly the same amount as the loot gained from both of the El Gigante.
Ramon Salazar
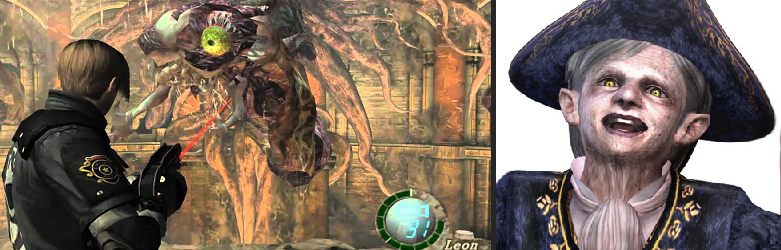 Finally! This little tyke would have gotten on your nerves the second he opened his smug mouth. Luckily, now is your chance to put him down. Although… he has grown a little in size. Salazar has 3 attack strategies, the first being a tentacle whip which can be easily dodged. The second is his main tentacle slam, which you will need to run away from. And third is a huge bite that instantly kills, try to avoid this one for obvious reasons. That attack will be easily to spot, as he takes a few seconds to charge his attack and his tentacle head will have it’s mouth open. The main objective of this fight is to attack Salazar when he isn’t shielding himself. To achieve this, shoot the main tentacle’s big yellow eye (it’s a weak spot). Try not to worry about the two tentacles on either side of him, just focus on the yellow eye. When you have done enough damage to the Verdugo part of him, Salazar will temporarily show himself and be vulnerable. If you have a rocket launcher here, one shot will end the boss fight instantly. However, since you’re quite late into the game, I would recommend saving it for later. If you don’t use the rocket launcher, try to get a few shots off before he can retreat behind the Verugo head. Repeat this process and he will eventually die.
Note: Sometimes the tentacle can knock you down to the pit below, where a group of parasites will be chilling out. Throw a flash grenade at them and you will be rewarded with treasures, then climb up the ladder to continue the main boss fight.
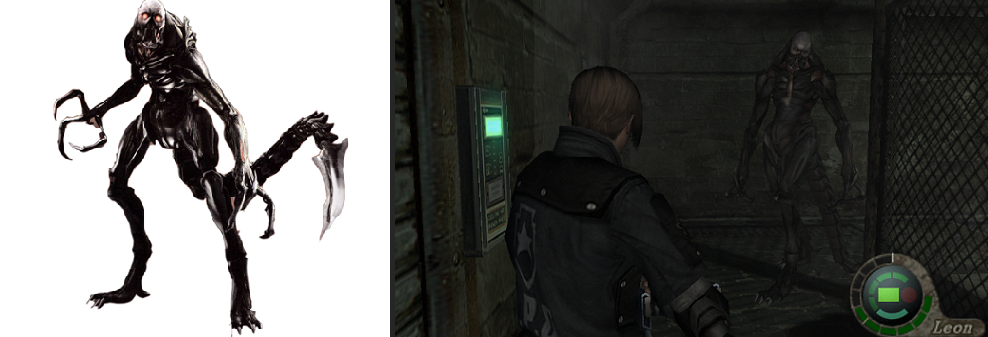
U-3
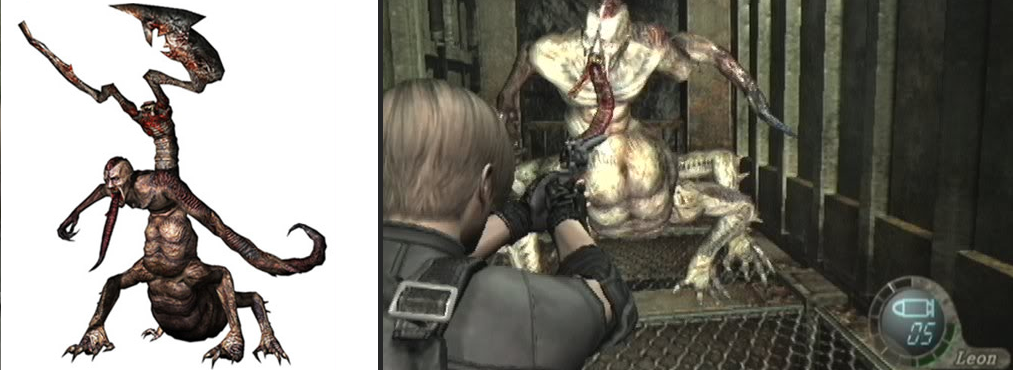 Also known as ‘It’. Really. The first half of this fight has you running through a tedious maze of boxes that look like shipping containers, getting from platform to platform before the box drops… *Gulp* All whilst trying to dodge QTE attacks from the deformed creature. During this time, the monster will mostly remain hidden up high in the rafters so basically all you need to focus on is shooting the obvious green lights and playing around with the control panels. He will occasionally drop down in front of you, but you can scare him off with a few shots from your handgun or shotgun. When he mutates, stick to using the shotgun instead of the handgun. Once you hit solid ground, he will stop skulking around and face you. Most of his attacks are strictly short-ranged swipes, so make sure you are at a distance. A shotgun or the Broken Butterfly would be recommended for this part. Focus your fire on shooting the large parasite on the creature’s back (surprise surprise). You can use the levers in the cave’s tunnels to separate you and the monster, temporarily. This should buy you some time to fire a few rounds/shells into him. You can also blow up the red barrel by the edge of the cliff when he is nearby which will deal damage and incapacitate U-3 briefly. After awhile, he will become enraged and start using a new attack where he will go underground. A QTE prompt will ensue. Another one where he will trying a pop-up attack before re-emerging but this can be easily dodged. He will continue to try to use these sneaky tactics but it shouldn’t put a stop to his inevitable end.
Jack Krauser
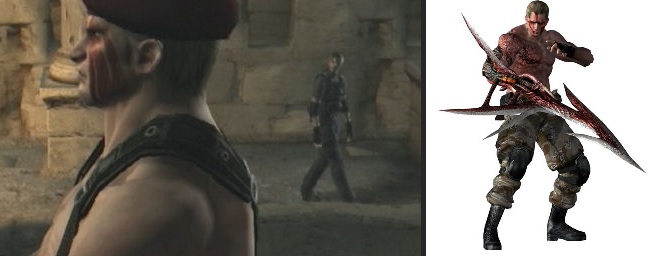
Now, you come face to face with an old… friend. Although a lot has changed and he’s not very happy with you anymore. He tells you there are three insignias to open the gate that leads to Ashley and, as predicted, he has the final piece which marks the inevitable boss fight. The first section of this fight begins with you positioned where the cutscene ends, so naturally you’re supposed to run to the left. Feel free to go into the small room and explore but after a very short amount of time Krauser will follow after you, just defend yourself as you would normally and he will disappear after being attacked (the little sook). Just go about your business and try to find the first two items scattered around the ruins but be careful as there are occasional QTEs, traps just waiting to be activated and even little flying battle robots (yes, really). He will attack you occasionally now and then with a knife, but apparently he is no match for a few swipes of your own as he will retreat immediately from a couple of swings from your knife. But later on, it will require more than an insane amount of bullets to force him to lay off. His other method of attack is from a distance behind cover, being a Rambo and endlessly spraying bullets from his assault rifle, so be sure to avoid them! Sometimes he will even throw a grenade or use explosive arrows, so watch out! As you proceed further into the level, expect to be ambushed by Krauser MANY times! He can also dodge shotgun blasts now then, which can be quite irritating but you will make progress eventually. You will soon come to an area with a control panel blocked by metal bars, look around and you will find a pushable statue which you can push onto a panel on the floor nearby to unlock it. After that point, the usual tactic applies, there will also be more high tech toys on the ground so be careful. Once you reach the top of the tower, Krauser will transform into blade armed freak followed by a QTE so be on your guard! There is also a time limit, so spend your time productively. He will use his blade arm as a shield, so aim for his legs (preferably with the Striker) when he does that. He’ll drop to one knee, so take this opportunity to shoot him in the head. Basically, rinse and repeat. If he attacks, try to dodge if possible. Once he is dead, simply backtrack to the wall with the missing insignia pieces, place them, and you are done!
Lord Saddler
The final boss fight. Congratulations on getting this far in one piece! Unfortunately, considering he is the final boss, he isn’t that difficult to beat as opposed to the other boss fights. But don’t forget he is still strong! I would recommend saving your grenades up for this point as they are very effective. He only has one form fortunately and most of his attacks purely involve swipes from his legs, most of which are avoidable. As soon as you have control, aim for the eyes on his legs and there should be a mini-cutscene where he is incapacitated briefly after a few shots, run up to him and press the corresponding button to initiate an attack on his main eye with your knife. After that, try to lure him near red barrels so you can shoot them when he’s on top of them. When he is stunned and flailing on the ground, you can run up to him to initate another attack on his main eye with your knife. He will later begin to throw giant metal bars (girders) at you if you are far away, which will initiate a QTE to dodge if you are fast enough. My advice is to run so you are at a small but safe enough distance (close enough to attack without being slashed but not so far that he will start throwing girders at you), be wary of the objects he throws, and shoot the eyes on his legs or his human body whilst making the most of your environment (eg. red barrels or if you’re using the control panel, with precise timing, you can smash a bunch of girders into him) until he is incapacitated and his weakest point, his mouth eye, is exposed for you to initate yet another knife attack. Be careful when he starts furiously stomping the ground like a small child having a tantrum, that is your cue to throw a grenade (if you have any left) at him when he lunges at you.
In a nutshell: If you don’t have any grenades or don’t want to use the crane control panel, just keep shooting him from a safe distance in the eyes in his legs until he is stunned and you can perform the knife attack up close. Rinse and repeat. After a number of times you have done this, Ada will throw a Rocket Launcher towards you, and all you have to do is aim it and fire it at Saddler and he will die. It is that simple! Or you can choose to just keep using the same tactic that I mentioned earlier and save the rocket launcher for your next playthrough, your choice!
Conclusion
 Congratulations on beating the game! I hope my (very informal) guide was useful to you, as it took me quite awhile to play through Resident Evil 4 again (I played it years ago when I was younger, but had to refresh my memory on how to beat the boss fights) and later, type up (I’m sure there are some typos) to share with you all.
Feel free to rate up my guide or add comments if you have any additional tips for other players.