
Overview
100% Guide by The Horror Network
Introduction
Note: There have been look-a-like copycat guides popping up. If it’s not labeled by THN (The Horror Network), it’s NOT one of mine and therefore not up to the quality that I aim to provide.
Welcome to the Assassin’s Creed Origins achievement guide.
The achievements here are pretty straightforward, and most of them will be gained through normal playthrough. There are no difficulty related achievements, so feel free to play on easy if you want; or hard, if that’s how you roll.
There’s not really a whole lot more to say, you’ll only need one playthrough and nothing is missable. So let’s just jump right in to the guide.
Do not, under ANY circumstances, complete anything other than the main mission that you are tasked with while playing as Aya. Doing so WILL glitch the game, since any killed guards, found treasures, explored tombs, etc will NOT count as being found by Bayek. This will void your “Old Habits” achievement!!!
The bug may have been patched, according to patch notes. However, no one has officially confirmed that it has been fixed.
> If you have anything insightful to add, please leave it in the comments below.
> If you’re looking for boosting/co-op partners, feel free to use the comment section.
> IF ANY DLC IS ADDED, PLEASE LEAVE A DETAILED COMMENT SO I CAN CHECK IT OUT.
Story Related

Complete the Prologue.
Story related, cannot be missed.

Complete Main Quest “Aya”.
Story related, cannot be missed.

Complete Main Quest “Pompeius Magnus”.
Story related, cannot be missed.

Complete Main Quest “The Scarab’s Lies”.
Story related, cannot be missed.

Complete Main Quest “The Hyena”.
Story related, cannot be missed.

Complete Main Quest “The Crocodile’s Jaws”.
Story related, cannot be missed.

Complete Main Quest “The Lizard’s Face”.
Story related, cannot be missed.

Complete Main Quest “The Aftermath”.
Story related, cannot be missed.

Complete Main Quest Dream Sequence.
Story related, cannot be missed.

Complete Main Quest “The Final Weighing”.
Story related, cannot be missed.

Complete the last Main Quest.
Story related, cannot be missed.
Kill Related

Kill 3 enemies with one hit.
For an easier time, save this achievement for when you’re a higher level. Once you’re around 20-25, go back to one of the starting areas and gather up some guards. Smash the mob of them with RB and they should all die in one hit.

Kill 10 enemies in a row without being detected.
Not as difficult as it sounds, especially when you get in to the second large area, Alexandria. Just take your time and be cautious. Remember to use Senu to scout out the targets ahead of time. Make use of bushes, and hide around corners.

Feed a predator with a corpse.
Crocs, Hyenas, Lions, or Leopards will do. Find a den for any of those animals, find a nearby camp or guard on the road. Kill a guard and put him on your horse. Bring the guard to somewhere overlooking the den and drop the dead body down onto the animals. This way they won’t “see” you but will see the body and will go and take a bite. I used the hyena den east of Siwa, you can approach from the north west (the usual way) and you will arive on the cliff above it.

Kill 30 enemies by shooting a fire arrow at oil jars
While you can just grind this out over time a great place to farm for it is the Kabotis Arsenal in Alexandria. There is normally a mounted patrol on the bridge outside. Shoot a fire arrow into the brazier above the main gate to set off the alarm then run in off the bridge, down into a house by the court yard at the bottom. This is full of fuel barrels. So is the dock out back and the upper courtyard. In fact the whole place is stuffed full of oil. Run arround with a fire bow shooting the barrels. Then when you are nearly done kill yourself in the flames to reset it. Repeat. In a good run you can get as many as 6-8 guys so it shouldn’t take more than 5-10 minutes to pop the achievement..

Defeat a Phylakes.
These tough enemies will randomly show up, as they will try to hunt you down for the entire campaign. You’ll get a warning when they’re approaching, and you can see them on the map marked by a red elephant looking icon. Prepare for a hard battle.

Defeat 8 Ship Captains.
Throughout the sprawling world of Egypt, you will find boats marked with a question mark. These are counted as explorable locations, and they always have a captain on board. You’ll get this in your quest to uncover the entire map anyway.

Destroy an opponent in a Hippodrome race.
Hippodrome Races are all chariot races with their own special controls. To destroy an opponent’s chariot, you must get close to them and press B to trample them, or get beside them and press B to ram them. This may be best saved for the final tournament, as there is an abundance of fire around the course which will help deal more damage to your opponents.

Finish an arena boss with an Overpower Attack.
Overpower Attacks are the special rage that Bayek enters once the yellow meter is full, and you’re prompted to press RB + RT. Save this attack until an arena boss has little health, and then unleash it.

Headshot kill an enemy with the bow while in the air.
This one is tricky to both explain and execute. Therefore, refer to the video guide for more detailed information.

Kill an enemy with the predator bow from more than 60 meters while controlling the arrow.
You need the enhanced Predator Bow ability. Refer to the video guide for more detailed information.

Defeat the war elephants Qetesh & Resheph.
These elephants are both level 40, and are part of a location objective. They are located at the very middle south of Uab Nome, bordering the Desheret Desert. Refer to the video guide for more detailed information.

Kill a poisoned level 35+ enemy with the torch in less than 30 seconds.
To do this, you should be at least level 35, if not 40. You’ll need the poison arrow skill, or a weapon that deals poison damage. Get the enemy down to 3/4th health, make sure they’re poisoned, then whip out a torch and beat them to death real quick. Refer to the video guide for more detailed information.
Exploration

Complete a tomb.
This should be one of your first achievements. Simply complete a location that has “Tomb” in the title. Completion usually entails picking up X amount of items, and/or killing certain enemies.

Take 1 photo in 5 different territories.
Simply click down the L3 and R3 sticks at the same time on your controller to enter photo mode. Press “A” or “X” to take a picture. Do this in 5 different areas of the world.

Win the first Hippodrome tournament.
After leaving Alexandria, your first story based destination is the Hippodrome; so rather early in the game. Simply win the first tournament and the achievement is yours.

Complete all arena events in the Krokodilopolis Arena.
As the description states. You’ll eventually come upon Krokodilopolis Arena, and you’re going to have to win all of the events.

Swim for 1500m, ride for 40km and run for 10km.
I’m not certain that there is a way to tell how much you’ve done on any of these three stats. If anyone knows, please leave a comment and I’ll add it to the guide. I got this achievement roughly 25 hours in to the game without even trying, and having explored about 5 locations in their entirety.

Complete 15 underwater locations.
You will get this while going for Old Habits. These locations are marked by ? in the middle of the sea, though boats do not count.

Defog the whole map.
All you need to do is visit each zone.

Reach the “Top of the World” in the Black Desert territory.
Extremely easy, since it’s marked by a ? on the map. However, you should be at least level 27 to visit this location. Refer to the video guide for more detailed information.

Witness raining bugs in the desert.
While out in areas of the map that are purely desert (no trees, no water, no cities), you will see a mirage every now and then. This will be a random chance encounter, so just spend some time out in desert landscapes if you don’t get it by the end of your playthrough. Do it during the day, not at night, and just keep running around on foot. Refer to the video guide for more detailed information.

Complete all hermit locations.
These are remote locations that must be found. There are only five, and they are marked on the map. Follow the video guide for more detailed information.

Complete all 12 Stone Circles.
The first one you should discover is in Siwa, and it will give you the quest for Bayek’s Promise. You’ll need to align all of the constellation in the 12 circles. These are marked by gold “?” on the map. Refer to the video guide for more detailed information.

Solve a papyrus mystery.
You will find Papyrus’ scattered throughout Egypt as part of location objectives. The easy part is finding them, the hard part is solving them. There are 25 in total. Refer to the video guide for more detailed information.
Old Habits

Complete all locations.
CAUTION: Achievement is buggy! To avoid starting a NG you must under no circumstances during the main mission that asks you to play AYA to do any outdoor activity ie camps, tombs, hermit, animal boss, side quests, papyrus ect … in short only do the mission requested!
The bug may have been patched, according to patch notes. However, no one has officially confirmed that it has been fixed.
Looking at the map, you must complete every single location to 100%. These are all of the areas marked by ?, and completing their objectives; kill a certain animal, loot X amount of items, kill X type of enemies, etc. Once a location is finished, the icon turns from white to grey, or from bright red to dark red if it’s an enemy territory. There is one ? mark not shown on the map. It’s between Siwa and Qattara Depression along the main road. You can find the Hotep Cavern about 350m away from the border line, on the Qattara Depression side.
Special Locations:
– Hotep Cavern: This location is not found by the Viewpoints, so travel from Siwa to Qattara Depression along the main road and it is just inside the Qattara border.
– Bureau of The Hidden Ones: Appears after completion of main story line quests, located in Memphis.
– Eesfet Oon-m’Aa Poo: Located inside the Great Sphinx. You need all 12 stone circles to access it and once accessed you need 50 Silica to activate the mechanism.The access point is in the large room with the blue lights shining from the ceiling down onto the scale model of Egypt and the pyramids. The panel you interact with is on the edge of the circle facing the direction from which you enter.

Location Objectives:
Siwa (levels 1-5):
– 3 Viewpoints (must be discovered, and are thereby auto-completed)
– Mountain of the Dead Tomb (Find the Ancient Tablet 0/1)
– Amanai Cave (Loot Treasure 0/3)
– Coral Escarpment Camp (Kill Captain 0/1, Loot Treasure 0/1)
– Temple of Amun (Loot Treasure 0/3)
– Halma Point (Loot Treasure 0/1)
– Ibex Lair (Kill Animal 0/1)
– Hyena Lair (Kill Animal 0/1)
– Vulture Lair (Kill Animal 0/1)
– Lysandros’ Oracle Offerings (Loot Treasure 0/3)
– Home (Loot Treasure 0/1)
– Camp Shetjeh (Kill Captain 0/1, Loot Treasure 0/1)
– House of Life (Find the nearby hidden Papyrus 0/1)
– Amun Stone Circle (Align the Stars 0/1)
Iment Nome (levels 6-8):
– 1 Viewpoints (must be discovered, and is thereby auto-completed)
– House of Sand Hideout (Kill Captain 0/1, Loot Treasure 0/1)
– Serqet Stone Circle (Align the Stars 0/1)
– Necropolis Bandit Hideout (Kill Captain 0/1, Loot Treasure 0/1)
– Divine Lion Stone Circle (Align the Stars 0/1)
– Eremos Hideout (Kill Captain 0/1, Loot Treasure 0/1)
Lake Mareotis (levels 6-8):
– Temple of Sekhmet in Yamu, 4 Viewpoints (must be discovered, and are thereby auto-completed)
– Crocodile Lair (Kill Animal 0/1)
– South Mareotis Trireme (Kill Captain 0/1) (moves around)
– Lost Crypt (Loot Treasure 0/2)
– Sunken Desmoterion Ship (Loot Treasure 0/2)
– Hypostyle Hall (Find the nearby hidden Papyrus 0/1)
– Vulture Lair (Kill Animal 0/1)
– Adexios Naftis Shipwreck (Loot Treasure 0/2)
– North Mareotis Trireme (Kill Captain 0/1) (moves around)
– Mareia Anchorage (Loot Treasure 0/1)
– Dead Men Tell No Tales (Loot Treasure 0/1)
– Hippopotamus Lair (Kill Animal 0/1)
– Lakeside Villa Outpost (Kill Captain 0/1, Loot Treasure 0/1)
– Anoia Cave (Loot Treasure 0/1)
– Abandoned Temple Hideout (Kill Captain 0/1, Loot Treasure 0/1)
Alexandria (levels 9-12):
– Alexandria, 3 Viewpoints (must be discovered, and are thereby auto-completed)
– Narrow Crevice (Loot Treasure 0/2)
– Mareia Trireme (Loot Treasure 0/1)
– Mareia Military Storage (Loot Treasure 0/1)
– South Wall Guard Post (Loot Treasure 0/1)
– Aya’s Home (Loot Treasure 0/1)
– Akra Garrison (Kill Captain 0/2, Kill Commander 0/1, Loot Treasure 0/4)
– Great Synagogue (Find the nearby hidden Papyrus 0/1)
– Royal Palace (Loot Treasure 0/3)
– Armory (Loot Treasure 0/1)
– Tomb of Alexander the Great (Find the nearby hidden Papyrus 0/1)
– E m p o r i o n Berthed Trireme (Loot Treasure 0/1)
– Great Library (Find the nearby hidden Papyrus 0/1)
– Sarapeion (Find the nearby hidden Papyrus 0/1)
– Kibotos Arsenal (Kill Captain 0/1, Kill Commander 0/1, Loot Treasure 0/2)
– Pharos Military Storage (Loot Treasure 0/1)
– Iseion (Find the nearby hidden Papyrus 0/1)
– Pharos Garrison (Kill Captain 0/1, Kill Commander 0/1, Loot Treasure 0/2)
Kanopos Nome (levels 11-13):
– Kanopos, Apollodorus’ Estate, Hippodrome, 2 Viewpoints (must be discovered, and are thereby auto-completed)
– Crocodile Lair (Kill Animal 0/1)
– Camp Menouthis (Kill Captain 0/1, Loot Treasure 0/1)
– Kheruef’s Shelter (Loot Treasure 0/1)
– Hamew Hut (Loot Treasure 0/1)
– Heket Beer Cache (Loot Treasure 0/2)
– Sunken Temple of Sarapeion (Loot Treasure 0/3)
– Shrine of Serapis (Loot Treasure 0/1)
– Als Hideout (Kill Captain 0/1, Loot Treasure 0/1)
– Menalaite Trireme (Loot Treasure 0/1)
– Requisitioned Tavern (Loot Treasure 0/1)
– Zephyros Stables (Find the nearby hidden Papyrus 0/1)
– Aristoteles Shrine (Loot Treasure 0/1)
Sap-Meh Nome (levels 12-15):
– Sau Village, 3 Viewpoints (must be discovered, and are thereby auto-completed)
– Taua (Loot Treasure 0/2)
– Mareia Port (Loot Treasure 0/1)
– Peristerion Town (Loot Treasure 0/1)
– Anthylla Outpost (Kill Captain 0/1, Kill Commander 0/1, Loot Treasure 0/2)
– Crocodile Lair (Kill Animal 0/1) (eastern one)
– Hypodoros Hamlet (Loot Treasure 0/1)
– Potamos Hideout (Kill Captain 0/1, Loot Treasure 0/1)
– Smuggler’s Dock (Loot Treasure 0/1)
– Hyena Lair (Kill Animal 0/1)
– Crocodile Lair (Kill Animal 0/1) (western one)
Khensu Nome (levels 13-15):
– Kleptes End (Loot Treasure 0/1)
– Hathor of Mefkat (Loot Treasure 0/1)
Sapi-Res Nome (levels 15-18):
– Sais, Letopolis, 3 Viewpoints (must be discovered, and are thereby auto-completed)
– Mefkat (Loot Treasure 0/2)
– Camp Shemu (Kill Captain 0/1, Loot Treasure 0/1)
– Hippopotamus Lair (Kill Animal 0/1)
– Psenemphaia Hideout (Kill Captain 0/1, Loot Treasure 0/1)
– Camp Pyrrhos (Kill Captain 0/1, Loot Treasure 0/1)
– Sap-Meh Warehouse (Loot Treasure 0/1)
– Nikiou Fort (Kill Captain 0/2, Kill Commander 0/1, Loot Treasure 0/4)
– Nikiou Post (Kill Captain 0/1, Loot Treasure 0/1)
– Sapi-Res Ruins (Loot Treasure 0/1)
– Camp Achlys (Kill Captain 0/1, Loot Treasure 0/1)
– Temple of Horus (Find the nearby hidden Papyrus 0/1)
Giza (levels 17-20):
– Great Sphinx, 1 Viewpoint (must be discovered, and are thereby auto-completed)
– Khufu Temple Hideout (Kill Captain 0/1, Loot Treasure 0/1)
– Eastern Cemetary Mastaba (Find the nearby hidden Papyrus 0/1)
– Sphinx Passageway (Loot Treasure 0/3)
– Eesfet Oon-m’Aa Poo (Activate the Ancient Mechanism 0/1) (requires all 12 stone circles completed, accessed via Sphinx Passageway, needs 50 Silica to activate the mechanism)
– Mausoleion of Crow (Loot Treasure 0/2)
– Khentkawes Hideout (Kill Captain 0/1, Kill Commander 0/1, Loot Treasure 0/2)
– Lost Village (Loot Treasure 0/1)
– Depleted Quarry Hideout (Kill Captain 0/1, Kill Commander 0/1, Loot Treasure 0/2)
– Per-Wsir Hideout (Kill Captain 0/1, Loot Treasure 0/1)
– Tomb of Menkaure (Find the Ancient Tablet 0/1)
– Camp Katashinono (Kill Captain 0/1, Loot Treasure 0/1)
– Hyena Lair (Kill Animal 0/1)
– Tomb of Khafre (Find the Ancient Tablet 0/1)
– Tomb of Khufu (Find the Ancient Tablet 0/1)
– Hemon Mastaba (Loot Treasure 0/2)
– Adorer of Thoth Tomb (Find the Ancient Tablet 0/1)
Old Habits (Pt. 2)
Ka-Khem Nome (levels 17-20):
– 1 Viewpoint (must be discovered, and is thereby auto-completed)
– Sebennytos Shipwreck (Loot Treasure 0/2)
– Dasos Hideout (Kill Captain 0/1, Loot Treasure 0/1)
– Abandoned Trireme (Loot Treasure 0/1)
– Hathor Stone Circle (Align the Stars 0/1)
– Khensu Anchorage (Loot Treasure 0/1)
– Khem Trireme (Loot Treasure 0/1)
– Lion Lair (Kill Animal 0/1)
Ineb-Hedjet Nome (levels 19-22):
– Pr-Hapi-n-Iwnw, Per Ousir, Kerkasoros, 2 Viewpoints (must be discovered, and are thereby auto-completed)
– Crocodile Lair (Kill Animal 0/1)
– Camp Agrophylake (Kill Captain 0/1, Loot Treasure 0/1)
– Akhet’s Crown (Loot Treasure 0/1)
– Anchorage (Loot Treasure 0/1)
– Akronisos Camp (Kill Captain 0/1, Loot Treasure 0/1)
– Winbe (Loot Treasure 0/1)
– Castoff Temple of Hapi (Loot Treasure 0/1)
– Pyramides Wharf (Loot Treasure 0/1)
– Kerkasoros Outpost (Kill Captain 0/1, Kill Commander 0/1, Loot Treasure 0/2)
– Altar to Hapi (Loot Treasure 0/1)
– Upper Nile Trireme (Kill Captain 0/1) (moves north into Ka-Khem Nome and Im-Khent Nome)
– Plesionhudor Hideout (Kill Captain 0/1, Loot Treasure 0/1)
– Hugros Crossing Watchtower (Loot Treasure 0/1)
– Abandoned Temple of Kherty (Loot Treasure 0/1)
Memphis (levels 20-23):
– Memphis, 3 Viewpoints (must be discovered, and are thereby auto-completed)
– Bureau of The Hidden Ones (appears upon completion of main story-line quests)
– Apagogeas Hideout (Kill Captain 0/1, Loot Treasure 0/1)
– Sunken Temple of Ramses (Loot Treasure 0/2)
– Temple of Hathor (Kill Captain 0/1, Loot Treasure 0/1)
– Hathor Cistern (Loot Treasure 0/2)
– Fai-Jon Lamentu Crypt (Loot Treasure 0/1)
– Omorfi Villa (Loot Treasure 0/1)
– Temple of Ptah (Find the nearby hidden Papyrus 0/1)
– Memphites Barracks (Kill Captain 0/1, Kill Commander 0/1, Loot Treasure 0/2)
– Corrupted Soldiers Cache (Loot Treasure 0/1)
– Sunken Crypt (Loot Treasure 0/1)
– Palace of Apries (Find the nearby hidden Papyrus 0/1)
– Yuny’s Beset Villa (Loot Treasure 0/1)
– Wabet (Find the nearby hidden Papyrus 0/1)
Saqqara Nome (levels 22-25):
– Nitria, 3 Viewpoints (must be discovered, and are thereby auto-completed)
– Leopard Lair (Kill Animal 0/1)
– Tomb of Djoser (Find the Ancient Tablet 0/1)
– Cobra Lair (Kill Animal 0/1)
– Per Our Hideout (Loot Treasure 0/1)
– Stranded Natron Caravan (Loot Treasure 0/1)
– Vulture Lair (Kill Animal 0/1)
– Tomb of Sneferu (Find the Ancient Tablet 0/1)
– Bent Pyramid of Sneferu (Loot Treasure 0/1)
– Hugros Hideout (Kill Captain 0/1, Loot Treasure 0/1)
– Mryitmw High (Loot Treasure 0/1)
– Hyena Lair (Kill Animal 0/1)
– Unfortunate Stash (Loot Treasure 0/1)
– Ekdikesis Outpost (Loot Treasure 0/1)
– Psammos Hideout (Kill Captain 0/1, Loot Treasure 0/1)
– Ruined Temple of Mafdet (Loot Treasure 0/1)
Faiyum (levels 24-29):
– Karanis, Soknopaiou Nesos, Dionysius, Euhemeria, 4 Viewpoints (must be discovered, and are thereby auto-completed)
– East Moeris Trireme (Kill Captain 0/1) (moves around)
– Leopard Lair (Kill Animal 0/1)
– Pisces Stone Circle (Align the Stars 0/1)
– Ketket Cove Hideout (Kill Captain 0/1, Loot Treasure 0/1)
– Sunken Temple of Pnepheros (Loot Treasure 0/3)
– Vault of Splendors (Loot Treasure 0/2)
– Wadjet’s Burrow (Loot Treasure 0/1)
– Covert Grain Store (Loot Treasure 0/1)
– Pannouki Hideout (Kill Captain 0/1, Loot Treasure 0/1)
– Beached Trireme Camp (Kill Captain 0/1, Loot Treasure 0/1)
– Vulture Lair (Kill Animal 0/1)
– Bakchias (Loot Treasure 0/1)
– Sarapeion of Karanis (Find the nearby hidden Papyrus 0/1)
– Underground Stash (Loot Treasure 0/2)
– Senwosret II Temple (Loot Treasure 0/1)
– Shi-wer Anchorage (Loot Treasure 0/1)
– Golden Horn Island (Loot Treasure 0/3)
– Abandoned Fishing Village (Loot Treasure 0/1)
– Taweret Stone Circle (Align the Stars 0/1)
– Hippopotamus Lair (Kill Animal 0/1)
– Hyena Lair (Kill Animal 0/1)
– Dionysias Caravanserai (Kill Captain 0/1, Kill Commander 0/1, Loot Treasure 0/2)
– Requisitioned Dionysias House (Loot Treasure 0/2)
– Sea of Sobek Anchorage (Loot Treasure 0/1)
– West Moeris Trireme (Kill Captain 0/1) (moves around)
– Dionysias Wharf (Kill Captain 0/1, Loot Treasure 0/1)
– Okteres Blockade (Kill Captain 0/1, Kill Commander 0/1, Loot Treasure 0/2)
– Sunken Treasure (Loot Treasure 0/2)
– Euhemeria Lighthouse Camp (Kill Captain 0/1, Loot Treasure 0/1)
– Euhemeria Royal Granary (Loot Treasure 0/2)
– Seized Oikos (Loot Treasure 0/1)
– Valley Market (Find the nearby hidden Papyrus 0/1)
– Wrecked Felucca (Loot Treasure 0/2)
– Eremites Hideout (Find a place to rest 0/1)
– Philoteris (Loot Treasure 0/1)
Black Desert (levels 27-37):
– Nomarch’s Tomb (Find the Ancient Tablet 0/1)
– Seshem.eff Er Aat (Activate the Ancient Mechanism 0/1)
– Ra-Horakhty Mountain Top (Find a place to rest 0/1)
Faiyum Oasis (levels 28-31):
– Krokodilopolis, Gladiator Arena, Philadelphia, 2 Viewpoints (must be discovered, and are thereby auto-completed)
– Hephaistias Wharf (Loot Treasure 0/1)
– Psenhyris Trireme Wharf (Kill Captain 0/1, Loot Treasure 0/1)
– Philadelphia Royal Granary (Loot Treasure 0/2)
– Sesen Grotto (Loot Treasure 0/1)
– Rubbayat Necropolis (Loot Treasure 0/1)
– House of Iwn (Find the nearby hidden Papyrus 0/1)
– Immersed Reed Pakton (Loot Treasure 0/2)
– Crocodile Lair (Kill Animal 0/1)
– Kerkesoucha Granary (Kill Captain 0/2, Kill Commander 0/1, Loot Treasure 0/4)
– Piamouei Colossi (Loot Treasure 0/1)
– Temple of Sobek (Find the nearby hidden Papyrus 0/1)
– Schena Wab (Loot Treasure 0/2)
– Faiyum Nomarch Villa (Loot Treasure 0/2)
– Confiscated Stathmos (Loot Treasure 0/2)
– Docked Naukleros Ship (Loot Treasure 0/2)
– Neorion Naval Arsenal (Kill Captain 0/1, Kill Commander 0/1, Loot Treasure 0/2)
– South Moeris Trireme (Kill Captain 0/1) (moves around)
Uab Nome (levels 29-33):
– 1 Viewpoint (must be discovered, and is thereby auto-completed)
– Tomb of the Cynic (Find the Ancient Tablet 0/1)
– Dioryx Megale Wharf (Kill Captain 0/1, Loot Treasure 0/1)
– Overwatch Tower (Loot Treasure 0/1)
– Leopard Lair (Kill Animal 0/1)
– Hyena Lair (Kill Animal 0/1)
– Hippopotamus Lair (Kill Animal 0/1) (eastern one)
– Hippopotamus Lair (Kill Animal 0/1) (western one)
– Senehem Depths (Loot Treasure 0/1)
– Ravaged Outpost (Loot Treasure 0/1)
– Camp of Qetesh & Resheph (Kill Elephant 0/1)
– Trireme Stranding Camp (Kill Captain 0/1, Loot Treasure 0/1)
– Arsinoites Quarry Hideout (Kill Captain 0/1, Kill Commander 0/1, Loot Treasure 0/2)
– The Scales Stone Circle (Align the Stars 0/1)
– Horus Stone Circle (Align the Stars 0/1)
Haueris Nome (levels 30-33):
– Hermopolis, 2 Viewpoints (must be discovered, and are thereby auto-completed)
– Iw Forgotten Cache (Loot Treasure 0/2)
– Tomb of Smenkhkare (Find the Ancient Tablet 0/1)
– Eeyoo Sekedoo Aat (Activate the Ancient Mechanism 0/1)
– Etesias’ Olive Grove (Loot Treasure 0/1)
– Kleithra Dam (Loot Treasure 0/1)
– Temple of Thoth (Find the nearby hidden Papyrus 0/1)
– Temple Archives (Loot Treasure 0/2)
– Lion Lair (Kill Animal 0/1)
– Tomb of Amenemhat III (Find the Ancient Tablet 0/1)
– Limestone Quarry (Kill Captain 0/2, Kill Commander 0/1, Loot Treasure 0/4)
– Metallon Docks (Loot Treasure 0/1)
– Fort Boubastos (Kill Captain 0/2, Kill Commander 0/1, Loot Treasure 0/4)
– Cleon’s Dam (Kill Captain 0/1, Loot Treasure 0/1)
– Cleon’s Wharf (Kill Captain 0/1, Loot Treasure 0/1)
Atef-Pehu Nome (levels 30-33):
– Kerke, 1 Viewpoint (must be discovered, and are thereby auto-completed)
– Opos Kerkouros Wreck (Loot Treasure 0/2)
– Warehouse of the Toparches (Loot Treasure 0/2)
– Desecrated Tomb (Loot Treasure 0/1)
– Kerke Wharf (Kill Captain 0/1, Loot Treasure 0/1)
– South Nile Trireme (Kill Captain 0/1) (moves around)
– Aneb-Hetch Anchorage (Loot Treasure 0/1)
Old Habits (Pt. 3)
Im-Khent Nome (levels 30-33):
– Udjat Apiary, 1 Viewpoint (must be discovered, and are thereby auto-completed)
– Ranos Hamlet (Loot Treasure 0/1)
– Saphthis Outpost (Kill Captain 0/1, Kill Commander 0/1, Loot Treasure 0/2)
– Leirion Apiary (Loot Treasure 0/1)
Herakleion Nome (levels 30-33):
– Herakleion, Yw Huts, Natho, 4 Viewpoints (must be discovered, and are thereby auto-completed)
– Nile Delta Ship (Kill Captain 0/1) (moves between Herakleion Nome and Im-Khent Nome)
– Crocodile Lair (Kill Animal 0/1) (southeastern one)
– Neith Cradle Hideout (Kill Captain 0/1, Loot Treasure 0/1)
– Crocodile Lair (Kill Animal 0/1) (northeastern one)
– Dismal Tree (Loot Treasure 0/1)
– Meketre’s Cache (Loot Treasure 0/1)
– Roman Camp of Jumbe (Kill Elephant 0/1)
– Mithidrates Roman Camp (Kill Captain 0/1, Loot Treasure 0/1)
– Wdj-ur Wreck (Loot Treasure 0/2)
– Thenessos Hideout (Kill Captain 0/1, Loot Treasure 0/1)
– Demesne of Sekhem (Find a place to rest 0/1)
– Sap-Meh Anchorage (Loot Treasure 0/1)
– Outskirts of Herakleion (Loot Treasure 0/1)
– Temple of Khonsou (Find the nearby hidden Papyrus 0/1)
– Home of Nehi (Loot Treasure 0/1)
– Zoiontegoi Shipwreck (Loot Treasure 0/1)
– Hippopotamus Lair (Kill Animal 0/1)
– Desher Bluff (Loot Treasure 0/1)
– Huntress Cave (Loot Treasure 0/1)
– Crocodile Lair (Kill Animal 0/1) (southwestern one)
– Chata Pond (Loot Treasure 0/1)
– Elephas Remains (Loot Treasure 0/2)
– Lah Hideout (Kill Captain 0/1, Loot Treasure 0/1)
– Irsu’s Huts (Loot Treasure 0/1)
– Liontari Debacle (Loot Treasure 0/2)
– Camp Nisi (Kill Captain 0/1, Loot Treasure 0/1)
– Galenos’ House (Find the nearby hidden Papyrus 0/1)
– Carcer Roman Compound (Kill Captain 0/1, Loot Treasure 0/1)
Libue (levels 31-34):
– Bewail Mountain Cave (Loot Treasure 0/1)
– Leopard Lair (Kill Animal 0/1)
– Saragina Camp (Kill Captain 0/1, Kill Commander 0/1, Loot Treasure 0/2)
– Lion Lair (Kill Animal 0/1)
Green Mountains (levels 32-35):
– Balagrae, 4 Viewpoints (must be discovered, and are thereby auto-completed)
– Akabis Roman Tower (Kill Captain 0/1, Loot Treasure 0/1)
– Auritina Roman Tower (Kill Captain 0/1, Loot Treasure 0/1)
– Bandit Hideout (Kill Captain 0/1, Loot Treasure 0/1)
– Asklepieion (Find the nearby hidden Papyrus 0/1)
– Balagrae Roman Barracks (Kill Captain 0/1, Loot Treasure 0/1)
– Shrine to Hygieia (Loot Treasure 0/1)
– Poimen Relay (Loot Treasure 0/1)
– Theras Ampelos (Loot Treasure 0/1)
– Refugee Haven (Loot Treasure 0/1)
– Roman Watchtower (Kill Captain 0/1, Loot Treasure 0/1)
– Lumber Depots (Loot Treasure 0/1)
– Kyrenaika Roman Citadel (Kill Captain 0/2, Kill Commander 0/1, Loot Treasure 0/4)
– Poludeukes Hideout (Kill Captain 0/1, Loot Treasure 0/1)
– Prasinos Outpost (Kill Captain 0/1, Kill Commander 0/1, Loot Treasure 0/2)
– Oracle of Apollo (Find the nearby hidden Papyrus 0/1)
– Kastor High Hideout (Kill Captain 0/1, Loot Treasure 0/1)
– Desperate Gully Hideout (Kill Captain 0/1, Loot Treasure 0/1)
– Forsaken Sanctuary (Loot Treasure 0/1)
– Aquaeductus Kyrenaike (Loot Treasure 0/3)
– Vulture Lair (Kill Animal 0/1)
– Collis Roman Hunting Camp (Kill Captain 0/1, Loot Treasure 0/1)
– Lake of the Clouds Ruins (Loot Treasure 0/1)
– Leopard Lair (Kill Animal 0/1)
– Necropolis Hideout (Kill Captain 0/1, Kill Commander 0/1, Loot Treasure 0/2)
– Roman Quarry Camp (Kill Captain 0/1, Loot Treasure 0/1)
– Roman Camp of Surus (Kill Elephant 0/1)
Kyrenaika (levels 34-38):
– Cyrene, Gladiator Arena, Apollonia, 2 Viewpoints (must be discovered, and are thereby auto-completed)
– Silphion Farm (Loot Treasure 0/1)
– Sunken Shrine of Aristoteles (Loot Treasure 0/2)
– Thibron Expedition Shipwreck (Loot Treasure 0/2)
– Apollonia Roman Barracks (Kill Captain 0/1, Loot Treasure 0/1)
– Apollonia Fields (Loot Treasure 0/1)
– Temple of Zeus (Find the nearby hidden Papyrus 0/1)
– Tomb of Battos (Find the nearby hidden Papyrus 0/1)
– Cyrene Barracks (Kill Captain 0/1, Kill Commander 0/1, Loot Treasure 0/2)
– Apollonion of Cyrene (Find the nearby hidden Papyrus 0/1)
– Roman Akropolis (Kill Captain 0/2, Kill Commander 0/1, Loot Treasure 0/4)
Desheret Desert (levels 34-40):
– Seth-Anat Tomb (Find the Ancient Tablet 0/1)
– Qeneb too Kah’Aiye (Activate the Ancient Mechanism 0/1)
White Desert Oasis (levels 36-40):
– 1 Viewpoint (must be discovered, and is thereby auto-completed)
– White Desert Sobek Ruins (Loot Treasure 0/3)
– Desert Waterfalls Hideout (Kill Captain 0/1, Kill Commander 0/1, Loot Treasure 0/2)
– Larder Station Hideout (Kill Captain 0/1, Loot Treasure 0/1)
– Djbt Jm Hideout (Kill Captain 0/1, Loot Treasure 0/1)
– Whymhty Vault (Loot Treasure 0/1)
– Hideout of Herwennefer (Kill Elephant 0/1)
– Desheret Dewu (Loot Treasure 0/1)
– The Great Twins Stone Circle (Align the Stars 0/1)
Great Sand Sea (levels 36-40):
– (nothing)
White Desert (levels 36-40):
– (nothing)
Isolated Desert (levels 37-40):
– Remetch Ra, Theos Elpis Rift, 4 Viewpoints (must be discovered, and are thereby auto-completed)
– Ouahe (Loot Treasure 0/1)
– Camp Hetoimazo (Kill Captain 0/1, Loot Treasure 0/1)
– Bathoslythos Ridge (Loot Treasure 0/1)
– Alexander’s Temple (Loot Treasure 0/2)
– Golden Tomb (Find the Ancient Tablet 0/1)
– Oun-mAa Niye Ressoot (Activate the Ancient Mechanism 0/1)
– Demiourgos Altar (Loot Treasure 0/1)
– Burial Delving (Loot Treasure 0/1)
– Apis Stone Circle (Align the Stars 0/1)
– Vulture Lair (Kill Animal 0/1) (eastern one)
– Camp Xeros (Kill Captain 0/1, Loot Treasure 0/1)
– Camp Tamaris (Kill Captain 0/1, Loot Treasure 0/1)
– Camp Khoikos (Kill Captain 0/1, Loot Treasure 0/1)
– Camp Dory (Kill Captain 0/1, Loot Treasure 0/1)
– Hmat Oasis (Loot Treasure 0/1)
– Tomb of the Nomads (Find the Ancient Tablet 0/1)
– Goat Fish Stone Circle (Align the Stars 0/1)
– Pissa Oros Citadel (Kill Captain 0/2, Kill Commander 0/1, Loot Treasure 0/4)
– Vulture Lair (Kill Animal 0/1) (western one)
– Kaminada Stairwell (Loot Treasure 0/1)
Qattara Depression (levels 37-40):
– Hotep Cavern (Loot Treasure 0/2) (not found by Viewpoints, located just inside Qattara border next to Siwa along the main road)
– Aquifer Oasis (Find a place to rest 0/1)
– Osiris Stone Circle (Align the Stars 0/1)
Marmarica (levels 37-40):
– 2 Viewpoints (must be discovered, and are thereby auto-completed)
– Hudor Fountain (Loot Treasure 0/1)
– Erythron Dye Workshops (Loot Treasure 0/1)
– Archile Pandocheion (Loot Treasure 0/1)
– Leander’s Villa (Loot Treasure 0/2)
– Legio XXXVII Roman Docks (Kill Captain 0/1, Loot Treasure 0/1)
– Chersonesos Roman Fort (Kill Captain 0/2, Kill Commander 0/1, Loot Treasure 0/4)
– Cape Chersonesos Settlement (Loot Treasure 0/1)
– Bemulos Roman Tower (Kill Captain 0/1, Loot Treasure 0/1)
– Desolated Lookout (Kill Captain 0/1, Loot Treasure 0/1)
– Theodoros Roadside Camp (Loot Treasure 0/1)
– Lion Lair (Kill Animal 0/1)
– Livius Roman Tower (Kill Captain 0/1, Loot Treasure 0/1)
– Endumion’s Nemein (Loot Treasure 0/1)
– Hydrax Roman Camp (Kill Captain 0/1, Loot Treasure 0/1)
– Kelida Hideout (Kill Captain 0/1, Loot Treasure 0/1)
– Thintis Roman Tower (Kill Captain 0/1, Loot Treasure 0/1)
Paraitonion (levels 37-40):
– 1 Viewpoints (must be discovered, and is thereby auto-completed)
– Keno (Loot Treasure 0/2)
– Keno Hideout (Loot Treasure 0/1)
– Ogdamos (Find a place to rest 0/1)
– Kalliergeia (Loot Treasure 0/2)
Great Green Sea (levels n/a):
– Ahment Anchorage (Loot Treasure 0/1)
– East Mediterranean Trireme (Kill Captain 0/1) (travels between Alexandria and Kanopos Nome)
Mesogeios Sea (levels n/a):
– West Mediterranean Trireme (Kill Captain 0/1) (moves around?)
Misc.

Complete Side Quest “Lady of Slaughter”.
You will come upon this side quest in Alexandria. Simply complete it for the achievement.

Complete Side Quest “Seven Farmers”.
In Uab Nome, you’ll find the Seven Farmers side quest. Complete it, and the achievement is yours.

Use Dawn & Dusk to make time speed forward 30 times.
One of the first abilities you can get is Dawn & Dusk. Grab it for 1 ability point, and then use it 30 times.

Reach level 20.
Max level is 40. If you’re doing all of the side missions and exploration, you will get this by the time that you finish the third major area (the one right after Alexandria).

Use the eagle for a total of 30 minutes.
If you’re playing the game right, you’re going to be using Senu a lot. If by the end of the campaign you do not have this achievement, simply use the rubber band trick on your controller and walk away from your PC for half an hour.

Be equipped with only Legendary equipment.
Legendary items are denoted by being yellow/gold in color. You must equip each of your inventory slots with Legendary items; including outfit and mount.

Activate a Master ability.
This doesn’t take as much time as one may think, due to the layout of the skill tree. Simply set up the pathway to the very last skill on one of the trees, and then master it by putting an ability point in to it.

Run away from 3 fights with a hippo.
There’s at least one ? area that involves a fight with a hippo. Go up to a hippo to aggro it, then run away. Rinse and repeat two more times.

Use all types of vehicle at least once.
There are only camels, horses, and chariots as mount types. I’m not sure if carts count, but there are a few side missions where you have to hijack a cart also, and at least one is located in Alexandria.

Craft 20 items.
Very self-explanitory. Keep upgrading your gear in your inventory (breastplate, bracers, tools, etc) and you’ll get this in no time.

Destroy 100 breakable objects.
There are thousands, if not hundreds of thousands, of items to smash in Egypt. These are primarily vases and pots, and they come with no indication they can be destroyed, but they can be. Just swing your sword at anything and everything, and this will be yours quickly.

Sell 100 trinkets at once.
You’ll gain ‘trinkets’ from looting things around Egypt; animals, guards, vases, etc. They’re marked as ‘uninteresting items’ when your shop screen is open. Just wait until you have 100 or more to sell, and then go vendor it by pressing down on the D-Pad to do it in bulk.

Tame a lion.
Refer to Set-up Date for more information.

Bring a tamed lion to a crocodile.
In order to tame creatures, you’ll need the Animal Taming and Sleep Dar abilities. Go find yourself a lion, and tame him; then go find a crocodile. Refer to the video guide for more detailed information.
The Hidden Ones (DLC)

Assasinate Tacito, Ptahmose and Ampelius
Story related, cannot be missed.

Complete Main DLC Quest “The Greater Good”
Story related, cannot be missed.

Complete Side DLC Quests “Rise of Shaqilat” and “Shadows of the Scarab”
To the west of the Bureau of the Hidden Ones, you are able to pick up Shadows of the Scarab. The other one, Rise of Shaquilat, starts inside the Bureau and then moves to an area that is northwest of Arsinoe.

Complete the Walls-of-the-Ruler citadel
This is an enemy outpost that you are sent to as part of the story. Assassinate Ampelius and complete the location activities.

Kill an enemy with a headshot while they are being harassed by Senu
This requires the “Eagle Harass” ability. Use it on an enemy, and then headshot them. Use a Predator Bow to make it easier. Some folks say it has to be done from a distance of 60m or more away, however.

Perform 3 Assassinations from a zipline
Head south of Arsinoe’s main fast travel point. You’ll find a small pyramid construction tower with a zipline and five guards. Kill the one that walks around near the zipline, and then draw attention to yourself to get the guards to swarm around you. Pick them off using the zipline.

Free 20 Rebels
Just like in the main game, you can release rebels from cages. They’re generally in outposts, and they are marked with blue diamonds on the HUD. Keep in mind that civilians do not count toward this achievement. A good tip for grinding is to use the outpost called Operum Tuorum Gemmam Castra, which contains around 7 captured rebels. Reset the outpost via the Dusk & Dawn skill, or by fast traveling away and then back.

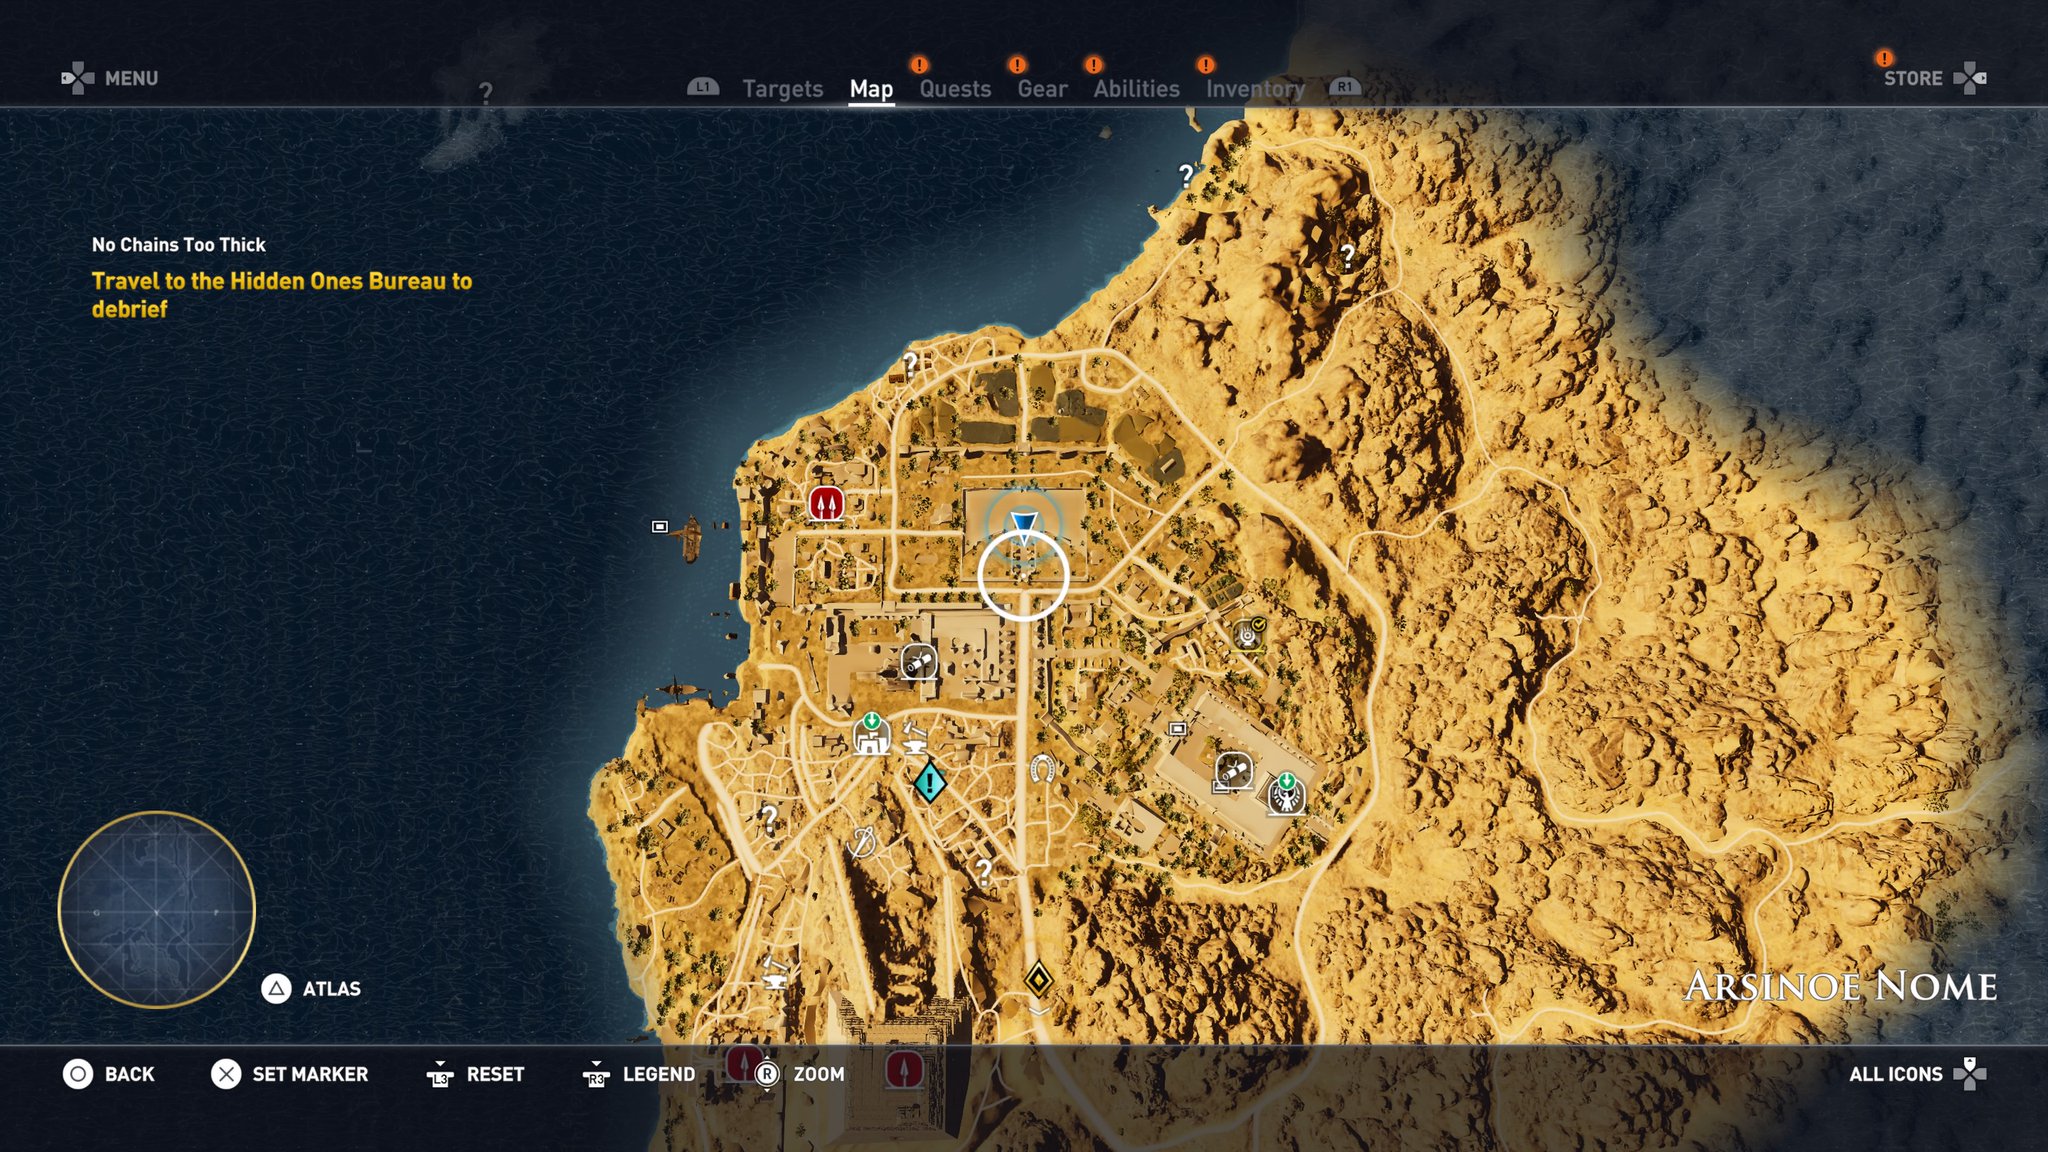
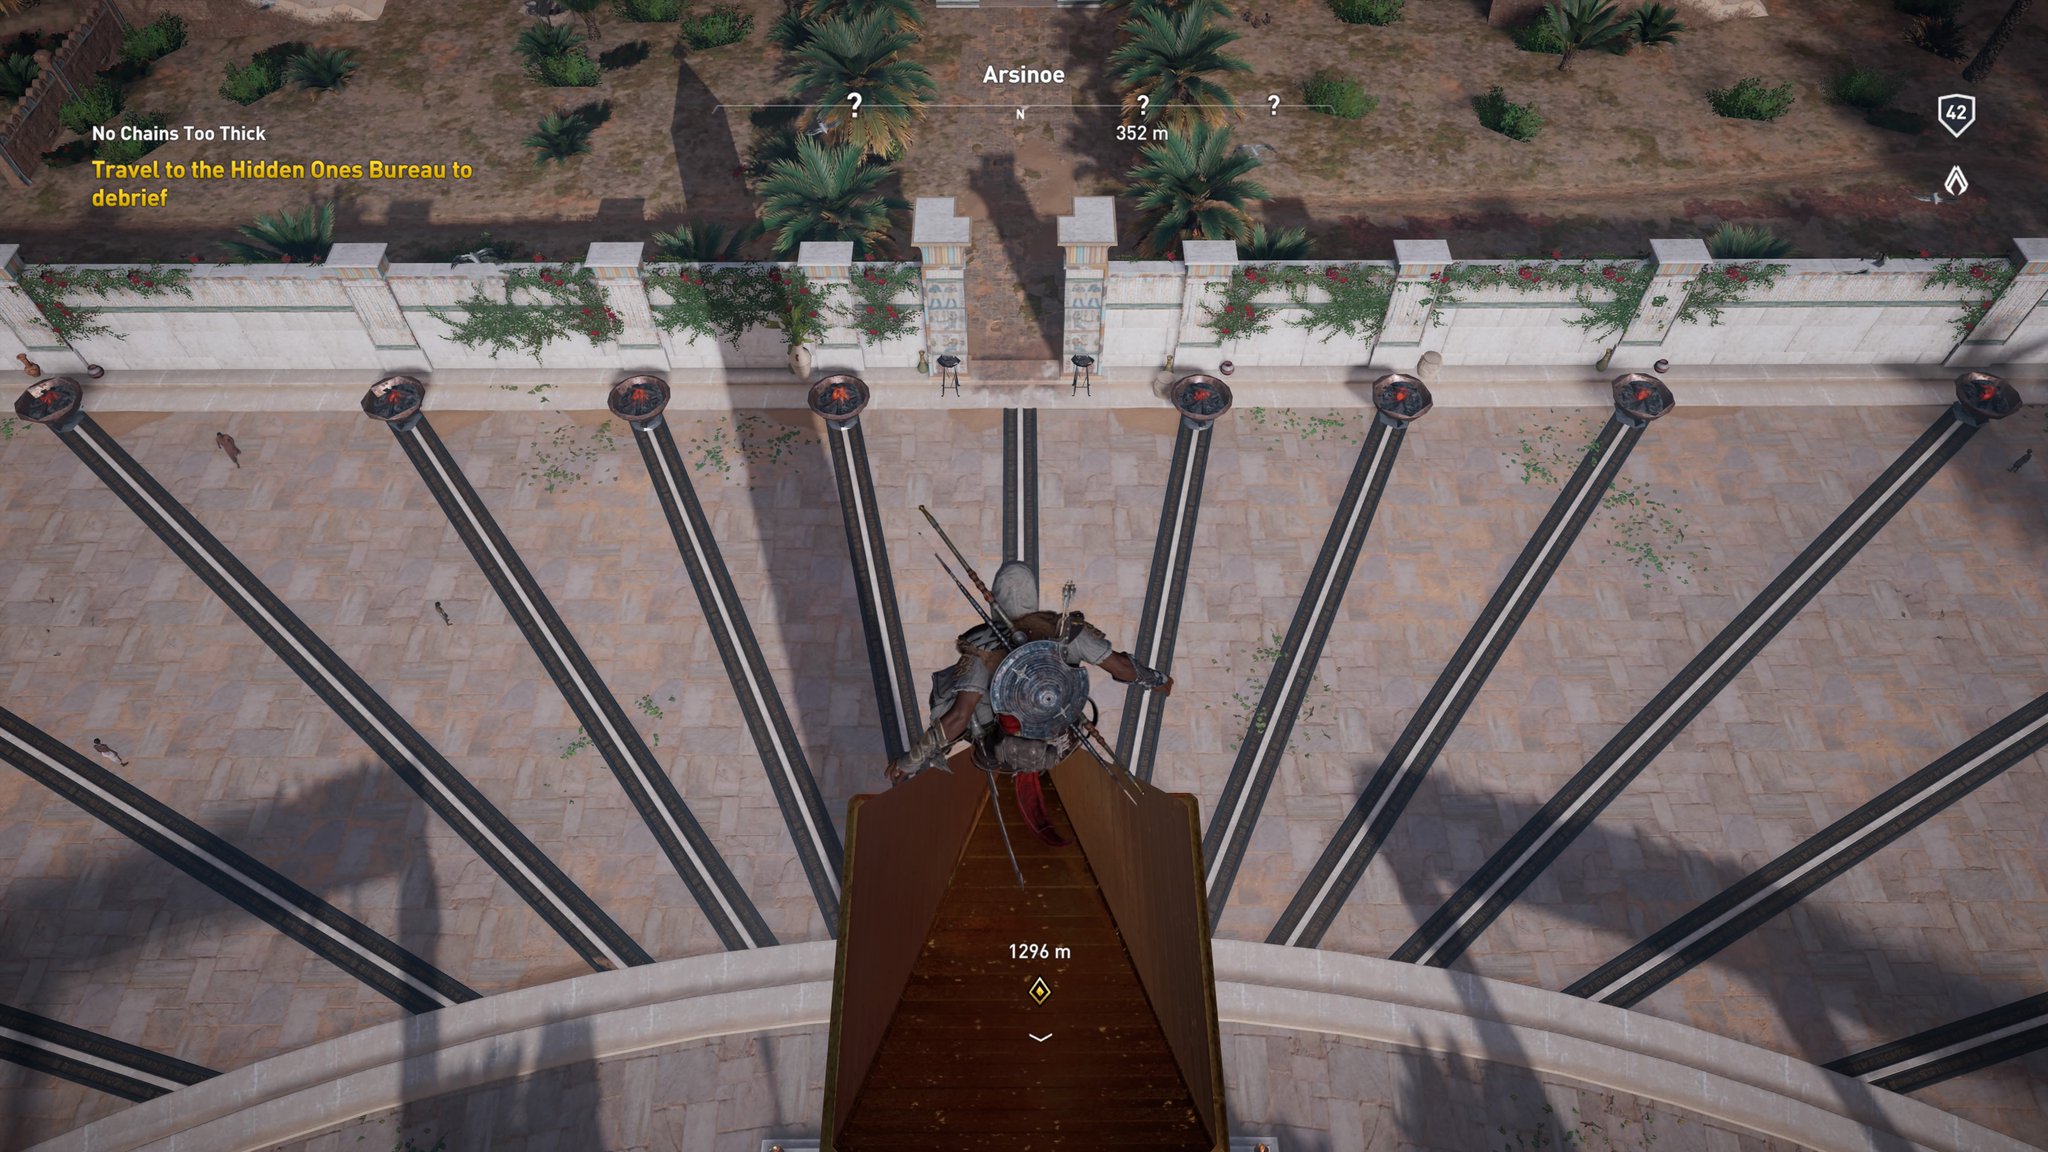
Perform a leap of faith from Arsinoe’s sundial obelisk between 10 am and noon
Easy enough, so long as you know where the sundial obelisk is. The sundial obelisk is located in the northern part of Asinoe. Refer to the first image for a more accurate location, and the second image for where the shadow should be for the 10 am and noon requirement.
Discovery Tour (DLC)

Complete one tour
Self explanitory, just complete one tour.

Complete all tours in the Daily Life category
Self explanitory, just complete all of the tours in the Daily Life portion.

Complete tours with at least 5 different characters
Self explanitory, just complete tours with five different characters.
Curse of the Pharaohs (DLC)

Defeat Tutankhamun in the Afterlife (The Curse of the Pharaohs)
Story related, cannot be missed.

Reach level 55 (The Curse of the Pharaohs)
Self explanitory, reach the new level cap of 55. If you’re level 49/5 at the start of this DLC, you will get to 55 naturally through story progression. You may have to do one or two side-quests… I did, but finished the DLC at 55 with another half-bar of progression.

Acquire Eternal Maw for use outside the Afterlifes (The Curse of the Pharaohs)
Can be purchased at the Stable in Set Maät for 5,000 coins.

Kill a Mummy by setting it on fire (The Curse of the Pharaohs)
Mummies only appear in the Afterlife. You’ll encounter plenty of them on your journey. By now, you should know how to ignite enemies. Simply widdle down the health bar on a Mummy, and then set it ablaze and let the fire take care of the rest.

Craft an upgrade using Shards of a Star (The Curse of the Pharaohs)
Shards of a Star are gained by killing the huge scorpions on the Afterlife; each kill with give you two Shards of a Star. You will need 20 of them to perform a single upgrade.

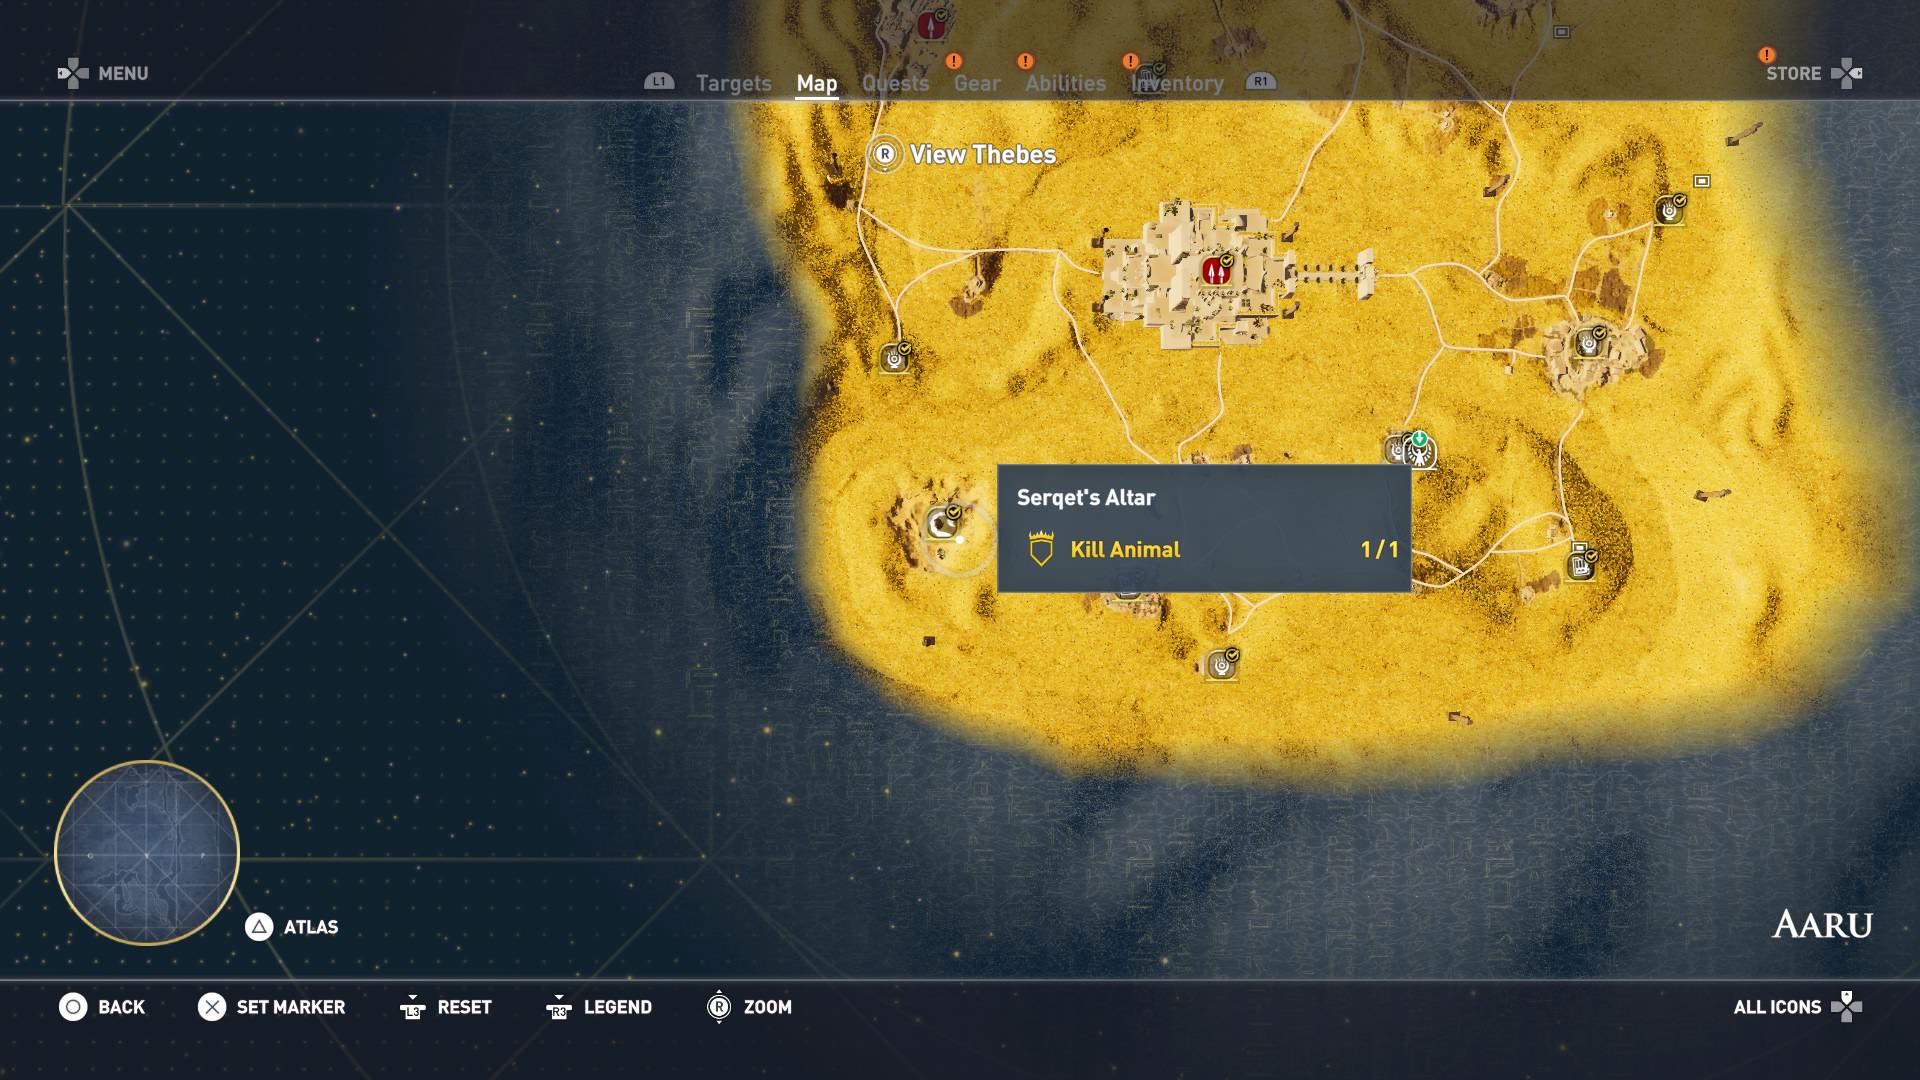
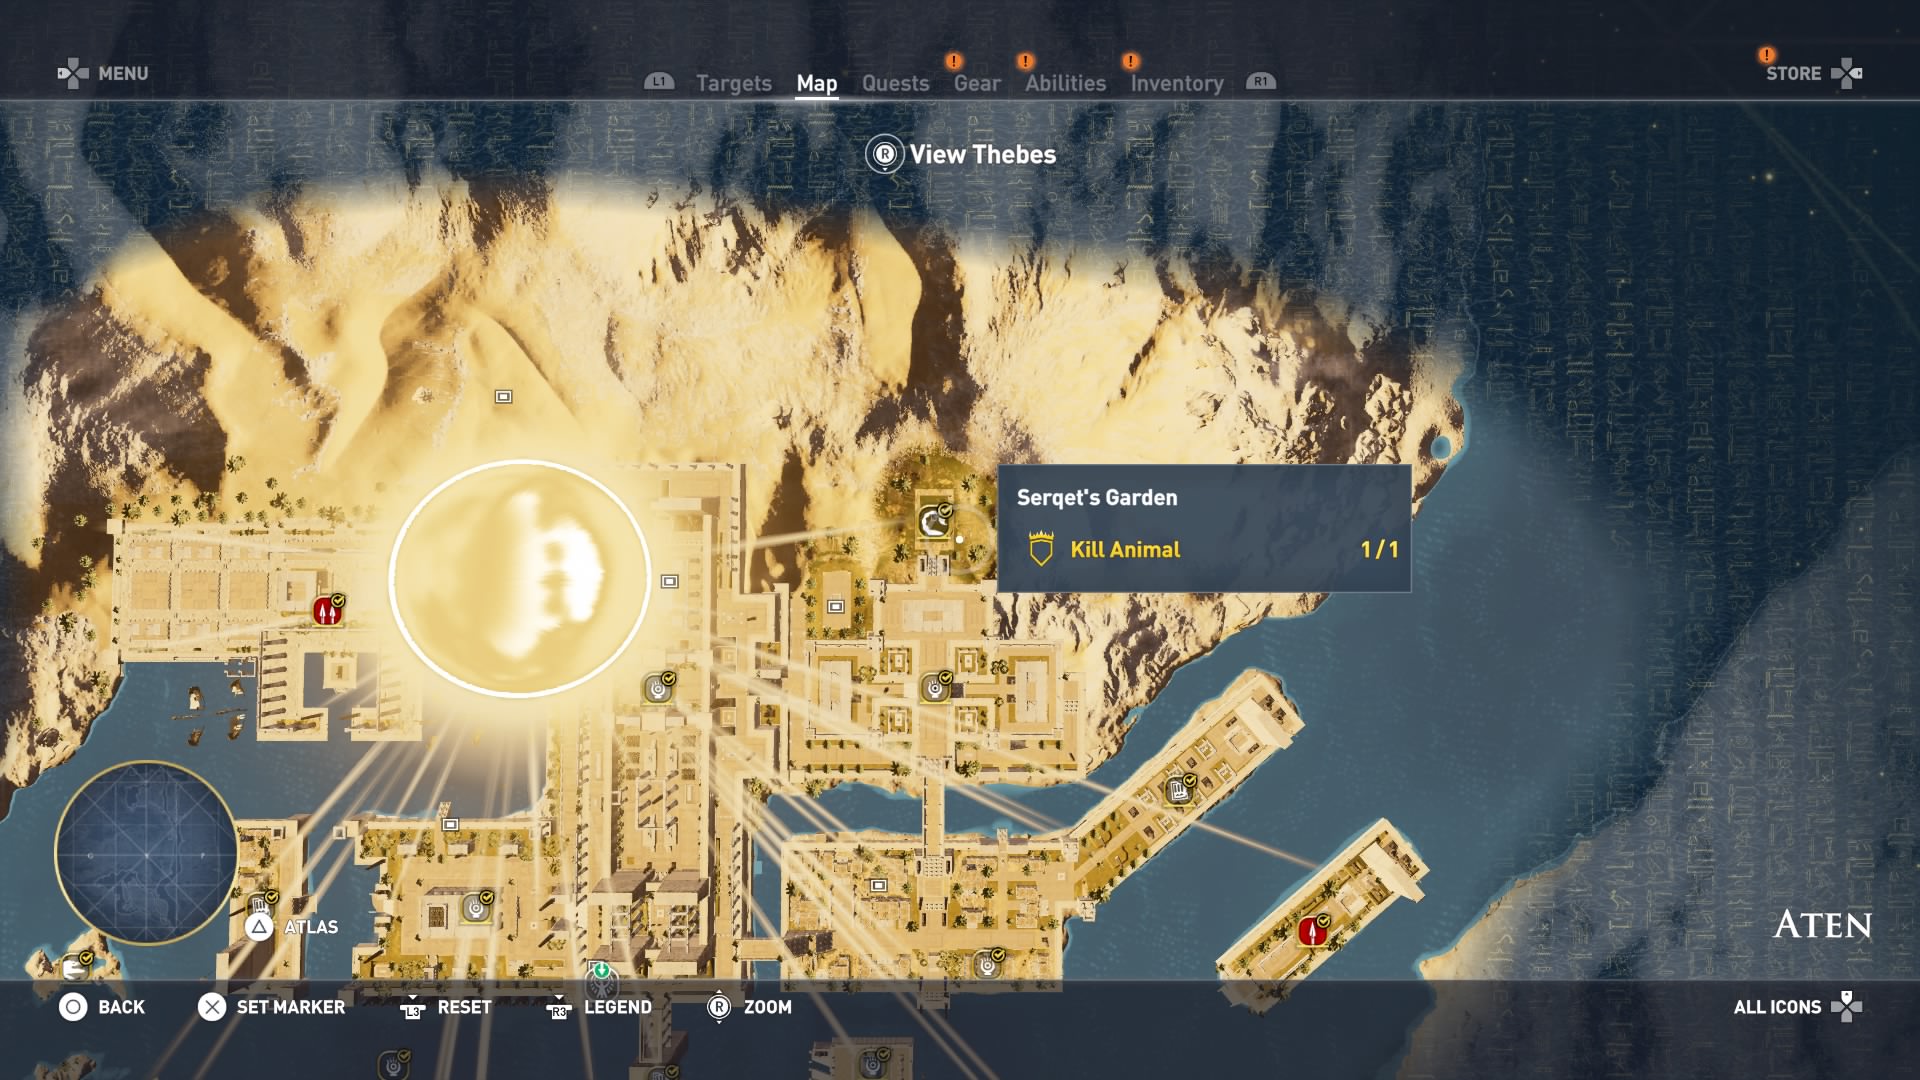
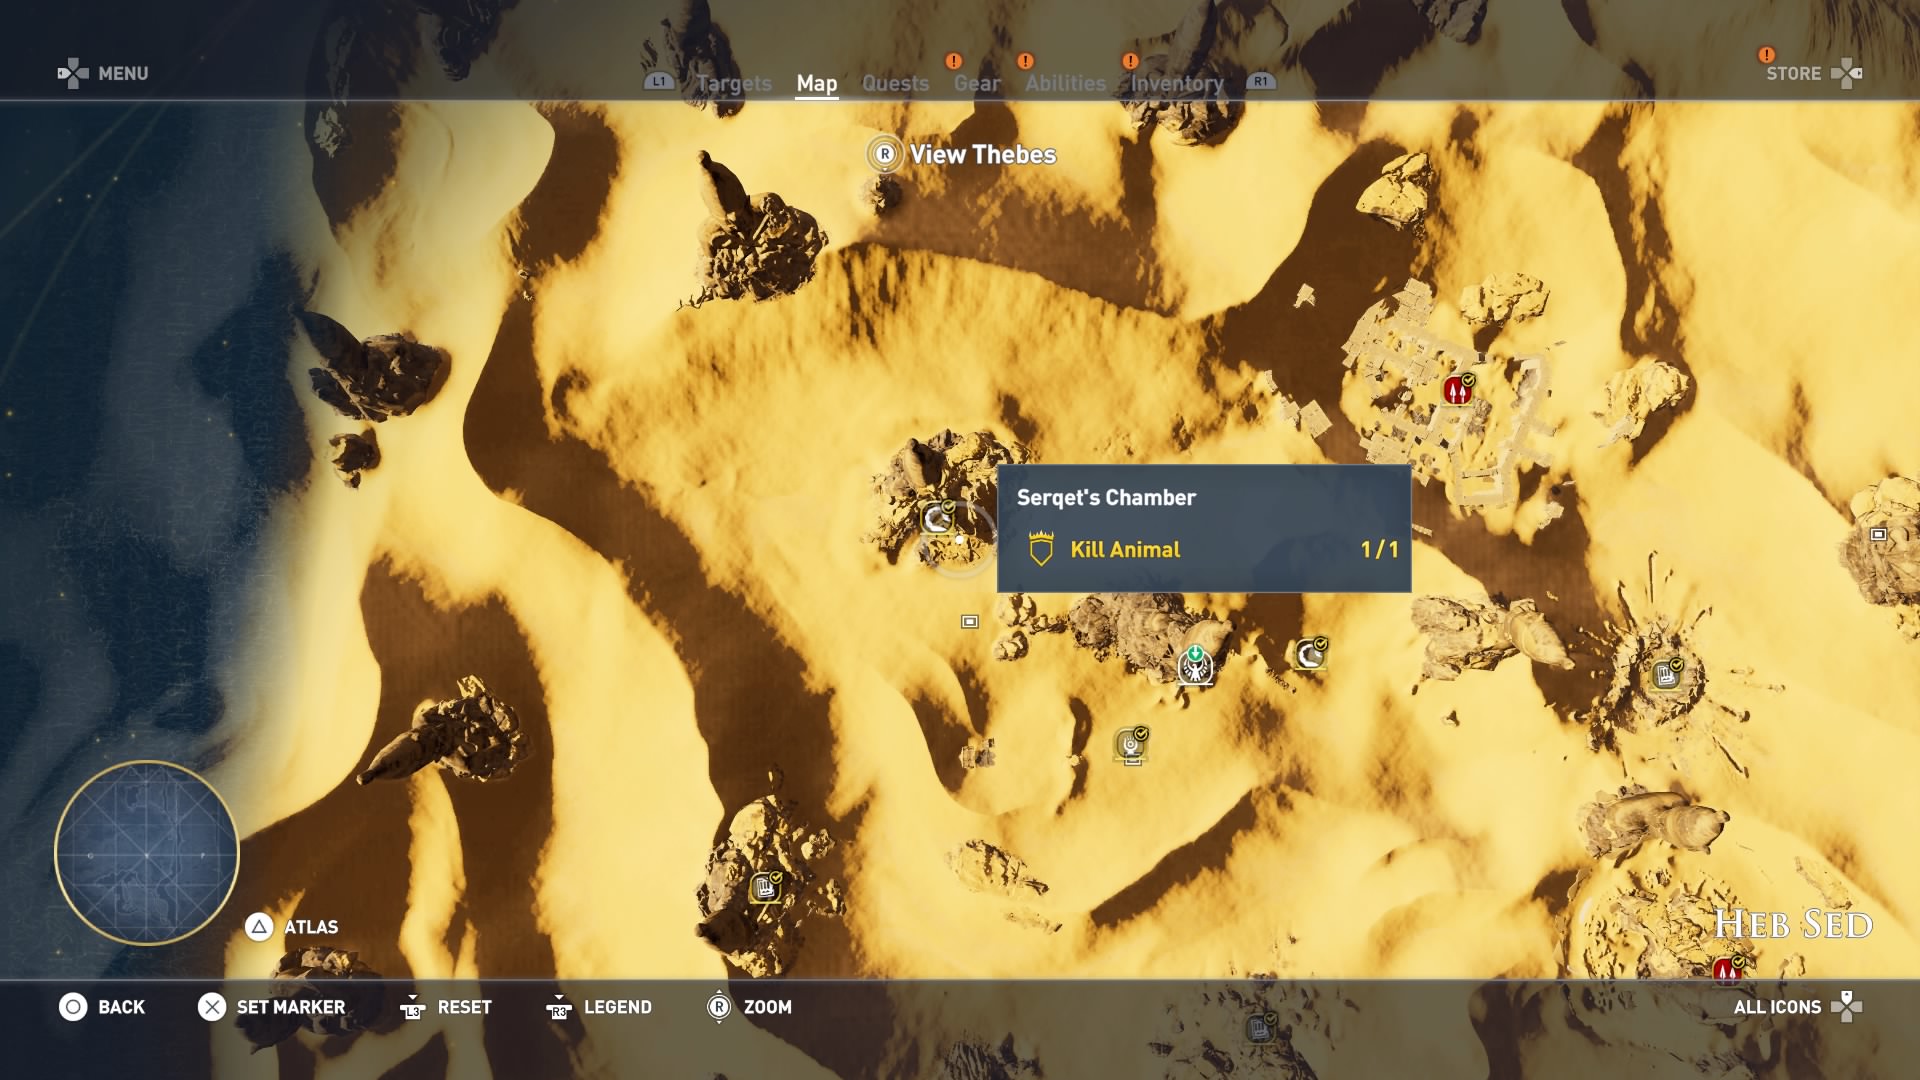
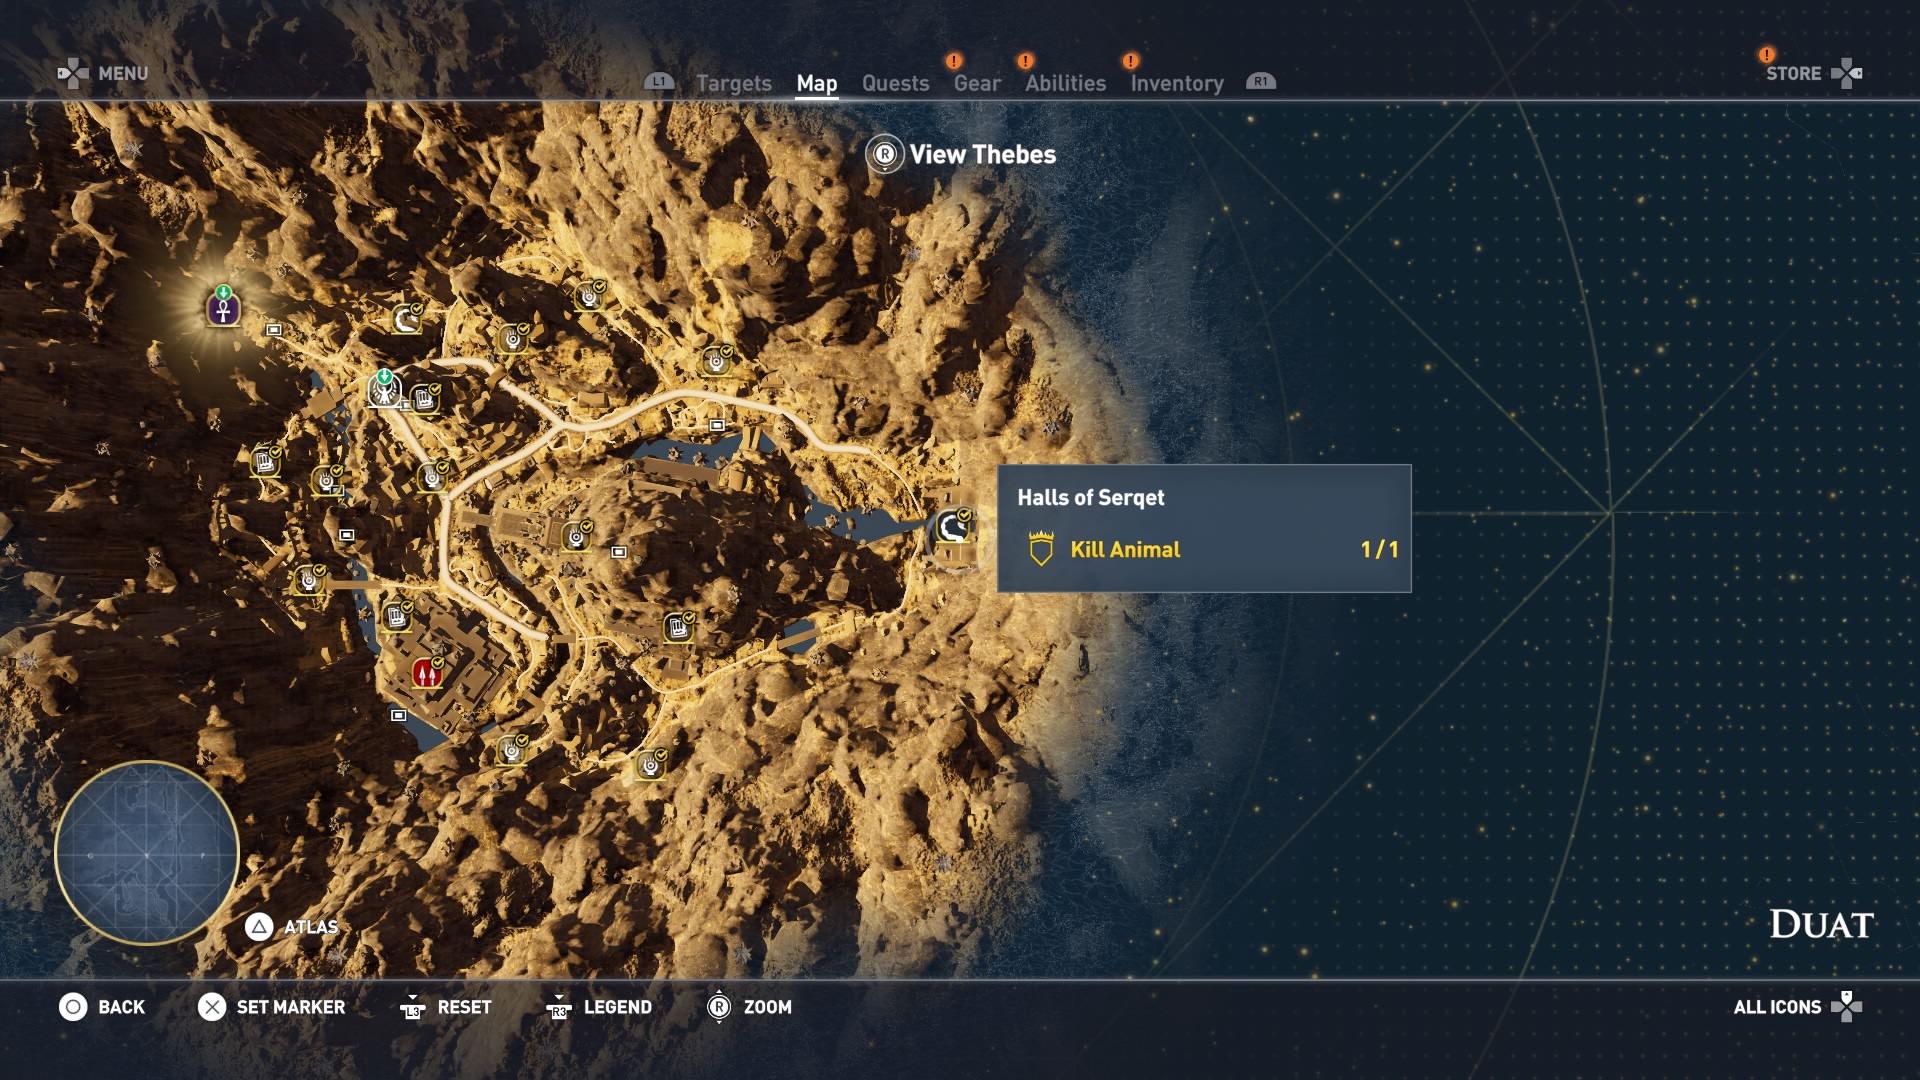
Complete the 5 Serqet locations (The Curse of the Pharaohs)
Serquet locations have extremely difficult enemies, do not even attempt them before you’re level 55, it’s just a waste of time. Each location consists of a level 58 elite enemy, 4 of the 5 having scorpions, which are accompanied by 1-2 other level 56-58 non-elites. Best method is taking a level 55 Predator and Light bow with you, more ideal if they’re ones that are “On Fire”. These enemies can kill you in one hit, even if you’re level 55, so use caution and maintain distance.
Waset Desert – Spring of Serqet – Kill Captain (1) & Loot Treasure (1) V
Tomb of Nefertiti – Serqet’s Altar – Kill Animal (1) V

Tomb of Akhenaten – Serqet’s Garden – Kill Animal (1) V
Tomb of Ramesses – Serqet’s Chamber – Kill Animal (1) V
Tomb of Tutankhamun – Halls of Serqet – Kill Animal (1) V
Wrap Up
Good luck in your achievement hunting!
If this guide helped you, give it a thumbs up so others can find it easier.
Achievement Guide written by The Horror Network / Deathless Void.
Do not redistribute this guide without my express permission.
> If you have anything insightful to add, please leave it in the comments below.
> If you’re looking for boosting/co-op partners, feel free to use the comment section.
> IF ANY DLC IS ADDED, PLEASE LEAVE A DETAILED COMMENT SO I CAN CHECK IT OUT.
Note: There have been look-a-like copycat guides popping up. If it’s not labeled by THN (The Horror Network), it’s NOT one of mine and therefore not up to the quality that I aim to provide.