
Overview
This Guide will attempt to help users learn and implement sounds using Wwise which replaces MILES for our already growing Workshop/Modding community for Contagion which is based off a heavily modified version of the Source Engine.
Foreword & WWise Version
Hello fellow survivors! I’m Ulrich, previously responsible for all audio content and audio implementation in Contagion. Thankfully, our very talented Level designer Joure already started going through the basics of creating new maps with our SDK. I wanted to show in the following tutorial how you can set up existing ambient sounds and ambient zones in Contagion as well as your own custom sounds.
All custom sounds much support Wwise 2014.1.4 build
Overview, Video Tutorials, and Files
The ambient sounds/soundscapes in Hammer aren’t linked in any way to the Wwise sound engine that we use.
Waveworks aka Wwise (https://www.audiokinetic.com/) is a powerful middleware which helped us to reduce iteration times thru development drastically as well it gave us fantastic possibilities to integrate audio in a very efficient way especially when it comes to modding (e.g. real-time tweaking). It’s used in many great games: from indie titles like Limbo to big budget titles as Metal Gear Rising, Deus Ex, Batman Arkham City, Assassin’s Creed, Mass Effect, Saints Row. It might feel odd at the beginning, but once you learn how to place sounds with our custom method, I’m sure you will like the benefits (no compiling, real-time tweaking, and accuracy).
https://www.youtube.com/watch?v=vcZ_48IdB2U&index=1&list=PLQg5Va4A__zyEsZzZFwgaeyOk7qBzC63k
[link]
[link]
http://www.youtube.com/channel/UCuv_-Z-CrnYup-N_dVpdCYg
Wwise in Contagion
You have to create a .txt file called” “soundbanks.txt” in your add-on folder „add-onsound“. This file defines which banks (aka “banks” or “.bnk”) will be loaded on which map. Bank files contain all types of ambient sounds or ambient zones. To save loading times and memory I would recommend loading only the bank files which you really need. Once you decided which sounds and which bank file you want to load for your map you just put the following into your soundbank.txt file:
// Load specific bank files linked to map names
“game” “downtown.bnk”
Or
“game” “yourbankfilename.bnk”
You also have to create another folder in the script folder called “soundsystem”. You create a .txt file called e.g. “sounds_ch_yourmap.txt” which stores all information for the sounds in the map. By default this script although WON’T BE SAVED IN YOUR ADDON! Folder, but you can find it in the default scripts/soundsystem folder of Contagion. After you created & tweaked all your sounds in game you have to copy over that file into your own add-on/yourmap/scripts/soundsystem folder. You can tweak the script, but as soon as you save the file in game while changing and adding sounds you have to copy over again that file. The proper hierarchy finally should look like this:

TIP: Check out the soundscripts for the tutorial map. Replace the existing names with ones that you need. I left the folder hierarchy, so you can understand how it works and where the scripts have to be placed.
Ambient Sounds with Existing Soundbanks
For the purpose of this tutorial I will load the downtown soundbank (“downtown.bnk”) for our tutorial map. So your soundbanks.txt file in your add-on/sound folder should look like this:

Once I’m in the map, I bring up the console and type
“as_asystem_enabled 1”
This activates the visual representation of all ambient sounds and ambient zones in the game:

Then I put „as_default_sound_event AS_DOWNTOWN_GENERATOR_04“and confirm with [ENTER]. A soundevent is an object that once was created with our authoring tool Wwise. It can be an ambient sound or an ambient zone. „AS_DOWNTOWN_GENERATOR_04“is the name of this object (AS= ambient sound, AZ= ambient zone). Then bring up the phone, because it’s easier to place ambient sounds without firing a gun :). Then Press [SHIFT] and you will see that the white cross in the middle will turn to blue, which defines the cursor or where you want to place your sound. Once you got the right spot press [LMB]. After that it should look like this:

The green sphere represents the border where the ambient sound will get activated, once you are out of that border it will turn yellow which means it’s no longer active. You can change the size of the yellow (inactive) sphere by walking as far as you would like it to be (your position represent the point where the border will be drawn). After that put into console: „as_setsound_maxdist“. It will always take the distance between you and the sound source as max value. The green arrow defines the direction of the sound (some sound sources emit sound like a cone). You can then change the direction of the sounds by using „as_setsound_direction“, press [Enter] and the arrow will always point to the players position.
TIP: Now you already should be able to hear the ambient sound of a generator. Walk around the sound, make sure it is placed where you wanted it be placed. Make also sure that the border of the sphere is big enough, so the sound doesn’t cut of or deactivates as soon as you are out of the sphere which would result in a very unnatural sounding behavior (this might occur when the attenuation curve of that sound is bigger than your activation sphere).
Ambient Zones with Existing Soundbanks
First activate: “as_asystem_enabled 1” again. Then use as example „as_default_sound_event AZ_DOWNTOWN_OUTDOORSTREET“which is the same command for placing ambient sounds. To keep track of the different sounds and zone we defined AS for ambient sounds and AZ for ambient zones. After that you press [LALT], the cursor will turn from white to yellow, keep [LALT] pressed in combination with your [LMB]. You should be able making a small rectangle which also turns from yellow to red:
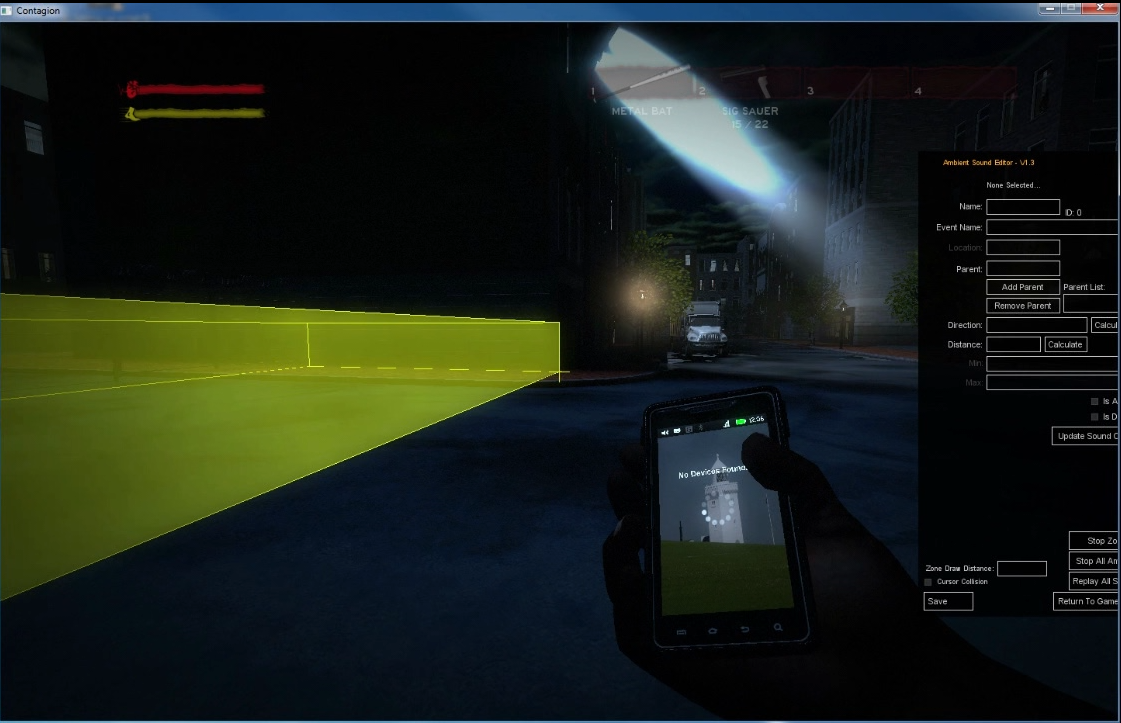

If you walk into it, it will turn from red (means it’s selected) to purple, which means it’s activated.
TIP: ambient zones represent an area which has a certain sound environment. You can use them to define rooms or outdoor areas. In most cases it should be sufficient to create the same ambient zone only at certain entries of an area, e.g. doors and windows. So you need 1x for the door inside (e.g. AZ_House_Indoor) and another one which is in front of the door (e.g. AZ_House_Outdoor).
Change Reverb Tail for Indoors
The “echo” of a shot varies when you fire a gun inside or outside due to different reflections, sound occlusion or sound obstruction. To simulate different environments, every shot which has been fired, checks if the ambient zone has been set to „Field“ or „Indoor“. You can set this manually in the created soundscript under [contagionscriptssoundsystem] then the script name. Open the script and you will find the following in our example:
“soundzone”
{
“event” “AZ_DOWNTOWN_OUTDOORSTREET”
“location” “Field”
“min” “2918.199707 1983.862793 137.970337”
“max” “3856.424072 2813.001465 209.970337”
}
Here it is defined by the value „Field“which gives every weapon a long reverb tail. If you have an ambient zone which is in a house you might want to set it to the value „Indoor“.
TIP: You do also find ambient sounds in this script. Sometimes it might be easier to tweak ambient zones and their parents in the script then in game.
Create Custom Ambient Sounds or Music
First you have to download the Wwise authoring tool, which you can download here (https://www.audiokinetic.com/downloads/) for free. Although I tried to explain as much as possible to make the creation of sounds easy for you, I unfortunately can’t discuss all features and functions of Wwise in this tutorial, so i recommend reading the Wwise Manual if you got further questions (can be found under „Help“).
After a successful install, load up the tutorial project file which I created for you. Extract the .zip file and open „WWise_ch_tutorialmap.wproj“. If you open it for the very first time, you will see a Project Explorer on the left side and a Property Editor on the right. You also should see the Master-Mixer Hierarchy on the top and the Actor-Mixer Hierarchy in the middle:

If you click on the marked plus symbol it should open the bus structure, which defines how the sound runs through your channels and buses (it’s similar to a traditional mixing console):

In the above picture you can see the project structure of CPC_Asylum (Thanks to dR.Vodker!).
The next picture shows how the signal flow would be displayed in a schematic view [CTRL+SHIFT+S]:

So whenever you create an ambient sound or an ambient zone, their sound signal should run through either Mod_ambient zones or Mod_ambient sounds. So whenever you want to create a new sound, drag’n’drop it into either one of these actor-mixers, create a random container (some sounds should be played randomly) or a blend container (some sounds should be played at the same time) to define their playback behavior.
You can change the properties of the soundobject in the sound property editor window:

Please don’t change the output bus on the audio object, otherwise you won’t be able to control it in real-time when you connect to the game. If you want to place your soundobject e.g. into an ambient zone with a reverb, you have to activate „Override parent“and send it to the required FX bus. Please keep the same IDs listed like in our example (so ID0 = RoomsBig, ID1= RoomsMedium, ID2=RoomsMisc, ID3=RoomsSmall). This can be useful when you for instance want to place a generator in a basement, and want to make sure that the sound of the generator does have also a nice reverb. At the bottom you’ll find a list with all reverb effects from which you can choose from.
Go to the tab „Source Settings“to define the quality of the sound being rendered into the bank. I made 4 conversion settings which have different quality settings (default setting is Medium). You can also create your own settings, of course. In most cases Medium or High should work very well.

Creating Events
You simply can create sound events by opening the “Event Viewer” [SHIFT+S], then [RMB] “New Event”>”Play”.

If you double-click on the created event (after giving it a descriptive name) you can edit the properties in the “Event Editor”:

Set “Play” as action for each ambient sound or ambient zone you are creating. You can drag & drop any object from the “Actor-Mixer Hierarchy” into the “Action” field.
TIP: Try to give your ambient sounds and ambient zones names which follow certain logic. In Contagion you can differ between ambient sound (AS) and ambient zone (AZ). The second part is the name of the map (_Asylum) and then the actual sound (_Fire).
Creating Soundbanks
Once you created all your sounds for your map, you then have to create a soundbank which will be linked to your map exactly like we already did in the earlier section (How to place simple ambient sounds with preexisting soundbanks) but with the name you creating for the soundbank.
With [F7] you can open the Soundbank Manager and you can create a new one with option “New” at the top of that window. You have to checkmark the new created map as well as “Windows” under platforms as well as “English” under languages.

If you double-click on the created soundbank, you can view the content of that bank. At this point drap&drop all the sounds which you want to be in that soundbank from the “Event Viewer” into the “Soundbank Editor”:

It also gives you a status report of you current events in case you accidently deleted events which still are showing up in the “Soundbank Editor”. You simply update your bank in the “Soundbank Manager” under “Update”.
Once you created a soundbank you might an error report or a log file which tells you if the soundbank has been successfully created:

TIP: Try to update the soundbank first before you create a new one. You can also change the directory of the created soundbanks by going into “User Settings” and overriding the Project Soundbanks Settings.
Useful Contagion Console Commands
Make sure you have Developer Console Enabled in Options > Keyboard & Mouse while in-game.
as_asystem_enabled [1/0] //enables soundsystem
as_asystem_save //saves created sounds into a script
as_zone_draw_distance [choose value from 100-3000] //defines the AZ draw radius
as_setsound_direction //set AS direction
as_setsound_event [Name of the ambient sound or ambient zone] // create event
as_setsound_maxdist //set max distance for sphere
as_setsound_name [Name of the ambient zone] // set name of ambient zone
as_setsound_parent [Name of the ambient zone] // set name of ambient zone
as_setsound_removeparent [Name of the ambient zone] //remove zone as parent
Comprehensive Wwise Event List
You can view the full list -HERE-[docs.google.com]
Ambient Sounds & Zones List :: Part 1
- AS_BIOTEC_AIRCONDITIONER_02
- AS_BIOTEC_CARHUM_01
- AS_BIOTEC_CARJEEP_02
- AS_BIOTEC_CARMAZBO_01
- AS_BIOTEC_CARSUBLIB_02
- AS_BIOTEC_DISTANTGUNFIRE_01
- AS_BIOTEC_EXITLIGHT_01
- AS_BIOTEC_EXPLOSIONSDISTANT_01
- AS_BIOTEC_EXPLOSIONSDISTANT_02
- AS_BIOTEC_FLIES_01
- AS_BIOTEC_FLIES_02
- AS_BIOTEC_FLIES_03
- AS_BIOTEC_FREEZERBIG
- AS_BIOTEC_FRIDGE_01
- AS_BIOTEC_GENERATOR_01
- AS_BIOTEC_GENERATOR_02
- AS_BIOTEC_GENERATOR_03
- AS_BIOTEC_GENERATOR_04
- AS_BIOTEC_GENERATOR_06
- AS_BIOTEC_GENERATOR_07
- AS_BIOTEC_OFFICEFAX_01
- AS_BIOTEC_OFFICEFAX_02
- AS_BIOTEC_PC_01
- AS_BIOTEC_PILOT_01
- AS_BIOTEC_PILOT_02
- AS_BIOTEC_POWERGENERATOR_01
- AS_BIOTEC_POWERGENERATOR_02
- AS_BIOTEC_RESCUEHELICOPTER
- AS_BIOTEC_SIREN_POLICE
- AS_BIOTEC_STEAMPIPE_01
- AS_BIOTEC_STEAMPIPE_02
- AS_BIOTEC_STEAMPIPE_03
- AS_BIOTEC_STEAMPIPE_04
- AS_BIOTEC_SURVEILLANCECAMERA_01
- AS_BIOTEC_TRANSFORMATOR_01
- AS_BIOTEC_TURBINE_01
- AS_BIOTEC_VENDINGMACHINE_01
- AS_BIOTEC_VENTCEILLING_01
- AS_BIOTEC_VENTLARGEMACHINE
- AS_BIOTEC_VENTSMALL_02
- AS_DOWNTOWN_AIRCONDITIONER_02
- AS_DOWNTOWN_AIRCRAFTOUTSIDE_01
- AS_DOWNTOWN_ALARMBELL_10
- AS_DOWNTOWN_ALARMBELL_50
- AS_DOWNTOWN_BALCONYCREAK
- AS_DOWNTOWN_CHURCH_01
- AS_DOWNTOWN_CINEMA_MOVIE_01
- AS_DOWNTOWN_DISTANTGUNFIRE_01
- AS_DOWNTOWN_DOGALLEY_01
- AS_DOWNTOWN_ELECTRICLARGEVENT
- AS_DOWNTOWN_EXITLIGHT_01
- AS_DOWNTOWN_EXPLOSIONS_01
- AS_DOWNTOWN_FIREBIG_02
- AS_DOWNTOWN_FIREBIG_03
- AS_DOWNTOWN_FIREINFERNO_01
- AS_DOWNTOWN_FIREMEDIUM_01
- AS_DOWNTOWN_FIREMEDIUM_03
- AS_DOWNTOWN_FIRESMALL_01
- AS_DOWNTOWN_FIRESMALL_02
- AS_DOWNTOWN_FRIDGE_01
- AS_DOWNTOWN_GASSTATIONCREAK
- AS_DOWNTOWN_GENERATOR_01
- AS_DOWNTOWN_GENERATOR_02
- AS_DOWNTOWN_GENERATOR_03
- AS_DOWNTOWN_GENERATOR_04
- AS_DOWNTOWN_GENERATOR_05
- AS_DOWNTOWN_GENERATOR_06
- AS_DOWNTOWN_GENERATOR_07
- AS_DOWNTOWN_PC_01
- AS_DOWNTOWN_PINBALLMACHINEMUSIC
- AS_DOWNTOWN_POWERGENERATOR_01
- AS_DOWNTOWN_POWERGENERATOR_02
- AS_DOWNTOWN_RAIN_CEMENTDRIPS_01
- AS_DOWNTOWN_RAIN_CEMENTSPLASHY_01
- AS_DOWNTOWN_RAIN_CEMENTSPLASHY_02
- AS_DOWNTOWN_RAIN_DOWNSPOUT_01
- AS_DOWNTOWN_RAIN_DOWNSPOUT_02
- AS_DOWNTOWN_RAIN_ONGLASROOF_01
- AS_DOWNTOWN_RAIN_ONMETALSHED_01
- AS_DOWNTOWN_RAIN_ONMETALSHED_02
- AS_DOWNTOWN_RAIN_ONMETALSHED_03
- AS_DOWNTOWN_RAIN_ONPATIO_01
- AS_DOWNTOWN_RAIN_ONPLASTICROOF_01
- AS_DOWNTOWN_RAIN_ONPLASTICROOF_02
- AS_DOWNTOWN_RAIN_ONPLASTICROOF_03
- AS_DOWNTOWN_RAIN_ONPLASTICROOF_04
- AS_DOWNTOWN_RAIN_ONPLASTICROOF_05
- AS_DOWNTOWN_RAIN_ONPLASTICROOF_06
- AS_DOWNTOWN_RAIN_ONPLASTICROOF_07
- AS_DOWNTOWN_RAIN_ONTENT_01
- AS_DOWNTOWN_RAIN_ONTENT_02
- AS_DOWNTOWN_RAIN_ONTENT_03
- AS_DOWNTOWN_RAIN_ONTREE_01
- AS_DOWNTOWN_RAIN_ONTREE_02
- AS_DOWNTOWN_RAIN_ONTREE_03
- AS_DOWNTOWN_RAIN_ONTREE_04
- AS_DOWNTOWN_RAIN_ONTREE_05
- AS_DOWNTOWN_RAIN_ONTREE_06
- AS_DOWNTOWN_RAIN_ONTREE_07
- AS_DOWNTOWN_RAIN_ONUMBRELLA_01
- AS_DOWNTOWN_RAIN_ONUMBRELLA_02
- AS_DOWNTOWN_RAIN_ONUMBRELLA_03
- AS_DOWNTOWN_RAIN_UNDERDECKDRIP_01
- AS_DOWNTOWN_RAIN_UNDERDECKDRIP_02
- AS_DOWNTOWN_RAIN_UNDERDECKDRIP_03
- AS_DOWNTOWN_SCREAMS_01
- AS_DOWNTOWN_SIREN_ARMY
- AS_DOWNTOWN_SIREN_CAR
- AS_DOWNTOWN_SIREN_FIRETRUCKS
- AS_DOWNTOWN_SIREN_POLICE
- AS_DOWNTOWN_SIREN_SHOP_02
- AS_DOWNTOWN_SURVEILLANCECAMERA_01
- AS_DOWNTOWN_TRANSFORMATOR_01
- AS_DOWNTOWN_TURBINE_01
- AS_DOWNTOWN_TVSTATICNOISE
- AS_DOWNTOWN_VENDINGMACHINE_01
- AS_DOWNTOWN_VENTCEILLING_01
- AS_DOWNTOWN_VENTLARGEMACHINE
- AS_DOWNTOWN_VENTSMALL_02
- AS_LOSMUERTOS_EXITLIGHT_01
- AS_LOSMUERTOS_FIRE_01
- AS_LOSMUERTOS_GENERATOR_01
- AS_LOSMUERTOS_GENERATOR_04
- AS_LOSMUERTOS_VENDINGMACHINE_01
- AS_LOSMUERTOS_VENTCEILLING_01
- AS_PARK_DISTANTGUNFIRE_01
- AS_PARK_EXPLOSIONSDISTANT_01
- AS_PARK_EXPLOSIONSDISTANT_02
- AS_PIONEEREXPRESS_DRAIN_01
- AS_PIONEEREXPRESS_EXITLIGHT_01
- AS_PIONEEREXPRESS_MACHINEROOM_GENERATOR_01
- AS_PIONEEREXPRESS_MACHINEROOM_GENERATOR_02
- AS_PIONEEREXPRESS_MACHINEROOM_GENERATOR_03
- AS_PIONEEREXPRESS_MACHINEROOM_GENERATOR_04
- AS_PIONEEREXPRESS_MACHINEROOM_GENERATOR_05
- AS_PIONEEREXPRESS_PC_01
- AS_PIONEEREXPRESS_PC_02
- AS_PIONEEREXPRESS_PIPEGARGLING_01
- AS_PIONEEREXPRESS_POWERGENERATOR_01
- AS_PIONEEREXPRESS_POWERGENERATOR_02
- AS_PIONEEREXPRESS_SINKWATERDROP_01
- AS_PIONEEREXPRESS_STEAMPIPE_01
- AS_PIONEEREXPRESS_STEAMPIPE_02
- AS_PIONEEREXPRESS_STEAMPIPE_03
- AS_PIONEEREXPRESS_STEAMPIPE_04
- AS_PIONEEREXPRESS_TRAINCREAK_01
- AS_RPD_AGONY_01
- AS_RPD_AIRCONDITIONER_01
- AS_RPD_AIRCONDITIONER_02
- AS_RPD_AIRCRAFTOUTSIDE_01
- AS_RPD_ALARMBELL_01
- AS_RPD_BASEMENTVENT
- AS_RPD_BROKENTOILET_01
- AS_RPD_CARMAZBO_01
- AS_RPD_CLOCKNEW_01
- AS_RPD_DOGDISTANT_01
- AS_RPD_DOGDISTANT_02
- AS_RPD_ELECTRICLARGEVENT
- AS_RPD_ELEVATORCREAKS
- AS_RPD_EXITLIGHT_01
- AS_RPD_EXPLOSIONSDISTANT_01
- AS_RPD_EXPLOSIONSDISTANT_02
- AS_RPD_EXPLOSIONSDISTANT_03
- AS_RPD_FIREBIG_01
- AS_RPD_FIREMEDIUM_02
- AS_RPD_FIRESMALL_03
- AS_RPD_FLIES_01
- AS_RPD_FLIES_02
- AS_RPD_FLIES_03
- AS_RPD_FREEZERBIG
- AS_RPD_FRIDGE_01
- AS_RPD_GENERATOR_01
- AS_RPD_GENERATOR_02
- AS_RPD_GUNFIREDISTANT_01
Ambient Sounds & Zones List :: Part 2
- AS_RPD_OFFICEFAX_01
- AS_RPD_OFFICEFAX_02
- AS_RPD_PC_01
- AS_RPD_PHONEDISCONNECTED_01
- AS_RPD_RAIN_01
- AS_RPD_RAIN_POND_DRIP_SOFT_01
- AS_RPD_RAIN_POND_DRIP_SOFT_02
- AS_RPD_RAIN_POND_DRIP_SOFT_03
- AS_RPD_RAIN_POND_DRIP_SOFT_04
- AS_RPD_RAIN_POND_SOFT_01
- AS_RPD_RAIN_POND_SOFT_02
- AS_RPD_RAIN_POND_SOFT_03
- AS_RPD_RAIN_SURFACE_DRIP_01
- AS_RPD_RAIN_SURFACE_DRIP_02
- AS_RPD_RAIN_SURFACE_DRIP_03
- AS_RPD_RAIN_SURFACE_DRIP_03_NOSTATE
- AS_RPD_RAIN_SURFACE_DRIP_04
- AS_RPD_RAIN_SURFACE_DRIP_04_NOSTATE
- AS_RPD_RESCUEHELICOPTER
- AS_RPD_SCREAMS
- AS_RPD_SIREN_FIRETRUCKS
- AS_RPD_SIREN_POLICE
- AS_RPD_SURVEILLANCECAMERA_01
- AS_RPD_TRANSFORMATOR_01
- AS_RPD_TURBINE_01
- AS_RPD_TVSTATICNOISE
- AS_RPD_VENDINGMACHINE_01
- AS_RPD_VENTLARGEMACHINE
- AS_RPD_VENTSMALL_01
- AS_RPD_VENTSMALL_02
- AS_SUBURBS_CARCHEVAN_01
- AS_SUBURBS_CARHUM_01
- AS_SUBURBS_CARHYNAC_01
- AS_SUBURBS_CARJEEP_02
- AS_SUBURBS_CARMAZBO_01
- AS_SUBURBS_CARSUBLIB_01
- AS_SUBURBS_CARSUBLIB_02
- AS_SUBURBS_CARTOYTA_01
- AS_SUBURBS_CLOCKNEW_01
- AS_SUBURBS_EXPLOSIONSDISTANT_01
- AS_SUBURBS_EXPLOSIONSDISTANT_02
- AS_SUBURBS_FIRETRUCK_01
- AS_SUBURBS_FLIES_01
- AS_SUBURBS_FLIES_02
- AS_SUBURBS_FLIES_03
- AS_SUBURBS_FRIDGE_01
- AS_SUBURBS_GENERATOR_02
- AS_SUBURBS_JINGLEBELLS
- AS_SUBURBS_LAWNMOWER
- AS_SUBURBS_PC_01
- AS_SUBURBS_POLICERADIO_01
- AS_SUBURBS_RESCUEHELICOPTER
- AS_SUBURBS_TVTESTONE_01
- AS_SUBURBS_VENTSMALL_01
- AZ_BIOTEC_ATRIUM
- AZ_BIOTEC_BASEMENT
- AZ_BIOTEC_BASEMENTCONTROLROOM
- AZ_BIOTEC_BASEMENTLAB
- AZ_BIOTEC_BATHROOM
- AZ_BIOTEC_CAFETERIA
- AZ_BIOTEC_ELEVATORINSIDE
- AZ_BIOTEC_ELEVATORSHAFT
- AZ_BIOTEC_HALLWAY
- AZ_BIOTEC_HALLWAYSMALL
- AZ_BIOTEC_KITCHEN
- AZ_BIOTEC_LABORATORIES
- AZ_BIOTEC_LOCKERROOMBASEMENT
- AZ_BIOTEC_OFFICE
- AZ_BIOTEC_OUTSIDE
- AZ_BIOTEC_RECEPTION
- AZ_BIOTEC_SERVERROOM
- AZ_DOWNTOWN_APARTMENT
- AZ_DOWNTOWN_BANK_BASEMENT
- AZ_DOWNTOWN_BANK_CORRIDOR
- AZ_DOWNTOWN_BANK_LOBBY
- AZ_DOWNTOWN_BANK_OFFICE
- AZ_DOWNTOWN_BANK_STAIRWAY
- AZ_DOWNTOWN_CINEMA_CORRIDORS
- AZ_DOWNTOWN_CINEMA_LOBBY
- AZ_DOWNTOWN_CINEMA_PROJECTORROOM
- AZ_DOWNTOWN_CINEMA_RESTROOMS
- AZ_DOWNTOWN_CINEMA_ROOM01
- AZ_DOWNTOWN_CINEMA_ROOM02
- AZ_DOWNTOWN_DINERENTRANCE
- AZ_DOWNTOWN_GARAGE
- AZ_DOWNTOWN_GASSTATION_GARAGE
- AZ_DOWNTOWN_GASSTATION_STORE
- AZ_DOWNTOWN_GUNSTORE_LOADINGDOCK
- AZ_DOWNTOWN_GUNSTORE_LOBBY
- AZ_DOWNTOWN_GUNSTORE_SHOOTINGRANGE
- AZ_DOWNTOWN_LOBBY
- AZ_DOWNTOWN_OFFICE
- AZ_DOWNTOWN_OUTDOORCHECKPOINT
- AZ_DOWNTOWN_OUTDOORCHECKPOINTNORAIN
- AZ_DOWNTOWN_OUTDOORHOUSEPORCH
- AZ_DOWNTOWN_OUTDOORSTREET
- AZ_DOWNTOWN_OUTDOORSTREETNORAIN
- AZ_DOWNTOWN_OUTDOORTENT
- AZ_DOWNTOWN_STAIRWAY
- AZ_DOWNTOWN_STORAGEROOM_LOADINGDOCK
- AZ_DOWNTOWN_SUBWAY_GENERATORROOM
- AZ_DOWNTOWN_SUBWAY_HALLWAY
- AZ_DOWNTOWN_SUBWAY_HALLWAYSMALL
- AZ_DOWNTOWN_SUBWAY_KITCHEN
- AZ_DOWNTOWN_SUBWAY_MACHINEROOM
- AZ_DOWNTOWN_SUBWAY_OFFICE
- AZ_DOWNTOWN_SUBWAY_PLATFORM
- AZ_DOWNTOWN_SUBWAY_RESTROOMS
- AZ_DOWNTOWN_SUBWAY_SERVICEROOM
- AZ_DOWNTOWN_SURPLUS
- AZ_DOWNTOWN_SURPLUS_LOADINGDOCK
- AZ_LOSMUERTOS_MAIN
- AZ_LOSMUERTOS_OUTDOOR
- AZ_PARK_OUTSIDE
- AZ_PARK_RESTROOMS
- AZ_PARK_TUNNEL
- AZ_PIONEEREXPRESS_CAFETERIA
- AZ_PIONEEREXPRESS_CELLAR
- AZ_PIONEEREXPRESS_CELLARSMALL
- AZ_PIONEEREXPRESS_HALLWAYBIG
- AZ_PIONEEREXPRESS_HALLWAYOFFICE
- AZ_PIONEEREXPRESS_LOCKERROOM
- AZ_PIONEEREXPRESS_LOCKERROOMSHOWERS
- AZ_PIONEEREXPRESS_MACHINEROOM
- AZ_PIONEEREXPRESS_MAINTENANCEROOM
- AZ_PIONEEREXPRESS_MAINTENANCEROOMOFFICE
- AZ_PIONEEREXPRESS_RESTROOMS
- AZ_PIONEEREXPRESS_SECURITYOFFICE
- AZ_PIONEEREXPRESS_STAIRWAY
- AZ_PIONEEREXPRESS_TRAININDOOR_TUNNEL
- AZ_PIONEEREXPRESS_TUNNEL
- AZ_RPD_BASEMENT
- AZ_RPD_BASKETBALLCOURT
- AZ_RPD_BATHROOMBASEMENT
- AZ_RPD_BATHROOMCELLBLOCKA
- AZ_RPD_BATHROOMFIRSTFLOOR
- AZ_RPD_BATHROOMSECONDFLOOR
- AZ_RPD_CAFETERIAFIRSTFLOOR
- AZ_RPD_CELLBLOCKA
- AZ_RPD_CELLBLOCKB
- AZ_RPD_CELLBLOCKBCORRIDOR
- AZ_RPD_CORRIDORFIRSTFLOOR
- AZ_RPD_ELEVATORINSIDE
- AZ_RPD_ELEVATORSHAFT
- AZ_RPD_EVIDENCEROOM
- AZ_RPD_GARAGE
- AZ_RPD_GARAGEOFFICE
- AZ_RPD_INTEROGATIONROOM
- AZ_RPD_KITCHEN
- AZ_RPD_LOADINGDOCK
- AZ_RPD_LOBBY
- AZ_RPD_LOCKERROOMBASEMENT
- AZ_RPD_MACHINEROOMFIRSTFLOOR
- AZ_RPD_MEDICALAREA
- AZ_RPD_OFFICEFIRSTFLOOR
- AZ_RPD_OFFICESECONDFLOOR
- AZ_RPD_OFFICESECONDFLOORDEADEND
- AZ_RPD_OFFICESECONDFLOORFIRE
- AZ_RPD_OUTSIDE
- AZ_RPD_ROOFTOPCONTROL
- AZ_RPD_ROOFTOPEXIT
- AZ_RPD_STAIRWAY
- AZ_RPD_STAIRWAYBASEMENT
- AZ_STOPAZ
- AZ_SUBURBS_HOUSEATTIC
- AZ_SUBURBS_HOUSEBASEMENT
- AZ_SUBURBS_HOUSEBATHROOM
- AZ_SUBURBS_HOUSEGARAGE
- AZ_SUBURBS_HOUSELIVINGROOM
- AZ_SUBURBS_OUTSIDE
- AZ_SUBURBS_OUTSIDEGARDEN
- AZ_SUBURBS_OUTSIDEROOF
- AZ_SUBURBS_OUTSIDESTREET
- AZ_SUBURBS_TRUCKCARGOAREA
Available Reverb Settings
0=Cellar
1=Garage
2=Cellblock
3=Tunnel
0=Kitchen
1=Basement, Stairway
2=Lobby, HouseGarage, Loading Dock
3=Elevatorshaft
0=Street Alley //good for outdoor areas, especially in streets
0 = SmallBathroom, Office
1 = Indoor Train
2 = TruckCargoArea
3 = IndoorHouse
Conclusion
We’d like to thank Ulrich for putting in the effort to help share Wwise for Contagion with you and we truly hope that this guide, video tutorials, tutorial files, and additional tutorial links are just what you need to bring to life your environments!
Best of luck from the entire Contagion Team!