
Overview
Note: This guide was created during Wreckfest’s early access. Some pictures and information are outdated, but it should still provide some helpful information.Are unwanted effects of mods getting you down? A new track disables vehicle damage? A skin mod rearranges the menu UI? There’s finally a solution!
Preface
Have you ever downloaded a mod that you expected to add a couple of tracks/arenas to your game, only for it to also change the handling and damage of vehicles? Have you ever downloaded a skin mod that also completely rearranged the menu UI? Usually, these changes are great! More often than not however, we get tired of how the mod affects other aspects of gameplay, and eventually disable the mod or unsubscribe from the workshop item entirely.
Wreckfest mods usually come with a trade-off. For example, “I want to race on this track, but I don’t like that it changes driving physics.” Luckily, there is a solution!
Before we begin, if this guide helps you at all, be sure to give it a positive rating so that it is easier for other users to find! If any part of this guide was confusing or unclear, be sure to comment below and let me know! This will help me to improve this guide and therefor help others in the community!
Before following the steps in this guide, you should always give mod developers feedback about anything you do or do not like about their mod. This feedback greatly helps content creators understand what they are doing right or where they can improve. Plus, it’s very encouraging to know that someone enjoys something that they put time and effort into creating, and may lead to more workshop content for us all to enjoy!
*Please note that the process described in this guide will make it possible (if it wasn’t possible already) to reupload mods created by other users. Doing so is against the Steam Workshop Subscriber Agreement.
With that said, let’s begin!
Download your mods
First things first! Be sure to subscribe to any modifications you want to use.
Skip to the next section if you have already downloaded your modifications.
Once you have subscribed to the workshop item, Steam should begin downloading the necessary files. Please note that it is currently impossible to specify which files you do or do not want to download.

Once you have all the necessary files installed, continue on to the next step.
Folder identification
After you have downloaded any mods you want to use, Steam should store them in a subfolder in your Steam directory. Navigate to this file location:

Now we are presented with a multitude of numbered folders. We need to find which of these folders contains the workshop content for Wreckfest. (For me, this folder was labeled as 228380. On your system, this may be different.)
If you have a folder labeled ‘228380,’ open that folder. (This won’t guarentee it contains data for Wreckfest on your system.) If you do not have this folder, open the first folder at the top of the list.

Inside the folder you opened, you will see one of the following possibilities:
- Nothing. If the folder is completely empty, this is not the folder for Wreckfest. Navigate back and view the next folder, then repeat this step.
- More numbered files. Again, start at the top and open the first folder. Skip down to “Mod folder identification.”
- Anything else. If you find anything not matching the above two possibilities, this is not the folder for Wreckfest. Navigate back and view the next folder, then repeat this step.
If you opened a numbered folder and found another group of numbered folders, open the first folder at the top of the list. Inside the folder you opened, you will see one of the following possibilities:
- Nothing. If you opened a folder and discovered that it was empty, navigate back one level and open the next folder in the list, then repeat this step.
- More numbered folders. If you opened a number folder within a numbered folder and found yet another list of numbered folders, navigate back two levels to ‘Workshopcontent.’ The bottom most numbered folder you are in is NOT the workshop content folder for Wreckfest. Return to the previous step “Wreckfest Folder Identification.”
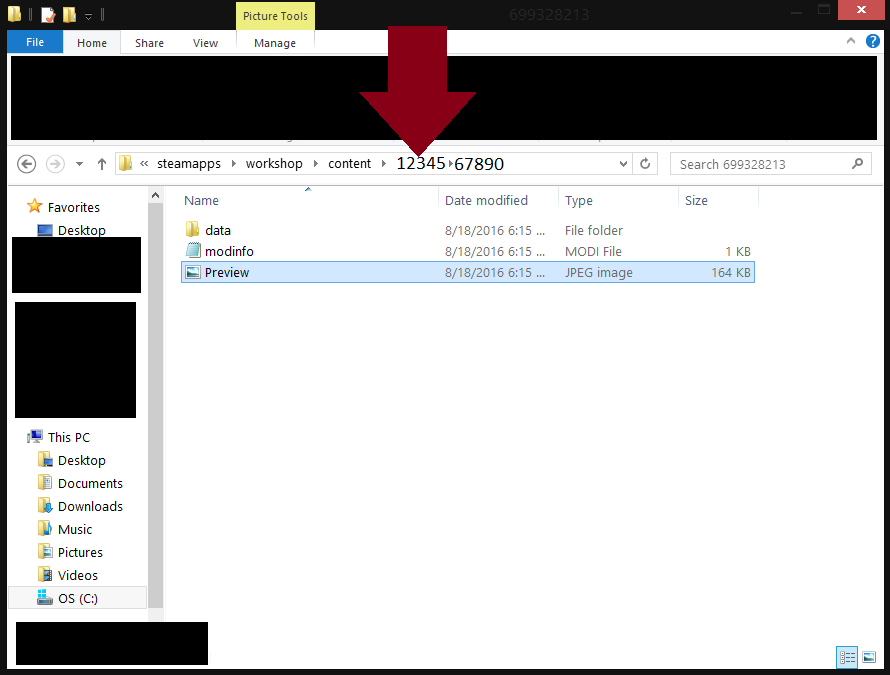
- A single ‘data’ folder, a modinfo file, and a preview image. This is what we want to see! If your window looks EXACTLY like the below image, you have found Wreckfest’s Workshop data folder, and one of the mods you downloaded! Continue to the next step. (the image may not be named ‘Preview.’ This is okay. (Make a note of your current file address in case you accidentally close the window or navigate too far back.))

Once you have found a folder containing the files in the above image, we need to identify individual mods. We will continue from this point looking at only one mod at a time.
In this folder, open the ‘Preview’ image. This image will match the thumbnail of the workshop item this mod is associated with. If this image contains the works title, such as “Real 2 Life,” we know that the folder we’re in contains all the data used in the “Real to Life” mod. If it shows “Destruction Derby,” we know this folder contains data for the “Destruction Derby” mod, etc.
When looking for a specific mod, simply navigate back one level and open the next folder down and so on until you find the mod you’re looking to alter. Once you’ve found the mod you wish to modify, note its file location and continue on to the next step.
Prevent Steam from updating the mod we want to alter
Now that you have found the mod you want to modify, we need to move it to another location.
Steam will try to update the mod as soon as it finds that its data does not match that of the workshop item. We do not want this, as this will revoke any changes we make to the files. To prevent this, we first need to move the entire folder out of this directory. For example, if the mod you want to modify is at the location “…workshopcontent1234567890,” we want to grab the folder labeled “67890” and move it and its entire contents to our Desktop or any other location where you can easily access it.
Unsubscribing from the workshop item is not necessary as steam will not check for a missing workshop content folder. Steam only checks the contents inside the second numbered subfolder. When you’re finished, continue on to the next step.

Determine which files you want and which you don’t
With the mod folder on our desktop, it’s time to open it up and see what kind of data it contains. If you followed the previous steps correctly, the now root folder should contain a single ‘data’ folder, a modinfo file, and a preview image.
Delete the preview image. It is not necessary and serves no purpose beyond initially uploading the mod to the Steam Workshop. If you don’t care about the mod description being viewable in the in-game mod manager window, delete the ‘modinfo’ file. I personally delete this file as it makes mods easy to distinguish from subscribed workshop items in-game. If you want to keep this file, leave it in its current location.
Now, open up the folder labeled ‘data.’ You may see one or several of the folders listed below. First, find the issue you want to change using the table, then use the flow chart to delete the appropriate file or folder. (If you want to make a file into a seperate mod, such as a damage.dset file, move it to the desktop or another folder temporarily.)

Now that you’ve disabled any part of the mod you do not wish to use, rename the root folder to whatever you want the mod to appear as in Wreckfest’s in-game mod manager window. I recommend naming it something that will help you remember what the mod is, and what part has been edited out, such as “DD – Tracks Only.”
Once you’ve given the mod a snazzy new nickname, continue on to the next step.
Move the mod into the ‘mods’ folder
The next action we need to take is to move the root mod folder into Wreckfest’s ‘mods’ folder. Next Car Game: Wreckfest reads non-workshop mods from the following directory:


If you set asside any files that you did not want bundled in another mod, but you would like them implimented as a standalone mod, follow these steps.
Create a new folder in “…Bugbear Entertainmentmods” and name it anything relating to the new standalone mod you are about to create. Within this empty folder, create a new folder and name it ‘data.’ Within this folder, create new subfolders until you create a path matching the chart below, depending on which type of file or folder you are trying to use.
Repeat this process for any new mods you would like to modify, making sure to use unique names to avoid mixing/overwriting any files.
Enable the mod in-game
If you followed the instructions correctly, your new mod should now be available in the in-game mod manager window.
Launch Next Car Game: Wreckfest (64 bit) or Next Car Game: Wreckfest (32 bit) and click the ‘Mods’ tab in the upper section of the screen.

Click the “Go race” button in the bottom section of the screen. The race setup screen appears and prompts you to choose a track and race conditions. If your mod adds a new track, cycle through the available tracks until you find the correct one. If your mod adds a new weather condition, such as “Rainbow Road 64,” cycle through the weather options until you find the condition you’re looking for.
Your vehicle will not appear in-game until you purchase it from the market. Click the button labeled ‘Market’ in the upper section of the screen. Ensure you are viewing vehicles, and scroll down through the list until you see the correct vehicle. If you have enough money, purchase it from the list, and return to the garage screen to select it.
The effects of these mods are not obvious until you meet certain conditions in gameplay, such as with the “Moon Gravity” mod. You’ll have to find the effects of these mods on your own.
Closing
Thanks for reading this guide all the way through to the end! If you found it helpful, don’t forget to give it a positve rating, as it let’s me know that these several hours that I’ve spent in agony using PrintScreen and Microsoft Paint haven’t been for nothing! I hope this guide has helped to clear up some confusion, and solved some problems for others that I fought myself for so long.
I wish you luck on your adventures in the modding community!
