
Overview
A personal Guide / Walkthrough – A Work in Progress
Blade of Destiny – Cover Page
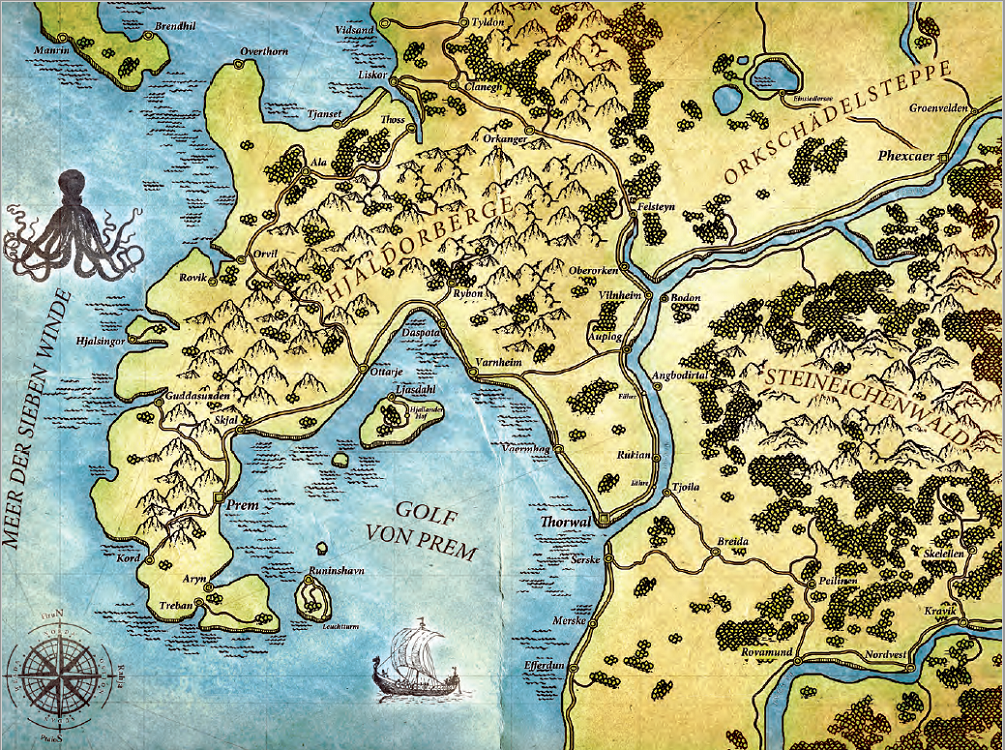
Blade of Destiny – Regional Area Map
Preface – Guide Conventions
Guide Conventions
I would like to preface everything before we start with the conventions I plan to use in creating this guide. In doing so, it is my hope this will give you the information needed to use the guide for your benefit and allow you to make some decisions on what part(s) to use or not.
This guide will follow my path through the game and while I enjoy turning over every rock and looking behind every bush there may be things I miss. If so, and you are aware, let me know and I will do my best to incorporate that into the guide. Also, the game has a very “Pen and Paper” feel: the narrator (Dungeon Master) takes on the numerous roles throughout the game and there are numerous random encounters; some with surprising results (see example below), and most without. These random encounters will not be documented in this guide (with the exception of the example below) as it is my presumption that you would find it more enjoyable to discover these on your own. The example that follows is meant to illustrate a random, non-quest related, encounter.
Random Encounter: A Stranded Wizard – Thorwal Harbor


You Gain a Magical Herb Pouch from this encounter and find yourself at the Thorwal Mages Academy
I intend to start the guide with information on quests, towns, and dungeons. This is for two reasons: 1) I want to play the game and not take the time to develop content on skills, spells, character generation… all of which will take time away from playing and 2) This other type of information can be obtained elsewhere and I hope to add sections on these topics after the fact. This guide will be a work in progress, being compiled as I go along in my adventure; therefore it will not be complete until well after I finish the game itself.
I do not intend to annotate any town or dungeon maps other than what the game provides. This is also done to refrain from providing too much information and spoiling the game for others. In the main sections of the guide I plan to incorporate quest initiation and completion content. It is my goal to have separate sections for each quest that will contain the full quest content, thereby leaving it to the individual player as to the amount of information they want to use / see.
Please keep in mind this is a work in progress and things may change over time. I will try to keep to these conventions as much as possible. Any and all feedback is welcome. Please, above all else enjoy the game.
Lou
Introduction
Realms of Arkania – Blade of Destiny
Personal Walk-through – Louis K. Marion – 2018
I remember with great affection playing the original Realms of Arkania Trilogy back in the 90’s. I was a big Wizardry fan (still am) and was very excited to see Sir-Tech branching off and adding a new world for their Hard Core RPG followers. The games weren’t perfect but for those of us who wanted to obsess over every stat / talent / skill / spell… these games were RPG nirvana.
I was therefore very excited to hear about the re-makes and had been putting off playing them in hopes of getting all three for a full play through. However, with the recent Steam Sale I picked the two current re-makes up and am extremely happy so far with Blade of Destiny. I tried the PS4 Version also (as Sony had it on sale) but cannot break away from the Keyboard and Mouse. I guess you can call me a die-hard PC Gamer as most games never feel right without a keyboard and mouse. Don’t get me wrong; I have been using consoles since the original NES and playing Zelda, Final Fantasy, and Dragon Warrior bring back fond memories but this game should be played on the PC in my opinion.
Although I have been very happy with the game itself, I am also very disappointed with the amount of information that is available (Maps…) about these games. Most searches come up with little to no results with most pointing to Steam Community Discussions about this or that. The Manual is sparse on specifics and to really understand even the Spell System I have been forced to go to the Dark Eye Core Rules for decent descriptions. So with that in mind I am going to create a guide on my own. This is my first undertaking of anything like this and it will most likely be a work in progress for some time to come.
I started playing with a fairly generic group: Dwarf (Frumgahr) – Warrior (Halbarad) – Warrior (Azabeth-Kain) – Leaf Elf (Mina) – Mage (Azariah-Kain) – (Mage Azaghail-Kain). These characters have been part of my life since the early 80’s playing Wizardry I – Proving Grounds of the Mad Overlord. I had progressed to the point of having seven pieces of the map but have decided to start over in order to gather the content needed to pursue this endeavor. My group this time will be all magic users: Ice Elf (Erinnila) – Silven Elf (Talimee) – Leaf Elf (Vindariel) – Druid (Tamion) – Witch (Yanis) – Mage (Delo). I selected these characters from the numerous pre-generated characters in order to get back into the game as quickly as possible. I am currently making my way through the Temple of the Nameless God – Elves with bows rule!!! I hope someone finds this information useful and most importantly enjoy the game(s).


Thorwal: Exploration – Quest Initiation – Starter Dungeon
Thorwal: Exploration – Quest Initiation – Starter Dungeon
Exploration:
You start the game in the Temple of Travia in the Town of Thorwal. A Temple is where you will do all Character Creation and Party Management Tasks and I plan to add sections to this guide for these at a later time as you can find a lot of information on Party Creation elsewhere. Once you have created your party of adventurers (see introduction for my choices) you can leave the Temple and begin your adventure. Thorwal is a huge port city so explore to your parties delight. Thorwal is located where the Bodir River empties into the Gulf of Prem, in the northwestern region of the continent of Aventuria. Since the Thorwal map is immense, I will only include a small area of importance in moving forward with the main story and side quests. This area includes the necessary shops and quest locations but you are free to explore the full city at your leisure. I am not including markups on the maps so explore, learn things on your own, and enjoy the game.

Travel by Land:
- Tjoila Ferry Station
- Vaermhag
- Serske
Travel by Sea:
- Vaermhag
- Varnheim
- Merske
- Efferdun
- Prem


Quest Initiation:
When you start the game there are three quests you should try to acquire right away. To do so, visit a Tavern (I headed over to the “Four Winds”) and The Three Quests will soon be initiated.


Starter Dungeon:
After initiating the first three quests, go speak to the Hetman (The Call to Arms) and also to Dramosh (Trouble in the Baily) the Dead Ship Quest will be done later in the game. They will each give you the means to further outfit your party – which you should do – I use:
- The Armory
- Grollo, Son of Grumbald – Weapons and Armor
- Stoerrebrandt-Grassberg – General Goods
- Minna Musporeiken – Herbs
- Phileas Brydason – Warehouse
Once outfitted and ready to go its off to the Baily. You may want to stop at an Inn for some rest first and see if you can get your Mage to Enchant his / her Wand. The Second Wand Enchantment will allow the wand to glow and therefore you will not need to carry any light with you into the dungeon. However, there are some nice lighting effects with the Torch and Lamp so you may want to give them a try. Don’t be concerned about leaving the Baily to rest or sell collected items as you will most likely need too several times before reaching the end of Level Two where this quest will be completed. Don’t forget to visit Dramosh to collect your reward:

You will have a chance to come back and finish the deeper levels later in the game.


Thorwal: The Call to Arms
Thorwal: The Call to Arms
The Blade of Destiny Sub-Quest – The Call to Arms – Complete


Thorwal: Trouble in the Bailey
Thorwal: Trouble in the Bailey
Side Quest – Trouble in the Bailey – Complete


Travel: North to Felsteyn (Stonerock?)
North to Felsteyn (Stonerock?)
Now that the “Trouble in the Bailey” has been resolved and you have some experience under your belt; it’s time to work on the Main Quest – “The Blade of Destiny”. The Main Quest will be made up of numerous sub-quests and we finished the first – “A Call to Arms” when we spoke to the Hetman. He gave us another when he told us about: Isleif Olgardsson in Felsteyn.
It looks like we need to get to Felsteyn and talk to Isleif Olgardsson. Make sure you have outfitted your adventurers and are ready to make the long trip north. There will be many stops along the way and also the occasional wilderness battle. So if you are ready – Lets Go!!!
Our first stop is Tjoila Ferry Station

Travel by Land:
- Thorwal
- Rukian
- Tjoila (by Ferry)

Our Next Destination is Rukian

Travel by Land:
- Tjoila Ferry Station
- Angbodirtal Ferry Station

We then Continue North to Angbodirtal Ferry Station

Travel by Land:
- Rukian
- Auplog
- Angbodirtal (by Ferry)

As We Head Further North We Find the Town of Auplog

Travel by Land:
- Varnheim
- Vilnheim
- Angbodirtal Ferry Station

Continuing North We Finally Arrive at a Major Town – Vilnheim

Travel by Land:
- Auplog
- Upper Orcam
- Bodon
- Phexcaer


Although We Have been on the Road for a Long Time We Push on to – Upper Orcam

Travel by Land:
- Vilnheim
- Felsteyn
- Hermit’s Lake


After a Good Nights Rest We Push on to Our Destination – Felsteyn

Travel by Land:
- Orkanger
- Upper Orcam
- Hermit’s Lake


Felsteyn – Varnheim – Ljasdahl
Felsteyn – Varnheim – Ljasdahl
Upon arriving in the Town of Felsteyn we seek out a Tavern and try to aquire information on “Isleif Olgardsson”. The bartender is a talkative fellow and soon we have the location and are on our way to pay Isleif a friendly visit. Our visit is rewarding as we are given a Piece of a Map Isleif has been keeping for many years along with some contacts he thinks may prove beneficial to our quest.
Map Piece Number One

After speaking with Isleif it appears that we need to make a trip to Varnheim and look for “Eliane Windenbek” to see if she can shed any light on our quest. After spending the evening drinking and talking with our new found friend we head for an Inn to spend the night and get a good rest before heading out for Varnheim at first light.
We travel south revisiting the same towns along the way (in reverse order) and finally arrive in Auplog. From Auplog we change direction and head west to Varnheim. While on the road to Varnheim we meet a Coachman – Hasgar Fjolnirson – who needs some help as his coach has lost a wheel. It seems he may have some work for us and invites us to visit him in Clanegh.
Hail for Love – For the God’s DLC – Quest Initiation

We continue on to Varnheim with the important task of speaking to Eliane Windenbek. We arrive in Varnheim tired and thirsty from our travels and head straight to a tavern to grab a bite to eat and something to wash it down. We ask the bartender if he knows Eliane Windenbek and he does. With that information we decide to seek out an Inn and get some rest, intending to visit Eliane in the morning.

Travel by Land:
- Daspota
- Auplog
- Vaermhag
Travel by Sea:
- Ottarje
- Ljasdahl
- Vaermhag
- Thorwal


After a good nights rest we awake with renewed spirits and head out to visit Eliane Windenbek. We find her house just as the bartender said. We have a long talk with her and she provides some further contacts and she also has a piece of the map. However, she is not as willing to part with it as was Isleif. She wants us to help her by seeking out and killing the servants of the “Nameless One”. She tells us of a location on Hjalland Island where they are planning to summon a great evil. We agree to help and head directly yo the Harbor to inquire about any ships leaving for the island.
Temple of the Nameless – Quest Initiation
