
Overview
I’m still a bit of a noob, so bear with me. These combos are supposed to be easy to use while utilizing the combat mechanics that get thrown at new players super freaking fast.
General rules of thumb
The combos for each button correspond to an element:
Y: Earth
X: Water
B: Fire
A: Wind
Purposes for the guard artes (requires Virtuoso’s Ventite):
Guard+Y: Pick up downed enemies or Healing artes
Guard+X: Generic combo if you hold X (requires warrior’s ventite) or a slot for malak artes
Guard+B: Random arte or slot for malak artes
Guard+A: Gap closer or slot for malak artes (in Eizen’s case, both)
To access the other malak artes, you will need to have the wizard’s ventite
Velvet

Tips:
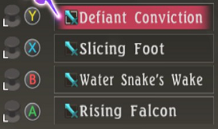
- I would highly recommend setting guard+Y to Water Snake’s Wake if you don’t have Defiant Conviction on the grounds that it picks up downed enemies.
- The artes that provide a status affliction are generally preceded by an arte to reduce a stat, granting the 4x bonus to that status effect’s proc rate. ex) using Shadow Flow can reduce defense, making Mega Sonic Thrust more capable of slowing.
- While Rising Falcon is used to close the gap between you and the enemy, it is also useful against enemies that have been launched into the air.
- If you swap out Water Snake’s Wake with Slag Assault for guard+B, you can charge your guard up to three charges, then drop in a Slag Assault to gain a bunch of souls through stuns or guard breaks.
- Twin Whip reduces attack, allowing paralyzing-inducing artes such as Defiant Conviction or Rising Moon to be more capable of inflicting paralysis.
- † Holding X when using Slicing Foot will execute a series of non-elemental martial artes. This is also a great combo starter to reduce SG costs for the artes you use after you theronize.
- † If you hold B when you use Soaring Dragon, you will follow it up with Infernal Torrent instead of Searing Edge.
- † If you hold Y when you use Mega Sonic Thrust, you will follow it up with Slag Assault. Hold it during Slag Assault, and you will follow it up with Binding Frost instead of Avalanche Fang.
† requires warrior’s ventite
X: Twin Whip -> Rising Moon -> Banishing Thunder -> Shell Splitter
Two low-cost martial artes are good to put at the beginning when followed up with hidden artes. Additionally, if Twin Whip inflicts attack down, then Rising Moon is x4 more likely to paralyze.
Rokurou


Tips:
- Rokurou has low focus, making it difficult to gain souls. To play around this, guard up to three charges, then pop it with Infernal Bloom to get a bunch of souls at the start of the fight.
- The artes that provide a status affliction are generally preceded by an arte to reduce a stat, granting the 4x bonus to that status effect’s proc rate.
- Form 1: Fire Burst is placed awkwardly because I don’t know where else to put it. Don’t judge me…
- Form 2: Imbue Earth can be placed in front of a character like Laphicet to give a little protection while you’re kicking @$$ elsewhere.
- You use Double Haze if you are low on SG in the middle of a combo.
- † Holding X when using Bone Breaker will execute a series of non-elemental artes.
- † Holding A will follow up your Hurricane Thrust with Armor Crusher instead of Jade Wave.
† requires warrior’s ventite
Y: Shockwave Slash -> Form 2: Imbue Earth -> Form 6: Dark Vortex -> Orochi’s Fury
Shockwave Slash puts you in an awkward position in that there are few artes that can effectively follow up with it. Form 6: Dark Vortex pulls the enemy to you, eliminating that problem; however, if you place a mine with Form 2: Imbue Earth first and pull the enemy to it, they will be launched into the air and can be hit with Orochi’s Fury.
Before you proceed to malak arte users…
It is important to know how to use the wizard’s ventite. If you have this item, then you are able to cast malak arte derivatives. To do this, begin casting a malak arte like you normally would, but instead of casting the arte when it is done charging, press the mystic arte button instead to begin casting the derivative. This allows you to cast your more advanced artes much faster than normal.
Pro tip: holding down the arte button (A, B, X, or Y) while casting an arte will keep you from immediately casting it, and it will restore SG during the time the arte is ready to fire.
You should develop the proper muscle memory when doing this stuff. I am either doing one of two things while charging a malak arte:
- Holding guard and spamming the arte button when I’m ready to fire and want to start charging a new malak arte.
- Holding down the arte button while spamming the mystic arte button when I’m wanting to start charging the derivative malak arte.
The derivatives for First Aid are as follows: 1 First Aid => 2 Elixir Vitae => 3 Divine Saber
Let’s say you press Y to start casting First Aid. If you continue to hold Y when it’s fully charged, you will not cast the spell until you release the button. Instead of releasing Y, you can press the mystic arte button to begin casting Elixir Vitae. When that arte is charged, you may press the mystic arte button again instead of releasing Y to begin casting Divine Saber. The casting time carries over each time you begin casting a derivative, reducing the risk of charging artes with long cast times.
Laphicet


General Tips:
- Laphicet’s main objective is to keep Blessed Drops active at all times to punish enemies that get too close to him.
- Laphicet’s break soul actually does damage in an area around him.
- When you use Laphicet’s hidden artes, you are not doing it to deal damage, but to land stuns to enemies that are too close. Exploiting weaknesses will make stunning easier. Okey, they can do a bunch of damage. They just have bad range and not very fast deployment time. Try to use a break soul first to get an opening before going all out with hidden artes.
- † Holding X when using Paper Rock will have Laphicet use a pretty fast combo that is quite helpful early in the game.
† requires warrior’s ventite
Guard+Y:
1 First Aid => 2 Elixir Vitae => 3 Divine Saber
Guard+X:
1 Pyrogenic Ring => 2 Blessed Drops => 3 Insubstantiality => 4 Elixir Vitae => 5 Divine Saber
Guard+B:
1 Bright Shade => 2 Kaleidos Ray => 3 Blessed Drops => 4 Insubstantiality => 5 Elixir Vitae =>
6 Divine Saber
Guard+A:
1 Geostigma => 2 Void Mire => 3 Dark Fangs => 4 Divine Saber
Malak Arte Tips:
- You should remember the order of these artes that are not blacked out.
- You do not have to remember what order Divine Saber comes in other than the fact it is the last derivative in all of Laphicet’s malak artes.
- Use Blessed Drops to create a barrier in front of you.
- It’s easy to remember which stats Laphicet’s artes steal. The trick is to know which element his artes use.
ArteElementsStat StolenKaleidos RayFire/Non-elementalArte AttackVoid MireEarth/Non-elementalDefenseBlessed DropsWater/Non-elementalArte DefenseDark FangsWind/Non-elementalFocus† Pyrogenic RingWater/FireAttack† In case you hadn’t noticed, Pyrogenic Ring is the exception since attack is associated with non-elemental damage, not fire or water.
Magilou


General Tips:
- Magilou has multiple objectives: pop Crown Fire to boost arte attack, place mines in front of Laphicet, and interrupt enemy artes with her break soul.
- Magilou’s break soul is devastating when used after three guard charges, oftentimes getting you at least one soul.
- Remember that using a break soul will give a soul to the enemy. The more souls an enemy has, the easier it is to cause status afflictions or stuns to it. So when you use Spell Absorber, be mindful of the enemy you give the soul to. As a bonus, you can have Velvet target enemies with the most souls, effectively allowing you to choose which enemies she attacks to keep her theronization up for as long as possible.
- Spirit Drop is very useful to get a bunch of souls when used after three guard charges.
- If you play semi-auto, then there is a chance didn’t know that Shrike Dive can be used at any range to effectively teleport to an enemy and knock them down. If you play semi-auto, you can dodge first, then use Shrike Dive to use it without running up to the enemy first looking like an idiot… oh wait, you’re Magilou; you will look like an idiot regardless 😛
Guard+Y:
1 Healing Circle => 2 Fairy Circle
Guard+X:
1 Aqua Split => 2 Flood Wall => 3 Final Embrace
Guard+B:
1 Blood Moon => 2 Crown Fire => 3 Explode
A
1 Water Mine => 2 Fire Mine => 3 Gravity Mine
Malak Arte Tips:
- You should remember the order of these artes.
- While the combo is set to allow you to spam A to place all 3 mines, there are situations where it’s better to not finish the mines, and do something else. In that situation, you can cast the derivatives of the mines finish up what you missed.
Eizen


General Tips:
- Eizen’s primary objective is to stun. As such, you need to pop Hell Gate as soon as possible to get your focus boost. Something that might help accomplish this is to start a combo with malak artes, finish with Stone Lance, then follow up with Eizen’s break soul to cast malak artes like Hell Gate super fast.
- The malak artes placed in the last position of each combo can easily have their derivatives cast. Just make sure you have time to do it.
Guard+Y:
1 Quickness => 2 Resurrection
Guard+X:
1 Stone Lance => 2 Frigid Photon => 3 Geo Rumble => 4 Resurrection
Guard+B:
1 Wind Lance => 2 Air Thrust => 3 Hell Gate => 4 Geo Rumble => 5 Resurrection
Guard+A:
1 Flash Step => 2 Illusory Veil => 3 Plundering Ghost => 4 Hell Gate => 5 Geo Rumble =>
6 Resurrection
Malak Arte Tips:
- You should remember the order of these artes that are not blacked out.
- Resurrection is the last derivative in all of Eizen’s malak artes.
- Don’t bother with Plundering Ghost. Just stun like a normal person.
Eleanor


General Tips:
- Eleanor’s malak artes can be used to build up souls quickly at the start of a fight.
- Shock Drum is a good follow-up to Eleanor’s break soul.
- Eleanor’s break soul is well preceeded by Violet Ray to pull in the enemies first.
- † Holding A when using Vanguard will have Eleanor execute a series of non-elemental martial artes.
† requires warrior’s ventite
Guard+Y:
1 Shock Drum => 2 Inspiration => 3 Life
Guard+X:
1 Ice Edge => 2 Rock Swarm => 3 Violet Ray => 4 Life
Guard+B:
1 Flame Beast => 2 Maelstrom => 3 Shock Drum => 4 Inspiration => 5 Life
Malak Arte Tips:
- You should remember the order of these artes except for the ones that are blacked out.
- All of Eleanor’s malak artes end with Life.
Community Combos
So if you ever want to start a new game and not have to remember what combos you had, or you simply want to share your combos, put them in the comments and I will put them here.