
Overview
Step by step with pictures all the way on how to launch Steam with -console and finish setup of a CommunityUs developer environment on SteamOS.
[Part 1] Steam Desktop Client
Go back to Workshop 101 anytime here:
[link]
If you get lost and “can’t see the forest for the trees”
[link]
Open Terminal:
Activites (or home key/windows key etc.) > Show Applications > Page 2 > Terminal


[link]
Continue:
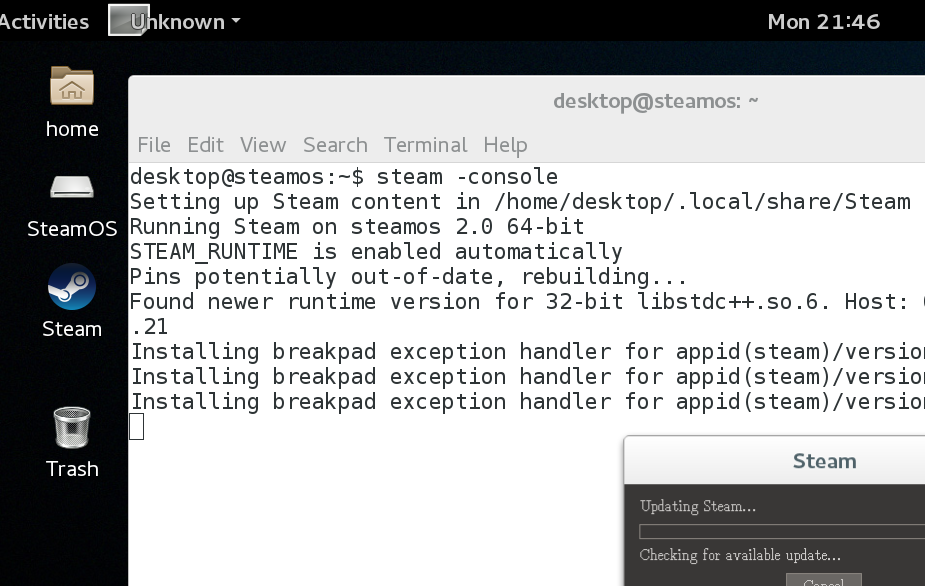
(Above Left) “Return to Steam” changes to just “Steam” (below) on your desktop. This is because with one Terminal command we are telling Steam client to install on our “desktop” user. We leave the SteamOS BPM (Big Picture Mode) alone in case you want to revert back.
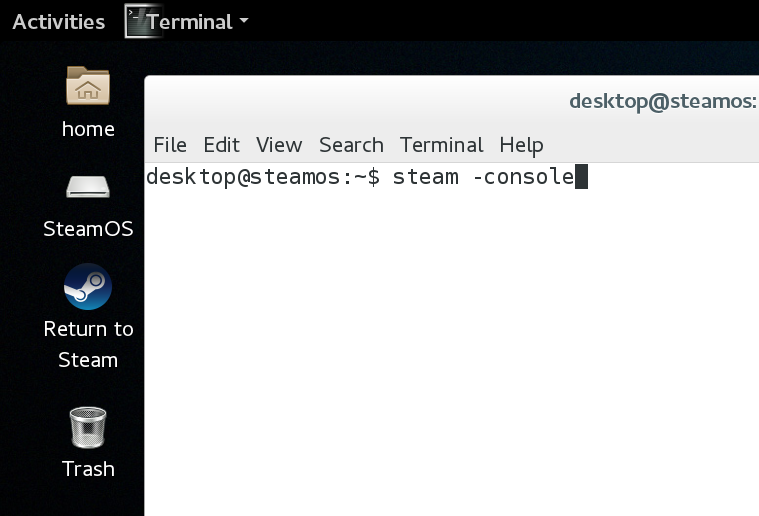
In Terminal:
We wait…
Learn more about adding this to your Steam desktop icon/link here:
[coming soon]
Why -console flag?
This is something in my opinion every Linux steam client should have since a non mac/win desktop is very command line prone – whynot? [link?]
What we get here, is -> the flatpack install of UnityHub and prereqs. takes a bit, our app will show:
CommunityUs Running
for a good time, and you may think it froze. If you have Steam console on you can see our PIDs (process IDs ticking away, so you know it is doing stuff in the background.
[Note] if we find a way to give a progress bar, better believe we will do that instead or in addition to.

Or do from right menu.
Then we want:
[coming soon – diff. home/desktop/Desktop and ~/]
this is where workshop folks spend a lot of time. Feel free to create a shortcut! We do.


[Part 2] Intall UnityHub
[Nov. 7th 2020 Update] Unity Hub is now best experienced (on SteamOS current) using the AppImage found here: [link]
I will update the guide when I have time. Leave a comment below to encourage the update and I will get right on it.
Go back to Workshop 101 anytime here:
[link]
If you get lost and “can’t see the forest for the trees”
[link]

Play UnityHub (Prereq. FlatPak and Workshop 101)
Let us note the time:
End time: 22:18 (below)

This part will take a bit, that is why we launched Steam client from command line with -console we get to see Steam PIDs in Steam Console Tab compared to our more verbose terminal logs.
After clicking Play we will be asked for password. (if recently entered a password you may not be asked) I was pretty pleased to see this from FlatPak. Shows PolicyKit is working, and this install is now about as easy as a windows/mac install. Something we want for those new to linux dev for sure!
Now below, I took screenshots of what gets installed into the FlatPak sandbox.

Do your due diligence on FlatPak security. We will setup a forum to discuss this. Keep in mind our view of security is something we should always pursue with sanity.
Here we line up Steam console next to Terminal to see what is going on each.

Look at the PID (Process IDs)


[Part 3] Install Unity Editor
Go back to Workshop 101 anytime here:
[link]
If you get lost and “can’t see the forest for the trees” (Unity part not done, but we will add to quick start)
[link]
Click dismiss. (read it of course)

Now click “Login”
Can also login at top right:


Take you pick.
If you did it right looks like this.
Now lets download Unity on SteamOS and get busy developing games and other cool stuff!


Click “Add” (you can download manually other Unity Editor versions too. But let us just stay sane for now.

On a default SteamOS install in 2019-Sep. we found Unity 2017 failed, so just choose 2018.2 (this will still let you use Javascript. but you loose that in 2018.3)
Our plan for now is to have a few different Unity versions we keep static, upgrading a project can be a pain esp. when it has a lot of code. So we will be sane about this too and document it.
So 2018.2 for now…
Just do the documentation module.
Also just to bullet test, you might notice we are testing on a crazy small drive of 128 gigs. (but yes it is a SSD.) But you should see how much free space you have. If you have less than 10 gigs, something is wrong and PolicyKit has you installing as root/sudo rather than as our user “desktop”

So sort that out, you don’t want to try to dev a game with less than 10 gigs. It is a huge pain.
If you want another language you can add some packs.

At some point you might be able to add different Unity versions like this…but it didn’t work for us.
Done. Now you can add modules, but you probably want to get started.


More bloopers if you quit UnityHub without creating a project.
ToDo…
Show Project setup.
Show making a new workshop Item/Enviroment/Codebase etc.:
[link]
For now I think Installing near where Unity Editors go…the ~/Unity
folder might be choice place to put your projects so it is all in one folder and then subfolders broken out.
I will cover this and clean up the guide once we get our git repo all clean.