
Overview
I made this guide to help you get all (or at least most) of the secondary achievements and clues in all main ten missions (and the two training missions).
Linking my other Guides
If you want to check out my other guides, make sure to do so here:
1) for the bonus books:
[link]2) for the keys for each mission (that has them):
[link]3) for all the useful guns you can find (and also a few useful techniques):
[link]Intro
Doing the secondary achievements and clues, I think may improve your performance on each main mission (and maybe also training camp missions). However, I do not focus on the secondary achievements and clues of the bonus missions (as they do not add a better score to your performance).
Besides, for those Commandos 2 lovers out there, just doing the primary objectives is not much fun..
Therefore, let’s jump straight in:
Training Camp 1
This mission has one secondary objective (to obtain the contents of the wooden box)
and
one clue (to basically not underestimate the sub-machine gun enemy on the bottom right corner):
This mission is pretty small and straightforward, and there are different techniques for completing this mission.

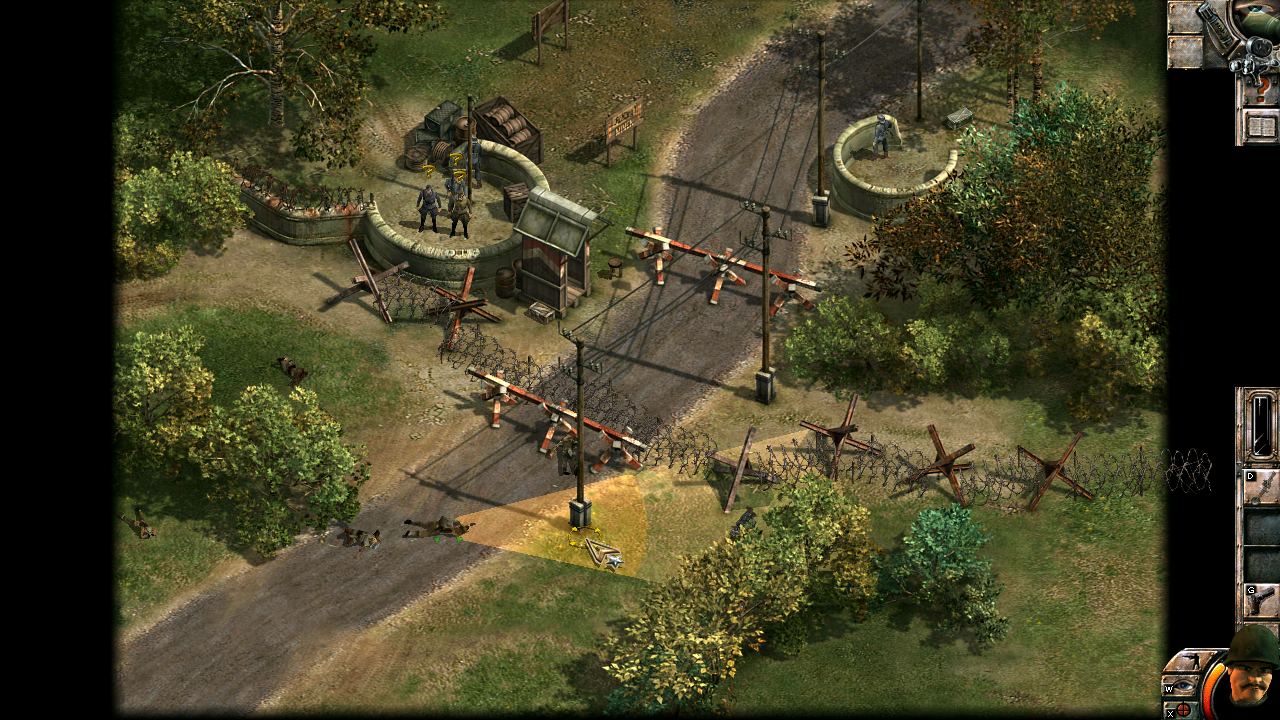
For the secondary objective you have to obtain the contents of the box:
You can do this in two ways really. You can use your thief to:
1) crawl under the barbed wire. If you do this method, be sure to crawl in the road area (because there is a mine to the left side of the wooden box.
2) climb on the telephone pole and then go down to the other area

You can also (if you want to) take the wire cutters from the steel box (that the thief has to unlock), and deactivate the mines, both of which are primary objectives.
Honestly, I personally never took the wire cutters in this map or did the secondary objective.. I will explain my method in quite a bit.
Every strategy is different, but the principle is the same:
step 1) neutralise the two riflemen and tie them up (and take their rifles and ammo)
step 2) neutralise the enemy soldier near the barbed wire
step 3) if you are playing on the very hard difficulty:
a) first neutralise the sub-machine gun enemy [clue for this mission]
b) then, neutralise the extra rifleman in the middle of the map
At this point, you can crawl under the barbed wire with your Thief to get to the contents of the two boxes.
When you go for the steel box (that the thief has to unlock), beware of the second sub-machine gun enemy.
Now, my method for this map is different after step 3, and this only works on Normal difficulty:
If you want to make a speedrun on this map at around 1 minute long (more or less), then you can quickly neutralise all 4 enemies near you and take the 6 bullets of rifle ammo from the two enemies. Then, what I do is I press the automatic fire (hotkey: X) and control + right click (to adjust the direction of where you want to use the automatic fire) and I just get in range to kill every enemy (and the second sub-machine gun enemy should ideally see the dead enemy being killed, so he will run there and die .. eventually:
Surprisingly, after killing all enemies (even if you do not take the wire cutters and deactivate the mines, it is mission complete.


By the way, Bonus Mission 1 has almost the same secondary objectives/clues with this mission (with the addition to get the explosives and flamethrower, to kill the enemy patrol, to deactivate the mines and then exit in the car). In that particular mission, you have to do at least all primary objectives in order to finish the mission and get your medal.

Bonus Mission 5 is set on the same map, but is slightly more intriguing:
It is set at nighttime, and you have to :
1) Switch off the spotlights
2) Get the flamethrower


For me, in that mission, there is a secret objective to get the wire cutters from one of the enemy riflemen (which you can also find in the steel box that the Thief can unlock):

In bonus mission 5, they do not ask you to deactivate all mines, and so, you can win the mission just by killing everyone (compared to bonus mission 1, where you have to deactivate them).

Training Camp 2
This is pretty straightforward and I do not think this mission’s clue should be much explained: just kill every enemy and take the contents of the three boxes (also one box inside the radio house).
Mission 1 – Night of the Wolves
Alright. This mission has 3 clues to complete:
1) Deactivate the electrified fence (and also inside the same building you can also deactivate the spotlights)
2) use the sleeping pills to knock out the assistant
3) Natasha should call the general on the phone (for him to go out of the building and for the thief to make him unconscious, so that he can then enter the enigma machine building). Alternatively, you can let him go towards the lighthouse (he will spend plenty of time there, enough time for you to go there and take the enigma machine).
#1: The lever to deactivate the electrified fence is this one:
If you wish to also deactivate the spotlights, it is the other lever:


Now, you can find sleeping pills in multiple locations – the first location that you can find them is the building where you are:


All you have to then do, is go to the house where the assistant is, and put the sleeping pills in the bottles like so:

Now, you can bring your Thief (Carefully) to this position:


… and make sure that the Thief has the security paper that the deceased French resistance guy gave him (the person that also gave him Whiskey (the white dog).

That is because, if Natasha has this paper and the Thief gets the enigma machine the game thinks that you do not have these two things at the same time. In other words, these two things should be in one inventory of a commando (not two commandos, because otherwise the cut-scene is not activated, and therefore you cannot win the mission). Also, make sure that Natasha has the keys when she goes to telephone the general.

Lastly, Natasha can telephone the general from here:


Mission 2 – Das Boot, Silent Killers
This mission has 3 secondary objectives and 4 clues. Some of them are self-explanatory and you really need to do them in order not to fail the mission after the first minute.
1) Secondary objectives:
Destroy the three AA guns found here:
This secondary objective is only visible to you AFTER you rescue the captain of the submarine (therefore, if you wish to do all objectives on the list, remember to destroy these guns at some point).


You cannot destroy these with grenades, you need either the red time bombs (hotkey: Y), the blue remote control bombs (hotkey: S), or even the bazooka (Hotkey: K).
Next, the clues!
1) Cut the barbed wire and deactivate the mines – quite self-explanatory, but remember, do not do any sudden movements, because you may end up killing your sapper in the process of finding the mines.
Some mines that are maybe hidden well in this map are these three:
Notice that the mines on the left have been deactivated whereas the three mines near where I am (and the mines on the right hand side have not). You can easily see this by the difference in height:

A mine is deactivated when it is elevated a bit (if it is low, then it is very much activated).
Now, if you place a landmine down, then it will also be at the low height (it will be activated), but it will activate, only when an enemy walks through that, which is very nice.
2) Pass the security papers to the Spy using the dog:
For this clue, you have to use your thief (number 8), Whiskey (your white dog; number 9), and the Spy (number 6).
What you have to do, is you have to transfer the enigma machine and the security papers you got from the Night of the wolves mission from the inventory of the Thief to the inventory of Whiskey. Then, you should transfer these to the inventory of the Spy.
It doesn’t matter if you do not have enough space in the Spy’s inventory (this is only temporary), as you can then move the items back to the inventory of the thief – you will still get the clue.
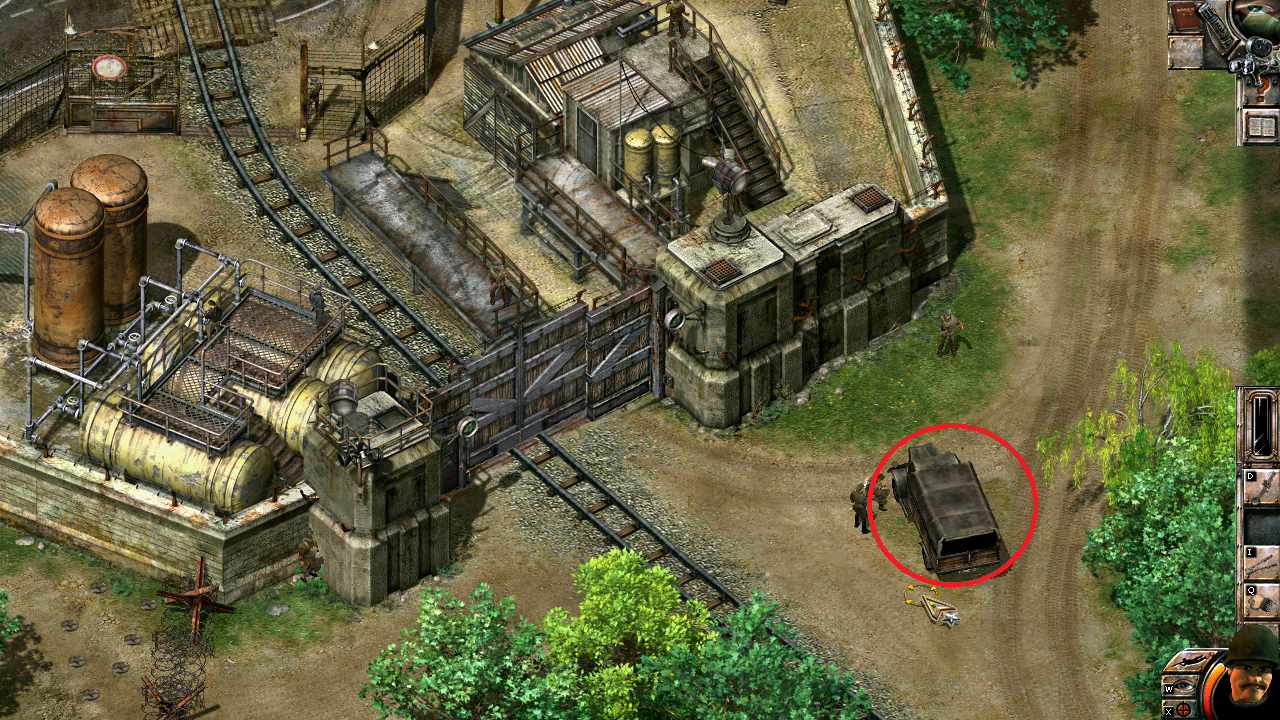
3) steal a vehicle: For this clue, you have to either drive the big truck found in the right side of the map, or you can get the small enemy car in the west part of the map (near the radio room):
For this clue, what you have to do, is open the gate, steal the vehicle (by driving it inside the base), and then leave it somewhere. Depending on where you want to start the mission from (right side or left side), you can pick the first or second vehicle for this clue.

4) Enter the base dressed as an official. This is the easiest clue to achieve, maybe. The spy must use the officer uniform and then enter the base with it.
Mission 3 – White Death
This mission has 3 secondary objectives:
1) Destroy the bow gun:
For the bow gun, beware of the patrol group inside that room (they are only two enemies, but one of them is a sub-machine gun enemy). You can examine the door (hotkey: W) to see when they pass away from the door, so you can enter the room. Also, you could try enabling the lever in this room, so that when the patrol passes through the middle they will die from the gas (remember then to deactivate this lever so that you can safely pass).


2) Destroy the central gun
3) Destroy the stern gun
These two guns are conveniently placed in the same room:
And this is how they look when they are destroyed:


Again, for these three big guns, you cannot use grenades to destroy them (you should either use a time-controlled bomb or a remote control bomb).

As for the clue (to use the balloon to get to the explosives), you could do that:
And then go for the explosives here:


As you can see though, it does not let me land near the box, so, you first have to clear this area of all the enemies and patrol enemies, so you can land (which is a bit impractical if you do use the balloon).

Mission 4 – Target: Burma
This mission, only has one Clue and no secondary objectives: Contact the fat man, and to arm the Ghurkas.
Ok, seems easy, right?

Right.
You can contact the man you are looking for, in here:
Now, to actually give 5 X rifles to the Ghurkas, you need to have 5 rifles from enemy soldiers.


After you collect 5 rifles, you can go here to give them some weapons to fight for the invasion:
If you go down the ladder, there will be a cutscene, saying that they do not have any weapons.


Mission 5 – Bridge Over the River Kwai
This mission has one secondary objective – to save the prisoners:
This is only shown after Guinness explains how to blow up the bridge, here:


In the Very hard difficulty, which is the mode I am currently using for this map, you can notice that the Green Beret (number 1) cannot reach (with a rifle) the point where you have to shoot in order to rescue the prisoners – I found that the Driver (number 5) can shoot (with a rifle) to the point where the prisoners are captured. In the very hard difficulty, you have to, at the same time, position your driver character at the point where I place him in the screenshot, because otherwise, even he cannot reach the shooting range for the rope:
Once you shoot the rope, you have exactly 30 seconds to dive in the water, press Shift on the Cell (to save them), and then exit the water (you know, there is a crocodile there, which might be interested in eating you if you stay there for a long time).

Now, as far as the clue goes, to go on an elephant and go to the other side of the map, you have to do this when all enemies are dead, obviously, because unless I am mistaken, they will see you as you move the elephant.


Remember, when you see the little “x” button on one of the three sidebar buttons of the thief, it means that you can now move the elephant with the Thief.


You can do so with the four (up (which is forward in this case), down (which is backwards in this case), left, right) arrows on your keyboard (just like you would move with a normal vehicle/boat).


Mission 6 – Guns of Savo Island
Secondary Objectives:
1) blow up the wall behind the golden monkey
2) steal the golden monkey
(I always thought these two were placed wrongly, in the list), like, first you can blow up the wall but then you can steal the monkey.. lol).
Anyway, to blow up the wall, you can use one of the blue remote control bombs of the Sapper (you only need two of them to blow up the 3 big guns (if you place them correctly).
This means that you can use one bomb for this secondary objective. The golden monkey can be found in the far door of the building where you get the keys from:
Now, as you may know, only the Green Beret can carry this thing, so, you may not want to try carrying it with other commandos:


As you can see here, I have previously blown up the place beforehand, so you can now exit using the door (as it is shown). I believe that you will only get the achievement if you actually place the golden monkey in the sea plane (where you go to win the mission).

Now, time for Clues!

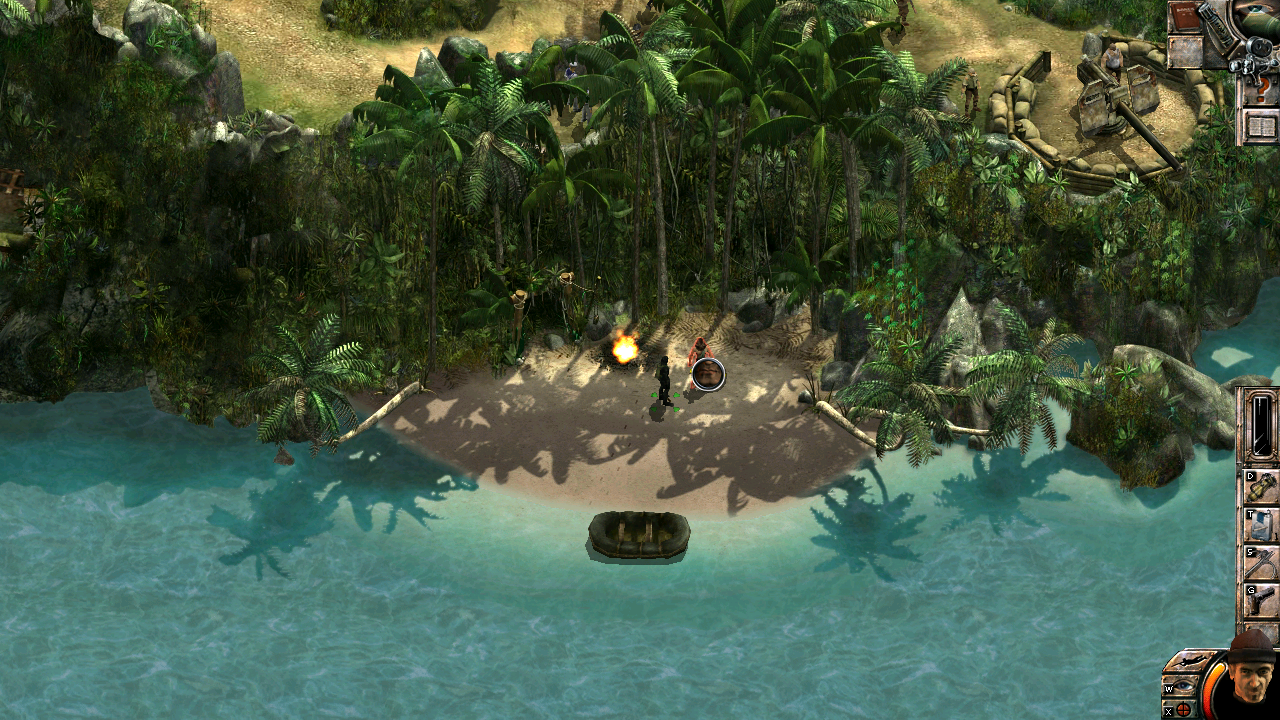
#1: Contact the Sailor:
This is pretty straight-forward, just drive on the Diver’s boat there, and talk to him:
After you talk to him, you can now access the #2 clue: Get the key to the tunnels. If you have not done so already, you could go through my other guide for collecting all the keys for Commandos 2 – Men of courage and navigate to this mission for that.
I put the link of my other guides in the intro chapter of this guide.
Next, for the #3 clue: find the blowtorch in the sunken ship, in order to open the bunker door.
Honestly, in Normal difficulty it is fine, but in Very hard Difficulty level this is way too much stressful for me to do, because the underwater enemies see you very fast (and the sharks too), that the Diver has to use his harpoon gun really fast (hotkey: L) and then, every other time you can press control and left click (to shoot), while underwater.
What I do, is I quick save (just in the point before the sunken ship), and then I see if I can kill the three enemies there, if I can, then great, but if I cannot, then I will probably use the sapper with a grenade to open that door.
Here, before you go for that enemy, you should definitely quick save (or do a regular save).


What I do (in the very hard difficulty) is I double click to go somewhere in range where I can shoot him (in his green field of view and then before I arrive there, I place my cursor directly on him (so that I am ready to shoot him when I arrive there:
Then, when you are in range, you can just press control and then left click (really fast; before he can shoot you).

Now, you can quick save again, because it is a very important position in the game.
In this case, I managed to kill the two threatening enemies, and the third one is really easy to get:
What I did, is I just entered this place, and I noticed the middle enemy if he is coming towards me, or if he going towards the shore (because there are 2 enemies there, you have to be careful and first attack the one enemy, and then the other one).

If you do manage to also kill these 2 enemies, then you can quick save again, and go for the third enemy.
Now, you can go to take the blowtorch 🙂

If you notice that you cannot pick it up (i.e. that you do not have enough storage in your inventory of the Diver (number 3), then you can rearrange your Diver’s inventory while underwater, so that you can then take the blowtorch. Sometimes, it’s not even removing things that is the problem, but rather arranging what you have in another way.


The blowtorch can then open this door:

Mission 7 – The Giant of Haiphong
This mission only has 3 clues:
1) Talk with the shopkeeper
You can find the shopkeeper here:
I have already talked to him, so now I can access the box where Natasha can equip her uniform and the Sniper rifle:


2) Contact Natasha

As I mentioned in my other guide, to Contact Natasha you have to go through the White building here:
3) Hide (at least one of your commandos) inside the truck which is momentarily stopping by the house where the Sapper and Thief are. For this one, you do not even need to keep them inside, you just need to put one commando inside and then you get this clue.


You can enter the truck here:

Mission 8 – Saving Private Smith
This mission has 4 secondary objectives
1) Free the Green Beret
2) Save the Sapper
3) Rescue the Sniper
[4) Prepare your men for the invasion – this one is only visible after you heal smith, and I guess after collecting the 6 bonus pieces and Smith operating the Radio, beneath where the sniper is captured].
So:
Green Beret is found here:
You can wait until the Lieutenant turns away (so that the thief can then go to punch him, and free the Green Beret, without making any noise).


Like I mentioned in my other guide, do not forget to take the contents of the inventory of the soldier in this house (blowtorch).

Then, to save the Sapper, your Green beret, can eliminate all the surrounding enemies, so that the Thief can then go on to the Telephone pole (much like in Bonus Mission 1, 5, or the Training Camp 1).
Now, as the Thief enters the building where the Sapper is held, just climb down the ladder and go save the Sapper. After doing so, you should give the sapper the blowtorch, and also the sapper can now neutralise the soldier in this house as well, taking his detector mine, and the anti-tank mine as well:


Then, the thief can throw a cigarette at the place that the lieutenant is looking at, so that the Sapper can then tie him up, and hide him inside the box:

Then, it is easy to neutralise all other enemies: you just shoot one rifle bullet to kill the rifle enemy near the door (with your thief), and then you run upstairs towards the ladder with your sapper before everyone comes down the ladder (ready to punch them). Then, you tie them up and neutralise the sniper up there.

Nice; good job so far! Now it is time to save your Sniper:
Step 1: it is useful to first get rid of the enemy seeing outside the window, and then go through each other enemy outside:
But you see, the mistake in this image (what I did not consider much) is that, if you throw the cigarette at that particular place, then the rifleman will exit the building coming towards it, but instead, he will then run towards the two dead guys (marked in red). Therefore, before throwing the cigarette case, do a quick save (or a regular save), and make sure that there are not any dead bodies nearby.

I noticed that at that particular angle, the rifleman will not notice the Thief as he is going towards the cigarette case. Then, just use your Green Beret to knife him as he exits the building:

In this picture I dragged the body near the Sapper’s house, just in case.

Now, In the next picture, I do not remember exactly how this happened, I think I threw a cigarette case near the stairs?, but somehow, the hidden allied soldier, did some very good job for me (killing a few enemies), so, probably this will not happen for you. If this does not happen for you, then you can use cigarette cases, and use your Thief’s mouse (hotkey: A), to distract enemies and then go with the Green Beret and punch them.
Ok now, you have cleared the outside enemies (from the house), and all surrounding enemies (and also the riflemen looking outside (from the inside of the house)). So, it is time for the thief to go inside and unlock the door, so that the Green Beret can then come.


Ok now, you have taken care of the first sub-machine gun guy, but what about the next enemies there?


Step 1: open the door to the room where the sniper is (with your Green beret), then select your Thief and press A (for his mouse), then what I do, is I wait for the officer to go into the room where the sniper is interrogated, and then I put the Thief’s mouse towards the wall there, so that the Green Beret can go and take the sub machine gun enemy (and later on the sniper enemy):
As you see in the above picture, just in case the enemy officer sees you and shoots at you, you have to punch him really fast and then go behind the door where I am in the picture (with your knife equipped), ready to knife all incoming enemies. At the same time, press 8 (for your thief) and then either hide him under the bed where the sniper is, or you can hide him in the round barrel thing (on the left side of my screenshot, near the door).


Then, you can go down the ladder and check that there is only one rifleman standing.
About the last secondary objective (to position your men for the invasion), I really do not know how to correctly position the men in the very hard difficulty, I am still figuring that out (so that no allied soldiers die (and also none of your commandos). I will update this when I find a good spot.

Now, Clues time!
1) You can get a first aid kit from the house where the sapper is held (wooden box near the door), or in the house where the Green Beret is captured: 1st floor in the cabinet where the bonus book is.
Now, as far as the wire cutters go, you also collect them from 2 places:
1) In the house where the Green beret was captured (ground floor):


OR

2) you can find these on the soldier near the southwest part of the map:

Mission 9 – Castle Colditz
Isn’t this map just epic??
I really congratulate the developers of this game for trying to make it hard for us to complete everything in this map (i.e. bonus books, objectives and finding the keys).
To obtain the secondary objective of this map you must visit six buildings in the inner part of the Castle (do not forget to visit the roof sometimes, even if it seems that no one will be there). The point for doing this is to save 58 Allied prisoners by giving them enemy uniforms (can be either soldier, lieutenant or officer), so that they can leave the castle undetected by enemies.
To make things a bit faster, I took some time and cleared these six buildings of all the enemies inside, so I will just highlight the allied soldiers that you should give the uniforms to.
The first building in my list has four Allied prisoners (#1-4):
Next, the second building has 17 prisoners that you should save (#5-21):


It should be noted that these two pictures (each having 3 Allied prisoners, shows 6 prisoners in total). In other words, I could not show all 6 prisoners in the main floor at the same time, so I had to divide it into two pictures (thus two camera views).


And now, if you go down those stairs, you will have to rescue another 2 Allied prisoners (do not forget to go down this ladder as well, if you wish to fully complete this objective).


Next, return to the main level in this building, and let us go up to the first pair of stairs:

Now, if you go up one more time, you will see two more Allied prisoners that need rescuing.


Great, now let us return to the main level and let us go up the last staircase in this building:
Good, now you have mostly rescued everyone in this building; however, there is still one more nearby prisoner to be rescued:


For him we will go to the roof (one floor up from where you are):
Yep. I know what you are thinking … wow, I always saw this enemy there, but I did not know how to get there.. Trust me, it took me quite a while to figure it out too.

Good, let us now move on to the next building (building #3), which in my list is the radio tower (from where the Green Beret must contact HQ when he has the 3 enigma parts in his inventory). This building only has one Allied prisoner (#22) on the top floor:


The adjacent building to this one is the 4th building on my list. This building has 19 Allied prisoners inside (#23-41):
Now, let us move onto the other floors of this building:


The last two Allied prisoners are situated in the top floor of this building (one floor up from where you are now) [via the ladder]:


To continue, the fifth building on my list has 3 Allied prisoners (#42-44):
As indicated in the picture as well, let us now go down those stairs to rescue one more Allied prisoner 🙂


You are doing great so far! Just one building left 🙂

Now, the sixth building contains the remaining 14 Allied prisoners (#45-58):
In the picture above (ground floor), it is really easy to miss this one Allied prisoner which is behind the door (that is why I tilted slightly the camera view, so that you are able to see him).


Now, let us move on to the other floors as well:
That last one Allied prisoner (#58) is situated on the 3rd floor of that building:


Good, now you have saved them all!
I would like to point out a side note now, for the primary objective:
If you find yourself unable to use the radio in this mission after you’re done, then perhaps you are not doing the two correct things:
In order for the radio to work (after you have finished every other primary objective), you must use the Radio with your Green Beret, and also, for this to work, he must be the one carrying the 3 parts of the enigma machine in his inventory). If you operate the radio with another commando, or you just do not have these 3 parts in the Green Beret’s inventory, then, you will simply not be able to finish that mission.
Mission 10 – Is Paris Burning?
This is the last main mission for Commandos 2 – Men of Courage.
It does not have any secondary objectives, but it does contain a couple of clues:
1) obtain the mines and all the explosives.
These can be found in these steel boxes (that the Thief can unlock, so that the Sapper can then do his thing):
These boxes are located on the south east part of the map (near the SS officer with the keys).

Getting to these boxes is very straightforward, just kill all enemies, steal an enemy officer uniform (use the Spy to distract enemies with this uniform), maybe even use the sniper to take out some difficult enemies, and use the sapper (with grenades), for enemy patrol enemies (or 2-3 of your commandos with sub-machine guns equipped.
For the two enemy tanks, we come to the second clue:
2) Steal a tank. This is the green tank, that has no driver inside, and the one and only tank that you can use to destroy the other two enemy tanks in this map. It is stored in the north east area:
The cool thing about the location of this tank is that not only you can destroy the first tank as it is passing by, but also you can go back to kill the two patrol groups of enemies as well:

As you can see from the image below, I already killed the first patrol group (and the first enemy tank as well).


Now let us go for the second patrol group in this area:


Last but not least, let’s remove their second tank as well 🙂

Finally, for the 3rd clue (to obtain the keys), you should know that they are located on this officer:

He is located at the south east of the map. For more information on precisely how to get these keys, and where these keys lead to, please feel free to follow my other guide on the keys locations in Commandos 2 – Men of Courage.
Outro
As always, please feel free to comment in the comments section in regards to whether or not this guide was useful for you.
Also, please remember to rate this guide after you are done reading.
For now, have a nice day 🙂