Overview
This guide will help you get started with Substance Designer (v3.1) very quickly. The aim of this tutorial is to make a metal material using stock texture, with a tweak-able dust parameter and export it as a Substance Designer Archive format(*.sbsar), that can be used in any Substance Compatible Software.
Preparing new Substance
Click on Add a new Substance.
Put any suitable name on My New Graph as a graph name in the New Substance Wizard[jira.allegorithmic.com]. Lets keep the other parameters as are for now and press ok

We are going to create a graph with 3 outputs (Diffuse, Normal and Specular maps) in Relative to Parent size mode, although we can change those parameters later directly in the graph.
We now have a new graph in the Explorer, and we can visualize it in the graph view:
We can notice that our package in the Explorer is called Unsaved Package*.
When you create a new substance, the package by default is not saved. To save it, select the package and click on the Save icon . Let’s call it My New Substance. The package has now be renamed in My New Substance.sbs.
Now, lets Import the stock texture.
Importing stock texture
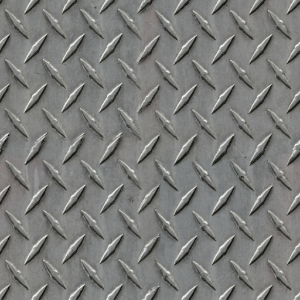
We will create the substance from an existing bitmap, so let’s use this metal below. Click here to download it.

Importing a resource allows you to edit this resource directly in Substance Designer, on the contrary to a Linked resource.The “DiamondPlate.png” resource is now visible in the Explorer.
Drag and drop the “DiamondPlate.png” resource in the graph. Link it to the Diffuse output to set is as a diffuse map. The 3D View will be automatically refreshed, with our new Diffuse map.

You can change the mesh in the 3D View to a plane, or any other meshes, in the Geometry menu.
Adding dust parameter
Let’s now add some dirt on this metal plate! We will use a noise to do so. Substance Designer provides many parametric noises, and you can of course create/use your own ones. For this example we will use an existing noise called BnW Spots 3 from the Library. You can find it under Generators > Noises filter.

Drag & drop it in the graph.
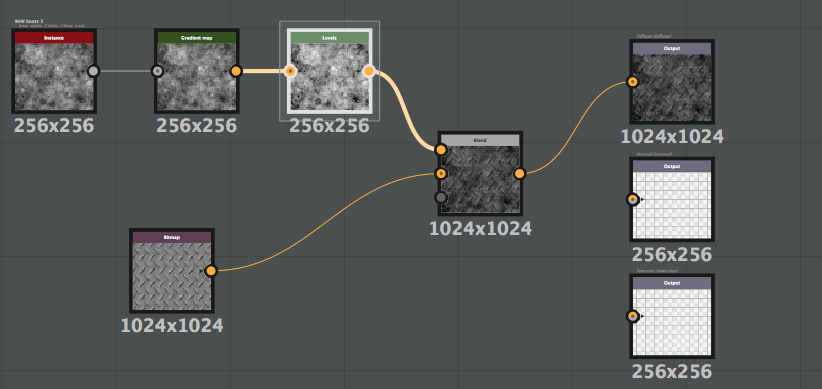
Create a Blend node in the graph (right-click, Add node -> Blend) to blend this noise with the DiamondPlate texture. The Blend node can blend 2 images according to the greyscale intensity.

Here notice that, the output of Bitmap node is Yellow. Which means the output from the node contains RGBA information. But the output of BnW Spots 3 node is grey. Which means its output is Grey-scale.
We can only Blend together nodes with same output. In out case, the output of bitmap node is color and the output of BnW Spots 3 is greyscale. Let’s add a Gradient Map node after the noise in order to convert its type to Color, and blend it with the DiamondPlate bitmap.

Let’s chose a Multiply blending mode for the blend node. Double click on the Blend node to display its parameters in the Parameters View. Chose Multiply in the Blending Mode drop-down list.

The metal plate is now dirty.

We can adjust the level of dirt playing with the Opacity parameter of the Blend Node. However the result is not satisfying as the full range of greyscale of the noise is used. Let’s add a Levels node to adjust it:

Substance Designer allows you to visualize in the 2D View several nodes while adjusting parameters from other nodes, which is really helpful when you need to see how a parameter will change the look of of your texture. In our case we want to adjust how the metal plate should look when then amount of dirt is at the maximum.
To do so double-click on the Blend node to visualize it in the 2D View, and put the Opacity slider at the maximum. Click then once on the Levels node so we can adjust its parameters, while still visualizing the final result of the texture. Modifying the Levels Histogram parameter will adjust the maximum amount of dirt both in the 2D View and 3D View.

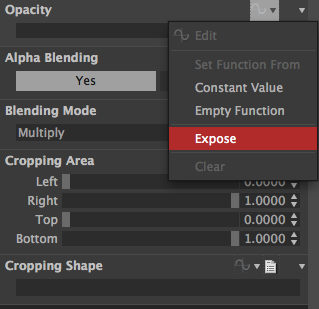
Let’s now expose the Opacity parameter so it will be possible for any users to play with it in Substance compatible software. Click on the Function icon of the Opacity parameter, and select Expose.

Call this parameter Dirt.

The Opacity parameter has been exposed and is thus now not anymore adjustable in the Blend node.
To change the parameters of the Dirt parameters (min value, max value, default value, etc.), double click in the graph view and check the Input Tweaks parameters.

Once a parameter has been exposed, you can only change its values in the Input Tweaks parameter.
Adding Specular Map
Let’s now create the specular map of our texture. In this map let’s make the diamonds of the plate more shiny than the plate itself. Add a Greyscale Conversion node and a Levels node from the bitmap, and plug it to the 3rd output. You can play with the histogram parameter of the levels to change the way how the specular map looks.

You can change the usage of an output (diffuse, normal, specular, etc.) in the Usage parameter of the output.
You can play with the light in the 3D View to see that the diamonds are now more shiny:

Adding Normal Map
Let’s finish by adding the normal map.
Add one more time a Levels node after the Greyscale Convertion node, and a Normal node to convert it to a normal map. Then plug it to the last output. You can play with the histogram parameter of the levels to change the way how the normal map looks

You can change the normal map format between OpenGL and DirectX in the Normal node parameters.
Here is our normal map:

Our metal plate is now finished.

Previewing on Substance Player
Let’s now see how it looks to play with the Dirt parameter. Try it in the Substance Player[jira.allegorithmic.com] by clicking on the 

Publishing in Substance Archive Format (*.sbsar)
Let’s now publish [jira.allegorithmic.com]it in .sbsar to be able to use this substance in Substance compatible software. Click on the Publish icon in the Explorer.

(Extra) Exporting maps
If you want to use them in a software not compatible with Substance then you have an option to export the maps.
Right click on the graph in the Explorer and select Export output as bitmaps.


