
Overview
Step-by-step guide for completing 100% of the game without dying.
Introduction
This guide does two things:
- Provides a proven and reliable path to get 100% of all items in a reasonable time span
- Gives tips and tricks for avoiding death in tricky and dangerous areas.
Some notes about this guide:
- The images and path taken are based on the video below, as is the skill tree. Videos are also taken from the video. However, images used to visualize tips or tricks are NOT necessarily used in this video since I have come up with additional techniques since I recorded this run.
- The difficulty setting was One-Life Mode. Although I have only played the game on that particular difficulty setting once (when I recorded this run), I have played the game on Normal with 100% and zero deaths at least 5 times, so the techniques described are well tested and proven reliable.
Also, check out my guide for Ori and the Will of the Wisps here.
General Tips
Ori and the Blind Forest is much more challenging than Ori and the Will of the Wisps, for a number of reasons:
- Instant Death is very common (lasers, crushers, lava, spike pits)
- Jumping is much tighter. This game is closer to a precision platformer than its sequel.
- Ori is less powerful in the beginning, with less energy and less abilities
- Walls aren’t as reliable. More on this below.
- It isn’t as easy to recover. Health is more limited, especially in the beginning before you can heal with a soul link, and many spike pits and other traps are designed so you cannot escape from them.
Walls in Ori and the Blind Forest have an issue that is common in physics-driven platformers, which is that they allow the player to become detached from the surface as the character traverses them. This is the wall equivalent to “falling” off an imperceptibly small ledge on the ground. This means that when you jump off an uneven wall, there’s a chance you will press the jump button while Ori is “floating” and it won’t trigger. This was fixed in the sequel by making Ori’s wall ability more “sticky”.
The best way to handle this situation is to recognize walls where this most commonly occurs. It can be extremely subtle, so I will be pointing them out throughout this guide.
A plus-side to Ori, however, is their ability to “slide” up walls from the ground, as seen in the video. This allows you to climb up a wall, often times quite far up, without having to do a wall jump. Plus, it can be done before acquiring wall jump.
As seen below, enemies will highlight with a purple outline. You can use this to help judge whether enemies are in range when using attacks like Light Burst.

Once you get the stomp ability, ground-based enemies should never be an issue anymore. Even the most powerful enemies will melt when pummeled with stomp. This is particularly useful in Misty Woods, where tough enemies like toads are abundant.
Dash, double jump, and other abilities are automatically restored when using the feather in the wind. They do NOT, however, restore when using the feather to float down (only up in the wind).
Charge Jump (and later, Charge Dash) can be charged up while in the air, which can allow you to use them in quick succession to get around.
Skill Tree
In my skill tree, I favor attack above all else, with the only exception being spirit magnet. I get all single-point skills first, then fully complete the attack tree and then the maneuverability tree. The video below gives an idea of what point in the game I acquire each skill point.
Sunken Glades


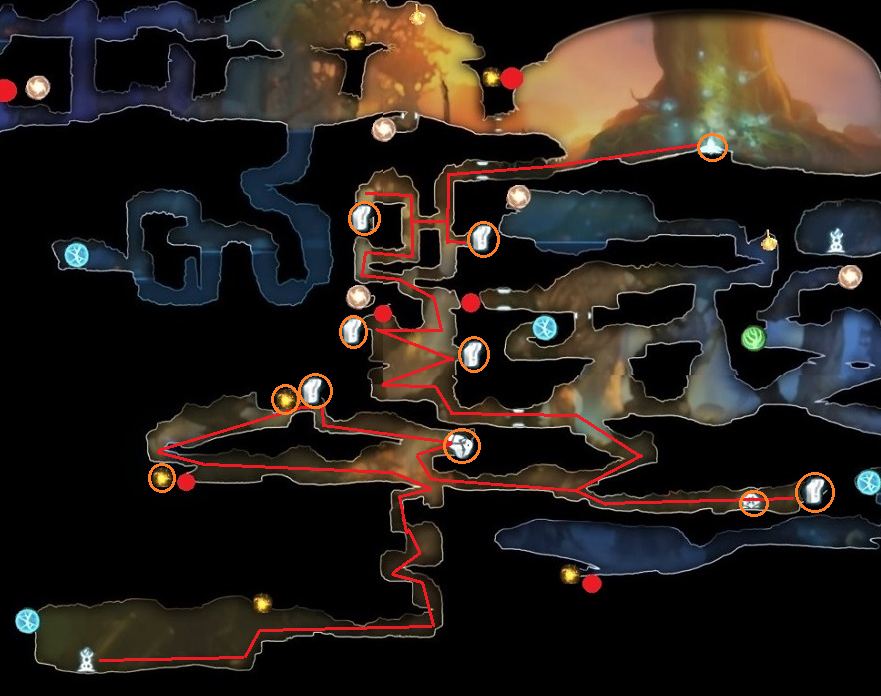
This advise goes for any light container bursts, but this one can easily be done reliably. Just wait to grab the secret light container under Sein until the enemies spawn. Be sure to lure the second enemy in for a double-kill.
Watch this jump. It’s very easy to slide too far
If you start this climb as soon as the projectile lands, you can climb up the entire wall without having to jump back and forth.
Black Root Burrow (Optional, if you want Dash early)
This early in the game, this area is VERY DANGEROUS! More than half my failed runs ended in this area. However, Dash can be invaluable when dodging traps, especially in the Moon Grotto. Use your best judgement. It may be worth an early risk to make things easier later on.

These are what I considering to be the most dangerous spiders in the game. You’re on small moving platforms with an enemy that can swing around while shooting projectiles, and the second half of the area is over a death-pit. Sometimes I get lucky, like in the video below, and manage to take out the second spider with a light container burst. Other times, they have to be taken out conventionally. There’s no tricks here, only good judgement and skill. Don’t get lazy or impatient here, as that’s easy to do this early in the game.
This is the other dangerous area (with the exception of the instant-death lasers, which are easy to get the timing of). The problem here is the color contrast, as it’s easy to lose track of Ori amidst the bright torches, projectile, and other glowing objects. The best strategy is to wait each time you activate a torch and jump over the projectile before moving on (this isn’t always necessary since some platforms allow the projectile to fly over you).

This is the other dangerous part. If the boulder hits you, it’s instant death. The hardest part is getting over the spikes, but there’s an easy and reliable way to get over it quickly without taking damage. All you have to do is jump-slide up the wall from the ground.

Hollow Grove

Small blobs can be killed instantly with Charge Burst, even this early in the game.
It can be tough to judge the perfect arcs in this part but I’ve worked it out from trial and error. You be relatively high up on the wall, but not so high that you hit your head on the ceiling.
DO NOT fall in these spikes. They are INSTANT DEATH.

Thornfelt Swamp

If you angle this rock in the spikes instead of pushing it all the way in, it’s much easier to reach the ledge.
These blobs will sometimes retreat back into the ground if you approach them. There’s a certain timing to it, though. You have to approach them after they been out for a moment but before they rear-up to fire. Use this to your advantage to help keep the area clear.
Moon Grotto
This is one of the more dangerous areas of the game due to all the instant-death traps. Take it slow and methodically. I avoid the energy door with the three energy pips until I clear the water as the health sphere isn’t worth getting at this point. Besides, you have to return later anyway to get the spirit light at the bottom of the pool.

These lasers are front-and-center in Moon Grotto. Not only are they instant-death with tricky timing, but they’re positioned such that you may find yourself having to pass them multiple times. As a result, I’ve come up with a variety of techniques for handling them.
Obviously if you have Dash you can use it to great effect. Make sure you don’t dash too far, though, or you’ll find yourself stuck against a wall.
When returning, Dash is not needed for the second laser.
You can also duck under the first laser.
Finally, if you’ve already used Stomp, you won’t be able to use Dash without much greater risk, but if you time it right, jumping across is relatively safe.
I have come up with a reliable plan of getting through this section without taking damage but unfortunately discovered this after the recorded run. This is the concept, though.

This keystone is very tricky to get as well, owing to the wall on the left being uneven and thus very unreliable. The better technique is to use the much more even wall on the crusher next to it. Just be sure not to go too high and hit the spikes.

Even though these spikes are technically skippable, I’ve never had much trouble with them. Just be sure you’re high up on the wall before double-jumping. DO NOT try to jump onto the ledge. It’s so small that you’re at high risk of overshooting it.

This wall is uneven and thus unreliable. Be extra cautious. It is more even towards the top and bottom.

There’s no way out of this spike pit. Don’t jump the gun and be sure to double-jump as soon as Ori slips off at the top of the rock’s cycle.

When getting these objects, you can push the redirection rock past the gap so the projectile doesn’t bother you while you’re up there.
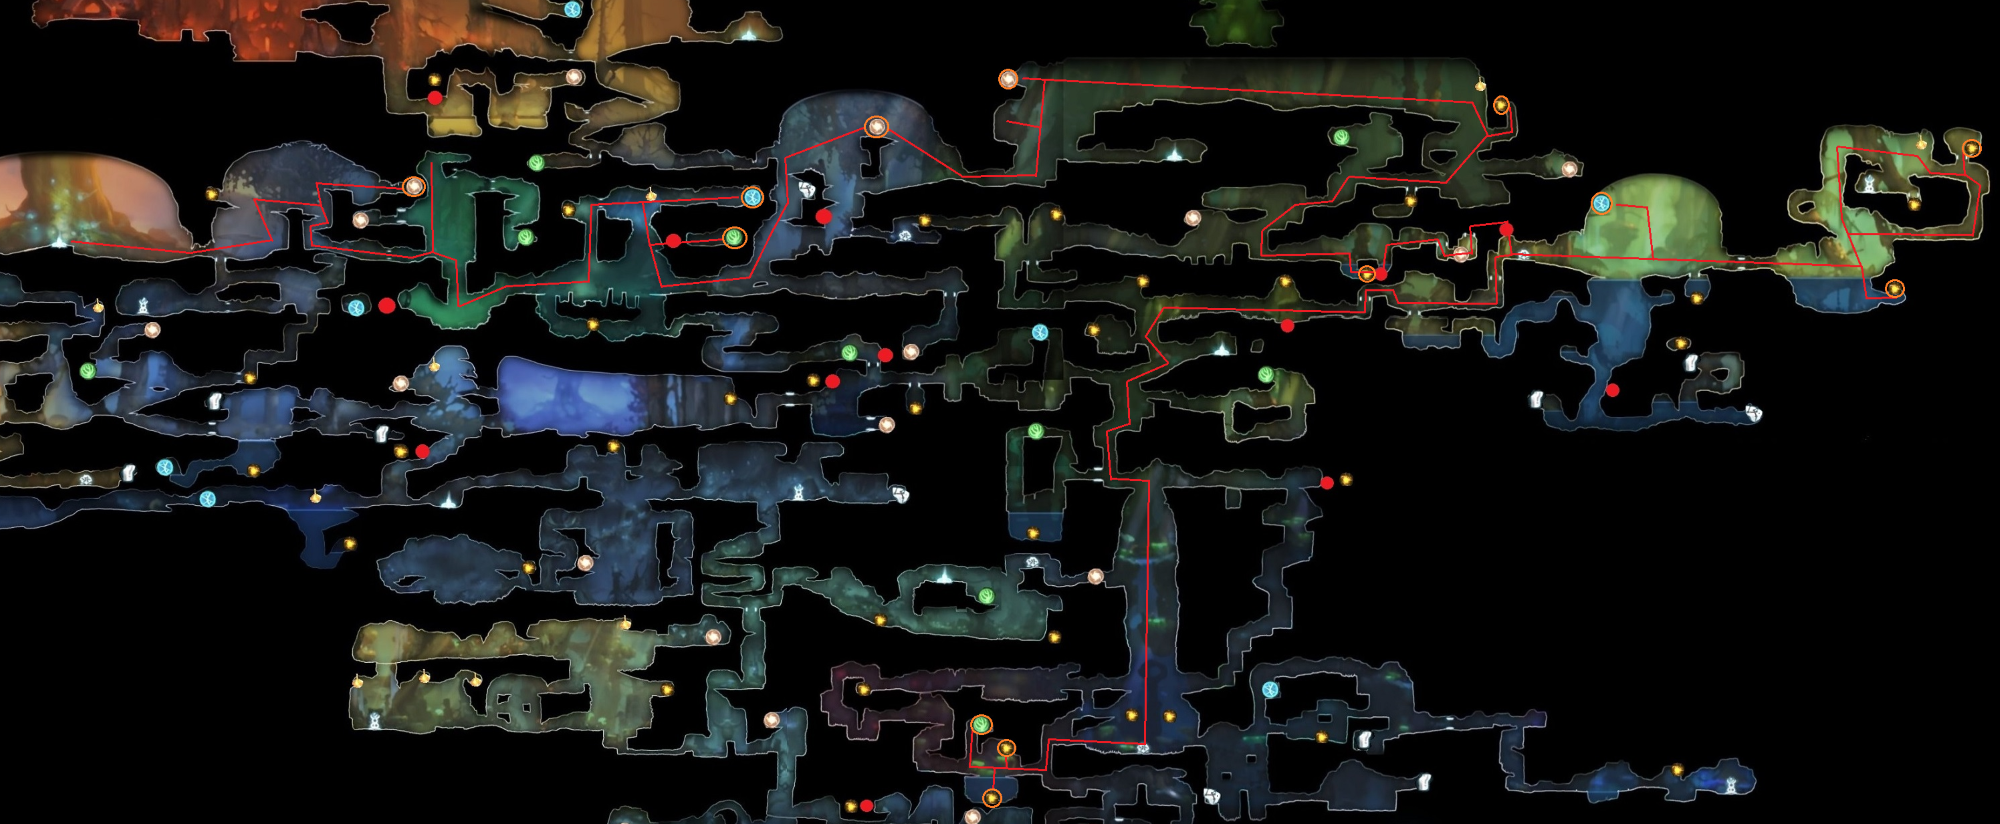
Ginso Tree
This jump through a portal is easy to overshoot. Hit the double-jump prior to reaching the portal.

This just takes practice. You need a good feel for Ori’s momentum, both from jumping and from traversing the portals.
Don’t jump up to meet them. This goes for the chase sequence as well.

This fight is exceptionally easy if you use this 1-2-1 rule (the numbers represent how many projectiles to kick back at each “station”).
That makes this area very easy and fast to traverse
This is TOUGH to get through while collecting all the spirit light. Here are some pointers, though:
- 0:18 – Bash this enemy instead of wall-climbing. You can even bash to the right to grab the spirit light faster.
- 0:40 – DO NOT double-jump here. There is literally not enough time. It feels tight but it is very doable.
- 0:57 – Bash straight at the projectile, then double-jump to the next projectile to bash onto the wall. (I nearly screwed this up in this run)
- 1:05 – Bash this enemy early, before it gets below the rock
- 1:12 – Don’t bother waiting for a projectile. Just bash directly off the spider.
Thornfelt Return
Not much to say here. Just remember to stomp everything and remember to use light burst on the fish and you’ll be fine. Also, this is the ideal time to grab things you missed in Thornfelt Swamp, the Moon Grotto, and Hollow Grove.

This is a useful skill that comes in handly for gaining extra height. Just use bash once to control exactly how high you want the next projectile to be, then use the second one to get the full height of traversal.
Valley of the Wind
This area is also relatively straight forward. Remember the spiders themselves can be bashed in the spike area, and the bash-luring trick also works for getting the ability point half-way up the pass.

This is the only vaguely threatening part since failure means instant death. If you’re quick enough, the ravens won’t have time to leave their initial positions.
Misty Woods
This area can be either incredibly easy or incredibly challenging depending on your approach. The trick is to remember all your abilities:
- Use Charge Burst to take out troublesome slimes in the middle area, as well as when you’re carrying the torch
- Bash enemies into spikes. They’re everywhere, so you may as well use them to your advantage.
- Stomp EVERYTHING, including flying enemies like the ravens.
- Remember you have Kuro’s Feather in this area. If you bash yourself up high, it will give you time to drift down and assess your surroundings. Just be sure not to bash yourself into ceiling spikes.
- And, finally, look before you leap. This mean panning the camera down before jumping off a ledge, and being careful around the wall-climb challenge to make sure the leaves are in the right configuration.
The only “trick” I discovered is the use of Kuro’s Feather to traverse this laser-section without triggering the leaves.
Forlorn Ruins
There are two infamous sections in this dungeon: The criss-crossing lasers, and the final sequence. However, neither of them are very challenging given a few tricks here and there.

Remember that you don’t have to carry the ball everywhere you go. This means you can do entire sections of this dungeon while ignoring the ball entirely.
There are two opportunities to skip across the dungeon a long ways. Take advantage of the changing gravity.
These things are SCARY! They’re crossing each other and scraping against rocks in very chaotic ways. However, there’s a few rules that make this area much easier to traverse:
- The safest time to enter the laser area is when the lasers are spread open.
- You can jump safely from one of the inner-most rocks to another inner-most rock when either the lasers are spread OR when they’re fully crossed.
- The best time to ground-pound the pillar-switch is when the lasers are fully crossed.
- Once you reach the end of the cave (on the right), use the walls to wait for a good time to fall to the health sphere.
Here are some tricks I found really help in this part:
- 0:19 – Remember you can bash this projectile. Don’t try to lure it by clinging to the wall
- 0:23 – Don’t bother floating through this area. Just drop to the ground and dash.
- 0:29 and 0:50 – There’s a precise trigger point for these falling rocks. Carefully approach them and be ready to duck into the right-hand alcove as soon as you see them move.
Sorrow Pass
This area has some very dangerous spike traversals, as well as a lot of traps that can catch you off guard (e.g. lasers, falling slimes, small areas where there’s no wind). Move slowly and watch your surroundings. Remember to use Bash to keep up your height and don’t be afraid to use Dash to get some distance into a long stretch so you don’t have to Kuro’s Feather the entire thing (with the exception of that one infamous keystone part towards the end. Take that part very slowly)

Watch this guy in the case where you knock him off the cliff. He can catch you off guard by respawning on top of you. Move quickly.

This rock can be bashed if you don’t feel like pushing it the entire way. HOWEVER, do NOT attempt to bash it if it’s already rolled a good ways down the path. The rock can bounce and unleash the laser on you for an instant.

This wall is nearly impossible to climb without having Ori go flying off into the spikes (as seen in the video). Don’t bother. Just hang low and hitch a ride on a projectile from the spider.
You know the one – with all the keystones at the end. Unfortunately, there’s very little in the way of tricks for this part. By best advise is to practice with the feather in an area like the Valley of the Wind and try to get a feel for Ori’s momentum. Practice approaching a part of a wall without gaining or losing much height.
The temptation is to do what I did this this run, which is to micromanage the feather to the point it looks like Ori’s having a seizure. I’ve since learned there’s no need to do this, and it’s not a great idea anyway since it’ll wear out your glide-finger. Instead, find a set of sweeping motions that can carry Ori to their destination. It takes a LOT of practice, so find a safe open area where you can spend plenty of time.
Lost Grove

When you first stomp your way into the main part of the Lost Grove, stay to the right. Yes, there are spikes on the wall, but past that is an instant-death laser waiting for you just above the ground. If you fall on the right, you’ll land safely on the muzzle.

Watch this laser and time it well. Use only two dashes. It’s a very tight fit.
I find this part is easiest by using Charge Jump instead of the bounce pad. It’s easier to time and more responsive. Also, Air Dash is invaluable, so try and build your skill tree such that you have that skill by this point in the game.
There’s no threat to this part. I’m only providing this screenshot so you can see the ideal place to stand to make this shot work.

Cleanup
Once you have all the abilities, it’s time to go back through the game and grab everything you missed. This part is very non-threatening is is mostly just a fun opportunity to go on a power trip as you re-traverse all the early parts of the game.


If this part makes you too nervous it’s very possible to go over. That said, there’s plenty of time to get through especially if you use Dash and Stomp to speed up your trip.
This is a quick way of dispatching two enemies at once as you approach Mount Horu
This is just a cool trick to speed up this rock section. It’s largely harmless, assuming you avoid getting hit by the roller, and doubles as a quick way to dispatch an enemy too.
Mount Horu
As dangerous as this area is, the toughest thing you’ll probably be fighting is your own nerves. Practice this area on normal difficulty. Make a save backup so you can replay each room and practice them until they’re second-nature. None of them are particularly threatening, especially compared with earlier parts of the game (Black Roots Burrow or Moon Grotto), but it can take some time to find a strategy and path that works for you.
One of the most common places I had trouble was climbing back onto the lowest crusher on my way back up. I found what worked best was dashing under it and using Charge Jump rather than trying to wall-climb up the side. The second crusher was also much less of a risk if I dashed into the wall.
This room is troublesome for the simple fact that projectiles can destroy the floors. I consider it a flaw in the design. That said, you need to be aware of where all the projectiles are and lure/bash them away from the floors. If something like this happens, don’t hesitate to give up and return to the entrance.
This is the part of Mount Horu that gave me the most trouble. It’s just too risky to go over the top on the way back. That’s when I discovered the best strategy is to simply ignore the top path and float down using Kuro’s Feather.
Also WATCH OUT when you go for that spirit light container. There is a GLITCH where the laser will occasionally slip between the cracks and strike the area down there. It’s a good rule of thumb to pretend the laser always reaches that section and time it accordingly.
Don’t bother with these guys. Just Charge Jump over them and let them take care of themselves.
This part is overrall not too bad. You’ll mostly just be fighting your nerves at this point. That said, here’s a few parts to watch out for.
- 0:05 – DO NOT dash here. There’s no rush and you’re most likely just going to dash your way into the lava. Ori is very small on the screen and easy to lose track of. Take it slow.
- 0:19 – Bash straight up when you get to this part and wait for the lava spout to go back down. You never want to find yourself trying to “beat the train” so to speak.
- 0:37 – This is the trickiest part since there’s so much to traverse in such a short time. Don’t try anything fancy like trying to recharge your dash by touching the ground. Just use your dash to get across one way and your double-jump to get across the other way.
- 0:52 – Don’t even bother dodging the rocks. They don’t matter at this point. Just make sure you get over to the right in time.
Let me know in the comments if there’s a particular area that caused you a lot of trouble that’s not mentioned in the guide.
Also let me know if there’s anything in this guide you found particularly confusing and I will try to make it clearer if I can.