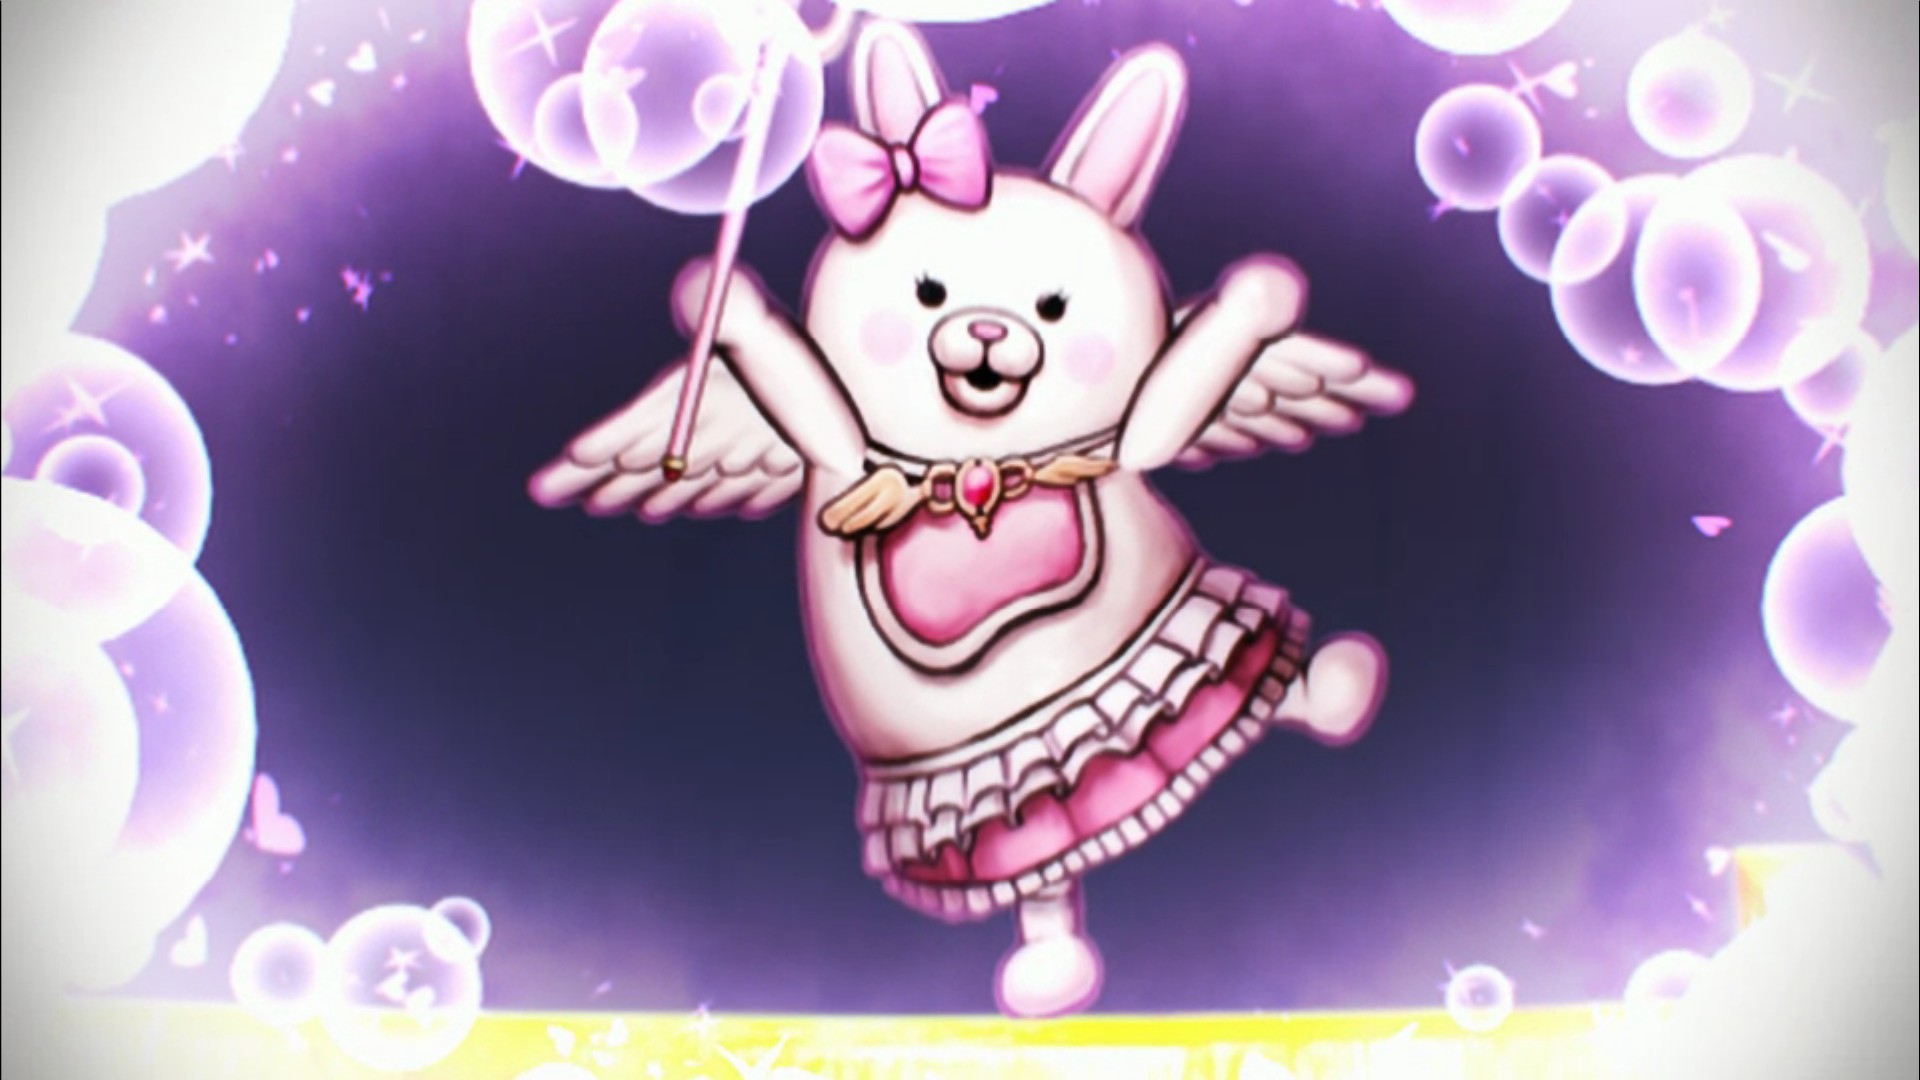
![Full 100% Achievement Guide [Spoiler free] for Danganronpa 2: Goodbye Despair](https://steamsolo.com/wp-content/uploads/2021/07/full-100-achievement-guide-spoiler-free-danganronpa-2-goodbye-despair.jpg)
Overview
This guide is a compilation of all the required information on how to achieve 100% completion and comments from me regarding achievements. I am not the one who is making this guide from scratch, rather i just put everything in one place so you can easily navigate.Most credits should go to:alteregobot.tumblr[alteregobot.tumblr.com]d2 wikia [danganronpa2084.wiki.fc2.com]d2 IGN wikia PSTrophies user admeister[www.playstationtrophies.org]And my personal gaming experience
Story related
I decided to hide the names of story-related achievements because some of them might be spoilerish (Also don’t forget to check missable events in miscellaneous section).

Finished the prologue


Finished Chapter 1
Finished Chapter 2
Finished Chapter 3
Finished Chapter 4
Finished Chapter 5

Finished every chapter
Monokuma dolls
Found half of the Hidden Monokumas

Found every Hidden Monokuma
Every chapter contains 5 hidden Monokumas dolls. You will be able to get last two dolls in each chapter only after murder takes place, so i will put the locations under spoiler as well. Keep in mind that you won’t be able to collect Monokumas from previous chapters
Chapter 1
- Your room, Upper right corner
- Rocketpunch Market, next to the vending machine
- Airport, On the right comes out with the baggage
- Old Building’s Office under the desk
- Byakuya’s Cottage, left wall
Chapter 2
- Library, Second floor on the right
- Drugstore, On the shelf on the right side
- Chandler Beach, on the left side, swimming in the ocean
- Beach House Closet, Left upper corner
- Mahiru’s Cottage, behind the TV
Chapter 3
- Movie theatre, Right side next to the poster
- Electric Ave, Left side in one of the purple windows
- Hospital 1F, Right side, End of the hallway last window with ghost
- Hospital 2F, Conference room, on the ceiling
- Motel room, inside the bathroom
Chapter 4
- Rollercoaster Grab it the first time you visit the location
- Nezumi Castle, Left wall above Kazuichi’s head Grab it the first time you visit the location
- Strawberry house 3F, In the flowerpot
- Grape house 3F Monokuma Archive, behind golden Monokuma statue left to the exit
- Strawberry House 2F, Standard room, under the desk
Chapter 5
- Vendor street, Eating on the right side
- Plushie Factory, On top of the basket with plushies
- Military Base, Upper left side, on top of containers
- Sea King Industries, Catwalk on the right
- Nagito’s Cottage, bathroom
Chapter 6
The whole location itself is pretty spoilerish, but feel free to open it as soon as you get there
- Room 1-A, Ceiling on the right
- Gymnasium, Sitting on the left side
- Bio Lab, Under the desk
- Teacher’s office, to the right on the bottom of the wall
- Classroom 2-B (Laundry), Next to the vending machine
Pets
Fully raised one type of pet
Fully raised every type of pet
Pretty easy to do if you are playing with gamepad. Simply stuck the analog on movement and leave it be for a minute or so. Don’t forget that every 100 steps (before evolution) pet crap himself and you need to clean it or the pet will die. Depending on the tier of the pet you will get a reward from 100-300 coins, presents and sometimes skills. So it’s an easy way to farm coins if you are strugling. Usually it take 100 steps from egg to baby, 1000 steps to start evolution, 100 steps evolution to happen and 2000 more steps to raise a pet. (about 10 mins of constant walking)
♥♥♥♥♥♥♥

Snakemi
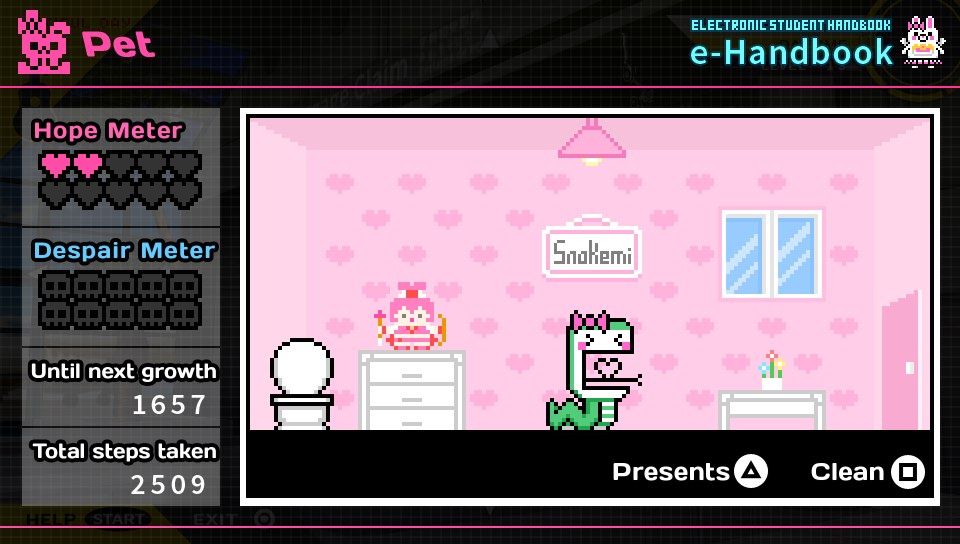
0-5 Despair Level
Pigmi

0-9 Despair level
Gorimi
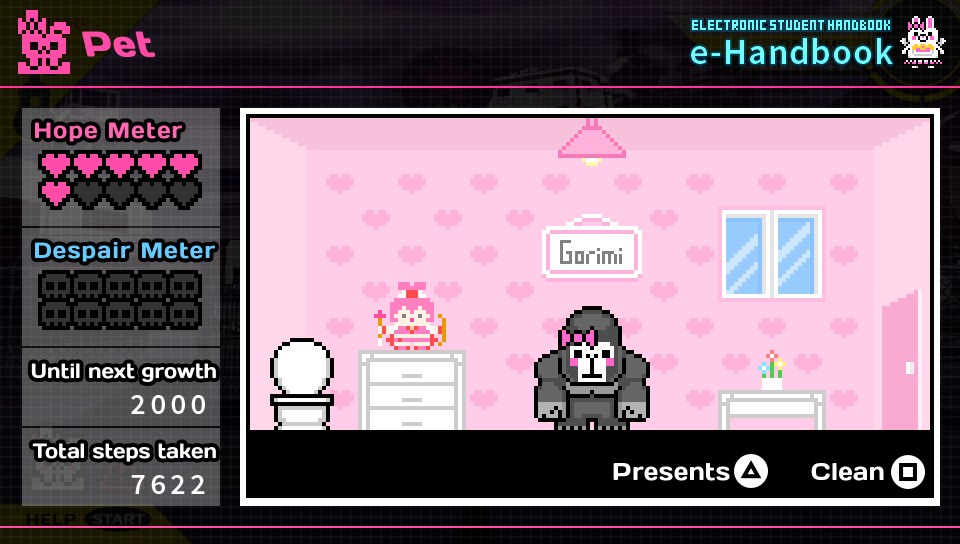
0-9 Despair Level
Usami
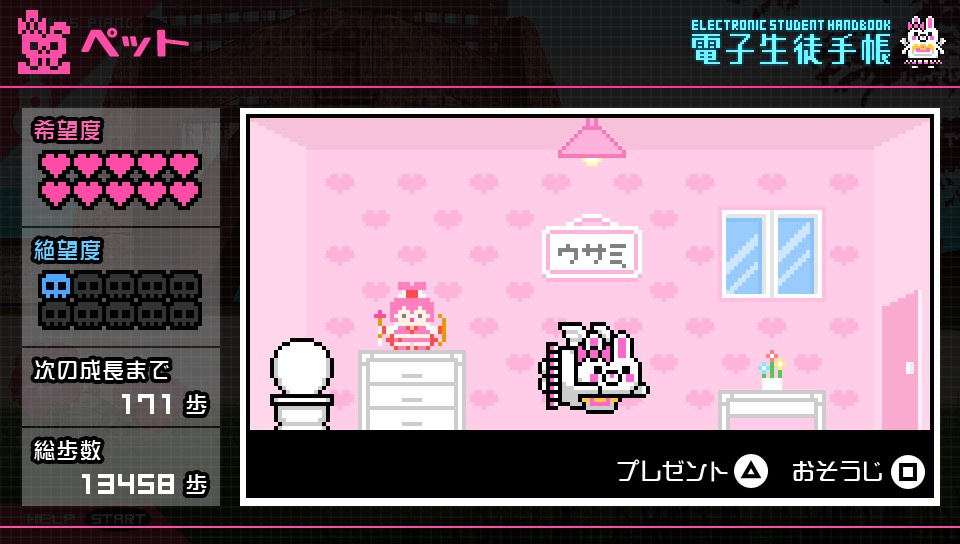
0-5 Despair Level
Monokuma

6-9 Despair Level
(As soon as pet gets out of the egg gift him presents and then leave him be to ♥♥♥♥ himself almost to death.
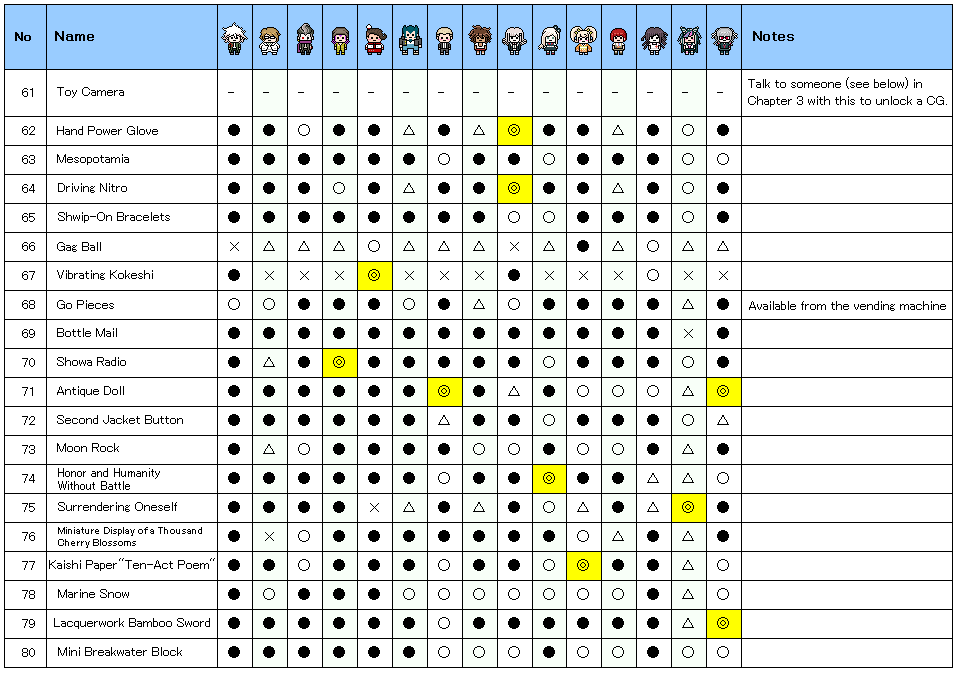
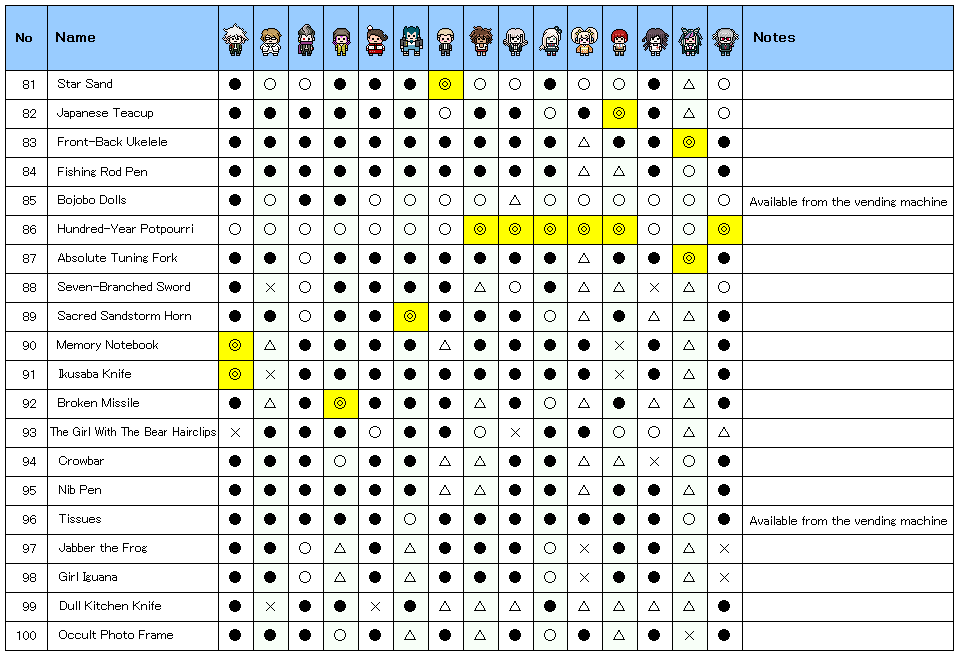
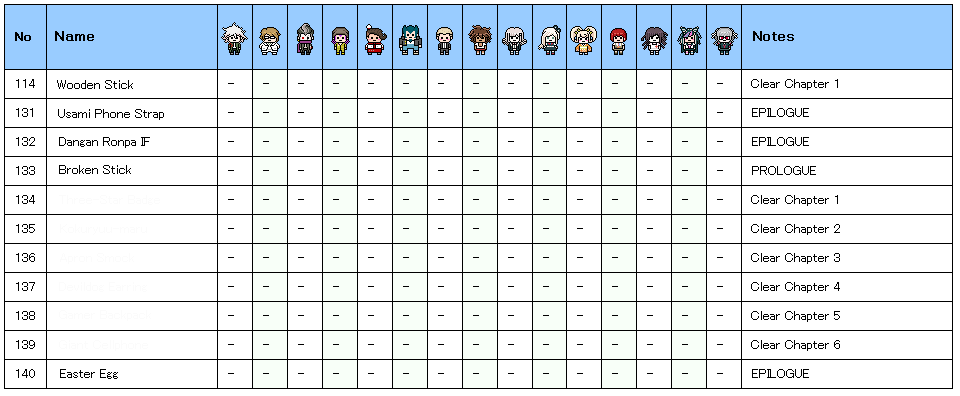
Hope fragments pt1

Filled in every page of every character’s Report Card
Credits for translating the table goes to
[alteregobot.tumblr.com]
“-X is baaaad
-Triangle is meh
-Filled-in circle is kinda nice
-Outline circle is pretty good
-Yellow double circle is super high-school level good”
Original post [danganronpa2084.wiki.fc2.com]
Reference[www.playstationtrophies.org]
There might be some difference in presents name due to different translations so i suggest using the numbers. Also i do not recommend checking the last two pages as they might contain some spoiler material

Filled in every page of Nagito’s Report Card
Excellent: Hope’s Peak Ring #33, Memory Notebook #90, Ikusaba Knife #91
Good: Blue Ram #4, Hope Biscuits #12, Viva Ice #15, Earrings of Evil’s Destruction #31, Another Hope #36, Go Pieces #68, Hundred-Year Potpourri #86, Sword Wind Secret Notebook – Sayaka Maizono #110
***As far as i know if you won’t invest your free time in Nagito during chapter 1 you won’t be able to raise Hope during the storyline at all
Filled in every page of Gundham’s Report Card
Excellent: Sunflower Seeds #18, Earrings of Evil Destruction #31, Mini Degeneracy Generator #56, Angel’s Fruit #108
Good: Blue Ram #4, Fur Muffler # 23, Hope’s Peak Ring #33, Spectre Ring #34, Another Hope #36, Fantasmal Fan 38, Hand Power Glove #62, Moon Rock #73, Miniature Display of a Thousand Cherry Blossoms #76, Kaishi Paper “Ten-Act Poem” #77, Star Sand #81, Hundred-Year Potpourri #86, Absolute Tuning Fork #87, Seven-Branched Sword #88, Sacred Sandstorm Horn #89, Jabber the Frog #97, Girl Iguana #98, Skull Mask #103
Filled in every page of Kazuichi’s Report Card
Excellent: Radiosonde #47, Lilienthal’s Wings #53, Mini Degeneracy Generator #56, Showa Radio #70, Broken Missile #92
Good: Coconut Water #3, Hope’s Peak Ring #33, Men’s Manma #43, Kiss Note #44, 2.5D Headphones #46, Razor Rice H.G. #50, Kirlian Camera #54, Home Game System #58, Portable Game System #59, Driving Nitro #64, Hundred-Year Potpourri #86, Crowbar #94, Occult Photo Frame #100, In-Vitro Rose #102
Filled in every page of Byakuya’s Report Card
Excellent: Chocolate-Chip Jerky #9, Sweet Roll Bag #13, Yashimi #17, Black Rabbit Handbook #45
Good: Ramune #2, Barley and Rice Pack #8, Pollock Roe French Bread #10, Gugelhupf #11, Hope Biscuits #12, Olitatoes #14, Sunflower Seeds #18, Coconut #19, Blueberry Pure Gold #30, Hope’s Peak Ring #33, Men’s Manma #43, Razor Rice H.G. #50, Go Pieces #68, Marine Snow #78, Star Sand #81, Bojobo Dolls #85, Hundred-Year Potpourri #86, In-Vitro Rose #102
Filled in every page of Teruteru’s Report Card
Excellent: Worldly Desire Glasses #29, Kiss Note #44, Vibrating Kokeshi #67
Good: Natural Jabber Salt #16, Yashimi #17, Coconut #19, I-Ro-Ha Shirt #20, Apron Dress #22, The Queen’s Straitjacket #25, Hope’s Peak Ring #33, Male Cylinder #48, Female Flask #49, Gag Ball #66, Bojobo Dolls #85, Hundred-Year Potpourri #86, The Girl With The Bear Hairclips #93, Lascivous Wonders of Nature #101, In-Vitro Rose #102, Angel’s Fruit #108
Filled in every page of Nekomaru’s Report Card
Excellent: Coconut #19, Brand New Sarashi #24, Oogami Clan Tome #42, Sacred Sandstorm Horn #89
Good: Barley and Rice Pack #8, Pure-Color Ragged Jeans #21, Hope’s Peak Ring #33, Ubiquitous Notebook #39, Infrared Thermometer #51, Go Pieces #68, Marine Snow #78, Bojobo Dolls #85, Hundred-Year Potpourri #86, Tissues #96, In-Vitro Rose #102
Filled in every page of Fuyuhiko’s Report Card
Excellent: Antique Doll #71, Star Sand #81
Good: Non-Alcoholic Wine #7, I-Ro-Ha Shirt #20, Fur Muffler #23, Blueberry Pure Gold #30, Silver Ring #32, Hope’s Peak Ring #33, Jabberian Jewelry #37, Lilienthal’s Wings #53, Multi-Sided Dice Set #57, Mesopotamia #63, Honor and Humanity Without Battle #74, Kaishi Paper “Ten-Act Poem” #77, Marine Snow #78, Lacquerwork Bamboo Sword #79, Mini Breakwater Block #80, Japanese Teacup #82, Bojobo Dolls #85, Hundred-Year Potpourri #86, Lascivous Wonders of Nature #101, In-Vitro Rose #102, Disguise Compact #107, Sword Wind Secret Notebook – Sayaka Maizono #110
Filled in every page of Akane’s Report Card
Excellent: Barley and Rice Pack #8, Hundred-Year Potpourri #86
Good: Ramune #2, Chocolate-Chip Jerky #9, Pollock Roe French Bread #10, Gugelhupf #11, Hope Biscuits #12, Sweet Roll Bag #13, Oiltatoes #14, Viva Ice #15, Yashimi #17, Spy Spikes #26, Silver Ring #32, Hope’s Peak Ring #33, Furoshiki Bag #35, Razor Rice H.G. #50, Mr. Stapler #55, Moon Rock #73, Marine Snow #78, Mini Breakwater Block #80, Star Sand #81, Bojobo Dolls #85, The Girl with The Bear Hairclips #93, In-Vitro Rose #102, Angel’s Fruit #108, Bandages #109
Filled in every page of Chiaki’s Report Card
Excellent: Super Strategy Encyclopedia 2nd Edition #41, Hand Power Glove #62, Driving Nitro #64, Hundred-Year Potpourri #86, In-Vitro Rose #102, Skull Mask #103
Good: Viva Ice #15, Sunflower Seeds #18, Hope’s Peak Ring #33, 2.5D Headphones #46, Multi-Sided Dice Set #57, Home Game System #58, Portable Game System #59, Shwip-on Bracelets #65, Go Pieces # 68, Moon Rock #73, Marine Snow #78, Mini Breakwater Block #80, Star Sand #81, Seven-Branched Sword #88
Filled in every page of Sonia’s Report Card
Excellent: Gugelhupf Cake #11, Brightly Colored Jeans #21, Century Potpourri #86
Good:Ramune #2, Civet Coffee #5, Hope’s Peak Ring #33, Rose In Vitro #102, Passionate Glasses #29
Hope fragments pt2
Filled in every page of Hiyoko’s Report Card
Excellent: Furoshiki Bag #35, Fantasmal Fan #38, Kaishi Paper “Ten-Act Poem” #77, Hundred-Year Potpourri #86, In-Vitro Rose #102
Good: Coconut Water #3, Sweet Roll Bag #13, Viva Ice #15, Silver Ring #32, Hope’s Peak Ring #33, Jabberian Jewelry #37, Black Rabbit Handbook #45, Antique Doll #71, Moon Rock #73, Miniature Display of a Thousand Cherry Blosoms #76, Marine Snow #78, Mini Breakwater Block #80, Star Sand #81, Bojobo Dolls #85, Sword Wind Secret Notebook – Sayaka Maizono #110
Filled in every page of Mahiru’s Report Card
Excellent: Silver Ring #32, Kirlian Camera #54, Japanese Teacup #82, Hundred-Year Potpourri #86, In-Vitro Rose #102, Disguise Compact #107
Good: Apron Dress #22, Worldly Desire Glasses #29, Hope’s Peak Ring #33, Jabberian Jewelry #37, Ubiquitous Notebook #39, Kiss Note #44, Antique Doll #71, Moon Rock #73, Marine Show #78, Mini Breakwater Block #80, Star Sand #81, Bojobo Dolls #85, The Girl with The Bair Hairclips #93
Filled in every page of Mikan’s Report Card
Excellent: The Queen’s Straitjacket #25, Mr. Stapler #55, Bandages #109
Good: Apron Dress #22, Half Safety Boots #28, Worldly Desire Glasses #29, Silver Ring #32, Hope’s Peak Ring #33, Jabberian Jewelry #37, Oogami Clan Tome #42, Male Cylinder #48, Female Flask #49, Infrared Thermometer #51, Gag Ball #66, Vibrating Kokeshi #67, Antique Doll #71, Bojobo Dolls #85, Hundred-Year Potpourri #86, The Girl With The Bear Hairclips #93, In-Vitro Rose #102
Filled in every page of Ibuki’s Report Card
Excellent: 2.5D Headphones #45, Clackers #60, Surrendering Oneself #75, Front-Back Ukelele #83, Absolute Tuning Fork #87
Good: Ramune #2, Luwak Coffee #5, Chocolate-Chip Jerky #9, Natural Jabber Salt #16, Yashimi #17, Coconut #19, I-Ro-Ha Shirt #20, Pure-Color Ragged Jeans #21, Worldly Desire Glasses #29, Earrings of Evil’s Destruction #31, Hope’s Peak Ring #33, Spectre Ring #34, Furoshiki Bag #35, Jabberian Jewelry #37, Fantasmal Fan #38, Super Strategy Encyclopedia 2nd Edition #41, Kiss Note #44, Female Flask #49, Razor Rice H.G. #50, Flash Hider #52, Mr. Stapler #55, Multi-Sided Dice Set #57, Home Game System #58, Portable Game System #59, Hand Power Glove #62, Mesopotamia #63, Driving Nitro #64, Shwip-On Bracelets #65, Showa Radio #70, Second jack Button #72, Mini Breakwater Block #80, Fishing Rod Pen #84, Bojobo Dolls #85, Hundred-Year Potpourri #86, Crowbar #94, Tissues #96, Lascivious Wonders of Nature #101, In-Vitro Rose #102, Skull Mask #103, Disguise Compact #107, Angel’s Fruit #108, Bandages #109, Sword Wind Secret Notebook – Sayaka Maizono #110
Filled in every page of Peko’s Report Card
Excellent: Apron Dress #22, Antique Doll #71, Lacquerwork Bamboo Sword #79, Hundred-Year Potpourri #86, Secret Wind Sword Book #110
Good: Non-Alcoholic Wine #7, I-Ro-Ha Shirt #20, Brand New Sarashi #24, Blueberry Pure Gold #30, Silver Ring #32, Hope’s Peak Ring #33, Jabberian Jewelry #37, Kiss Note #44, Multi-Sided Dice Set #57, Mesopotamia #63, Honor and Humanity Without Battle #74, Kaishi Paper “Ten-Act Poem” #77, Marine Snow #78, Mini Breakwater Block #80, Star Sand #81, Japanese Teacup #82, Bojobo Dolls #85, Seven-Branched Sword #88, Lascivious Wonders of Nature #101, In-Vitro Rose #102, Disguise Compact #107
Magical Miracle Girl Monomi
Cleared all stages of Magical Miracle Girl Monomi
(Each level unlocks after you finish the chapter)
Collected every possible item in Magical Miracle Girl Monomi
Now this one can take a while. Totally there are 60 pieces of equipment – 20 in each category. Should take around 2-3 hours of post-play. Depending on your luck.
All this credits goes to admeister[www.playstationtrophies.org] for making such amazing reference table
- Wooden Branch: Starting equipment.
- Sturdy Branch: Appears in any stage on Easy difficulty.
- Bamboo Broom: Appears in any stage on Easy difficulty.
- Souvenir Wooden Sword: Appears in any stage on Easy difficulty, as well as stage 1 and 2 on Normal difficulty.
- Wash Line Pole: Appears in any Easy difficulty stage.
- Carpenter’s 2×4: Appears in any Easy or Normal difficulty stage.
- Sacred Tree Branch: Appears in any Easy difficulty stage.
- Barbed Wire Bat: Appears in any Easy or Normal difficulty stage.
- Witch’s Broom: Appears in any Easy or Normal difficulty stage.
- Summer Carnival: Appears in stage 3 and beyond on Easy difficulty, and in all stages on Normal difficulty.
- Bartholomew: Appears in the Secret stage on Easy difficulty, as well as in stage 5 and Secret stage on Normal difficulty.
- Rayxanber’s Rod: Appears in stage 4 and beyond on Easy difficulty as well as stage 5 and beyond on Normal difficulty.
- Topsy Turvy: Appears in stage 5 and Secret stage on both Easy and Normal difficulties.
- Pink Bomb’s Rod: Appears in stage 5 and Secret stage on both Easy and Normal difficulties.
- Master Rod: Appears in stage 5 and Secret stage on both Normal and Hard difficulties.
- Gold Rush: Appears in stage 5 and Secret stage on both Normal and Hard difficulties.
- Meteor Rod: Appears in stage 5 and Secret stage on Normal difficulty.
- Vanquish: Appears in the Secret stage on Normal difficulty, as well as stage 4 and beyond on Hard difficulty.
- Despair Rod: Appears in stage 5 and Secret stage on Normal difficulty, or Hard stage 5 and beyond.
- Seventh Sea Hope Rod: Appears in stage 5 and Secret stage on Normal or Hard difficulty.
- Monomi’s Ribbon: Starting equipment.
- Freshman Ribbon: Appears in any stage on Easy difficulty.
- Polka Dot ribbon: Appears in any stage on Easy difficulty.
- Red & White Headband: Appears in any stage on Easy difficulty.
- Camellia Hairpin: Appears in any stage on Easy difficulty.
- Bunny Ears Headband: Appears in stage 3 and above on Easy difficulty.
- Feather Scrunchy: Appears in stage 3 and above on Easy difficulty.
- French Twist Ribbon: Appears in stage 4 and above on Easy difficulty.
- Bride’s Veil: Appears in stage 3 and above on Easy difficulty, as well as in most Normal difficulty stages.
- Gold Brocade Ribbon: Appears in stage 5 and Secret stage on Easy or Normal difficulty.
- Pop Star: Appears in stage 4 and above on Easy difficulty.
- Melancholy Ribbon: Appears in the Secret stage on Easy difficulty, as well as in most stages on Normal difficulty.
- 2 Tax Gold: Appears in stage 5 and Secret stage on Easy difficulty, and in most stages on Normal difficulty.
- Magical Ribbon: Appears in stage 5 and Secret stage on Easy difficulty, and in most stages on Normal difficulty.
- BPM: Appears in every stage on Normal difficulty, as well as in stage 3 on Hard difficulty.
- Silver Rabbit’s Ribbon: Appears in stage 5 and Secret stage on Normal difficulty, as well as in most stages on Hard difficulty.
- Swallowtail: Appears in stage 5 and Secret stage on Normal difficulty, as well as in most stages on Hard difficulty.
- Mercurius: Appears in stage 5 and Secret stage on Normal difficulty, as well as in most stages on Hard difficulty.
- Despair Ribbon: Appears in stage 5 and Secret stage on Normal difficulty.
- Autumnal Hope Ribbon: Appears in stage 5 and Secret stage on Normal difficulty, as well as in most stages on Hard difficulty.
- Monomi’s Diaper: Starting equipment.
- Crawley Diaper: Appears in any stage on Easy difficulty.
- Aquatic Diaper: Appears in any stage on Easy difficulty.
- Copyrighted Diaper: Appears in any stage on Easy difficulty.
- Wool Pants: Appears in stage 4 and above on Easy difficulty, as well as in most stages on Normal difficulty.
- Holy Diaper: Appears in stage 2 and above on Easy difficulty.
- Premium Diaper: Appears in stage 3 and above on Easy difficulty.
- Old Man’s Grass Skirt: Appears in stage 3 and above on Easy difficulty. This is the one piece of equipment that you really want to get, since it increases your chance of finding new equipment after defeating an enemy. You should keep it equipped while you’re working on earning the trophy.
- Stealth Scanties: Appears in stage 4 and above on Easy difficulty.
- Normal Undies: Appears in the Secret stage on Easy difficulty, as well as stage 5 on Normal difficulty.
- Cattle Trunks: Appears in stage 4 and above on Easy difficulty.
- Briefs of Resolution: Appears in stage 4 and above on Normal difficulty.
- Ante Panties: Appears in the Secret stage on the Easy and Normal difficulties.
- All or Nothing: Appears in the Secret stage on Easy difficulty, as well as stage 5 on Normal difficulty.
- Ruler’s Underwear: Appears in stage 5 and above on Normal difficulty.
- Bayonet Bikini: Appears in the Secret stage on Normal difficulty, as well as in stage 3 and above on Hard difficulty.
- Orthodox White: Appears in stage 5 and Secret stage on Normal difficulty.
- Mystery Cruise: Appears in the Secret stage on Normal difficulty.
- Despair Diaper: Appears in the Secret stage on Normal difficulty, as well as stage 4 and above on Hard difficulty.
- Hope Cloth Beam 1000: Appears in stage 5 and Secret stage on Normal difficulty, as well as in the Secret stage on Hard difficulty.
Island mode
Cleared Island Mode once
Saw every possible Island Mode ending
In order to see every ending you need to play Island mode at least 4 times (including gathering remaining Hope Fragments) and use Trip Tickets 10 times with each character (if you get all answers right). Also in order to see those endings you must complete the last Monomi request. Should take around 4 hours to do so. On first walktrough i suggest not to bother with what Monomi ask you to do, but simply leveling up your stats and finishing the reports. On the second playthrough collecting shouldn’t be a problem anymore.
Beach
Let’s take our clothes off.
Let’s fish!
Let’s drop some coconuts.
Movie Theater
Let’s sit in the front row!
Hmm, I sort of want a hot dog…
There’s anime!
Shot Through the Heart
Affirmation Bullet – Has that quality
Library
I should probably read some technical books…
This place is dangerous…
This is a great place to kill time.
Movie Theater
I’d rather film than watch them…
Curry-flavored, huh…
Watch a movie about animals…?
Shot Through the Heart
Affirmation Bullet – Have this island under his control
Jabberwock Park
This looks like a great spot for napping.
Let’s sit down for now.
If we break that statue…
Beach
Let’s split a watermelon.
Let’s go fishing.
Let’s make a sand castle!
Amusement Park
Let’s ride the rollercoaster!
This place looks fun.
Do you want to hold hands
Shot Through the Heart
Negation Bullet – Dissapointed
Beach
Let’s go fishing.
Let’s look for crabs.
Let’s swim!
Library
Let’s look for some valuables.
Let’s take a nap…
There’s not much to do here…
Movie Theater
I feel like having a hot dog.
There’s anime…
Maybe we should just go…
Shot Through the Heart
Affirmation Bullet – Nothing more important than food
Movie Theater
A yakuza film, huh…
We need to have popcorn.
3D, huh..
Shot Through the Heart
Negation Bullet – Waste of time
Beach
Let’s make a sand castle!
I guess we could go fishing.
Let’s split a watermelon.
Shot Through the Heart
Negation Bullet – Hate me
Library
All right, let’s look for treasure!
That’s a lot of books.
Shall we study?
Shot Through the Heart
Affirmation – Stand with me?
Jabberwock Park
There’s no one here.
What a weird statue.
Let’s climb that statue.
Beach
Let’s drop some coconuts.
Let’s take it all off.
Let’s build a sandcastle!
Amusement Park
You could take some pictures here.
Do you want to hold hands…?
Let’s ride the carousel.
Shot Through the Heart
Negation Bullet – All I can do is take photos
Amusement Park
Let’s climb that castle.
This place looks like fun.
Let’s go inside the haunted house.
Shot Through the Heart
Negation Bullet – Hate me
Military Base
Let’s ride the tanks.
This is pretty exciting.
Let’s look for fuel.
Shot Through the Heart
Negation Bullet – Too Abnormal
Jabberwock Park
How about some tree climbing?
The scenery is so nice…
If we move that statue…
Beach
Let’s go running.
Let’s gather seashells.
Let’s build a sandcastle!
Library
This is a great place to kill time.
All right, time to look for some treasure.
Let’s read something.
Movie Theater
I’d rather make my own movies than watch them…
We need to have popcorn!
Let’s watch a love story.
Amusement Park
This place looks fun.
Let’s ride the rollercoaster!
Where’s the mascot?
Shot Through the Heart
Negation Bullet – Decide for me?
Jabberwock Park
All right, let’s go running.
All right, let’s pick up the litter.
Speaking of parks, the bathroom…
Beach
Let’s go running.
Let’s swim!
Let’s split some watermelons.
Library
I guess I should look at some photobooks…
All right, let’s work out
Do you want to do some studying?
Movie Theater
It’s all about the salty flavor!
I’m going to go to the bathroom…
A sports movie…
Amusement Park
Let’s ride the carousel.
All right, let’s dash!
Let the games begin!
Shot Through the Heart
Negation Bullet – Doesn’t trust me
Jabberwock Park
The sky is blue.
The breeze is so nice.
Let’s take a walk.
Beach
Let’s make a sandcastle!
Let’s bury ourselves.
Let’s gather seashells.
Amusement Park
Let’s ride the carousel.
We could get lost here.
Do you want to hold hands?
Shot Through the Heart
Negation Bullet – Doesn’t care about me
Jabberwock Park
Let’s climb that tree.
If you break that statue…
Wanna take a walk?
Beach
Let’s make a sandcastle!
Let’s split some watermelons.
Let’s go running.
Library
I’m bored.
All right, time for some hide-and-seek.
Where’s the CD corner?
Movie Theater
We can’t miss out on popcorn.
Wanna watch some horror movies?
Let’s sit at the very front.
Amusement Park
All right, let’s dash!
Let’s ride the rollercoaster!
Do you want to hold hands?
Military Base
Let’s look for fuel.
We could have a live concert here.
All right, time to explore.
Shot Through the Heart
Affirmation Bullet – Aren’t Strangers anymore
Jabberwock Park
Let’s take a walk.
Let’s climb a tree.
Let’s pick up some trash…
Beach
Let’s split some watermelons.
Let’s go fishing.
Let’s make a sandcastle!
Amusement Park
This place looks fun.
Let’s ride the carousel.
Let’s climb that castle.
Shot Through the Heart
Affirmation Bullet – Waiting for an opening
Miscellaneous + Missable Gallery Events
Collected 999 Monocoins
Should be easy (comparing to the first game) if you will raise ~3 pets + coins from Trials you should get it by the 4th chapter for sure
Collected 50 unique presents
Collected every possible present
Presents are obtainable from Monomi machine, vending machine (extra menu), raising a pet. As well you will need to obtain all Hope Fragments and beat all the levels in Monomi mini-game
Hajime Hinata breaks through level 50
Hajime Hinata breaks through level 99
You should normally get it if you are aiming for raising all types of pet achievement and gathering all Hopes
Break through 5000 total number of steps
Break through 10,000 total number of steps
Challenged vending machine 100 times
You will eventually get it from using Monomi machine
Obtained all types of items in vending machine
Buy every type of present at vending machine at least once
Unlocked all gallery items
In order to buy all the Events, Artwork, Music, Movies from the gallery you will need around 1300 coins in total and in order to unlock all the Events you will need to read Danganronpa IF novel after completing the game as well. Also the game have missable events, so try not to miss them as well. In order to trigger one you will need to buy a specific item from the vending machine or be lucky enough and get it at random:
First event: Talk to Kazuichi with the Practice Sword/Replica after Togami asks everyone to gather at the park. The actual event will start after the scene at the park.
If you don’t have present or coins for it yet, don’t talk to Soda yet. Raise a pet, get some coins and then you can buy a gift and trigger the event
Second event: Talk to Mahiru with the An-An magazine the next day, when she’s standing outside the hotel.
Third event: After Mahiru agrees to help Hiyoko and everyone else leaves, talk to Mahiru with the Man’s Nut.
Fourth event: In Fuyuhiko’s hospital room, talk to Kazuichi with the R/C Battler manga. Note: You can only talk to one person during this time, so make sure to only select Kazuichi.
Fifth event: The next day, talk to Hiyoko with the Toy Camera outside the hotel.
Sixth event: Talk to Ibuki with the Summer Festival Tree CD right after that.
Cleared a class trial without taking any damage
Cleared a class trial without having to retry once
Cleared a class trial without using your Concentration skill once
Not so difficult to get all three of them during first trial. Just be careful and save frequently.
Destroyed 100 white noise lines across all class trials
Destroyed 500 white noise lines across all class trials
If you are not playing with any guide you should normally get it by 4th or 5th chapter. If you didn’t managed to get it before completing the game you still able to replay Trials from chapter select menu
EPILOGUE