Overview
Contains beginner tips for S.T.A.L.K.E.R.: Misery.
Introduction
Hey you, welcome to the harsh Zone! Everything is dire here, but we’re are here to guide you through it so you minimize the pure dread and suffering of Misery.
What is Misery? Misery is a full-concept modification for S.T.A.L.K.E.R.: Call of Pripyat, and brings the game to an whole another level of difficulty. It overhauls everything, and adds depth, realism, and a bigger challange than the base game. The only thing that remains the same is the story.
Combined we have over 2,500 hours in Misery, (Majority from Martial.Lore) and we’ve decided to pass our Misery experience to some new recruits.
Got it? Let’s go.
Classes
In Misery, there are 3 diffrent classes. Assaulter, Recon, and Sniper. Let’s go in-depth with each one. The main difference between these, excluding assaulter – is the starting loadout.
Assaulter, this class has to eat and sleep alot. This is inconvenient because there’s a lack of food in The Zone. The sleep downside can be ignored, since you’re at a safe-zone commonly often. But sleeping increases hunger, so it has a knock-on effect on forcing you to eat even more.
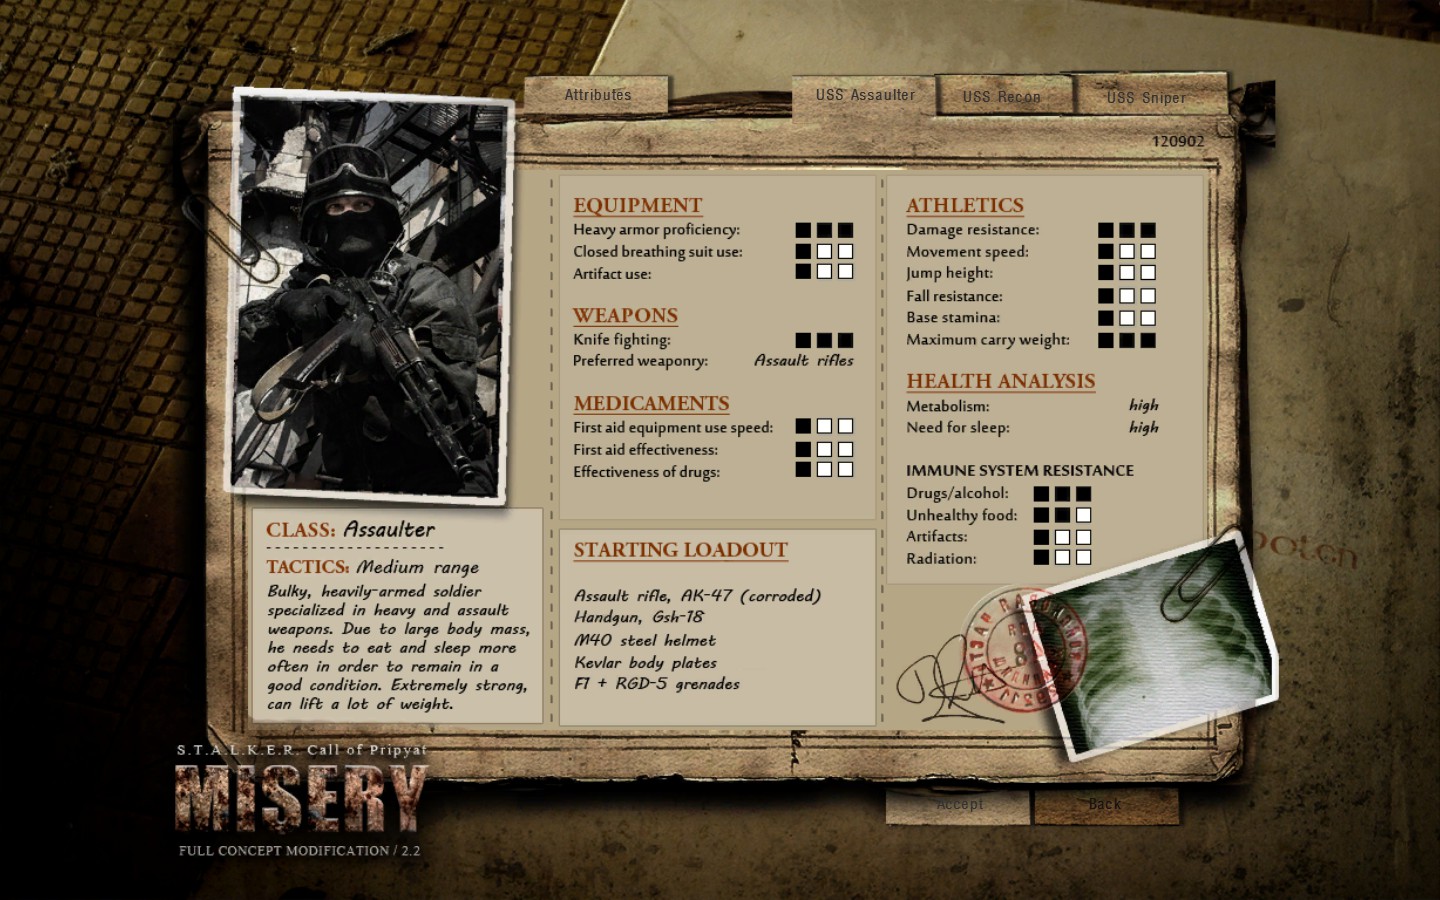
I should also mention that there’s a sleeping bag – so you can effectively sleep anywhere. Though this isn’t exactly desire as The Zone treats everyone harshly. Sleeping in the open often gets you radiation and makes you even more hungry.
The good thing about this class is that you start with an AK-74, albeit corroded, and a M40 steel helmet. You also start with several Kevlar Plates, and a few extra grenades.
Recon, the class we’re most familiar with. It’s my go-to. You don’t need to eat and sleep alot, still not as good as Sniper, but good enough that you don’t need to struggle as much with food. Misery is not about perfect, you can’t get perfect – everything needs to be good enough.
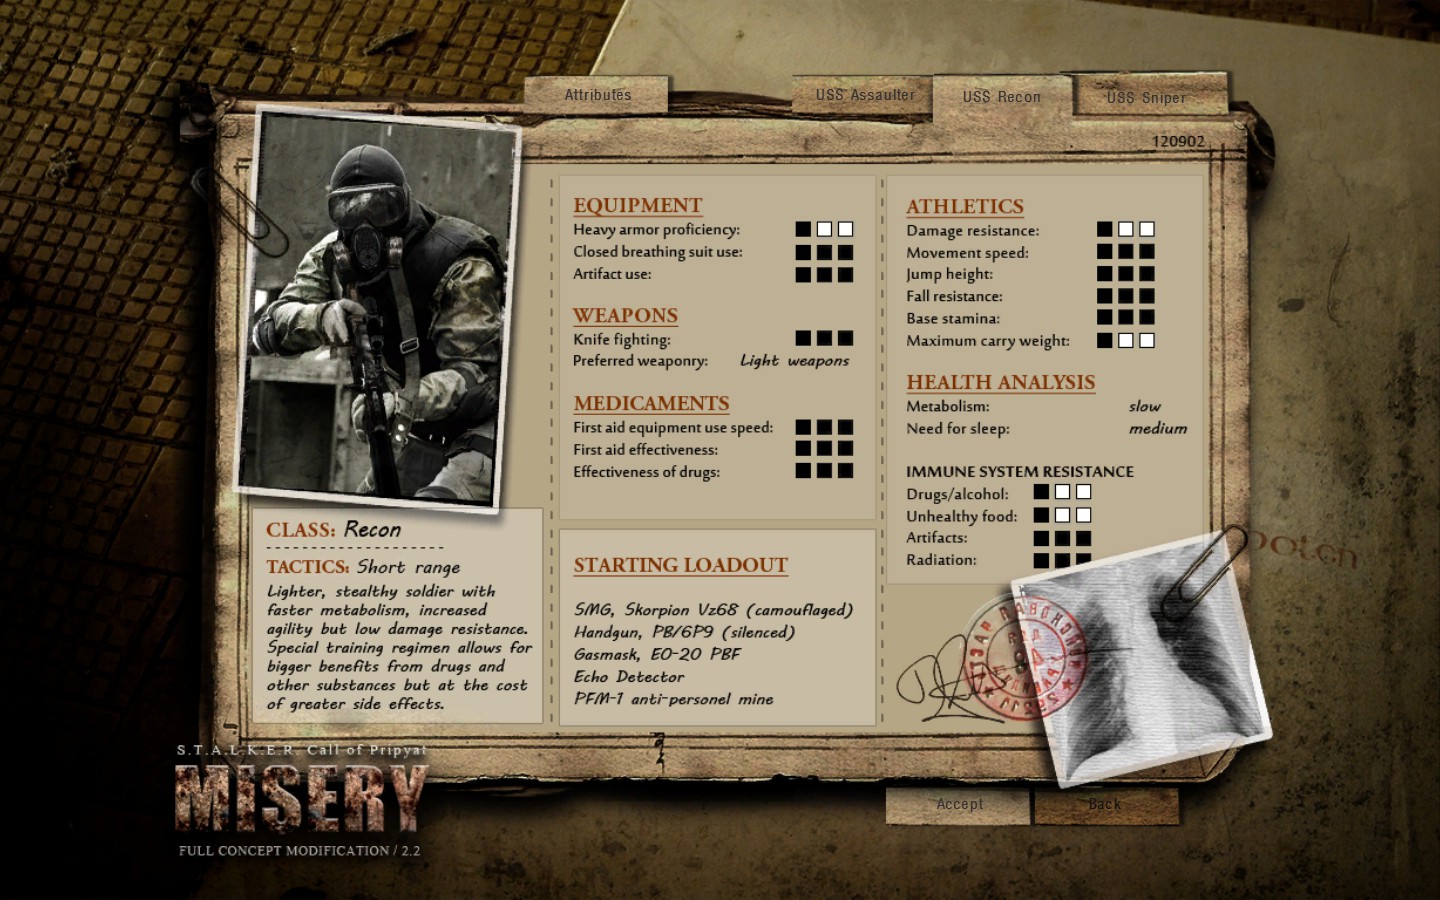
You start with a Skorpion Vz68, a Gasmask – and PMF-1 anti-personel mines. I don’t use these, but they’re worth a good chunk of money.
Ah, the Sniper. A solid choice when you’re not sure what to pick. You barely have to eat and sleep, and you can wield almost any gun. Sniper handles junk food good as well – so you don’t have to get him the top-shelf stuff to survive!
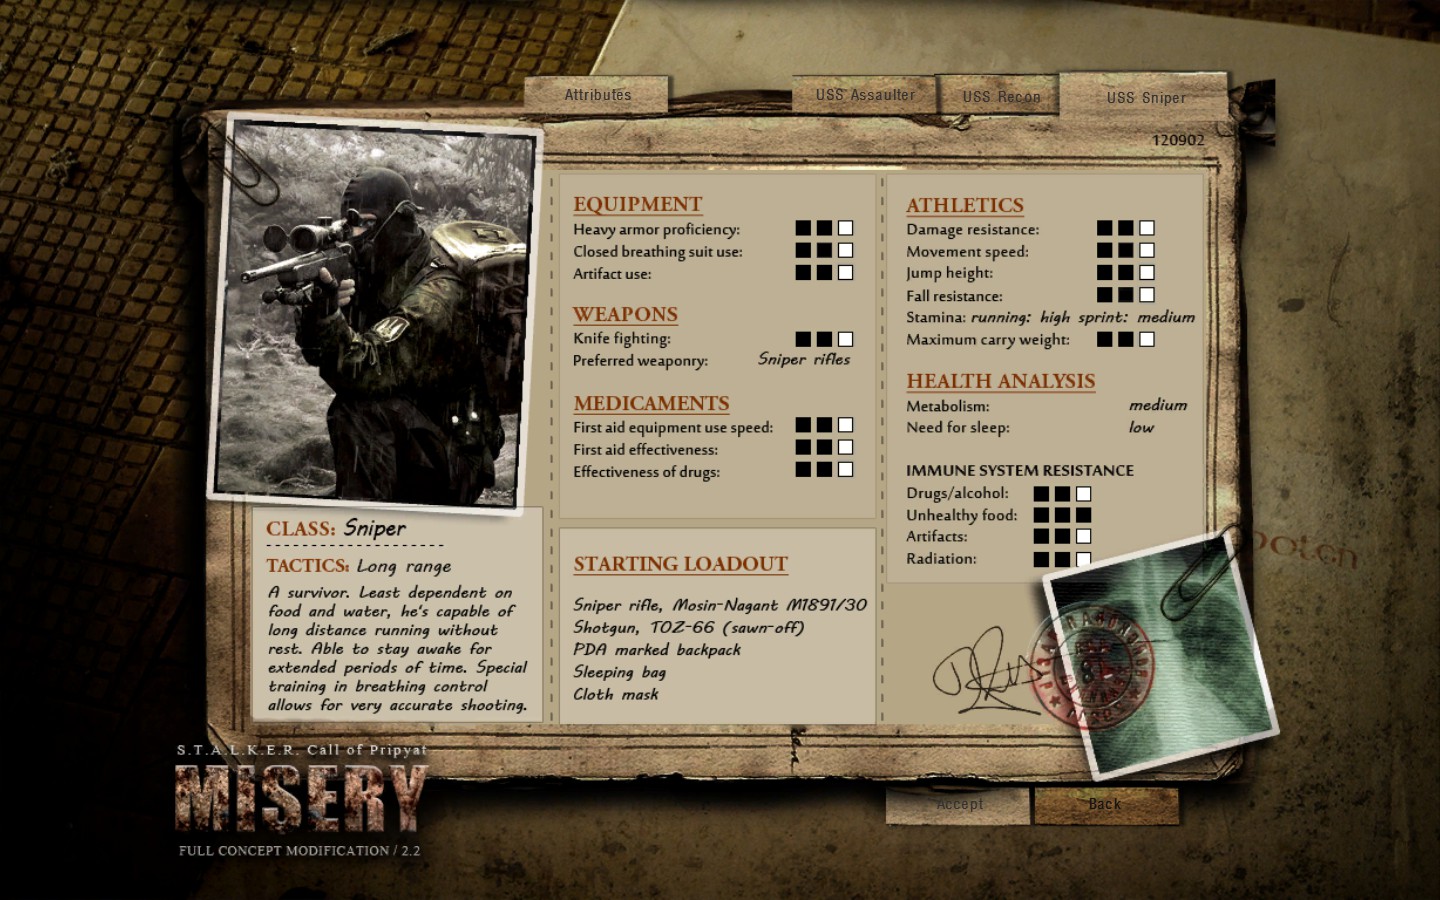
You start with a Mosin-Garant M1891/30, a Sawn-off shotgun, and a PDA marked backpack
User Interface
You’re dead meat in The Zone if you don’t understand how your Inventory works. So let me walk you through this.

This green square represents everything in your inventory.
This is your money. The more you have of it – the better. It can be used to purchase stuff in The Zone.
This is your weight limit. The ”Total” number represents how much stuff weighs in your inventory. The ”Max” number is the maximum reccomended ammount. If you go over this, you won’t be able to sprint for as long, and once you go really over it, you won’t be able to move.
This is your head slot. This is where you put your head-gear onto. It’s separate from the armor piece. Some armors may come with a mask pre-equipped, so you can’t put a separate head-piece onto it.
This is your armor. This is vital in The Zone, try to get the best armor you can afford. A good one will let you survive a few shots while not being insta-gibbed. Don’t get cocky now – you’re no tank even with an Exoskeleton!
This is your primary weapon – or secondary. It’s interchangable with 7. I always like to carry a rifle on me.
This is your secondary weapon – or primary. It’s mainly used for pistols/shotguns.
These are your armor slots. You can place Kevlar Plates. I have 2 now. They stop bullets.
Your quick-access slot. Set the items you want to be able to access in a blink of an eye here. Good to have a medkit and some anti-rads on there.
This is your health bar. It reaches zero – you die. Try to keep it full.
Your bleeding indicator? Is it flashing – if yes, use a bandage. The sooner it stops – the less damage you receive.
Your radiation symbol. If it’s melting – you’re full of isotopes.
Your weapon condition. The lower it is, the more likely your gun is to jam. And if you’re shooting at someone, or something – it’s a major inconvenience, and will likely result in you dying.
Basic Controls
You download this mod – and you’re all confused. Pressing L doesn’t turn on your flashlight, there’s so many items – how does even pitching a tent work? Well strap in, we’re gonna tell you all about it.
First off all, L does nothing since it’s your headlamp. You only have a very bad wind-up one. If you open your inventory by pressing I, you’ll see that your detector slot is occupied by it. Press O to bring it up. You can only use it in combination with one-handed weapons.
You’ll also be using low-crouch alot. It’s ctrl+shift. You’ll go alot lower than the usual crouch, and this can save your head from getting popped. It is also necessary to reach many stashes.
Open your inventory by pressing I, and right clicking on anything will open a menu. You’ll be using this alot. This is where most of your control item-wise lays.
General Tips
Now, you’ve chosen a class, know how the UI works – got your flashlight out and you’re ready to go!
These tips will help you immensely.
Act like you’re in The Zone. Never lose focus – the moment you die, a bloodsucker will sneak up on you and chop you to bits! Now we don’t want anything like that to happen, do we?
A few things that help me concentrate are:
- Shutting off the lights
- Closing the door
- Playing at night
Play as you’re in The zone.
Well, I always go for an Ironman run – so saving alot is only to prevent losing progress in case of a crash. But if you’re new, you’ll be dying. Don’t rely on quick saves. Hard saves are your go-to.
Losing super hard? Run. Why die a sad slow death, while fighting a lost battle – when you could abandon ship and run. What is more valuable, some super bad condition pistols, or your stalker life?
Don’t be greedy now, the reward won’t be cool enough to justify the risk. I can’t count how many times my Iron-man run ended since I was a bit too greedy, yeah. My 5 hour playthrough gone since I wanted to get that low condition AKM.
Good gear is expensive to upkeep, a few fights pass – and you have to repair it. It’ll cost an arm and a leg, but if you have really good gear early on, it’ll ruin you.
You aren’t that good, nobody is. Trying to take out a merc squad will end in nothing but disaster. The only time I think it’s acceptable to start fighting is unless you’re behind a lone stalker – shoot him in the back of the head. Your life is more valuable than his. The Zone is harsh.
Yeah, the blazing siren is super cool – and it warns you about an incoming emission. But it’s smart to keep one eye on the sky, the sky ripping in half and turning orange isn’t normal.
Sell your excess stuff. You won’t need 20 tubes of glue, I can promise you that.
Weapons
In Misery, there are alot of weapons…

Which ones should you use? Well there’s no defined best, but there is one that is my go-to early on.
AKM, a classic. You can’t go wrong with this – if you get a full condition one early on, you’ll be able to deal with humans in no time. Simple but reliable. Easy to upkeep, which is important since repairs cost alot.
Upkeep is important. In order to have a reliable weapon that won’t jam when you pull a trigger. Don’t want it jamming when you’ve got it to a bloodsuckers skull now, don’t we? You can use repair kits to repair your weapon. If you find any, keep them at your Safe Box. Don’t carry them around – they weigh alot, and you never fire enough bullets to justify bringing a Heavy Repair Kit with you.
You can use any weapon you want – and effectively too. Proficiency helps you, but isn’t a deal-breaker when shopping for a new gun.
Save money, use standard rounds for mutants – and use Armor-Piercing rounds for hostile enemies. Always aim for the head. A shot or two will bring any human down.
Always carry two weapons that use different ammunition, it’s practical. One runs out, switch to the other. The best choice most of the time is a shotgun and a rifle.
Hostile NPCs can seem terribly proficient at killing you with them–few things are as horrifying than seeing them launch a rifle grenade towards you, and when you see a bandit’s arm go back, you know you want to make that headshot or move fast. However, grenades are also very useful for you. You can slow a pursuing pseudogiant with a well-timed grenade thrown in its path. A couple of rifle grenades are probably the most effective tool to stop a chimera. Snorks don’t like them. A grenade dropped in the vicinity of a dog pack or a bloodsucker swarm will improve your morale greatly. And burers can’t deflect rifle grenades at all. If rifle grenades are not yet available in store (early game), you could meet a friendly stalker in the Shadovsk who carries what you need.
This guide doesn’t go in-depth with everything. It’s a beginners guide designed to get you to learn the ropes quickly.
Armor
Armor in Misery is really important. Getting a new suit isn’t as flashy as getting a new gun – but I’d argue it’s more important. Sometimes, you get shot. Nobody is perfect – but with armor that shot can prove to be just an injury rather than a lethal mistake.
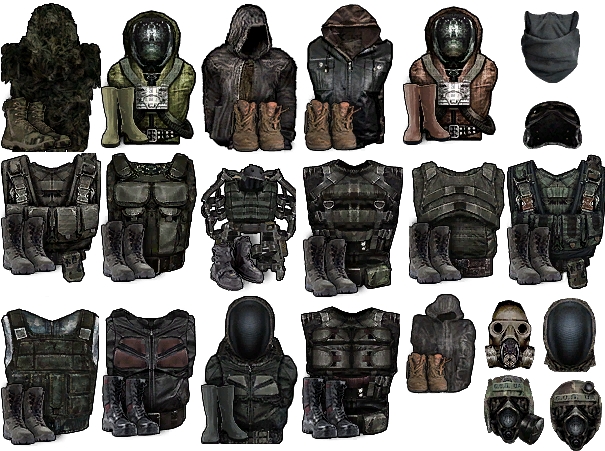
If someone damages your armor a bit too much, it’ll cost so much to repair it. Always keep some repair kits in your Safe Box, and if you’re a bit richer – you’ll have PDA Marked backpacks scattered around The Zone with some basic supplies.
These damage your armor so much, especially the thermal ones. It’s advised to stay away from them unless absolutely necessary.
Zaton
Safe-zones are marked with green, normal areas with yellow, and anomalies with red.
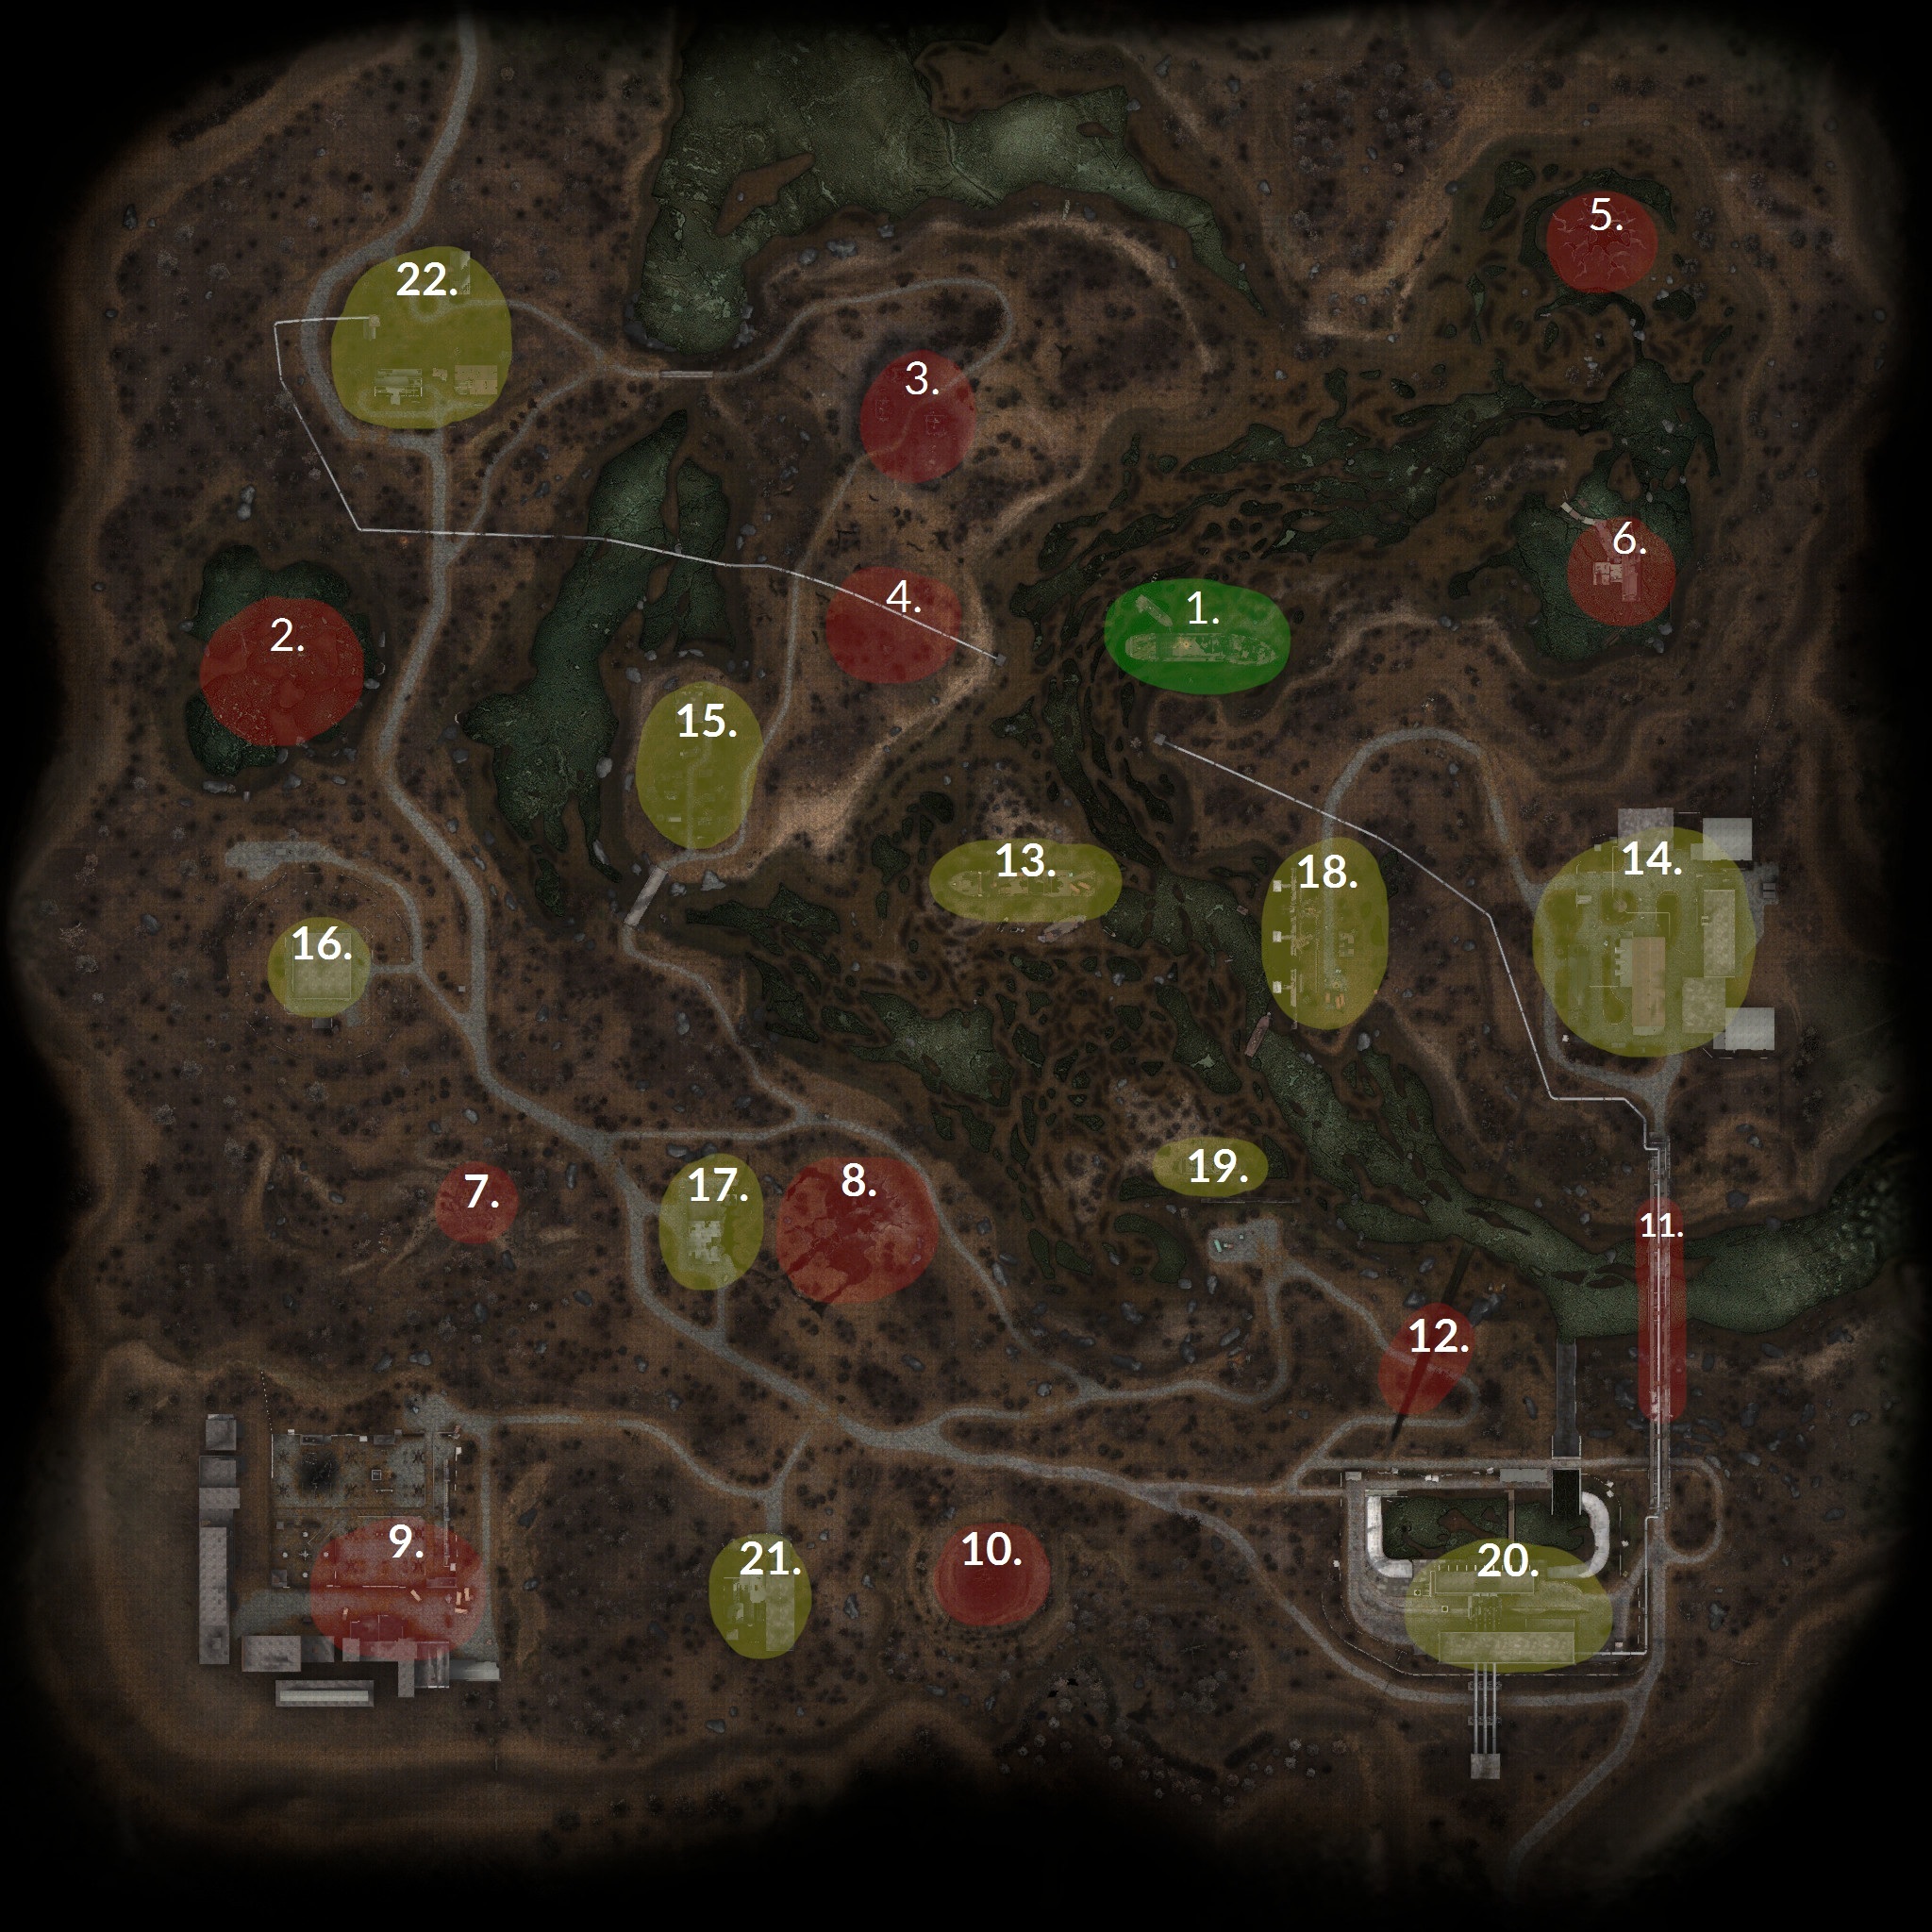
The Skadovsk. The only safe area in Zaton. It’s a ship inhabited with all kinds of people but these are the notable ones.
- Beard, sells general supplies and is the leader of Loners.
- Owl, sells military supplies – ammo, guns etc.
- Tremor, the Skadovsk’s doctor, sells medkits and medical supplies.
- Cardan, the person who will repair/upgrade your gear.
- Pilot, the ”Guide” between Zaton/Yanov. This is your ticket out.
- Sultan, the leader of the Bandits.
Get used to this place, it’s the closest to home you’ll get in the zone.
The Swamp. Location of Stingray 5 surrounded by Acid and Gravitational anomalies. Use chemical resistance drugs and have a decent mask when approaching.
Burnt Farmstead. Full of Burner anomalies, you’ll take alot of Thermal damage here – so be prepared.
This part is underground. There are Acid, Fire, and Gravitational anomalies. A few good artifacts can be found here, but apart from the ”Three Comrades Quest”, there is no use here.
Boiler anomaly. Burner anomalies here, but it’s a gold-mine of artifacts. When approaching you’ll see a scripted scene.
Dredge Station. Part of a side-quest[stalker.fandom.com] given by beard. Some gravitational anomalies here.
Oakpine Anomaly. Full of acid anomalies, also an artifact gold-mine. A gas mask can be found near here.
Claw anomaly, near the fueling station – contains a few springboard anomalies. Deeper into the anomaly you can find a metallic case in a care, when opened it contains a few very valuable items.
Iron Forest. A radioactive ruin full of electro anomalies. This area is fairly dangerous – the mutants you can encounter here are:
- Controller
- Bloodsucker
- Snork
- Zombie
- Poltergeist
Sounds complicated? No, not really – but there are always a multiple of the mutants here. A few dozen snorks, a few dozen zombies. To examine Stingray 2, you need to snipe the controller from afar, and cheese the bloodsuckers by jumping on and off the nearby trucks.
Circus Anomaly. Bizzare sight, two comets flying around in a circle, pyrogeists can often be found here – and even an odd Controller can be encountered.
Preobrazhensky Bridge. It’s a home to an abandoned convoy. Good loot can be found here with little, to no danger. You need to buy keys from owl to get a Gas Container from here.
Scar Anomaly. Looks like a huge scar in The Zone, high psy-levels are found here, coupled with some Electro anomalies.
Shevchenko. Old tanker, many loners are found here. Coupled with some of the most awesome stashes in-game. There are a total of 3 stashes here, and you can find loads of goodies here.
Ranger station. The mission ”Transaction[stalker.fandom.com]” takes place here. Good place to take cover from emissions here, Bandits are camped out before this mission – and after it’s often populated by Loners.
Izumrudnoye. Filled with mutants, also some nice stashes here. Good place to hunt some flesh when you’re low on food.
Krug Antenna Complex. It’s a bloodsucker lair, I don’t dare to take a step in this god-forsaken place. Used as a sub-mission of the bigger quest ”Missing Stalkers”.
Fuelling Station. An abandoned gas station. In the near proximity of this you’ll always see a flesh or two.
Dock Cranes. Old dock in Zaton. A good place to scout out your surroundings. You’ll always see a few people here just chilling by the camp-fire.
Old Barge. Home of Noah[stalker.fandom.com], a crucial person to speak to if you want to get to the Southern Plateau to examine the fallen chopper.
Waste Processing Station. Home of a mercenary base, Owl sends you here to get some top secret documents. But don’t tell anyone – they’re top secret.
Substation Workshops. Home of another mercenary base. To get in here peacefully you’re forced to give away a bit of food.
Sawmill. Really dangerous zone, full of zombies. Stay away at all costs – only approach when necessary.
Yanov

Yanov station. One of two safe areas on this map. Notable people here are:
- Hawaiian, the local trader – sells food, drinks, weapons, armor, everything.
- Bonesetter, the local medic – he sells medical supplies.
- Shulga, leader of Duty.
- Loki, leader of Freedom
- Nitro, the local technician
- Trapper, the local legend guide – he tells you about the mutants. Speak to him if you’re interested.
You’ll be spending most of your time here.
Quarry, full of acid anomalies. A landmark because of the huge excavation machine.
Substation. An abandoned train-station, hasn’t seen a train in years. It’s good to take cover from the odd emission.
Cooling Tower. As you run by the Cooling Tower you may often hear fragmented radio communication coming from somewhere in the vicinity, sounds like distress calls… If you work for the scientist you’ll soon find out why.
Ash Heap Anomaly. Looks like an old graveyard, but with the Burner anomalies all around – it’s now a crematorium.
Crashed UAV. Talking to the people in Yanov Station will reveal that there is some rumors of a ”UFO” flying around. Searching it will yield a Memory Module, when decoded it reveals the location of the three Strelok stashes.
Kopachy village. This area is really great for killing zombies and stealing their gear. There are some rumors that mercenaries do their dirty deals here though…
Scientist’s Bunker. This is an another safe-area. Notable people here are:
- Hermann, the big bad wolf. Gives you good paying side quests, sells super rare medical supplies.
- Novikov, technician of the bunker. Doesn’t do regular upgrades, but does more advanced psy one.
- Ozersky, second to Hermann – gives you the Oasis side-quest.
Also this is the base of the Ecologist faction in The Zone.
Volkhov AA Complex. There’s a loot room in here, you can find a note and fight through some rodents and a Burer. Sometimes a controller spawns, but it’s rare.
Anomalous Grove. Full of acid anomalies, don’t go in unless you have good headgear. Location of the strange plant.
Duty Warehouse. Unmarked location, if you give Morgans PDA to Loki, good loot will come to you.
Plavni Anomaly. Full of acid anomalies, bloodsuckers spawn near here.
Cement Factory. This is a sight to behold. A factory ruined by the second Chernobyl disaster. There are radio materials here – and it’s the center piece for the ”Radio Materials for Nitro” quest. Also contains one of the Strelok stashes.
Bitumen Anomaly. Looks like a huge crater near Jupiter Plant. It has alot of Burner and Vortex anomalies.
Eastern Tunnel. If not for the mutant lair – it would be just the place for stalkers to gather.
Parking Lot. Hasn’t seen a car in years – full of Electro Anomalies.
Checkopint. A hideout for bandits, with the leader of Jack.
Jupiter Plant. Important story location, a radio development factory – now used for research of ”Item 62”, aka ”Gauss Rifle”. It serves as the entrance to the Pripyat Underpass.
Ventilation complex. No notes.
Oasis. Home of the ”Hear of the Oasis” artifact.
Entrance to the Oasis. Guarded by Zombies.
Helipad. Home of Stingray 1, surrounded by mines. Caution when approaching.
Container Warehouse. Location has been infested by bandits, lead by Sishak.
Monolith camp. No-one hostile here, approach them and they’ll ask you to ask around in Yanov Station for a new home.
Pripyat
This is Pripyat, and since it’s a beginner guide we won’t be going in-depth with the locations. Just the names and a few notes. More info will be added in the future.

Laundromat, only safe-zone in Pripyat.
Apartment complex.
Department store.
Grocery store.
Book store.
Kindergarden.
Schorched earth anomaly.
Yubileiny Service Center. Contains the entrance of X8.
Hospital.
School.
Vine Anomaly.
Old Service Center.
River Port.
Prometheus Movie Theater
Mutants
The Zone is well populated with mutants, ALL of which can kill you if you are careless. Never take for granted that an area is clear of danger. The best way to die a useless death is to stand in one spot admiring the view. Use your eyes and ears and stay alert at all times.
Mostly harmless. But a pack of flesh will attack and overwhelm you if you are slow.
Much faster than you. They hit really hard but don’t like going into bushes for some reason. So if there are no boulders to jump on, find a good-sized bush!
Mostly annoying. Also quite hard to shoot due to their erratic movement. They can also knock you off a rock if it is too small. A large pack can hold up your progress for quite a long time.
Deadly. Like boars crossed with dogs. They are relatively quiet so keep your ears alert for their snarl as they run up behind you. One alone will rarely cause problems but a small pack is another thing.
I hate them. They don’t care if you’re on a rock. Just don’t let them get close. Drop an antipersonnel mine, a rifle grenade or fire a solid burst as they run towards you. If there is more than one, drop everything and run, preferably towards some friendly stalkers.
These guys creep me out. They aren’t a huge challenge if you’re prepared, but you’re almost never prepared. Keep an eye on your surroundings, if you see a shimmer in the air – shoot, don’t think.
Don’t look at them. If you have a line of sight to them, close it – take cover. If possible, snipe them from afar.
They are really annoying to deal with, and if you aren’t equipped correctly – can be lethal in most cases. If you do not have a shotgun, try to escape – since killing them with a rifle will be too costly – and in most cases your attempts will be fruitless.
This section is WIP.
Performance
Okay, you realised how to play the game – but it stutters like hell. What now? Well, don’t worry, there is one simple tweak that will reduce the CPU usage of Misery and help you to run it more smoothly.
Right click on your game, go to properties, local files – browser local files. Then follow this path.
gamedata>configs>alife.ltx
When opened, find this string.
switch_distance = NUMBER HERE ; 300 ; 950 ; 150 ; 350 ; 450 ; 500 ; 550 ; 600 ; 850 metres
Number is a variable, in your alife.ltx it’ll look different. Replace it with 150 – that’s the vanilla valule. So what is it? Beyond the distance of 150 meters people will be only stored in memory, it’ll decrease the stutter. Some downsides persist, if set too low, enemies will not spawn. Don’t go under 100.
This will be easier with Notepad++.
The End
Well this is it, the end. It’s been quite the ride stalker – but now you’re ready to go out there!
Still think you’re not quite ready? Want to hone your skills even more? We’ve compiled a list of extra guides that’ll help you survive in the harsh Exclusion Zone.
- Official Game Guide[themiserymod.com]
- A Misery Handbook
- Yasti’s Gameplay Tweak Compendium
- Hunting Guide
More will be added in the future. Keep in mind most of these guides are out-dated. I’ll personally make sure to update our guide with each new release.
NOTE THIS GUIDE IS STILL WIP