Overview
A guide all about building Railways to support your mining operations.
Introduction
In any given game of Factorio, sooner or later, you will run out of resources in your starting area. In order to expand to more distant resource patches and bring them back to your base, railways can be built to quickly move large amounts of both solid and fluid resources via trains.
Railways are a complex topic, and can be a stumbling block for new players, even with the in-game tutorials. Sometimes they can seem to refuse to work with no apparent reason! This guide is intended to sum up everything I learned building my first serious rail network in Freeplay, presented in as much detail and with as many examples as I can.
So make yourself a tea, and let’s dive in!
But trains are hard! Can’t I just use belts and pipes?
The answer to that question is, “Yeah, you could… but there are good reasons not to.” These are as follows:
- Belts are slow. Even blue belts will take a while to transport resources over very long distances. A very long belt line such as this will also be expensive to construct, both in terms of resources and time.
- Belts have limited throughput – your basic yellow belt only moves 15 items per second, which just isn’t enough to fuel a growing factory. Pipes suffer from a similar problem, in that their internal pressure drops as fluid travels over long distances, reducing your end throughput to a trickle (although this can be mitigated with Electric Pumps).
- Belts and pipes are vulnerable to attack. If even a single section is destroyed by Biters or a carelessly-thrown grenade, the supply will be cut until the damage is repaired.
Trains avoid all of these problems: they can move fast over long distances, offer very high throughput of resources, and are extraordinarily dangerous to anything foolish enough to stand in front of them (including the player – more on this later!). However, they do require a bit more leg-work to set up than transport belts, especially if you intend to run multiple trains on the same tracks. For now, let’s start with building a single rail line between two points, in order to supply our factory with resources from a mining outpost.
Getting Ready
In order to start building a railway, the Railway technology must first be researched, needing Red and Green science packs. This unlocks Rails, as well as the Locomotives and Cargo Wagons to run on them. To move fluids such as Crude Oil by train, Fluid Wagons must be used, unlocked by researching the Fluid Wagon technology (also needing Red and Green science). Finally, to set up stations for our trains using Train Stops, the Automated Rail Transportation tech is required, requiring Red and Green Science to unlock.
I strongly recommend automating the production of Rails; depending on your situation, you might easily need a few hundred to reach your desired resource patch. You’ll also need some other bits and bobs before you start:
- The Locomotives and Wagons to make up the train.
- A couple of Train Stops (for our train to stop at).
- Fuel and equipment to extract and move your target resources (Mining Drills, Pumpjacks, Belts, Inserters, Pumps, etc.).
- If you’re playing with Biters enabled, your new territory will also need defending with Turrets and Walls.
You will also need to consider how your mining operation will be powered. A standard solution is to run Big Electric Poles from the main factory alongside the rails to the outpost. Alternatively, one might consider an independent local power network with Solar Panels and Accumulators.
How to Build A Single-Train Railway
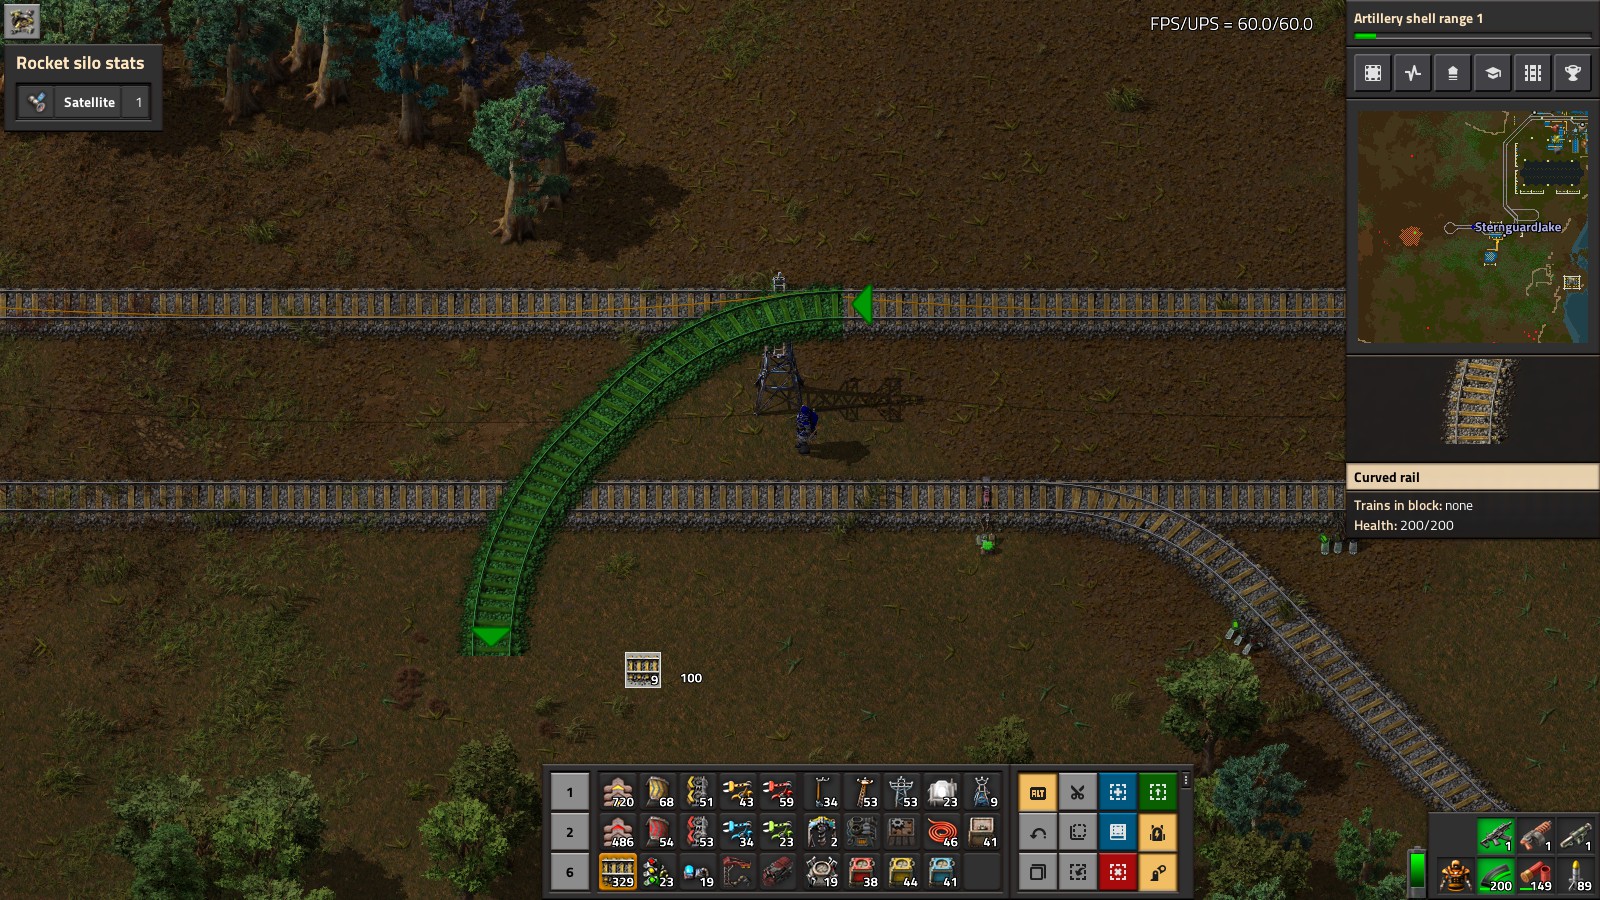
Once you have a few stacks of rails, we can start laying our track. Tracks can be placed in a similar manner to belts (and rotated with the R key), or by using the rail planner. To bring up the rail planner, mouse over a placed section of rail and click the green arrow that appears, then move the mouse to draw out a new section of rail. Once you’re satisfied, you can then click again to place the rails. This latter method is the only way to lay curved sections of rail.
Later on, construction bots can easily build railways with the appropriate blueprints. If you’re building a new line in the wilderness, Personal Roboports will be needed to host the construction bots.
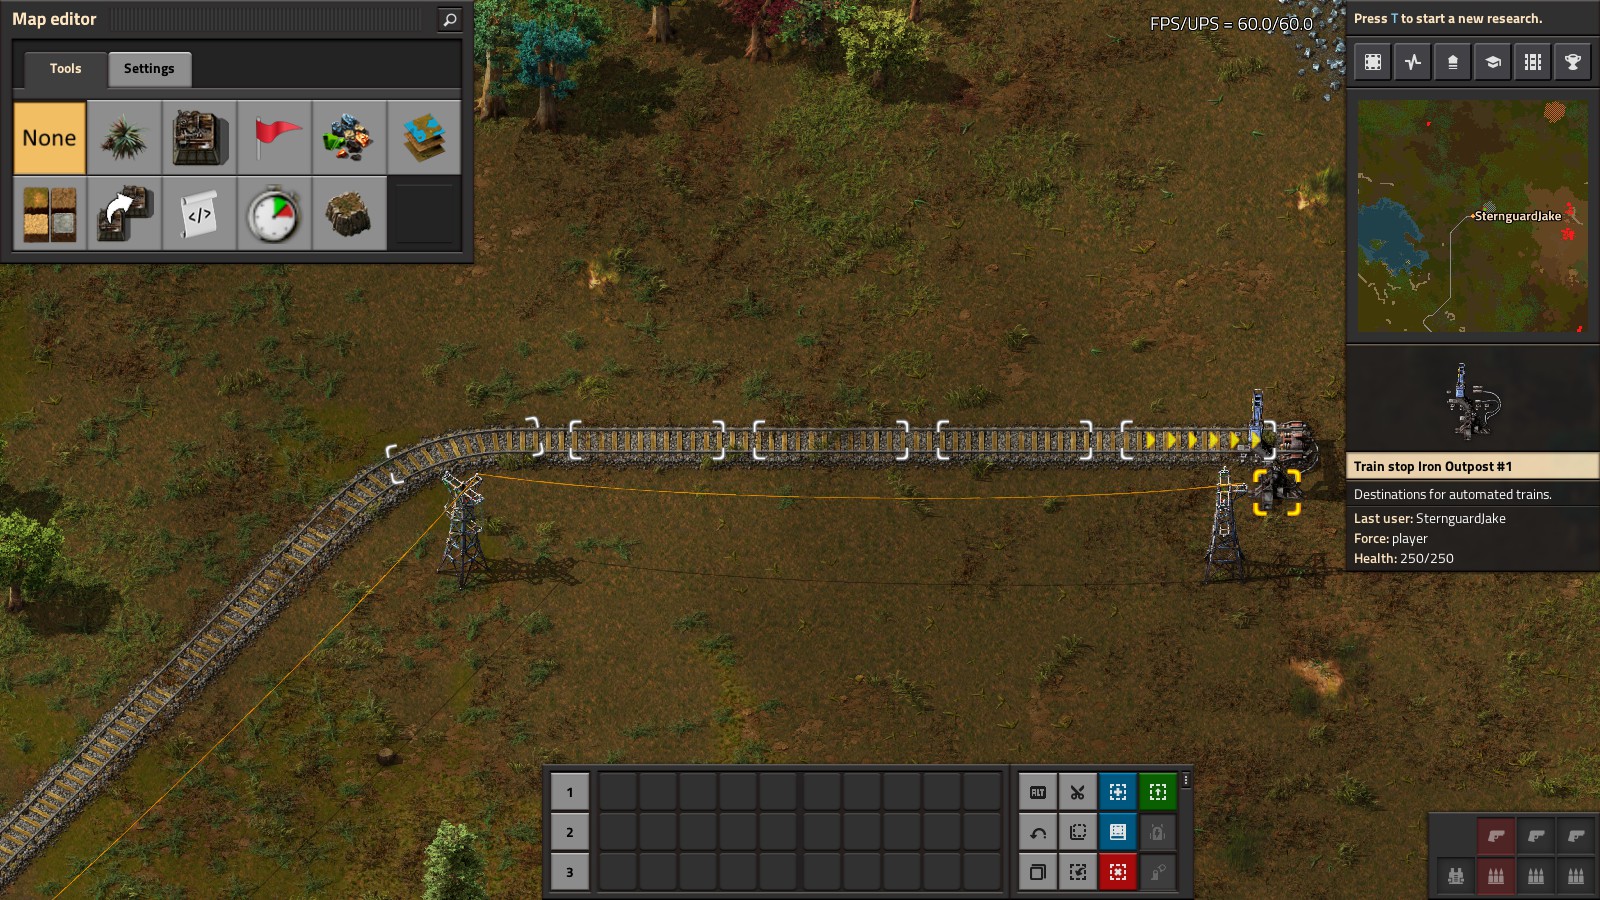
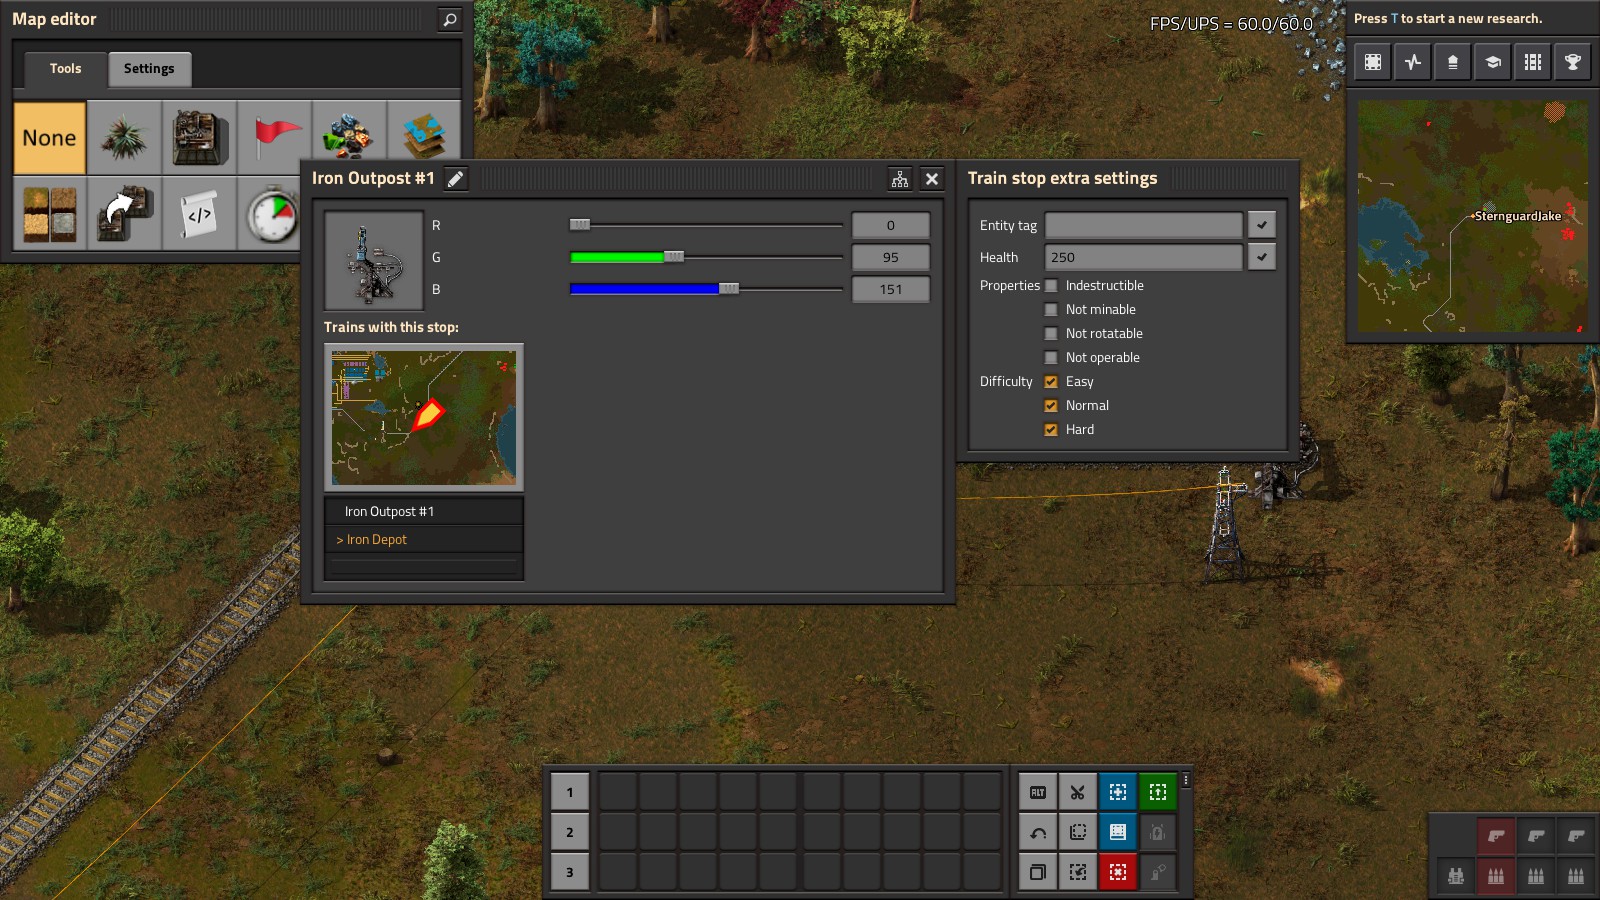
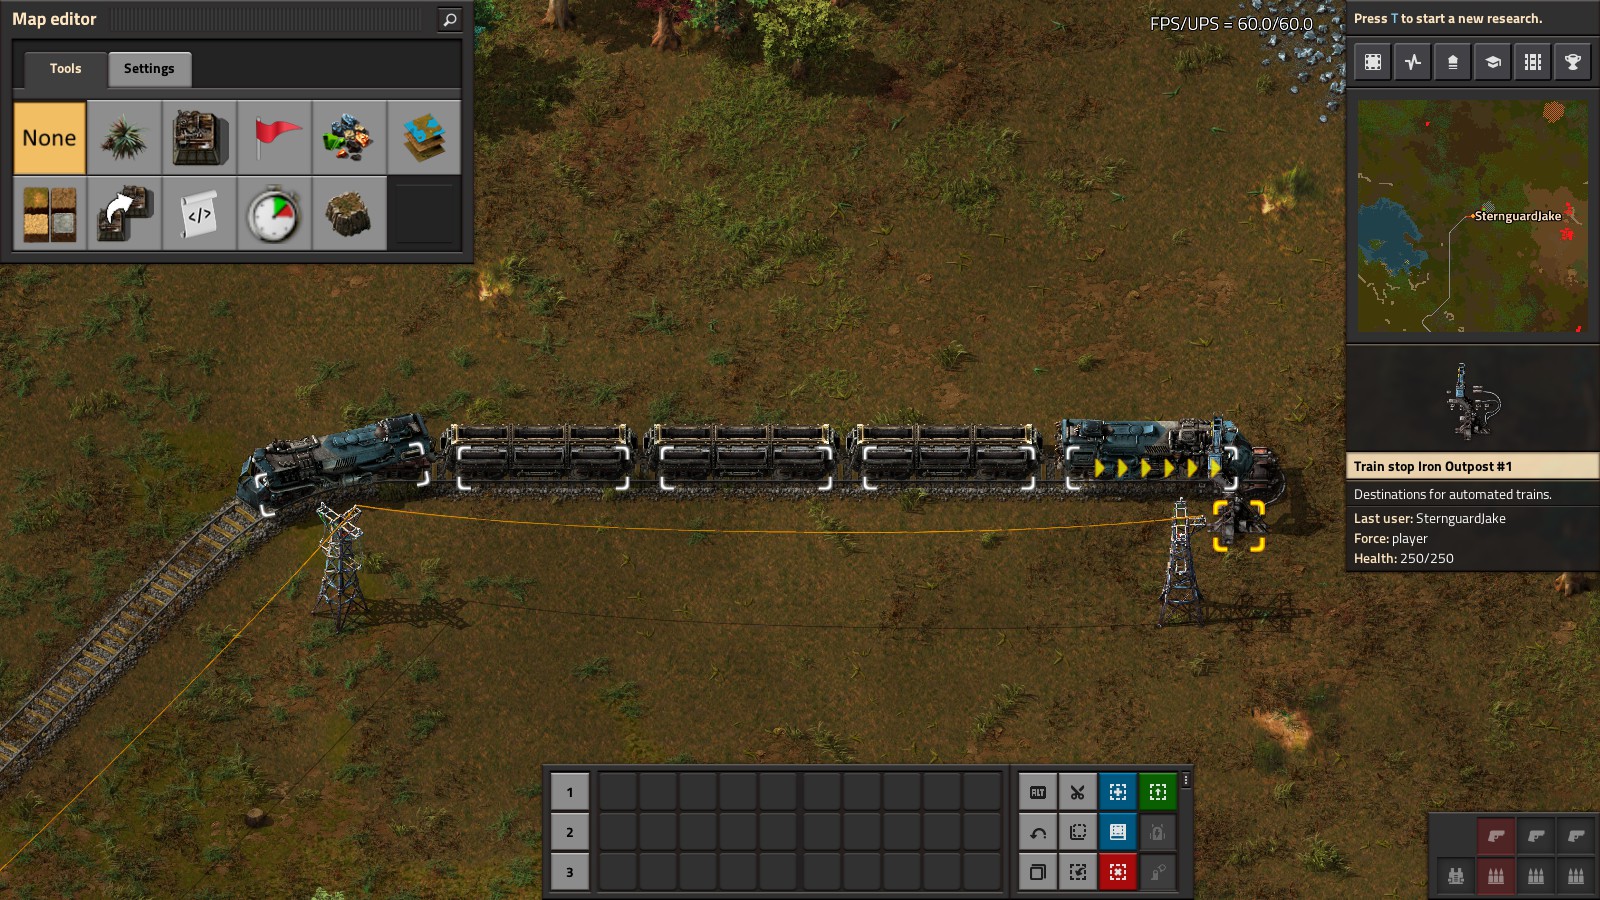
With the track laid and power brought over, we can now place our train! But first, it needs somewhere to stop – in this example, a Train Stop is placed at the end of the track. As Factorio was developed in the Czech Republic, stops must always be on the right-hand side to be visible to our trains. Once placed, you can click on the stop to give it a suitable name (in this case, Iron Outpost #1, as this will be an iron-mining site), as well as a colour using the sliders or RGB values. Once you have train(s) using this stop, they will also be displayed in this panel.
Mousing over the Stop will show the direction of travel (yellow arrows), along with several white boxes – these are a visualisation of the size of a train at that stop. You can adjust the default size in Settings, so you can make sure that your station will definitely be big enough for your train. Trains placed will then snap to the stop, allowing you to build your station around it in the right place on the first try. The last thing you want is to fill your station Storage Tanks with 100K Crude Oil, only to discover they need to be shifted one tile over…
At this point, we need to consider how big our train should be, and what direction it should run in. Including more wagons means the train can transport more resources at a time, but it will also take longer to accelerate to its top speed – those wagons are heavy! Using multiple Locomotives to pull the train can mitigate this. Longer trains will also need appropriately larger stations to receive them.
In this basic example, our train needs to be able to travel in both directions; one way to the outpost, and then back along a single line. This means we need to place a Locomotive at both ends of the train, so it can travel automatically in both directions. This is inefficient in terms of acceleration, as the driving locomotive will have to pull both the wagons and the trailing engine (which will not help move the train), but it has the advantage of keeping our network simple, which is what we want when starting out.
The screenshot above shows a 1-3-1 train (Locomotive – 3 Wagons – Locomotive) placed at the Train Stop. I adopted this train configuration for transporting ores in my first Freeplay map, with 1-2-1 trains for moving Crude and other petroleum products. These are by no means the only way to configure your trains; experiment and see what works (and looks) best for your situation.
You will have no doubt noticed the “No Fuel” icon flashing over your placed Locomotive(s) by this point; they are burner devices, and therefore need fuel to run. In the early game, this will be either Wood or Coal, but later on, better fuels such as Solid Fuel blocks will become available. For now, you can manually load up to 3 stacks of fuel; an automated solution is presented later in this Guide.
The First Station
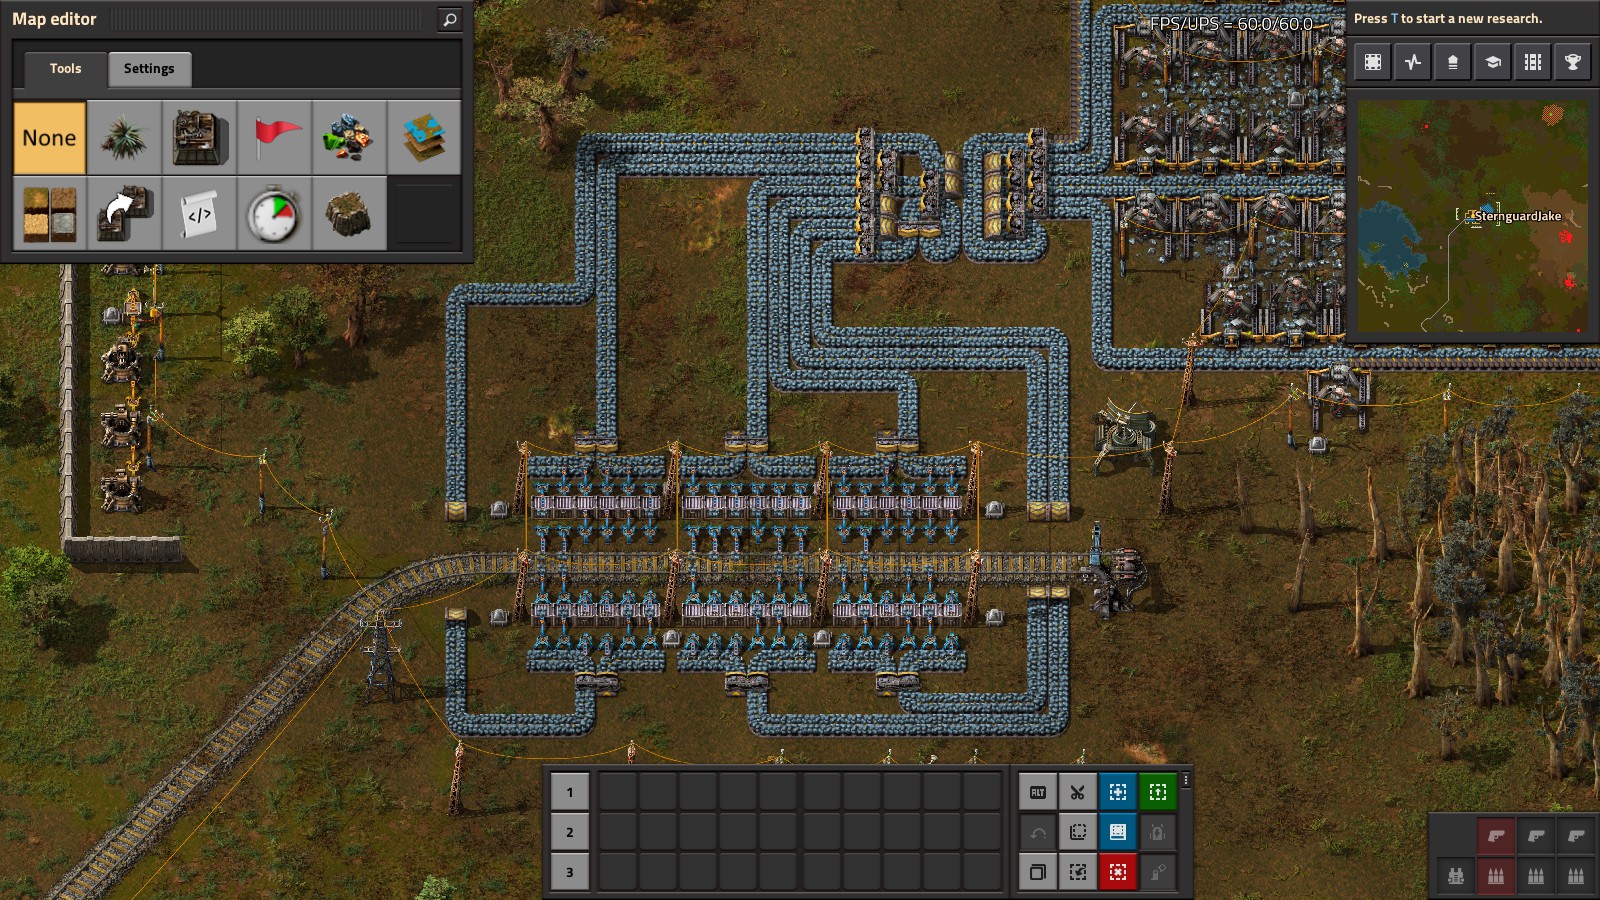
Now that our train is placed and fuelled, it needs to be loaded with cargo. The screenshot above shows the initial Iron Outpost in operation – the Mining Drills output onto two Yellow belts, each of which is fed into a single Cargo Wagon via a set of six Fast Inserters. Each belt is split before loading to distribute the ore more evenly, speeding up the loading process.
Cargo Wagons can hold up to 40 stacks of resources, so a set of Steel Chests is also included as a resource buffer. Iron ore can accumulate in these while the train is travelling back and forth between stations, giving you a big reserve of resources to quickly load into the train when it arrives. A pair of Radars give map visibility, while sets of Gun Turrets and Walls have also been built to protect the station from attack.
The screenshot above shows a second example station, this time for unloading Oil. To load and unload Fluid Wagons, Pumps must be placed, with each wagon able to support up to three Pumps. When a train arrives at the station, they will connect to the wagon(s) automatically as shown and pump the Oil into a set of buffer Storage Tanks, ready to be refined. It is also possible to barrel fluids and transport them via Cargo Wagons, but I wouldn’t recommend this for a beginner for several reasons. Extra infrastructure is needed to fill and empty the barrels, a longer loading time is needed, and to cap it off, a Cargo Wagon full of barrels has a lower capacity than a Fluid Wagon.
Once the train is fuelled and loaded, hop into it using Enter and use WASD to drive back to base, where you can repeat this process to set up an unloading station for your precious cargo, with a second Train Stop.
Setting Automated Train Routes
Although our train line is now functional, at the moment it has to be manually operated. While it is excellent fun to whizz across the map at the helm of hundreds of tons of steel, it is obviously not an optimal solution. Fortunately, we can set up an automated schedule for our new train using Train Stops, allowing it to automatically run back and forth to deliver resources.
Clicking on the Locomotive will bring up the route planner screen, shown above. At first, your train will be set in Manual mode. To set up an automatic route, click the “Add station” button to add two or more stations to the train’s route, along with a wait condition. The screenshot shows a simple back-and-forth path; the train empties its cargo at the Depot, travels to the mining outpost and waits until its cargo is full, at which point it travels back to the unloading station. Multiple conditions can be specified for a stop using the AND and OR operators, e.g. depart when cargo is full or after three minutes, whichever is sooner.
Temporary train stops can be placed on this window using CTRL+Click, which can be used to remotely order a train to a specific location. Upon arrival, the stop will disappear after five seconds. The Locomotive’s colour can also be set from this screen.
With automated trains, we also need to consider automated fuelling; the last thing you want is for fuel to run out and strand your cargo in the Biter-infested wilderness! My preferred solution is to set up chests holding 10 stacks of fuel for each Locomotive at the train’s unloading station, as shown in the example Oil station in the previous section. Each of these are hooked up to a Programmable Speaker, which will broadcast a global alert if the fueller chest becomes empty. It requires some manual set-up and occasional resupply, but will happily provide localised refuelling once built. The fueller chest(s) can then be upgraded to Requester chests once available, to keep them supplied via logistics bots.
Alternatively, a dedicated refuelling station, with fuel being produced or supplied locally, could be built and added to the train’s schedule. However, this approach may cause bottlenecks if several trains need to refuel at once.
Station Upgrades
We all know that the factory must grow, so it follows that your stations will need to grow too to keep up with demand. Here are some tips and tricks to boost their performance.
- Use more Mining Drills! Also make sure that the Transport Belts can handle their combined output – a Yellow belt can support 15 basic Electric Miners on a side, before Mining Productivity techs and module boosts are applied. If your mineral patch is bigger than this, use Red or Blue belts as appropriate to keep things moving. This will increase the Pollution cloud around your outpost, so make sure your defences are well-planned – it might be a long drive to get there if things start exploding!
- Use a standard lane balancer. In the example Iron Outpost above, we have four belts of ore coming out of our resource patch, which we want to load onto our train using six belts as quickly, and therefore evenly, as possible. This is achieved by placing a lane balancer, which takes in some number of input belts and returns some number of evenly-loaded output belts. A variety of standard designs for these are available online, so don’t worry about trying to build one yourself (unless you can do it better!).
- Use the right loading tools for the job. This means Fast (at a bare minimum), and later Stack Inserters, along with Inserter stack size upgrade technologies. Beware of the latter’s power consumption – a Stack Inserter draws 132kW while running, almost as much as an Assembler 2. Make sure your factory can handle this spike in energy demand when a train pulls in for unloading.
Fluid loading and unloading is simpler – Pumps connected directly to Storage Tanks, as shown in the second screenshot above can shift immense amounts of fluid very quickly. - For non-fluid resources, load and unload from both sides of the track. There is no real reason not to do this, except for lack of space (in which case, you should build your station somewhere else!). At a loading station, two sets of chests means wagons are loaded twice as quickly, and the size of the resource buffer at the station is doubled, keeping your throughput stable and potentially allowing multiple trains to service a single station. Having more loading belts allows a larger lane balancer to be used, which in turn reduces the compression of belts coming out from the resource field, allowing mining drills to stay active and producing.
Similarly, for unloading stations, two sets of chests means wagons are unloaded twice as quickly, and the larger resource buffer at the station will help keep your factory running in case of fluctuations in supply. A smaller lane balancer may be best here, in order to ensure the output belts are fully compressed and supplying the destination smelters/assemblers at maximum efficiency.
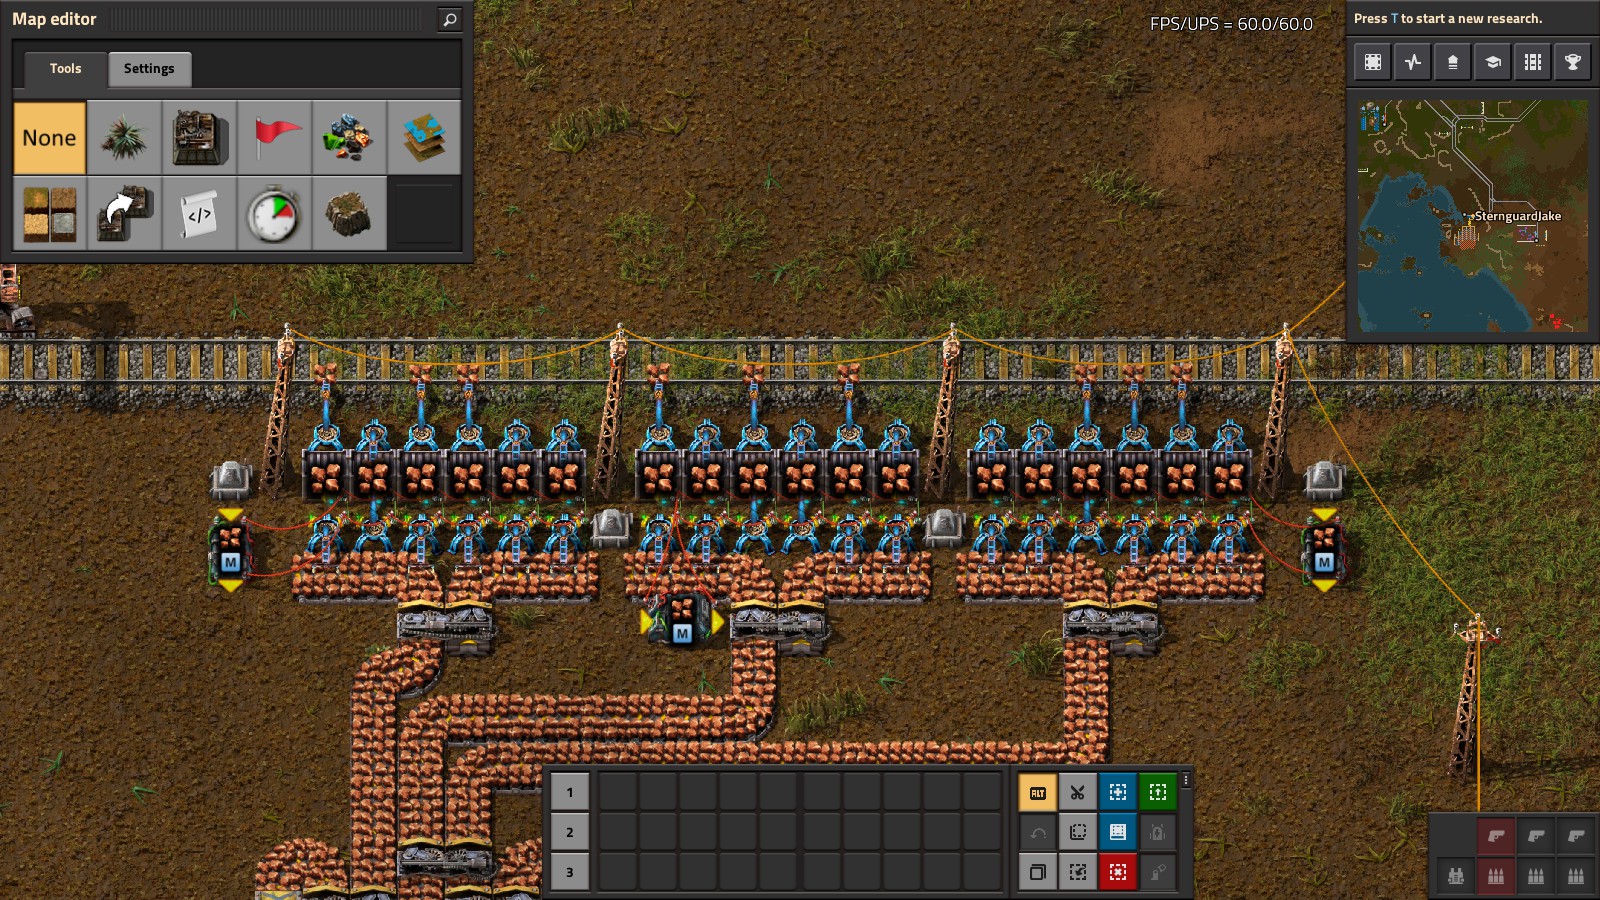
- To load trains as quickly as possible, we want all of the Inserters to be working at the same rate. To achieve this, we need to ensure the buffer Chests are loaded evenly from the input belts, and make sure that the first Inserters don’t take all of the incoming resources. Arithmetic Combinators can be used for average loading, via the following steps:
- Run a red wire along each of the Chests and connect it to the input of the Combinator. The Combinator is now receiving the sum of the contents in each Chest.
- In the Combinator itself, divide this signal by the number of connected Chests. This can be specified by the resource (in this case, Copper Ore), but a better approach is to use the Each wildcard in order to handle any resource. This is output as the signal M (for Mean).
- Connect the Combinator’s output to all of the loading Inserters. Each Inserter also needs to read the contents of the Chest it is loading into, so a second connection using a Green Wire is needed.
- Set each Inserter to move only when the contents of the Chest (the Copper Ore signal in this example) is less than or equal to the mean signal M. If the chest is overloaded, this condition will not be met and the Inserter will not operate, giving the others a chance to work and distribute incoming resources evenly.
This process is not necessary for fluids, which will balance themselves out in their tanks automatically over time by nature of being liquids.
- Run bigger trains – more wagons can carry more things! This will only work if your outposts can generate sufficient resources to fill them quickly; if they can’t your trains will be sat for a long time loading, reducing your throughput.
- Run faster trains to deliver resources more quickly. There are a few different ways to do this, the most obvious one being adding more Locomotives, which means more power. Single-direction trains are faster than bi-directional ones; not having to pull a trailing Locomotive means they can accelerate more quickly. Speed and acceleration can also be improved by using better fuels, such as Solid or Nuclear Fuel. Finally, the Braking Force line of technologies improves the deceleration of trains, allowing them to stay at top speed for longer without going off the rails.
Handling Multiple Trains Via Signals
One big improvement you can make to the throughput of your rail network is to run multiple trains on it. This might be multiple trains delivering one resource, or moving multiple types of resources on one set of tracks, e.g. separate trains for Iron and Copper. However, this introduces new problems – how can we make sure our trains don’t block each others’ paths, or worse, crash into each other?
To stop this from happening, we can place Signals to control where and when our trains are allowed to go. These require the Rail Signals technology, unlocked with Red and Green Science packs. Like Rails, it is worth automating these – if you’re adding signals to a long stretch of track or making multiple junctions, you can get through a whole stack surprisingly quickly!
Holding a signal of any kind near rails will bring up the signal view, shown in the screenshot above. The green squares show valid locations for signal placement. Like Train Stops, signals must also be on the right-hand side to be visible to trains. Additionally, placing a signal makes that stretch of track one-way, unless a second signal is placed to make a pair, marked by the white square in the screenshot above. Both of the tracks in the screenshot above are one-way, with the lower track for trains heading south-east and the upper track for trains travelling north-west.
Placing signals divides the track up into blocks, marked by the cyan and magenta lines. Each signal views the block of track following after it; if the block is occupied by another train, the signal will turn red; any following train will stop at the red signal and not proceed further until it becomes available.
In practice, it is a good idea to place signals at regular intervals along your tracks, to allow multiple trains to travel safely on one stretch of track. This interval should be larger than your longest train length to ensure a train does not stop over two blocks.
Chain Signals
Regular Signals are suitable for single stretches of track, but junctions and intersections can pose problems for them. If a train stops on an intersection or set of points, it can quickly cause a deadlock in your rail system.
Fortunately, a second specialist signal type, the Chain Signal, can be used to avoid this. A Chain Signal can see the colour of the signal(s) which follow it, and will only allow a train to pass if it can also pass one of the subsequent signals.
The example above shows the correct signalling for a simple intersection. Trains will travel from right to left; if both of the tracks on the left are occupied, the Chain Signal will be red and will not allow a train to enter the intersection block (cyan). A regular Signal placed here would be green, as it cannot view subsequent signals, potentially allowing the intersection to be blocked. This gives rise to a simple rule, “Chain signals before an intersection, regular signals after.” Using this rule, complex junctions such as the one below can be created.

Help! My train has no path!
The “No Path” warning is the bane of any Factorio railroader’s existence. If you see this warning flashing above your train, this simply means the train is attempting to reach a station, but has no path to get there. Unfortunately, this error message won’t tell you exactly what the problem is or where it lies, meaning some manual troubleshooting is needed.
In the screenshot above, the Oil train on the left is attempting to leave for a distant outpost, but has no path to get there. This might be caused by several different issues.
- There is no track between the two destinations.
- The train would need to reverse to get to its destination (automatic trains can only drive forwards).
- The train would have to pass a signal on the left-hand side of the track (making it one-way only.)
- The target Train Stop is placed incorrectly (recall that it must always be on the right-hand side!).
When diagnosing a No Path issue, it is a good idea to ensure that you have Radar coverage of your stations and tracks, to help diagnose the problem from the Map view. Another very handy trick you can use is opening the faulty train’s route planner and holding the CTRL key, as if placing a temporary stop. This allows you to trace along the path you want the train to take; if the path stops, the problem must lie at that point. Using this, I traced the Oil train’s path to this junction just outside the outpost, where it stopped. Can you see what the problem is?
The prize is behind door number one – a piece of track is missing, meaning the train was able to leave and not return. Upon placing the missing rails, the train happily continued on its way.
Let’s look at another example – when setting up my first Copper train, it refused to leave for my Copper outpost, giving a No Path warning. After hunting around on the Map view, I found the issue at this junction, in the first screenshot below. The signal is green, so what’s the problem?
Although the signal is green, it’s on the left-hand side of the track for an approaching train – a second signal, shown in the second screenshot above, is needed to make the section of track two-way.
Freight Yards
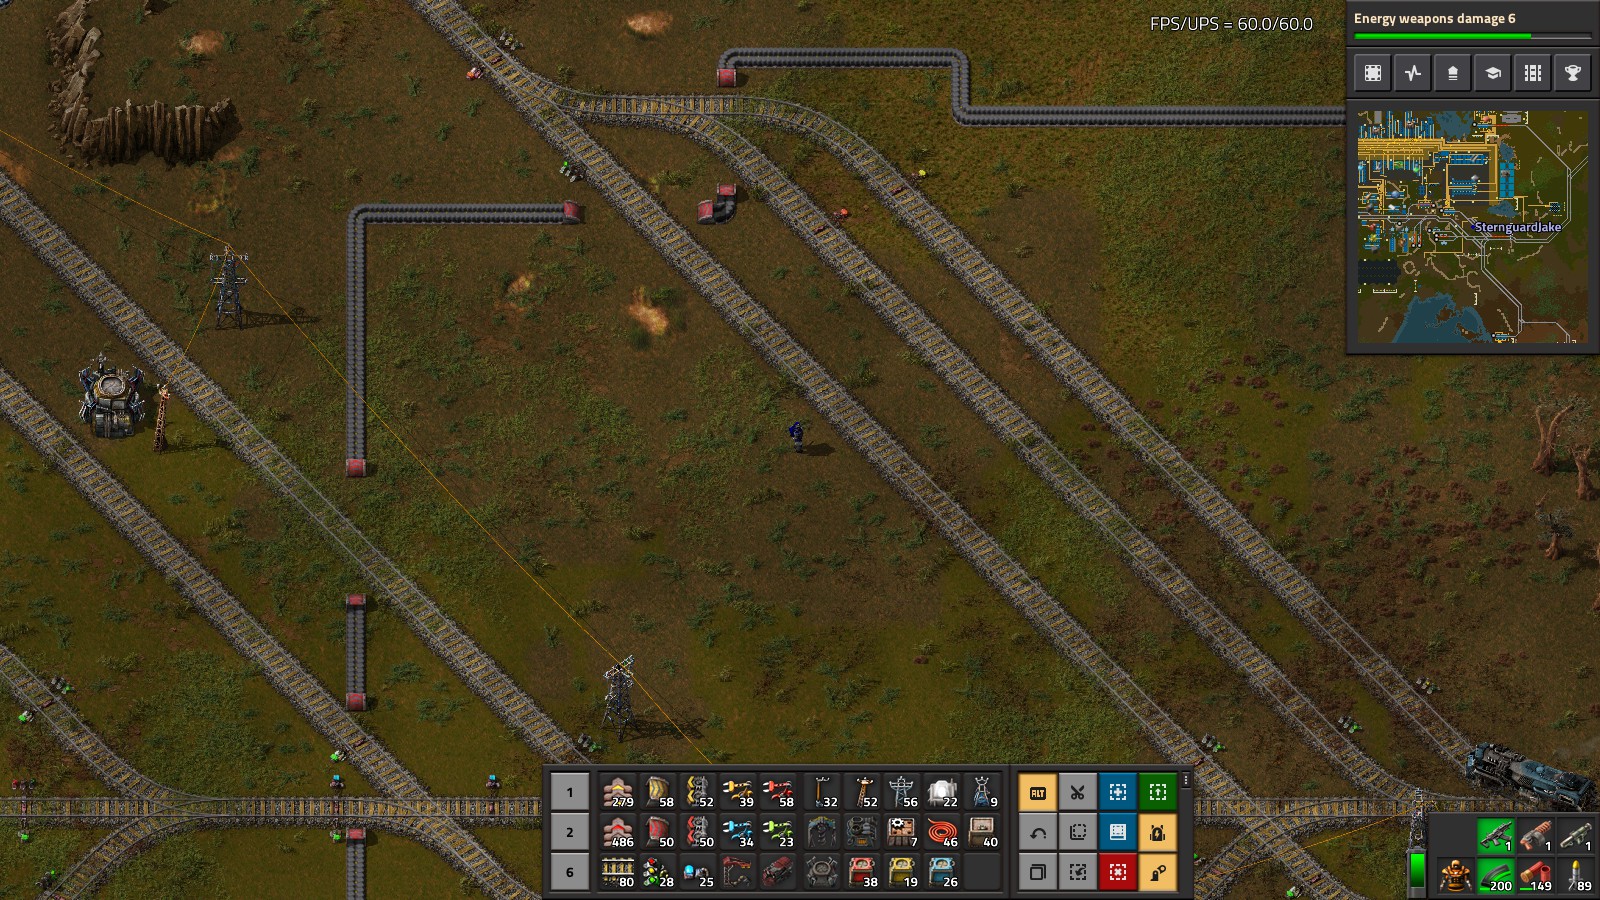
As your factory grows, you may need to have multiple trains bringing resources to one central station. If so, these trains will need somewhere to wait for their turn to enter the station, without blocking the rest of your network. A standard solution to this problem is to build a freight yard, often colloquially referred to as a stacker by the community. The screenshot below shows an example yard before an unloading station, with space for up to two trains to be held. This can be easily extended by building more waiting tracks.
Watch Your Step
Trains will not check if you or your Car are on the tracks as they approach; as a result, Trains are widely recognised as a leading cause of death in Factorio!
If you have to cross a set of tracks, make sure to check your mini-map for any oncoming trains. Don’t loiter on the tracks, even if you’re placing signals, and definitely don’t drive on them with your Car – it’s just not as sturdy as a Locomotive. Also, please don’t jump from a moving train. Remember, you’re playing as an engineer, not Jackie Chan. If you want to cross tracks in the “right” way, consider using gated crossings to stay out of trouble. Signals can accept circuit connections, and can be set to turn red if a Gate opens for you.
For more details on how not to get hit by your own trains, I refer you to this guide by Darknorwood and Hammy, which is both entertaining and illuminating.
Final Remarks
As you start to move multiple types of resources on your networks, it may be a good idea to colour-code your locomotives and stations, to tell at a glance what they are carrying. The appropriate mods will[mods.factorio.com] do this for you[mods.factorio.com].
For another tutorial on train signals with more pictures and GIFS, see this page[wiki.factorio.com] on the Factorio Wiki.
Remember: chain signals before an intersection, regular signals otherwise, and look both ways before you cross the tracks!
Thank you for reading this guide – may your factories grow and prosper.
– SternguardJake

