
Overview
This series will explain from start to finish how to create a class mod (similar to mine) for D:OS2.Part 1 covers creating your add-on mod, and a test level with a placeholder debug object.
Creating your Mod
To create mods for D:OS2, you need to download both the Divinity Engine 2 tool, as well as the Data package (shown as DLC for D:OS2). Full instructions[docs.larian.game] for these steps can be found on the Larian wiki.
Be sure to open the Divinity Engine 2 tool from Steam, rather than from a saved shortcut, each time. There are known issues with publishing mods if you don’t follow this instruction.

On opening the engine, you’ll be asked if you want to Open an existing project or Create a new one. Choose ‘Create’ and select the ‘Add-On’ type. Give your mod a descriptive but short name, including your nickname, as shown.
Setting up a Test Level
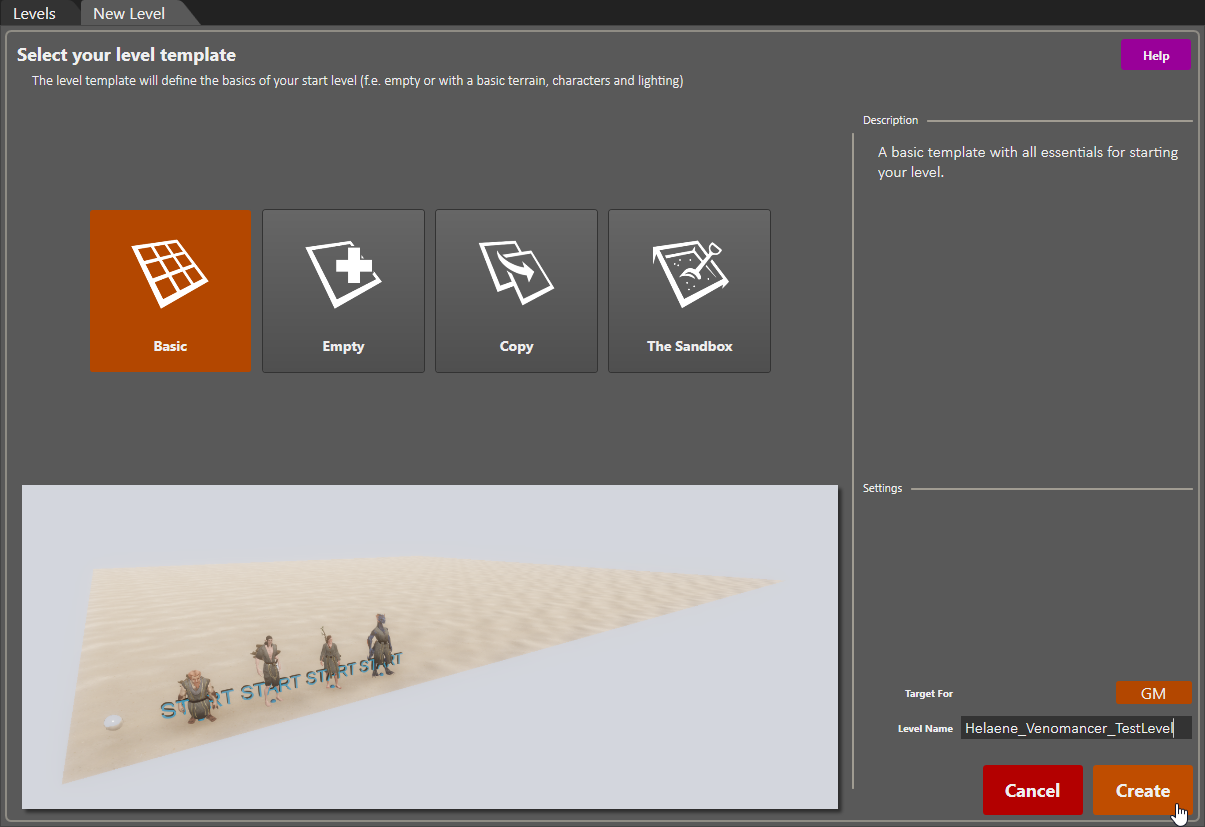
When your new mod is created, you’ll be prompted to Open an existing level or Create a new one. Create a new level from the Basic archetype, and give it a descriptive name.
Adding a Debug Object
One easy way to test your skills in the test level is by adding an object and applying some scripts to it. To add a debug object, look in the Root Templates panel at the bottom center of the screen. Select ‘All’ on the left if it isn’t already. If there aren’t options on the left, click the button that looks like a folder with an arrow pointing upward (to load in all root templates).
TIP: “Root Template” is just a fancy way of referring to ‘objects’ of various kinds that are composed of the ‘resources’ available in the game. Resources might include things like materials, physics, lights, etc. Root Templates include things like scenery objects, characters, and consumables.
To choose your debug object, select ‘Consumables’ on the left side of the Root Templates panel. Right-click the ‘item’ type button (looks like an orange barrel). In the search box, you can enter a keyword to look for, if you have something in mind. Otherwise, just scroll through the list on the right and select objects to preview them. Once you’ve picked an object, make sure the ‘Place a New Object’ button is selected on the far left of the window (looks like a mountain with a plus sign) and simply point and click (not drag) to place your object into your test level.
In your test level scene, select your debug object you added previously. In the Sidebar panel on the left, change the Name value (towards the top) to something more specific and helpful.
Scroll down in the Sidebar panel until you see ‘Use Actions’. Click the value next to ‘Use Actions’ and then click the … button that appears to open the dialog. In the dialog, remove the ‘Consume’ action, and instead add the ‘Store_Use’ action, then click Apply.
Now your debug object will be ready for the basic script we will write for it, to apply your new class preset and add skills and other attributes for testing.

This is a good time to SAVE your progress by clicking the File option in the top menu bar and choosing ‘Save All’.
Debug Scripting
In order to have our debug object actually do something when clicked, we’ll need to write our first story script. Open the Story Script Editor with the icon shown below.

When the editor window opens, go to File –> New and provide a name for your script file (something like Helaene_Venomancer_Scripts).

Now in the main window (the KB section, seen below), add in the following script snippet:
//REGION DEBUG_VENOMANCER_SKILLS
IF
CharacterUsedItem(_Char, 8ba9f6d3-327b-42c7-99f5-dc73ea5cfe3f)
AND
IsGameLevel(“Helaene_Venomancer_TestLevel”, 1)
THEN
CharacterApplyPreset(_Char, “Venomancer”);
//END_REGION

You’ll need to customize the script by replacing:
- the long number string with the GUID for your own debug object (right-click on it in your test level and copy GUID).
- the name of your test level (presumably it differs a bit from mine)
- we haven’t actually created our class file yet, so to see this work, use something like ‘Battlemage’ or ‘Rogue’ (change it back later)

IMPORTANT: To see scripting changes take effect, you must do three things:
- Save your script changes
- Regenerate definitions (file menu, seen below)
- Reload your test level
Do those three things, then switch to ‘game mode’ and try out your object!
For much more information about story scripting, look here:
[link]

Decorating your Level
I like to add some ambiance to my test level by changing the terrain material and adding decorative elements. It helps to keep me inspired while I’m creating and tuning skills.
To change the terrain, click the ground. In the Sidebar panel on the left, you’ll see the terrain material selected. Open the Resources Panel by clicking the second icon after the Items header in the top tool bar (looks like a box of crayons). That will open the Resources Panel as another tab after the game preview window in the center. Click the ‘Shared’ entry on the left of the new panel to get to all of the main game resources, and then right-click the icon for the materials type (looks like a blue sphere). As you select each material in the window, you should see a preview of it in the Preview panel on the right.
To use a selected material from the Resources Panel for your test level terrain, flip back to the game preview center pane by clicking the tab that says ‘Eyes of a Child’, then click the long string of numbers next to ‘Terrain Material ID’. You should then see a … button, which when clicked will show the current material selected. Click the left arrow button to use the material you’ve selected from the Resources Panel to replace your level’s terrain.

You can also add some mood objects to set the scene for your class. In this case I’ve added a couple of spooky swamp trees and mushrooms. Add these objects just as you looked for, selected, and added your debug object – but you don’t have to restrict yourself to the ‘item’ type (orange barrel icon), you could add characters, scenery objects, etc as you like.
Use the second and third icons in the left toolbar (arrows pointing in 4 directions and square with a circular arrow around it) to translate (move) or rotate your placed objects.

Don’t forget to SAVE your progress!
Adding Characters
Enemies, Allies and Traders, Oh My!
Its a good idea to eventually place some other characters in your level to test skills. You can place characters just like other types of Root Templates, but you’ll want to explicitly set their alignment (enemy, ally, etc) to get them to behave as you like.
In the Root Templates Panel, right-click the ‘Characters’ type icon (looks like a magenta person). Make sure ‘All’ is selected on the left, or you won’t see any results. Feel free to use the search box again to find a particular character type, otherwise you can just scroll and select one. Place them into your level as you did with the other objects.
Select the character you’ve just placed into your level (note: NOT the player character) and in the Sidebar panel on the left, scroll down to the Alignment field. There are probably three choices you might make: Good NPC, Evil NPC and GLO_SilentMonks. The first two should be self-explanatory, but basically Evil will make them aggro as soon as your player character gets in range, and Good will make them assist you in battle (as long as their ‘Can Fight’ and ‘Can Join Combat’ attributes are set to True).

You can also change the characters Level, Scale, Blood Surface Type, Floating ability etc using other fields in the Sidebar when the character is selected.
You can change the characters equipment set by selecting another one from the dropdown in the line called ‘Equipment’.
TIP: Silent Monks make for good test characters because they don’t aggro until you attack them. They do carry spears that cause ‘Muted’ which can be inconvenient for testing, so you may want to select different equipment for them.
After we create a trader for your class in a later section, you’ll probably want to drop them into your test level too.
This is another good time to save your progress (File –> Save All).
Select the first icon in the top menu bar (looks like a video game controller) to set the game preview area to ‘live’ mode. Click to move the player character around or attack other characters to test that your alignment settings worked.
Project Settings
Before we wrap up this first chapter, let’s set some of the basic properties of our project – so that next time we go to open it, we’ll have a nice identifiable image to select.
Click the ‘Project’ menu in the top menu and select ‘Project Settings’. Reformat the project’s name if you like, add your nickname to the Author field, and upload a large square image to serve as the icon for your mod. Press the Save button in the dialog when you’re done, and then save your progress with File –> Save All.

—————————————–
Continue on with Part 2: [link]