
Overview
A cycle by cycle introduction to Oxygen Not Included, intended to introduce players to various elements of the game, how to get through key milestones, and how to consider base layout, research priorities and other decisions that all players need to face. This guide is based around the Space Industry Upgrade and assumes that players have at least tried the game once on their own.
Getting Started – Dupe Selection
This is a standard survival playthrough of the new Space Industry upgrade, but with the advantage of a somewhat known map. We’ll be able to go directly to a few very beneficial map features. I always encourage new players to either repeat a known map or to reveal the map and see which way to dig. Once you’re a bit more experienced, then you’ll be better equipped to tackle an unknown map. As a result, we’ll make faster than typical progress.
We’re going to use map seed 122285938. I’ve played this map once before and haven’t explored most of it, but I do know that due west of the start location is a cool slush geyser, which makes bases MUCH easier to get running. Above that is a cool steam vent, and further above that and a bit west is a natural gas vent. There’s also some very large cold biomes with lots of wheezeworts which are also very handy. These three map elements give you a host of key items: the cool slush geyser will take care of a lot of our heat problems as well as water and oxygen. The cool steam vent is a bit redundant with the slush early on but a bit later in the game gives us additional water for oxygen. The natural gas vent will take care of most of our mid-game power needs. The wheezeworts will take care of the rest of our heat problems, and with a lot of them, we can explore various techniques.
Start a new game. Choose ‘Survival’, and then choose ‘Custom Game’. Enter 122285938 for your worldgen seed. That will generate the same map that you see me using here.
Next, you’ll be asked to select your 3 starting dupes. Here’s my starting 3:
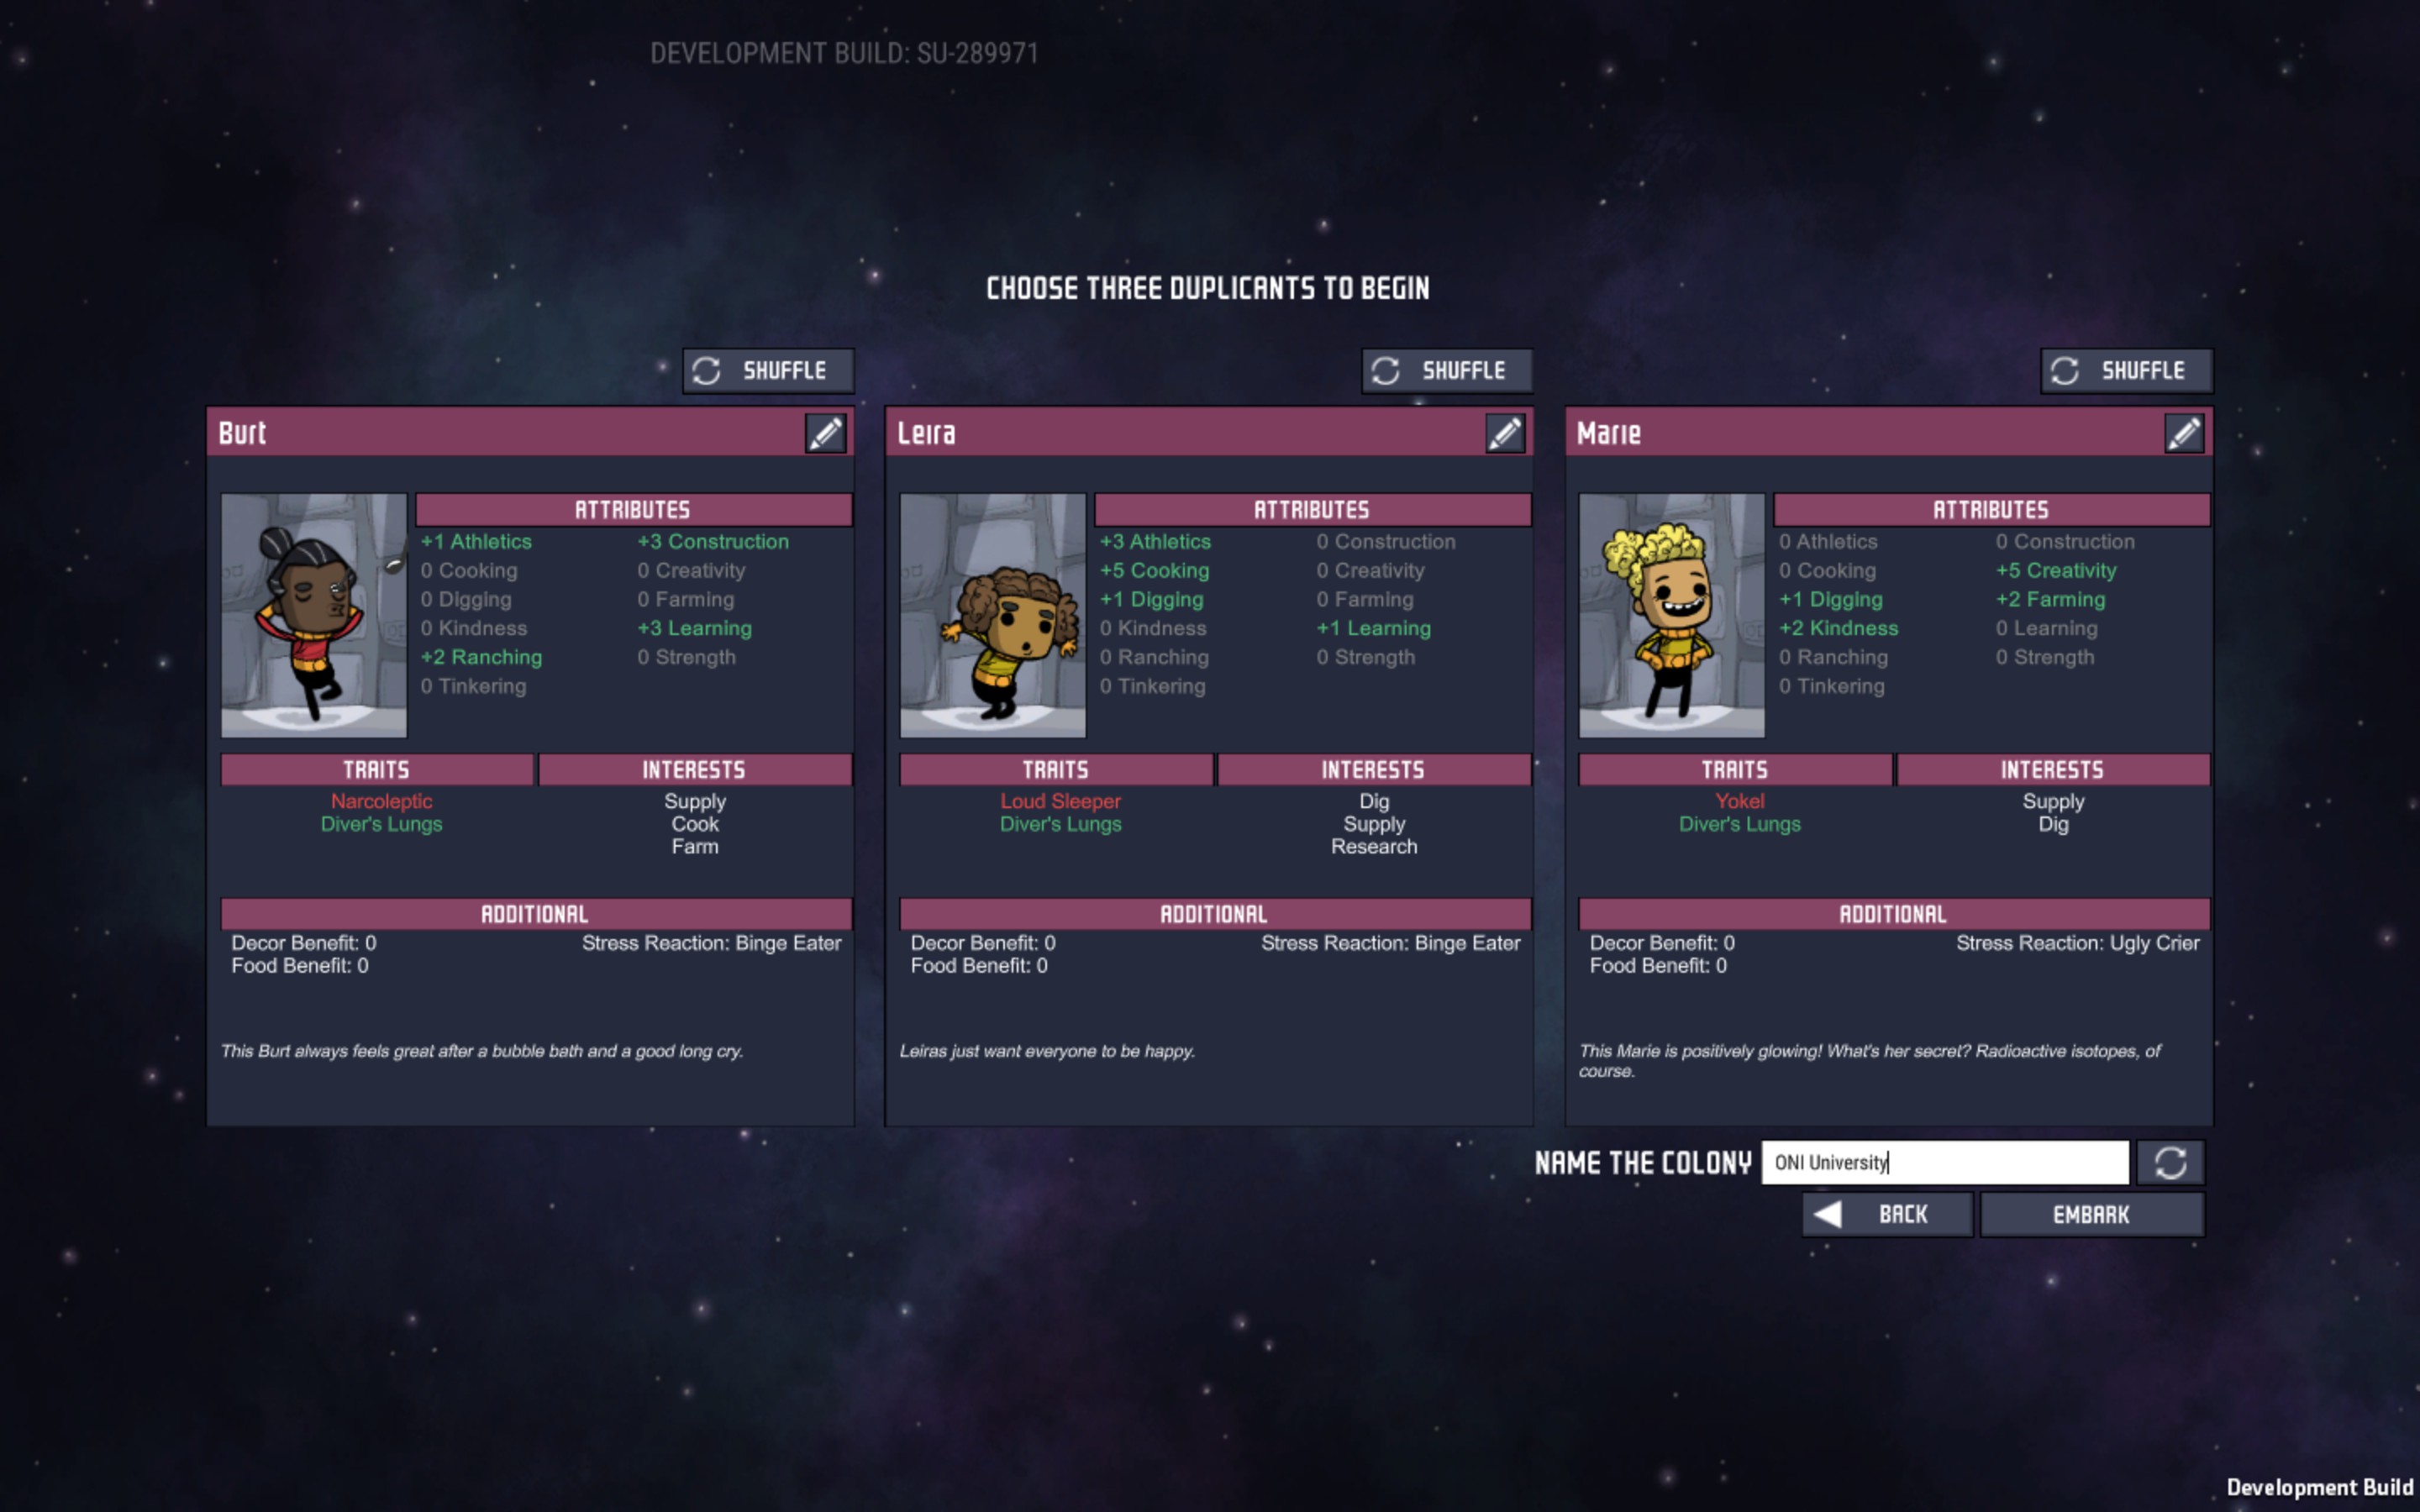
I spent a bit of time (5-10 minutes) rolling these three dupes looking for a few key characteristics that would make this easier to get going. First off, all three have the ‘Divers Lungs’ trait. This causes them to use 25% less oxygen. Not only is it a great trait in terms of giving you a bit more time to get going, it’s a trait that helps throughout the entire game. In terms of negative traits, there are only two that I actively avoid in my starting 3: ‘Mouth Breather’, which causes them to use 100% more oxygen, and ‘Flatulence’ which causes them to leave little pockets of natural gas around the map. Not really a huge problem, but it’s frustrating early on to have your food crops not growing because there’s a pocket of natural gas sitting on them. I’ll give a 2nd look at any dupes with ‘Anemic’ trait. That causes them to walk slower. A -5 ‘Athletics’ attribute results in a 50% lower walk speed, which is VERY slow. I generally reroll that dupe, but not always. In time they’ll overcome that and it won’t be a concern. Make sure you don’t have 3 ‘Yokel’ traits or else you have nobody who can do research and that’ll really make the game tough.
I don’t worry about the stress reactions at the bottom. Our goal is to never see those occur, and if they do, it’ll be rare enough to not be a big problem for us. I have a lot of interests here, but I didn’t worry about that too much either. I really only care that at least one dupe has the ‘Research’ interest.
Aside from looking at that ‘Athletics’ attribute to make sure its not a large negative value, I want at least one dupe with a +2 or higher ‘Creativity’ score. When combined with the +2 ‘Creativity’ that comes with the Artist job, a +4 Creativity will give you reliable masterpiece paintings which really helps get your morale going early on.
These are really only things I look at with the starting 3. All of the attributes will increase with experience, so the effects of low values are only temporary. The interests become less important with more dupes. Many of the traits are either temporary in that they buff/debuff an attribute, or are trivialized later in the game. So as we go on, we can pick dupes based on our needs at the time. But at the start, everything is hard, and really the most constrained resource you have is time. Research takes time, getting farms up takes time, getting O2 production up takes time, building takes time. Even as early as cycle 10 some of these pressures are coming off, so we’re just stacking the deck as much in our favor as possible for those first few cycles to get things moving quickly. Our goal here is to get to the mid-game with relative ease so we can explore various techniques for success.
- Leira’s ‘Loud Sleeper’ trait means that early on I need to build one bed away from the others so that she doesn’t wake them up, putting them in a bad mood and causing them to be less productive. A lot of the early game is avoiding mistakes, and that would be slow us down a bit.
- Leira is also going to be our starting researcher given her interest. Burt has a higher Learning attribute, but Leira will close that gap quickly due to the Research interest giving her a 50% boost toward mastery.
- Marie will be our first artist once we get to that stage.
- 3 Divers Lungs will impact how we work out our oxygen production needs.
- No Bottomless Stomach means we don’t need to adjust how we work out our food production needs.
But aside from those things, I don’t see anything else worth making a mental note about. If I had an anemic trait, I’d probably put that person on Research since that job doesn’t require walking much. Eventually they’ll cycle off of that but the base will be better established and the slow walking will be less problematic.
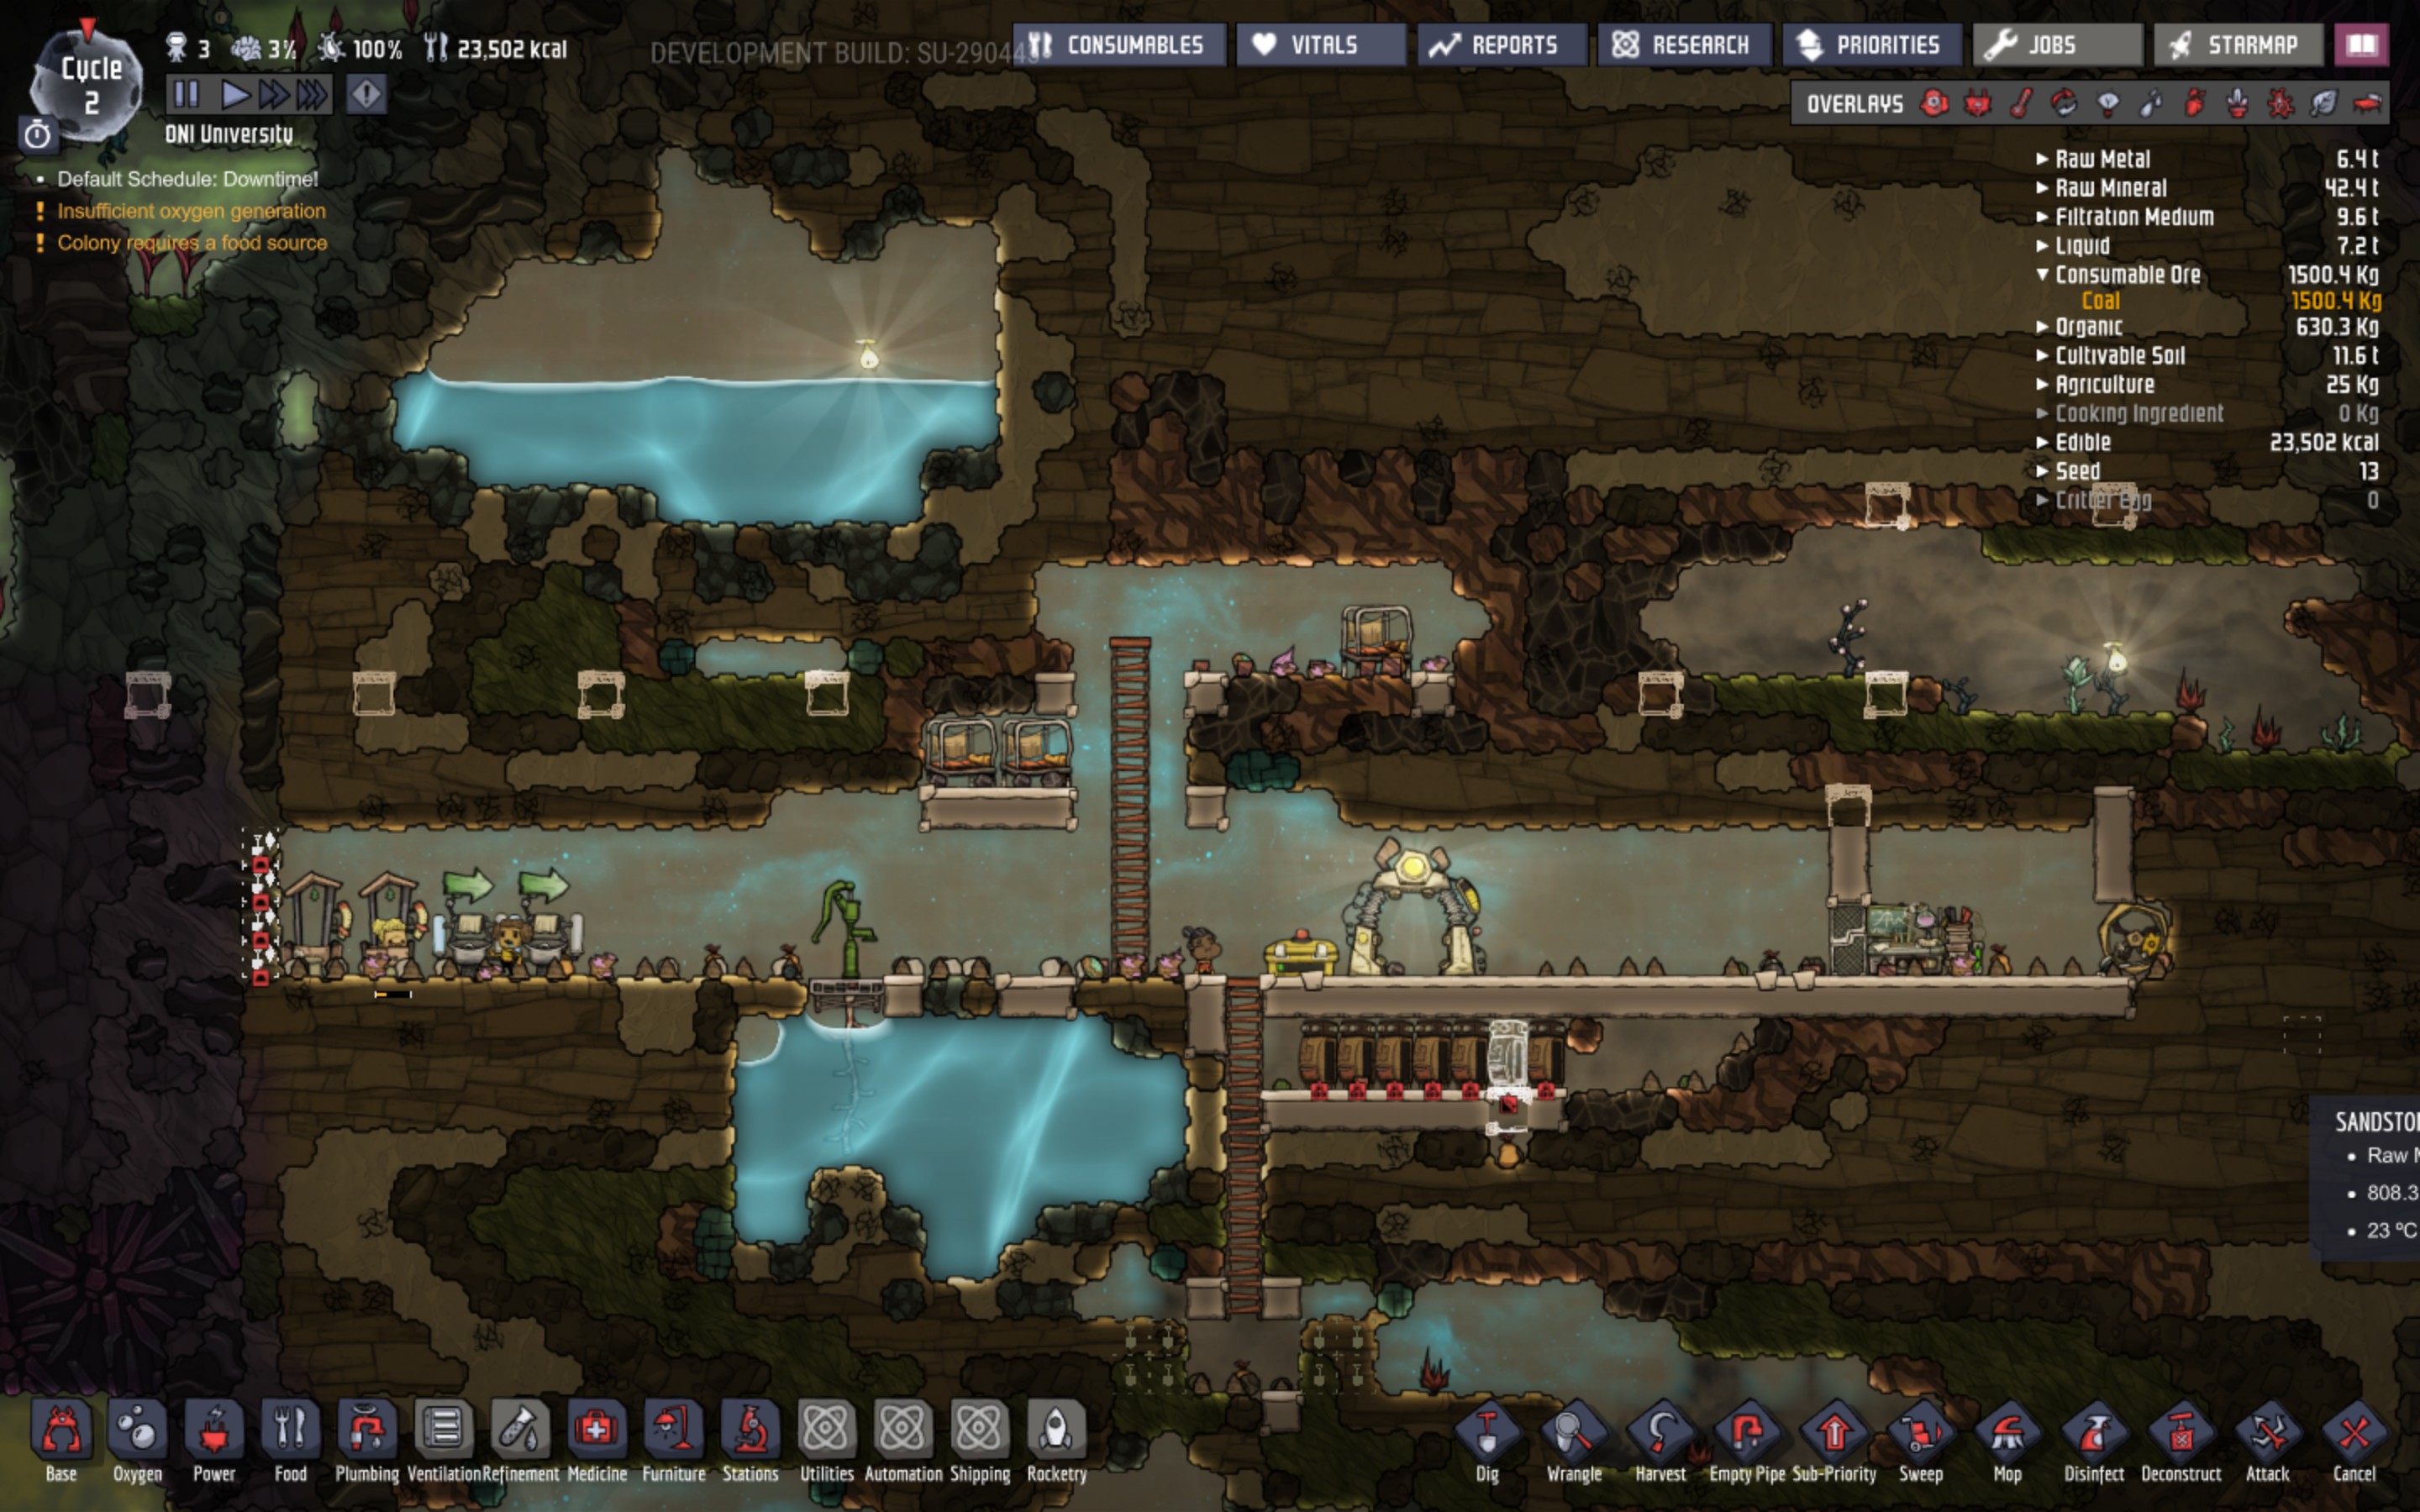
And with that, we are on our way:

Cycle 1: Base Design Pattern
So, where do we begin? Well, let’s pause and start with what I see when I look at this:

I’ve marked off what I eventually would do here. It’s probably a little overwhelming so let’s walk through it.
From the printer left and right I’ve marked out a 4 unit high area to be dug out. All buildings in the early-mid game are 4 units high or shorter, so that’s a reasonable room height. Additionally, dupes can only dig and build that far up. In a 4 unit high room, they can dig to the ceiling and build up to the ceiling, but they can’t reach the ceiling. In order to dig a room higher than 4 units, you either need to do it in 2 passes – having them climb up and dig to the ceiling and then come back and remove the material they were standing on, or you’ll need to build temporary floors/ladders. Not a problem later, but it’s a LOT of extra work we don’t need now.
I started a ladder about 6 tiles left of the printer. The location isn’t that critical, but there are some characteristics to this start that lead me to do that which we’ll return to. This ladder will form a central 3-wide vertical shaft that will basically extend the entire height of our base. In the ceiling you can see I marked with a tile where the sides of the shaft will be. We’ll have rooms on either side of the shaft. A lot of players have two or more vertical shafts with 3 or more rooms across on each floor. I tend toward a single shaft with relatively large rooms on either side, set by the in-game room constraints. There’s no right or wrong answer here, just preference. I go for a single shaft because dupes can travel vertically as fast or at times faster than they can horizontally, so when moving from task to task I want a bias toward up/down rather than left/right. The other reason for that bias is that the map varies more vertically than horizontally. The surface is up, the magma layers are down, but other than different biomes, there’s no fundamental difference from side to side. That means our eventual goals will be to go up and down.
Looking up and down you see a repeating pattern of a 4 high main level, a 1 tile floor, a 2 high service level, a 1 time floor, etc. Again, this is a matter of preference. One of the things we’ll need to manage in the game is stress, and decor contributes a fair bit to that. In the game there are a lot of ugly things we’ll need to build – pipes, vents, batteries, transformers, compactors, pumps, etc. Most of them are 1-2 units high and we’re going to hide a lot of them in these service floors out of sight. That’ll let our 4 high rooms be more functional and more attractive. A LOT of the game is building infrastructure and we’re going to aim for about a 50/50 ratio of infrastructure space which is more or less hidden and hard to get to and living space which is visible and easy to get to. This also allows us to combine main and service floors if need be into a 7 high space or a 10 high space, and we’ll likely do these down the road. Sometimes when setting up ranches or refining spaces you want a bit more flexibility.
The rooms on each side will have 23 units wide of usable space, with the assumption of a wall/door separating it from the ladder and from anything to the outside of that space. In the ceiling of the main level above the printer – at the top of that natural cavity – you can see where I’ve put down 5 tiles each with a 5 tile space between them. This marks out the width of the floor. A 23 unit wide space allows for a single room which is 23 wide x 4 high = 92 tiles, which is slightly smaller than the maximum for certain types of rooms, or it can be subdivided into two 11 wide rooms, or three 7 wide rooms, or four 5 wide rooms, etc. The tiles I’ve put down are designed to eventually divide that floor into four 5-wide bedrooms, and those tiles serves as a guide for sizing the other floors. I’ve done the same thing on the left side of the ladder.
My sense here is that I’m going to build bedrooms on the two floors above and the two floors below the printer on the right. Around the printer I’ll build a recreation room with a little room next to it for research. To the left of the ladder a bathroom on the top using that top pool of water, a medbay below that, a kitchen to the left of the printer, a mess hall/great hall below the kitchen, and maybe another bathroom below that.
So these set the early dimensions and a design pattern that we can turn to and repeat as much as we need. We’ll adapt it as we need. So what needs to actually happen in cycle 1?
Cycle 1: Minimum Viable Base
By the end of cycle 1, we want the following things done:
1. Cots for each of our dupes
2. An outhouse
3. A wash basin
Dupes that don’t sleep in a cot work slower the following cycle, so that’s important to keeping us from getting bogged down. Dupes need to use the bathroom every cycle, so by the end of the cycle we want the outhouse. Dupes that don’t have an outhouse to use will pee polluted water (PH2O) on the floor, which has 3 downsides:
* It will take time to clean up, which bogs us down
* Dupes will walk through the liquid giving them soggy feet which will lower their morale
* The polluted water will spread germs around the base making it more likely dupes get sick.
The wash basin may take a few cycles to get operational, but we need some basic hygene to protect against food poisoning. After the dupes use the outhouse they’ll pass by the wash basin and wash up removing germs. There are two kinds of germs in the game – food poisoning and slimelung. The former mostly comes from not having sinks or wash basins. The latter from exposure to polluted oxygen from slime. In either case exposure to enough germs will lower the dupes immunity and cause them to get sick. Food poisoning will cause them to vomit PH2O around the base, leading to the negative cycle noted above. Slimelung doesn’t cause vomiting but does slow your dupes down a lot and if untreated can lead to death. We won’t encounter slime/slimelung for a while.
You can see the outhouse and the wash basin in the plan. Ideally, you want the outhouse in a dead-end that forces them to walk back past the wash basin. Walking past it is what triggers them to use it. For now, this location will work fine.
It doesn’t sound like a lot of work, but it’ll take a while. Dupes are slow in the beginning, but they’ll get a LOT faster as we go along. On the image above you can see that I put the cots in the service floor for now. We’ll move them after just a few cycles.
Now, returning to the ladder placement. There’s another thing I see on the map that’s guiding my decision-making, and that’s the two pools of water. They’re kind of in my way, and yet, having continuous access to water is critical. I want to move that water, but I don’t have pumps yet. But I see an opportunity on the map. Next to the ration box you see I’ve started a ladder that will go down to the 2nd service floor below the printer and you can see that I’ve indicated a pump there. I’m going to use that open space to my advantage, build out that 2nd service floor early and turn it into a makeshift water reservoir. Then I just need to break through the lower water reservoir and let it dump down into that space.
Now, I could simply extend the main ladder into the water and have the dupes work in the water, but there are two downsides:
* They’ll get the soaking wet debuff which will really lower their morale quickly, causing us to deal with morale problems earlier than necessary
* if they spend enough time in the water (remember, they’re pretty slow) then they’ll get hypothermia which will slow them down for two cycles.
It’s worth spending a bit of extra effort to do this without getting wet. So the main ladder shaft placement winds up being dependent on giving us enough space for this temporary ladder, plus a divider.
We’ve marked off way more work than we really need to do on cycle one, and the dupes may spend their time digging spaces we don’t need rather than focusing on our 3 goals. There are two ways we can handle this:
* We can use the subpriority system to mark our goals as more important
* We can remove access/deselect the stuff we don’t want them working on.
In my case, I’ll deselect the stuff I don’t want:

So, a bit of the main ladder to set it’s location, the space for the 3 cots, and digging to the left to get the outhouse in. Plus the temporary ladder down to where the water reserve will go. Once the dupes start working, I make two changes:
1. I deselect the excavation space to the right of the printer. They don’t need to do that yet.
2. I move one of the cots from the service floor to the main floor above where the bedrooms will eventually go, remembering that I have a loud sleeper. I’ll assign that remote cot to that dupe. And so at the end of cycle one, here’s what we have:
3. I build two outhouses and two wash basins so we have a backup if one is out of service.

Cycle 2: A Bit of Math

We successfully have beds and an outhouse. Let’s go over a few other items to look out for from Cycle 1:
Above the ration box is a blue-green ore called oxylite. It slowly degrades and releases oxygen when exposed and when there is less than 2000g of air pressure around it. Its the only way we have for making oxygen right now and is only found naturally around the starting biome. We’ll need to do research for new ways to make oxygen. You can mine oxylite but you’ll lose some capacity to produce oxygen, so mine around it for now. Fortunately none was in our way, but keep an eye out for that. You may want to expose some of the other pockets of it to buy time before getting an oxygen industry up and running.
Next to the outhouse is some ore that we can’t mine yet because we don’t have a dupe with a high enough skill. We’ll need a job board to get there and we’ll need research to get a job board. As such we only have one outhouse now, but we’ll build a second. You always want at least 2, that way if one is full and nobody has tidying prioritized, you won’t have accidents. In the end I find 2 per 8 dupes to be fine.
I set the subpriority on the outhouses to 8 because when they fill up, I want them emptied urgently. I set the subpriority on the wash basin to 7. You’ll also notice the wash basin is set to ‘right’. By default it’s set to ‘both’. I don’t want them to wash up when they are going left toward the outhouse, only when they are leaving, so the right arrow indicates they’ll only use it when walking in that direction.
We know we need to produce food and oxygen, and maybe some other things as we go. So how much do we need? Each dupe consumes 1000kcal per day, so right now we need to produce 3000kcal each day. The standard early food sources is mealwood which produces a meal lice every 3 days which provides 600kcal, or 200kcal per day on average. We’ll then need about 15 plants. The wild mealwood plants can supplement this but they grow much slower, so we can’t rely on them too much. Around the printer, we’ll dig up a bunch of muckroot, so for a few cycles we may dig up what we need. I prefer to keep at least 5 days rations on hand, so our goal will be 15000 kcal.
Normally each dupe consumes 100g of O2 per second or 60kg per day (600 seconds per day). Our starting 3 have the divers lungs trait so they only consume 75g per second or 45kg per day. So we’ll need to produce 135kg per day to keep our air pressure up. Our air pressure goal is 2000g. Some air producing machines stop working at that level, and standard air vents stop at that level as well. 1000g is fine, but we should be concerned below that, and it’ll vary a LOT across the map. We’re looking for what seems typical and whether we’re making enough or not which can be seen in the reports tab.
We also want our air temp to stay under 30C. Our most important early plants stop growing above 30C. This too will vary a lot, but we want to check key living/growing areas. We’re around 22C now. But if we look at the material to the right of our outhouse we can see that material is over 40C, so we’ll have a bit of heat trouble on that side of the base.
So here’s our Day 1 summary with our goal in parens:
Food: 20,000kcal (15,000kcal)
Oxygen: ~1200g (2000g)
Oxygen rate: -101kg (>0kg)
Temp: ~22C (<30C)
Goals for Cycle 2:
1. Get research started
2. Build a temporary pump so we can fill the wash basin
3. Start working toward the water reservoir project, and establish some storage space
Cycle 2: Recreation Room, Decor
Research is critical to get started because it unlocks everything else we need to go forward.

We need a Research Station, which needs power, so we add a manual generator and a battery and run a wire between each of them. A dupe will run the generator charging the battery which will power the research station for some time. On cycle one, we only needed sandstone to build everything, but these things all need raw metal. Fortunately, there’s a decent amount of copper that needs to be mined out.
So, why did I put the research station there? I’m going to split this side of the floor into 2 rooms. If you look on the room overlay (the bed icon in the overlay ribbon) you’ll see an entry for Recreation Room:
Leisure time will further improve Morale for Duplicants visiting a Recreation Room
At least one Recreational Building
At least one decorative building
No industrial machinery
Minimum size 12 tiles
Maximum size 64 tiles
We’re going to turn the space around the printer into a recreation room. It can be at most 64 tiles, so 16×4 high. We have a divider designated there, which leaves a 6 wide room which will be our research room – just enough space for a 2 wide research station, a 3 wide supercomputer, and for now a battery but later a plant or sculpture for decor bonus.
The recreation room is where idle dupes go, and if we have a stressed dupe, one of the first things to do is to put them on a reduced work schedule where they have a 5 shift break. That break will give them a +4 morale boost vs the +1 they get with only a 2 shift break. They’ll spend that break in the rec room, and if we also make that a high decor area, it’ll further improve their morale.
The rec room isn’t that important. We won’t have to deal with stress for a while, but we do want to pay attention to the various room types, constraints and bonuses. By cycle 20, having some rooms providing bonuses will be key to keeping dupe stress down. So as we make decisions, we’ll just check in on possible room effects and adjust from there. For now, we’re just going to avoid building too much in these 16 tiles that we won’t want to stay.
So, let’s look at decor.

First thing we notice is a deep green around the printer. The printer itself gives a +30 decor boost, and the printer gives off light which adds another +15. And we can add to that pretty quickly here without a big research investment. It’s a natural place to center a room that benefits from decor.
The other thing we notice is deep red pretty much everywhere else and that’s because of debris. Those negative areas will reduce our dupe morale, so just cleaning the place up will help a lot.
Cycle 2: Research Setup
So in our Cycle 2 plan, we’re going to reserve some space around the printer for a rec room that we can get up and running pretty quickly to use for stress management, get our research stuff set up in the remaining space, and in the service floor below, we add a bunch of compactors so we can start to clean up the high occupancy areas – notably the printer floor and the bedrooms. We don’t want this to interfere with other goals, but we can find a way to balance it in there. Stress isn’t a big problem now, but it’ll get worse soon.
There’s more work designated than our dupes can do, but we want to make sure the research bits get done, so this time we’re going to use the sub-priority tool to set all of the research stuff to 6 – from the floor to the equipment. That way they’ll focus on those things first and then move onto the others when they’re complete.
You can’t see the research station wiring so here’s a detail:

The wires are run through the floor since they have a negative decor with a 1 tile radius, being hidden like that avoids the decor penalty. We still get some where they pop out of the floor, but it’s a lot less. The order of the items on the circuit doesn’t matter. The generator can produce 400W and the research station consumes 60W. The one battery can only consume 200W, so half the work of the generator is being wasted, but we won’t keep this arrangement for long. The battery holds a maximum of 10,000J, and is currently around 7100J. A 60W research station then consumes 60J per second so a full tiny battery can power it for around 167 seconds – a bit less than 3 minutes.
I set the subpriority on the generator to 8 and the research station to 7. I want them to have priority but I don’t want someone to fail to empty the outhouse in favor of the generator. I also set the dupe priorities. I want Leira’s research to be ++ and her operator to be +. That way she’ll prefer to run the generator and do research over the others, and over digging/building.
They made a bit of headway into the storage compactors, but the outhouses are done, the wash basin has been filled and research has begun.
How do we prioritize research? This is going to be very situational, but I always start it the same way with Jobs. Building a job board allows you to give dupes jobs which will allow them to start to boost their abilities significantly and unlock some new abilities, such as mining out that material by the outhouse.
From there I do Basic Farming and Meal Prep. Farming because we need to get crops planted soon, and Meal Prep because one of the more critical rooms to help with morale is the Great Room and we need mess tables for that. Beyond that, it depends on what the most urgent colony needs are.
Cycle 3: Selecting New Dupes, Barracks
Day 2 summary with our goal in parens:
Food: 22,000kcal (15,000kcal)
Oxygen: ~1500g (2000g)
Oxygen rate: -120kg (>0kg)
Temp: ~22C (<30C)
Research Queue: Jobs, Farming Basics, Meal Prep
We’ve added food, just by digging up more than we’ve eaten. That helps. We’ve added oxygen as well from oxylite, but that’s going to run out in the next 2 cycles.
Our goals for Cycle 3:
1. Research Jobs
2. Continue toward water reservoir
Cycle 3 Construction Plan

You can see that the plan for the water reservoir in the 2nd service level below the printer has been laid out. Leira will spend all her time on research for the foreseeable future, so we only have two dupes digging/building. We’re also marking out the barracks but I’ve set the priority at 4 since it’s not important at this time. Let’s look at the barracks rules:
One Cot
No Industrial Machinery
Minimum Size 12 tiles
Maximum Size 64 tiles
Morale +1
Our rooms are 5×4 so 20 tiles – toward the small side given the range allowed. But what’s important is that the room is large enough for our loud sleeper to not disturb her neighbors. With 4 dupes per cluster, we’ll aim for 4 such clusters or 16 dupes total. Most of this cycle will be sitting back and letting the dupes do their thing.
Every 3 cycles the printer will offer up the oppotunity to choose a new dupe from a selection of three. The first decision to make here is whether you want to grow the base by one dupe. I tend toward a slower growth than many players and aim for some certain milestones. While a new dupe is more labor allowing you to build faster, it’s also more food and oxygen to get up and running. Since I build the base out in clusters of 4 bedrooms, I set expansion milestones in sets of 4, and I’ll grow to 4 dupes immediately, provided I like the dupe.
I expand to 8 dupes once I have oxygen and food production consistently exceeding demand.
I expand to 12 dupes once I have sustainable oxygen and food production exceeding demand.
I expand to 16 dupes once I have gas management in place.
So, I’m open to adding a dupe. Let’s see what we have:

I’m not going to take any of these. Here’s my reasoning:
They’re all pretty strong on attributes. Turner has +5 creativity, but we have that covered from our starting dupes. Interior Decorator brings a -5 Decor Benefit, so keeping his morale up will be a little harder. And his only interest is Dig, which isn’t that helpful overall. Travaldo’s Unconstructive trait means he can’t build, and Yokel means he can’t do research. That makes him of limited use, and build is a pretty important skill early on. Nails provides dig and build interests, which I like, but the traits and attributes don’t bring me anything terribly exciting. So, I’ll pass and hope I find a better candidate on cycle 6.

We end cycle 3 with Jobs research nearly complete. We’ll select jobs on cycle 4.
Cycle 4: Assigning Jobs and Priorities, Latrine
Day 3 summary with our goal in parens:
Food: 20,000kcal (15,000kcal)
Oxygen: ~1200g (2000g)
Oxygen rate: -125kg (>0kg)
Temp: ~22C (<30C)
Research Queue: Jobs, Farming Basics, Meal Prep
Our goals for cycle 4:
1) Assign jobs to our dupes
2) Adjust dupe priorities
3) Continue researching Basic Farming and Meal Preparation

We have another room opportunity. By walling off our outhouse we can create a latrine.
Using a toilet in an enclosed room will improve Duplicants’ Morale
One or more basic toilets (Outhouse)
At least one wash station (Wash Basin, Sink, Shower or Hand Sanitizer)
No industrial machinery
Minimum size 12 tiles
Maximum size 64 tiles
Morale: +1
Stress isn’t a problem yet, but every point of morale that we can create serves to keep stress at bay. Barracks are still low priority. We want to get the water reservoir finished and tidied up, and get everyone a job.
With the Job Board built, we’re going to give our dupes jobs. Jobs carry both benefits and challenges. We’re going to assign Leira to the Research Assistant (Tier 2) job to help her research faster. This gives her a +2 buff to learning and allows her to use the Super Computer. It’ll take several cycles to master that job, which she’ll do faster because of her Research interest. If we remove her from that job before mastery, then she loses the buff and Super Computer access. However, if she masters Research Assistant, she keeps both even after changing jobs, and becomes eligible for the Scientist (Tier 4) job. The +2 buff also means she’ll research faster and raise all skills faster. In the course of mastering Research Assistant she’ll probably add at least one reserach skill level raising to +4 and maybe +5.
Burt and Marie are doing a combination of digging, buiding, and sweeping, so what jobs to give them? My preference is to prioritize the Gopher (Tier 1) job, which isn’t related to any of them. Why? Well, Gopher gives +2 to strength and +400kg to carrying capacity. Going from strength 0 to +2 increases tidying by 50% (which covers sweep) and raises carrying capacity by an additional 80kg. Strength 0 dupes can carry 200kg, but with the Gopher perks they can carry 680kg. That doesn’t help with digging, but it means 1/3 as many trips to haul materials to a building and 1/3 as many trips to sweeping to a compactor. As our base grows, walking will consume a significant amount of time, and reducing the number of trips by 2/3 is huge – certainly bigger than the perks for the construction job and aside from unlocking the perks for being able to dig out the material next to the outhouse, better than the perks for miner.
The downside to jobs is the growing morale needs. Our starting dupes had a morale need of 1, which is easy to reach. You get +1 just for being a dupe, you get another +1 if you have a 2 shift break in the schedule (which is in the default schedule) and you take a -1 hit for the bad food. So overall, not a lot of stress. But a Tier 1 job increases that to a morale need of 2, and a Tier 2 job to a morale need of 4. The hit for being a point below the morale need is only 3% per cycle, so we can go 33 cycles in this state. The hit for being 3 points below the morale need is 8% per cycle, so only about 12 cycles in this state. That means keeping Leira happy is going to be quite a bit harder, and we need to plan accordingly. Once you master a job in a tier, that morale need remains, so be careful to not master higher tier jobs until you’re ready. If you leave the job before mastery, your morale need will fall to the higher of your new job and previous masteries.

I do a bit of housekeeping here. I set the default for new dupes as seen below. Research and art I reserve for the individual in those jobs, but the others flex a bit. You have to be careful as it’s not that hard to knock a dupe out of their job area and send them off to do other things. Putting dig at ++ for Leira would probably take her off of research and send her digging. I give her operate + so that she’ll go over and run the generator when the battery drains.
Over time we’ll need to tweak tidy and operate to ensure that someone is prioritizing emptying the outhouse and running equipment. We will also need to tweak farm once we get food planted.

We end cycle 4 with Basic Farming research nearly complete.
Cycle 5: Oxygen Generation
Day 4 summary with our goal in parens:
Food: 16,000kcal (15,000kcal)
Oxygen: ~1100g (2000g)
Oxygen rate: -125kg (>0kg)
Temp: ~22C (<30C)
Research Queue: Farming Basics, Meal Prep
With minimal digging, we didn’t unearth any food. A bit more than 5 days reserve. Oxygen levels didn’t go down as much as last cycle. When you remove a solid tile by digging or deconstructing, you create a 1 tile vacuum. To maintain a 2000g O2 pressure, you need to add an extra 2kg of O2 to fill that space. Digging rapidly as we did in cycle 3 can make it really difficult to keep your dupes in a comfortable O2 area. With little digging in cycle 4, the drop was less.
Cycle 5 Goals:
1) Finish Meal Preparation research
2) Begin oxygen production
3) Finish preparing water reservoir
We start cycle 5 with farming basics nearly complete. This will unlock both planter boxes and algae terrariums. Our oxylite is effectively used up, so we need to produce our own. Our eventual goal is to build what the community has dubbed a SPOM, a self-powered oxygen module. We don’t have the tech and infrastructure to do that yet, but from the outset we can build an algae deoxydizer and now that we have researched basic farming we can build an algae terrarium. There’s a healthy debate which is better, and that usually means that neither is clearly better. So lets explore the options:
Algae deoxydizers are inefficient, but can output enough Oxygen to keep a colony breathing.
Power 120 W
Heat +1.5 kDTU/s
Decor -10 (2 tile radius)
Requires Algae: -550g/s
Effects Oxygen: +500g/s
Our 3 dupes thanks to the Divers Lungs trait only consume 75g/s oxygen each, or 225g/s total. An algae deoxydizer is about twice as powerful as we need. That’s not necessarily a problem as it means it can run intermittently and still adquately do the job. It consumes fair bit of algae, but so long as we don’t rely on these for too long, it should be fine. I’ve never run low on algae, personally. It requires a fair bit of power though – a small battery can only run it for 83s, so it’s going to put a dupe on the generator a lot of the time unless we get another power source going. It also puts out a fair bit of heat. That’s not necessarily a problem, early on, but as we’ll find out soon, our farms will be sensitive to temperature and it will force us to deal with cooling a bit faster.
Placing Algae Terrariums in well lit areas will produce more oxygen.
Decor Decor -10 (2 tile radius)
Requires Algae: -30g/s, Water: -300g/s
Effects Oxygen: +40g/s (44g/s in light), Carbon Dioxide: -333.33mg/s, Polluted Water: +290.33g/s
Algae terrariums trade out power for water. No generator, but they need a fairly large amount of water. Hauling water also takes up labor so it’s not necessarily a win from that perspective. Our 3 dupes will need 6 terrariums to cover their needs. Terrariums do return their water usage almost entirely in the form of polluted water, which we can later convert back into clean water, but in the meantime will offgas polluted oxygen. In balance for this, they’ll consume some carbon dioxide, which may or may not be desirable. There is a trick to reduce labor on the terrarium and that is to build it in a shallow (< 2 tile) water source. The terrariums will absorb the water directly without need for labor.
Ultimately, this choice really comes down to a larger decision regarding technology paths. Algae deoxydizers are a good choice if your plan is to focus on complimentary features – getting coal generators going early, and finding other ways to deal with the CO2, such as carbon scrubbers which also use power. Algae terrariums are a good choice if your plan is to focus on water technologies and take a low-power starting path. Both converge at the SPOM, so pick the path that fits best with your preferred style. Most players prefer the algae deoxydizer.
I choose the terrariums because they require less infrastructure and I prefer to minimize my interim infrastructure builds, and because I tend to tend to focus on water technologies to get bathrooms and hydroponic farms going a bit faster. Just my preference. And in this build we happen to know we will encounter the cool slush geyser first, so it helps toward that end. If we were going to reach the natural gas vent first, I might choose to go the other way. This is why knowing some of the map layout is so beneficial.

By the end of cycle 5, meal prep research is nearly done. The water reservoir is finished and swept and I’ve removed the top water pump. In cycle 6 we’ll breach the water pool. I’ve started to sketch out where the food storage will go.
Cycle 6: How Gas Works
Day 5 summary with our goal in parens:
Food: 16,000kcal (15,000kcal)
Oxygen: ~1000g (2000g)
Oxygen rate: -87kg (>0kg)
Temp: ~22C (<30C)
Research Queue: Meal Prep, Power Generation
We’re still behind on oxygen, but it’s a little better than it was.
Cycle 6 Goals:
1) Drain the lower pool
2) Build the food storage area
3) Plant our first food
Finishing the sweep in the water reservoir is why the Gopher job is beneficial. Dupes can sweep 3x faster with this skill. Then it’s a matter of punching up into the pool and allowing it to flow down. We’re going to do a trick here to help us with the food storage, but it requires knowing how gas works.
It’s important to understand how gas dynamics in ONI works. There are a few basic rules:
- Two gas types cannot occupy the same tile at once
- Differnet gases do not mix. Polluted oxygen doesn’t mix or infect clean oxygen
- Different gases can trade tiles vertically or horizontally, but not diagonally
- Heavier gases are more likely to swap downward and lighter upward
- Adjacent tiles of the same gas will combine quantities. Think of the quantity of gas in a tile as its pressure. This allows adjacent tiles of the same gas to combine into one if needed to equalize pressure and for a single tile to expand into two tiles for the same reason.
These rules have some unexpected implications. Consider a single tile wide shaft like a ladder shaft. High oxygen pressure at one end can’t have an isntantaneous effect on low CO2 pressure at the other end. It needs to work through the process of swapping adjacent tiles, merging and splitting tiles, and so on. It can take a long time for the oxygen to migrate from one end to the other. But widen that shaft to 3 tiles and now instead of a two possible exchanges, each tile can exchange with 3 or 4 tiles. Gas can migrate much faster this way.
We can also use this to our advantage. If we want a region of gas to migrate slowly, then give it only a single tile interface outside of the region. This is how we set up our food storage area.

We’re going to do a more advanced technique here. It’s not necessary to our base, but it’s a good opportunity to see how it can work. In the shot above I’ve completed the floor above the pool of water. As you can see, there’s no gas in there. If we empty the pool from the bottom by digging where the cursor is, the water will drain down and leave a vacuum behind. If there’s more water than our reservoir can hold, it’ll stay that way, creating what’s called a water lock. Gas can’t pass liquids, but dupes can.
The food storage area works by creating a sealed area with only an access point at the top. We want that space to fill with CO2, which is the heaviest gas. Over time, CO2 will settle down in there displacing the O2 and lighter gases. Food doesn’t spoil when exposed to CO2, so it’ll work like a refrigerator, but won’t use any power. When we break into that space at the ladder, it’ll be a vacuum from the pool draining, so we can minimize the amount of gas that we need to replace with CO2. We could even climb up into the vacuum and do the construction with no gas there, but that’s not really necssary, and it’d be much slower.
Cycle 6 gives us another chance to pick a dupe:

Ma-ma has Divers Lungs but only Operator as an interest. Turner is kind of meh. But Meep is interesting – +3 Athletics and Learning, +6 Ranching and interest in Operator and Cook. He’ll catch up to the others fairly quickly and has a really nice start on ranching which is a pretty labor intensive job.

By the end of the cycle, we’ve gotten the food storage area built sufficently. Two new boxes have been built – one for edible items with a subpriority of 8 and one for cooking ingredients with a priority of 7. We want to quickly get food in there so it will stop decaying, and the two boxes give us an easy visual cue as to how much cooking vs edible we have. The water is draining down into the storage area.
You’ll also notice that water pressure doesn’t really work as it should. In the real world the water column piled up in the pool ought to force water to rise up the pump and ladder areas and flood that lower level, but that doesn’t happen. Instead water will remain topped off in the tile just below these until the water column drops to the the same level. That’s also a handy feature.
We got a few bristles planted around the printer. They won’t help us all that much for food, but they have a positive decor. The farm tiles don’t have a negative decor, unlike the planter boxes. This will help boost decor while also giving us a little utility. We selected Meep too late to get his cot built, so he’s sleeping on the floor. Oh well.
Cycle 7: Light, Food
Day 6 summary with our goal in parens:
Food: 13,500kcal (20,000kcal)
Oxygen: ~900g near printer, but 2000g near terrariums (2000g)
Oxygen rate: -48kg (>0kg)
Temp: ~22.5C (<30C)
Research Queue: Power Generation, Advanced Research, Plumbing, Sanitation, Decontamination
With another dupe, we have to recalculate. Instead of 3000kcal per day, we need 4000kcal. Instead of 225g/s of O2, we need 325g/s, or 195kg per day. The terrariums put out 40g/s, so we need a total of 8 to break even.
Cycle 7 Goals:
1) Dig out Meeps barrack
2) Clean up central ladder/pool area to get 4 more terrariums built
3) Plant mealwood
We raise the priority for digging out Meeps barrack since we really want that done today. Our oxygen is really good near the terrariums but it’s not getting up near the printer, and that’s because of that one tile exchange point. By opening up the area around the ladder, that’ll get fixed.
I put 4 mess tables in the food storage area. Why? Because there’s some oxygen I want to get rid of, so I need dupes to go in there and inhale it, and exhale CO2. We really want them on the floor directly below, but that will need a few more cycles to be ready. Once the food storage area is mostly CO2, we’ll carefully dig out the rest of the space to make sure no more oxygen comes in.
Down on the level next to the pump I put down 15 farm tiles. We’ll plant mealwood here as we dig it out. We don’t have 15 seeds, and that’ll take a few cycles to acquire, so it’s okay if we don’t finish it all this cycle.
We’re researching Power Generation because I want to put an improved battery below the research station. Then we’ll do advanced research to unlock the supercomputer, and then we’ll work up the decontamination tree to get deodorizers, which we want because of the algae terrariums. They’ll pay off in other ways, and we want the sanitation items because the room after the mess hall that we want to build is a proper bathroom.
We plant some Bristle Blossoms around the printer because the printer is a free source of light, and because bristles require light to grow. They need a temp below 30C and they need water. And they add decor. Beyond the printer, shine bugs put off light, and we can build lamps that use electricity. The light overlay helps us see where we can plant. The rules for light propagation are a bit unintuitive, so always check the overlay:

We need to produce 4000kcal per day. So how many plants is that?
The 5 bristle will each produce 1600kcal of Bristle Berry every 6 days. That works out to 267kcal per day each or about 1300kcal per day. We need another 2700kcal per day from mealwood. Mealwood each produce 600kcal of meal lice every 3 days or 200kcal per day. We’ll need 14 of them at a minimum. We have 15 farm tiles, so this should cover us once we have enough seeds to plant. Harvesting plants has a chance to drop seeds, and higher skill farmers cause them to drop more often, so as our dupes are nearing mastery of their jobs, we may drop one into farming just to get seeds to drop a bit faster.

We didn’t complete as much of the build as I had expected. I didn’t really have the priorities set well, and the dupes take longer when working in water.
Cycle 8: Cleanup
Day 7 summary with our goal in parens:
Food: 12,000kcal (20,000kcal)
Oxygen: ~900g near printer, 2500g near terrariums (2000g)
Oxygen rate: -60kg (>0kg)
Temp: ~22.5C (<30C)
Research Queue: Advanced Research, Plumbing, Sanitation, Decontamination
We’re down to 3 cycles of food, and mealwood takes 3 cycles to grow, so we must get them planted this cycle. We’ll up the priority on that area. Oxygen rate is still low, but the other 4 terrariums were built late in the cycle. This will be our first full cycle with 8 terrarriums.
Cycle 8 Goals:
1) Plant mealwood
2) Finish digging out other areas.
Nothing new to introduce this cycle. We’ll finish up as many of the projects we’ve already started.

Most of the mealwood is planted. Still a little cleanup to do, but it shouldn’t take long in cycle 9. We’ll plan out our mess hall next.
Cycle 9: Pollution, Mess Hall
Day 8 summary with our goal in parens:
Food: 11,000kcal (20,000kcal)
Oxygen: ~1100g (2000g)
Oxygen rate: +42kg (>0kg)
Temp: ~22.5C (<30C)
Research Queue: Sanitation, Decontamination
We did dig up some food, so we’re just a bit below 3 cycles. We’ll have bristles in 4 cycles and 10 meal lice in 3 cycles, so we should be okay. We’ll want to add some surplus soon, however. We’re net positive on oxygen by a reasonable amount. Our pressure is actually climbing faster than expected because in addition to the +42kg excess, the 8 stacks of polluted water bottles being dropped on the ground are off-gassing around 10g/s of polluted oxygen. That’s about 48kg per cycle. If they keep piling up, they should double that amount.
Cycle 9 Goals:
1) Finish prior projects
2) Start mess hall
The bottles of polluted water on the ground that get emptied from the terrariums are a bit of an eyesore, but they’re going to help us here for now. Every second they have a chance of emitting polluted oxygen (PO2), and the stacks of polluted water will grow. When they hit 1000kg, they’ll emit between 20-30g/s, or about half of what a terrarium puts out. When they off-gas PO2, they lose a comparable amount of liquid. Right now they aren’t harmful as they don’t produce germs, but once we punch into slime that’ll change and it’ll become quite dangerous. But before we reach that point, we’ll have researched deodorizers which consume sand and PO2 and release clay and O2. We have plenty of sand, and we will want clay, so we’ll use the deodorizers to convert the waste water into more oxygen and get some wanted clay out of it. After a few cycles we can probably turn off half of our terrariums, cutting our water and algae usage in half.
So while terrariums are generally not as good as algae deoxydizers, becasue we have plenty of water here and becasue we’ll want deodorizers before we punch into the slime biomes, which is coming up soon, they start to pay off a bit more here at the end.
Our dupes are nearing mastery and we’ll start wanting to put them in higher tier jobs, which will require more morale bonuses. The mess hall, and then the great hall following it are relatively easy rooms to build and give a lot of morale.
Eating a mess table in a mess hall will improve a duplicants morale
One Mess Table
No Industrial Machinery
Minimum Size 12 tiles
Maximum Size 64 tiles
Morale +3
The mess hall can be no more than 64 tiles, so another 16×4 space. But the Great Hall can be up to 120 tiles. Our floors are 23×4 = 92 tiles, so we’ll design it with a ladder going up to the floor above where another 6×4 space can be appended. If we grow to 16 dupes, we’ll probably want the extra space anyway. The remainder of the floor above will be the kitchen with quick access to the food storage. I’ve selected a wall/door to mark off the 16 tile space leaving the terrarriums outside. We won’t upgrade to a great hall until we no longer need terrariums.
We want to be careful as we don’t want to break into the food storage and release the CO2 there that we’re collecting. We also don’t want to dig the bit of oxylite that’s still there since we can avoid it for now.
We can also choose a new dupe, but we want to hold at 4 for a little bit. We’ll just let it sit there so we can pick one at the time of our choosing.
All but one bristle is planted, so we’ve done what we can for food for the time being. And our food storage is looking pretty good on the oxygen overlay:

A little O2 will work it’s way in there because the pressure outside the storage space is higher than inside, but as our dupes go in there they’ll consume those pockets of O2 and exhale CO2. It’ll take a good 20 cycles but eventually the pressure in there will equalize with the outside and O2 will stop leaking in. For now, it’s a small enough amount that the food won’t rot much.
Cycle 10: Off-Gas Containment, Washroom Planning
Cycle 9 summary with our goal in parens:
Food: 9,700kcal (20,000kcal)
Oxygen: ~1300g (2000g)
Oxygen rate: +21kg (>0kg)
Temp: ~22.5C (<30C)
Max Stress: 10%
Research Queue: Decontamination, Filtration, Distillation
We’re down to 2 1/2 cycles of food so we’ll start to get low food warnings before the crops come in, but we should be okay. We’ll look for a place to stash a few more crops to give us some surplus. We’re also starting to get a little bit of stress going. 10% isn’t a problem, but it’s something we’ll start to pay closer attention to.
Cycle 10 Goals:
1) Finish prior projects
2) Plan Washroom
We’re reliably positive on oxygen generation, so we can relax a bit on that for now. If need be, we can keep this going for probably 50 cycles, but we’ll try and retire it long before that. Food is a bit touch and go, so we want to improve that.
We have one barrack stubbornly not yet done. We’ll move the mess tables down to the mess hall and start to get that morale bonus. I’m giving up on the oxylite there because the air pressure in that area is already >2000g, and the oxylite won’t off-gas unless it’s below that. There’s a new battery I want running in the service floor below the resarch station that requires a bit of digging.
There’s an item I usually do very early on but I simply forgot, and that’s a compactor to prevent off-gassing of solid materials. There are few solid materials that release gas (and lose a bit of mass in the process) and we may want to prevent that from happening. Our outhouses produce polluted dirt which off-gasses polluted oxygen, which we can convert into regular dirt in a composter, but for now we’ll just store it away. We’re going to mine the oxylite which off-gasses oxygen. We’ll soon run into bleach stone which off-gasses chlorine, and later slime which off-gasses germ infested polluted oxygen. In a standard compactor they still release gas, but if you put the compactor in any kind of liquid, it won’t do that. In our water reservoir near the ladder we’ll build a standard compactor. Dupes can reach it without going in the water and it’ll safely hold our unstable solids.
I set the sub-priority of that compactor to 8, and have it store polluted dirt, and then oxylite once it gets mined. We’ll add bleach stone and slime once some of those drop.
So our next big project is going to be to build a washroom. This map is quite fortunate with the location of the upper pool. We’ll lay out the washroom above the pool on our planned pattern, and turn the service floor below into a reservoir like we did previously. This will be a fairly advanced project and will take at least 10 cycles to complete. That’s good because we have some research still to complete. In addition to finishing up Decontamination to get our deodorizers, we also want the pressure doors from that area, and then we’ll move onto Filtration which we don’t need yet, and then Distillation which unlocks the very important water sieve. The water sieve takes polluted water and sand and makes clean water and will be key to our washroom build.

There’s a bunch of moving parts to this project which will involve a number of new techniques, so we’ll break it down step by step.
Using a fully plumbed Washroom will improve Duplicants’ Morale
One or more flush toilets (Lavatory)
One or more plumbed wash stations (Sink, Shower or Hand Sanitizer)
No Outhouses
No industrial machinery
Minimum size 12 tiles
Maximum size 64 tiles
Morale: +2
We’re constrained to 64 tiles so 16×4 again. We carve off a 6 tile service space farthest from the ladder which we’ll make good use of. That leaves us with room for 2 latrines, 2 sinks, and 2 showers. Dupes don’t need to use the sink after using the shower, so we put the the shower closer to the door. This room will give us a +2 morale bonus instead of the +1 we have now, but more importantly, the shower will give us a temporary +3 bonus when used, and the room is much less labor intensive than the latrine. Instead of carrying water from the pump, we’ll have an electric pump pipe the water into the fixtures. They’ll emit polluted water, which we’ll pipe into a sieve converting it back into clean water. The sink and shower emit the same quantity that they consume, but the latrine emits more than it consumes, so the whole system once primed will run without additional water being added, and it’ll produce a little bit of excess. Good deal.
But first, we need to learn how to enclose that water pool while its in place. We’ll learn a few new techniques in that process.

I’ve removed some of the dig/build elements so we don’t get too far ahead of ourselves. We have two challenges here.
1. We want to build under the water and even displacing some of it upward, without it draining into our base.
2. We have a bunch of sand there which will fall downward causing similar problems.
There are some simple tricks to doing this, but it requires a bit more micromanagement than we’ve done thus far. For a start, we’re going to allow our dupes to dig up and over the top of the space to install the ceiling. We’ll be running some pipes up there and it’s easier to reach from above, and it’s a safe build to leave largely unattended.
Near the water we’re only going to want to disturb the column which forms the rightmost wall of the reservoir. I’ve extended that wall up by one tile since it looks like we have a bit more water than will fit. Our reservoir will hold 46,000 kg (46 tiles) of water, and I think we have closer to 51. That lip will help make sure it doesn’t spill over.
I’ve deselected everything one tile to the left of that column. We don’t want a dupe choosing to mine out the second column before finishing buiding the first. This is going to largely be a process of carefully completing one column, then moving one column to the left, competing it, and repeating. Once you get the hang of it, it’s pretty easy.
Leira has mastered Research Assistant so I’m moving her to Gopher and moving Burt to Research Assistant. He’s not qutie mastered Gopher, but that’s okay – it’s more important to land his +2 learning. We’ll put him back to finish up Gopher when he’s done I chose Burt because he’s already +3 learning, so he’ll move through this fairly quickly. I generally rotate all of my early dupes through Research Assistant, Gopher, Apprentice Miner, Apprentice Architect. We do those jobs a lot, so having everyone with those perks helps. That also keeps the Morale tier no higher than 2 for a while. Many other players specalize their dupes, and eventually we will, but moving Leira to Scientist (Tier 4) would push her Morale requirement to 8, and we can’t meet that yet. She’d get stressed very quickly. We’ll be there soon enough.

By the end of cycle 10, everyone is in their barrack, the mess hall is ugly, but qualifies as a mess hall and gives the +3 bonus. The supercomputer is in, and the battery is almost built. And we have enough of the rightmost wall of the washroom build complete to move onto the next step.
Cycle 11: Diagonal Construction
Cycle 9 summary with our goal in parens:
Food: 9,500kcal (20,000kcal)
Oxygen: ~1500g (2000g)
Oxygen rate: +8kg (>0kg)
Temp: ~22.5C (<30C)
Max Stress: 8%
Research Queue: Decontamination, Filtration, Distillation
We’re holding at 2 1/2 cycles of food thanks to digging some up, so that helps. Our new mess hall has put everyone positive on morale, so stress should stay near 0% for a while.
Cycle 11 Goals:
1) Water reservoir construction
2) Plant additional food
3) Begin sweep
We’ll put down 8 temporary planter boxes above the food storage area for more mealwood. This will give us an additional 1600kcal per cycle, though I only have 2 seeds at the moment. I could put down farm tiles, but I don’t want to risk disturbing the CO2 in the food storage.
We haven’t really done much to sweep the place up, so we’re getting some decor hits. Because of the micromanagement needed for the reservoir construction, having a standing low-priority sweep avaialble will keep dupes busy while we designate the next action. We’ll start with the barracks, then move onto the printer/research area. Again, we’re working extra hard to make sure that we keep our dupes low stress.
The key to building under liquids or without disrupting gasses is the technique of diagonal construction. Liquids and gasses cannot move diagonally though a corner where two solid objects meet. But dupes can dig through that corner and build through that corner. They generally cannot sweep through that corner, though.

So our approach here is to methodically ensure that the tile we want to dig/build has a solid tile next to and below it, and that our dupe can reach through the resulting corner. By moving tile by tile, your dupes can inch across and build a floor under a liquid.
Take care that sand will not always behave like a solid tile, or snow, and under enough pressure other natural tiles can leak and give way. If in doubt put a constructed tile there.

Here you can see that as he digs out that tile, the sand above collapses and falls into that space and the water rushes in as well. With time you’ll learn how to look at a given spot and anticipate what will happen. If it wasn’t for the wall on the right the collapse of the sand column downward could have let water flow to the right.

With that tile constructed, we can designate digging a space for the dupe to step into in order to reach through the next corner and construct the next segment of floor. We’ll repeat this over and over. Having the right priorities on your dupes can really help this along. I usually mark one for Build ++ and Dig + and – for everthing else. That way they’ll always prefer to build first and with no build opportunity then they’ll dig. Turning on proximity in the priority options can also help keep the dupe from running across the map for something.
Cycle 12: Alternative Build Approaches
Cycle 11 summary with our goal in parens:
Food: 11,500kcal (20,000kcal)
Oxygen: ~1500g (2000g)
Oxygen rate: -1kg (>0kg)
Temp: ~22.5C (<30C)
Max Stress: 0%
Research Queue: Decontamination, Filtration, Distillation
We’re up to 3 cycles of food thanks to some mealwood coming in. 5 more mealwood are planted, so we should be able to stockpile 4,000-5,000kcal every 3 days or so.
Cycle 12 Goals:
1) Water reservoir construction
Marie mastered Gopher so she’s now an Apprentice Miner. We’ll need to dig through some material that requires that skill. She’s unable to do research so she won’t rotate through that job.
We’ll continue to focus on our reservoir build. It’s a slow process but things will pick up once we get the bottom completed.

Because we’ve got a bit too much water, I’m having the dupes build every other tile where the floor will go. This will minimize the displacement of water so we don’t have too much push upward and give the water more opportunity to flow back down.
This could also be done by building ladders which won’t displace the water, but we can’t build on them, so we’d have to destroy and replace them with tiles anyway. We’ll see if this approach works well enough.
Instead of the approach of slowly building the floor from below, we could also have our dupes jump in the water and build below them. That’s safer in that it’s almsot impossible to flood the base that way, but from experience I know that the dupes would spend enough time in the 23C water that there’s a high likelihood they’d develop hypothermia. Hypothermia will slow them down considerably for 2 cycles, so it’s probably a wash in terms of time. This approach is irritating but a bit more predictable, in my view.

With a lot of micromanagement, pausing the game right as a dupe is building (not removing) a diagonal tile select the next ones to dig out so that when that job is done the dig job is the next one they will choose. Pay close attention to whether they complete the build or not. They should provide they don’t need to bail out due to lack of oxygen or the work schedule ending. If they don’t complete the build, unselect the dig. If they come back and start the dig first, then you’ve drained the pool into your base. Because you can pause it’s not too dangerous, but you have to pay close attention. You can also use the Move To directive when you select a dupe to get them to stop what they’re doing. Also helpful when they get into some kind of a pathing bug and just spaz out in place, or if they’re on the wrong side of a dig or build and are about to get cut off. Sometimes my dupes will try and do the farming from below, standing in the water pool rather than standing on top. A Move To directive will get them on top. Dupes don’t always think through the consequences of their actions.
Cycle 13: Revisiting Oxygen, Deodorizers
Cycle 12 summary with our goal in parens:
Food: 16,000kcal (20,000kcal)
Oxygen: ~1500g (2000g)
Oxygen rate: -32kg (>0kg)
Temp: ~23C (<30C)
Max Stress: 0%
Research Queue: Decontamination, Filtration, Distillation
Up to 4 cycles of food as more meal lice have come in and we’ll get our final bristle planted. We have those 8 surplus mealwood plants down as well. Oxygen came up short this cycle mainly because the build micromanagement kept the dupes from going down and services the terrariums. We’ll also notice our temperature is starting to climb. It’s 24C at the mealwood closest to the latrine, and we’ll find that first mealwood plant outside the door will probably be the first place we see any impact due to heat. But we have a little while yet. We’ll cover heat in more detail later. Overall, we’re doing okay. O2 is okay, not great, food is on the upswing. Stress is good.
Cycle 13 Goals:
1) Finish water reservoir containment, start washroom build
As you can see, we’re past the most dangerous part of lining the bottom of the reservoir and can now move without so much micromanagement. I’ll finish the left side bottom first using a sub-priority of 7 and then dig out the top, and then finish digging out the reservoir. That’ll give the water some room. So in our washroom we’re going to install some machines that need power. The pump won’t be needed to run the washroom water cycle once it’s primed, but we will need to remove some water to keep the space from overflowing. We have a liquid vent planned in there which we may not need, but it’s always nice to have the option. We’ll dump our excess water into the lower reservoir since we’re slowly using that one up. We’re also going to build a water sieve in the space to the left of the washroom. It’s 4 wide by 3 high and will need power when it runs, but that’ll only be 1-2 times a day. We’ll start off with a local generator/battery setup but before long find a better way to power this room.
The room below the washroom will be our medbay, and we choose this location because we’ll borrow the washroom infrastructure so we can put a latrine and sink in there. Hopefully we will never need the medbay, but we certainly don’t need it now, so we’ll temporarily use this space for some early manufacturing. We can still throw down a med-bed if needed. We’ll put a battery and generator here, and probably upgrade that to a coal generator fairly soon. For now, we keep digging and get that reservoir finished.
Another of the potential downsides of terrariums over a deoxydizer as the deoxydizer can be run more reliably as we saw in the last cycle. Our O2 at the bottom of the base is over 2000g, but at the top it’s closer to 800g, mainly because of all the digging we’re doing at the top. We’ve got one more cycle of that and then we’ll mostly be building, so we should be fine. One other tradeoff in the choice of O2 production is overpressurization. If we had a deoxydizer where our terrariums are, it would be shutting off as soon as the pressure hit 2000g – that’s what it does. Getting that O2 to the far side of the base can be pretty difficult in that case, particularly if that’s where the dupes are consuming the O2. By comparison the terrariums will keep pumping out oxygen at any pressure. With this setup that’s a little handy as it’ll help pressurize the area above faster, but there’s a downside. When the pressure hits 4000g, the dupes eardrums will pop, giving them a pretty bad stress debuff for half a cycle. We’ll find that the air pressure above the bottom mealwood farm will be the highest as the O2 gets pushed into that corner and has trouble evening out. We’ll probably install a pressure relief soon to help with that when we introduce the next trick to our O2 production.
So terrariums can better help distribute O2 across a base early on, but require more attention. If we were using a deoxydizer, we’d probably be more concerned as it’s more of a set and forget kind of thing, but its ability to distribute O2 is a bit weaker. Instead of installing it at the bottom of the base, I would probably have built it next to the latrine knowing that I would be building both up and down early on. I could also put a coal generator there to power it, which would help fill the food storage with CO2. I’d get a CO2 problem at the bottom of the base, but we could put 1-2 terrariums down there to soak up that CO2, and not have to try and maintain 8 of them. Had we installed the deoxydizer at the bottom of the base we might be considering relocating it now. Also, terrariums are handy if you want to generate bit of O2 far from your infrastructure. If you’re doing some exploratory digging and your dupes are constantly running back for O2, drop a terrarium down and it’ll create a nice little pocket of O2 and keep your dupes working.
It’s important to experiment with all the game has to offer. Try both, mix and match, see what the pros and cons are and see what works best for your play style.
By the middle of the cycle our Decontamination research completed and we’ve moved onto Filtration. This unlocks deodorizers and we’ve put several of them down around the bottom of the map. Deodorizers will prove vital to protecting our dupes later on, but for now, they’ll help us with our O2 generation.
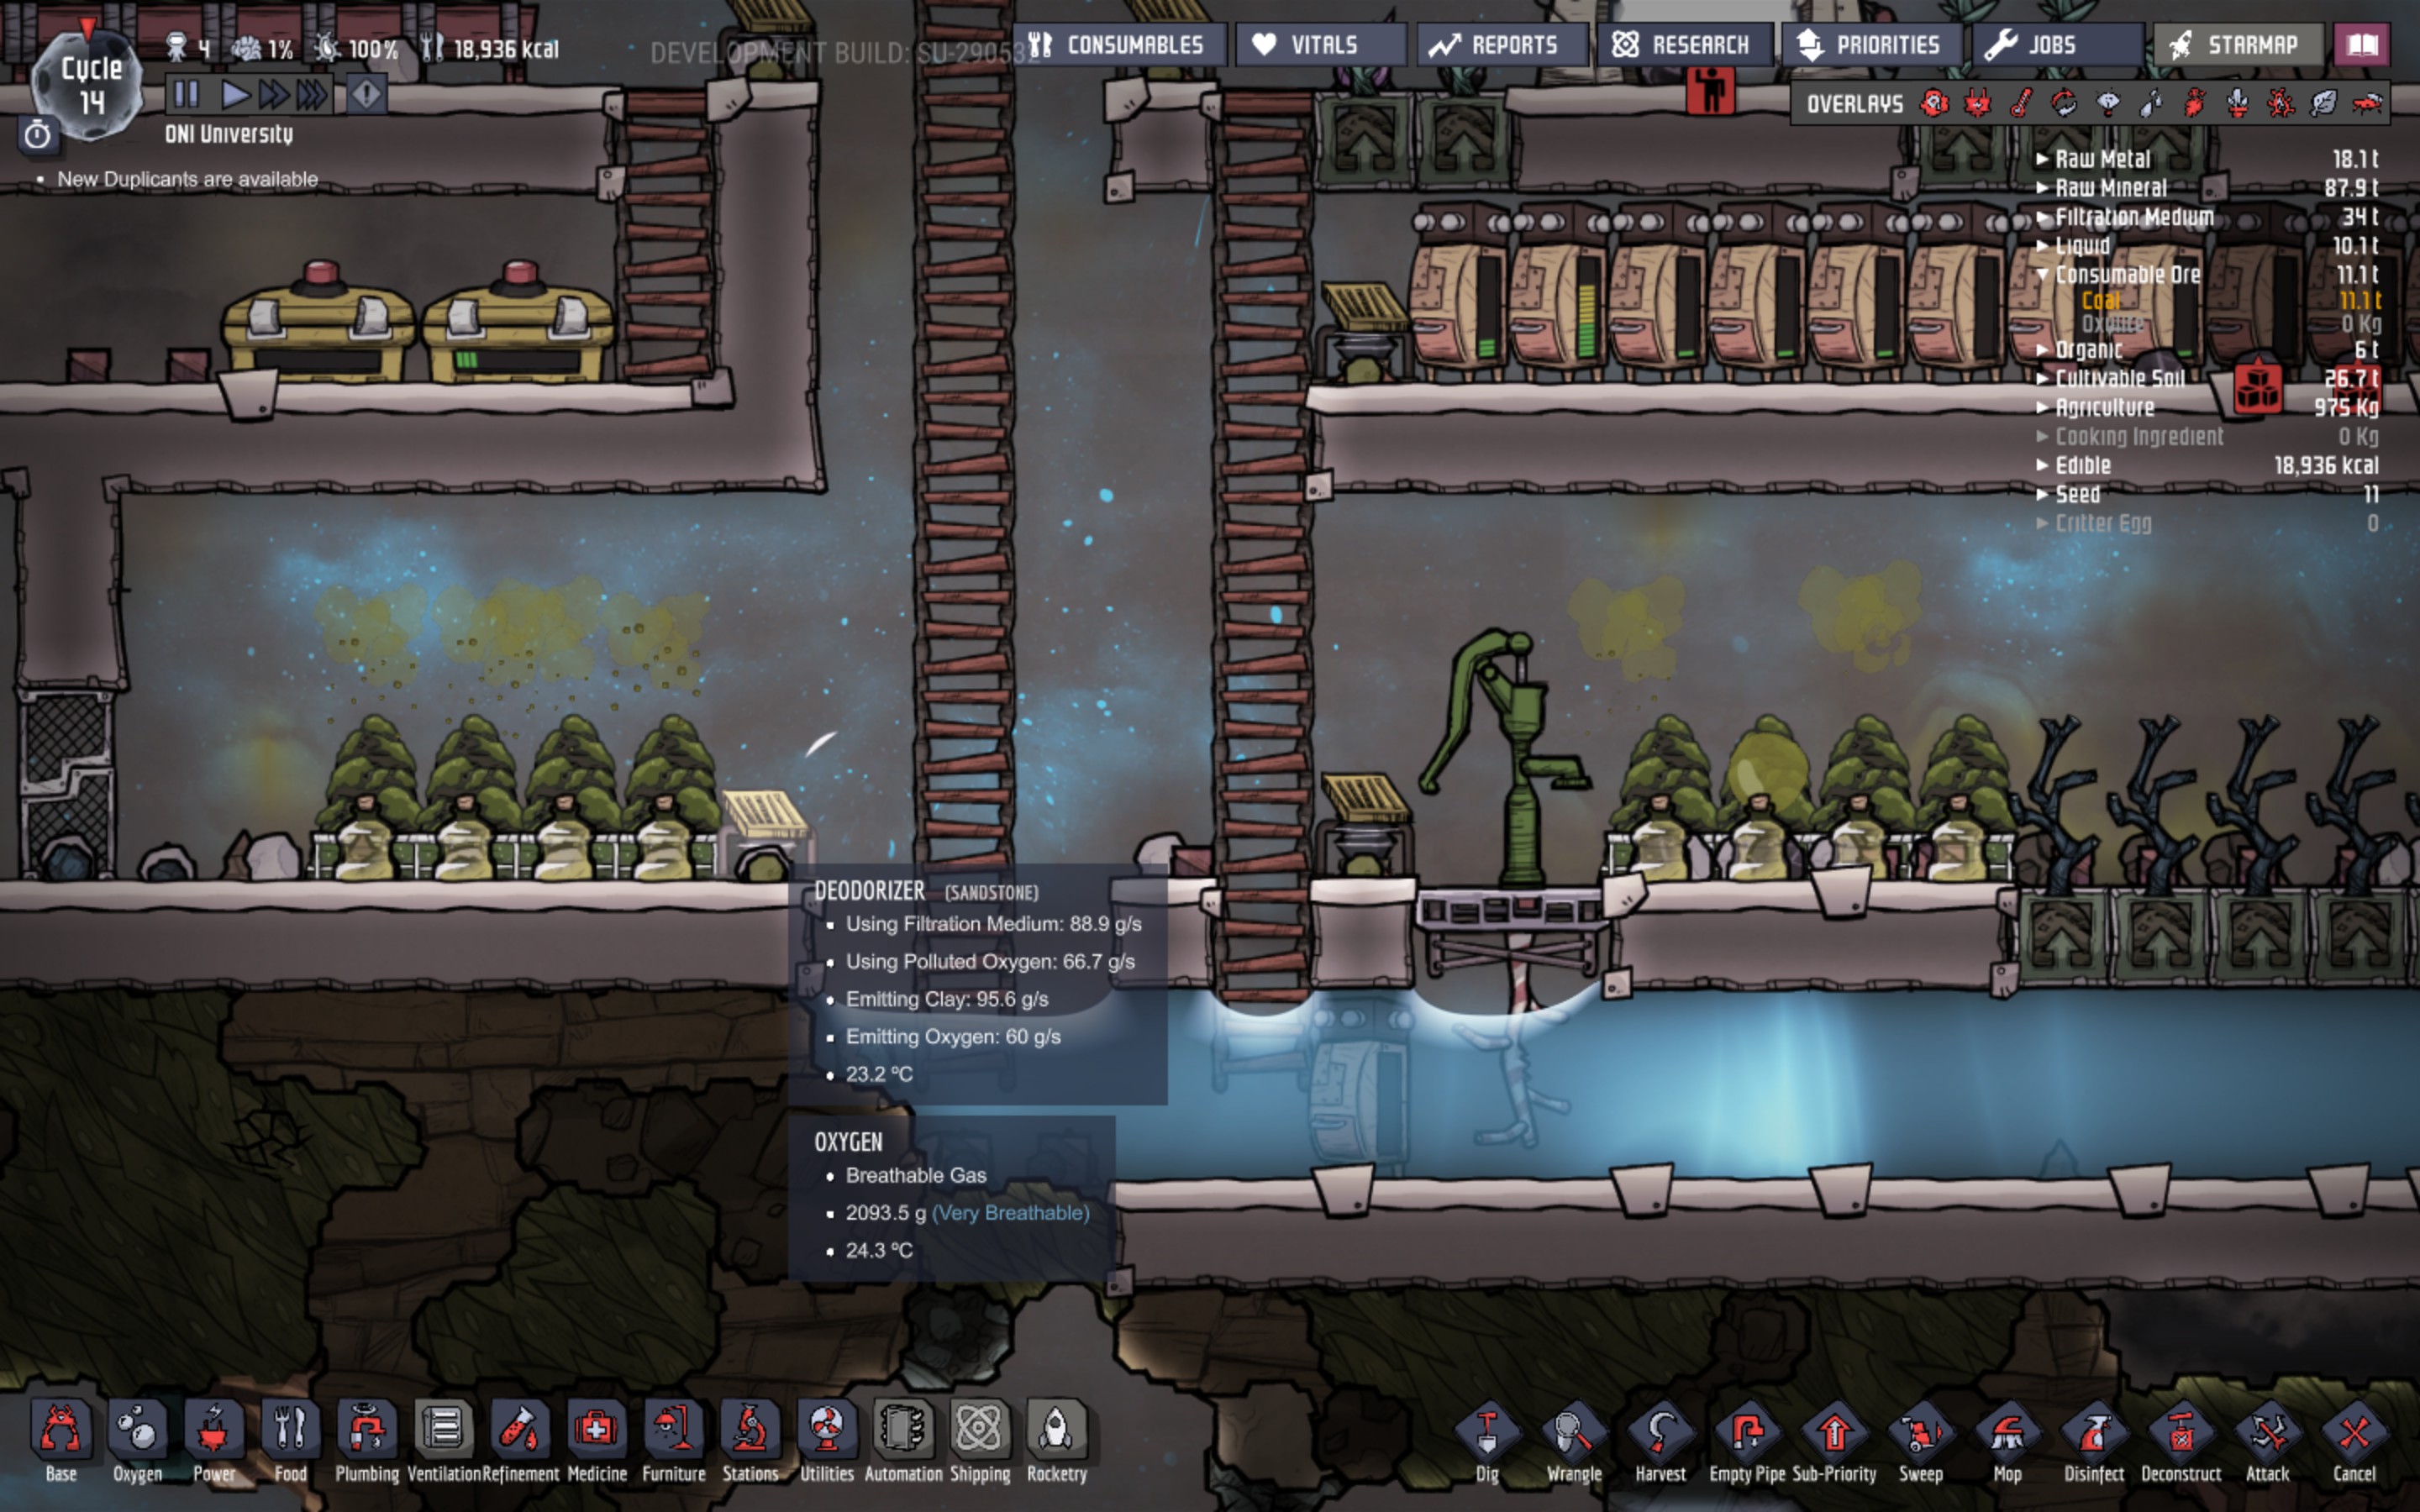
By now, our dupes have been emptying the terrariums of polluted water and just dropping it on the ground since we haven’t set up any place to take it. That polluted water will periodically convert some polluted water into polluted oxygen, which isn’t being counted toward our O2 generation, but which does add to the overall pressure in our base as the PO2 takes up some space. Now, pockets of polluted oxygen looks gross and should trigger a sense of a alarm, but for now is okay because this polluted oxygen has no germs. Later, once we reach slime biomes, that polluted oxygen will make our dupes sick – sometimes very quickly. The deodorizers convert polluted oxygen to oxygen, consuming sand and producing clay. We have loads of sand, and clay will be useful. Our bottles of PH2O on the ground are creating between 80g/s and 120g/s of PO2, or about the equivalent of 2-3 terrariums once it’s cleaned up in a deodorizer. We should see the PO2 quickly clear up and and our O2 production jump up. In fact, we can probably start turning off terrariums saving water, algae, and dupe labor. Deodorizers have no decor penalty other than the debris penalty from the dropped clay, so we can put them down liberally. They will pull in any PO2 in a 5×5 box centered around the deodorizer, but not through walls.
Cycle 14: Build Workflow
Cycle 13 summary with our goal in parens:
Food: 19,000kcal (20,000kcal)
Oxygen: ~1500g (2000g)
Oxygen rate: +58kg (>0kg)
Temp: ~23C (<30C)
Max Stress: 1%
Research Queue: Filtration, Distillation
Nearly up to our 5 cycles of food reserve. The mealwood comes in waves so this will jump up and down a little, but we should be consistently above 20,000kcal once our temporary mealwood matures. But the important thing here is that the deodorizers are doing their thing. With only half a cycle in service, we’re now considerably above our O2 rate. I would expect that to climb as high as +150. We’re going to have to watch for overpressure areas near the bottom of the map and we’ll start to disable terrariums.
Cycle 14 Goals:
1) Finish water reservoir containment, start washroom build

We didn’t make as much progress toward the washroom in cycle 14, but that’s okay since we got the deodorizers down, which will solve our O2 problem for quite some time. Working in water is also much slower and to be avoided whenever possible.
I’ve put down a generator and battery which we’ll use to power our washroom in the beginning. I gave myself an extra tile so that if we decide to put in a 3×3 coal generator that we won’t need to move anything. Other than that we keep digging.
When digging and building there are a few things you can do that won’t change the result, but which may save you some time. Consider the ceiling of the washroom. This is a routine pattern of digging some material to provide access to a tile you want to build. If your dupes prioritize digging over building, they’ll dig out to reveal that build location, but also dig out the tiles above it and the ones beyond it. Dupes can dig two tiles in front of them, so they’ll clear out that space beyond the build. Now, if they’re digging the same material they’d use to build, that material will fall all the way down, requiring the dupe to climb down, pick it up and walk back up. If, however, they prioritize building over digging, they’ll dig until that build tile is revealed, then build it creating the floor, and when they mine the material will drop at their feet so they can just pick it up and build. Sometimes you want it to drop becasue you want the material down there. Sometimes you don’t. In the end it doesn’t matter a lot, but how quickly your dupes work can depend a lot on factors like this.
Returning to the alternating floor which allows our dupe to hop across, another benefit of that is that dupes can pick up materials that are up to 3 tiles below them, so the dupes can pick up the debris that has fallen in the water without having to go in the water. Every time they go through shallow water and get soggy feet they’ll get a small stress penalty, but they’ll also stop on dry land and shake out their shoes. If they go through deep water they’ll get a big stress penalty and stop and shake out their clothes. So every time the dupes are building in there and hopping on those wet tiles, they get slowed down when they leave. Ladders might have been a better option here as I think the water would have stayed below the top of the ladder leaving their feet dry. They could still pick up the material that dropped, and the time cost to deconstruct the ladders at the end probably would be less than what they’re doing now. Either way the task will get done.
As you play along you’ll notice these things and adjust how you go about directing your dupes. Nothing to worry about, but if you see players taking different approaches this is part of the reason why.
Cycle 15: Routine Washroom Building
Cycle 14 summary with our goal in parens:
Food: 20,000kcal (20,000kcal)
Oxygen: ~1600g with some pockets as high as 3000g (2000g)
Oxygen rate: +133kg (>0kg)
Temp: ~23C (<30C)
Max Stress: 0%
Research Queue: Distillation, Internal Combustion, Interior Decor, Artistic Expression
We’ve hit our 20,000kcal target, so food is good. We’re starting to see some overpressurization and we’re now producing massively more O2 than we need due to the deodorizers. We’ll turn off 2 of the terrariums and possibly a 3rd.
Cycle 15 Goals:
1) Get power generation for washroom set up
2) Finish the washroom ceiling
3) Start to install fixtures

The order of these doesn’t really matter, but looking at the fixtures, we’re going to have to build the floor underneath them, and I think that’ll push the water up over the floor causing our dupes to get wet again. So we’ll put that off as long as we can. There’s no real rush here since we’re still researching the sieve which we need for the next major stage of construction.
On that, the Distillation research requires both research station and super computer work. So we could assign two dupes to research and do those two things in parallel getting the research done quicker, but it’s not a problem if it doesn’t get done until cycle 16. We’ll have our dupes run around and clean some stuff up, which we’ve been neglecting a bit.
Looking forward on reasearch, we’ll take care of Internal Combustion to get the coal generator, and then the two decor researches so we can get some art up. Among other things, that’ll let us upgrade our mess hall to a great hall.
Back on our construction plan, we’ll bury the power wire in the wall and run it through a switch before going to the pump. Eventually we’ll empty this reservoir into the lower one, but there isn’t room for all of it, so we’re going to want to run the pump intermittently. Instead of sending a dupe into the water to turn the pump on and off, we’ll use the switch. I put the switch to the side bcause I plan on putting the sieve to the left of it.
Again we’ll let our dupes build and sweep.
Meep mastered Gopher this cycle, so I put him on Apprentice Architect to help speed up our construction a bit.
Cycle 16: Routine Washroom Building
Cycle 15 summary with our goal in parens:
Food: 25,000kcal (20,000kcal)
Oxygen: ~1600g with some pockets as high as 3000g (2000g)
Oxygen rate: +48kg (>0kg)
Temp: ~23C (<30C)
Max Stress: 1%
Research Queue: Distillation, Internal Combustion, Interior Decor, Artistic Expression
We’re well ahead on food. I turned off 3 terrariums and our oxygen rate is still pretty high. I think I’ll turn off a fourth soon. Oxygen is only around 1000g in the washroom so I think I still want some surplus for a bit. We’ve got some chlorine gas in the mix from when we mined out the washroom area. A little bit of chlorine isn’t a problem. It’s a heavy gas and will settle toward the bottom of the base, but will sit on top of the CO2. We may get some in our food storeroom, but that’s okay. Chlorine kills germs on contact, and our food won’t rot in chlorine. It may settle down on our mealwood and mealwood won’t grow in chlorine, so we’ll just keep an eye on that. We’ll deal with gases more earnestly later on.
Cycle 16 Goals:
1) Finish the washroom ceiling
2) Start to install fixtures
3) Plan out plumbing once Distillation is researched

Nothing new to introduce this cycle either. Just catching up on construction and a bit of sweep.
Cycle 17: Routine Washroom Building
Cycle 16 summary with our goal in parens:
Food: 25,000kcal (20,000kcal)
Oxygen: ~1600g (2000g)
Oxygen rate: +30kg (>0kg)
Temp: ~23C (<30C)
Max Stress: 0%
Research Queue: Distillation, Internal Combustion, Interior Decor, Artistic Expression
Oxygen is distributing well. No place is below 1200g and we now have a few tiles as high as 6000g in that corner above the farms. 5 terrariums are still running, and I’ll turn another one off this cycle.
Cycle 17 Goals:
1) Plan out plumbing once Distillation is researched
2) General build cleanup and sweep

Distillation didn’t quite finish last cycle but we should be able to lay out our plumbing this cycle. In the mean time, I went ahead and designated the floors I want in this space. We’ll go ahead and work on digging those out and generally cleaning the place up as a low priority. The temporary ladder we bulit for the lower reservoir can be removed now that the central ladder is in place. In the mess hall, I put down a couple of ladders so that we can build the ceiling. Rather than build down from the food storage, which would be easier, I want to leave that space the size it is for now because it’s currently 100% CO2 but low pressure. If we dig that space out more, the pressure will drop more and we’ll start to get some O2 coming in. There’s no rush to expand that space so we’ll do a bit of extra work and build that from below.
I’m going to increase Leira’s priority for cleaining up. She’s in the Gopher job now and let Marie and Meep build while Burt handles research.
Distillation is complete and the sieve is constructed. Leira mastered Gopher so I put her in Apprentice Architect to help speed the next part up. The great room excavation/ceiling is done other than the abyssalite tiles in the corner that we don’t have the skill to remove yet. We’ll need to get Marie’s Apprentice Miner job mastered and put her in the Miner job to have the skill to do that. No rush. The temporary ladder is removed and those floor tiles replaced. A little bit of sweep got done. Cycle 18 will be all about plumbing and we should have a functional self-supporting washroom!
Cycle 18: Plumbing, Material Selection
Cycle 17 summary with our goal in parens:
Food: 28,000kcal (20,000kcal)
Oxygen: ~1600g (2000g)
Oxygen rate: +37kg (>0kg)
Temp: ~23C (<30C)
Max Stress: 0%
Research Queue: Internal Combustion, Interior Decor, Artistic Expression
I didn’t disable the terrarium as planned. The excavation of the mess hall took care of the overpressure. We removed around 30 tiles, and if we want to maintain a 2000g pressure, we need to add 60kg of O2. So, overall base pressure didn’t go up, and the overpressure areas went down. We’ll stay with this number of terrariums for probably 2 more cycles. Food keeps increasing.
Cycle 18 Goals:
1) Plumb Washroom
This is one of the more important lessons. Bridges are extremely useful and there are many things you can do using bridges rather then relying on powered filters/valves/sensors. We’re going to explore some of that here. These lessons apply equally to gas and liquid bridges. The game really opens up once you get the hang of this, which is why we rushed washroom so quickly. Typically I don’t worry about a washroom until cycles 30-50. The latrine is fine, but for the sake of a stable base early and getting into some important lessons, we did it early. The map was also very kind in terms of water placement. This is exactly where I usually put my washroom.

Before we lay out our pipes, let’s decide what to make them out of. Right now we have a choice of sandstone, igneous rock, granite, sedementary rock, and obsidian. Prior to the Space Industry Upgrade, we’d soon be adding abyssalite to that list, and pretty much every prior ONI tutorial you encounter will reference it, becuase abyssalite constructions were extremely handy, but that’s no more. It’s been replaced with other late game materials from here out.
So far we’ve made everything out of sandstone. It’s the abundant material at start and it’s the baseline with no special properties. I will continue to build almost all walls, floors, and ladders out of sandstone if only to use it up over other mateirals more useful for other things. Igneous rock has a +15C overheat temperature and is slow heating. That is, it’s a decent insulator, so if we don’t want to transfer heat between the pipe contents and the surroundings, it’s a good choice. Granite also has a +15C overheat temperature but has a +20% decor bonus. We’ll save it for anything decorative. Sedementary rock is thermally reactive so it exchanges heat more readily. Obsidian has a +15C overheat temperature and is thermally reactive. Igneous rock needs 5x as much energy to change temperature as obsdian and sedementary.
In the washroom, I’m not worried about decor. Standard pipes have a decor of 0 and 20% bonus on 0 is still 0, so we’ll rule out granite. The sieve is useful machine not just because of how it converts polluted water to clean, but also because it’s a heat creator/destroyer. When you put water into a sieve, no matter what temperature it is, it will always come out at 40C. If you want to create heat, put cold water in, if you want to destroy heat, put hot water in. Since we want our base below 30C, we don’t really want to deal with that 40C water, so we will want to insulate from it. We’ll choose igneous rock for our pipes. Later on, we can research both insulated pipes that further restrict temperature exchange and also radiant pipes which encourage it. We’ll make use of both. Igneous will do for now.
In the plumbing layout above, we have the first step of our water system. At the bottom you see where clean water will be fed to the fixtures and at the top where polluted water will be taken from the fixtures to the sieve input. Now, we could simply connect the sieve output to the input line at the bottom and call it a day, but that leaves us with two problems:
1) We need to prime the system by adding some water to those pipes. Thankfully we have some water right there and a pump.
2) The washroom produces more polluted water than it consumes. The sink and shower are balanced but our dupes add a bit in the lavatory. The lavatory take 5kg of water and produces 11.7kg of polluted water. 4 dupes using it once per day will produce around 27kg of water per day. That’s a bit more than is needed for a single bristle plant. But, water doesn’t compress, so if our system keeps adding water, at some point it’ll get full and stop working. We need an outlet.
The problem then becomes how do you decide how much to remove from the system and how much to keep in the system so it can continue to work. Sounds like something you need a sensor and a valve for, but we can do it without those, using bridges.
Cycle 18: Bridges
Each tile of pipe can contain a single type of liquid up to a given amount. No other type of liquid can merge with it or pass it. An adjoining tile with the same liquid can combine with it. When the pipe gets blocked, subsequent matching packets will combine with it until the capacity of the pipe and then start to fill the tile behind it. Even though a gas pipe can hold 1000g of gas, and a liquid pipe can hold 10kg, if you feed in alternating 1g packets of clean and polluted water into a 10 tile long pipe, it will become blocked after 10g of liquid, even though the pipe could hold up to 100kg. The reason is that the packets of alternating type can’t merge or pass. They just line up and sit there.
Gas and liquid bridges are intended to allow you to have gas and liquid pipes cross each other without combining. But they have a few special properties.

Here’s an example of two pipes – left and right – with a bridge between them. The first thing we notice is that bridges have an arrow a specific input and output. So they operate like a one-way valve. We can move a liquid from the lefft pipe to the right pipe but not the reverse.
The game sometimes gets confused with what direction water should flow in a pipe, and bridges can help establish that. The pipe on the left must flow from the top to the bottom. Water can’t come up from the bottom or from the right. The pipe on the right must flow from the bridge down, but it’s not clear if liquid flows from the top to the bridge or from the bridge to the top. That pipe will need to get hooked to an input or output for the game to know.
Bridges don’t contain liquids, they teleport it. Assume the left pipe under the input to a bridge contains 10kg of clean water and the right pipe under the output of the bridge is empty. The bridge will teleport that 10kg into the pipe under the output and it’ll flow from there.
If however, the pipe under the output contains 3kg of clean water, then the bridge will only teleport 7kg to reach the capacity of the right pipe segment leaving 3kg behind in the left pipe segment.
If instead the pipe under the output contains 3kg of polluted water, then the bridge will teleport nothing because it can’t mix liquid or gas types in a pipe segment. The bridge will be considered blocked until the pipe under the output can receive at least some clean water. If the right pipe is flowing with a mix of clean and polluted water, and the left pipe is only clean water, then the brige will serve to top up every clean packet that comes by in the right pipe, ignoring the dirty packets.
The pipe has two precendences that are important. Any gas or liquid that reaches the input to a bridge will always teleport provided that it can be recieved at the other end. This allows us to use a bridge to create a standard flow with a predictable overflow path. The output to a bridge will always prefer the pipe over the bridge. That is, the bridge will never interrupt the flow of the pipe it teleports to. If that pipe is always full, or always has a different liquid or gas in it, then the bridge will never teleport. This allows us to use the output of a bridge as way to top-up an existing pipe.

To our previous plumbing setup, we’ve hooked up the sieve to the input for the fixture, and we’re taking the output from the submerged pump and connecting it to the fixture input line via a bridge. This arrangment will result in the input inline preferring the output of the sieve and only drawing from the pump when the bit of pipe under the output is empty or partially empty. We put it as close to the fixtures as possible so that any water in the pipe between the sieve and the bridge wil be used first. That section of pipe works as a buffer. So, we now have a way to fill the washroom system, and after a few cycles, that pump shouldn’t ever have to supply water again because the lavatories generate excess water.
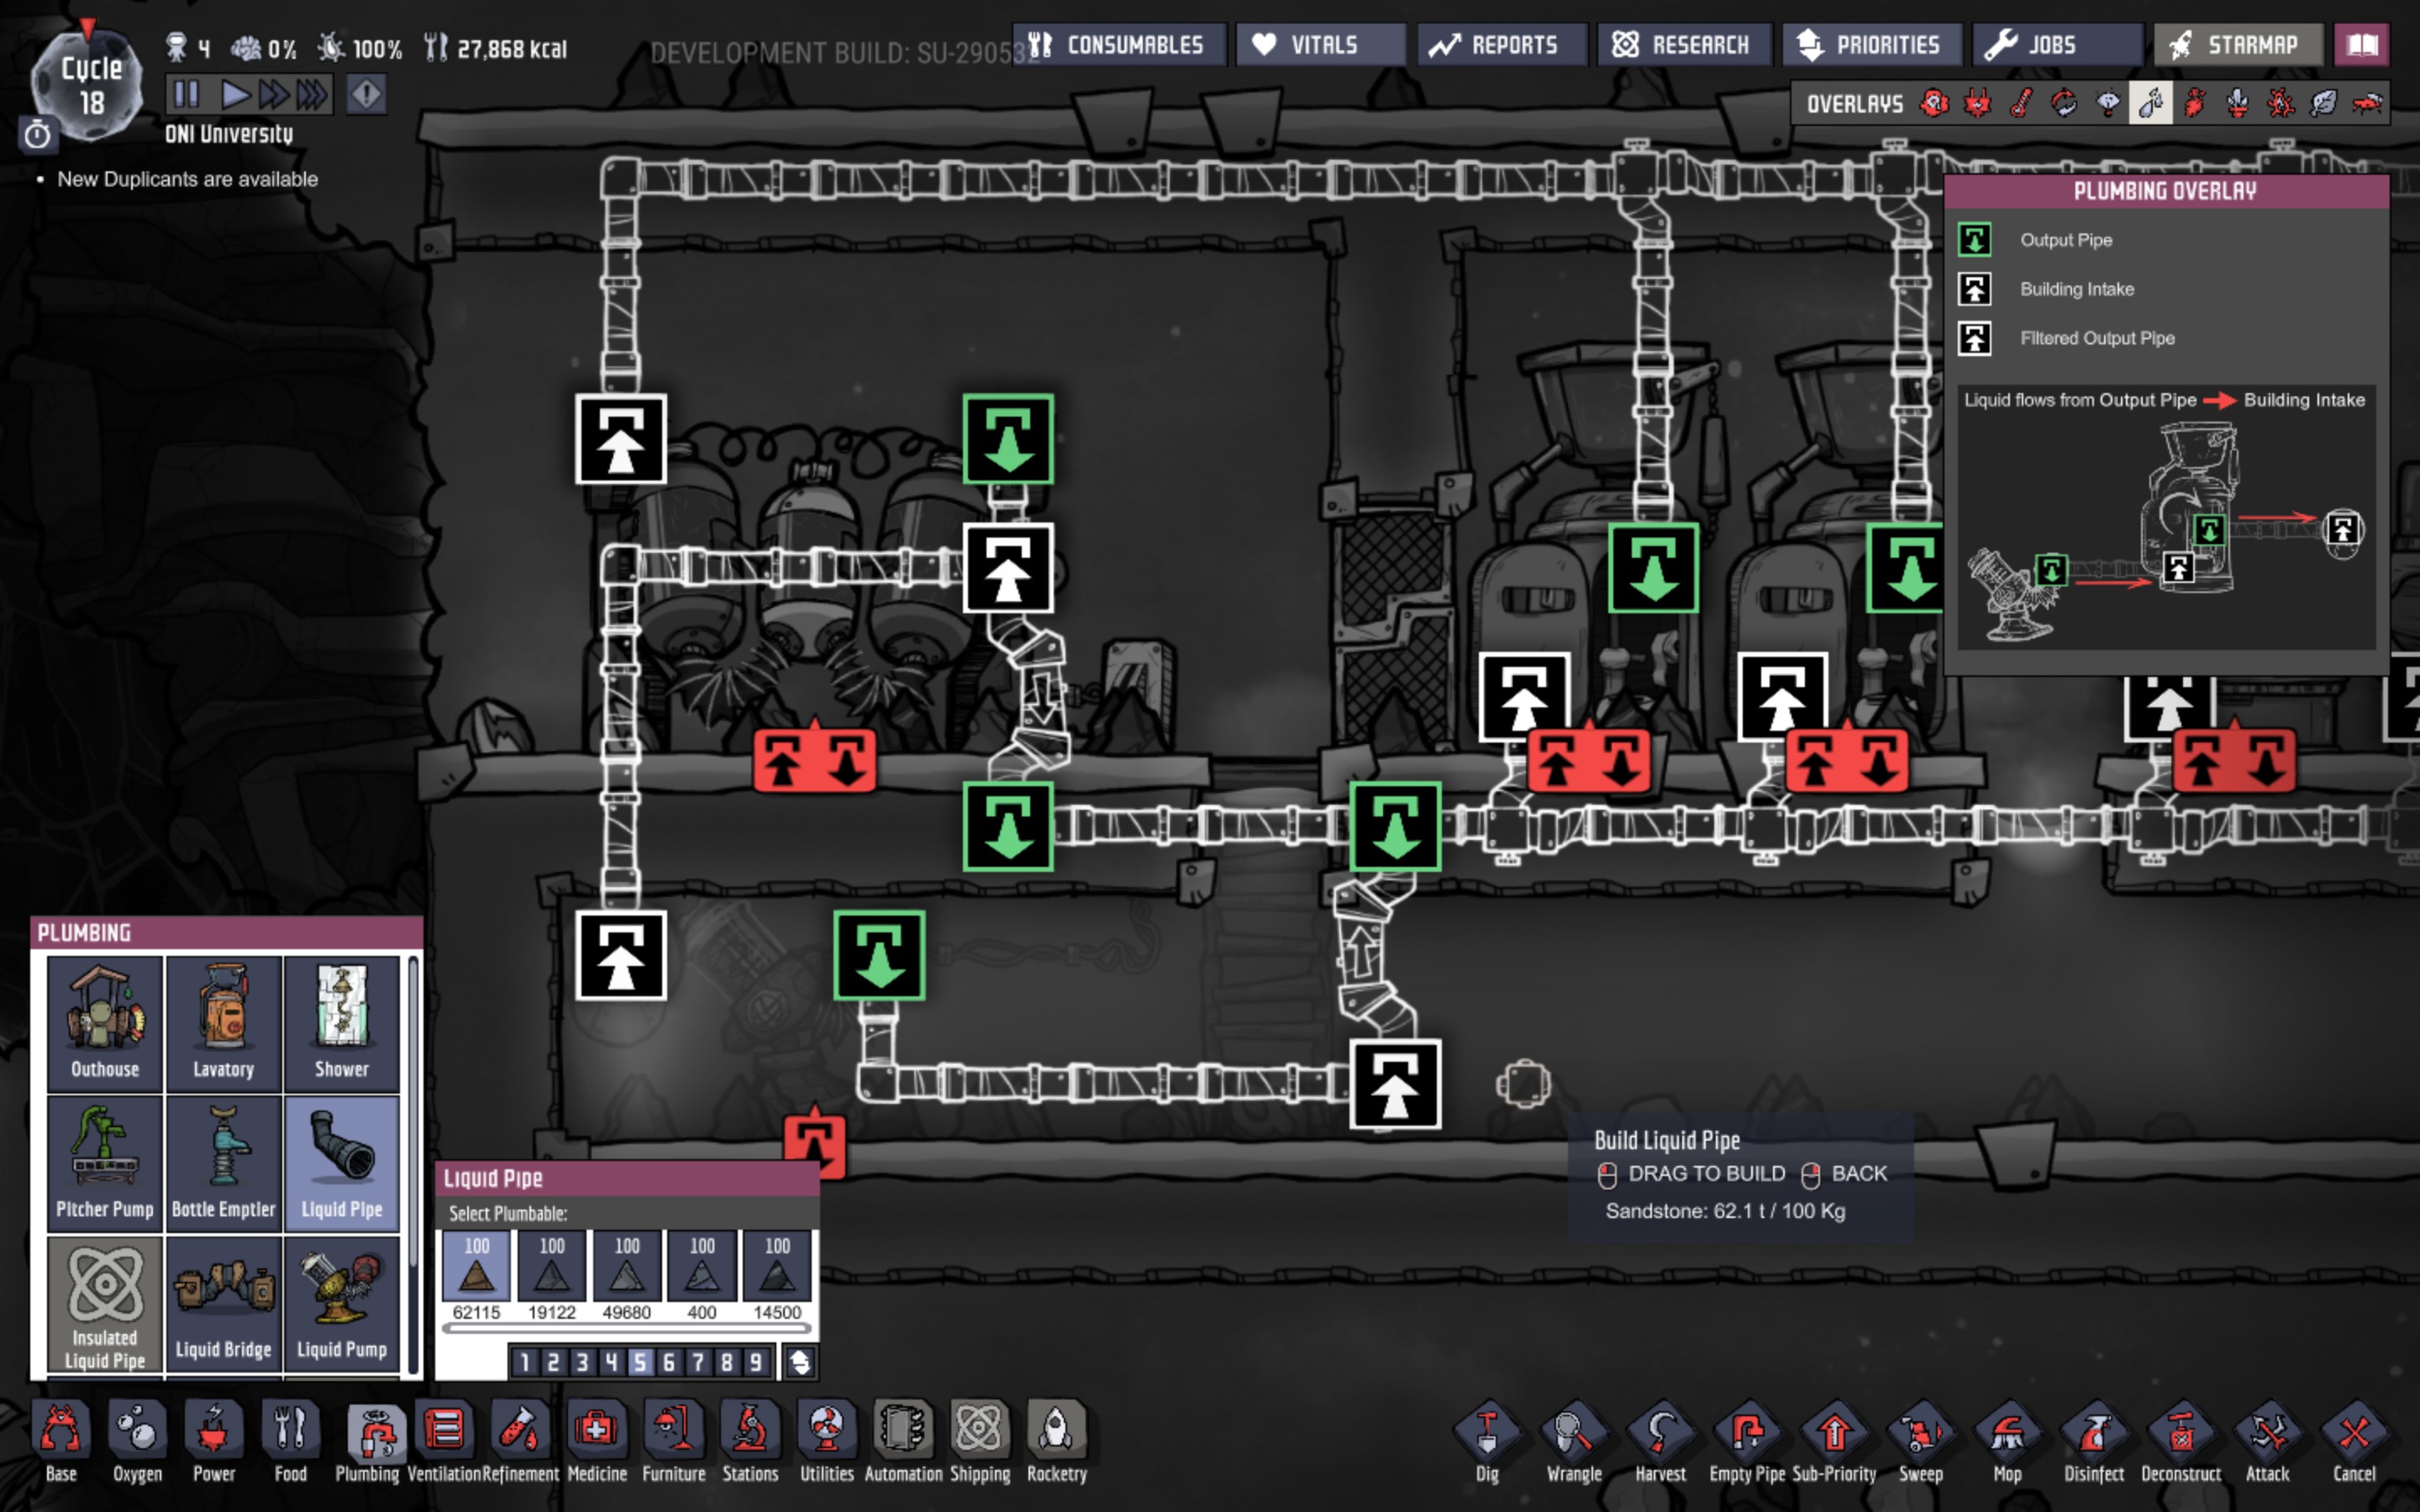
We’ve now removed a bit of the pipe betwen the sieve and the bridge and added another bridge there with a pipe that branches off and leads to the liquid vent. This is our overflow. The new bridge prefers the input, so as long as there is space at the output on the way to the fixtures, the sieve output will go to the fixtures. Once that is blocked and the bridge can’t teleport any more, it’ll send the water to the liquid vent.
Now we have a system that can’t get backed up. The pump will add if needed and the new bridge will send any excess to the drain. No valves or sensors needed. But there’s one more improvement we can make. Our water reservoir is full, and we really want to be filling the one at the bottom of our base. So can we send the overflow there directly? We’ll make another change.

Here we’re bypassing the liquid vent in the reservoir entirely and have built a new one by the central stair. The overflow will be send there where it will fall gracefully to the bottom of our base and into the first reservoir. Alternatively, we can run a pipe all the way down there and put the liquid vent in the lower reservoir, and we may eventually do that once we’re ready to extend the central ladder downward, but that’s not our plan for a little bit. This will do for now. Additionally, another bridge was added past the top-up line so that if the pump is running it’ll empty into the overflow and head down to the other reservoir. To start, we’ll run the pump to prime the bathroom system, then turn it off with our switch. After that, if we need water below, we can turn it on and it’ll go to the overflow. Pretty flexible, and we did it all with bridges. Now, I’m going to redo the piping to make it more compact and to provide a longer buffer pipe. It’ll be functionlly identical, but harder to see what’s happening. Don’t be afraid to tear it apart and rebuild it. It’s just water and thanks to the ladder down it’ll mostly clean itself up.

Cycles 19-20: Wrapping up the Early Build
Cycle 18 summary with our goal in parens:
Food: 30,000kcal (20,000kcal)
Oxygen: ~1600g (2000g)
Oxygen rate: +44kg (>0kg)
Temp: ~23C (<30C)
Max Stress: 0%
Research Queue: Interior Decor, Artistic Expression, Brute Force Refinement
Continuing to do well with food and oxygen. Nothing to change there yet.
Cycle 19 & 20 Goals:
1) Finish Washroom
2) Tidy up

Didn’t quite finish the plumbing but it’s close. Once it’s done we’ll turn on the pump which will prime the system and dump some of our excess water so we can finish the floor. Right now our washroom doesn’t qualify as a washroom because the openings in the floor count the water space below as part of the room, exceeding the maximum size. We’ll then finish the floor and turn off the pump since we’ll overflow the lower reservoir if we don’t.
Then, we’ll just keep working on sweeping and getting our other digging and floors done before we embark on our next large task. After Artistic Expression which will allow us to build artwork, we’ll move on to Brute Force Refinement so we can start to refine metal which we’ll need for a number of things down the road.
At this point, I consider the early game to be complete. We have net positive food and oxygen production, at least until the water and dirt and algae run out. We can run well past cycle 50 in this state. One our dupes has morale 10, and in a few cycles we can boost that to 16 or more. So, stress is well under control for some time.
The base is a mess and will take some time to clean up. We don’t have a solution for the inevitable heat buildup. We don’t have a sustaniable water source. Our power production is primitive and unreliable. There’s still a lot to do, but nobody is going to die for a while, and that’s what we’re after.
Intermission: Mid-game Base Design
We spent the first 20 cycles moving quickly to get a basic functional base up and running. Food, oxygen, and stress are all under control right now and should run fine through cycle 50 at least. So, where do we go next?
So let’s review our base design. What we have now works pretty well, but we’ve built virtually no infrastructure. There’s no plumbing beyond our washroom, no gas ducts, almost no wiring, and so on. We’re going to start needing that stuff, and a lot of it, so where do we put it? So far we’ve been building floors with a 2 tile high service floor below it. We turned 2 of them into temporary water storage. One is food storage. One has a battery and a bunch of compactors. Two are empty. Well, these are designed to hold a lot of that local infrastructure and keep it out of view. But they really only work for the floor above and below. How do we move resources across the map without plowing through living space? Well, let’s take a look:
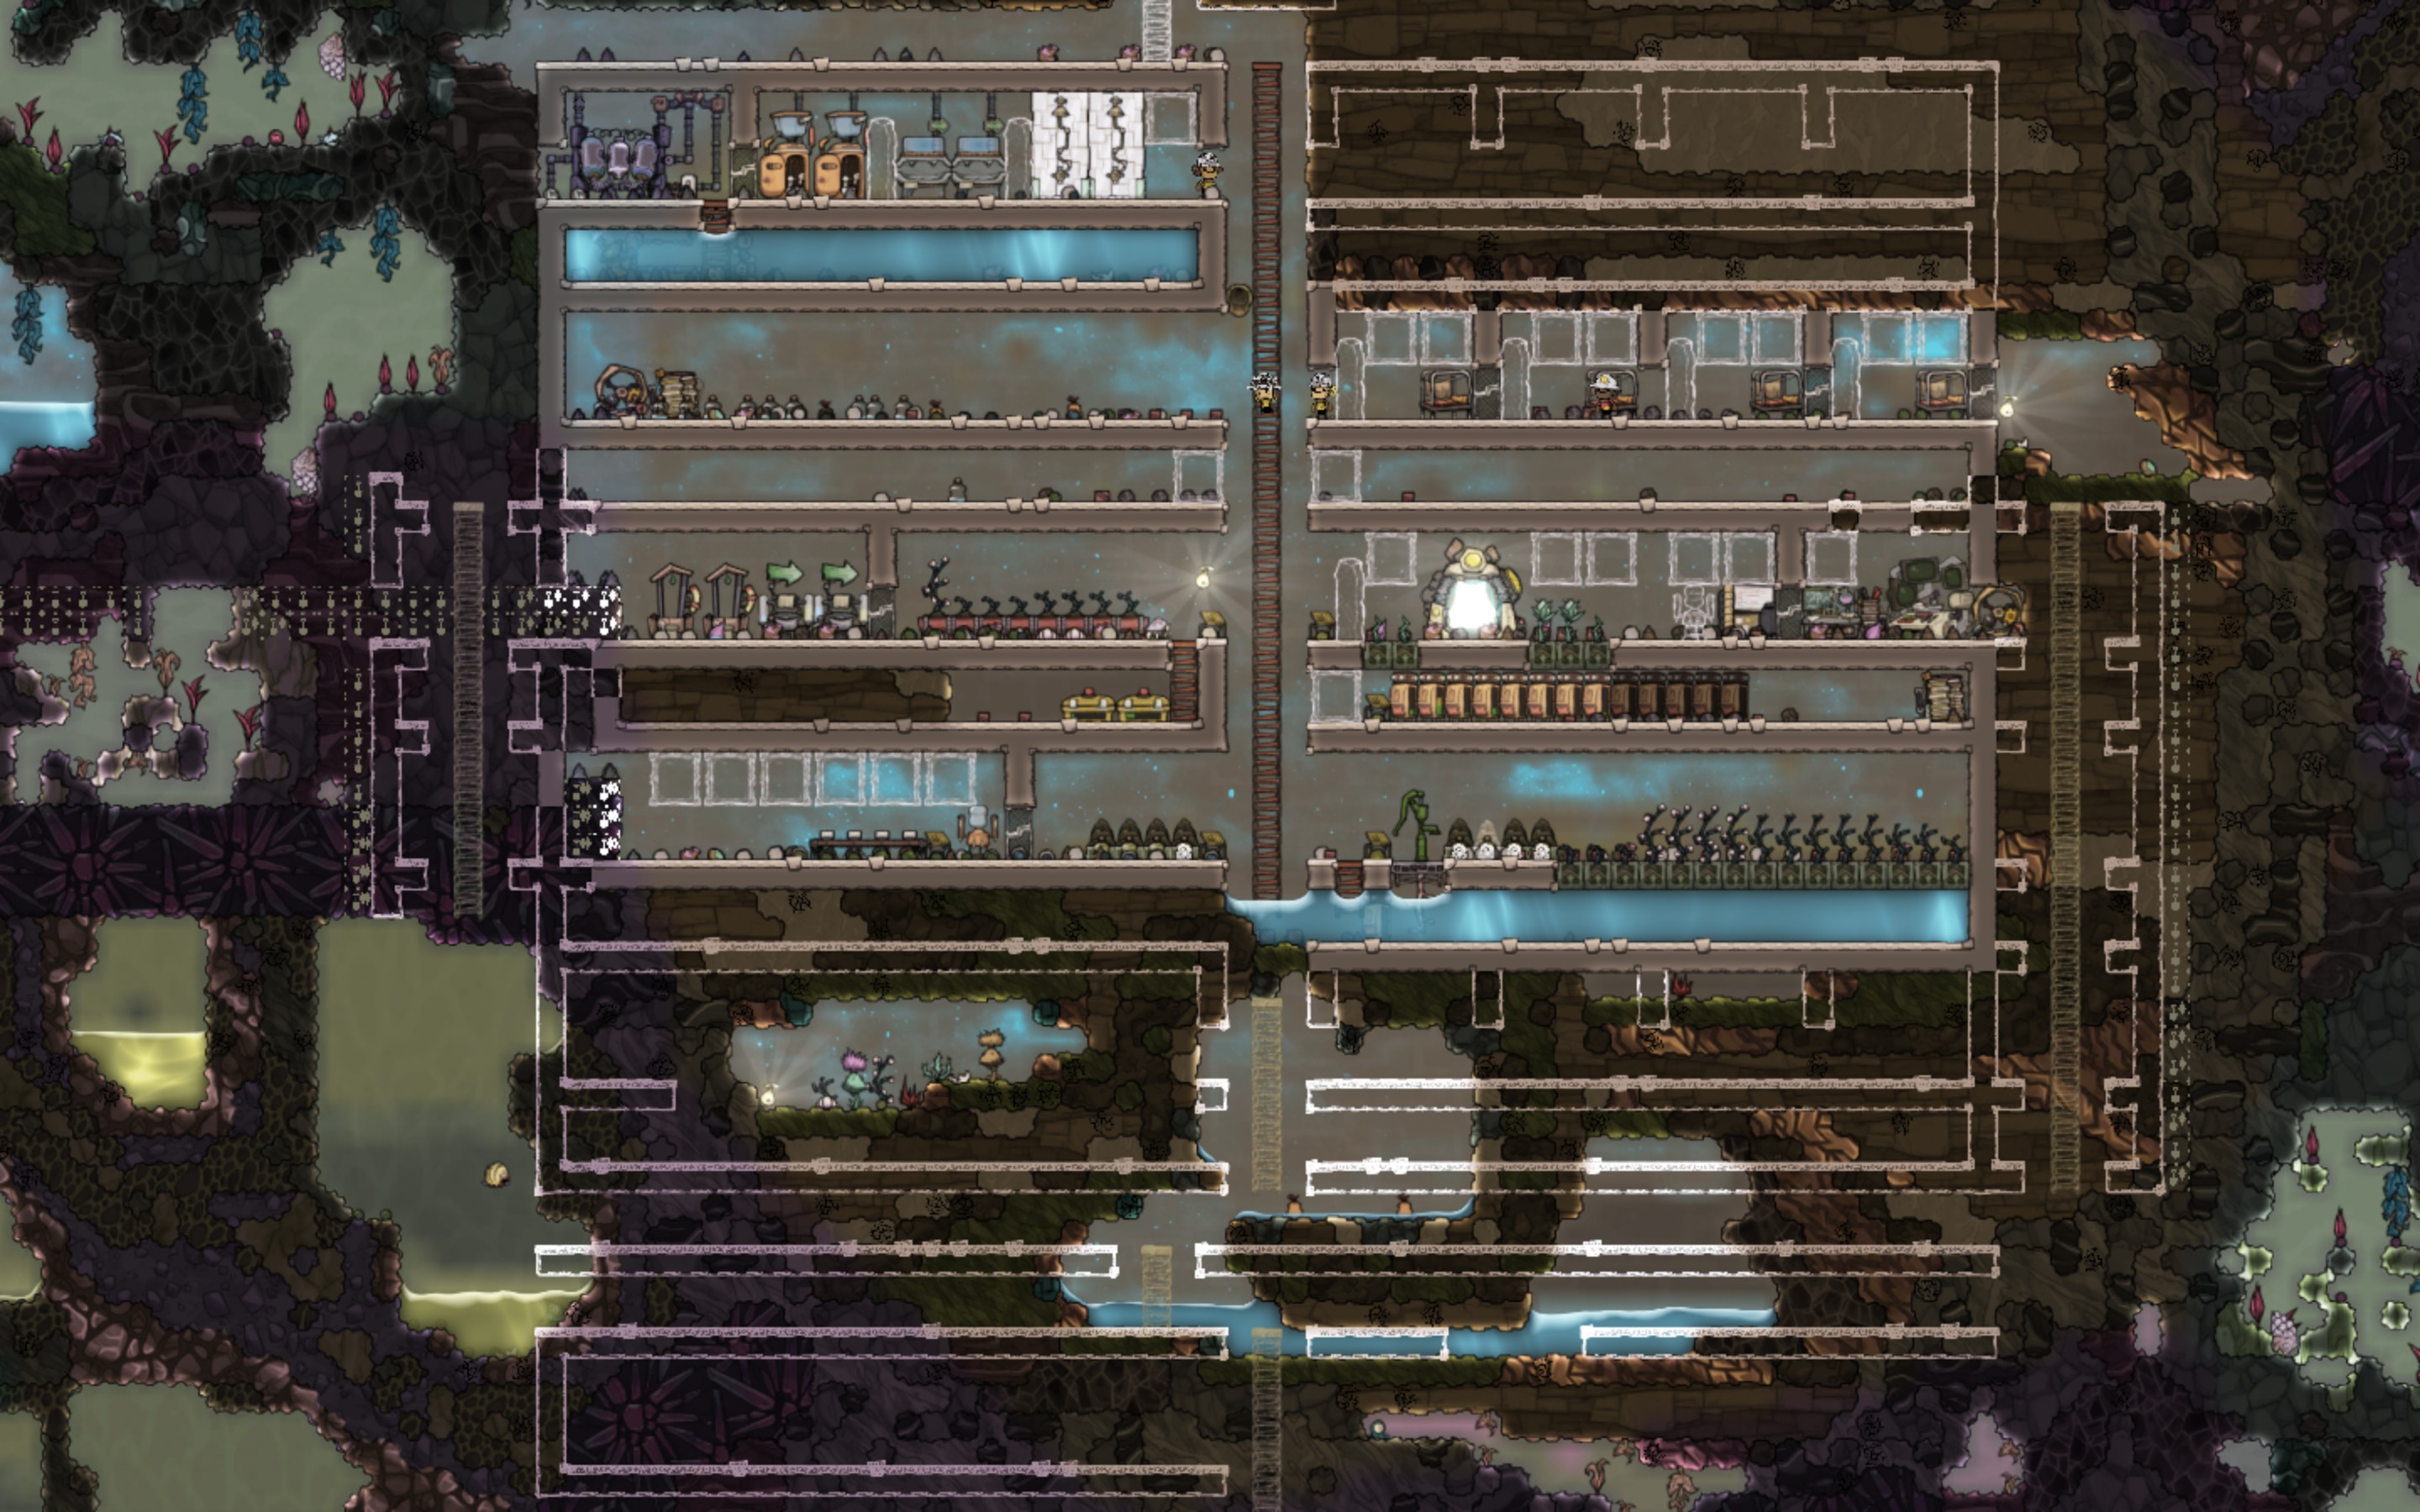
Zooming out, this is our living sector, centered around the printer. We’re going to have 5 floors and about 10 rooms in this sector. Here’s our guide:
This can give us a good base of 16 dupes. We’ll want a 2nd washroom once we go over 8 dupes. Think of this as the morale sector. That’s the focus. Above this sector we’ll have a farming/ranching sector. Same general layout of 4 high floor with 2 high service floor, but we’ll have an extra 2 high service floor between the sectors, and we will put an airlock there. Below this sector we’ll have a manufacturing sector, also with an extra service floor and an airlock. We may not need the airlocks, but it’ll help us to prioritize our cooling and oxygen if need be, ensuring that our living area is clean and comfortable. Ideally the other sectors are just as nice, but experience tells me that can take a little while.
Manufacturing goes below because we’ll be digging down toward the magma layers, oil, and other hot and nasty stuff. Farming and ranching goes up, because that’s the only other direction to go in.
So in order to accommodate our larger infrastructure, we’re going to build a service shaft on each side the entire height of the base. It’ll be 5 wide, so we can run supply pipes up and waste pipes down and because dupes can only build 2 away from the ladder. The outer wall of the service shaft will be insulated to protect the base from heat.
Cycles 21-23: Planning the mid-game
Cycle 19-20 summary with our goal in parens:
Food: 36,000kcal (20,000kcal)
Oxygen: ~1600g (2000g)
Oxygen rate: +30kg (>0kg)
Temp: ~23C (<30C)
Max Stress: 2%
Research Queue: Brute Force Refinement, Ventilation, Pressure Management, Air Systems
Everything is going smoothly.
As we move into the mid-game, our projects will take longer. Our first goal is to secure a renewable water source, and we actually have two nearby to choose from. With a reliable source of water, we can move our air production over to electrolyzers, which only require water and power. No risk of running out of algae, and less labor intensive. A renewable water source can also allow us to move off of meal lice for food and onto bristle berries. Like electrolyzers brisltes just need water and power, and our dupes will like them better.
We’ll start by finding our two water options, then devise a plan to stockpile some water, process it, and get oxygen production going.
Cycle 21-23 Goals:
1) Start artwork construction
2) Begin service shaft
3) Dig toward geysers
We’ve completed the first two decor researches, so we can start to place artwork around the base. We need a good decor item to upgrade the mess hall to a great hall. There’s no urgency to any of this, so we’ll set the sub-priority at 4. All of our sculptures and paintings will be made from granite due to the decor bonus.
We’re going to start on the left-side service shaft digging down to where we want to build our SPOM. We’ll skip the outermost wall for now becasue we want it to be insulated and we haven’t researched insulated tiles yet. No rush in getting that done either.
In order to keep our dupes focused, I’m assigning Marie to the Groundskeeper job and adjusting her priorities so she handles the terrariums, the farms, and sweeping up the most used areas. Leira is still in Apprentice Architect and Burt is in Apprentice miner so they can work on that dig toward the geysers. Meep is continuing with research.
There was a small problem with the plumbing setup that I didn’t discover until it was built. This isn’t unusual.
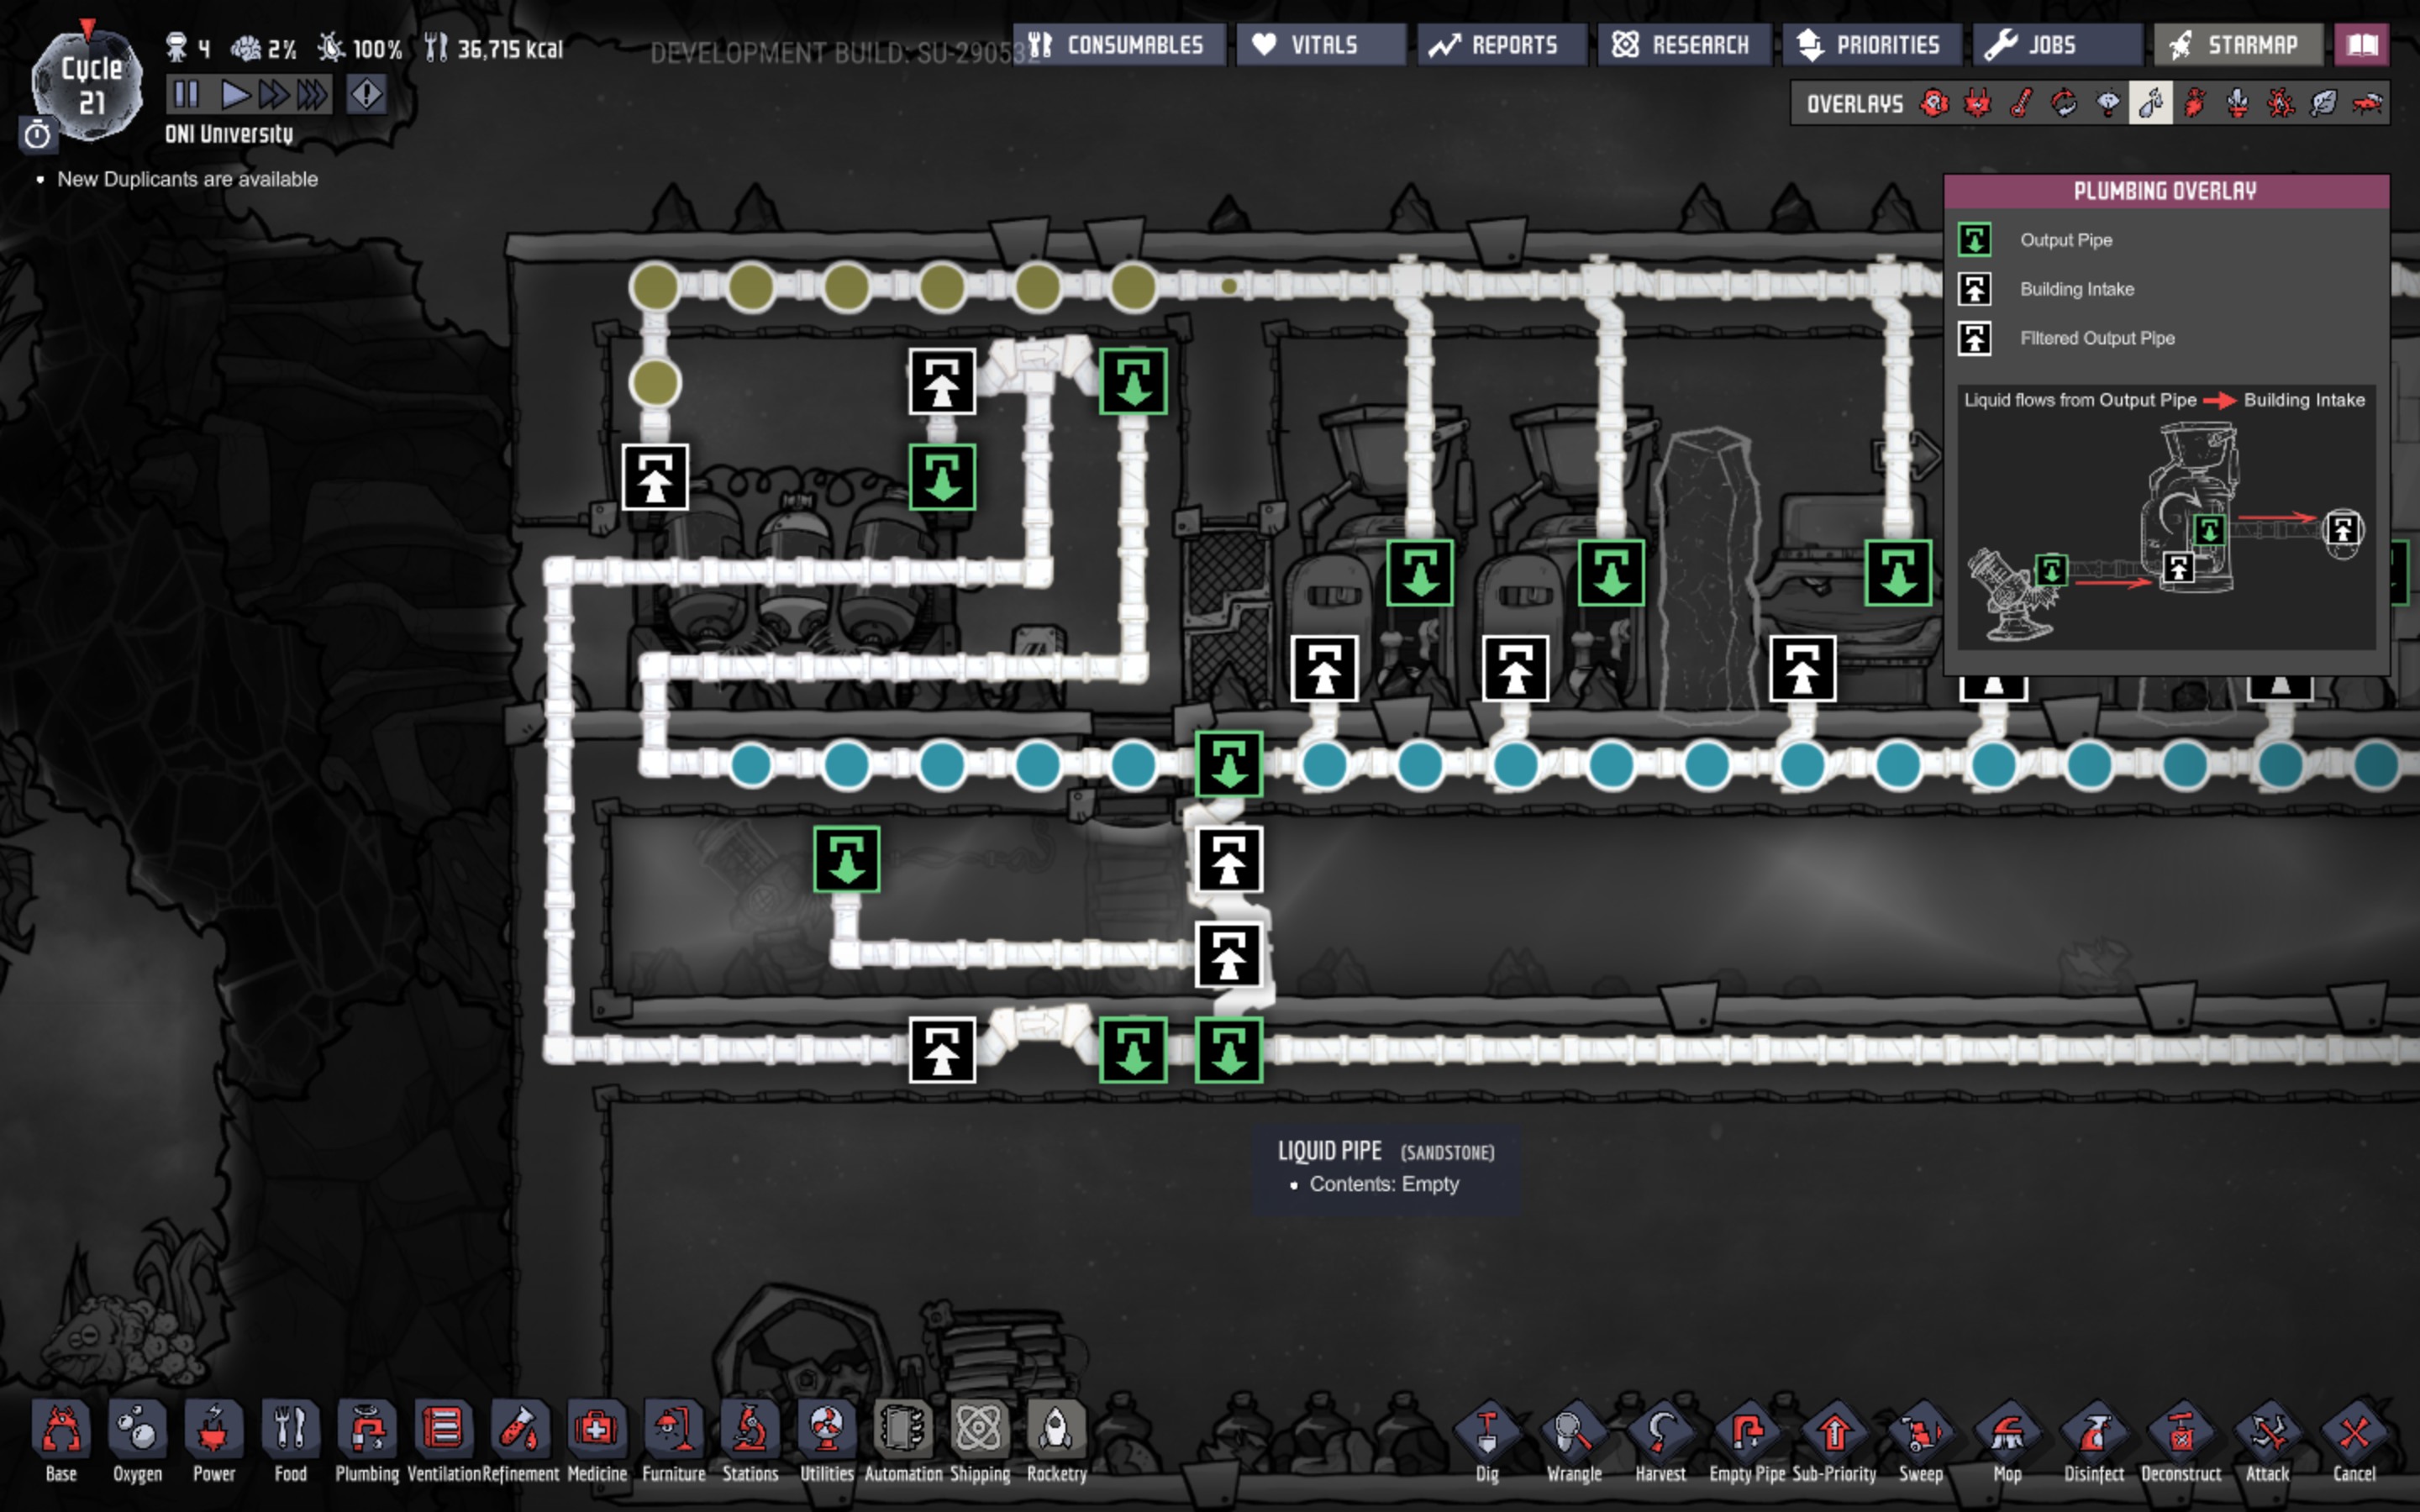
In the overflow line, it’s ambiguous what direction liquid should flow between the two bridges. Water could flow from the submerged pump back up toward the sieve and then down again into the line to the fixtures. By putting a bridge in that line, it makes clear the flow direction.
Cycle 24: Choosing Water Source
Cycle 21-23 summary with our goal in parens:
Food: 37,000kcal (20,000kcal)
Oxygen: ~1500g (2000g)
Oxygen raate: +62kg (>0kg)
Temp: ~23.5C (<30C)
Max Stress: 0%
Research Queue: Air Systems, Improved Plumbing, Liquid Tuning
Everything is still going smoothly. The large dig west is happening faster than the O2 system can fill it. That’s not a problem so long as we have overproduction and give the system time to catch up. I removed four of the mealwood planter boxes because food was accumulating pretty quickly and I wanted to save some labor.
The area to the west of the base is pretty warm so opening up to it will heat up our base a bit faster. We still have quite a while before it starts to cause problems. The barracks are finally swept, as is most of the washroom. I’ll keep Marie working on that for the forseeable future. It may not be the best use of her time given all the morale boosts we’ve already created, but I like tidy bases.
Research is moving pretty quickly now. We’ll add Improved Plumbing and LIquid Tuning. These will give us acces to insulated and radiant pipes, and we’ll probably need both of them for the next part of our build. We’re researching faster than we can use the new technology so we may hit a point where we want to stop research for a bit.
Cycle 24 Goals:
1) Choose a water source and begin planning infrastructure for it
2) Continue to tidy the base
To the west of the base we’ve revealed two water sources. The first is pretty apparent, a cool steam vent.

Looking at the status it’ll output about 1400kg of water per cycle while it’s active. We don’t know how long it’s active until we analyze that, but typically they’ll be active for some dozens of cycles out of roughly 2x that many cycles. So if we want a steady amount of water without running out, we’ll need to be able to store some of it to carry us through the inactive periods. But we can probably guess this will give us around 700kg of water on average per cycle over a sufficiently long period of time (perhaps 100 cycles or more). Our bristles consume 20kg per cycle, so this vent can supply enough water for around 35 bristles indefinitely, given enough planning on our part. That’s 9300 kcal per day or enough to sustain 9 dupes. Split between bristles and O2 production, it should easily sustain a base of 6-7 dupes indefinitely. Moving to other sustainable food sources that don’t need water, we might be able to run a base of 16 off of it.
The steam it puts out is 110C and we’ll need to cool that for it to condense to water. We’ll also need to cool it down somehow, becasue that’s too hot for brisltes and dumping near 100C water into our base will heat it up in a hurry. Nevertheless, cool steam vents are a great source of water. It’s not that hard to deal with the heat once you get a reasonable power supply going.

This one is harder to spot. You can tell that some kind of vent or geyser is here by the 4-tile wide neutronium strip. I’ve dug into the very corner of it to reveal what kind it might be without allowing to erupt. Revealing a volcano in this location at this stage of the game would, well, suck. We’re not ready to play with volcanos. Getting a cool slush geyser is almost like lowering the difficulty of the game. It’ll output 2,280kg of polluted water every cycle while active, or around 1140kg per cycle accounting for inactive periods (which we’re guessing at for now). That’s about 50% better than the cool steam vent and should easily keep a base of 8 dupes in both food and oxygen.
What’s more the polluted water is -10C, so we can use it as a heat sink, cooling down other things around us. In fact, it’s proximity to the cool steam vent means we can use it to cool that down. Now, we’ll need to run the polluted water through a sieve to turn it into clean water, but that’s easier to deal with than cooling the steam, plus we get a lot of water out of it. We’ll start with the slush and come back for the steam a bit later.
So, for dealing with a cool slush geyser we will want a reservoir to collect the polluted water, then feed it into a sieve to turn into clean, and a reservoir to collect the clean water. It’d be nice to do this on demand, but the geyser won’t be running for many cycles at a time, so we need to store enough to get through that period. We’ll send a scientist to analyze it soon to see how soon it will next become active, and how long the active/idle periods are. That’ll tell us how much storage we need, and whether we need to do something immediately or if we have time to work toward more of a permanent solution.
For now, we’ll reveal it, plan for a pump and piping toward our base. We’ll want to store it somewhere down in the manufacturing area. Ideally at the bottom, but we’ll see if we have time to do that. We’ll start digging downward now though.
Cycles 24-26: Change of Plans
So no sooner do I send my scientist in to analyze the cool slush geyser than it start to erupt. First thing I immediately cancel the analysis because the dupe will get hypothermia in -10C water before they can do anything useful. We’ll have to rethink when to do this. So, that means we have an active geyser that will remain active for who knows how long and then go inactive for again, who knows how long. From prior experience I know that if I take the time to lay out a long term plan, by the time it’s done, the geyser will be inactive and I’ll have to wait dozens of cycles to see it erupt again. This time we’ll come up with a quick temporary solution.
If you thought I had this all planned out, I do. But circumstances will constantly come up to cause you to take a different path to get there and improvise. Right now we need to assess where we are, what we have to work with, and deciding on a plan that makes sense for right now. The nice thing about ONI is that there’s no penalty other than time for dismantling something you build. You get 100% of your resources back. So we’re going to keep our long term goal in mind, choose to do something different, and try and minimize how much we’ll have to fix.
Right now, we’re just interested in capturing as much of the geyser output as we can because we don’t know how long it’ll last. Looking at the map I think the best solution is to use that natural opening where the left service shaft was going to go, which already contains polluted water, and simply pump our water there. We can get access to that pretty quickly and it’s quite large. We’ve already got mastery in Apprentice Miner on Marie, so we can put her in the Miner job so she can mine out the abyssalite. That chamber, however, is in a slime biome, so if we drop any slime, that water will get polluted. We can cross our fingers and hope for the best, or we can carefully put some walls down, deodorizers, and keep it out of contact with the slime. I’ll do that. If our polluted water gets saturated with germs, we’re going to be unhappy. We’ll drop a pump in the bottom of that space and then figure out what to do from there.
We’re also going to adjust our research a bit. We’ll keep working through Improved Plumbing because we’re going to want the insulated pipes, but we won’t need the radiant pipes so urgenly, so we’ll skip Liquid Tuning. Instead I think we’ll pick up Temperature Modulation so we can put down insulated tiles and then I’m not sure after that. We need about 5 technologies and the order we need them isn’t quite clear yet.
I also want to take on another dupe. Normally I’d wait until I have sustainable O2 and food, which we won’t have until this project is done, but I’m worried that if this takes too long, then we might miss our window with this geyser. I know we can generate enough O2 with what we have for 2 more dupes. And food is just a matter of dropping down more mealwood. We have 40t of dirt, so we’re good for mealwood fertilizer for ages, and we have 8t of algae so we’re fine for terrariums for some time. And if you look at where we’re going to be buiding next, we’ll get a bunch more algae i the process. We’ll task one dupe with just keeping the base running, one on research and everyone else mines/builds.

So here’s our immediate construction plans. Rather than drop down a pump, battery, generator and lay pipes over, we’ll just dig a corridor over to the shaft and let gravity do that work for us. We can add the pump later. And we’ll wall in the shaft to keep it from the slime, but that will require some very careful digging. We’ll focus on that when we get to it.

I decided to take Ruby. +3 learning and +1 in just about everything else, and interest in Dig and Operate will be helpful right off the bat. She’ll become an apprentice miner and start digging our her bedroom which we’ll put on the floor above the current ones.
Cycle 27-29: Collecting the Cool Geyser
Cycle 24-26 summary with our goal in parens:
Food: 21,000kcal (25,000kcal)
Oxygen: ~1600g (2000g)
Oxygen rate: +82kg (>0kg)
Temp: ~23.5C (<30C)
Max Stress: 1%
Research Queue: Temperature Modulation, Automatic Control, Generic Sensors
Our food store is falling fast. We’ve thrown all of our dupes at the build and the farms have gotten neglected. I’ll put Marie back on Groundskeeper and we’ll try and get food back on track. We still have 4 days stock, so no emergency yet.
Turning all of the terrariums back on has given us a large surplus of oxygen again. We may pick another dupe today which will put us around break-even or possibly a bit of a deficit. We’ll keep an eye on it.
i’ve decided to resarch Generic Sensors after Temperature Modulation. That will allow us to build smart batteries and and we’ll get a coal generator going.
Goals for cycle 27:
1) Carefully remove slime from the polluted water reservoir
2) Build polluted water reservoir

The corridor to let the polluted water flow toward the reservoir is complete and we’ve punched down into the space. The urgency was to make sure the geyser didn’t get covered in 500kg of water and become overpressured, and that’s taken care of now.

To deal with the slime, we put a dry base under the slime so that it falls someplace easy to grab. Once we dig one out, we pause, set the storage compactor that we put in our water reservoir to accept slime. When we dig out a tile, we again pause and mark it to sweep priority 9. We’ll build under each patch of slime, then remove the slime, then build where the slime was. If everything goes right, we can get out of this with no germs in the water.

We have another chance to pick a dupe, and I decide to go with Turner. Learning +3 and Night Owl. We’ll put him on a different schedule that lets him work at night. He’ll be a good choice for keeping the base running, taking care of any thing that needs attention at night. And during the 3 night shifts, he gets a +3 bonus to every skill.
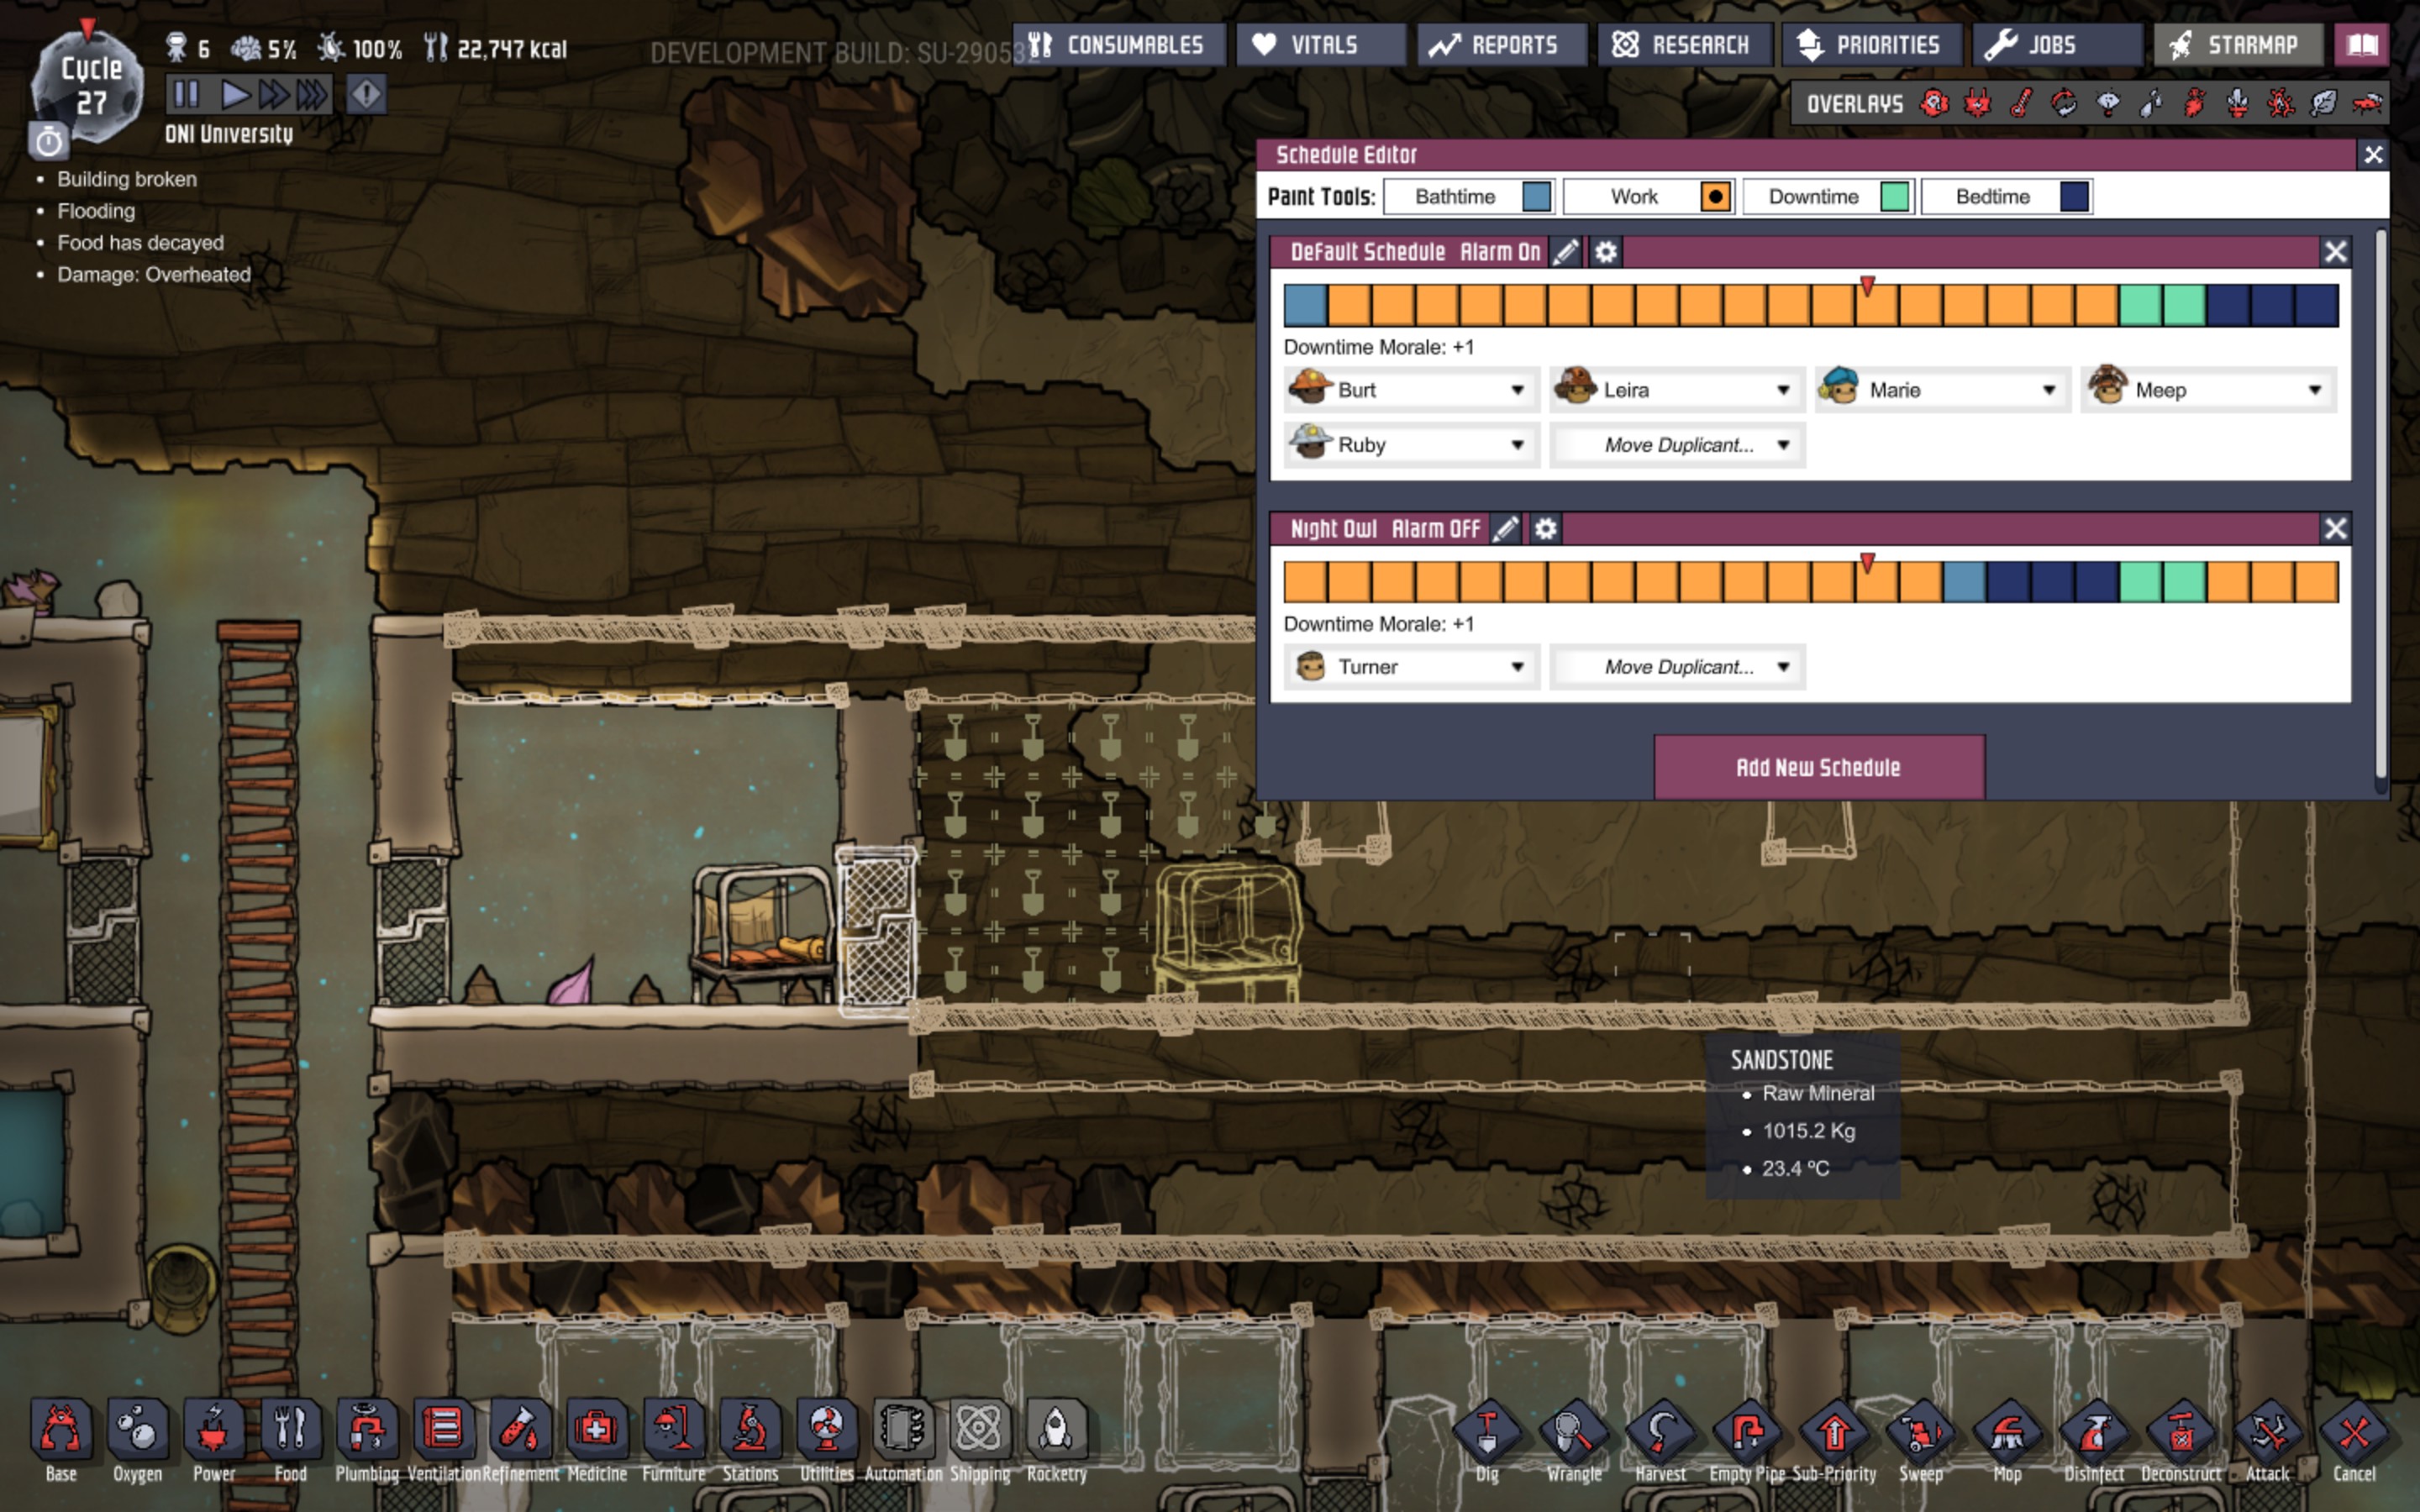
Here’s the schedule for this dupe. I overlapped his free time with that of the others so he can have more of a shot at the social morale perks.
Cycle 30-34: Opening the Manufacturing Sector
Cycle 27-29 summary with our goal in parens:
Food: 21,000kcal (25,000kcal)
Oxygen: ~1600g (2000g)
Oxygen rate: +41kg (>0kg)
Temp: ~24C (<30C)
Max Stress: 8%
Research Queue: Generic Sensors, Fossil Fuels, Advanced Power Regulation,
We’ve stabilized the food situation and with Turner helping out all the farms are now fully serviced. Oxygen is still positive, but I wouldn’t be surprised to see it turn negative again. We’re consuming 525g/s, the terrariums are producing 320g/s, and we’re getting better than 200g/s out of the deodorizers. Not sure how much we can rely on that.
Starting to get a little stress now. We’re putting dupes into Tier 3 and 4 jobs while we rush this build, and at Tier 4 we need morale 12. We’ve got the following from rooms:
Barracks +1
Washroom +2
Mess Hall +3
And +1 for duplicant and +1 for 2 shift break. We’ll get intermittent buff from showering and social interactions. If we get a painting complete in the Mess Hall it’ll upgrade to a Great Hall +6. Increasing decor will help as well. Better meals would also help, but there’s not much we can do with meal lice. I think I’ll put Marie in Art Student and get that Great Hall upgrade.
Cycle 30 goals:
1) Upgrade to Great Hall.
2) Extend central ladder downward
3) Deal with water below base

We’ll extend our overflow from the bathroom down to the lower reservoir and use tiles to push the water to the right and seal that area off. We can then extend the central ladder downward to where the next patch of water is. I’ll drop a pitcher pump down there and disable the current one and drain that are that way, probably along with a little pushing with tiles. We’re going to start building a SPOM immediately to the right of the bottom of the left shaft. That’ll be the top floor of the manufacturing sector.
As for that little grotto with the bristles and the shine bug, I almost can’t stand to disturb it it’s so perfect. But I’m going to avoid it for a while. It’s pretty common for shine bugs to go extinct as you won’t find any out of the starting area, but you can ranch them. That grotto is a perfect shine bug ecosystem, so we won’t disturb it until we are able to breed them.
Below the washroom I’ve selected a rock granulator be built. It’ll allows us to refine metal. It’s inefficent as it only gives 50kg of refined metal for 100kg of raw metal, but we only need a little. We’ll research a better machine later. We’ll need a little bit of refined metal to make a smart battery and automation wires.
We’ll take a few cycles for housekeeping here. We’ll prioritize sweeping a bit to help with decor. We’ll dig down and try and dry out the left side of the area below the base so we can build our SPOM.
Cycle 35-37: SPOM Prep
Cycle 30-34 summary with our goal in parens:
Food: 43,000kcal (25,000kcal)
Oxygen: ~1700g (2000g)
Oxygen rate: +24kg (>0kg)
Temp: ~24C (<30C)
Max Stress: 0%
Research Queue: Advanced Power Regulation, Advanced Automation
Well, the food is definitely coming in.Oxygen is holding up as well, but I’m not ready to add a 7th dupe. Things are going well with 6. Stress is down now that we’ve got a great hall, put up a bit of art, and cleaned up a fair bit of the debris.
Goals for cycle 35:
1) Start the SPOM build

We’re going to start building the SPOM, or self-powered oxygen module. There are lots of guides to these, but we’re going to be following one of the
. Credit to Yiyas for the design and excellent tutorial.
We’ll start with insulated tiles around the level using igneous rock for the extra insulating benefits. We can’t easily insulate the side against the service shaft, but that’s okay for now. We’ll fix it later. This design is also good in that it doesn’t require as much automation, so we have everything we need right now. We’ll put the cooling area to the right of the SPOM, and install the hydrogen generator on the floor below. We’re going to need a sieve and we’ll put that next to the hydrogen generator. Eventually we’ll build up to a centralized water system but right now we just want to put our water to work and get rid of our terrariums. We’ll go through the build step by step. There’s a few new things to introduce.
You can see how I handled clearing the water out of the SPOM area. I blocked part of the water and am just using the pitcher pump to clear out what’s there. It’s not a fast way of doing it. We could have dropped a liquid pump in there and cleared it out in half a cycle. So why take 6 cycles to do it? Well, I just wanted to slow things down a little. The debris up in the living area was bothering me, so I thought I’d let the dupes spend a few cycles on some quality of life issues. Basically, I just felt like it. It helped to get the food caught up, get ahead on morale again, and do a few little odds and ends. Sometimes you just need that.

I also replaced the manual generator and regular battery for the washroom with a coal generator and a smart battery. We use a simple automation wire to connect them in addition to the power wire. The automation wire allows the smart battery to turn the coal generator on and off as needed. I have it set to turn on when the battery depletes to 25% and to turn off at 100%. This way we don’t waste coal, and we don’t waste dupe time filling the generator so it can run when the battery is already full.

I also put the door on the Recreation Room so we can start to use that if our dupes get stressed. We’ve also swept up and put some art around the research station. Our scientist has a morale need of 12, and was only getting 9 before. But with the great hall upgrade and the decor boost (decor averages around 50 at the research station) he gets an additional +3 from the great hall and morale from decor went from a -1 to a +3. So we can probably have our dupes working Tier 4 jobs without taking any additional measures now.
Cycles 38-42: SPOM
Cycle 35-37 summary with our goal in parens:
Food: 47,000kcal (30,000kcal)
Oxygen: ~1800g (2000g)
Oxygen rate: +72kg (>0kg)
Temp: ~24C (<30C)
Max Stress: 0%
Research Queue: Low Resistance Conductors, Advanced Automation
Food is good. Lots of oxygen. Stress is very under control. All good. I changed up the research a bit and decided to put Low Resistance Conductors in earlier since we’ll want to do some conductive wires here.
Goals for Cycle 38:
1) Build core of SPOM O2 production
2) Dig out space for SPOM power generation
We’re going to slow things down here to go through the SPOM. You’ll find a ton of tutorials out there and lots of different styles of SPOM. We’re going to use one that was recently developed. It’s simple in terms of technology and delivers some really nice benefits. Lots to learn while building it as well.
So, a SPOM is a self-powered oxygen module. It relies on a number of different pieces of equipment, at a minimum an electolyzer, some gas pumps, and a hydrogen generator. Here’s the basic theory:
An electolyzer takes clean water and with some power splits it into hydrogen (H2) and oxygen (O2). The pumps take the gases and separates them, sending the hydrogen to the hydrogen generator to create power (no other output) and the oxygen into your base. The idea is to design it in such a way that it can produce at least as much power as it takes to run.
The electrolyzer outputs 1000g of combined H2 and O2, and the gas pumps can consume at most 500g of gas, so we need at least 2 pumps. But if we recall, two different gases can’t occupy the same space, and so to get the pumps to perfectly take 500g/s, they need to be fed with gas tiles that are always above that value, and because they put the gas into a pipe that itself can only contain one kind of gas per pipe segment, it turns out there’s no way to make it work at perfect efficiency over any period of time. So, we use 3 pumps. One mostly captures H2, and two mostly capture O2, and together they can keep up.
On paper, it should just barely work. The electrolyzer requires 120W, the gas pumps 240W each. All told the system needs 840W. The hydrogen generator can consume 100g/s of hydrogen and produces 800W. Since the electrolyzer outputs 112g/s of hydrogen, if we had two generators they could produce 896W, giving us a surplus of 56W. That assumes that we aren’t trying to cover the power cost of the pump to deliver the water, or any filters, or other things.
In the variety of SPOM designs you see all kinds of variations to improve that efficiency. One approach is to optimize the gas pumps so they don’t run as often. 3 pumps can move 1500g/s, so if we use sensors and such we can have them run only 2/3 of the time, provided that they can always consume full packets. Done effectively you can recover an additional 240W on average, and that’s a lot.
Our design uses a little exploit of the game to produce a bit more hydrogen and bit less oxygen making it more power efficient at the expense of being slightly less O2 efficient. It may get patched out at some point, but it also has the advantage of being a pretty simple design in many respects, so we’ll use it here.
There are some other assumed components to a SPOM. The electrolyzer outputs at 70C regardless of the temperature of the water going in, which is much warmer than we want, so an efficient way to cool the air down is needed. Typically that’s done with wheezeworts, plants you can dig up in frozen biomes that absorb gas and then release it at a lower temperature, no power needed. We’ll do that as well. In the end, we’ll have a contraption that doesn’t need much if any power to operate, doesn’t need any dupe labor, and will produce enough O2 for about 8 dupes forever thanks to a geyser, and which doesn’t have any adverse byproducts, not even heat. Nifty.

So here’s our starting point. The SPOM O2 production area needs a 6×4 space, and you can see the first elements of it built on the left. There’s an electrolyzer with a gas pump on either side and the 3rd on top. The top one will mostly capture the lighter and lesser quantity H2, and the side ones the heavier and greater quantity O2. We’ll insulate the entire space. I’ve also laid out what we’ll eventually do with the rest of the floor. We’ll build a 2nd SPOM on the right side closest to the ladder and in between we have a 9×4 space for the wheezeworts for cooling both SPOMs. But we won’t build any of the ghosted items for a while.
We want the place insulated for a few reasons. The electrolyzer outputs at 70C, so that space is going to heat up to that point and then stabilize and we don’t want that heating up our base. The gas will at first heat the place up, along with the equipment, but above 70C it’ll take heat with it when we pump it out causing the temperature to stabilize. But right next door we’re going to build a space that we want to get very cold, certainly below 30C, and we don’t want the base to be heating that space up.
Because the gas production space is going to get up to 70C, we want to be selective about what we build those components out of. Normally electrolyzers and gas pumps overheat and stop working at 75C, and that’s a little too close for comfort. But if we make these out of gold amalgam, we raise the overheat temperature to 125C, and that’s plenty. We got some gold amalgam digging out the left service shaft.

Attached to the electrolyzer is a signal switch located in the service floor. You’ll need some refined metal for this, but we’ll be sealing this place up tight and it’s always good to have a way to turn things on and off, so we’ll put this in. So long as we have a wire exiting the space, we can always reroute it later without having to unseal the room.
We’ll spend the next few cycles digging out the service floor and the floor below, and I’ll show the steps after they’re built so it’s easier to see what’s going on in the various layers.
Cycle 43 : SPOM Plumbing, Power, Automation
Cycle 38-42 summary with our goal in parens:
Food: 51,000kcal (30,000kcal)
Oxygen: ~1900g (2000g)
Oxygen rate: +10kg (>0kg)
Temp: ~26C (<30C)
Max Stress: 2%
Research Queue: Refined Objects, Smelting
Food and oxygen continue to be good. Temperature is coming up, however. The cool slush geyser is helping to cool the area to the west of the base, but it’s not yet enough to cool the air down. So far the farms aren’t in trouble, but it’ll be close before some of this cooling can really kick in.
Research is going very quickly as the dupes are skilling up. Turner is now on research and has a +11 learning at night, and researches at 4x speed then. I’ve added all the automation I need in the near term, and we’ll work up to smelting so we can set up a more efficient raw metal -> refined metal system.

I’ve now completed the gas production equipment, and the hydrogen generators below. I installed two, though it’s unlikely we’ll need the 2nd one. As with the washroom setup, where we were producing more water than we were consuming and needed an overflow, we have a similar situation here. Should the SPOP run 100% of the time, even for a few cycles, one hydrogen generator won’t be able to keep up with the hydrogen production which will be at least 12% higher than consumption. We’ll have other uses for the hydrogen eventually but for now we can convert it to electricity and find a use for it in that form.

The plumbing is really simple here. Run a line from the polluted water liquid pump into the sieve and into the electrolyzer. Each machine will only run if they have both input and output so the plumbing will help to regulate our power usage. We’ll probably add a machine to this setup a bit later, which is why I left 3 tiles of space between the sieve and the hydrogen generator.
I used insulated pipes made from igneous rock. Standard pipes would be fine, but I make a habit of using insulated by default and then choosing others depending on need – regular pipes when I need decor, radiant when I want temperature transfer.

There’s a few things to pay attention to in our power setup, and there’s a few ways to handle it. A standard wire can handle a load of 1000W. Above that and the wire will randomly break and need to be repaired. If we assume a circuit with the liquid pump, the 3 gas pumps, and the electrolyzer all running simultaneously we’re are at 1080W. There’s a chance we would get lucky and they wouldn’t all run simultaneously, but if a wire inside of the gas production area broke, it’d be really inconvenient to fix. So we’ll assume that we will exceed 1000W. Adding in a 120W sieve certainly pushes us over that limit.
There are a few ways to handle this.
1) Upgrade the wires to conductive wires, which can handle 2000W
2) Run one circuit for the gas production (840W) and a completely separate one for the liquid pump and sieve (360W)
3) Run a single circuit with isolated subcircuits by using power transformers.
I chose to do 1. For one, I don’t mind wasting some raw metal due to the inefficient rock granulator. Conductive wires use the same amount of refined metal as standard wires use raw metal, but the rock granulator wastes half of the material in the transition. I like the simplicty of the circuit this way and later on we’ll actually divide our infrastructure using transformers and having the conductive wires gives us a little design flexibility. Plus, I think they look a lot nicer.
The challenge with 2) is that you then have the SPOM powering one circuit, and what’s powering the other? You can’t combine them without transformers. We could split our hydrogen and put each hydrogen generator on a different circuit, and if each comes up short? Now we have two circuits to top up.
We’re going to do subcircuits eventually and use our service shaft, but that’s a bit inconvenient now given that it’s full of water. So, we’ll just put 3) off until it’s more convenient.
So, the material we build out of doesn’t matter. I used copper. I usually save my gold because it’s good for anything temperature sensitive, but we’re not talking about a lot, so don’t sweat it.
There’s a manual generator there. At the very least we need to bootstrap the system. Even if it is self-sustaining once it’s running, We at least need to get all the equipment powered until the first batch of hydrogen can be turned into power. We’ll leave it there for now. Eventually we’ll have a larger power grid and can remove it.
You’ll also see that the conductive wire inside the gas production area extends into both the floor and ceiling. This is so that if I want to tap it from the top instead of the bottom, we can access that from the outside. Little bit of future-proofing.
Very simple. We already set up a switch to turn off the electolyzer. We’re using a smart battery attached to both of the hydrogen generators to turn off the generators when the battery tops off. This is again a way to improve efficiency. However, note that we previously said we’ll use the generators to handle the hydrogen overflow by converting it into a power overflow, and here we’re cuttting that off as well. I don’t expect this will be a problem as there’s no shortage of power needs, but we can always turn that off and let the hydrogen generators overproduce.
That leaves the duct work, and there’s a lot of that with a lot of steps.
covers all of this but it assumes a fairly knowledgable player. We’ll follow it closely but move through it a bit slower.
Cycles 44-47: SPOM Duct Priming
Cycle 43 summary with our goal in parens:
Food: 54,000kcal (30,000kcal)
Oxygen: ~1900g (2000g)
Oxygen rate: +24kg (>0kg)
Temp: ~26C (<30C)
Max Stress: 5%
Research Queue: Refined Objects, Smelting
Goals for Cycles 44-45:
1) Build the ducting for the SPOM and turn it on
Lots of screenshots here. The first thing we’re going to focus on is how to filter our gas into a hydrogen only line and an oxygen only line. There’s 3 reasonable ways I can think of to do this:
1) Use the gas filter part which takes a mixture of gases, filters one kind out into one line, and filters the remainder into another line. With only two gases, it’d work perfectly for us. The only downside is that it takes 120W, and that’s a lot if we’re only looking at a 60W surplus. That takes us from a self-powering system to a non-self-powering system. We’ll probably use them elsewhere, but let’s stick with the sprit of self-powered.
2) Most SPOM designs use the lighter density of hydrogen relative to oxygen to naturally separate the two gases and putting the top pump in a location that after a few cycles will only ever contain hydrogen. Typically in this arrangement you need to add a pressure valve to control the gas pumps to make sure that enough gas remains behind to block the gases from mixing. This design works really well and is very common.
3) Use gas bridges to create a mechanical gas filter. This will be 100% reliable once built, requires no power, but takes a bit of work to get going. This is what the inventor of this design did, and we’ll do it too. It’s a really good technique to learn.
For our ducts, we’re just going to use regular gas pipes made out of whatever material. I’m using igneous out of habit. These will reach thermal equilibrium with their environment pretty quickly and that’s fine. We’ll use insulated and reactive ducts outside of the SPOM.


We start by building a temporary gas duct out of the top gas pump that empties into a vent, and a duct loop that contains a gas valve. The positioning of the duct loop is important. The purpose of the loop is to serve as the hydrogen filter for our system. The idea here is that we’re going to get a packet of hydrogen in this loop of at least 15g and no other gases. The gas filter will be set to allow 1g of gas through. When the packet of gas reaches the valve, it’ll send 1g through, then another 1g, and so on until every segment of the loop contains at least 1g of hydrogen. There may be more than 1g piled up in the segment at the intake of the valve, but that’s fine.
Go back and review how bridges work. A bridge can only teleport a packet of gas or liquid if the pipe under the output can receive it. If the filter loop only ever contains hydrogen, even if only 1g of it in each segment, then oxygen can never enter this loop provided that only bridge outputs touch this line because bridges are one-directional. So why filter the hydrogen and not the oxygen? Because there’s a lot less of it, so it’s less likely to get backed up.
The top pipe from the gas pump to the vent is to isolate that packet of hydrogen.

Here we’ve turned on the electrolyzer and the gas pump and started sucking in a mix of oxygen and hydrogen from the electrolyzer, as well as some CO2 from the room. We tell a dupe to deconstruct the vent or deactive the pump, and everything freezes in place. Then we deconstruct the duct segments around a hydrogen packet to isolate it. We’ll freeze it there and then give it a way to get to the filter loop.

We add a bridge from the pipe segment with the captured hydrogen to the filter loop. The bridge being one-directional prevents gas from coming back to that segment.

And with our gas valve set to 1g, we get a duct full of 1g hydrogen packets just going around and around forever, always there to block any other gas from entering the loop.
We can then deconstruct the top ducts and the bridge.
Cycles 44-47: Finishing SPOM Ducting


Here we’re building the basic ductwork for the system. Pipes out of all three pumps going in seemingly random directions, but it’s all designed so that the bridges work. When you’re designing your own stuff, there’s a lot of cancelling and redoing and some swearing and questioning if it’s even possible to make this spaghetti work. Don’t worry if you struggle to lay something like this out – we all do. There’s a bunch of bridges, so let’s add them one by one and expain what they do.

We’re following the top gas pump output. It wraps down and to the right and we add a bridge from this line to the hydrogen filter loop. The bridge will try and teleport every packet that hits the input to the output, but it’ll only be able to teleport the hydrogen ones because the output will always have 1g of hydrogen under it. We can’t ever try and pass more hydrogen through than it can take because the pump can only draw 500g of gas, the filter pipe can take 1000g, and it will only ever contain 1g. So every hydrogen packet will teleport to the loop, and every oxygen packet will turn upward and back toward the pump.

We’re now following the right pump output to the left and doing the same thing, bridging so all the hydrogen packets teleport into the loop and all oxygen ones turn upward.

And now the left pump, also to the left, and again using the bridge to teleport hydrogen to the loop. so what if things time out so that every hydrogen packet from each of the 3 pumps hits the same packet in the loop, from 1g to 1g + top pump hydrogen + right pump hydrogen + left pump hydrogen? Well, as it happens, once the system gets going, there will never be so much hydrogen in the gas chamber to add up to 1000g.
So at this point, we should only have oxygen going through the remainder of the ducts.

Back to the top pump line, we bridge over the pump output just to reach the other side. Just using the bridge as a bridge. But now we have a complete line from the top pump to the vents on the right side. The vents are just temporary. We’ll begin to architect something more productive soon.

Now to the right pump line, after filtering the hydrogen out, we bridge the remaining oxygen onto the top pump line. Now this pump is fully tied in.

Turning to the left pump line, again after filtering out the hydrogen, we bridge the oxygen to to the top pump line. Now all three pumps are tied in. Can these all pile onto the same packet like we explored with the hydrogen? Yes, but that should only stall for one packet, and will generally just cause the packets to compress a bit rather than stall the pump.
So, where does the hydrogen go?
So, the gas valve works the same way as a bridge, in that it will always give priority to serving the valve rather than passing packets along the pipe. So there should never be a case when the valve isn’t sending 1g through the valve. Any surplus will then carry forward where we enter another bridge, just to make sure that we never have anything back up into the loop. One way in, one way out.

We then use a bridge to take the hydrogen to the first hydrogen generator. Again, the bridge will have priority so in most cases it’ll send every packet into this generator.

And a 2nd bridge to feed the 2nd generator. The SPOM can’t produce more hydrogen than two generators can consume. The only thing preventing that is the automation on the smart battery. We may end up disabling that. We’ll see. The hydrogen pipe then just stops. We could put a vent here, but hopefully we won’t need it. When we have other needs for hydrogen, we’ll tap into it here.
How robust is this system? Pretty robust. The biggest problem will be if the hydrogen backs up, stalls the hydrogen loop, and hydrogen starts entering the oxygen output. For now that’s okay. It’ll slow our system down but nothing will break, we’ll just get some hydrogen in our base. Later, when we need to deliver pure oxygen to certain things, we’ll end up breaking them. So ensuring the hydrogen line doesn’t stall is pretty important.

And it works! Now, it won’t self-operate until we seal it in.

Without sealing it up, the pumps will just recirculate the base air.
At this point, we’ll start turning off our terrariums. It still needs work – we’ll need to cool the air, and we need to distribute it, but we’ll turn to our plan with the service shaft to see how we want to do that. Before we get to those, we might need to hurry to anothere plan for the polluted water, since the shaft is filling quickly, and the SPOM can at most consume 1/4 of the geyser output.
Intermission: Too Much Water!
Ok, so we hustled to capture that cool slush geyser, not knowing how long it was going to erupt for, and now our imprompu storage area is filling quickly. The SPOM will help slow the rate it fills, but not by that much. We have a few options:
1) Do nothing! Our setup would just result in the channel backfilling to the geyser until it overpressured and stopped erupting. But then we also don’t know how long it’ll be dormant.
2) Find a new temporary place to put it. We’ve got a mess of nearby caverns already full of polluted water. We could break into one of them and just shunt the excess there and then deal with getting the water out later.
3) Figure out a permanent place to put it and start work on that.
4) Use it faster.
I’ll reject 1 because what’s the fun in that? I generally resist tempoarary options because it’s easy to get in a pattern of constantly jumping from one patch to another and never getting to a permanent solution. Usually you’re better off just biting the bullet and doing the big thing. So we’ll reject 2.
My normal approach would be 3. Dive down toward the bottom of the base, build out a big ol’ reservoir, and start pumping it there. I tend to do it that way so that I can use gravity as much as possible, and then I push it upward to use it. Unlike the real world, it takes no more energy to pump water up instead of down, so let it flow down and pump it all the way up. I normally have 5 regular floors above the permanent reservoir. The SPOM is in floor 1, the hydrogen generators floor 2. So we’ve got a bit of digging to get there. But it’s certainly doable. We’re getting pretty fast build/diggers, so we could probably knock out enough of a space in 10 cycles or so.
Using it faster is also a viable option. We’re going to want to get off of mealwood, and bristles are a good choice. We could start our first permanent farm up above the washroom. The challenge we’ll face is that bristles want to be under 30C and all of our water needs to go through a sieve which will output at 40C. But, we have a trick! I would normally run this kind of multi-level infrastructure in the service shafts and if we run the clean water up the left shaft using a thermally conductive pipe, it’ll exchange heat with the cold water coming out of the geyser. It’s currently 12C so if they average, we’ll be able to bring it down to around 26C. Perfect! We can also run our oxygen through there doing the same thing and cool it down before we get wheezeworts.
So, let’s do the farm because it should be fairly quick and then also do the permanent storage.
Cycles 48-49: O2 and H2O Distribution
Cycles 44-47 summary with our goal in parens:
Food: 72,500kcal (30,000kcal)
Oxygen: ~1900g (2000g)
Oxygen rate: +24kg (>0kg)
Temp: ~26C (<30C)
Max Stress: 5%
Research Queue: Agriculture, Ranching, Animal Control
We’re seriously overproducing food now, but that’s okay. We’re about to transition from one food type to another, so we may have bunch of cycles with no food coming in. 12 cycles is a big buffer. Oxygen is good, but we just turned off the terrariums. Between the SPOM and the deodorizers, we should still be vastly overproducing. Since we’re going to set up our first permanent farm, I’ve put all of the remaining agriculture researches in our queue.
Goals for Cycle 48:
1) Distribute oxygen from the SPOM
2) Distribute water from the sieve
3) Perform a bit of undesirable gas containment

The SPOM isn’t helping as much as we need though because the distribution is terrible. It’s just dumping out next to the SPOM and it’s not easy for the O2 to migrate up the base. As a result the vent will be routinely overpressured while the dupes up top are running out of air. The deodorizers are making up for some of that problem, but now’s a good time to do proper air management. We’re going to take the O2 coming out of the SPOM and start to build a loop up the left service shaft, then at some point cutting across and coming down the right service shaft. We can then punch into the living space and drop vents on each floor. That’ll more evenly distribute the O2. When the first floor hits 2000g pressure, the gas will just continue up to the next floor, getting it to 2000g, then the next and so on. So long as the SPOM is able to keep up with demand we’ll be able to uniformly cover the entire base. If we need 2 SPOMs to run the base we’ll have to get a bit more creative as one SPOM is outputting at nearly the maximum capacity of the ducts. We can’t run 2 SPOMs through one O2 distribution system. We’ll need 2 systems. Thankfully our plan to segment the base into 3 sections will make that a lot eaiser.
We’ll run the duct into the left service shaft and head straight up. I do good resources up the inside of the shaft closest to the base to make deliveries easy, and waste down the outside of the shaft. At each floor we branch off and hook up to a vent. Branch or bridge? I’m inclined to branch. A bridge will prioritize feeding that floor and if we’re underproducing, we’ll end up with some parts of the base with lots of O2 and others with none. By branching, we’ll distribute it a bit more balanced. Another good option is to put a gas valve there and tune them so they deliver a steady supply over time. We’ll just branch for now and deal with any fine tuning solutions later. We may never need them.
Because we want to take advantage of the cold PH2O, the duct in the bottom of the shaft is regular obsidan pipe, and insulated igneous at the top. We want to exchange heat at the bottom, and then protect it at the top. We could use a reactive pipe, but I don’t think it’ll be necessary and I don’t want to produce that much refined metal now. This should be fine.
We’re going to do the same thing with the water coming out of the SPOM. Branch it off run it out to the service shaft, regular obsidan at the bottom and then insulated at the top. No branching into floors now though. Just straight up past the washroom to where the farm will go.
We want to minimize the amount of undesirable gas in our base, so we’ll start to put in some crude airlocks. As we dig up the left shaft and into the farm area, we’ll release a bunch of heavy chlorine. We don’t want that in our base keeping our plants from growing. The airlock next to the mealwood will stop a lot of it, and I’ve installed a few airflow tiles in the floor above the service shaft to allow the chlorine to better settle down in the shaft and the corridor to the geyser. There’s not a lot of chlorine, and it’s lower pressure 1000g, so it shouldn’t be a big problem. We’ll put another airlock between the farm sector and the living sector. These aren’t powered yet. We’ll get to that. It’s fine.
We’re going to have to allow some gas migration to take place, but we’ll use the service shafts for that and try and keep our base interior O2 only.
This will take a few cycles to build and then we’ll turn our attention to the top of the base. We’ll prioritize the gas containment, then the O2 line and ducts since that’s useful now, and have them deal with the H2O pipe last.
Cycle 50: Farm/Ranch
Cycles 48-49 summary with our goal in parens:
Food: 68,000kcal (30,000kcal)
Oxygen: ~2000g (2000g)
Oxygen rate: +15kg (>0kg)
Temp: ~26C (<30C)
Max Stress: 9%
Research Queue: Ranching, Animal Control
Looking at the air temps closest to the new airlock, temperatures are lower than near the mealwood, so it would appear that 26 or 27 will be our high point. The O2 coming out of the vents, after passing through the polluted water is 18C. We probably don’t want it much colder than that for now.
Stress isn’t really climbing. I forgot to build Turner a mess table in the great hall, so he wasn’t getting his +6 morale bonus. That will be fixed this cycle.
Goals for cycle 50:
1) Gas containment at the transition from living sector to agricultural sector
2) Layout of first farm/ranch
The O2 distribution is done for now, and the H2O pipe is still being finished.

We have our double service floor setup between the residental sector and the agricultural sector. The central ladder run is broken, dupes need to move to the side a bit, and on the level above we have an interim airlock. This is mainly to minimize gas exchange between the two sectors.
On the left side we have a pocket of chlorine. We’ll dig into this space from the left service shaft to try and have the gas settle down the shaft rather than into the base interior. We’ll carefully build from the interior using diagonal construction and then connect the two spaces when we feel we’ve cleared out enough of the gas. We’ll extend the O2 duct up to this level to help push the chlorine down. This first room is going to be a hybrid farm/ranch. Only 14 hydroponic tiles in the floor in two sets of 7. We’ll be starting with mealwood, and ranching dreckos. After a number of cycles, we’ll hopefully have a shiny drecko egg and start to transition the mealwood to bristles which will consume water. Our intent here is to raise shiny dreckos so we can shear them of plastic, which we’ll start wanting soon at least in small quantities. We’ll plant more bristles on the other side. We should be able to eliminate our mealwood usage once that’s done, other than what we need for ranching.
This should take another couple of cycles.
Cycle 56: Farm/Ranch Goals
Cycles 50-55 summary with our goal in parens:
Food: 81,000kcal (30,000kcal)
Oxygen: ~2000g (2000g)
Oxygen rate: +139kg (>0kg)
Temp: ~26C (<30C)
Max Stress: 34%
Research Queue: None
We have one dupe with a rising stress. Having trouble keeping him consistently at 12 morale given his current job. An easy solution is to put them on a schedule with a 5 cycle break which will give them a +3 boost over a schedule with only a 2 cycle break. Plus they’ll spend time in our rather nice recreation room getting a decor boost.
Oxygen rate is quite high as it’s filling in all the little corners of the base. I also put a terrarium in the left service shaft to soak up some of the CO2 there. By replacing the CO2 with O2 that’ll allow more of that chlorine to settle in the shaft by sinking below the lighter O2.
Goals for Cycle 56:
1) Finish the first farm/ranch
2) Start the second farm/ranch
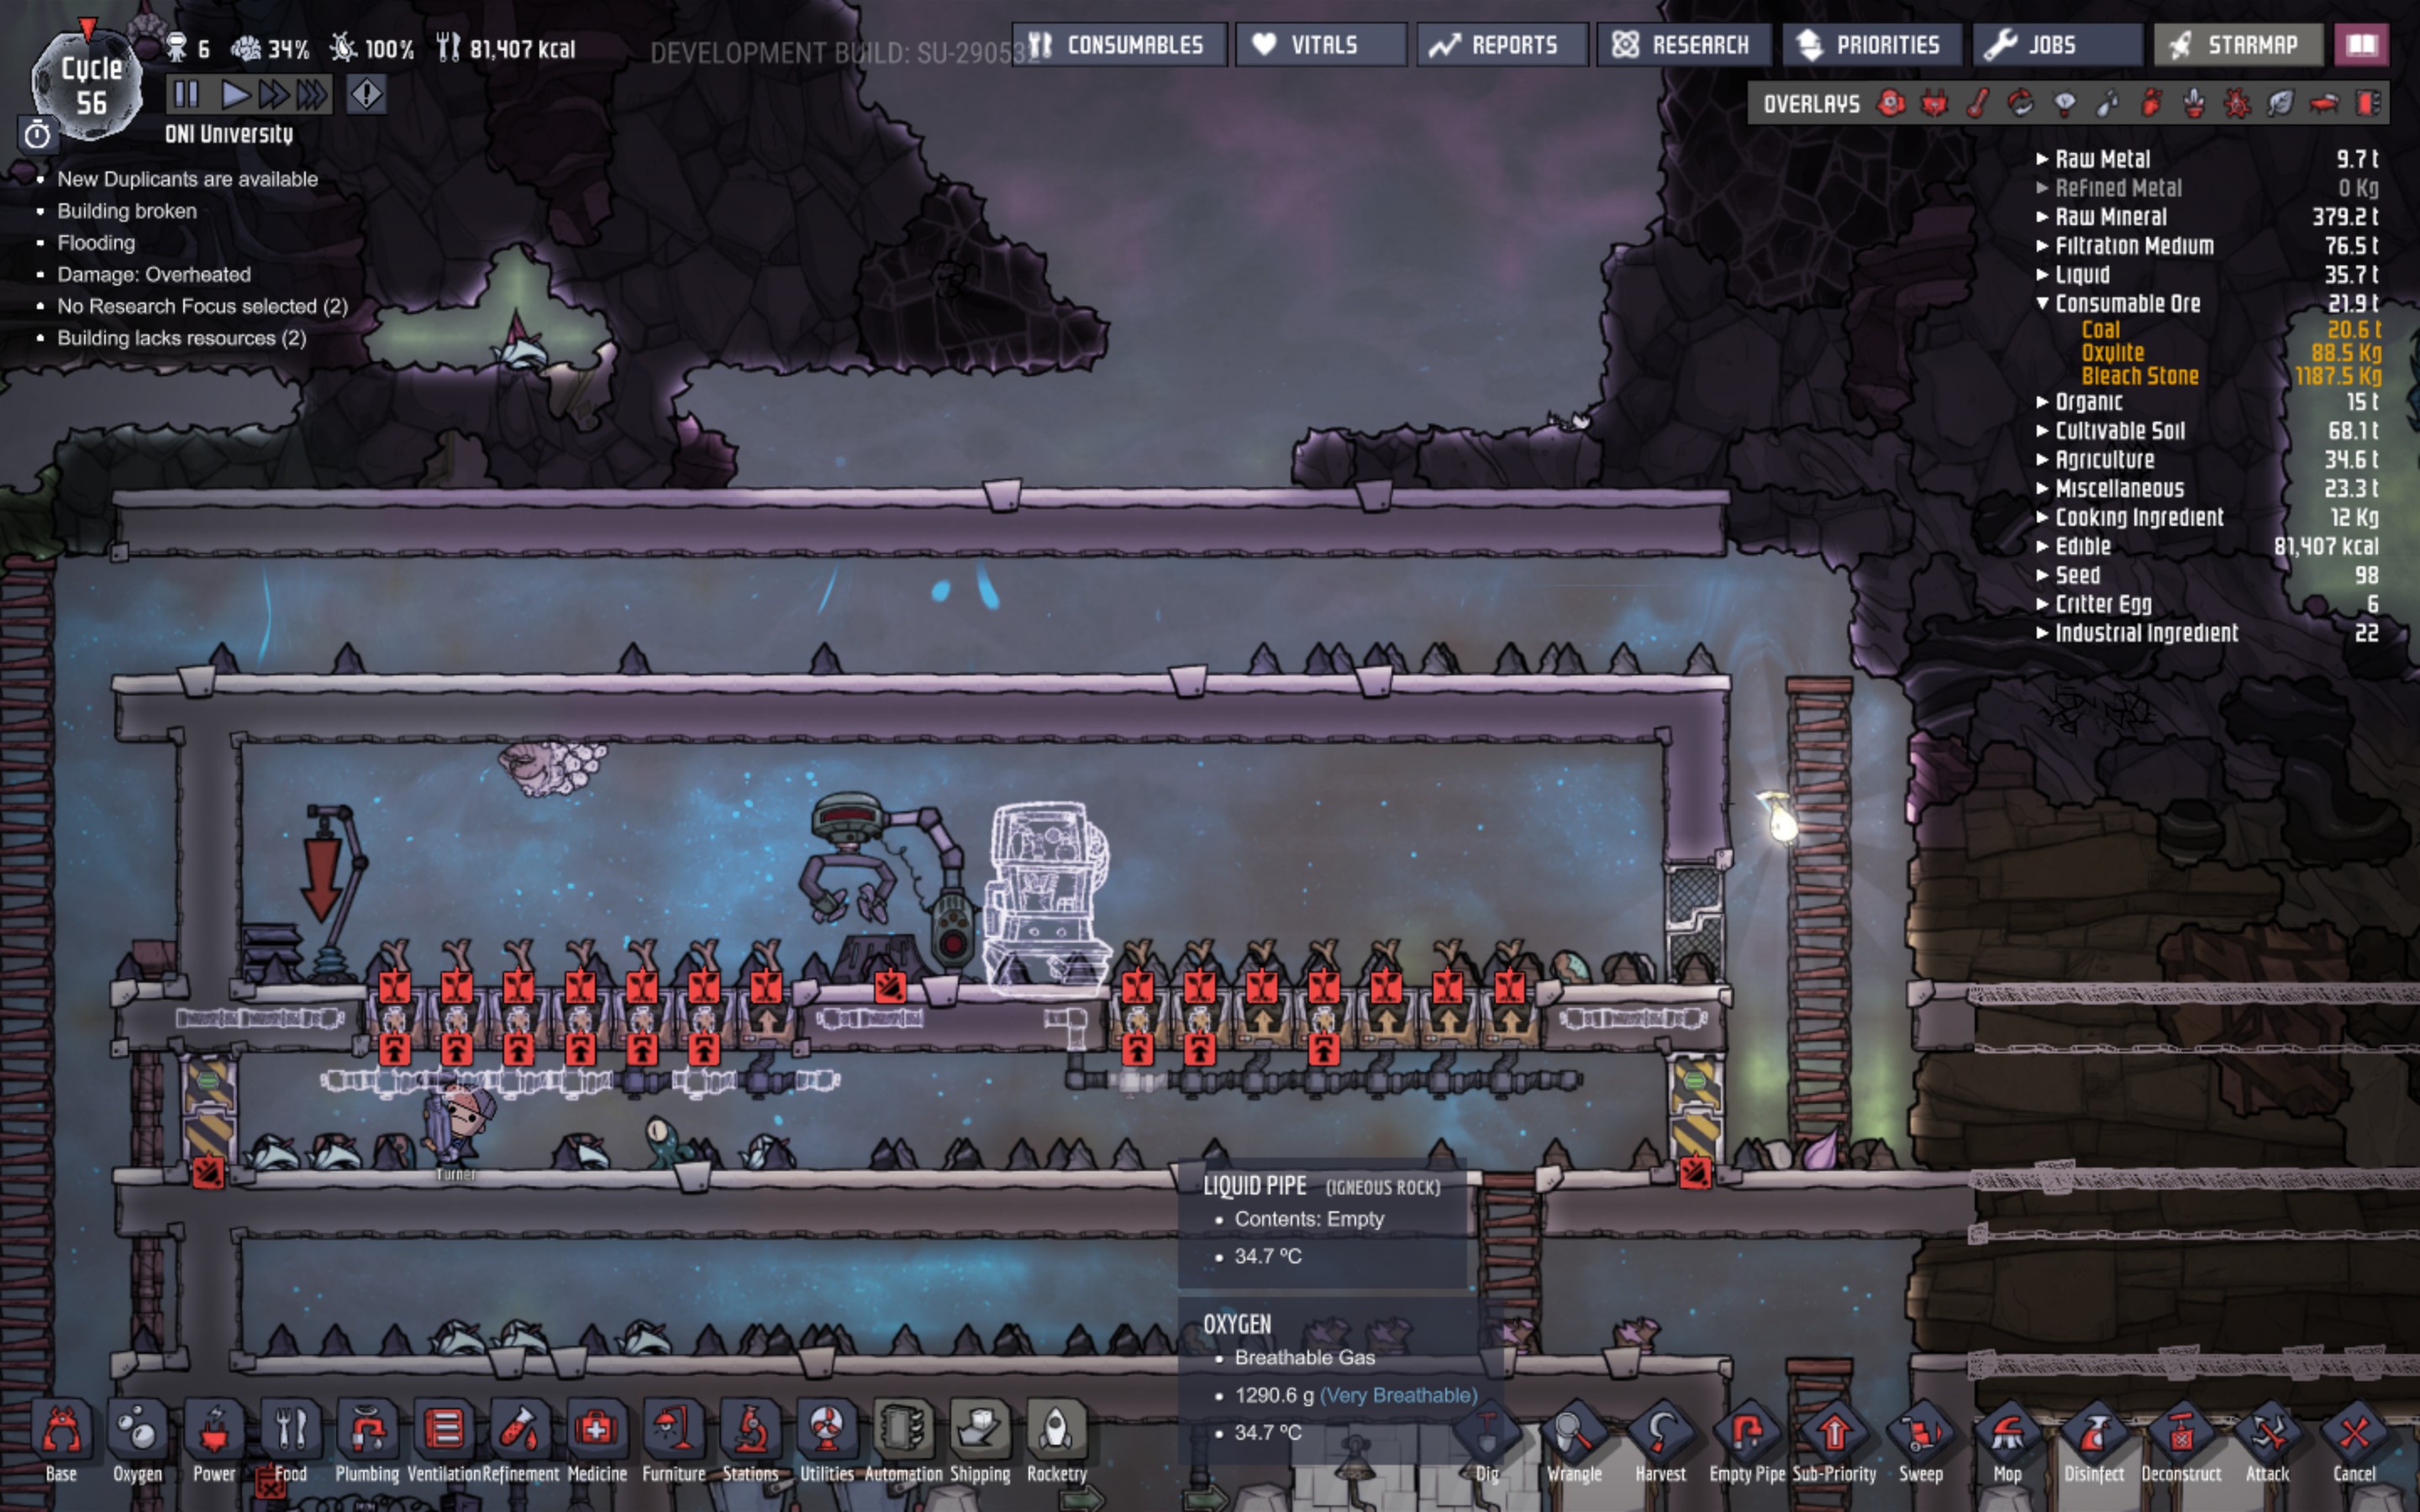
Here’s the setup of our first farm/ranch. Farms can get a Greenhouse room bonus where crops will grow faster, but a lot of players don’t bother since the added labor often isn’t worth the faster growth. Rather than build a Greenhouse, we’ll build a Stable, and take the bonuses for ranching critters. Stables can be up to 96 tiles in size and ours is 92. We’re going to raise dreckos here, and dreckos have a few benefits for us:
1) They are easy to feed. Rather than eat dropped food, they eat the plant while it’s growing, setting its growth back. But that means you need to grow the plant in the stable, not elsewhere and then haul it in.
2) They produce useful materials for is, so we can recover reed fiber from the standard dreckos and plastic from the shiny ones by shearing them. This makes them a great source for a little bit of early plastic.
Standard dreckos eat mealwood, so that’s what we’ve planted. The stable has a drop-off point, so we can wrangle more dreckos and have them delivered here, a shearing station, and a grooming station which will cause a dupe to groom the dreckos, making them happy. Happy dreckos reproduce faster and are more likely to evolve from standard to glossy. We should be able to get a glossy after 10 cycles or so. Faster reproduction also allows us to either use the excess eggs for omlettes, or to use the dreckos themselves for meat.
There are 7 hydroponic tiles on each side of the stations, which is the most we can illuminate with a light bulb at the ceiling not yet installed because we don’t have power here yet. Glossy dreckos don’t eat mealwood but bristles instead, so once we get one, we’ll start replacing the mealwood with bristles, so in effect the dreckos will only consume water, which we have plenty of right now.
You might notice that the mealwood is all dead. That’s because of the temperature. This space was around 42C when we dug it out, but the air vent at the floor is outputting 16C O2, and once the water pipes are connected, it’ll start feeding in water, hopefully below 30C to help cool them off more. We shall see. We’re down to 33-35, so I’m hopeful it’ll come down quickly.
The reason I’m not running the water pipes through the hydroponic tiles is that there was recently a bug that caused the hydroponic tiles to sometimes block water flow. This avoids that. It may not be necessary. It certainly looks a lot nice running the pipe through the tiles..
The last big thing to add to this room will be tricky. It turns out the dreckos only grow the reed fibers and plastic when they are in a hydrogen environment, and these plants don’t grow in hydrogen. So, we’ll run a pipe up here and fill the top two tiles of the space with hydrogen and keep oxygen in the bottom 2 tiles. We’ll go through those choice later. We’re not ready for it yet. But that’s why the O2 vent is on the floor rather than ceiling.
Cycle 60-63: Expansion, Passive Cooling
Cycles 60-63 summary with our goal in parens:
Food: 110,000kcal (30,000kcal)
Oxygen: ~2000g (2000g)
Oxygen rate: +130kg (>0kg)
Temp: ~26C (<30C)
Max Stress: 2%
Research Queue: None
We’ve gotten our stress under control simply by giving the dupe an extra 3 hours off per day. Assuming they’re idling in a high decor area, that’s often enough.
Goals for Cycle 60:
1) Tie up some loose constructions ends in the residence sector
2) Build out the right service shaft to prepare to build downward for liquid storage
We’ll take a few cycles to finish digging out the residential sector. Everything is in good shape, the farms are built but need some time for heat control to work. We’re going to want to build some large reservoirs near the bottom of our base for polluted and clean water storage, so we’ll start to bulid out the right-hand service shaft. We’ll build down both as needed, and probably start with the left shaft so we can get to wheezeworts soon.
We start on the right because our dupes are getting really fast at digging and will easily dig themselves into a vacuum where they can’t breathe. By excavating that large area and then shifting to the left shaft, we give it time to fill with oxygen and hopefully also some of our unwanted gasses, removing them from the living area. The service shafts serve as giant, base-height gas sorting chambers. We pump oxygen into the living space and use that to push out the gases we don’t want. The heavy gasses will settle at the bottom of the service shafts and the light at the top where eventually we’ll pump it out and put it to use.
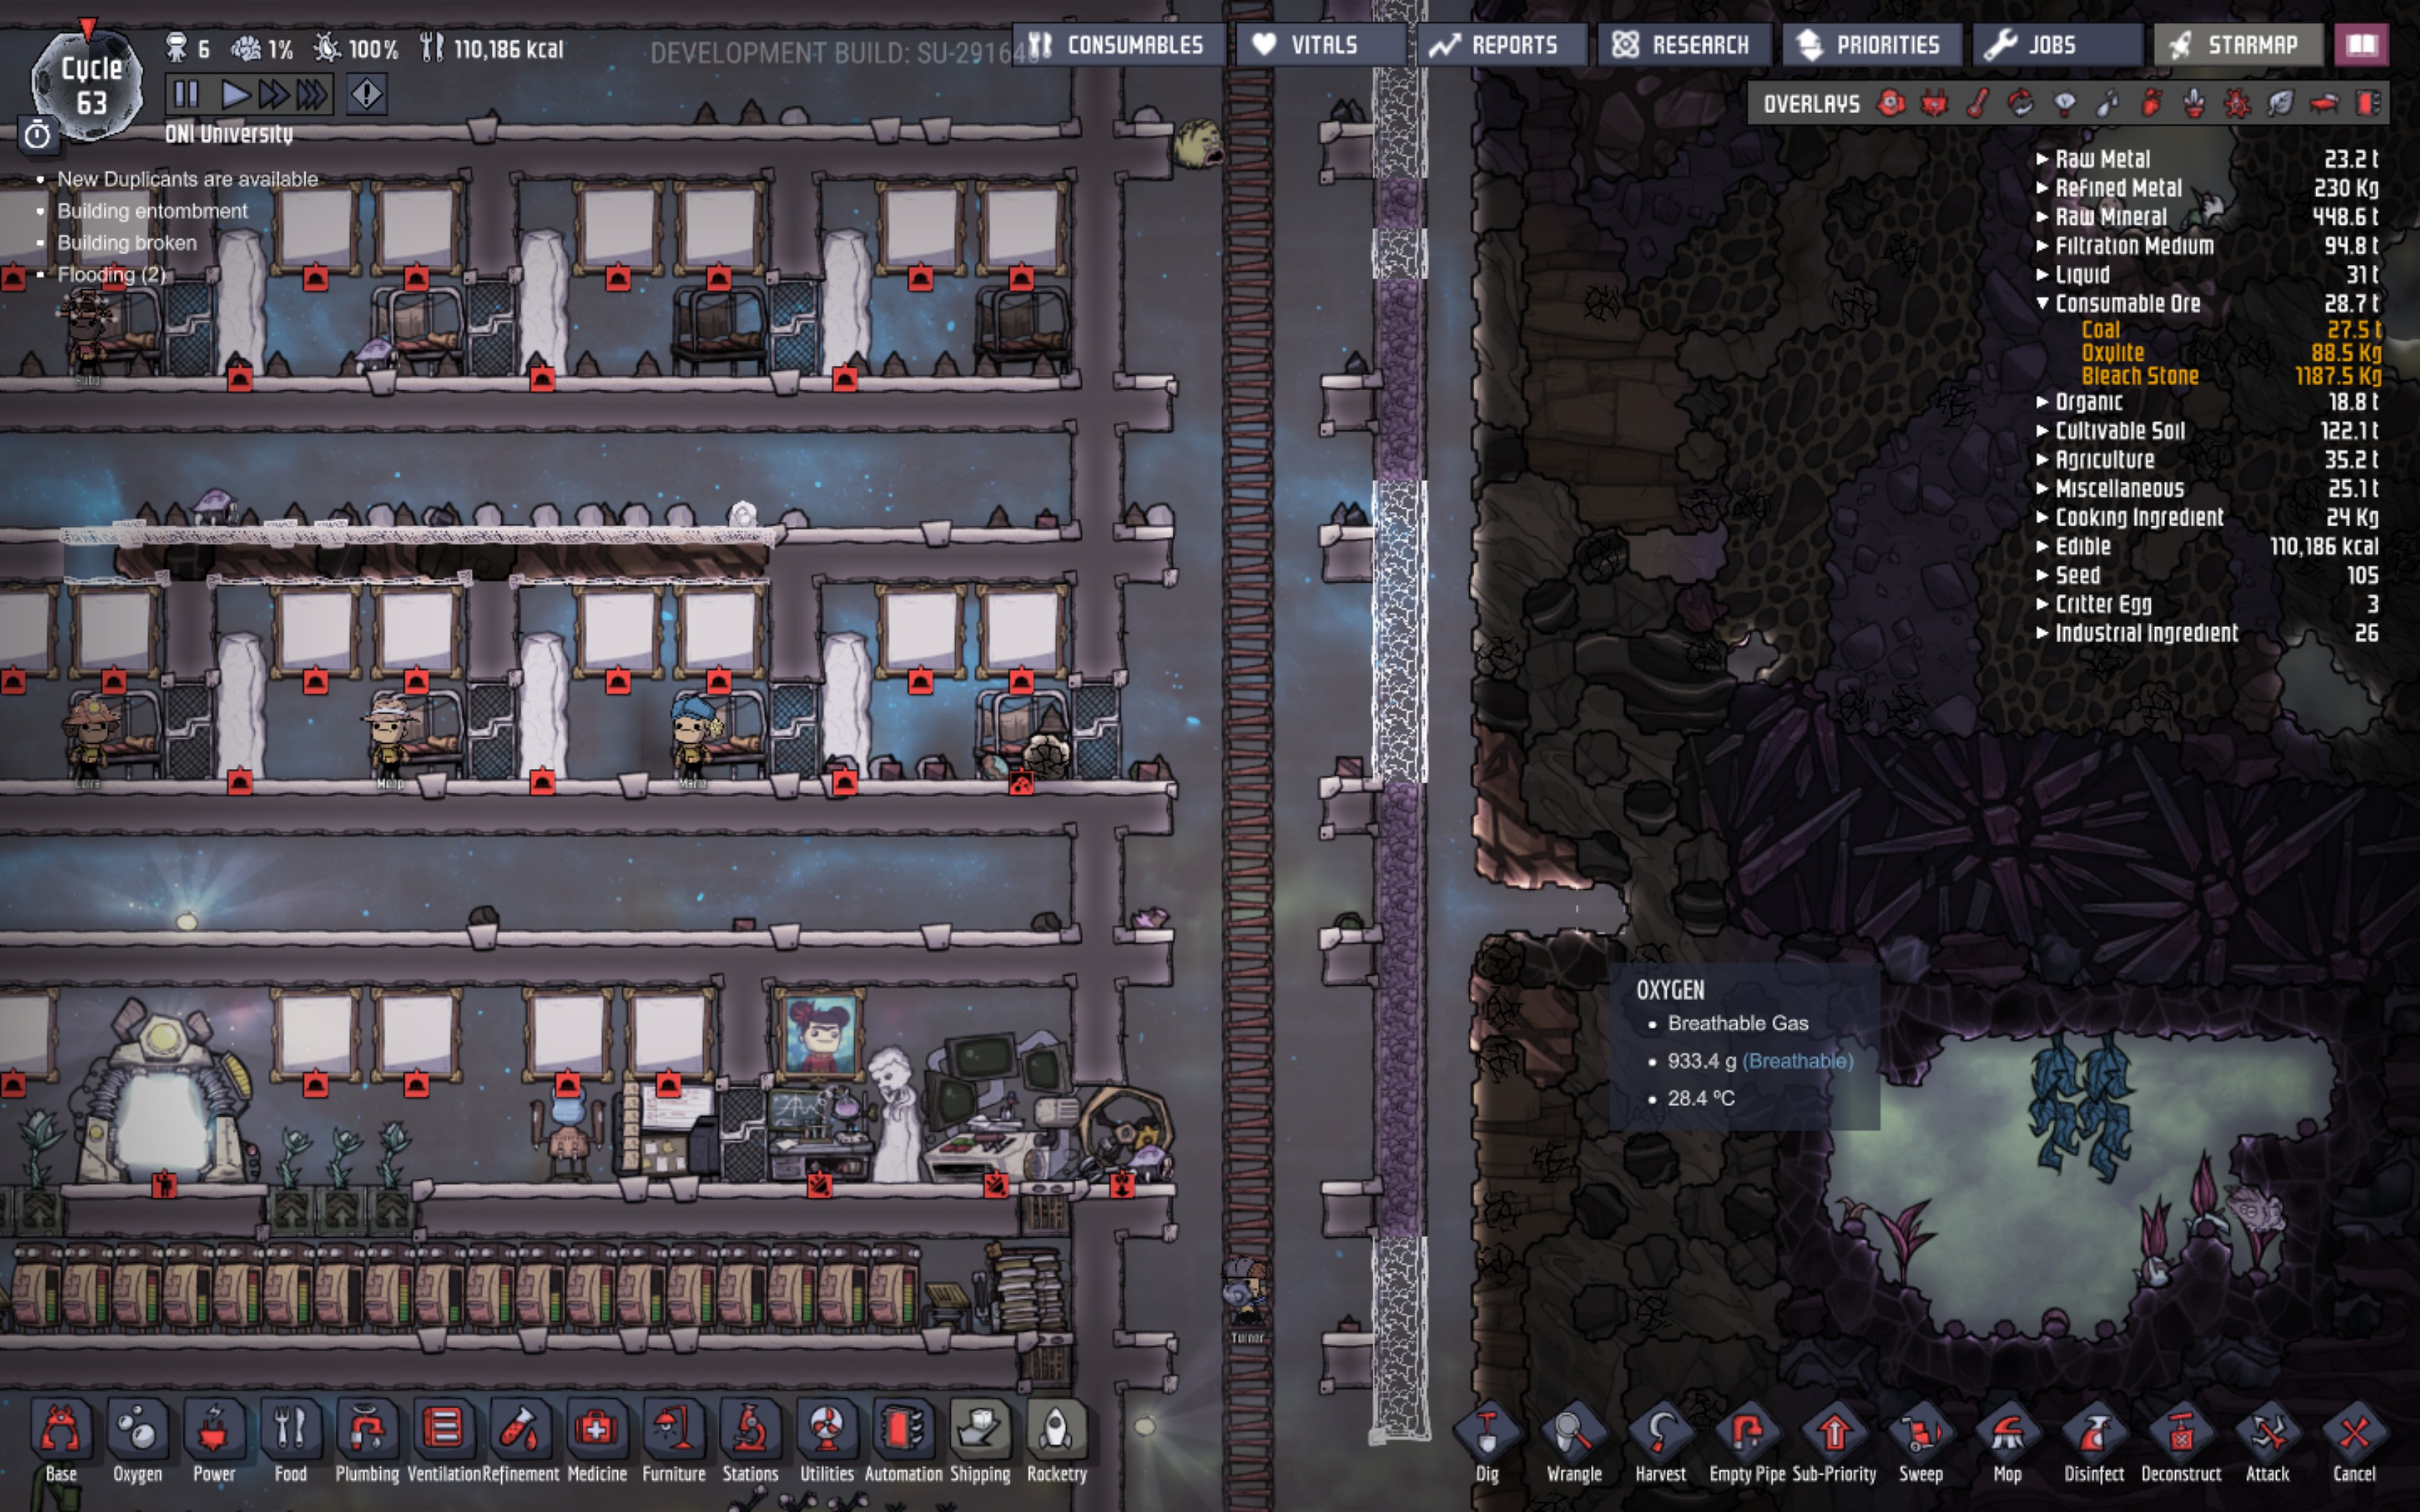
As we did with the temporary polluted water catch we’re digging a 5-wide shaft with a ladder down the center. Extending the floors out gives our dupes a place to stand and build. We dig one tile beyond the insulated wall that we build becasue gases are much worse heat conductors than solids or liquids. While it’d be perfect to surround our base with a vacuum preventing any heat intrusion, an insulated wall witth a gas tile beyond it will serve us well for a rather long time.
Returning to the farms, it may not be obvious how the farms will cool down. There are several heat exchanges taking place here, so let’s walk through them.

To start, we’re piping both oxygen up to the farms and clean water to the bristles. The PH20 from the slush geyser comes out at -10C and the H2O and O2 come out of the SPOM at closer to 40C, which is too warm for the farm. But as they pass up through the PH2O, through our obsidan pipes, they exchange heat with the surrounding PH2O. The gas will cool quickly because it doesn’t hold much heat energy, but the water takes some time. So long as its moving slowly enough, it’ll have time to cool down, and the bristles, even though they aren’t growing due to heat and lack of light are slowly consuming water. As we can see, at the top of the PH2O column, the O2 is down to 13C and the duct down to 11C, the H2O down to 21C and it’s pipe also down to 11C, and the PH2O up to 11C. We’re achieving temperature equilibrium with the more conductive pipe and the polluted water. The contents of the pipes haven’t cooled quite as much but they’re well under 30C which is what we need. As we move up we switch to insulated pipes which maintain the temperature of the gas and water.

Up at the farms we’re releasing O2 at under 20C, which will help keep the area cool, but the amount of heat stored up in the hydroponic tiles, air, plants, and so on is quite a lot. It’ll take ages to cool it using O2. The bristles located on the right side farm are consuming water, pulling it past the left farm. These aren’t insulated pipes, so as the water moves through it lowers the temp of the pipe and raises the temp of the water. The water at the rightmost bristle is entering at 31C, still too warm, but my pipes which had been 34C/35C are now all under 31C, and some down to 26C. With each passing cycle, they’ll get colder and I expect will settle out no higher than 25C after a while. So, the bristles should cool down below 30C in maybe 10-20 cycles.
But the mealwood doesn’t consume water, so there’s no direct cooling of those hydroponic tiles like there is for the bristles. Well, the pipes do enter the hyroponic tile even if there isn’t water flow there and so the pipe itself is transferring heat. Not fast, but steadily. What’s more, the material that was mined out on the very left side was over 40C, so that area is very warm. But that’s where the coldest water arrives so it’ll have the greatest effect on cooling and those tiles are already down to 36C. It’ll take longer to cool this area down than the bristles because it started so much warmer, but we should have mealwood producing on at least some of the tiles within 20 cycles. We can speed up the cooling of select tiles by tempoarily planting bristles there, but for now I want them on the right pulling as much cool water over as possible. We have a bit of time to let this work. Ultimately, we’re using the geyser to destroy heat in the farms through a very roundabout method. We’ll keep improving these methods as we go.
We’ll take a few cycles to catch up on our service shaft construction and then start digging down to where we want the reservoirs. Our temporary PH2O space is filling up.
Cycle 64-69: Expanding the Base
Cycles 64-69 summary with our goal in parens:
Food: 100,000kcal (30,000kcal)
Oxygen: ~2000g (2000g)
Oxygen rate: +30kg (>0kg)
Temp: ~26C (<30C)
Max Stress: 3%
Research Queue: None
Goals for Cycle 64:
1) Dig the left service shaft down to where we want to build our liquid storage
2) Further cooling work in the farms
The right service shaft is now complete from the bottom of the farm section to the top of the manufacturing section. While that equalizes with oxygen, we punch through the service floor just below the SPOM into the left service shaft area and start to dig down. We’ve got a vending machine in the way of our ladder, so we’ll just have to route around that for now. I’m not above deleting that in debug mode. I fundamentally don’t believe in the indestructibility of vending machines. We’ve got 5 wheezeworts in this area which is pretty decent. Turns out we’ll have a lot on this map. We’ll harvest two of them now to go up in our farm area for a bit of temporary cooling.
Our plan is to have five 4-high manufacturing levels (one of which contains our SPOM, and one of which has the hydrogen generators), followed by a 2-high service floor.

The reservoir will be a 3-high floor with a 6-high reservoir. That’s just a restructuring of a 2-4-2 into a 3-6 space, maintaining our pattern. But there’s really no reason it couldn’t be any size – it simply evolved out of repurposing that pattern. I’ve found that a 6 high by 23 wide reservoir is about the right size to hold an entire slush geyser output. Even if ours is unusually high output, we’ll be using it as we go, so we should be okay, at least for a while. The left reservoir will be our H2O, and we’ll build an identical one on the right for PH2O. Additionally, we want these to be insulated because we’re going to do a lot of heat management here.
These will take a while to build since we’re going to want to sweep as we go. Our dupes will get hypothermia if they need to clean them out after they fill up. Because of the height of the space, this is a good situation to dig down in layers, allowing our dupes the ability to build as they go.

Turning back to our farm cooling situation, we’ve installed 2 wheezes to help things out. Another heating/cooling varaible that tends to get overlooked is the debris. Debris continues to carry the heat it had when mined and will transfer that to the air and the object it’s resting on. On the left farm the debris is 40+C, so we want to make sure that gets swept and carried elsewhere. Where it goes doesn’t matter that much becasue no other part of our base is that sensitive to heat. We’ll use debris as a portable heat exchanger as we go along.
With a lot of sweep to take care of and a lot of digging to do, we’ll expect to spend quite a few cycles on this project. Expect to build a lot of compactors in service floors. We still want to pick up 2 more dupes so we’ll see if any promising candidates show up.
Cycle 70-80: Digging
Cycles 70-80 summary with our goal in parens:
Food: 88,000kcal (30,000kcal)
Oxygen: ~2000g (2000g)
Oxygen rate: +0kg (>0kg)
Temp: ~26C (<30C)
Max Stress: 29%
Research Queue: Liquid Tuning
Goals for Cycle 70:
1) Continue to dig out liquid reservoirs

We picked up a new dupe. Banhi doesn’t dig, but she has divers lungs and decent stats. Farming and art preference + reasonably high creative and tinkering will be useful. We’ll start her off helping with the sweep since we have so much of it to do right now. We’ll pick up one more good one after her for now.

Here’s the current state of the reservoir area. Progress has been slow due to balancing other things. I decided to wall in the left shaft because the heat penetration into the cold biome was causing things to melt and the liquid was becoming a problem. I left a gap a the bottom so I could enter that space, but this should keep the place from heating up any further. The 3 wheezes still in there will more than make up for the heat entering through that gap. I installed a terrarium and deodorizer in the reservoir area because there was zero oxygen down there. It’ll do for now.
I’ve also begun digging the right reservoir (the PH2O one) and will prioritize that since my temporary reservoir is getting very full. I put a liquid vent in the upper right corner of each reservoir and a liquid pump in the lower left. The idea is that most of our inflow will be PH2O which we’ll pipe down the right shaft and into the right reservoir. We’ll pump out from the opposite corner to help equalize the temperature, run thorugh a sieve, etc. and put H2O into the left reservoir which we’ll then pump up to our base.
I started Liquid Tuning research becasue we need radiant liquid pipes for a heat exchanger. We’re going to need 2-3 tons of refined copper, so I’ve put someone in the General Engineer job and will work them up to Electrical Engineer by refining. Soon after this we’ll want to start building heavy conducting wire and we’ll need an Electrical Engineer for that. We’ve got an excess of hydrogen due to the SPOM overproducing relative to the power we use, but the metal refinery will make quick work of that.
The farm cooling is going well. The right farm is below 30C, but nothing is growing because I haven’t put power in yet. The left farm has about half the mealwood growing and half at between 30C and 32C. Should only take a few more cycles. I put a dupe in the rancher job to start caring for a pair of dreckos. Each standard drecko needs about 3 mealwood to stay fed, so a pair for now, and maybe 2 more later. Hopefully we’ll get a glossy egg soon since we really want glossy dreckos for the plastic they produce. In order to reserve food for the dreckos, we’ll set the plants to not autoharvest. We can reverse that if we find we are overproducing for the dreckos.
Normally, creatures will only drop a single egg in their lifetime, as a self-replacement. But if you feed and groom them and keep them happy, they’ll drop eggs much more frequently. Through this process we should get a glossy drecko egg before long, but we can also choose to either cook the eggs into omelettes or raise them and kill them for meat. We’ll start with omelettes since that easier. One rancher will do nicely for quite a while. We probably have another 10 cycles or so to finish this dig/sweep. Things will pick back up a bit by then as we’ll have our Engineer trained up and our research done.
Our oxygen generation is a net zero, but that’s because we’re pretty much fully pressurized, at least around where the vents are. Nothing really to worry about.
Cycle 81-90: Still Digging
Cycles 81-90 summary with our goal in parens:
Food: 62,000kcal (30,000kcal)
Oxygen: ~2000g (2000g)
Oxygen rate: -50kg (>0kg)
Temp: ~26C (<30C)
Max Stress: 9%
Research Queue: None
Goals for Cycle 81:
1) Build heat exchanger
2) Sweep PH2O reservoir
3) Start extension of right service shaft

We’ve got our 8th dupe. Quick learner, Operate/Art/Farm, decent distribution of stats.

Our reservoirs are structurally mostly complete, so lets turn to the plumbing. I’ve changed my mind regarding the location of the vent and pump for the PH2O reservoir and made it a mirror image of the H2O one. We’re still going to bring our PH2O down the right service shaft, run it under the PH2O reservoir, and then through radiant pipes in the H2O reservoir, and then into the PH2O vent.
The idea is we’ll take -10C PH2O, and assuming our H2O is the output of a sieve and at 40C, the radiant piping will exchange heat, leaving a 15C H2O reservoir and 15C PH2O when it exits the pipe. That’ll be cool enough for our bristles and bathrooms. Flipping the layout just makes the plumbing simpler.
In the meantime, we’ll put the bottle emptiers to work on the PH2O reservoir and finish sweeping that area so that we can start to fill it. Still have some metal to refine. While that continues we’ll connect the right service shaft and prepare to pump out our temporary PH2O storage.
We’re starting to run low on food due to the additional dupes, so we’ll turn our attention to thatt problem next. Getting power up to the bristle farm is one solution. Another is that we have some cooking ingredients we can prepare. Both require power, so we’ll get working on power in a few cycles.