
Overview
Getting the most out of the Zoltan Class Cruisers – A.K.A. How not to die from your Zoltan Bubble going pop
[Type A] The Adjudicator
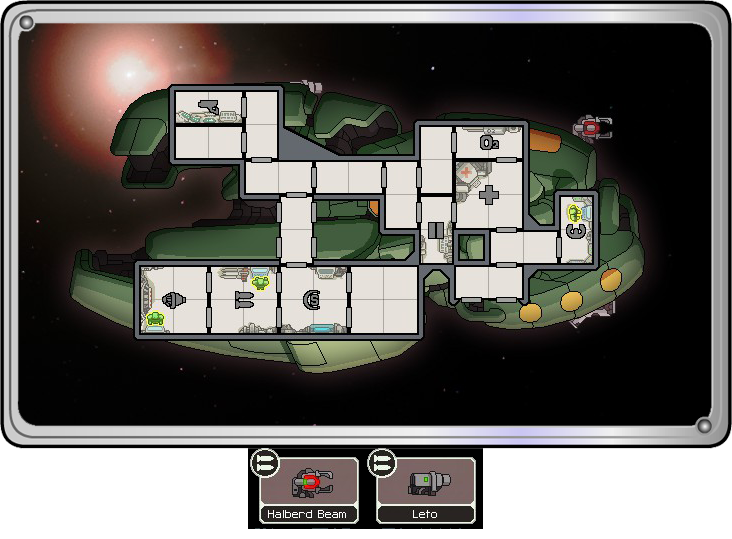
A fantastic ship whose shield makes the early sectors a breeze, giving you a chance to load up with some cool kit

By now you’ve probably fought many Zoltan ships and are sick to death of their Super Zoltan shields… well now you get to start with one of your own! You basically get 5 points of damage negated by any weapon and block mind control, boarders and so on – A wonderful bubble to be sure. In fact if you fight quickly, you can pretty much skimp on shields for the first few sectors – Freeing up a ton of scrap for other goodies
Squeezing the shields
Contrary to a lot of ships, you’re better off putting your initial scrap into your engines, instead of more shields. The reason here is to get the most out of your Zoltan shield – The more shots that miss, the longer it stays up!

The Halberd Beam is a pretty fantastic weapon to start with, dealing some serious damage to whatever it hits, almost capable of one-shotting a smaller ship. You have a Leto, but it will gather a ton of dust to begin with where the Halberd Beam has to work alone. You do not have the power to run both, and the Halberd is superior in pretty much any scenario. You’re fine to begin with, but need to quickly get an additional power bar into the weapons so you can field both (you’ll need them by the time you’re fighting 2 shields)
Truth be told, your Leto’s sole job is to take down the shields… anything else can be dealt with by the beam itself. But remember, unlike other beams, the Halberd can pierce one layer of shield (albeit at reduced damage) – So be economical with your missiles. When using the beam, not only should you try and hit as many rooms as possible (damage is dealt per room, so the more that falls under the line, even a corner, the more damage you deal!) but also start from the shield room if it’s not completely offline. If you offline it as the laser starts, the rest of the shots will deal maximum damage
Little glowing friends

Just when you thought you were safe
Don’t get too cosy behind your Zoltan shield though. Random-event boarders will still occur, so don’t forget to pick up some a boarding crew. Your Zoltan’s have lower HP so won’t stand up for long in a fight
Bubble Sanctity
One thing to bear in mind if (and likely when) you go boarding… The Zoltan Super Shield blocks enemy mind control. Whilst this might seem like a good thing, the catch is that any crew you teleport out will no longer be protected – As such, you can guarantee that one of your boarding team will get controlled when you beam them in. A counter is very important here (Hacking or Mind Control of your own), otherwise you’ll have to wait for your shield to drop and for someone else to get controlled – or just blow their room up, I’m cool with that
What to aim for
The Zoltan shield grants a nice advantage against the flagship – blocking the hacking unit, boarding drone and mind control at the start, giving you a strategic upper hand. But that said, it will barely last, so upgraded engines and 4 shields are, as always, a must
But with no superfluous systems, you have quite a bit of freedom here:
– +3 Crew (x2 Boarders: Rock / Mantis)
– +1 Support Weapon to aid the Halberd Beam
– Crew Teleporter
– Hacking Module
– [Optional] Bomb/Missile to replace the Leto
– [Optional] Mind Control

The Halberd beam will likely still be an inclusion in your final build, and for good reason. If you get a Flak, you’re really in a position to shred ships! The flagship has a lot of systems to target – But the useful one is hitting pilot/shields/weapon room seat in one go: effectively sticking a sign on the ship saying “Kick me”. The systems are strong though, so it’ll take a few hits
[Type B] Noether
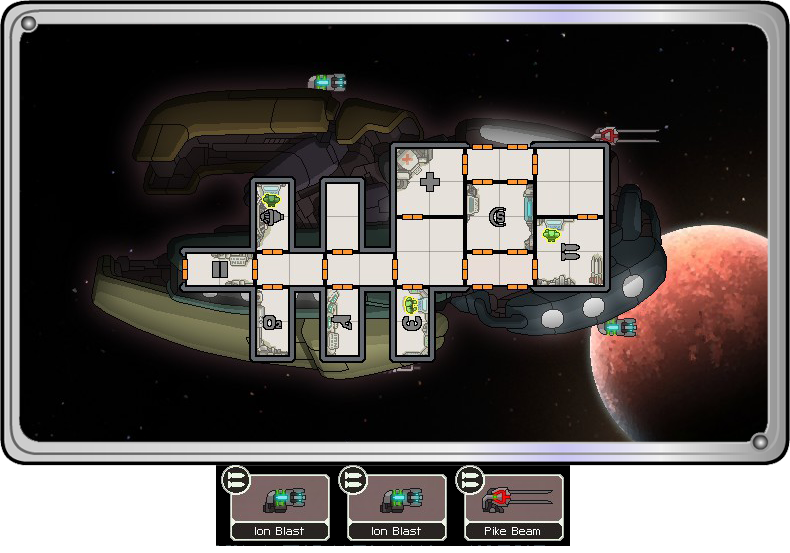
Pretty good, but a harder ship compared to the Adjudicator. Whilst not terrible, you have to spend 100 scrap just to get 1 shield, and its weapons, though cool, have a limited shelf life
Much like the Type A – You have 3 Zoltan crew, bringing the same advantages and problems. The reactor still sucks (so the triple power boost isn’t actually as amazing as it looks) and a repair/boarding crew are very important for your fragile guys. Beware of accepting risky text events (like giant spiders) as losing one of your crew early will lose you vital power too!

Once again we have the delightful Zoltan shield… although this time your shields are non-existent. You only have 1 bar invested and it costs a whopping 100 scrap to buy the 2nd to get 1 shield. In other words, once your Zoltan shield goes… you’re in trouble. As such, the trick is all about ending fights quickly. Ion Pulses and asteroid fields are particularly nasty, so try to escape or accept your opponent’s surrender as soon as possible in those

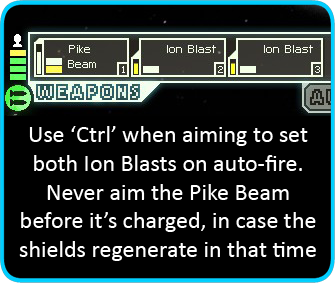
Don’t get too attached to your weapons – You’ll need to switch them out down the line. They’re good and the synergy is fun, but it’s a whopping 4 bars and even 2 shields get annoying as you need to sink 3 ion shots into them just to buy a window for the Pike Beam. Laser/Flak are good alternative weapons, as they either damage the ship or lower the shields enough to sneak a beam shot in (as soon as your shot gets the last shield, pause, aim and fire the beam before it regenerates) so win-win! Don’t get me wrong, the pike beam has a great range and is good for much of the game, but it costs 2 bars and is entirely dependent on keeping shields down – so if you find better, replace it
About those shields…
Without a doubt, you’ll need to bite the bullet at some point to get that pesky 100 scrap purchase out the way to get some real shields online. You can bypass it entirely for the first sector or 2 to put your scrap into other stuff (engines are good)… after this? Well…
Basically, if you get good weapons that ends fights quickly – you can try and bide your time, investing more in the likes of engines to squeeze the most you can out of the Zoltan shield. However, if weapons are hard to come by or you go more for a boarding crew: You’ll want to get the shields quickly, as fights will get too drawn out to rely purely on the Zoltan Shield

– +3 Crew (x2 Boarders: Rock / Mantis)
– A new set of weapons (x2 Normal – x1 Support/Bomb)
– Crew Teleporter
– Hacking Module
– [Optional] Drone Room / Cloaking / Mind Control
The ultimate picture is much like The Adjudicator. The Zoltan shield will buy you the initiative, but strong engines and fully upgraded shields are still a must to survive the fight. On top of this, a boarding crew with a few useful backing weapons are always a winner. Due to your dependency on the Zoltan Shield in the early phases – Cloaking or Drone Room (+ Defence Drone) to get the most out of it is also a good call here. You have the flexibility to host many systems here
[Type C] Cerenkov
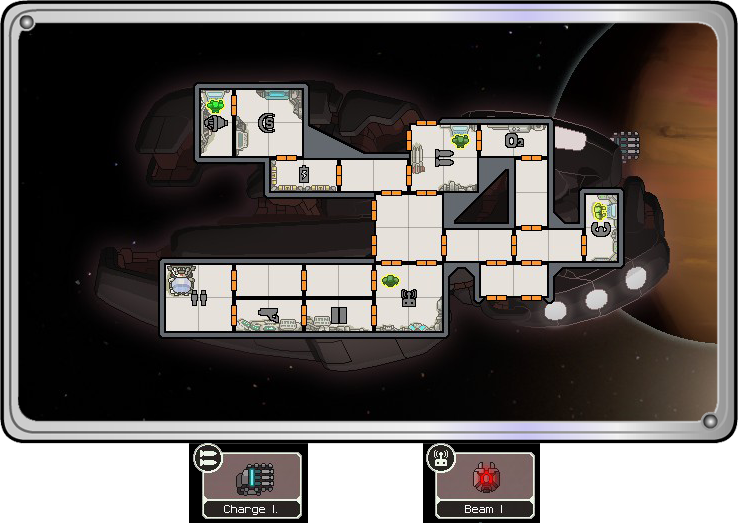
An otherwise decent ship made painfully challenging with its laughable reactor. The first few sectors will be the most difficult as you juggle sparse resources

If you’ve played the Torus (Engi Type A), the setup of this ship should feel familiar. Ultimately you need to ion the shields to allow your beam drone to do its work. The catch is that obviously both need to be running at all times to allow you to do anything. The good news though, is that your Zoltan shield should largely stop anything from knocking either system offline
The bad news is that you have to keep the buggers powered…
Fighting for power
Not even 4 Zoltans can save you from the hilariously awful reactor on the ship. 2 bars, that’s it. Assuming 1 Zoltan is flying the ship (negating its passive power boost), you’re 5 power bars short… And just to make it worse, it costs 30 scrap a throw for the first column of updates. Power management is, by far, the biggest challenge with this ship

The positioning of your Zoltan is important here. Grudgingly 1 must sit in the pilot’s seat, but the other 3 should be stationed in systems you want running at all times. As such, it’s a good idea to move the one from the shields to the drone room (for now) – You won’t be needing it at the start of each fight (what with your Zoltan shield). You then want to divert 1 bar of energy to your oxygen and 1 to weapons (so your Charge Ion will always run) as you want neither cutting out suddenly when the battery’s effect wears off

Surviving fights
Whilst not quite as fast as the Ion Blast II, the Charge Ion can keep 1 shield permanently down if it keeps hitting. Whilst you have the opportunity to stack up 3 shots to fire at once, you’re better off constantly firing just the first one as it charges (it gets your Beam Drone something to hit sooner). Only stack when you’re going against 2 shields (in which case you want all 3)
Wait until the first ion charges, then fire up that back-up battery! Launch the Beam Drone, ion the shields and put an extra bar into your engines (greater evasion will help squeeze more life out of your Zoltan Shield) – It’s a good idea powering up the shields just so you have something in place in case your Zoltan shield drops

All that’s left is to keep ioning the shields as your Beam Drone does its work. The battery is likely to cut out before you trash the enemy ship, so you have 2 choices here
Chances are, you’re really close to winning… so put the oxygen bar into the beam drone to keep up the attack (your Charge Ion should still be running so you shouldn’t have lost a gap in your ion shots). If not, then you’ll potentially have to kick up your shields (divert the oxygen and Charge Ion power until one of your Zoltans makes it to the shields) and wait out the recharge. Once it’s back, repeat the above
Needless to say, upgrading your reactor is probably your main target of the first few sectors. As soon as you get any non-Zoltan crew – don’t forget to swap out the one in the pilot’s seat so you get an extra bar to play with

Whilst 4 Zoltan might seem to give you a fragile crew against boarding and fires, don’t forget you have a clone room this time – which takes the pressure off somewhat. You can also gamble with text-events (though be careful investigating empty ships – because you can’t replace one that becomes infected and acts as an enemy)
That said, still make blast doors and a decent crew a high priority. You can’t afford to flippantly let your Zoltan’s die mid-fight (text-event boarders will still occur despite your Zoltan shield)
What to aim for
– +3 Crew (x2 Boarders: Rock / Mantis)
– A new set of weapons (x2 Normal – x1 Support/Bomb)
– Crew Teleporter
– Hacking Module
– [Optional] Defence Drone
You’ve got a lot to juggle with this ship. The reactor is your main priority, but the advantage here is that you can do it in small chunks as opposed to a huge, single expenditure… so don’t feel that you have to spend every bit of scrap you get your hands on. Always leave some to one side to snag crew, weapons or a teleporter at stores – And only boost the reactor as you get surplus
As with most drone-combinations – You ideally need to break yourself of this dependency quickly; especially as your Chain Ion will start to struggle against 2 shields or more. The Ion itself isn’t bad, so even a single decent laser weapon should be enough to help out for several sectors. But by the flagship you’ll probably want to have sold the Chain Ion and Beam Drone for something better. That said, keep hold of both until you have a full accompaniment of weapons, even if you get boarding – just in case you hit drones or Lainus ships
Once your reactor starts to resemble a normal ship and you have some more offensive capabilities, you’re in a position to take a breather. The rest of the game should be business-as-usual from here
Thoughts and Suggestions
Anything I’ve missed?
Anything you’d like more detail or explanations on?
Disagree with any of the above and want to challenge me to a race around Mars in Lego rockets?
Give me a shout! There’s plenty more to come, so any changes and suggestions are welcome. The awesome ones shall be implemented and full credit will be given to the delightful owner
All the best
Links to the other Class Guides
Hungry for more? Fear not – The other ship classes are catered for! Just follow the links below:
– Kestrel Class
– Engi Class
– Federation Class
– Mantis Class
– Slug Class
– Rock Class
– Stealth Class
– Lanius Class
– Crystal Class