
Overview
Two stun builds for Scout using the M1000 or the Deepcore GK2 and the Jury-Rigged Boomstick.
Introduction
Those builds are centered around an aggressive playstyle that will offer a great DPS and enough flexibility to manage most situations. The M1000 and the Deepcore GK2 will be used for damage while the Boomstick will be used for utility (mobility, stun and fire).
If you want to get precise regarding damage, DPS and stats in general, you can use this build planner: [link]
- Have all the weapon modifications recommended unlocked.
- Have a promoted Scout to unlock the 2nd active perk
- Have enough progress in the perk tree to unlock the recommended perks and the 3rd passive perk slot
- The Hipster Overclock for the M1000 and the Bullets of Mercy OC for the Deepcore are mandatory
- The Special Powder Overclock for the Boomstick is not mandatory but is highly recommended
Generalities

- M1000: 100% stun chance on focus shots, 3 seconds duration
- Deepcore GK2: 40% stun chance on weakspot hits, 1.5 seconds duration
- Boomstick: 50% stun chance per pellet (8 pellets), 6 seconds duration
After being stunned, a target will become immune to stun effects for several seconds. This is important to take into consideration: if you want to stun a big target for 6 seconds with your shotgun your need to be careful not to stun it first with your primary weapon.
Furthermore, the following creatures are immune to stuns:

Driller and Engineer (and some Gunner builds) are very good at dealing with hordes of enemies. Scout struggles in that regard and there is no strong interest in trying to make him good at it. Those builds focuson making Scout even better at what he does best: being extremely mobile and being good against High Value Target.
Leave horde enemies to your teammates, they are better than you at dealing with them. Focus on High Value Targets (HVT) like Spitters, Wardens, Macteras and Oppressors. Spamming shots will empty your ammo reserves in the blink of an eye so choose your targets and always try to aim for weakspots.
The reason we take Hipster on the M1000 is that it will allow us to maintain some interesting breakpoints (most notably kill Grunt with one hipshot to the head and Spitters with one shot in the body) while providing almost twice the ammo count. This makes hipster the most forgiving build when missing shots but the high fire rates also allows it to reach the highest DPS for the gun.
As you will see in the “Breakpoints & Combat Strategies” section, focus shots provide a lot of utility when coupled with the stun perk. Immobile enemies are easier to hit which results in better DPS and ammo management.
Make sure the areas where your teammates fight are always lit. Once the light is on try to assist your teammates by killing Spitters, Macteras and by helping them kill bigger targets. Be ready to use an IFG/Cryo grenade if a teammate is in trouble. Killing an enemy accross the map is cool but killing an enemy threatening a teammate first is always better.


Mission types & Mutators
The builds presented in this guide will perform slightly differently, the M1000 build offering better DPS but worse crowd control than the Deecore GK2 build. The M1000 build will also perform better at long range while the Deecore GK2 build will perform better at close range. Considering this, I recommend using each build in the following missions:


 Gold Rush: Deep Pockets will help greatly in collecting more ressources.
 Golden Bugs: Deep Pockets will help greatly in collecting more ressources.
 Mineral Mania: Deep Pockets will help greatly in collecting more ressources.
 Rich Atmosphere: the higher creatures’ speed can give you a hard time aiming for weakspots, especially with the M1000. Stuns will help in that regard, as well as IFG grenades.
 Volatile Guts: the IFG and Berserker combo (see the Pickaxe & Grenade section) will be very dangerous to perform because enemies will damage you with their explosion at melee range. The Vampire perk could also be switched with another perk of your choice.
 Cave Leech Cluster: you can consider taking the Heightened Senses perk (especially if palying solo). Otherwise think to use your Flare-Gun on the ceiling more often.

 Exploder Infestation: exploders can be killed with one pickaxe hits, making them an easy way to get health back with the Vampire perk.
 Lethal Enemies: the IFG and Berserker combo (see the Pickaxe & Grenade section) will be very dangerous to perform because enemies can deal massive melee damage. I recommend switching Berserker for something else (Iron Will for example).

 Mactera Plague: M1000 build recommended. The M1000 has more power against Macteras in my opinion. Just bring a Cryo grenade instead of the IFG.

 Regenerative Bugs: Scout is very single target focus so you will most likely always immediatly finish targets you start shooting.
 Shield Disruption: be very careful with fall damage as you will take direct health damage every time. I recommend taking Sweet Tooth instead of Deep Pockets to help with health recovery.
 Swarmageddon: Deepcore GK2 build highly recommended. The M1000 is very bad against swarmers so the GK2 with Cryo Grenades is your best bet. You can also consider taking the Thorn perk for extra help.
Bosco recommendation

T1: we take mining speed so that Bosco will work faster on Nitra, Gold and other minerals and will be available again sooner (doesn’t increase digging speed).
T2: Rockets upgrade
T3: we take an extra revive as it is the more valuable in this row. This allows us to make one extra mistake per mission.
T4: we take Cryo Rocket for the suppport it provides. See below for more details.
T5: we take Electrocuting bullets for the supports it provides. Electrocuted creatures will be heavily slowed down, making them easier to hit in the weakspot.


This little Robot can do a lot of things for you, use it as much as possible to gain time during your solo missions. When commanding with your laser pointer, Bosco can:
- mine minerals
- dig and carry ressources from the walls
- carry additional objects
- build pipes during On-Site Refining
- protect Doretta during Escort Duty
- mine Ommoran Beamers druing the final phase of Escort Duty


M1000 build

Pros:
- Good single target DPS with Hipster bursts, good one-shot capacities with accurate shots .
- Nervous playstyle
- Stun is good offensively and defensively
- Decent against hordes once mastered
- Works well with a Cryo Driller
Cons:
- Requires decent aiming skills
- Forces a more aggressive playstyle which is less safe than a focus oriented playstyle
- Tricky to play on Solo Escort Duty or Solo Salvage Operation

T1: we take damage to reach some breakpoints, ammo is not too much of an issue with Hipster.
T2: we take armor damage to be versatile against more enemies. Focus speed is not needed and the recoil on Hipster is perfectly manageable after a bit of training.
T3: we take +75% clip size which is a massive boost compared to +25% focus damage. A bigger clip means less reloads and longer bursts of damage when needed.
T4: we take extra weakpoint damage to reach some breakpoints and increase our DPS against big targets. Blowthrough is praised by many players but it mostly deals trash damage (rarely hitting weakspots) and is harder to exploit.
T5: we take stun to secure our kills on many targets. Fear is unwanted as we want enemies to face us to be able to hit their weakspots and we don’t need the extra reload speed with our increased clip size and the Born Ready perk.

See the “Breakpoints & Combat Strategies” for some details on the breakpoint offered by the weapon.

T1: we take more ammo as we don’t build for damage. This will allow for more stuns and to compensate for the ammo “wasted” by the Special Powder Overclock.
T2: we take increased fire rate to be quicker when using the weapon. It also allows to propel yourself faster with Special Powder.
T3: we take the Stun mod that got boosted in update 35 and now provides a total of 6 seconds of stun duration. This is very useful coupled with a Hipster M1000 as it will leave the stunned victim open to a lot of damage.
T4: we take Blowthrough to get more fire power against hordes. It also allows to hit more enemies with one shot, potentially stunning more targets at a time. This is both an offensive and defensive choice.
T5: we take White Phosphorous Shells to increase our damage a bit and to provide the benefits of fire damage. Some enemies are weak to fire but fire can also burn webs, detonate gaz clouds left by Praetorian and Oppressors, unfreeze enemies for a burst of damage. A good addition to make our Boomstick more versatile.

- it can help us reach distant locations quickly
- it can help us break a fall when needed which is great when you try to reach ressources on the ceilings of caves.
- it can help us quickly escape dangerous situtations
Special Powder is very fun to use and vastly increases the mobility of the Scout, making him even better at what he aleady does well.
Deepcore GK2 build

Pros:
- Good single target DPS against creatures afflicted by status effects
- More forgiving and a bit better at close range than the M1000
- Stun is good offensively and defensively
- Decent against hordes once mastered, can kill Swarmers with one bullet.
- Benefits from a Fire/Cryo Driller, an Electrocution SMG Engineer and a Fire/Poison Gunner.
Cons:
- Can burn through ammo quickly if used poorly
- Lacks accuracy mods which makes it worse at longer ranges
- Less DPS than the M1000 build
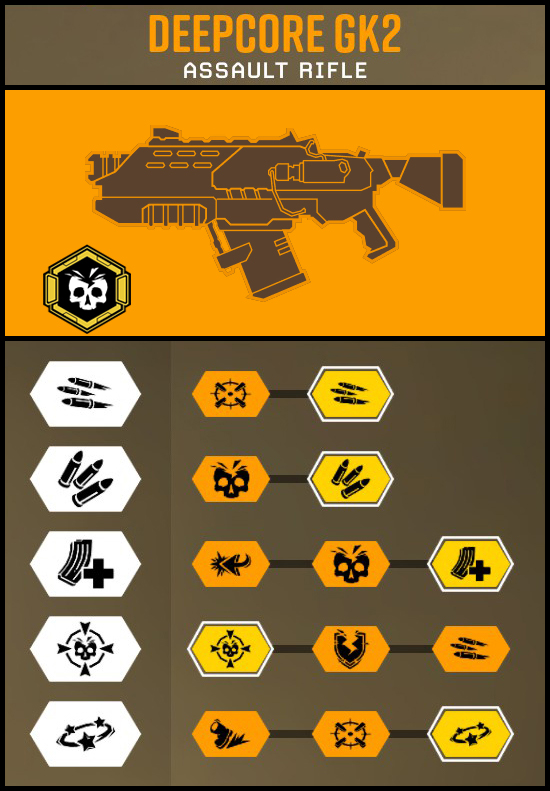
Our Deepcore is built for damage at the cost of long range accuracy. Bullets of Mercy will take advantage of all the status possible to increase the damage dealt.
T1: we take increased rate of fire to maximise our damage against bigger targets.
T2: we take ammo for sustainability. We already deal 15 damage which kill swarmers in 1 hit so more damage is not mandatory.
T3: we take +10 clip size to compensate for the -5 clip size reduction of the Bullet of Mercy Overclock. This is mandatory to maintain good DPS against big targets and to spend way less time reloading.
T4: we take extra weakpoint damage increase our overall DPS. This also allows us to reach some breakpoints like killing grunts in 3 headshots.
T5: we take stun to secure our kills on many targets and to trigger Bullets of Mercy.


Others: Driller’s Flamthrower, Gunner’s indendiary grenade, Magma Core hazards, other weapons with specific mods or overclocks.

Others: Cryo Driller, Bosco’s Cryo Rockets, Glacial Strata Hazards, other weapons with specific mods or overclocks.

Others: Gunner’s Bulldog or Thunderhead with specific mods or overclocks.

Others: Electro Crystals, Engineer’s SMG with specific mods or overclocks, Bosco’s Overcharged Rounds.
Others: other weapons with specific mods or overclocks.

T1: we take more ammo as we don’t build for damage. This will allow for more stuns and to compensate for the ammo “wasted” by the Special Powder Overclock.
T2: we take increased fire rate to be quicker when using the weapon. It also allows to propel yourself faster with Special Powder.
T3: we take the Stun mod that got boosted in update 35 and now provides a total of 6 seconds of stun duration. This is very useful coupled with a Bullets of Mercy as it will leave the stunned victim open to a lot of damage.
T4: we take Armor Damage to compensate for the lack of armor penetration on the Deepcore. This will allow us to have an easier time against many armored creatures, especially Q’ronar Younglings, Q’ronar Shellbacks and Mactera Bundles.
T5: we take White Phosphorous Shells to increase our damage a bit and to provide the benefits of fire damage. Some enemies are weak to fire but fire can also burn webs, detonate gaz clouds left by Praetorian and Oppressors, unfreeze enemies for a burst of damage. A good addition to make our Boomstick more versatile.
- it can help us reach distant locations quickly
- it can help us break a fall when needed which is great when you try to reach ressources on the ceilings of caves.
- it can help us quickly escape dangerous situtations
Special Powder is very fun to use and vastly increases the mobility of the Scout, making him even better at what he aleady does well.
Flare-Gun

T1 and T3: we take ammo to be able to place more Flares. More ammo means more walls can be lighten up which means you’ll be more efficient. An extended duration would only be useful on static objectives like Salvage Operation.
- 2 ammo upgrades: 18 flares * 75 burn duration = 1350 seconds of light total
- 1 ammo and 1 duration upgrades: 15 flares * 90 burn duration = 1350 seconds of light total
- 2 duration upgrades: 12 flares * 105 burn duration = 1260 seconds of light total
T2: we take the least useless one, a bit more fire rate to go back more quickly to what we were doing before needing to ligh up the area.
Grappling Hook

T1 and T4: we take cooldown in order to be more active with our grappling. This will help move faster around the map and the time saved recharging the hook can be the difference between life and death in tense situations or when making a wrong move.
T2: range upgrade. More range is always great even though the Special Powder OC will help us reach further.
T3: we take extension speed to start moving around faster. The safest option of the two.
Tip: a common strategy to reach minerals on vertical wall is to place yourself just under the wall, initiate a rather vertical movement with the grappling hook and perform a power attack with the pickaxe to instantly break the wall and create a hole where you can fit. If you miss you can switch to your Boomstick to break you fall with the Special Powder Overclock.
Pickaxe & Grenade


We build our pickaxe to favour area damage in order to compensate for the single target oriented playstyle of the Scout class.
T1: unclocks Power Attack.
T2: we take increased Area of Effect.
The IFG grenade is a fantastic support tool, great for crowd control. Creatures inside the field will be slowed down by 75% and they will receive 30% more damage, which is both great for making hordes easier to kill (slower moving targets are easier to hit precisely) and for helping to kill bigger, more tanky targets quicker.


It is best used against the following targets:
“Fox” Armor Rig

T1: we take Bigger Mineral Bag which, combined with the Deep Pockets perk, allows us to reach 60 minerals capacity. You spend a lot of time collecting minerals as Scout so this is not a luxury.
T2: we take shield capacity. This is mostly up to personal preferences but we don’t really want to tank as Scout so a bit more armor can negate a bit more mistakes.
T3: Fall damage reduction.
T4: we take the Explosive Shockwave with the M1000 to help deal with Swarmers, creatures against which Scout struggles.

Breakpoints & Combat Strategies (M1K)
Note: “critical hits” mean shots hitting the weakspot of the target.
This list details breackpoints for the M1000 on hazard 5 difficulty. This is not an in-depth guide on how to fight each enemy but rather a list of interesting breakpoints and ways to engage each of them if you want to be efficient.


or one focus shot to the body ➔ stunned ➔ one critical hipshot.

or one focus shot to the body ➔ stunned ➔ one critical focus shot.
or chain 4 critical focus shots from afar.


Use an IFG grenade for extra damage if you can spare one.


or one focus shot to the body ➔ stunned ➔ one critical hipshot
or 3 hipshots to the body.


or one focus shot to the body ➔ stunned ➔ one critical focus shot.

or one focus shot to remove the armor ➔ 3 critical hipshots.

or double shotgun blasts when close (can’t be stunned but weak to fire).


while standing still ➔ one critical focus shot or 3 hipshots to the belly.

while standing still ➔ hipshots to the belly until dead.
Hitting the eyes or the tail is worth but hard, don’t bother if low on ammo.

If you are not afraid to get up close you will be able to perform a lot of damage on big targets like bosses. Don’t forget to optimize your damage for you and your team by using IFG grenade at critical moments where the creatures’ weakspots are exposed.
You will burn rather quickly through your ammo but you will be the one doing the most damage so this is worth it.
Breakpoints & Combat Strategies (GK2)
Note: “critical hits” mean shots hitting the weakspot of the target.
This list details breackpoints for the Deepcore GK2 on hazard 5 difficulty. This is not an in-depth guide on how to fight each enemy but rather a list of interesting breakpoints and ways to engage each of them if you want to be efficient.
or use your shotgun first to break the armor and stun.
Even though it has a 66% fire resistance and is immune to stun, it can be worth to use some shotgun ammo to set it on fire as it will be your only way to proc Bullets of Mercy on your own.
or 4 shots to the body.
or 12 shots to the body (or down to 8 shots with early stun and armor break).
while standing still ➔ 3 critical shots or 8 shots to the belly .
while standing still ➔ set on fire with shotgun (weak to fire during this state) ➔ shots to the belly until dead.
Hitting the eyes or the tail is worth but hard, don’t bother if low on ammo.
or set it on fire with your shotgun then wait for the mouth to become bright pink to shoot it. Don’t spam shots otherwise as it will take a lot of ammo to kill without hitting a weakspot.
Bosses are immune to stun and very resistant to elements so you will never be able to trigger Bullets of Mercy on your own. Try to stay at medium range and focus on being accurate to make every bullet count, otherwise you’ll be out of ammo very quickly.
Conclusion
I made this build to emphasize every aspect of the Scout playstyle: being a mineral hoarder with as much mobility as possible and providing as much support to the team as possible. The Hipster rework of update 35 changed it for the better and I believe it is now where it should have always been.
I hope you’ll find this build as fun as me. Feel free to share your opinions and to adapt this build to your needs.
Find out my favorite Gunner build in my other guide:
[link]
Rock and Stone !