
Overview
This guide will teach you how to properly compile a map for publishing. Many times I have likely suggested that you use “Full Compile” on your Hammer-made maps. What do I mean precisely?
The works of compiling
In an update, the Puzzlemaker shows progress of compiling your map in three stages: “Building geometry”, “Computing visibility”, and “Calculating lighting.” Before that, there was only one progress ring which showed “Building Test Chamber…” Unfortunately this became tedious, as there were only 16 ticks and about 5 mins to compile a map.
This means there was about 18 seconds per tick, which made compiling a map look tedious.
Anyway, there are three corresponding stages of the compiling process:
1) vbsp, which compiles the geometry of your map, checks for leaks, etc. and gives you a portal (.prt) file if there’s no leak.
2) vvis, which uses the .prt file to compute visibility. This step is so critical to Portal 2 maps that your map will not compile if it has a leak.
3) vrad, which uses the details from vvis and vbsp to calculate the lighting for your map. This normally takes the most time to finish, and twice as long for compiling both LDR (Low Dynamic Range) and HDR (High Dynamic Range).
The Hammer compiler/runner also has other nice options, such as copying your map into the Portal 2portal2maps directory (because that’s where the game will recognize your map) and starting the game fullscreen or windowed. When it runs, it will run in “developer” mode, which gives a verbose runoff of stuff you see on the console (and then some) in the upper-right corner, so you can debug little problems without having to open the developer console (though you might still need to use the console to execute commands such as noclip unless you have them bound to a key).
Common misconceptions and the solution
Based on the hundreds of Hammer maps I’ve seen, I can confidently say that there are a couple of misconceptions:
1) There is only one way of compiling maps, so there may as well be just one “COMPILE” button.
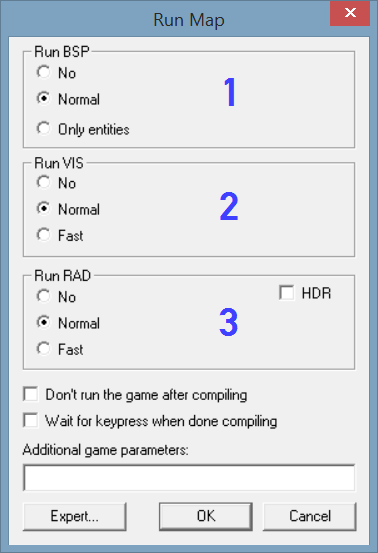
2) Compiling on “Normal” with HDR checked is good enough.
Points of fact:
1) There is more than one way to compile your map, from quick & dirty modes to the slow & beautiful ones.
2) Compiling on “Normal” with HDR checked is never good enough! The compiler will only compute HDR lighting and not LDR lighting. Furthermore, -final is left out of the equation.
The proper way
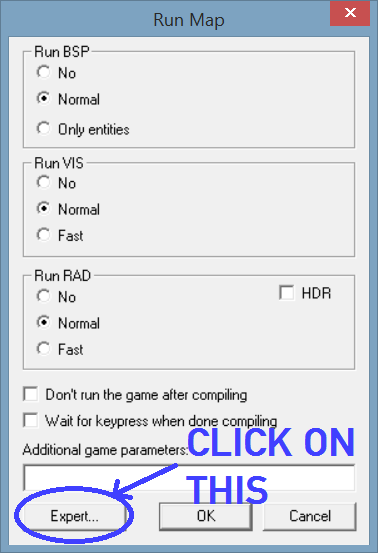
1) When compiling, click on Expert… Despite the implication of the name of this button, you do NOT need to be an expert at Hammer to use this. There are presets that you can use without having to know much about how the system works (it’s command-line based btw).
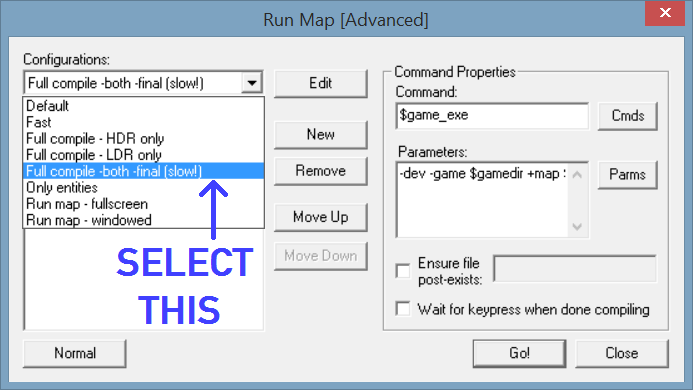
2) Select the “Full Compile -both -final (slow!)” mode from the drop-down menu.
3) Hit “Go!” and that’s it!
TIP: you can check and uncheck the various parts of the compiling process seen below. For example, you can uncheck vrad to debug any logic errors in your map without having to wait the extra 3-4 mins for your map to finish compiling.
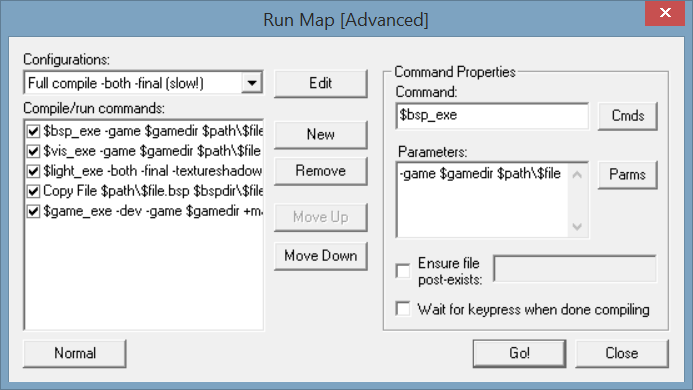
Then once you’ve debugged those errors, you can check vrad again and debug lighting issues. You can also uncheck the part that runs the map in-game if you have any custom content to embed before running/testing/debugging your map.
What does it look like? (NEW)
Maybe some of you don’t understand what the visual effect of using a Full Compile is. Here’s a little illustration of a couple of elevator rooms, both of which are very ubiquitous among Hammer maps on the workshop:

You should immediately notice the differences: the top image is darker than the bottom one — hell it’s even hard to see what color the floor is supposed to be other than “black” despite there being the normal gray carpet texture there!
But in the bottom image, you can see that everything’s well-lit, and moreover that it’s evenly and plausibly lit. No extra light entities were added to make the bottom image brighter than the top one. That is the power of using a Full Compile when getting ready to publish a map.
If you want to see another example, check out the entrance hallway in all those exported PeTI maps. Normally there’s a yellow wall in many of them, but without a Full Compile it’s black instead.
That’s all
If you’re still lost or confused, post a comment below. An Aperture Science testing associate should be available to revive you with peptic salve and adrenaline give you cake and grief counseling answer your questions if they’re not already answered by this guide. We wish you the best of luck in your mapping adventures.
Please see also this guide for more information on making better Hammer maps.