Overview
Long story short: It’s a guide for making Overgrown-styled tests in the Hammer Editor, and then uploading them to the workshop. This is currently incomplete, as I still need to edit videos and upload them.
Overgrown Overview
What is Overgrown style?
How DARE you ask ths question? But, for those who have gotten Portal 2 and just jumped right into the Puzzle Editor or Hammer, it’s the style of the testing rooms at the beggining of the game, beofre you and Wheatly accidentally turn on GLaDOS. When GLaDOS is turned, after a fw Overgrown tests, the style of Reconstruction begins.
Overgrown is not as simple and easy as Clean tests, but not as difficult as Reconstruction tests. While the Overgrown style has many props, ~90% of them or static, and don’t even do anything. Some are dynamic, but majority of that small amount are just lopped animations, so there are no worries.
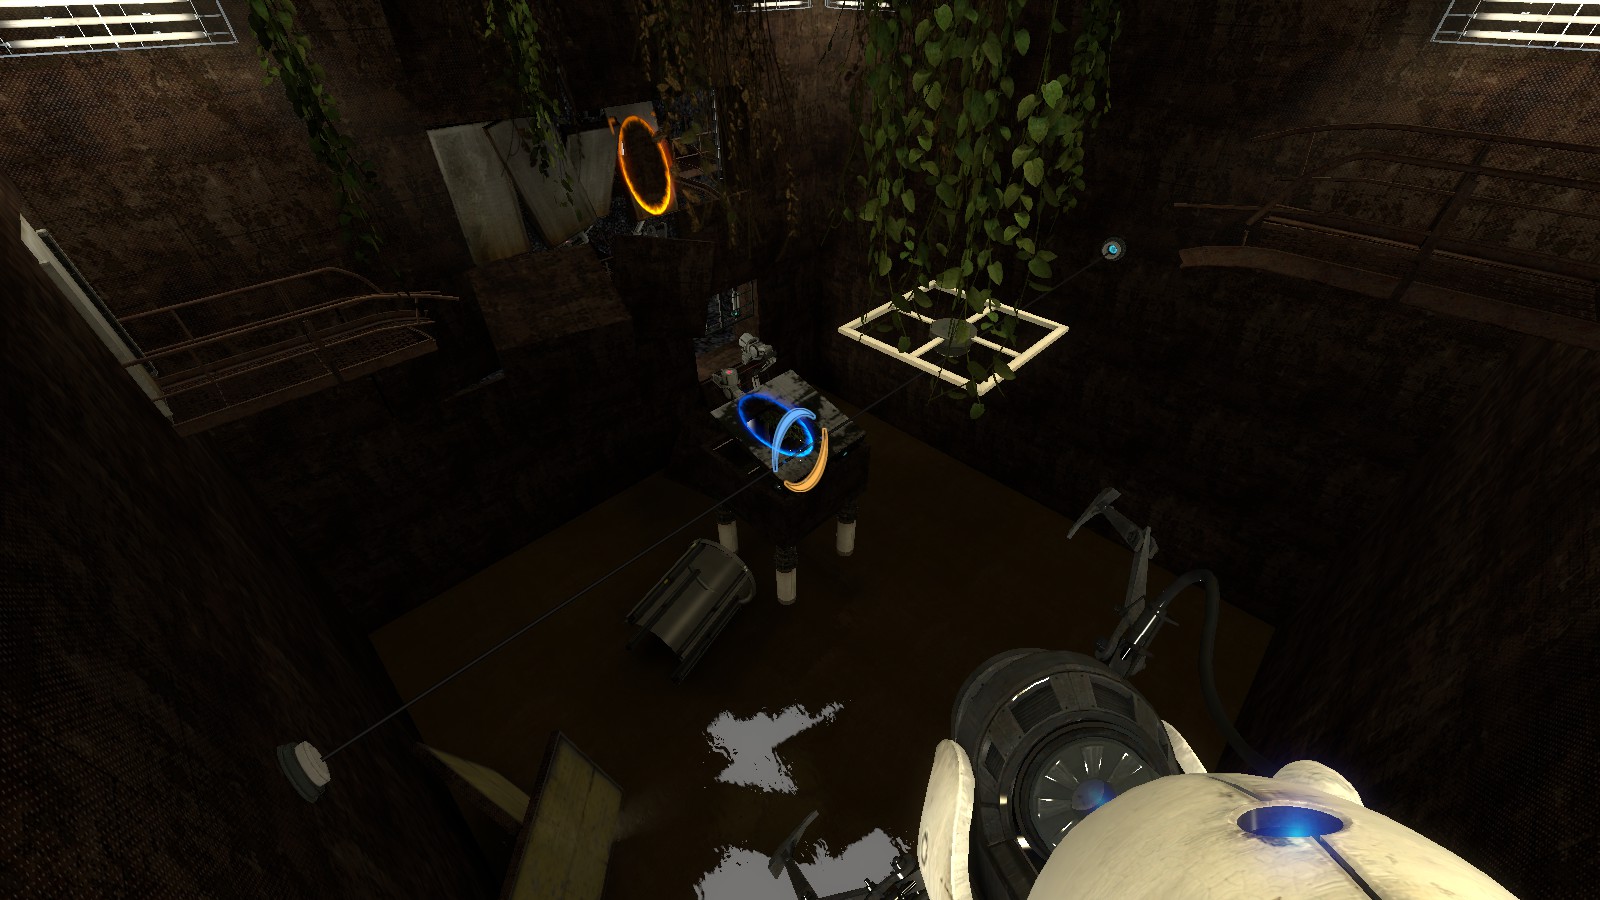
The image below is a lazily taken screenshot of a small Hammer map I’m making, though this isn’t all that there is:

From Editor to Hammer
Creating the puzzle in Puzzle Maker
By now, everyone knows of the in-game Puzzle-Maker, and are familiar with it. This guide is assuming you are familiar with both the Puzzle Maker and Hammer, forgot to mention.
To begin with, open up Portal 2, and hop into the Puzzle Maker. I highly recommend you get Bee 2.4, a mod for the Puzzle Maker that adds more items and styles for the Puzzle Maker.
For those with Bee 2.4
If you have Bee 2 or Bee 2.4 installed onto your computer, go ahead and open it up, create a new palette, and choose the style of Clean and go with the default Puzzle Maker items. If you want to, you can go ahead and use the new items fro the Bee mod, but I will not be going over these items and how to incorporate them.
Moving Right Along
Once you have the Puzzle Maker open, go ahead and make a new test, and create the puzzle.
=Notes on Overgrown Testing Elements=
There a few things I should note about Test Elements, and what to not use before creating your puzzle. I do NOT recommend the test elements of:
-Funnel
-Ariel Faith Plate
-Gels
There are other things to note about lighting, and here they are:
-Don’t use MANY lights, even on the ceiling. When we port the map to Hammer, we’ll be destroying the roof, letting in sunlight when we do what I say. The “sunlight” should light up the majority of the testing environment, so keep lights out of where the roof will have caved in, unless you just need to see where you are, then use them temporarily.
-Stick with Warm Light Strips. We can either change them in Hammer, or those with the Bee Mod can just use the Warm Light Strip item the Bee Mod supplies the user.
=Back to Puzzle Maker=
Now, look and read carefully, as if you do what I say, you might com out with a neat puzzle ready for Hammer. DO NOT, and I repeat, DO NOT copy the puzzle I’m making, as though it’s an example test, I created it. So please, make your own.
=My Puzzle=
Editor:

=Exporting to Hammer/.vmf file=
When you have completed maing your puzzle and have gone through it to make sure it has a solution and ALL of the testing elements are usable in some shape or form, in the Editor, in the top-left corner, click “File” and find “Publish”. This will compile your puzzle, so that it can be published. DO NOT CLICK ON ANYTHING HERE. If your Developer Commands option has been enabled in your Options, press the “~” button on your keyboard, or whatever key you set to up the command window, and, with the “Publish Chamber” window still open, type in the command line “puzzlemaker export ‘your_level_name_here’ “. Replace “your_level_name_here” with the name of the vmf file. Any spaces turn into underscores. This is REQUIRED.
Image:
Now, open your Portal 2 folder, via where you installed Steam, and go to “steamapps/common/Portal 2/sdk_content/maps”, then find your .vmf file with the name you gave it in the command window in-game. I called mine “laser_and_cubes_overgrown”.


My File (Highlighted):
Now, you are good for opening it up in the Hammer Editor.

Texture Changing
Finding Hammer
You may notice, under your Librry and “Installed”, that the Hammer Editor is not there. So, here’s how to find the Hammer tool, and install it.
1. Do NOT search up “Hammer”. That’s not how to get it.
2. Find “Portal 2 Authoring Tools” or “Portal 2 Authoting Tools – Beta” (Doesn’t matter which)
3. Install it.
4. Open it.
When you open Portal 2 Authoring Tools, you’ll get a small window that shows many things, the three slections at the top being “Hammer World Editor”, “Model Viewer”, and “Face Poser”.
5. Slect “Hammer World Editor”
6. When it’s finished loading, go to “File”, “Open”, and find your .vmf file that you exported from the Puzzle Maker from the last section.
To view your map better, go to “Instancing”, “View Instances”, and elect “View Normal”. Now you won’t have that annoying green highlight over all of the instances.
=My File=
=Changing The Textures=
Select your “Face Edit Sheet” tool, and select ONE of the black, side faces, where there’s noting on it. Click “Replace”, and lect the “Browse button that’s on the RIGHT side of the Edit window. Browse and search for the texture called “black_wall_metal_005c”, and click “Replace”.

Find a face that has something on it, like the sides where the Good pit is, or one of the faces that has one or two light strips.The texture it has is called “black_wall_metal_002b”. Go through the same process as beofre, only finding the texture “black_wall_metal_005b”.
Now slect a floor face, and repeat the same process as the first one, this time finding the texture “black_wall_metal_005a”. the texture it originally had should be called “black_floor_metal_001c”. This should replace both the floor and the ceiling textures.
If you have created floor lasers nd laser catchers, you’ll find the odd texture up on top/underneath the lasers. Select one of those faces, where the original texture should be “black_wall_metal_002a”. Replace that texture with “black_wall_metal_002a”, or something similar.
If you made white panels along the walls, select one of those faces, with the original texture being “white_wall_tile003a”. Replace this texture with the texture “white_wall_tile004f”.
=White Panel Textures=
Now you my have noticed in the Single-Player campaign that the white panels near the floor have that modly kind of texture to it. And you may have just now looked at you white panels and have noticed that yours don’t. Simple solution: Once again, select you Face Editor Tool, and select the floor wall panels’ faces. Under the “Shift” section on the Editor window, change the Y form “0” to “512”.
With white panels that touch the ceiling, it looks, to me, odd that they’re left untouched. Select all of the white panel faces that touch the ceiling, and set the “rotaion” to 180. If it’s still completly white, without that moldy texture, change the Y to “512”. Now, it’ll look like it’s also molding from the top as well:
Now, you may have noticed that there are more faces whose textures were replaced than how many are visible inside of the chamber. If you go outside of the chamber, and even inside some of the side penales, you’ll notice that there are MANY more faces, 4-6 times as many faces than there ae inside of the chamber. When we get to optimizing the map, we’ll fix those, as it can/will slow down crappier computers.

=Texture Notes=
-Do NOT use the “cheap” textures, as those are for textures the player will never get close to, and helps optimization.
-Do NOT use vertex textures, as those aren’t for flat faces. (Though this one is personal choice.)
=Final=
Now, we can move on to instance replacing and other things.

Instancing Replacing (Bee 2/2.4)
FROM HERE ON
From here on, it is HIGHLY recommened that you have the Bee 2/2.4 mod installed, else you will NOT have access to the instances I’m about to list here. The next section will be fore those who do not have/don’t want Bee Mod, because there are work-arounds.
=Warning!!!=
ALWAYS SAVE CONTINUOSLY!! Change a texture, save. Move a model, save. Why? Because Hammer can crash at anytime, and if you don’t save, BOOM, crash, you lost all of your progress.
=Changing The Instances=
-This part depends on if you have this test element in your map. If you don’t, then skip that piece, then move to the next.
-When slecting the overgrown styled version of the test elements, be sure to LCIK ON THE VMF IN THAT FOLDER, even if it’s already named in the typing bar near the bottom of the window, else you’ll get the original instance again.
-Stairs
Open up the instance by double-clicking on the element in the Camera view. Slect the “VMF Filename” tab in the list on the left of the Configurations window, and click “Browse” on the right side of the window. Go to “instancesbee2overitems”, and select the “stairs.vmf” file. Click “Open”. Press “Apply”. Done.
-Droppers
Again, open the instance, following the same steps, find the “wrecked” dropper, thise time going to “instancesbee2overcube” and selecting the “dropper.vmf” file. Open, apply, done.
-Angled Panels
Open the instance, browse in the “instancesbee2overitems” directory, and find the file “angled_panel”. Done.
-Glass Panels
Open the instance. under the “instancesbee2overitems” directory, find the .vmf file “panel_clear.vmf”. Select it, open it, done.
-Entrance Hall
This one may require a bit more work. Open up the entry hall, go to the “instancesbee2over” directory, and replace your current entrnce hall with the new one, or just go ahead and delete that whole entrance hall entrance, and make your own. Copy and pasting everything into the your map is a pain in your neck, as of how the Bee 2/2.4 devs constructed the entrance hall. Besides, making your own halls makes it more personal, and can help you develop your own style.
-Exit Hall
Same as the Entrance Hall.
-Entry/Exit Elevators
Get one of the official .vmfs from the “instancesturbine_elevator” directory. Specifically, “arrival_elevator_destructed_base_12.vmf”. Replace the departure elevator with “departure_elevator_destructed_base_13.vmf”. Replace the arrival/departure logic with “
Remeber: You yourself can create a custom elevator, aain, using instances. Create a new file, copy and paste everything from one of the official instances, and then you can edit to your desires, so long as you always tke a step back, check what you’ve done, and maker sure it LOOKS GOOD. (This is what I’m doing, so don’t mind me!)
The End. Go ahead and, really and truly, skip this section. Just, do what I say in the next section.
Instance Replacing (Hammer Replacements)
Note
This section will be made up of video tutoirials, as I deem it impossible to teach what’s needed here by typing it all out.
=Instance Replacing=
-Delete all instances, except for droppers. We can create new instances of those anyway.
-I prefer this method, as it gives you less of a chance of picking out a Bee 2/2.4 instance, and it gives you more control over what you want, allowing much, much more creativity to flow forth.
-Elevators:
-Lasers (Catchers and Emitters):
-Droppers:
-Fizzlers/Laserfield:
-Motion Platforms:
-Observatory Room (Behind it is the optional feature):
Detailing
This will once again be a video tutorial, but adressed to YouTube and Steam users, as this video will be published publically to YouTube.
=Detailing=
-Please note that all of this is UP TO YOU, you have full control here, and there’s nothing stopping you from doing what you want; Except for your PC and Hammer limits,
-Video:
=Optimizing=
-Why is Optimizing down here? Because it’s not that big, really: You can use int and skips if you need to, nut other than that, nothing much.
-Use nodraw on every face you KNOW that tester WON’T see.
Uploading to the Workshop
You constucted this big, very nice test chamber. So you want others to see it, right? Well, you can’t just “WHOOP!! Upload to Workshop!” There’s a process behind it. The first part, is to get the Wrkshop compatibility inside your level.
=Workshop Compatibility=
-In Level:
-Uploading to Workshop: