Overview
This is a basic guide for anyone who wants to take any SimplePlanes aircraft, and convert it for Ravenfield.
Intro
So, you want to take your SP creation, and be able to experience it in Ravenfield? Well, you came to the right place.
All you need is this:
- Your aircraft model from SimplePlanes
- Blender 2.79
- Unity 5.6.3p1
- The time and suffering that comes with using Blender and Unity
- A photo editor of some sorts
- A audio editing software (Not really needed, but recommended for uniqueness)
The more parts your aircraft has, the longer it may take to finish.
Be sure to join the Ravenfield Discord for any questions you may have towards modding.
Discord[discord.gg]
You generally would want to have at least a little bit of experience with blender, to make your life easier. I would recommend watching a tutorial on how to navigate blender at least.
https://www.youtube.com/watch?v=JYj6e-72RDs
*Note that both Blender and Unity are free.
*Note that this only touches on aircraft.
*Note that this is my way of doing it, there may be other (maybe easier) ways to do this.
Let’s get started.
Exporting from SimplePlanes
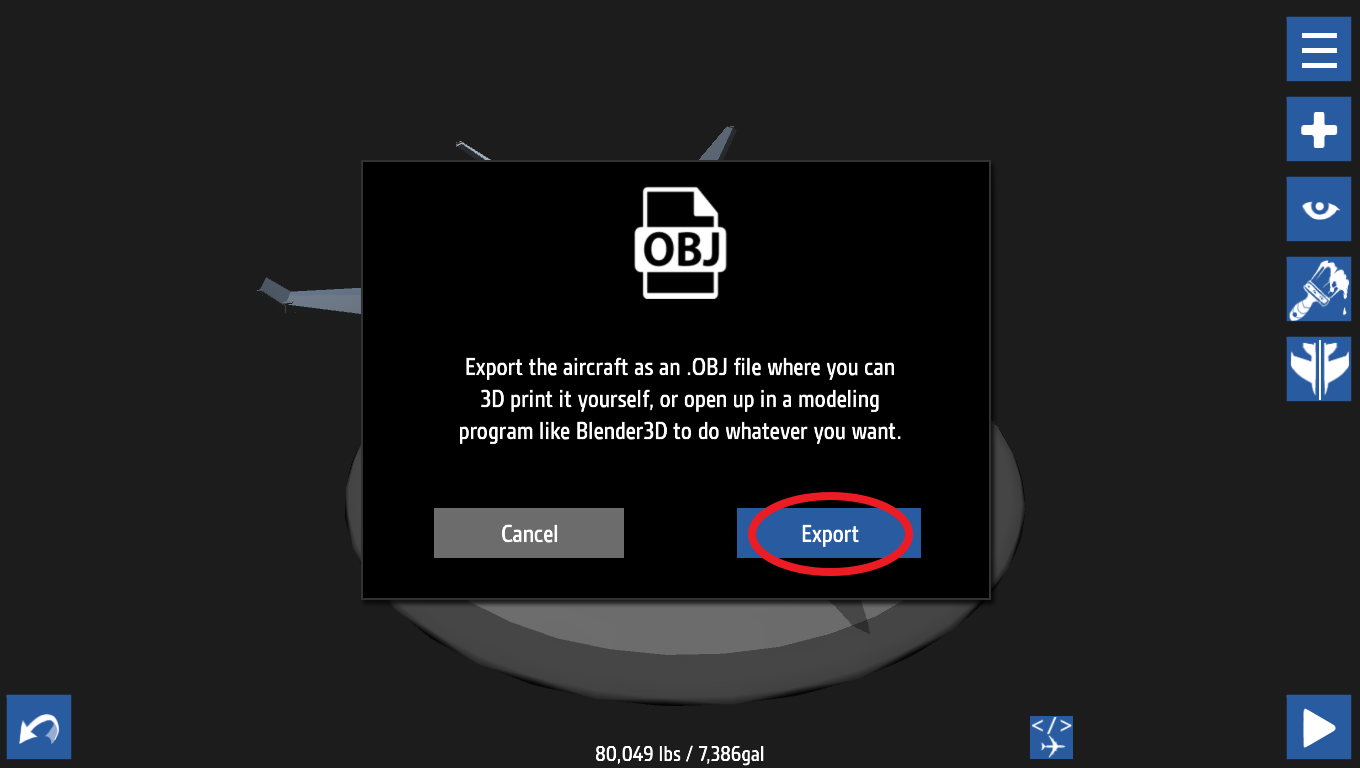
We start by selecting our aircraft in SP. I’ll be using a fictonal jet bomber that I never published on SP as a example. Once you have your aircraft selected, click on the Designer Menu button and click on “3D Print/Export”.

Then, click on “export”.
Once it’s exported, there will be some text at the top telling you where the file is located and the name of the file.

We’re done here, time to move on to Blender.
Importing into Blender
Ok, now that you’ve exported your aircraft from SP, it’s now time to import it into blender. Once you open Blender, do this:
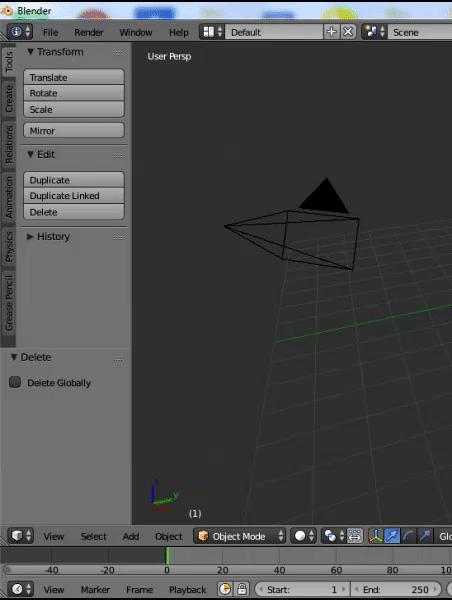
Go to File>Import>.obj (Waveform) and find the location of your .obj file.

From here on you can do whatever you want to the model.
Modeling in Blender
Now, you have to reconnect the aircraft parts, and remove the unnesseary parts. This can be time consuming. If you want the aircraft to have it’s own map blip, follow the directions on Joe the Pirate’s “Weapon Modding 101” when making a UI icon. But instead, have the camera facing exactly -180 degrees downward and have the Freestyle Borders at 4.0 thickness. Make sure the front of the aircraft is facing the top of the screen like this:

This makes sure that the blip faces correctly in Unity. Once you finish reconnecting the aircraft parts, You can start to recolor your aircraft (can be time consuming too). Make sure you do this first:

That will keep things from not moving correctly in Unity. When you’re done coloring and connecting, do this:

Click on the Orange cube next to the globe. Then, under Transform, set X axis rotation to 0. Then go in edit mode and press R+X to rotate on X axis. Rotate it back to its original position. Doing this will allow it to load in Unity without it being flipped.
Not gonna touch Animation because I don’t know how to do that just yet.
*You should rename your meshes in blender, it’ll make it easier to find in Unity.
Now that your done with Blender, it’s time to set it up in Unity.
Setting it up in Unity
Make sure you have Unity 5.6.3p1 before you get to setting your mod up. If you don’t have the latest modding tools, you can get it from Ravenfield’s Official Website. Also, you’ll need the Tools Testing Project[drive.google.com] in order to use lock-on missiles for your aircraft (or any vehicle that uses lock-on weapons[drag the file into your Unity project]).

We start off with the vanilla Ravenfield attack plane. If you didn’t already, you basically just drag it in to view from Assets>Prefabs>Vehicles and look for the plane prefab. Once you have it out, you can click on “plane” in the scene and it will show in the Hierarchy, like this:

Then, you go to the mesh filter to change the mesh to yours. It’s located in the Inspector, here:

for a better look:

Click on that little circle next to the text box in the mesh filter, and then proceed to look for your model’s mesh. If you can’t find it, then you may have saved it in the wrong location. You should save your models in RavenfieldToolsPack>Assets>Models>Vehicles to keep them in one place.
Once you find the mesh of your model, click on it. It should show like this:

You can delete or keep these objects in the prefab after you select your mesh:
Most of them you probably won’t need. You should keep the wing rigidbodies if you want the aircraft wings to break off after the aircraft explodes. Keep the glass if you have a custom cockpit for the aircraft. Keep the stick parent if you have a yolk for your aircraft. Keep any or both of the propellers if you have a propeller aircraft, and keep the Disable on Death for any control surfaces, a custom throttle, and the wings so you can have the wings dissapear for the rigidbodies.


For this particular aircraft I’m using, it is one object, so I can delete everything bulleted in red.
You can start applying the correct colors after you delet or keep the things listed above. For my aircraft, I have to look in my Inspector and under Mesh Renderer, I change the materials number from 3 to 7 (The number of colors I used for this aircraft).

After you color your aircraft, you should get started setting up colliders for your aircraft.

Colliders allows the following:
- to Crash Kamakaze into things
- to Repair the Aircraft
- to Enter the Aircraft
You can use four different types of colliders:
- Box
- Capsule
- Sphere
- Wheel
The ones you’ll probably be using the most is the Box and Capsule colliders. All the colliders are pretty simple to use so I won’t be explaining how to use them.
Well, now that you’ve done that, you can use those mounted weapons that you hopefully didn’t delete.

The location of the muzzles on your weapon is where a bullet (or other projectiles) will exit from a weapon. If you look at Joe the Pirate’s Weapon Modding 101 tutorial, you can learn how to use the Mounted Weapon script in the Inspector. It’s basically the same thing.

The Picture above is my aircraft prefab in the Inspector, yours should something like this. Most of the things here can be left alone, but you may need to change the things highlighted in red.
Setting It Up In Unity: Lock-on Weapons
To use Lock-on weapons for your aircraft, you’ll need the Tools Testing project made by the SteelBirb himself.
If you have in your Unity project now, go to Tools Testing>Prefabs and drag the tomcat into your scene. Then, copy the Tracking Canvas from its hud and the Target Tracker from its Mounted Guided Missiles. Then, in the Hierarchy, move them to your aircraft. In your scene, move the target tracker to the front of your aircraft, where the pilot is. Don’t move the tracking canvas. Change whatever weapon that uses Lock-on missiles to the Missle Crosshair that the tomcat uses (It’s mesh is called “Crosshair_Lock_Circle”).
Exporting & Testing your Aircraft
When you are finished setting up your aircraft, you have to export it as a .rfc file. You do that by going to Assets>Content and look for the Example Vehicle Content Mod and copy it. Rename it to the name of your aircraft or something that will help you remember where it’s at.

Place your aircraft in attack plane, bomb plane, or both. Then, at the top of the screen, click on Ravenfield Tools>Content>Export Content Mod if you believe everything is okay with your mod. If you’re not sure if everything is ok, you can click on Sanity Check Content Mod, and it will tell you the fatal issues of your mod if there’s any.
Hopefully, you should see something like this after clicking Export Content Mod:

From here on you can test your aircraft in Ravenfield to see how it performs in air combat.

Alright, time to publish to steam!
The Final Product
Okay, you are almost done making your mod. You’ve tested it, made adjustments if needed, and tested it again.
You’ve taken some pics with the in-game photo mode, and made the thumbnail for your mod. Now it’s time to Publish your mod.

You type in the Title and Description (This can always be changed later), and click on your aircraft .rfc in the box to the left, next to where it says “Content to Publish”. You click the Make Public checkbox (leave empty if you want it to be private, it can be changed later) and click Publish!
You just went through hours millions of years of converting your SP aircraft to Ravenfield. Hope my guide helped you out, this is my first guide on steam.
Anything I should add? Let me know please.
You’re Welcome