Overview
The HUD elements in Half-Life shrink at higher resolutions. I was sick of playing in 640×480, so here’s a workaround I tried.
What’s the problem?
The Steam version of Half-Life works pretty well in HD resolutions, but there is one glaring issue. Because Half-Life and its expansions were designed to run in 640×480, the UI gets smaller the higher your resolution goes. When playing in 1920×1080, or god forbid 4K, the HUD elements are comically small. It baffles me that Valve implemented widescreen but could not be bothered to scale the HUD to your resolution.


Procedure
This section details how I made these custom files. If you are not interested in the creation process, skip to the “Downloads and Installation Instructions” section.
Half-Life’s sprites are contained in .SPR files and defined by text files. Within the game folders, “valve” for Half-Life, “gearbox” for Opposing Force, “bshift” for Blue Shift, and “tfc” for Team Fortress Classic, the .SPR and .TXT files are contained in the “sprites” folder. To edit the .SPR files, they need to be converted into .BMP, which is a much more common image format.
SprView[gamebanana.com], or Sprite Viewer, worked fine for me, but you could also use SpriteExplorer[gamebanana.com] if you prefer. Both of these programs work perfectly in Linux using Wine, so don’t let your OS stop you from converting files. Regardless, you can just skip this step and use my unaltered or edited .BMPs from the “Downloads and Installation Instructions” section if you so prefer.

This is where the bulk of the work is. I used GIMP to edit the .BMPs, but it only exported valid .BMP files when I checked the “Do Not Export Color Information” box when exporting. Also, i could not figure out how to create a functional .BMP from scratch, so I worked off of existing images when I needed to make a new file. I would imagine that other popular photo editors such as Photoshop and MS Paint would be able to handle .BMPs, but I cannot offer any advice.

It would be easy and straightforward to multiply the size of every .BMP by our desired amount, but the .SPR format has some unfortunate limitations. First, they cannot be larger than 256 pixels in width or height. Since most of Half-Life’s .SPR files already approach the limit, I had no choice but to split up the graphics within each image and upscale each one individually, piecing them together afterward.

To get sprites with modified positions and sizes to be understood by the game, the .TXT files need to be changed as well. They are plain text files that can be edited in any old text editor, such as Notepad in Windows. I use Debian as my desktop OS, so I used Mousepad for convenience. This tutorial[www.quaddicted.com] explains the text file’s format, and I will paraphrase here. The leftmost phrase is the name of the sprite being defined in that line, do not change this. The next phrase is always either 320 or 640, which defines which video mode the sprite is for. 320 applies to video modes lower than 640×480 only, so ignore it and make sure you only edit 640 lines. The third phrase is the name of the .SPR file, minus the extension, that the graphic is stored in. if you move agraphic to a new .SPR file, remember to edit it’s line three.

The next two numbers are the X and Y coordinates for the start of the sprite within its .SPR image, measured in pixels naturally. The origin (0, 0) is the top left corner, and increasing X moves right while Y increasing goes down. The last two numbers are the X length and Y height of the sprite in the same format as the previous two. As a quick reference, translate a text file line as
spritename videomode>=640 filename(.spr) X-location Y-location length-right height-down
I used SprWiz[gamebanana.com] for my conversions because it was easy to figure out, but this tool makes converting many .BMPs at a time extremely tedious. Consider finding an alternative method to make your life easier. On the bright side, it also works well in Linux with Wine, despite some visual glitches. All of the monochromatic graphics only converted correctly for me when I used the “Additive” transparency option, as did the multi-frame “640_pain” and “640_train” sprites. Likewise, the colored crosshair graphics only converted using “Alphatest” mode.

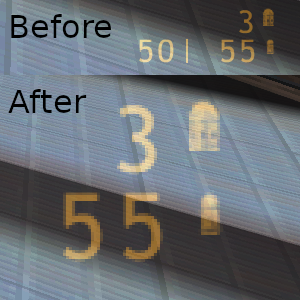
Results
Half-Life, 3x in 1020×1080:


If you plan on switching resolutions frequently, this mod is also inconvenient, as smaller resolutions will now have oversized and overlapping graphics, with the exception of very small resolutions below 640×480.


Despite the issues, I would much rather replay Half-Life like this than with an absurdly small interface or an unfavorable resolution. Give it a try if you’re interested.
Downloads and Installation Instructions
Download the folder below for the size you want to use. Copy the six contained folders into your Half-Life directory, replacing any pre-existing files.
1x[www.dropbox.com] – unmodified files, in case you need to undo this mod.
2x[www.dropbox.com] – Double the original size, perfect for 1280×720 (720p), 1280×1024, or 1280×960. The most consistent option.
3x[www.dropbox.com] – Triple size, perfect for 1920×1080 (1080p), the one I use.
4x[www.dropbox.com] – Quadruple size, for 3840×2160 (4K), the least consistent option with several noticeably small elements remaining.
Copy these over the corresponding regular versions.
Extra Large Crosshairs – Faithful to the crosshair sizes in 320×240 mode. Not fully tested in game, please report any issues to me in the comments.
2x – 4x Crosshairs[www.dropbox.com]
3x – 6x Crosshairs[www.dropbox.com]
4x – 8x Crosshairs[www.dropbox.com]
To revert any of these mods, delete the “sprites” folders inside of “valve, “gearbox” and “bshift”. Then, you can either copy the files from the “1x” download or use Steam’s “verify integrity of game files” option. The latter option will most likely remove other mods, however.
Other Notes:
- This is incompatible with custom crosshairs, but feel free to use this as a template for making your own crosshairs or HUD.
- These modded files should not interfere with small video modes like 320×240, but I am unable to test low-res modes at the moment. Either way, it will make the HUD larger than it should be at 640×480.
- You can switch between the different size options freely by copying the contents of another zip over your old install, but doing so will leave behind unused .spr files in most cases.
- If you don’t have Opposing Force or Blue Shift and don’t plan on enabling HD models, you can copy only the “valve” folder to only modify vanilla Half-Life, but doing so breaks the crosshairs in Opposing Force.
Here are my custom .BMP files in addition to the unmodified ones[www.dropbox.com] for anyone who wants to modify them. For instructions on how to convert them back into .SPR files when you’re finished, see Step 4 of the “Procedure” section.
To Do
- Split up large sprites to work around the 256 pixel limitation, or remove said limit altogether
- Modify the HUD layout so that ammo icons are not partially off screen
- Make a version for the WON retail CD releases
- Enlarge the HUD in other GoldSRC games and mods, such as Team Fortress Classic
- Find mistakes or inaccuracies and fix them
- Enable unused sprites, such as Opposing Force unused crosshairs