Overview
Easy two storey Stone Cottage.
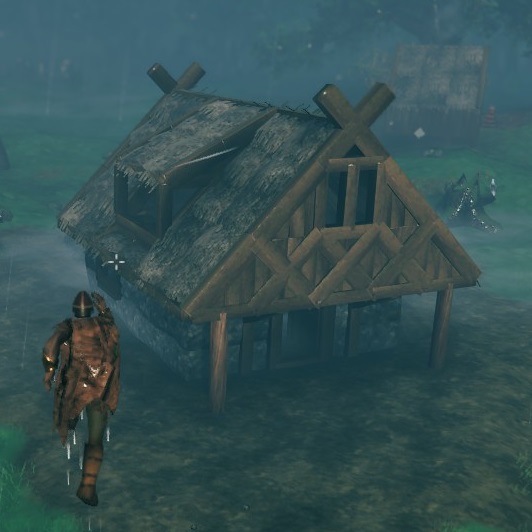
Finished cottage.
Follow this guide to learn how to build a small two storey cottage.
Ground floor.

Second floor.

Outside.


Ground floor and walls.
Step 1.
Start with a 4×3 section of floor on flat ground, with 2 small floor sections at the front for the door and
a single small section at the back side, this will be removed after the next step.

Step 2.
First place a normal stairs on small floor section sticking out at the back of the floor, this can then be removed. Place 2×1 stone blocks all the way around the floor sections.

Step 3.
Place a small floor section inside the room at the top of the first set of stairs, then add another section of stairs turned 90 degrees, on top of the first layer of stone blocks. Start with half blocks at the doorway and around the windows, use 2×1 stone blocks to fill in the rest of the second layer of the wall. Put 2 small floor sections and a wooden beam in the gaps for the windows.

Step 4.
Put three 28 degree beams on top of the second layer of the wall on each side of the house. Two on the front, two on the back and two in the middle, place them so they are only sticking out half distance. Place the final section of stairs. Finish the window and door frame and place a gate for the door. Finish the walls with a third layer of 2×1 stone blocks. Place vertical beams next to the door and place two 28 degree beams sticking out full length to the front.


First floor and roof foundation.
Step 1.
Starting from one the 28 degree beams go around the entire building and place horizontal beams.
When you get to the front, place a half beam first, and create a post at each corner of the front of the building using 4m core wood poles. After you place the poles you can remove the half beam and replace with normal beams.


Step 2.
Place floor sections in a 4×6 rectangle on top of the walls. Leave the space above the stairs clear and place small floor section on top of the walls near the stairs.

Step 3.
Start with 45 degree wall sections from the edge of the back and front of the cottage and place 3 full walls with the 45 degree cross sections embedded in between. Place another two 45 degree wall sections on the second layer of the wall, and make a window frame with beams. Use the half beam to place the vertical beam in the middle of the window, place a last 45 degree cross section on top the finish the front and back wall of the roof.


Step 4.
On the right side of the edge of the floor place a line of half walls.

Finishing the roof.
Step 1.
On the right side start at the beams at the bottom and build 2 rows of 45 degree roof sections.
For the final row start from the cross, as these will have to be overlapping with the second row of roof sections.

Step 2.
Place 45 degree beams after every 2 rows of roof sections. For the final bit at the top place a 45 degree wall section. Place beams all along the top and on the bottom of the 45 degree wall sections.

Step 3.
Opposite from the top middle of the roof between the two 45 degree wall sections, build out two rows of 26 degree roof sections. Place 26 degree wall sections to the side of the roof along with a half wall, and place regular beams along the bottom.


Step 4.
On the left side place half walls along the edge of the floor, except in the middle place two 26 degree roof ridges.

Step 5.
Place beams on top of the ridge of the roof section, place half walls on the inside and cover the space in between with small floor sections. Place 26 degree wall sections on the sides.


Step 6.
Add horizontal beams to the front of the overhanging roof, place two vertical beams below the corner and add two 45 degree beams.

Step 7.
For the final step fill in the remaining open roof pace with 45 degree roof sections.