![[1.7.8] A beginner's guide to all of Signal Simulator's systems for Signal Simulator](https://steamsolo.com/wp-content/uploads/2021/07/1-7-8-a-beginner-s-guide-to-all-of-signal-simulator-s-systems-signal-simulator.jpg)
Overview
Signal Simulator can be quite a complicated game, especially to newcomer. In this guide, I’ll try my best to explain the game’s various systems and how to interact with them. This guide is spoiler-free.
About this guide
Signal simulator can be quite a complicated game for newcomers. I’ll try my best to explain all of the game’s systems and how to interact with them. That said, I won’t cover anything that could be considered a spoiler. For event signals, see my other guide here.
This guide will focus on the game’s systems, how you interact with them and what you need to do in order to resolve any issues.
Part 1 of this guide will cover the core systems to find your (first) signal, part 2 will focus on the various other systems that you’ll need to understand to play signal simulator.
Part 1 – System Efficiency, Charge Efficiency, Solar Panels & The Generator

Charge efficiency is how fast the batteries recharge. This value will decrease over time as the solar panels collect dust. In order to clean the solar panels, leave the observatory and go to the roofed area in the distance shown below.


System Efficiency determines how efficient your systems are. Let’s suppose you have the default antenna rotation speed of 0.01. Having a System Efficiency of 50% would drop that to 0.005. Keeping this as close to 100% as possible is important. If your system efficiency reaches 0, then systems such as download, antenna rotation, etc will stop working completely.
It’s strongly advised to turn off ANYTHING you aren’t using at the moment. EVERYTHING draws power. If you aren’t looking for a signal at the moment, turn off both Antenna detection and Coordinate detection. Lights consume power as well, so turn them off in areas where you don’t need them.
 One tool that can assist in keeping your systems running is the generator. This device consumes fuel and turns it into power – just like real world generators. Fuel is flown in every morning via helicopter, along with other bits of tech that I’ll go over later.
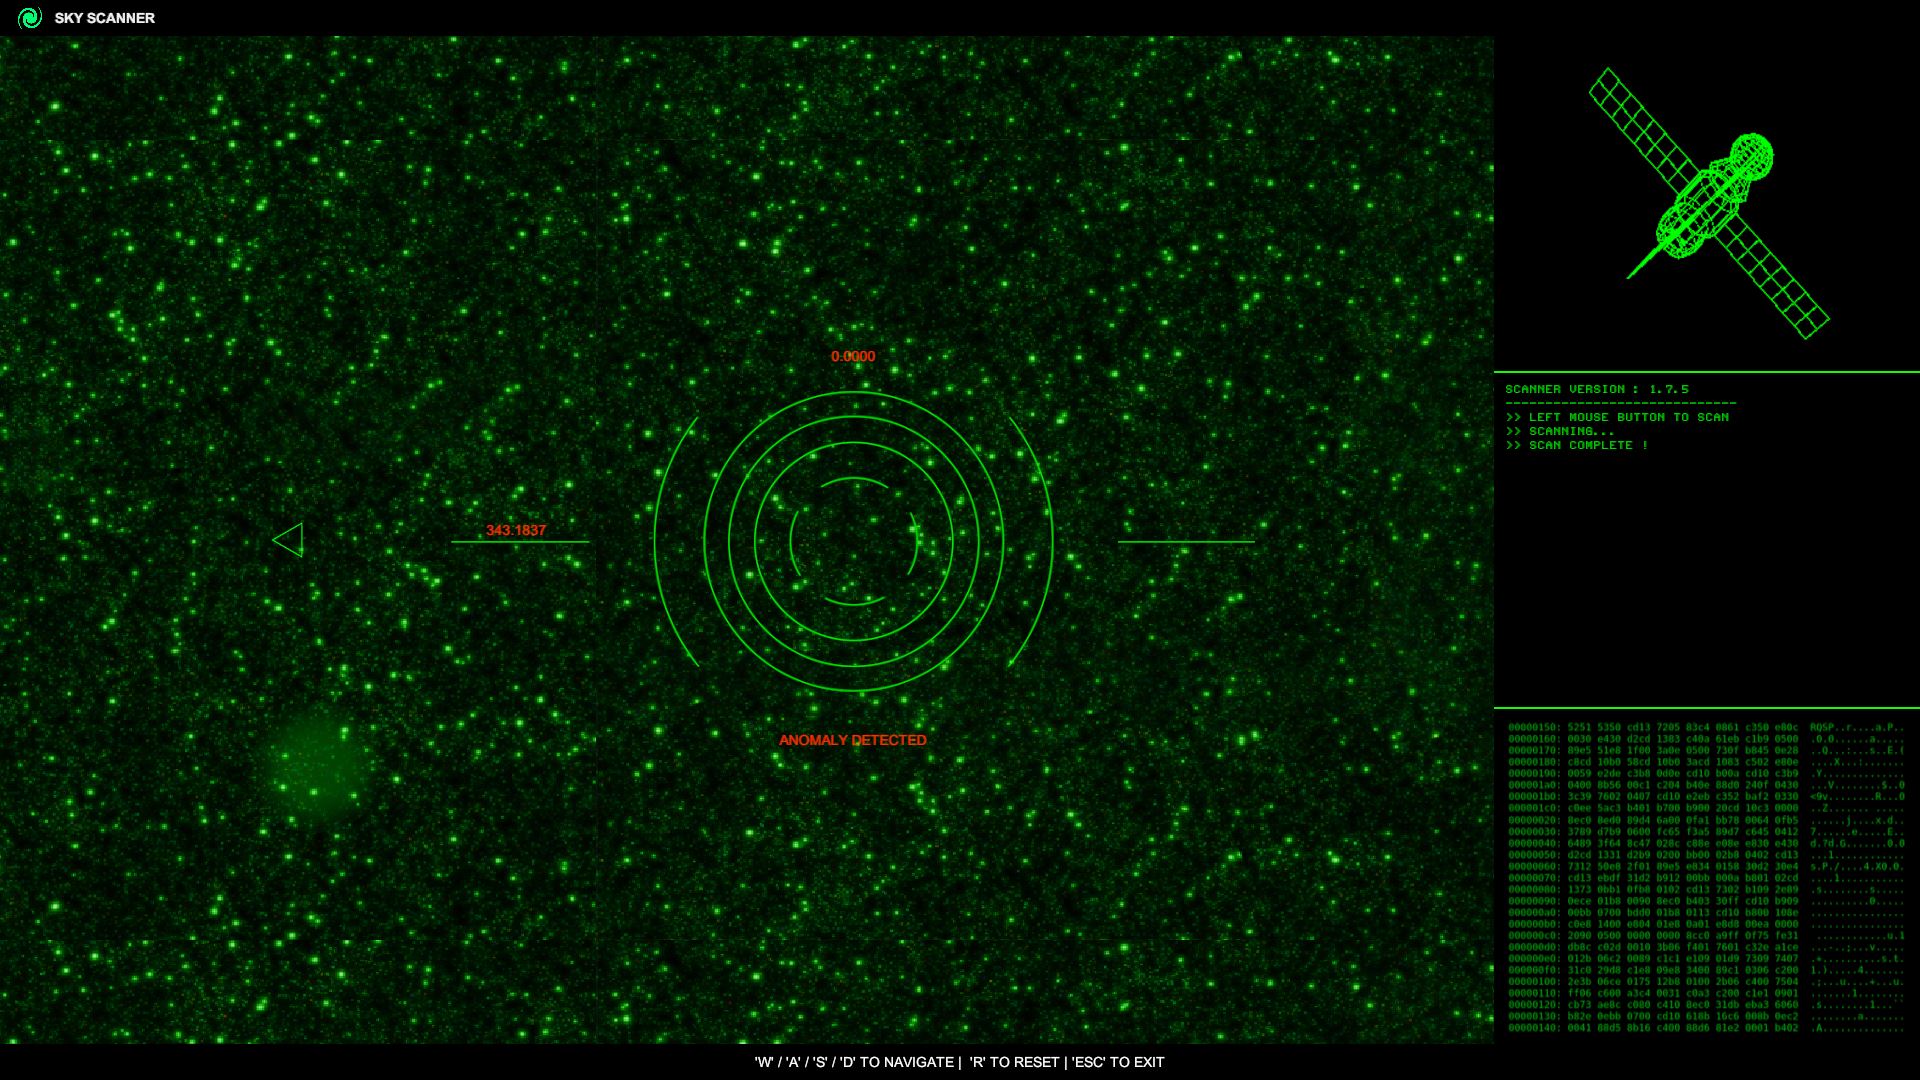
Part 1 – Sky Scanner

The sky scanner is what you use to find signals to download. To find a signal, hold the left mouse button until the scan is complete. Then, use WASD to move the scanner to where the signal is located. You can tell where you need to move the scanner by either a solid green circle and/or arrows around the centre. The image below will show you what both of these look like:


Part 1 – Frequency tuner

Assuming you’ve just come from the sky scanner, this thing should be emitting a beep sort of noise – you’ll know when you hear it. Using the black dial, tune the frequency until it stops emitting that noise and the light next to “Frequency locked” goes green. Do be careful, though, as you can still move the frequency after that goes green. Moving too far from the correct frequency will make the light go red and the noise to play again.
If you have tracking tech available, you may also opt to press the red button on the left that reads “Auto scan” to let the system find the frequency for you.
If you have located the frequency, the tuner will look like this:

Part 1 – Coordinate detection
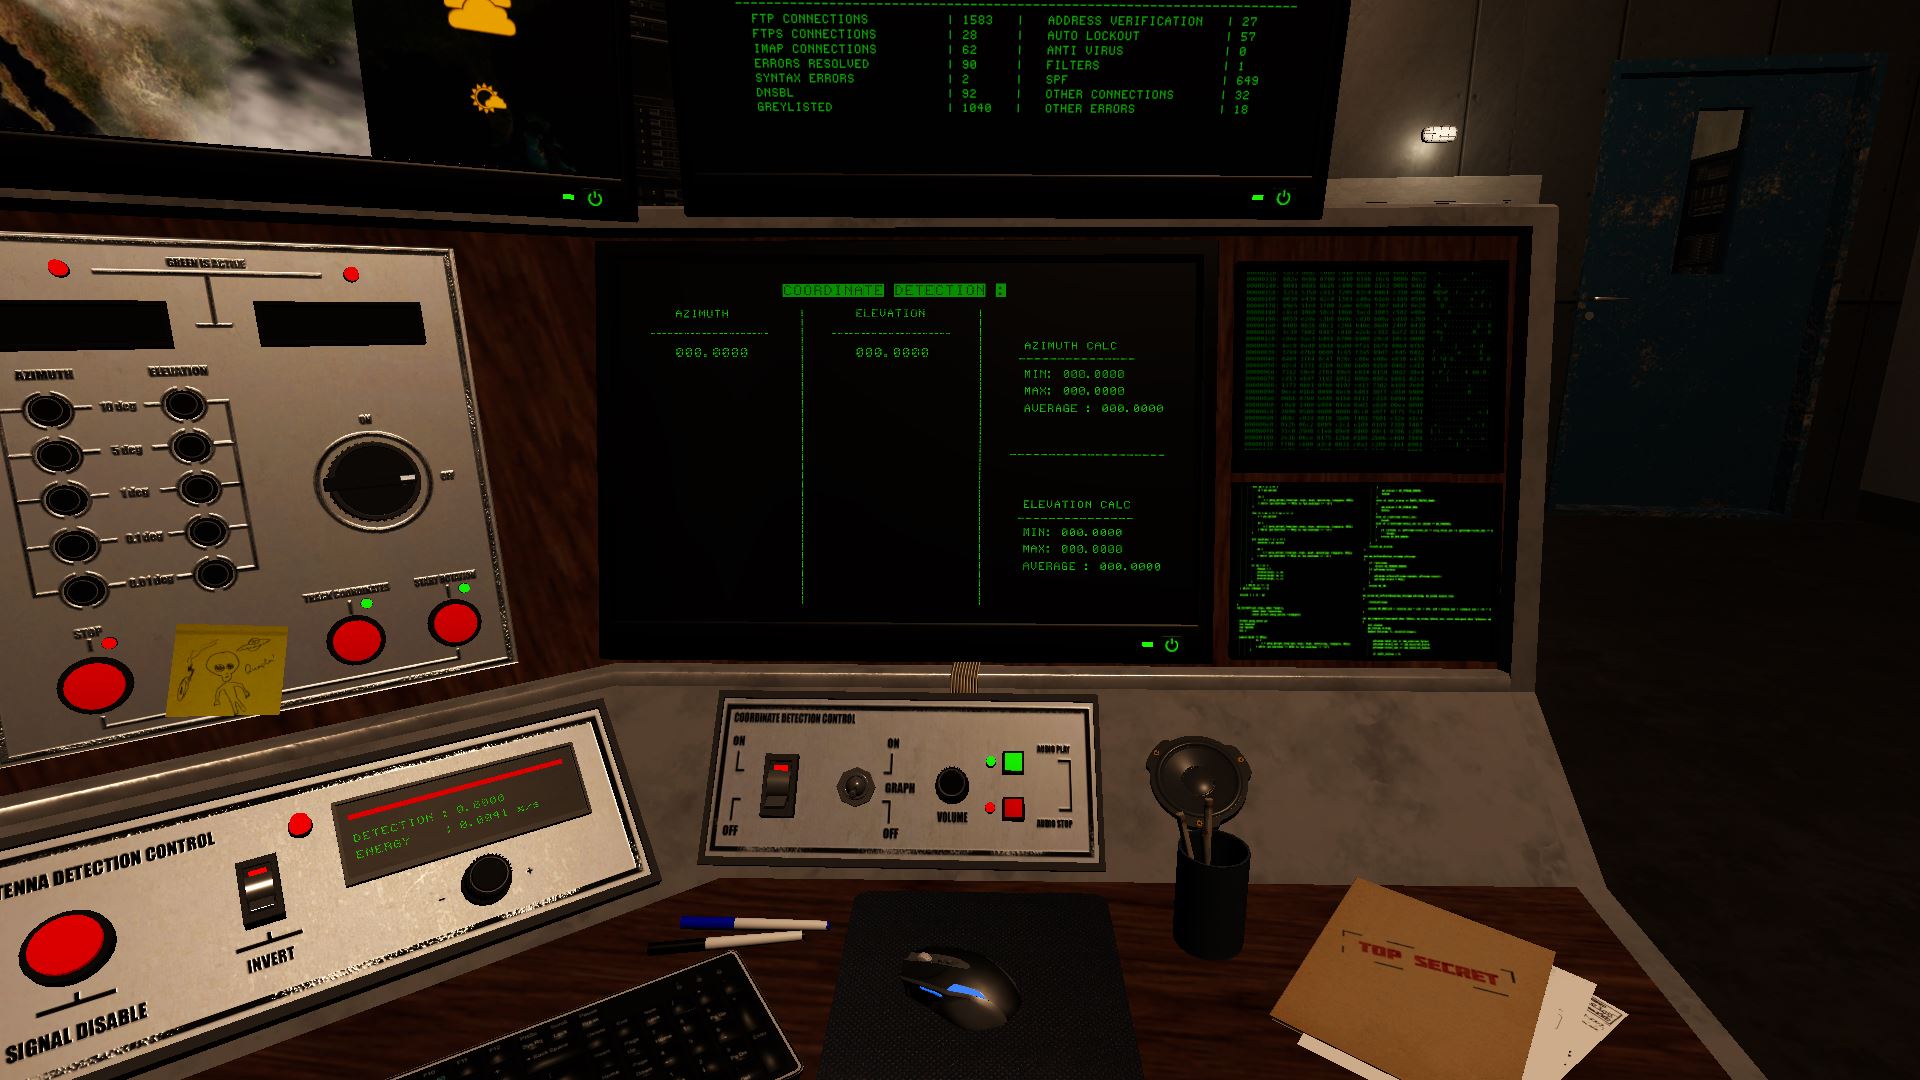
This system will give you a bunch of coordinates to work with. However, this system isn’t very accurate. You won’t be using the individual coordinates this thing spits out. You are far better off using the averages, or whatever other system you come up with. The signal you’re looking for will be between the min/max values, or perhaps just outside them. BE WARNED this system seriously struggles when the coordinates are near 0/90 elevation or 0/360 azimuth.
Note: this system consumes 3.5%-4.5% more power while active.
This is what the coordinate detection system looks like when it has coordinates in it:


On/off switch: This switch turns the coordinate detection system on/off.
Graph on/off: This switch turns the graph display on/off.
Volume & Audio Play/Stop: These control the audio the coordinate detection system makes.
Part 1 – Antenna control

This system controls the rotation of the antennas. To use it, make sure the switch is on the right is set to “On”, then enter the desired coordinates using the 10 black knobs on the left. From top to bottom, these knobs change the coordinate by these values: 10, 5, 1, 0.1, 0.01. The knobs on the left control the azimuth, and the knobs on the right control the elevation. Once you are done, push “Start rotation” to make the antennas move. Note: you cannot change the destination coordinates through this system while the antennas are moving. If you’ve got new coordinates you want the antennas to move towards, stop the antennas, then start them again.
Note: While the antennas are moving, power consumption will increase by 7.5%-8.5%.
“Track coordinates” will simply make the antennas follow the averages displayed on the coordinate detection system, and will almost always have the antennas moving – unless the averages aren’t moving.
While the antennas are moving this is what the panel will look like:


Signal disable: This button removes the current signal, if there’s any. You should only push this button once you’re done with a signal.
Invert: Inverts what antennas are on/off.
+/- dial: turns antennas on/off one by one. You can use this to save power while downloading signals.
Note: Each antenna consumes 4.5%-6.5% more power while active per antenna, totaling an 85.5%-123.5% increase in power consumption with all 19 antennas on.
Part 1 – Signal strength

This system indicates how close you are to the correct signal coordinates. The more green these bars are, the closer you are. Note: the “Antenna Detection” upgrade will allow you be less accurate but still download the signal.
A quick disclaimer: this system behaves a little differently depending on what difficulty setting you’re on. Here’s how it behaves:
Part 1 – Download

Here is where the signal will download. There’s nothing I really need to explain here.
Note: This system consumes 1.5%-2.5% more power while active.
Part 2 – Terminal

The terminal is where you can run a bunch of commands that impact things around the observatory. To reach the terminal, access the laptop, and then click on “terminal”. From there, enter your password. By default it will be “admin” – I’m not sure if this is case sensitive or not. To see a list of all available commands and their actions, run either “help” or “/?”. To exit the terminal, run “exit” or press the escape (esc) key.
Part 2 – Transmissions
To send a signal into space, you need a few things:
1: Enough transmitter tech.
2: A random signal (Story and event signals are invalid for this). Random signals can be identified by complete gibberish.
If you have both of these, you can go to the terminal and run the “transmission” command, then enter your message. You can enter whatever you like.
Once your transmission has been sent, you might get a response. If you are going to get a response, it will be instant, at the same coordinates and at the same frequency as the last signal you downloaded. Do be aware, however, that responses are extremely rare.
Part 2 – Tech

Tech is used to fuel the generator, send signals into space, etc. A small amount of tech is dropped off every morning, specifically: 10 Fuel, 5 Electronics, 5 Transmitters, 15 Data Analysis and 2.5 Chargers.

Fuel is used to run the generator.
Electronics unlocks the ability to use the tracking system.
Transmitters allow you to send transmissions out to space with the “transmission” command in the terminal.
Note: you can only use this command on random signals.
Data Analysis allows you to search through all your decoded signals for module schematics. To do this, go to the terminal and run the “signalanalyze” command.
Chargers allow you to quickly recharge your system efficiency. This tech can be activated with the “powerboost” command.
Note: this tech is intended to be a last resort. Attempting to run your observatory solely off these won’t go too well.
Part 2 – Servers
Servers manage the download speed. Keeping these running properly is quite important. On occasion, these servers may break down, shown bellow:


Note: Server temperature impacts how frequently the servers will fail. Keeping the temperature bellow 50 is a good idea.
Also note: Having errored servers reduces the server download speed and antenna detection range by 50%.
Part 2 – Upgrades

There are various upgrades you can spend your hard earned credits on.
Increases how fast the antennas rotate in the azimuth (horizontal) direction.
Increases how fast the antennas rotate in the elevation (vertical) direction.
Increases how far off the antennas can be from the signal and still download it.
Reduces how fast the electronics tech is used during tracking.
Makes the coordinate detection system more accurate.
Allows for more coordinates in the coordinate detection system before old ones start getting overwritten. This makes the coordinate detection system more accurate.
Increases the server cooling to prevent it from overheating as often.
Increases the signal download speed.
Reduces the maintenance cost for the various modules.
Installs more solar panels which allow your systems to recharge faster during the day.
Reduces the power consumption of your systems, meaning you use less power at night and recharge faster during the day.
Increases how much power the generator produces.
Decreases the chance of a power outage when there’s a lighting strike.
Reduces the speed at which the antennas move away from calibration 0.
Increases the power that goes to the other systems when power is diverted to other systems.
I.e: When this upgrade is at 0, diverting power to other systems causes the non-boosted system(s) to drop to 80%. This upgrade increases that 80% value.
Increases the chance that the BOINC system will generate a module for you.
Increases the speed of BOINC.
Increases the speed of the auto calibration system.
Part 2 – Modules

Modules are like upgrades, but with a couple differences. These are more intended for end game players.
First, and most importantly, you need to find module schematics in signals you download.
Second, There is always a drawback – typically less credits you can use paired with something else.
Here’s a list of every module, it’s benefits, and it’s drawbacks:
Note: all values bellow assume no upgrades to modules, since that upgrade decreases the maintenance cost.
The data upgrade allows for faster download speeds (up to +25%), but comes with maintenance costs (up to -10% credit income) and more energy consumption (up to +10%).
The Subreflector upgrade increases the antenna detection range (up to +25%), but comes with maintenance costs (up to -5% credit income) and more energy consumption (up to +15%).
The coordinate upgrade reduces the coordinate detection system’s error (up to +25%), but comes with maintenance costs (up to -15% credit income) and more energy consumption (up to +5%).
The rotor upgrade increases how fast the antennas can move (up to +25%), but comes with maintenance costs (up to -5% credit income) and more energy consumption (up to +15%).
The power core upgrade decreases power consumption (up to -25%), but comes with maintenance costs (up to -10% credit income) and less recharge rate (up to -10%).
The fuel injection upgrade reduces the generator’s fuel consumption (up to -25%), but comes with maintenance costs (up to -5% credit income) and produces less power (up to -15%).
The heat exchanger upgrade decreases the max temperature (up to -25%), but comes with maintenance costs (up to -5% credit income) and more energy consumption (up to +15%).
The solar panels upgrade increases the recharge rate (up to +25%), but comes with maintenance costs (up to -20% credit income).
The power upgrade increases the power the generator produces (up to +25%), but comes with maintenance costs (up to -5% credit income) and more fuel consumption (up to +15%).
Part 2 – Calibration

Over time the antennas will move off target. There’s three ways to re-calibrate the antennas: Manual, Automatic or Both. To check the current calibration, run “calibration” in the terminal. A calibration exceeding +/-10 will start to have negative effects.
First of all, you must move the antennas to an azimuth of 0. If you’re already at the antenna, go into it’s server via the (locked) door, and run “service” and then “startrotation”.
The stairs should look like this if the antenna is at 0:
Make your way to the top of the antenna, make sure you end up on it’s eastern side. If you’re in the right place, you will see this box:
This box shows the current offset for the elevation/azimuth (Whichever is currently selected) for this particular antenna. You need to make that number as close to 0 as possible. Using the black dial on the left, tune the offset to bring it closer to 0. When you’re done, press the green “calibrate” button.


To automatically re-calibrate the antennas, go to the terminal and run the “calstart” command. You can use “calstop” if you want the auto calibration to stop.
Note: While this system is active, you won’t be able to move the antennas.
This is what an active auto cal looks like:

Part 2 – Weather, Temperature & Wind

There are various weather states, some of which will directly impact your operations. Here’s a list of weather states as well as their effect (if any):
The outside temperature impacts how easily the server cooling system can move the server’s heat. The hotter it is outside, the harder it’s going to be.
Wind has the ability to – and always does – blow your antennas off target. This effect gets worse as the wind gets stronger. If you’re in the middle of downloading a signal, make sure the antennas stay close enough to the target, otherwise the download will stop.
Part 2 – Power Distributor

The power distributor will allow you to divert power to one or more of: “Antennas”, “Server” and “Coordinates”.
Note: boosting a system will cause the others to go slower.
Here’s a table of what the distributor’s values are in various scenarios:
Note: the 80% displayed above can be improved with the “Energy Distribution” upgrade.
Diverting power to the antennas will allow them to rotate faster.
Diverting power to the servers will allow signals to be downloaded faster.
Diverting power to coordinates makes the Coordinate Detection system more accurate.
Part 2 – BOINC
The BOINC system will slowly generate module schematics for you, at the cost of increased power consumption and higher heat generation. BOINC consumes 3.5%-5.5% more power while active. To start BOINC, go to the terminal and run the “boincstart” command. To stop BOINC, run the “boincstop” command.
Note: This system is very slow. Even when fully upgraded, it will still take about half an hour to finish once.
Part 2 – Antenna Shutdown

In rare cases, an antenna may go offline. If this happens, you will see an alert (shown above) and hear a constant beeping noise. If an antenna does go offline, you won’t be able to move the antennas.
First, you need to identify what antenna was even shutdown. To do this, go to the terminal and run the “diagnostics” command. Diagnostics will return the following:


Part 2 – Rover

The rover is used to scan the ground, and to detect anomalies. For the events attached to this thing, see my event guide here. To use this thing, click the buttons on the left (“L”, “B”, etc) to give the rover commands. The sliders next to them change how much the rover will move, by default this value is 1. To execute the commands, click “execute” in the bottom left corner. To exit the rover, click “logout” in the top right.
Here’s the commands with their effect:
Radiation is used to guide you closer to an anomaly. If the radiation is above 1, running the scan command will have an effect on something. Note: you cannot scan the same place twice.
When the rover is detecting radiation, you’ll get an audible notification in the observatory in the form of a geiger counter, shown bellow:
