Overview
This Guide is here to walk you through setting up a dedicated server step by step. You will need Administraitor permissions to perform some of these steps. Enjoy.
For Exsisting Server Owners – How to Install and Move Server over to New Dedicated Server Binaries
OK, On Aug 3rd, Snail released a new set of dedicated server binaries. These reduce the amount of disk space need from 60 gb to 2.7 gb. I will detail how to set these up below so all can see how it is done.
- 1. 1st thing you will need to do is to goto your save folder on your exsisting server and make a back up of it and save it on the desktop, or a place that you will remember that is not in the server folder.
You can usuall find it here: C:YouserverfolderDNLSaved The Saved Folder is the one you wanna Back up for later use
- 2. Now, you will need to create a new folder on you Hard Drave or SSD that you will Install the new server to.
- 3. You will need to download SteamCMD again, or use the one you downloaded in the primary install “Getting Ready for installing SteamCMD in Windows” section. SteamCMD Download
- 4. Save the SteamCMD zip file for later use.
- 5. Unzip this into your newly created file.
- 6. Now, right click the SteamCMD.exe and select Run as Administraitor
- 7. Once it is complete, type quit at the command promt to close the window.
- 8. Create a text file in the new folder and add this test to it.
@echo off
start “” /NORMAL “C:YourFileNameHereSteamCMD.exe” SteamCMD +login anonymous +force_install_dir “C:YourFileNameHereServers” +app_update 630230 validate +quit
This will download and install the new server binaries. They should be about 2.7 to 3 gb in total size.
Note: Verify the steam_appid.txt file is there, if not goto section Fix: “Server started and not Showing in Server Broswer, Favorites, or My Survivors.” and follow those directionhs then come back.
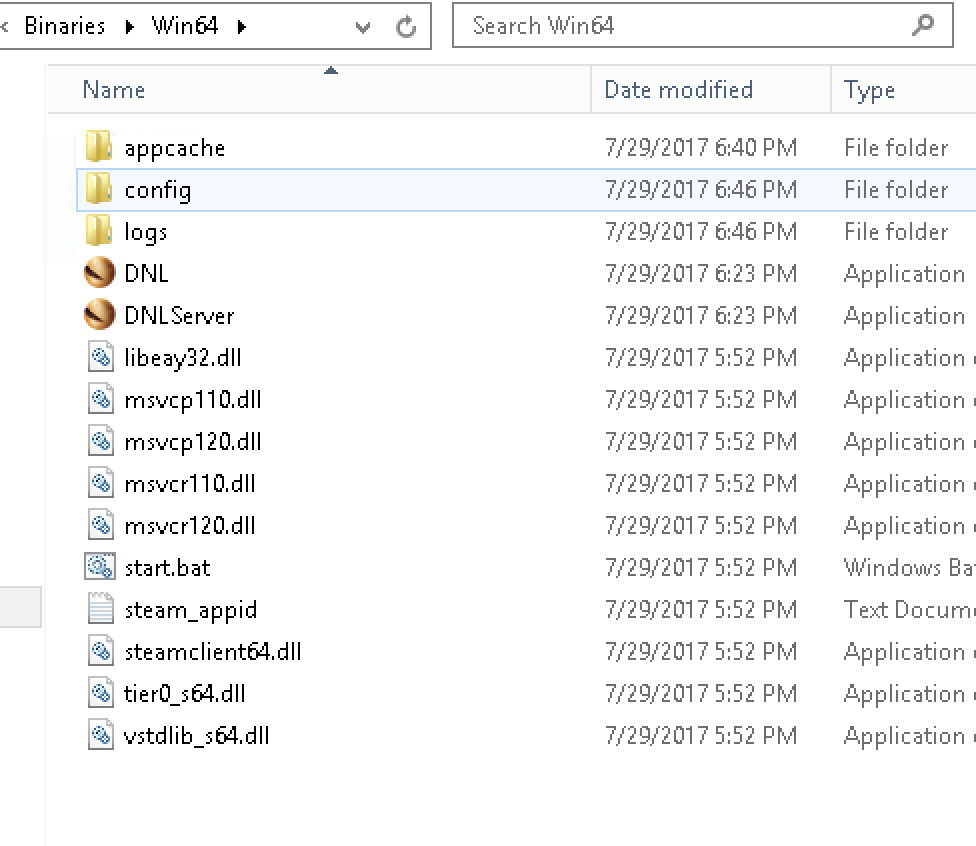
- 9. Now navigate to the Binaries folder. C:Tour Folder Name HereFilesserversDNLBinariesWin64
- 10. Here, we will create a new text file. Drop thise Text in the body of the text file:
start “”/NORMAL “C:Your Folder Name HereserversDNLBinariesWin64DNLServer.exe” “/Game/DNL/Maps/CapeOfSacredPath/DNL_ALL?Port=7777?QueryPort=27015?SessionName=Your Server Name Here?MaxPlayers=70?listen?AllowFlyerCarryPvE=true” -nosteamclient -game -server -log -servergamelog
Note: You will want to copy the Server name, server IP for MultiHome, and both port nuber here from the olde Start.bat file. Now,
- 11. Now save this file as Start.bat. ALso Shut down old Server now. Leave the files for now, but make sure it is shut down.
- 12. Goto the save file you backed up earlier and put in here: C:Your Folder Name HereserversDNLSaved
It should look like this when done.

- 13. Verify that your old server is shut down. Now right click the Start.bat file and Run As Administraitor.
- 14. If you followed the directions correctly, the server should show up in your favorites once it is fully started, and My survivors lists too. This is dependent on you have already favorited the server and created a character on it as well.
Note: It has been said that you neem the old dll files from the old server installs. I have verified this on 3 different server installs that this is not the case. They are not needed.
If you did not get the desired results, before asking below, go through every step and verify that you did not make a typo or miss a step.
New Comers Start Here – Getting Ready for installing SteamCMD in Windows
Thank you for chosing this guide. A lot of hard work went into getting this information together for you to use. So if you could, please like and favorite above to show your support.
Thanks,
Admin team
Note: this section sets up a basic command prompt server for you to use. it is great for those that want total control over thier server and like to be hands on in all aspect of thier server administration.
However, there now is an alternative. The Dark and Light Server manager. It is a full GUI server manager that provides all of the most used settings for a DnL server and some of the most obscure as well. it also has full SteamCMD support and a built in RCON tool. If you would prefer this over the basic server, please goto the Section named “Server Management Alternative. Dark and Light Server Manager(From the maker of ASM)” below.
OK, so you want a private dedicated server? Well lets get to it.
Note: This is for Windows Servers only. Linux server binaries have not been released as of yet. Once they are, we will update this Guide to include them.
- 1. Make sure you are signed into a administraitor account. This is very important.
- 2. Create a File folder on the drive you want to use for your server. Example: C:DnLServer
- 3. Now go here SteamCMD Download And save the file.
- 4. Once the file is downloaded, open it up and extract it to you the folder we created earlier.
- 5. Now, you will right click on the extracted file and Run as Administraitor. This will download and install the SteamCMD files and program.
- 6. SteamCMD is now installed. Type quit at the command prompt and the window will close
- Now lets move to the next section.
Downloading and Installing DnL Server Files
Ok, this is where it get a little tricky. Here you will also need Administraitor permissions to perform some of these tasks.
- 1. In the folder where SteamCMD is installed, you will want to create a text file.
- 2. Now, lets create a new folder inside the C:DnLServer folder we created earlier. Something like: C:DnLServerServers
- 3. Add this to the body of the text file: @echo off
@echo off
start “” /NORMAL “C:YourFileNameHereSteamCMD.exe” SteamCMD +login anonymous +force_install_dir “C:YourFileNameHereServers” +app_update 630230 validate +quit - 4. Now you will need to save it as “Update Server.bat” (WITH THE QUOTES). This will change the file to a batch file that will run all the commands in it one after the other.
- 5. Right click on the Update Server.bat file we just created and select Run as Administraitor. The SteamCMD should start up and start downloading and installing the DnL Server files.
If the install stalls or crashes during download, just run the SteamCMD.bat again as Admin and it should continue where it left off.
Lets get to the good stuff. Next Section.
Prepping your server for 1st run
So, we have the server installed, lets get down to it shall we?
Now, to the 1st step.
- 1. You will now need to navigate to the binaries folder in the server install folder. Here is an example of where it would be located: C:DnLServerFilesServerFilesDNLBinariesWin64
- 2. Once there, you will want to create another text file there. now add the text below to the body of the text file:
start “”/NORMAL “C:DnLServerServerFilesDNLBinariesWin64DNLServer.exe” “/Game/DNL/Maps/CapeOfSacredPath/DNL_ALL?Port=7777?QueryPort=27015?SessionName=<YourServerName>?MaxPlayers=70?listen?AllowFlyerCarryPvE=true” -nosteamclient -game -server -log -servergamelog -servergamelogincludetribelogs -ServerRCONOutputTribelogs -useallavailablecores -usecache
Note: ServerPassword= does not like lowercase or numbers. UpperCase is preferred. I suggest not using the ServerPassword= in the command line, instead use it in GameUserSetting.ini like shown below.
- 3. Now, Save the File as “Start.bat” (WITH THE QUOTES). This file will be your Server Start command.
- 4. Ok, lets navigate to the GameuserSettings.ini File so we can get it set up properly. It is located in: C:DnLServerFilesServerFilesDNLSavedConfigWindowsServer
- 5. Now open it and paste the below text at the bottom of the file. Make sure to tht there are now sections like the ones listed below already in the ini file. If they are there, just add these setting to those sections.
Note: If there is not a GameUserSetting.ini file in that location, skip to Step 8 and after you have started the server, close the server and then come back to this step. The ini file will be there now.
[ServerSettings]
RCONEnabled=True
RCONPort=27020
Port=7777
QueryPort=27015
DayCycleSpeedScale=1.000000
DayTimeSpeedScale=1.000000
NightTimeSpeedScale=1.000000
XPMultiplier=1.000000
TamingSpeedMultiplier=1.000000
HarvestAmountMultiplier=1.000000
ResourcesRespawnPeriodMultiplier=1.0000
PvEDinoDecayPeriodMultiplier=1.000000
GlobalVoiceChat=False
ProximityChat=False
NoTributeDownloads=False
AllowThirdPersonPlayer=False
KickIdlePlayersPeriod=2400.000000
AutoSavePeriodMinutes=30.000000
ListenServerTetherDistanceMultiplier=1.000000
MaxTamedDinos=5000.000000
RCONServerGameLogBuffer=600.000000
AllowFlyerCarryPvE=True
AlwaysNotifyPlayerLeft=True
DontAlwaysNotifyPlayerJoined=False
ServerHardcore=False
ServerPVE=True
ServerPassword=
ServerAdminPassword=
SpectatorPassword=
ServerForceNoHUD=False
ShowMapPlayerLocation=False
EnablePvPGamma=True
DisableStructureDecayPvE=true
ActiveMods=
ActiveMapMod=0
PerPlatformMaxStructuresMultiplier=1.000000
AllowHitMarkers=True
AllowCrateSpawnsOnTopOfStructures=True
BanListURL=”http://playark.com/banlist.txt”
RCONEnabled=True
ForceAllStructureLocking=True
DisablePvEGamma=False
DifficultyOffset=1.0
OverrideOfficialDifficulty=1.0
[SessionSettings]
SessionName=Server name goes here
[/script/engine.gamesession]
MaxPlayers=100
- 7. You Will need to add or change any of the above setting to your liking. Go ahead and add the Server name, ServerPassword, and AdminPassword as well. Some of the above setting will not work, but they will not cause an issue. DnL will just ignore them.
- 8. Now save your changes. Right click on the newly edited gameusersettings.ini file and click PROPERTIES. At the bottom make sure READ ONLY is ckecked and hit OK. Now navigate back to the binaries folder.
- 9. It is time to start the server the 1st time. Right click the Start.bat file and Run as Administraitor. The server should start up. It will take about 5 minutes for it to populate into the steam list.
- 10. Firewall requirements. You need to open up the required ports to allow people to connect to your computer. The default ports are 7777, 27015, and 27020. The firewall needs to have the following ports opened and forwarded to you server if your using your routers firewall… 7777,7778 – 27015,27016 – 27020,27021
- 11. You also need to confirm that you have your DMZ, if your router has one, set for the computer that is running the server. Check your router manual for help there. Here is my setup for an example. I do run MANY servers, so my numbers are different.
[link]
That is it. You have a Dark and Light Dedicated Server! To save the server, use admin commands ingame or RCon. Also, To update the Server, just run the Start Server.bat file again. This might need to be done 2 or 3 times at the moment until they get the server manager out for DnL.
Edit: Steam keeps parsing the setting for the Ban list as a link, just ignore the link and Copy the text.
Server Management Alternative. Dark and Light Server Manager(From the maker of ASM)
Hi all,
Well, I have gotten permission from bletch over at the Dark and Light Server Manager forums to post this guide. In this guide there will be 2 sets of instructions, one for setting up a brand new server, and one for migrating an exisiting server to DnLSM(Dark and Light Server Manager). Please follow these instructions to the letter. OK, lets get to it!
- 1. You will need to be logged into am Administraitor account or have administraitor priviledges to go any further.
- 2. You will need to download the latest updated copy of DnLSM from this link. Dark and Light Server Manager Download Page[servermanagers.freeforums.net]
- 3. Now, goto the drive you want DnLSM installed on, and create a folder for it, something like C:DnLServerManager or something similar.
- 4 Extract the zip file you downloaded to the folder you created above.
- 5. Navigate to the folder you created: C:DnLServerManager folder.
- 6. Here, We will need to right click the DnLServerManager.exe file and goto the properties of that file.
- 7 Once in the properties, Goto the Compatability Tab at the top, then toward the bottom of the window, check the box that says Run as Administraitor. Click the Appy Button at the bottom and then the OK button.
- 8. Now double click the DnLServerManager.exe file to start DnLSM for the 1st time. This will bring up a new box. There is a screenshot below
.

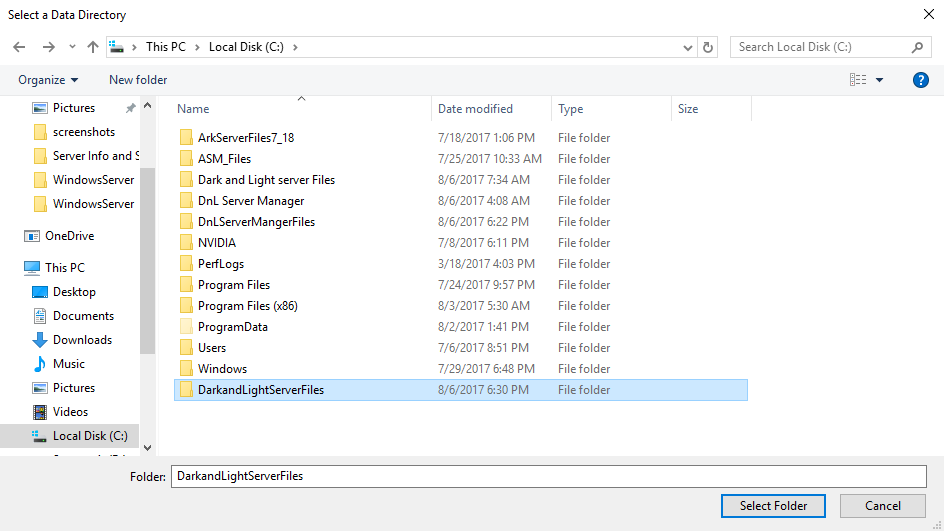
- 9. After clicking OK, you will have to create a new folder to save your new SteamCMD install and servers too. C:DarkandLightserverFiles is a good example. Use the “Create New Folder” button at the top to create the new folder. Below is a screen of what it should look like.
- 10. Next you will get this pop up on your screen.
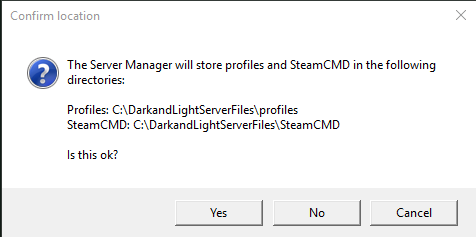
- 11. Verify this is where you want the servers to be installed and then hit yes. DnLSM will now start the SteamCMD download/install as well as launch the DnLSM for the 1st time.
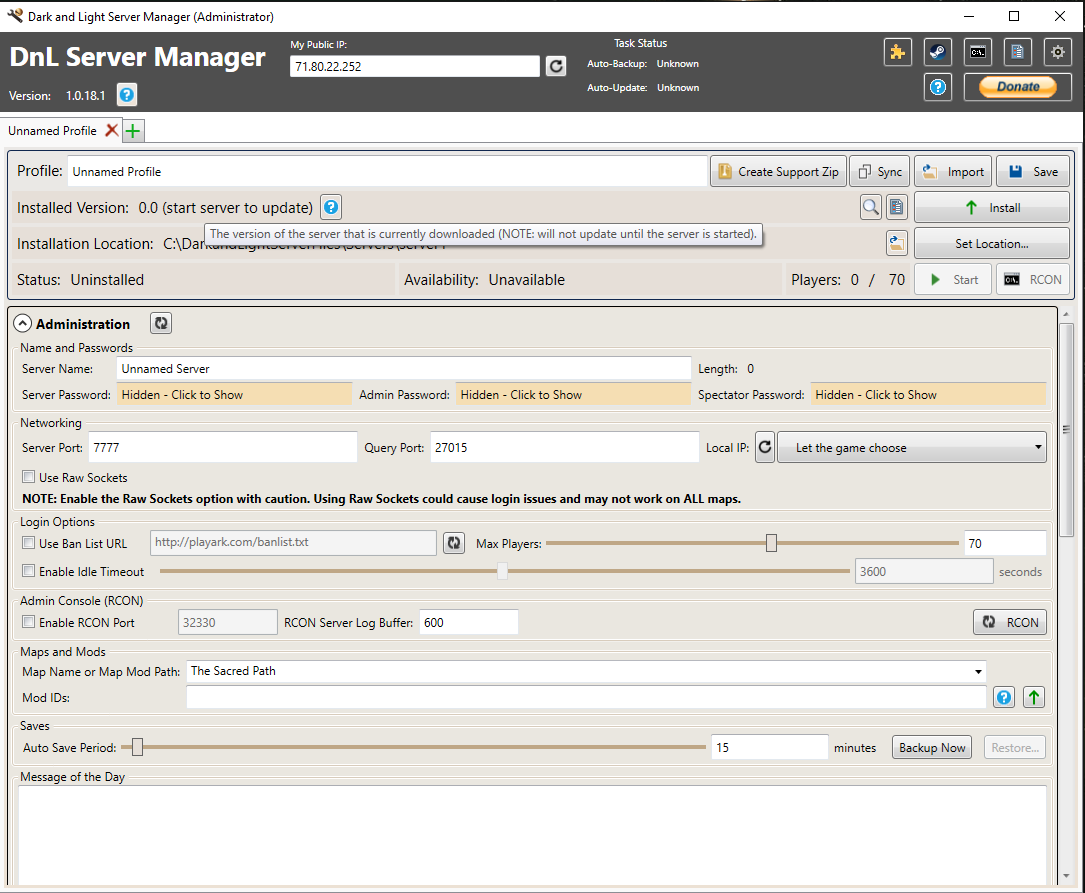
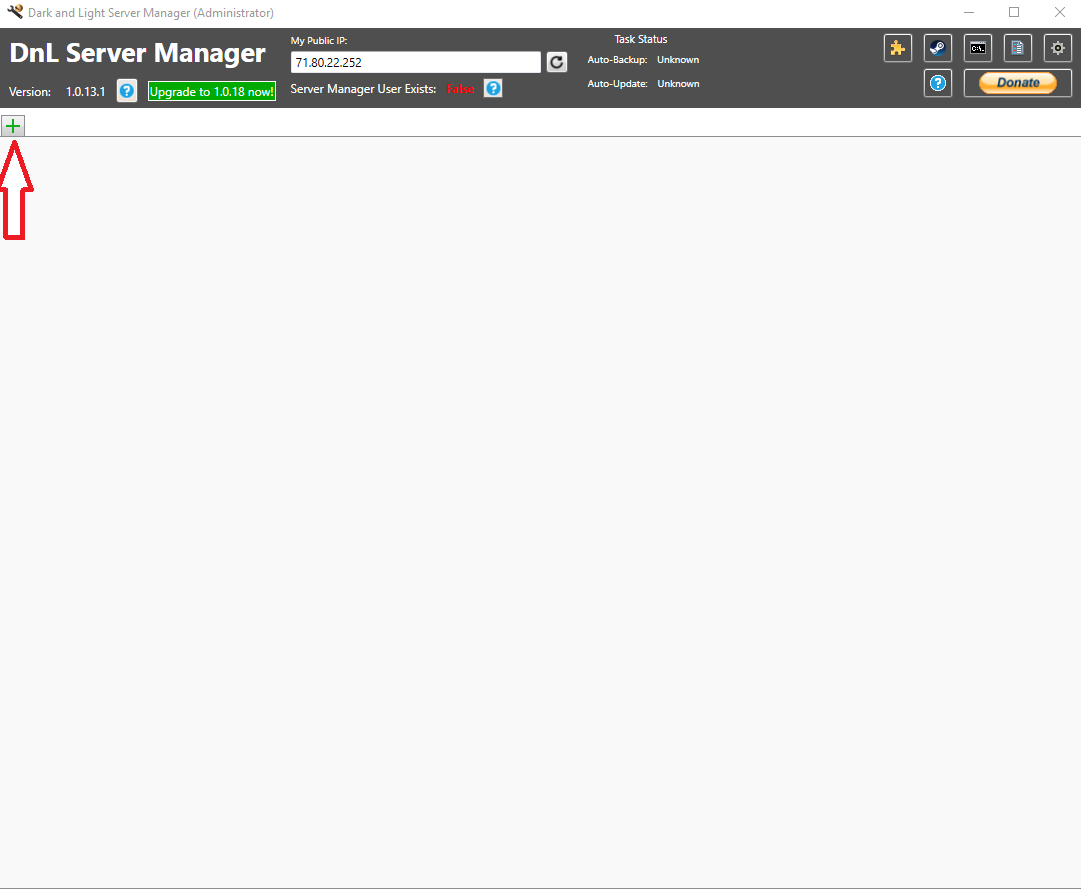
- 12. At this time, the DnLSM will be open and look like the screenshot below. Click the Green + sign on the tab in the top left of the body of the window. It will be noted by a red Arrow pointing toward it.
- 13. Now you are ready to install your server files. Click the Install button at the top right of the page.

- 14. At this time, a new window will open and the server will start to install. This may take a while depending on your internet speeds.
- 15. Once the Server is finished installing, you will need to now set up your server. Expand the Administration section. It will look like this.
- 16. Here is where you make all your choices. Go ahead and name your server, change all the passwords, make sure the ports are open in your router that you chose. If you do not know how to do this, there are 100’s of tutorials on youtube that explains this better than we can. Enable RCON. Set your message of the Day. And then slowly go through all the other settings below and choose which ones you want on or off on your server.
- 17. Once you have finished with all the settings you want, You now need to go to the top and Name your profile. I suggest copying the server name exactly, so there will be no confusion later on if you want to run more servers.
- 18. If you are satisfied with all your settings, click the Save button at the top right of the window.
- 19/ Once the save is complete and you have verified the ports are open in your router, then it is time for the 1st start of your server. Hit the Start button at the top right of the window. It is right below Set Location button.
Congratulations! You are not the proud owner of a new DnL server with a great GUI server Manager, and a RCON Tools as well.
I will be finishing this guide up on the 7th of Aug. The 1st 14 steps above will need to be completed for you to be able to continue with this guide. See you then.
Fix: Server started and not Showing in Server Broswer, Favorites, or My Survivors.
Ok, there are serveral description of how to fix this issue, but I will try to create one that is more user friendly. Here we go.
- 1. If your server starts and you do not see this line at the top of your server command propmt window, proceed to the next step:
Setting breakpad minidump AppID = 529180

If you do see this, then your issue is not what this fix addresses. Please ask in the chat below to see if someone else has a fix for your specific issue.
- 2. Goto your Binaries folder As listed in the guide above. There look to see if you have a text file named:
steam_appid
if not, create a text file and name it steam_appid. And then add 529180 no spaces to the body of the text. save the file.
- 3. Restart the server with Run as Administraitor. If the line above shows up, your server should now show up in the server list.
- 4. If after adding this file, you are still not seeing “Setting breakpad minidump AppID = 529180”. Follow the below instructions:
You can either:
a) Download this: [link]
extract the rar file and then place all the files in the BinariesWin64 folder (same folder as the DNLServer.exe and the steam_appid file)b) If you own ARK: Survival Evolved, you can also get these files in the above download in the ShooterGameBinariesWin64 folder of the ARK server files, move all the .dll fies from here, into the BinariesWin64 folder of Dark and Light.
Now start the server (using the .bat file you created earlier) as administrator and you will now see “Setting breakpad minidump AppID = 529180” and the server will show up in Steam favourites, in-game and elsewhere once fully started.
You do not need to install Steam on the host machine with this fix.
Credit to the game server host ServerBlend[serverblend.com] for the above fix.
If the steps above did not fix your issue, then you have either a firewall, router, port, or antivirus blocking your server from getting populated to the Steam Server List. Ask below in the chat for more help.
Editing you Game.ini to get some Cool Gameplay Changes
Earlier this month, i had started a thread about server owners and the use of Game.ini settings. And I was asked a few times to make a guide out of it. Well, Seeing that this actually goes well with this guide and it’s subject line. I have decided to add it here and to expand on it in the next few weeks to come.
So, below you will see a list of commands that can be added to the Game.ini that will effect your gameplay in very specific ways. Most are self explanitory with what they do, but for now, if you have any questions or issues, post below ans we will see about getting it sorted out for you.
[/script/dnl.shootergamemode]
MaxTribeLogs=100
bDisableFriendlyFire=False
bPvEDisableFriendlyFire=True
bDisableLootCrates=False
MaxNumberOfPlayersInTribe=0
bIncreasePvPRespawnInterval=False
bAutoPvETimer=False
bPvEAllowTribeWar=True
bPvEAllowTribeWarCancel=False
bAllowCustomRecipes=True
CustomRecipeEffectivenessMultiplier=1.0
CustomRecipeSkillMultiplier=1.0
bUseCorpseLocator=True
bAllowUnlimitedRespecs=True
bAllowPlatformSaddleMultiFloors=False
SupplyCrateLootQualityMultiplier=3.0
FishingLootQualityMultiplier=1.0
OverrideMaxExperiencePointsPlayer=250000
PlayerHarvestingDamageMultiplier=1.0
CraftingSkillBonusMultiplier=1.0
OverrideMaxExperiencePointsDino=10550
DinoHarvestingDamageMultiplier=3.0
DinoTurretDamageMultiplier=1.0
ResourceNoReplenishRadiusPlayers=0.35
ResourceNoReplenishRadiusStructures=0.35
GlobalSpoilingTimeMultiplier=3.0
GlobalItemDecompositionTimeMultiplier=3.0
GlobalCorpseDecompositionTimeMultiplier=3.0
CropDecaySpeedMultiplier=0.25
CropGrowthSpeedMultiplier=20.0
CraftXPMultiplier=5.0
GenericXPMultiplier=1.0
HarvestXPMultiplier=3.0
KillXPMultiplier=4.0
SpecialXPMultiplier=1.0
StructureDamageRepairCooldown=180
PvPZoneStructureDamageMultiplier=6.0
bFlyerPlatformAllowUnalignedDinoBasing=True
bPassiveDefensesDamageRiderlessDinos=False
bDisableStructurePlacementCollision=True
PlayerBaseStatMultipliers[0]=1.0
PlayerBaseStatMultipliers[1]=1.0
PlayerBaseStatMultipliers[2]=1.0
PlayerBaseStatMultipliers[4]=1.0
PlayerBaseStatMultipliers[5]=1.0
PlayerBaseStatMultipliers[7]=1.0
PlayerBaseStatMultipliers[8]=1.0
PlayerBaseStatMultipliers[9]=1.0
PlayerBaseStatMultipliers[12]=1.0
PlayerBaseStatMultipliers[13]=1.0
PerLevelStatsMultiplier_Player[0]=1.0
PerLevelStatsMultiplier_Player[1]=1.0
PerLevelStatsMultiplier_Player[2]=1.0
PerLevelStatsMultiplier_Player[4]=1.0
PerLevelStatsMultiplier_Player[5]=1.0
PerLevelStatsMultiplier_Player[7]=1.0
PerLevelStatsMultiplier_Player[8]=1.0
PerLevelStatsMultiplier_Player[12]=1.0
PerLevelStatsMultiplier_Player[13]=1.0
PerLevelStatsMultiplier_DinoTamed[0]=1.0
PerLevelStatsMultiplier_DinoTamed[1]=1.0
PerLevelStatsMultiplier_DinoTamed[2]=1.0
PerLevelStatsMultiplier_DinoTamed[4]=1.0
PerLevelStatsMultiplier_DinoTamed[7]=1.0
PerLevelStatsMultiplier_DinoTamed[8]=1.0
PerLevelStatsMultiplier_DinoTamed[12]=1.0
PerLevelStatsMultiplier_DinoTamed_Add[0]=1.0
PerLevelStatsMultiplier_DinoTamed_Add[1]=1.0
PerLevelStatsMultiplier_DinoTamed_Add[2]=1.0
PerLevelStatsMultiplier_DinoTamed_Add[4]=1.0
PerLevelStatsMultiplier_DinoTamed_Add[7]=1.0
PerLevelStatsMultiplier_DinoTamed_Add[8]=1.0
PerLevelStatsMultiplier_DinoTamed_Add[9]=1.0
PerLevelStatsMultiplier_DinoTamed_Add[12]=1.0
PerLevelStatsMultiplier_DinoTamed_Add[13]=1.0
PerLevelStatsMultiplier_DinoTamed_Affinity[0]=1.0
PerLevelStatsMultiplier_DinoTamed_Affinity[1]=1.0
PerLevelStatsMultiplier_DinoTamed_Affinity[2]=1.0
PerLevelStatsMultiplier_DinoTamed_Affinity[4]=1.0
PerLevelStatsMultiplier_DinoTamed_Affinity[7]=1.0
PerLevelStatsMultiplier_DinoTamed_Affinity[8]=1.0
PerLevelStatsMultiplier_DinoTamed_Affinity[9]=1.0
PerLevelStatsMultiplier_DinoTamed_Affinity[12]=1.0
PerLevelStatsMultiplier_DinoTamed_Affinity[13]=1.0
Thankis to the creator of the guide above for figuring out how the PerStat setting work in DnL. Please go there and give him a like as a show of your support.
Notes
If you find any gramatical errors or incorrect instructions. Please Pm me with details and I will get it straightened out. I am a little tired, I have been up for 40+ hours.
For us that run servers on a regular basis, we understand that 90% of the server issues we will run into are usually self inflicted upon ourselves. We missed a step, forgot to tick a box in the router, a mistype in a commandline, and so many 100’s of other issues that we almost always bring on ourselves. So, we know from experience that the issue with your server is more than likely going to be operator error. It is a fact that we live with daily.
So, If we seem short or a little hostile, I do appologise, but that is the how we get when what we know as fact from working with servers daily, is being challenged by someone who asked us for help. Just follow our instructions. If you do not understand, ask politely and we will try to help you understand.
Please be prepared to have to go back and triple check your work and then post screens and code here for us to see. If we ask a question, answer it in detail. If we tell you to check something, do not argue, just do it. Because from out experience with servers, we know that is most likely where the problem is originating. Give as much informations as you can. Are you hosting, or renting a host? Thsi is a big one that you need to provide to us.
All in all, we want you to get your servers up and running so Dark and Light will grow faster and be bigger and better.
And one last thing, the biggext mistake we all make when setting up a server is rushing it.
