Overview
I remember it as if it was yesterday. An adolescent 12 year old me sat in front of his computer in his boxer shorts. He had been observant of a plethera of references to this game; Half Life 2. Reffered to as “The best singleplayer First person shooter ever made”. He scoffed to his computer screen as he pondered to himself “How great can this game possibly be?” weeks later, he opened up steam and bought the game. Little did he know that he was going to have quite possibly the most immersive gaming experience he’d ever have or everIt’s been several years since that juvenile destroyed the citadel and he revisits his memories on occasion. But he now begs lord Gaben, Allah, Hitler, or whatever deity resides over us for a mod or mod collection to breathe new and improved graphics into the phenominal game. Well luckily for myself, it has happened. I have finally found a restoration to the now minimal graphics that ISN’T Cinematic Mod. Well, why waste more time? Here it is….
Specs
———————————————————
#1. SPECS
———————————————————
Before we start installing anything, I should tell you my PC specs. If you have a computer with lower specs than this, chances are this will damage your fps or possibly make the results look different.
Processor: AMD FX(tm)-8350 Eight-Core Processor 4.00 GHz
RAM: 16.0 GB
System type: 64-bit OS, x64 based processor
Graphics card: GTX 1060 6GB

Let us begin…
————————————————————–
#2. Let us begin…
————————————————————–
Optionally, you can start by installing the Half-Life 2: Update. This mod tries to improve the game through light graphical tweaks and bug fixes. Most notably, it improves the game’s shadow maps. I don’t recommend using it, a few mods are not compatible with it and it has not been updated with valve’s recent HL2 fix. As of right now, the project is dead. If you don’t care you can install it anyway.
Please also note the game directory will be different, for HL2:U users, it’s “C:Program Files (x86)SteamsteamappscommonHalf-Life 2 Update”
————————————————————–
Resolution
————————————————————–
If you have an NVidia card and Geforce, you are given the ability to give source games a super resolution. It messes up the UI on some games, but most UI elements remain intact when using it for HL2 (and the Update). If you use a 1280×1024 monitor like me, geforce allows you to expand that to 1810×1448 in the options menu. It doesn’t really do much in the way of appearance in my opinion, but you may think different, so I’d give it a shot.

Exec
———————————————————–
#3. EXEC
———————————————————-
Once you navigate to this path,
Windows : C:Program Files (x86)SteamsteamappscommonHalf-Life 2hl2cfg
Linux : ~/.steam/steam/steamapps/common/Half-Life 2hl2cfg
MacOS : ~/.steam/steam/steamapps/common/Half-Life 2hl2cfg (i think this is the right location, as Linux and MAC are both Unix based)
please take note of the file named “autoexec.cfg”
right click on it and you will be given a context menu. Click on “open with” and specify a text editor of your choosing. notepad is fine, do NOT use wordpad, it has formatting issues with cfg files.
If there is no autoexec.cfg, simply create one.
{
// Multithreading
r_queued_decals 1 //Queued decals.
r_queued_post_processing 1 //Queued post processing.
cl_ejectbrass 1
cl_burninggibs 1
cl_maxrenderable_dist 8096
cl_phys_props_max 1024
cl_ragdoll_collide 1
lod_transitiondist 6400
mat_use_compressed_hdr_textures 1
mat_phong 1
mat_aaquality 8
mat_antialias 16
mat_bumpmap 1
mat_compressedtextures 1
mat_envmapsize 512
mat_envmaptgasize 512
mat_forceaniso 16
mat_hdr_level 2
mat_hdr_tonemapscale 16
mat_hdr_uncapexposure 1
mat_bloom_scalefactor_scalar 1.0
mat_monitorgamma 2.2
mat_monitorgamma_tv_enabled 1
mat_monitorgamma_tv_exp 1.5
mat_monitorgamma_tv_range_max 255
mat_monitorgamma_tv_range_min 1
mat_motion_blur_enabled 0
mat_motion_blur_forward_enabled 0
mat_motion_blur_strength 0
mat_parallaxmap 1
mat_picmip -10
mat_max_worldmesh_vertices 128000
mat_postprocess_x 8
mat_postprocess_y 8
mat_reducefillrate 0
mat_specular 1
mat_wateroverlaysize 512
mat_debug_postprocessing_effects 1
mat_forcedynamic 1
mp_decals 4096
mp_usehwmmodels 1
mp_usehwmvcds 1
r_avglight 3
r_decals 99999
r_eyeglintlodpixels 4
r_lod -8
r_maxmodeldecal 4096
r_radiosity 3
r_rainradius 2250
r_rainsplashpercentage 100
r_rootlod 0
r_shadowmaxrendered 1024
r_shadowrendertotexture 1
r_shadows 1
r_shadowcolor 75 75 75
r_shadowdist 500
r_shadowmaxrendered 100
r_queued_decals 1
r_queued_post_processing 1
r_waterdrawreflection 1
r_waterdrawrefraction 1
r_waterforceexpensive 1
r_waterforcereflectentities 1
r_maxdlights 300
r_worldlights 5000
mat_viewportscale 1
mat_viewportupscale 1
in_usekeyboardsampletime 0
mat_forcehardwaresync 0
mat_levelflush 1
mat_diffuse 1
c_maxdistance 800
mat_frame_sync_force_texture 1
con_filter_enable 1
// Hardware AA+AF
mat_software_aa_quality 0 // change to 6 if not using reshade
mat_software_aa_strength 0 // change to 6 if not using reshade
mat_software_aa_strength_vgui 2
mat_software_aa_blur_one_pixel_lines 0.5
mat_software_aa_edge_threshold 0.8
mat_bumpmap 1 // Enable bumpmapping
mat_compressedtextures 1 // Enable DirectX texture compression
mat_envmapsize 512 // Raises the allowable physical dimensions of a texture
mat_envmaptgasize 512 // Raises the allow physical dimensions of a sprayed texture
mat_postprocess_x 8 // Improves post-processing effects
mat_postprocess_y 8 // Improves post-processing effects
mat_reducefillrate 0 // Disables fillrate reductions
mat_parallaxmap 1 // Enables parallax mapping
mat_specular 1 // Enables specular lighting
mat_forceaniso 16
mat_antialias 0 // Change to 8 if using Reshade
mat_aaquality 2
// ragdolls
g_ragdoll_lvfadespeed 0
g_ragdoll_fadespeed 0
g_ragdoll_maxcount 128
g_ragdoll_important_maxcount 64
// for them epic screenshots
jpeg_quality 100
// not related to graphics
cl_forcepreload 0 // ran with this on 0 for a while, game stutters less. Change to 1 if you like.
sv_forcepreload 0
cl_software_cursor 1
sv_autosave 1
// FOV
r_JeepFOV 70
viewmodel_fov 85
fov_desired 90
fov 90
sv_cheats 0
}
After doing this, replace the “txt” file extention with “cfg”.

Texture Mods
————————————————————–
#4 TEXTURE MODS
————————————————————–
Now for mods. All of these can be found at gamebanana. If you wish to install anything else, please do so with caution and make a backup of any mods you may already have. All of these mods are installed the same way, though a path called “custom” in this directory. Also, you’ll need 7zip. I personally prefer it over winrar as 7zip is open-source and doesn’t bother you to pay for it all the time. Linux users should use tar or xz, which come by default on most modern distributions.
[link]
Win: “C:Program Files (x86)SteamsteamappscommonHalf-Life 2hl2custom”
Lin: “~/.steam/steam/steamapps/common/Half-Life 2/hl2/custom”
Mac: “~/.steam/steam/steamapps/common/Half-Life 2/hl2/custom”
——————————————————————-
Texture Packs
- Upscaled Textures: (there are two upscaled trexture mods on gamebanana but one is far too big[gamebanana.com] for me to recommend and the other is incompatible with HL2: Update[gamebanana.com]
- HL:A Textures: [link]
——————————————————————-
- Slime: [link]
- Glass: [link]
- Vista: [link]
- Water: [link]
- Trees: [link]
- Fence: [link]
- Blast Door: [link]
move either v1 or v2 into your custom folder, then open the scale file of your chosing and move the materials into your v1/v2 folder. Optionally, rename the v folder to “slime replacer” for better categorization. I personally prefer v2 with scale 6. As for the glass, I couldn’t really notice a difference between any of the variants. So just use whichever one has a nicer name to you. The tree mod is considered discontinued, but it still covers enough textures to warrant an appearance.
——————————————————————-
place the vpk you want into custom. In each, there are two,
one for english, one for russian. Do not install both. If there’s a common folder, install that too.
Skin Mods
——————————————————————-
#5 SKIN MODS
——————————————————————-
themanclaw’s Replacers
Extract EVERY vpk file into custom.
——————————————————————-
A-06’s Replacers
- Healthkit[gamebanana.com]
- Vending Machine[gamebanana.com]
Extract one of the vpk’s of your chosing into custom folder.
——————————————————————-
Jerson’s Replacers
PROPS
Extract one of the EN vpk’s of your choosing for each into custom folder
——————————————————————-
Shadow_RUN’s Replacers
Technically these are npcs but whatever. Place the vpk’s in custom.
——————————————————————-
Volkolak’s Replacers
- Water Tower[gamebanana.com]
- Foliage[gamebanana.com]
- Citizen Radio[gamebanana.com]
- [link]
- [link]
——————————————————————-
[link]
weird github link but it’s got cool stuff in it. Click “code” to download
——————————————————————-
HD Ammo Crates[gamebanana.com]
——————————————————————-
For the sprites, We will be using Motorhead’s
[link]
Extract “Ultra Effects” folder to custom.
——————————————————————-
Viewmodel model replaces the world model for all weapons.. This is because the world model was made really low-quality for performance reasons. but the game’s so old now that most pcs have no issues rendering the higher quality variants
[link]
Just make a new folder in your custom folder named after the mod and place the materials and models inside.
—————————————————————
Nothin’ like the detail of bullet shells flying on eject…
[link]
Extract the vpk into custom (not the folder)
—————————————————————
Arms Collection
[link]
Place vpk in custom
OR you could use
[link]
drag “Mark V” folder into custom and also Dirty/LED but not both!
—————————————————————–
[link]
Make a new folder in your custom folder named after the mod and place the materials inside.
——————————————————————
[link]
extract “SplodeHD” folder into custom
—————————————————————–
This one makes all the pictures you see in safe zones colored, in my opinion, this makes more sense than vanilla. It’s subjective though.
[link]
Put the folder into custom
——————————————————————
I didn’t even think this was possible. This mod adds a scope overlay when rightclicking with the crossbow. Follow the creator’s instructions.
[link]
——————————————————————-
Can’t say no to more HD props. This one’s the baby doll model you see sometimes.
[link]
extract “Baby Doll HD Edit” folder into custom
——————————————————————-
HD Airboat
[link]
create new folder named after the mod and extract materials folder to it.
——————————————————————
Improved Tree Textures
[link]
extract vpk into custom folder
——————————————————————
Half-Life: Alyx props
[link]
There are three parts to this mod. The mod itself, the vodka bottle, and an update to the vodka bottle. I’d recommend installing them all. This mod is packaged a little weird, ignore the materials and models folder and simply extract “hla_props_8b336” into custom

Decal Replacers
[link]
[link]
[link]
[link]
[link]
[link]
Sound Mods
———————————————————-
#5. SOUND MODS
———————————————————-
While sound is usually subjective, and you might prefer the valve originals, I think these are worth a listen, as they’re both very close to the vanilla style, and high quality.
———————————————————-
City Battle Ambience
[link]
create folder named after the mod inside custom, then extract
sound folder into it.
———————————————————-
Strangetalk Ambience noise
[link]
create folder named after the mod inside custom, then extract
sound folder into it.
———————————————————-
Gunship sounds Remastered
[link]
create folder named after the mod inside custom, then extract
sound folder into it.
———————————————————–
Strider sounds Remastered
[link]
create folder named after the mod inside custom, then extract
sound folder into it.
———————————————————–
HLA Barnacle Noises
[link]
———————————————————–
Stunstick sounds
[link]
extract to custom
———————————————————–
Remastered Weapon Sounds
[link]
———————————————————–
Characters
————————————————————–
#6. CHARACTERS
————————————————————–
Because this segment is merely optional, I will not go into detail as to how to install these. However, you should get a good idea as to how from segment 3…. Additionally, this will be modular. do not install every single one of these at once. Only install one for each category.
—-
Combine Soldiers
- Half-Life: Alyx Combine [gamebanana.com]
- Dynamic_’s Remastered Combine[gamebanana.com]
- Jims Combine[gamebanana.com]
Metropolice
- Civil Protection Remake[gamebanana.com]
- Civil Protection Remake: fancy eye FX[gamebanana.com]
- Half-Life: Alyx Metropolice[gamebanana.com]
—–
Combine APC: [link]
Combine Dropships: [link]
Combine Advisor: [link]
—–
Citizens : [link]
——
Main Characters
Porkydacorgi’s Complete Character Pack[gamebanana.com]
Gman: [link]
Kleiner: [link]
Mossman: [link]
D0g: [link]
Alyx: [link]
——-
Zombies: [link]
——-
Vortigaunts: [link]
————————————————————–

Weapon Mods
—————————————————————-
#7. WEAPON MODS
—————————————————————-
Note that these are on (tweaked) vanilla animations.
[link]Reshade
—————————————————————-
#8. RESHADE
—————————————————————-
Now, for the cherry…. the most important part of this entire sunday! The suspense must be killing you… Are you ready? Are you ready? Are you hanging at the edge of your seat??
First: go to your steam library. I know, a bit difficult considering that means exiting out of this page… right click on Half-life 2 Update and press “properties”. from here, you should be given the option to “set launch options.” Type in the empty bar (if it isn’t empty remove all lines)
this without the quotation marks…
“-noipx -novid -nocrashdialog -w 1920 -h 1080 +mat_forcehardwaresync 0 -useforcedmparms -noforcemaccel -noforcemspd -dxlevel 98”
if your resolution isn’t 1920×1080, please change these values to fit your own. You can check what your resolution is by going here[bestfirms.com]
—————————————————————–
Instead of ENB, we are going to use Reshade. If you find your own presets, you can use SweetFX or ENB instead if you like. Although, I wouldn’t recommend ENB, It can be challenging to find what works best for each game engine, but from my experience, reshade is the superior choice. The performance is better and the amount of stuff you can change is about on par with ENB
If you are going to use a different preset from mine,
——————————————————————
you can download reshade here..[reshade.me]
After downloading it, run the executable. You will be prompted to pick the game you want. Go to your half-life 2 directory and click the hl2.exe. When it prompts you to pick the API, pick DX9. You also will want to make sure to install the following effects if you intend to use my preset.
Curves
Levels
Clarity
SMAA
PPFX SSDO
AmbientLight
After it builds the files, manually go to your Half-Life 2 directory and move “d3d9.dll, ReShade.ini”, and “reshade-shaders” to your bin folder. What you do from here is your choice. You can either make your own reshade preset or download one off the internet I have provided the one used in the screenshots…[cloud.disroot.org]
Also download these settings into the same directory if you want ambient occlusion to work…[cloud.disroot.org]
simply drop it in your bin folder, same as the reshade assets
Just as a warning to Linux users. I have no idea how you’re supposed to use this on linux. I’m sure there’s some weird ♥♥♥♥♥♥♥ you can do to get it to work, as there usually is. Maybe you’ll be able to run it through wine or something. I’ve never messed with wine so I don’t know how well it functions here. This link could be a good starting point…
Reshade is now working with latest DXVK master from linux_gaming
————————————————————–
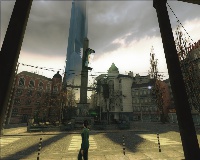
PRESTO!!! YOU ARE DONE!!! You have the most beautiful HL2 to date! You can thank me later….
