Overview
Concisely explains every aspect of Avatar and World creation for VRChat. Additionally teaches all one needs to know about computer graphics and game design to get started, assuming no prior knowledge.
Preface
Anyone who’s tried to learn creating content for VRChat understands the lack of collected, concise learning materials. Tutorials are scattered, with many being barebones, outdated or go against best practices (including VRChat’s official documentation). The goal of this compendium is to congregate the up-to-date tutorials and documentation, along with distilled knowledge to help both those who want to start creating and those who already are. Especially for VRChat [a VR application that must render in real-time], learning the techniques to make content that both looks appealing and performs well is essential.
[Text, sections and video links enclosed in brackets are optional reading; they will typically explain why something functions the way it does.]
{Text in curly braces will recommend advanced techniques or programs.}
Embedded videos are highly recommended for everyone to watch; if not otherwise clearly stated, widgeted videos are provided for those especially interested in a particular section.
Topic headers will have links to the official documentation (provided they exist). You do not need to read these but I would recommend doing so if you are stuck or are curious about a certain topic.
In Unity, you can click 
Gathering Tools
To upload custom content to the game, you must install a specific version of Unity, the VRChat SDK, and use a VRChat account (not Steam or Oculus) of at least New User (Blue) ranking.
You will want to install the Unity Hub, as it makes managing Unity easier. Download here[docs.vrchat.com] and then click this link to download the version of Unity that VRChat currently uses.
Then you want to download the VRChat SDK here[www.vrchat.com]: from the Downloads tab on VRChat’s website after logging in.
If you are starting a new project, you will want to download VRCSDK3. There are two versions: one for avatars and one for worlds.
You will also want Blender[www.blender.org], a free 3D modeling software.
Create a new project by opening Unity Hub, selecting New in the top right corner and set the template to 3D [VRChat does not support the other templates].
Note that every GameObject contains a Transform component; the transform of an object defines its position, rotation and scale on the X, Y, and Z axes.
TL;DR
- Q or middle mouse drags
- W adjusts position
- E adjusts rotation
- R adjusts scale
- Don’t forget to switch between center vs pivot and local vs global!
- Hold alt while left clicking on a sub-hierarchy arrow to completely expand/contract it!
- Press F to focus on a selected object; hold F while dragging to follow.
Essential Knowledge: Part 1
The following knowledge applies to both worlds and avatars.
3D graphics consist of 3D models.
The geometry of the models are called a mesh, and are made of polygons, or 2D shapes: triangles (3 sides), quads (4) and n-gons (5+, typically undesirable).
These polygons are made of vertices (the points), edges, and faces.
Originally posted by ck12.org:

The makeup of those polygons on a mesh is called the topology. Good topology is essential to working on models effectively.
Every polygon has a normal vector, perpendicular to its coplanar 2D plane. This helps determine what parts of the mesh are “inside” and “outside”.
By default Unity does not render the back faces of polygons, called backface culling.
If you can only see the back faces of your avatar (or a part of it), chances are the normals are inverted. This will be especially noticible; it happens to a lot of avatars when custom shaders are disabled.
How color or detail is applied to the mesh. It combines a shader and textures.
If a part of your model is a shadeless magenta, something is wrong with the material slot (typically a referenced shader is missing) or there is no material applied to that part of the model.
Component of a material which determines how it interacts with light. The 2 types of shaders you will work with in VRChat most often are Unity’s Standard shader[docs.unity3d.com] for photorealism, and toon shaders (for a cartoon or anime look).
VRChat’s shaders are optimal if you can use them, mainly Standard Lite and Toon lit, because only VRChat’s shaders work with Oculus Quest and they are very light on performance.
{
If you need a more robust and versatile toon shader than VRChat’s official one, they recommend the 3 below:
I would recommend Poiyomi because it is the most widely adopted, has the most features and has an extensive video documentation.
}
The Unity standard shader has 2 sliders, one metallic (should only be used if the material is a metal) and the smoothness slider, used to tell the material how much light it should diffuse or reflect. These 2 principles are part of PBR, or Physically Based Rendering.
TL;DR everything reflects and absorbs some light, so you should never set the slider to exactly 0 nor 1. You should try to get as close as you can to the material preview image using the metallic and smoothness sliders.
DON’T GO OVERBOARD WITH THE SMOOTHNESS! If a material isn’t shiny (like unpolished wood or brick), don’t make it overly shiny! It will just look wet or wrong!
To be Oculus Quest compatible, every material must use one of the VRChat shaders provided in the SDK for the Oculus Quest version of your avatar/world.
You may want to use the VRChat shaders for PC sometimes, as their performance cost is very low [because they are variants of shaders for mobile].
[
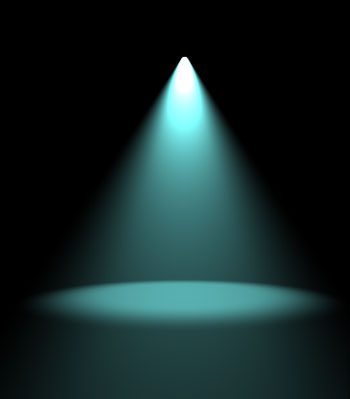
You may also want to use custom shaders for particular effects, like a water shader or a faked volumetric lighting shader[noriben.booth.pm] to make a light source really pop.
]
^ Faked volumetric lighting, using a shader, a light source and a cone mesh.
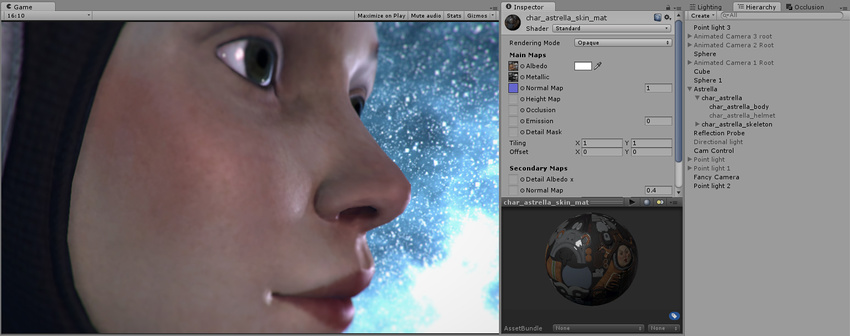
The 2D images a material combines which are projected onto the triangles.
Projected onto those triangles are textures (AKA maps), which are 2D images. Unity utilizes several different types of textures, combined into a material, which you can then apply to a 3D model.
Texels (texture pixels)[en.wikipedia.org]
Texture types[docs.unity3d.com]:
A picture of a surface, but with all the shading information removed. This is the most clearly visible texture.
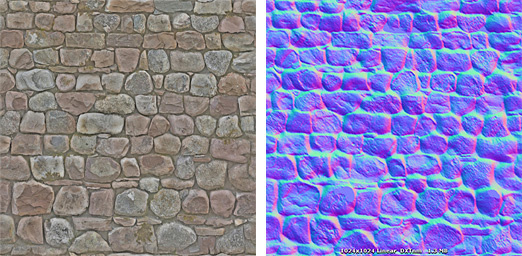
A mostly blue-purple image, which fakes 3D by altering the angle (the normal vector) at which light reflects off of the surface (at a specific texel).
Originally posted by docs.unity3d.com:
A stone wall texture and its corresponding normal map texture
This texture insets or extrudes different parts of the material.
In Unity you should typically set this pretty low [or else looking at the material at an angle will ruin the effect, which is especially noticeable in VR].
[link]
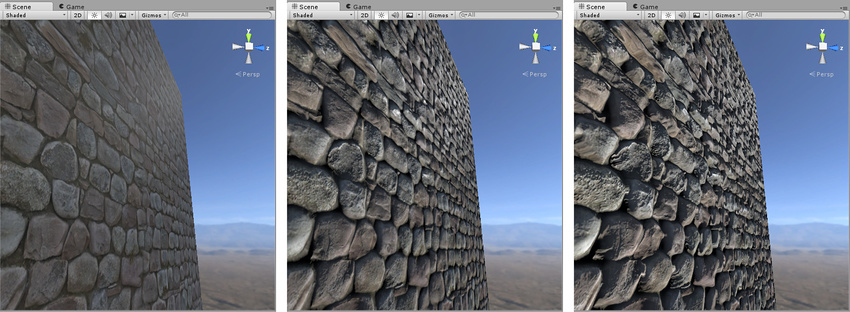
Originally posted by docs.unity3d.com:
“From left to right in the above image: 1. A rocky wall material with albedo assigned, but no normalmap or heightmap. 2. The normal assigned. Lighting is modified on the surface, but rocks do not occlude each other. 3. The final effect with normalmap and heightmap assigned. The rocks appear to protrude out from the surface, and nearer rocks seem to occlude rocks behind them.”
[
Displacement maps are calculated using parallax mapping in Unity. This is the cheapest real-time approximation but also the least accurate, and the illusion breaks at intense angles.
]
Puts indirect shading information into the material, simulating parts where it would be harder for light to escape. Separating the occlusion map from the albedo map allows for more intricate shading according to the lights in the scene.
This may be in your material, and should only be used in Unity if different parts are different amounts of metallic. If it is a solid color texture, don’t use it, and just use the metallic slider to get as close as you can to the material preview.
For use with the alternative specular workflow. Use this workflow only if your material comes with a specular map that isn’t just one solid color.
When activated, the emission property of the material is used to define the intensity and color of light it emits. The emission map is used to define how the emission is different across the material.
Essential Knowledge: Part 2
[
Used for extra detail or imperfections, such as cracks or scratches in a surface or the tiny pores of skin.
Originally posted by docs.unity3d.com:
This character has a skin texture map, but no detail texture yet. We will add skin pores as a detail texture.
The end result, the character now has subtle skin pore detail across her skin, at a much higher resolution than the base Albedo or Normal map layer would have allowed.
Detail textures can have a subtle but striking effect on the way light hits a surface. This is the same character in a different lighting context.
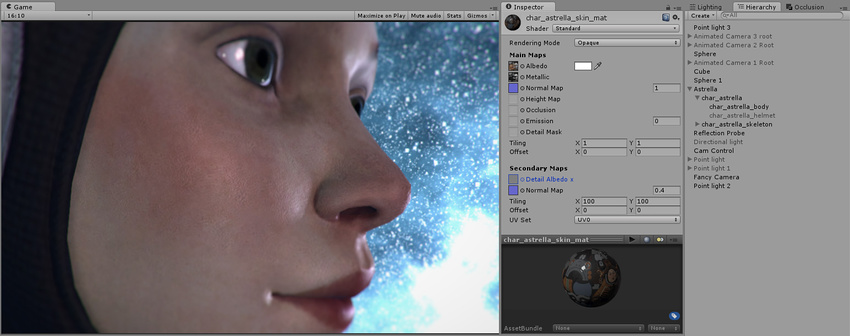
You can find many separate surface imperfection maps[cc0textures.com].
]
[
Thickness map
Used for subsurface scattering, to simulate when light passes through a material. A great example of when to use it is for skin, leaves or cloth.
You can generate this map by inverting the normals and baking ambient occlusion.
You will need a custom shader to apply it, like Poiyomi, or both Silent’s photorealistic and toon shaders.
]
[
Diffuse map
A base color map with balanced shading (no clearly directional light source). This is the texture you would get if you simply took a picture of a surface. If a model only has one texture then it would be considered a diffuse texture (you will find this a lot on toon shaded models).
This texture has fallen out of favor in the PBR workflow for the albedo and ambient occlusion texture combination, which allows for more variable shading of a material and better compression when using multiple albedo maps (like for different skins).
]
Specifies how the 2D textures should be projected onto the faces.
Originally posted by Wikipedia:
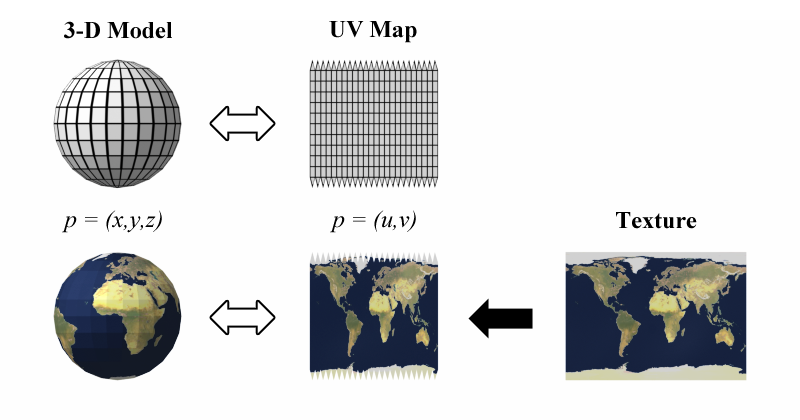
The best way to think of it is that your mesh is made of paper, and you have to decide where you want the cuts in order to lay it flat.
UV stands for the vertical and horizontal axes U & V, since W,X,Y & Z are already used.
[link]
Types
- Default- all the textures on a material except the normal map(s)
- Normal- used exclusively for normal maps
- Sprite- if you want to have a 2d image displayed in 3D space (ie use it for a picture hanging on a wall)
Should be disabled on grayscale textures (e.g. Height and AO) or else they won’t function properly!!!
If the texture looks blurry from a distance, change the filtering algorithm from Box to Kaiser.
Set to Trilinear for the best result.
Makes textures not appear blurry when viewed from angles. I would recommend setting it to 16. [In Unity the setting is a slider but only works in powers of 2.]
Max resolution
The maximum resolution the texture renders at.
For world textures I typically wouldn’t recommend setting it higher than 1K (1024×1024).
A lossy compression algorithm. I would recommend setting it to 0 for the lowest file size.
Optimization is incredibly important for VRChat. Being in VR, it should run at a high frame rate so the users can play the game comfortably. I’ve experienced countless times when my friends or I had to quit because we were feeling too nauseous.
Keeping this number as low as possible without terribly sacrificing quality is the balancing act you will have to perform in developing content for this game. Reducing the number of polygons is done through decimation; in Blender this is mostly done through the decimate modifier.
Each material slot incurs a draw call on the CPU. Ideally on an avatar or 3D model you will have 1 material slot per differently shaded part.
Merging multiple material slots into 1 is done through texture atlasing. This can be automated in the CATS Blender Plugin.
Setting Up For Quest Creation[docs.vrchat.com]
Organize your files! It sounds boring but it will save you a ton of headache in the long run!
I would recommend creating a dedicated folder for VRChat project assets, and splitting the assets up by first:
- Avatars
- Worlds
And then:
- Textures
- Models (if a texture goes with a specific model group the two in the same folder)
- Prefabs
- Shaders
I would recommend organizing your textures by type, similar to how they are categorized in texture websites like [link].
What’s important is that the organization works for you; you can adjust it however you like.
Name your files descriptively! You should be able to know what a file contains without having to open it!
Hitting the Tab key in a text box jumps to the next text box!
Reset GameObject transform
On the transform component of a GameObject, click the (gear on the top right) and click reset.
This will return the object to XYZ position & rotation to 0,0,0, and the XYZ scale to 1,1,1.
Alternatively you can just reset the position, rotation, or scale individually via the same dropdown.
Copy & Paste Components
- Click the gear on any component
- click copy
- click the gear of another component
- click “Paste as New”
If working in Blender, there are many addons (free & paid) that can speed up your workflow!
3rd most important tip: if you are creating something custom, use reference photos! You will not be able to create something in 3D from memory as quickly or as good as you would from a reference photo! There are many subtleties and details you forget!
2nd most important tip: if there’s something specific you’re trying to do, don’t try to figure it out yourself, look it up! Speaking from experience, you will likely become frustrated and do it in a suboptimal way. There are many tutorials and answered questions that will help you immensely. If you can’t find the answer you’re looking for, post a question! It’s almost certain other people have it too and that someone has the answer. Even experts ask questions.
And the #1 most important tip: if something goes wrong in Unity, READ THE CONSOLE!!!
Blender Fundamentals
What is a .blend1 file and why do you (not) need them?[cgcookie.com]
~ Avatars: Basic Upload ~
Below is an alternative guide utilizing Pumkin’s Avatar Tools[github.com].
- Install the VRCSDK and Pumkin’s Avatar Tools by importing the package into your Unity project (drag it from Windows Explorer into the Project window at the bottom). New options will appear on the top row of Unity: VRCSDK>Show Control panel & Tools>Pumkin’s Avatar Tools.
- Import your avatar’s FBX file and all of its textures.
- Right click in the Project window. Select Create>Material. In the Inspector window, change the shader to either VRChat>Mobile>Toon Lit or VRChat>Mobile>Standard Lite. Duplicate (Ctrl+D) this material enough times until you have a material for every texture.
- Click on an empty material, and drag a texture to it in the Inspector window. Do this for all your textures.
- Click on the FBX file in the Project window. In the Inspector, click rig, and under the dropdown select humanoid (if the avatar is a humanoid) and click apply.
- Under the Materials tab of your FBX, click and drag the materials into their material slots, then click apply.
- Drag the FBX into the Scene window. Reset the transform by clicking
(the gear icon) and clicking Reset Transform. [This will center the avatar and set its scale to 1].
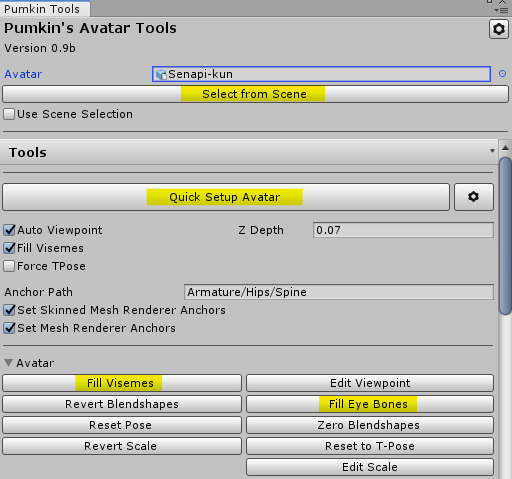
- At the top bar, go to Pumkin>Tools>Avatar Tools. Click “Select from Scene” and then “Quick Setup Avatar”. Also click “Fill Visiemes” and “Fill Eye Bones”.
- At the top bar, open VRCSDK>Show Control Panel. Login, go to the builder tab, auto-fix all the red errors and click “Build and Publish for Windows”.
- Wait a bit and it will bring up a window like this:
(If the image isn’t correct you can go to the Scene tab, drag around the VRCCam and return to the Game tab).
Fill in what you need and you’re done!
You can change your avatar’s size/scale through Pumkin’s tools!
If you scale without the tools don’t forget to re-position the viewpoint!
Setting a solid color background is easy! Under the camera component, change Clear Flags to “Solid Color” and click the color box to pick a custom color!
You can also more easily make interesting custom avatar PFPs through Pumkin’s Avatar Tools!
Upload an image as an avatar’s profile pic by importing an image, and in the Inspector change Texture Type from “Default” to “Sprite” and the camera from “Perspective” to “Orthographic”.
(Uploading an avatar can be quite confusing for a beginner. I hope to make a concise video tutorial in the future after gathering feedback. I will also explain errors some users may encounter and how to overcome them.
It will likely be aimed toward complete beginners, teaching only what you need to know for first uploading pre-made avatars in Unity, and then frankensteining them in Blender. It will follow best practices and by the end your avatar should have an excellent performance rating [light-green star].)
(There is also a beginner’s guide to uploading your first avatar[docs.vrchat.com] in the VRChat Documentation. I find it insufficient, and it is also now partially outdated because it pertains to the superseded Avatars 2.0.)
If your avatar has unshaded purple-pink sections:
- Find the material (the file with the sphere thumbnail)
- Change the shader (the dropdown near the top) to a different one( like Poiyomi, VRChat>Mobile>Standard Lite or VRChat>Mobile>Toon Lit
[
It is caused by Unity looking for a custom shader that isn’t there.
You could change it to your own custom shader or Unity’s standard, but VRChat’s shaders are simple, optimized, and look identical even when people have shaders blocked in their safety settings, so it’s best to use them first.
Later you can decide whether a more fully fully featured shader (Silent’s, Xiexie’s or Poiyomi) is worth using instead; of course, these shaders are more complex and require learning and toying with their features to maximize their potential.
BTW Silent’s Cel Shader is a rewrite of Cubed’s Cel Shader (which is depreciated).
]
You will probably want to unmap your jaw in your avatar’s rig. Click on the FBX, go to the rig tab, configure, head, select the bone assigned to the jaw and press delete, then click apply.
Ensure that the ARMATURE of your model (not your model) is set to an XYZ scale of 1,1,1.
You can do it VRChat’s way[docs.vrchat.com], which requires maintaining two separate projects, or you can use my one project method.
- Duplicate your avatar
- Press F2 and append “Quest” to the name in the hierarchy
- Import EasyQuestSwitch[github.com]
- In it set all the materials and set them to switch to VRChat/Toonlit shader for Quest
- Under the Upload tab of the VRCSDK window, “Switch Build Target to Android” (this will take a while)
- Use Pumkin’s Avatar Tools to remove incompatible components from the avatar (like Dynamic Bones and constraints)
- Open the VRCSDK window, fix any other errors and upload!
- Switch back to Windows build in the VRCSDK window when done
Video guide of how to make Quest optimized avatar
Alternatively you can use the “Bake” settings in the Blender CATS plugin to get a quicker but inferior Quest Optimized avatar. Quest optimized avatars can be used as fallback avatars for non-Quest compatible avatars.
Easy alternative method that uses two projects[gitlab.com] (article in Japanese, use auto-translate in Chrome)
~ Custom Avatar Workflow ~
For those who don’t want to deal with MMD parts and much of the nitty-gritty involved with that workflow of avatar creation, and instead would like a more cohesive, traditionally artistic approach to 3D avatar creation there is an option called VRoid.
What you do is create a model using VRoid Studio[vroid.com] and upload it via the VRM Converter for VRChat[booth.pm], a Unity tool.
(If there is demand for it I may expand this section. I do not have much experience with VRoid because I dislike the style.)
Combining various different parts, such as body bases, faces, hair, clothes, etc. into a single model with a single cohesive rig.
Typically these parts are taken from MMD models.
Originally posted by Tupper:What’s an MMD model, and where do I get one?“What is “MMD”?
MMDs are model files used by the program MikuMikuDance. This program is typically used to create music videos, animations, and etc. If you search for “MMD dance” on YouTube, you’ll find tons of examples of these models.They’re a great way to import models because they come with a full rigging, full textures, and full UVMaps. All you have to do is set it up for VRChat, which is what I cover in my guide.
Unfortunately, if you don’t want to be an anime character, MMDs typically are anime-styled. You might want to look into importing a Source Filmmaker/GMOD model, or look at Models Resource[www.models-resource.com] for a huge repository of models ripped from games.
Where do I get MMDs?
A lot of people say to look on DeviantArt for models, but most of those are “kitbashes”– in other words, someone put together a bunch of parts to make an original character. These might look good and unique, but they’re often extremely high polycount. That’s why I recommend the following two sites for finding MMDs:Nicovideo[3d.nicovideo.jp] – A great resource for extremely high-quality models. Lots of Kancolle.
Bowlroll[bowlroll.net] – Also a great resource, but a bit harder to navigate.
Both of these sites are in Japanese, so I’d suggest using Google Chrome for automatic translation of the pages. Also, both sites require a login– I just use my Twitter login for Bowlroll, and I made an account for Nicovideo.
VERY IMPORTANT – Respect the rules
Artists put a ton of blood, sweat, and tears into making their models. Oftentimes, they have a license for use with the models. Ensure that you read the license, and obey it to the greatest extent that you possibly can.Although you will not get banned from VRChat for using a model outside of the licensing terms, it is possible that the artist will issue a DMCA takedown request to VRChat to remove the model. In this case, the model will be removed from the servers, and VRChat will likely notify you.
Oftentimes, if you message the creator on social networking tools and explain what you plan on using the model for, they will be okay with it. You aren’t making money off the model, so sometimes artists are happy to let you “cosplay” as their character.
As an example, the model I use in VRChat is electrica2014’s rendition of the Touhou character, Cirno. I messaged electrica2014 on Twitter using Google Translate (they do not know English), and explained the use. They were happy to let me use the model, since I asked.
As far as the Touhou licensing goes, ZUN’s licensing on Touhou is very open– it allows for the use (and sale of) fanworks. The closest thing that VRChat comes to in licensing is “cosplay” (in my opinion), so if the license mentions that cosplay is okay, you’re probably fine.
Finally, violating the licensing rules of MMDs has a secondary effect– if it becomes prevalent, MMD artists will be less prone to releasing their models publicly in the future. Obviously, we don’t want that– so just ask!
[link]
(I copy-pasted this part rather than just linking to it because the rest of the guide is outdated)
Avatar base and accessory hunting[vrchat.fandom.com]
The process of frankensteining an avatar involves gathering all the parts you want, importing them into the same .blend file via CATS (don’t forget to click Fix Model!), posing them to where they overlap the base model, and merging them via CATS through the Custom Model Creation tab.
Apply decimate modifiers to objects with a high poly count. Before atlasing your textures, save a new file (increment easily in Blender Save As menu by clicking the +).
When making avatars in Blender, DON’T APPLY DESTRUCTIVE CHANGES UNTIL YOU ABSOLUTELY HAVE TO!
A destructive change is one that cannot be easily reverted without Ctrl+Z, like clicking apply on a modifier, or atlasing your textures.
Before you make destructive changes, SAVE AS A NEW FILE!!!
You can easily increment files in Blender’s Save As menu by clicking the +.
This workflow allows for your avatar to be easily customized later while also being able to keep it optimized when you export to Unity.
Additionally, you also have multiple save points you can return to in case you made an accident along the way, rather than having to start over.
If that fails, Blender also saves auto-backups (File>Recover>Auto Save…).
{
Version control (like Git) can be a lifesaver here if spending significant time on a single avatar.
For more information, see the Version Control subsection under Worlds.
}
~ Learning custom avatar creation: Part 1 ~
CATS Documentation (learn CATS here)[github.com]
To automatically generate lip sync via CATS, go to the Visemes dropdown. You must have at least 3 mouth shape keys to start: AA, OH, & CH. Once you have those open CATS, open the Visemes menu, select the shape keys and click “Create Visemes”. [This will create the 15 visemes necessary for lipsync in VRChat.]
If the 3 slots don’t automatically fill, try translating your model via the Model Options dropdown. If the shape keys aren’t already in your model you must create them using Blender.
In Unity, fill the visemes via Pumkin’s Tools.
[link] – (if your model doesn’t come with the 3 visemes required for CATS)
[link] – (uncommon, extra work)
Allows an avatar’s eyes to dart around and focus on objects of interest. Created through CATS. The tooltip popups will guide you.
Applied in Unity first through Pumkin’s Tools, then set the eye rotations in the Descriptor.
If you have clothes on top of your base mesh, delete the polygons underneath that should be covered! This will not only increase performance, it will prevent clipping issues!
Select the base mesh, go into wireframe mode and select the faces to delete. Then navigate to the Object Data Properties tab (inverted green triangle), create a new vertex group, and with nothing else but the faces you want to delete selected, assign them. Now rename the group descriptively and deselect.
Before you delete these faces, save a new file first!
Locate the Examples3 folder in the SDK in Unity. Click on vrc_AvatarV3HandsLayer.controller, duplicate it (Ctrl+D), then rename it descriptively. Create a new subfolder in your avatar’s folder for animations, and place the new controller there.
In your avatar descriptor, under Playable Layers, click Customize then under FX Default Non-Transform. Drag the controller into the slot.
Duplicate your avatar in the scene. Open the Animation window (Ctrl+6). Create a new animation (e.g. Smile). Click record. Then click on the body in the hierarchy, and in the Skinned Mesh Renderer open Blendshapes. Drag them to make the expression you want (in this case Blendshapes like Blink Happy, a slight smile, and slightly raised eyebrows.)
When done, click the top diamond at frame 0 in the animator, Ctrl+C, then Ctrl+V at exactly frame 1.
In the Animator window, navigate to the hand movement (in this case Open), and set the animation file in the Motion slot in the Inspector window.
AV3 Walkthrough – Part 3 – Weights, Blending, and Tracking – Avatars 3.0[ask.vrchat.com]
[link] Note that custom hand poses will not have an effect when using Valve Index controller finger tracking.
Many models and bases will likely come pre-rigged. If you rig your own model it must conform to the VRChat Rig Requirements[docs.vrchat.com].
If using a humanoid avatar ensure that in the model import options it is set to humanoid.
If using a non-humanoid avatar, use the generic rig [and it is ideal that you use your own animation controller].
Rigging can be done in Blender by using rigify.
[link]
[link]
Rigging can also be done quickly and easily through the website mixamo.com.
Quick Start – Mixamo Avatar Creation[vrchat.fandom.com]
The way the bones are mapped to the mesh is through weights. Bone weights can be painted onto the mesh via weight painting.
Weight painting is hard. There is no perfect weight painting. You will suffer when weight painting.
It’s OK and a necessary evil that every 3D artist must endure if they want to properly rig their characters.
[link]
[link]
Avatars – [Tutorial/Guide] Twist Bones: What are they, and how do you use them?[vrcat.club]
Find the image texture of what you would like to edit (e.g. the hair texture) and bring it into an image editor (like GIMP or Photoshop). If you want to edit the color, select what you want to edit and mess around with the color settings. If you completely want to change the color set it to grayscale first and then change the hue.
Clothing models can be searched for on DeviantArt, search “MMD (name of clothing item)”.
You would then parent the clothing using CATS.
Don’t forget to respect the rules, many explicitly say not to use them in VRChat.
The quickest and easiest method to create custom clothing in Blender is to select all the faces of your avatar that you want there to be clothing, marking seams, UV unwrapping, adding a texture and adding a solidify modifier to make the clothing look like it has depth and isn’t shrink wrapped to the avatar.
Additionally you can sculpt the clothing mesh to your liking. For simple edits you can just use the Grab brush (G on keyboard).
You can also sculpt using Blender’s physics based cloth brushes and bake the extra detail into a normal map.
{
Clothing can more realistically be created in Blender by “stitching” 2D planes with cloth physics applied to them.
[link]
I would not recommend this method as it is tedious and not scaleable.
}
{
If you are especially interested in 3D clothing creation, you can either buy the Garment Tool for Blender by bartoszstyperek {LINK REMOVED}https://gumroad.com/l/GarmentTool or a perpetual license of Marvelous Designer.
[link] }
~ Learning Custom Avatar Creation: Part 2 ~
For an anime-styled 3D character, you’re going to want geometry-based hair (as opposed to particle-based). There are different ways to model hair depending on what you want your final result to look like.
[link]
[link]
The process of painting textures onto models. For non-PBR texture painting (just a diffuse texture) Blender works fine. Pre-made image textures (like MMD faces, etc.) can be edited through GIMP or Photoshop.
{
Substance Painter is by far the most robust PBR-texture painting application but also the most expensive. Alternatives include ArmorPaint (€16 for the precompiled version) and the free Quixel Mixer.
[link]
Again if you are just painting a diffuse texture just use Blender.
}
AV3 Walkthrough Index – Avatars 3.0[ask.vrchat.com]
As of publishing Avatars 3.0 is very new. This section will likely be updated.
VRChat advises against using rig hacks because they may break in future updates.
[link]
Are you masochistic enough to make every part of an avatar yourself?
Rainhet’s avatar courses seem to be the most streamlined and simplest for creating an avatar from scratch in Blender.
There is a and an .
To add these, find the CutsomOverrideEmpty file in the VRCSDK. Make a duplicate of it (ctrl+D) and rename it (something like CustomOverride) (press F2).
Click on it and the animation slots will appear in the inspector window with
nothing in them. If empty, the animation will be the VRChat default; if filled with a .anim file, it will be overwritten and that animation will be used instead.
To apply the animations to the avatar, click on the avatar and drag the CustomOverride onto the Custom Standing Anims and Custom Sitting Anims slots in the avatar animations component in the inspector window.
~ Don’ts of Avatars and Optimization ~
Don’t put automatically playing audio on your avatar (like music that plays when it loads in). That audio will also replay any time a player reloads avatars, like every time they change their safety settings. It’s one of the most obnoxious components you can put on an avatar, it’s completely unsolicited, and everyone in the world hears it at an equal unspatialized volume, so please don’t use it.
Don’t put real-time lights on your avatar.
Avoid gratuitous particle effects; they are extremely obnoxious, tank the framerate, and are often nausea, epilepsy, and anxiety inducing.
DO NOT PUT SCREEN WARPING EFFECTS ON YOUR AVATAR. This is the single worst component type you can apply to an avatar, as it is usually unsolicited and the effect is literally sickening, as in nausea, epilepsy, and anxiety inducing.
Read the limits[docs.vrchat.com]
Read the documentation[docs.vrchat.com]
On each texture file (image, typically .jpg or .png), in the inspector window,
- under compression, select normal quality (if it isn’t already)
- Enable crunch compression
- Click apply

(You can do this with multiple textures selected to expedite the process)
The total number of triangles on your model via decimation. You can either use quick decimation via CATS, or for better results you can use CATS to separate the model (like by loose parts) and apply decimate modifiers to those parts individually.
Combine identical materials via CATS Optimization dropdown, Material tab.
Create atlases of different materials. This will merge multiple textures/materials into one [reducing draw calls & increasing performance].
[link]
The fewer the better. You can reduce the number of bones by merging their weights into their parents. Many MMD models come with far too many bones on parts like clothing than is optimal for VRChat. CATS has a bone merging section.
Dynamic bones are from a paid Unity add-on[assetstore.unity.com] that allows for bones to delay their return to their neutral position using physics. It is mostly used for hair or animal ears. They are often the single most performance-intensive component you can put on an avatar, so if you choose to use them, keeping their number to a minimum is essential. Merge bone chains!!!
Note that Oculus Quest does not support dynamic bones.
This is put on the parent bone of the to-be-affected child bones. The fewer the better. For example, if you want dynamic bones on your hair, you can put a single dynamic bone component on the head bone (and exclude all the non hair bones) instead of putting a separate dynamic bone component on each chain of hair bones.
Allows collision of dynamic bones on your own avatar. Generally doesn’t work well and is horrendous for performance. Ideally avoid, if you need them then have a maximum of 2, one for each hand.
Note that the collider shape is a capsule, not a sphere.
The colliders can be easily removed though Pumkin’s Avatar Tools.
There is a feature in Performance options in Safety settings called Limit Dynamic Bone Usage, enabled by default. This limits the number of Dynamic bones to 32 and the maximum dynamic bone components to 8. Try to stay below this threshold by merging bone weights and using fewer Dynamic bone components, but putting exclusions on them (e.g. put one on the head bone for the hair but exclude all the non-hair components).
You can view all of the restrictions here[docs.vrchat.com].
Quest Content Optimization[docs.vrchat.com]
- Absurd material counts (MERGE SAME MATERIALS IN CATS, COMBINE DIFFERENT MATERIALS USING THE MATCOMBINER IN CATS)
- Unassigned dynamic bone collision checks
- Gratuitous dynamic bone colliders / collision checks
- Gratuitous dynamic bone components
- Gratuitous dynamic bones (MERGE THESE CHAINS VIA CATS!!!)
- Cancerous effects
- Absurd polygon count
- Absurd particle count
- Realtime lights
— Worlds — Part 1
I recommend using VRWorldToolkit: a Unity Editor extension for making VRChat worlds[github.com]. It will help you optimize your world.
EasyQuestSwitch[github.com] helps to switch a world (or avatar) from PC to Oculus Quest: allows to switch properties of all specified assets (like the shader of a material) to a specified PC or Quest version with one button.
Create a new project and name it appropriately.
Follow this tutorial for VRChat[docs.vrchat.com], but ignore the Home Kit and Triggers, they are outdated.
Great for making/prototyping levels and level geometry. Effectively a simple 3D modeler inside Unity.
Tips:
Create empty Gameobjects (GameObject>Create Empty OR Ctrl+Shift+N OR right click Hierarchy>Create Empty) and use them as folders to organize objects! BEFORE MAKING ANYTHING AS A CHILD OF THE GAMEOBJECT, RESET THE TRANSFORM!!! DO NOT MOVE THE EMPTY GAMEOBJECTS THEMSELVES, MOVE ALL OF THE THINGS INSIDE OF THEM!!! (If you don’t this will screw up progrids!!!)
Z-Fighting, also called stitching, occurs when multiple 2D planes are in the exact same location (e.g. a picture on a wall). Avoid this by moving the object that is supposed to be overlapping the other a miniscule amount forward.
For simple sculpting inside Unity. Great for making natural landscapes.
[link]
UNOFFICIAL VRChat Creator Glossary[docs.google.com]
Tip: only download free assets you think you’ll actually use; you can always come back to get them later. You can find plenty of free and paid assets on the Unity Asset store. I’ll list some additional free asset sites below:
Kenney Free Assets[kenney.nl]
Check the dimension metrics for the materials that you download, if they are available. This will inform you how much you need to change the tiling setting on them to get them to scale properly. They will often be in deviations of a meter (e.g. 1m x 1m).
When hunting for textures, prefer lossless .PNGs rather than lossy .JPGs. Unity compresses the textures as mentioned above; using lossless images will lead to higher quality textures and smaller texture sizes in Unity.
[(Completely optional) If you want to losslessly compress the .PNGs on your computer you can use a program like PNGGauntlet. Unity does not store textures as common image formats like PNG or JPEG because of their relatively slow decompression time.]
Texture Search Engine[textures.one]
Free PBR texture sites:
If a non-color texture appears colored in Unity (like a slight green), bring it into a photo editing program like GIMP and export it as a grayscale image (8bpc GRAY in GIMP, GRAYA if it has an alpha/transparency channel).
{
Substance Player[www.substance3d.com] is a free program where you can easily create custom, high-quality textures using .sabar files. You can get these files for free at CC0textures[CC0textures.com].
[link]
}
Hunting for models is far more difficult than for textures. Ensure that:
- The file format is .obj or .fbx, preferably the latter
- The poly count is low (or you’ll have to decimate it yourself)
I would recommend checking the Unity asset store first. If you can’t find it there then Google “*object name* 3D model”.
Free 3D Model Sites & Resources[devga.me]
Decimation (lowering the polygon count of a mesh) can be done manually by removing/merging vertices/faces or automatically.
To do it automatically in Blender, you can select quick decimation in CATS or use the decimate modifier on a mesh.
[The decimate modifier is also great for creating LODs if you want to go the extra mile.]
There are also programs meant specifically for decimation and retopology, like the free Instant Meshes.
DO NOT import .blend files directly into Unity! Export them as .fbx, then import!
You will also need a skybox. You can get some from the Unity Asset Store, or I also recommend TowelCloud’s skyboxes[gitlab.com].
Pickupabble objects require 3 components:
- Rigid body: allows object to interact with physics [called a rigid body because there is no deformation]
- Collider: allows the collider to collide with other colliders (so the object will not simply pass through everything)
- VRCPickup: allows the object to be grabbed in VRChat
To make a VRChat object pickupabble, add the VRCPickup component to the GameObject.
This will automatically add a rigidbody (if there isn’t one already).
The collider types [in order of lowest to highest performance cost]:
- Sphere [1 vector]
- Capsule [2 vectors and the distance between them]
- Box [a volume]
A mesh collider will form it’s collider to the mesh. If applying to an object with a rigidbody, the mesh collider should be set to convex so it can collide with other objects with rigidbodies that have convex mesh colliders.
A convex collider will also limit the collision mesh to 256 triangles.
In addition, the naming convex relates to conavity; the collider is not concave; for example, any openings, like on a bowl or a cup would be covered with a convex collider.
When creating colliders for objects with a rigidbody, it is best to use a primitive or a combination of them for a result that is both performance and believable.
The orthographic view mode (where everything is of equal distance to the camera) is extremely helpful for editing colliders. To enable it, click on the box in the top right corner of the scene view.
For example, on a beer bottle, I would use a capsule collider around the part that can roll, and a box collider inside the capsule that goes to the top and bottom of the bottle so it can stand up.
For even more believability, you can apply physics materials to colliders; for example, if you have a carpet floor, you can apply a high friction physics material to it, and a low friction physics material to an ice sheet. Several physics materials come with the Unity Standard Assets[assetstore.unity.com].
[link]
DO NOT USE MESH COLLIDERS FOR COMPLEX MESHES! [This is extremely taxing!]
It’s best to add one or multiple primitives (box, sphere, or capsule) collider(s) to the object and make the colliders conform to the mesh that way.
In a 3D modeling program like Blender, you can create a set of simpler meshes in the same model, turn off their mesh renderer, and give the simpler meshes a mesh collider. This will save performance and most players won’t notice the difference.
[link]
[link]
Unity also uses different types of joints. These can be useful for creating things like physical doors.
[link]
— Worlds — Part 2
Prefabs allow for an object and all its components to be saved into a single asset.
These are especially useful for things like light fixtures or pickupables! Combine a light source and a 3D model into a prefab! Combine a pickupable, its vrc_pickup script and its collider(s) into a prefab!
[link]
{
Check out the Udon prefabs section[docs.google.com] of VRCPrefabs. I also recommend Vowgan’s Collision Sounds[vowgan.booth.pm], they are incredibly satisfying.
}
This section will summarize and revise this written tutorial by Xiexie[vrcat.club].
Types of lighting:
- Real-time- calculates lighting every frame
- Baked- pre-calculates lighting on the editor’s computer and generates light maps (textures that contain lighting and shading) which are overlaid on those objects
- Mixed- combination of baked for static objects and real-time for dynamic objects
Types of lights:
- Directional – Essentially the sun. There should be no more than 1 per scene. [Its rays are infinite, so its position does not matter but its rotation does.]
- Point – projects light outward in all directions from the center. Simulates a lightbulb.
- Spot – projects light outward from the center in a cone. Simulates a spotlight.
- Area – projects light outward from a 2D rectangle or circle. Simulates a ceiling office light.
ALL LIGHTING SHOULD BE BAKED! NO REAL-TIME NOR MIXED LIGHTS SHOULD BE USED IN A VRCHAT WORLD!
[Real-time lights in VRChat they will either look terrible, tank your framerate, usually both.]
So how do you light dynamic objects? Light probes. These probes pre-calculate how an object would be lit at that probes location. Many of these probes are placed in a group, and when dynamic objects move through this group they blend the probes and are lit accordingly.
[link][docs.unity3d.com]
Used for reflections. They act as a camera, taking 6 pictures from where they are placed (the 6 directions) and combining that data into a cubemap (a spherical image). Overlapping reflection probes blend.
DO NOT use screen space reflections in VR.
Reflection Probe Guide[gitlab.com]
Go to Window>Rendering>Lighting Settings to bring up the window.
If your scene is completely indoors with no windows, turn off the skybox lighting.
If it is an outdoor scene, turn skybox lighting on and set the directional light source in the lighting settings.
Texels are like pixels placed onto an object, and used to calculate the baked lighting. For many PC worlds I find ~30 texels per unit to be a sufficient compromise between quality and size.
Have your lights set to cast soft shadows.
To actually see how the lightmap texels will be projected onto your geometry, you can click the dropdown at the top of the Scene window (the one that is usually set to “Shaded”) and set it to “Baked Lightmap”.
To change the lightmap UVs of your mesh, you can do so in the model settings (click on the model in the Project window and change the Generate Lightmap UVs settings at the bottom of the Model tab).
[While some objects with short shadows may be more accurately lit with hard shadows, soft shadows are more accurate across longer distances and look better at lower texel resolutions. Unity doesn’t include adaptive shadows out of the box like PCSS (Percentage Closeness Soft Shadows).
Next time you go in the sunlight, look at your shadow. Look at how the edges are sharp close to the origin (your feet) and get blurrier as you go up! That’s what techniques like PCSS emulate.]
Do not overuse texels! The more texels you have, the larger in file size your lightmap(s) will be!
[link]
There are some situations where you would want to have a higher texel count because of overlapping lightmapping UVs (common with probuilder objects). UV overlap[docs.unity3d.com]
In your level design, avoid putting detailed shadows on the floor or low on the walls if your lighting is baked; the non-static models walking on top of those shadows won’t have those detailed shadows projected onto them.
Controls the maximum resolution of the lightmap(s). Set it so that you only have one lightmap for optimal performance.
Controls how many bounces a light ray will perform. [These take a long time to bake]
Most scenes shouldn’t need more than 2. [Exceptions would be scenes lit entirely indirectly.]
Have you ever pulled on a door handle, only when you should have pushed? Level design, like door design, is best when you never even notice it.
Through level design you can make people perform actions subliminally. It may sound obvious, but people won’t do what they can’t do.
As a level designer it’s your job to form your levels in such a way that you get people to do what you want them to without them even realizing it.
For example, don’t want people to congregate around a certain area (like the stairs)? Through design, you can make it far less likely that people will gather there (like by making it smaller and less inviting than the areas around it).
Through design you can greatly influence how players act.
Recommended videos:
[link]
[link]
[link]
[link]
[link] – design applies to everything, not just video games
One extremely important and often overlooked aspect of VR level design is changes in elevation. When walking around your playspace, the elevation should not constantly change. Even strafing in your playspace but moving up or down an incline in-game can be extremely disorienting.
In VR, changes in elevation should be
- Expected
- Deliberate
- Consistent
- Short
- Performed entirely with artificial locomotion (thumbstick or jumping, ideally just one and not both simultaneously for greatest comfort)
VRChat has a layer called Walkthrough; if you set an object to this layer, physics objects will still collide with it but players will pass through. I would recommend setting much of the furniture to this layer.
{If you’re super interested in level design, you can read this 123-page document on the topic by industry experts[docs.google.com].}
Set your static GameObjects to static [this will set the sub-parameters, occlusion and occludee static to true]. Then go to Windows>Rendering>Occlusion Culling, and hit bake before uploading your world.
[Unity won’t render avatars the player can’t see; since rendering avatars is what tanks performance the most, good VRChat level design should subconsciously guide the player to look only at the other players they are interacting with, without rendering a bunch of poorly performing avatars in the background that they don’t care about.]
— Worlds — Part 3
- Download the Post Processing stack from the package manager
- Add a post processing volume to the camera
- Download Silent’s post processing profile[gitlab.com]
- Import it into the project (drag it in from Windows Explorer)
- Go to each color setting, change it from 100 to the maximum (200)
- Add it to the camera
- Connect the camera to the VRCworld component
- Make the post processing toggleable with a button in the world
Read Silent’s post here for more info.[gitlab.com]
Motion Blur, Depth of Field, and any Screen Space effects (reflections, ambient occlusion, etc.) should never be used in VR. [Screen space effects tend to screw up in VR due to the 2 cameras (used to render separate images for each eye).]
Screen distortion/warping effects should never be used in VR. They are extremely nauseating.
Audio[docs.unity3d.com]Create a new empty GameObject and add the component VRC Spatial Audio Source. This will automatically add an Audio Source component.
If it is world music, uncheck enable specialization.
To compress the audio, set the compression format to Vorbis, and adjust the slider lower for more compression.
If the audio is spacialized, check “Force to Mono”.Audio-basics-crash-course[ask.vrchat.com]
UdonUdon is how to make code in VRChat worlds. It is a visual scripting language, which means it uses blocks and nodes rather than traditional lines of code.
If you already know C# and would rather use it to write your Udon scripts using lines of code, you can use UdonSharp[github.com] to do so.
Getting Started with Udon[ask.vrchat.com]
Many people view coding as a daunting black box. As a programmer myself, I can assure you that a basic understanding of it’s principles is not as complex as some portray it. The best advice I can offer you is:
- Take it slow, don’t try to learn everything at once
- Don’t dabble or attempt to modify a piece of code until you know what it does
- Go in with a logical mindset
The last one is paramount. Think about the exact logical steps a computer would have to accomplish to achieve a desired result. Then putting it together will mostly be a process of translating that logic into computer code.
Oh, and the 2 most important tips:
READ THE CONSOLE!!! and
WRITE COMMENTS!!!!!!!!!!!!!!!!!!!!!!!!!!Unity runs on C#, so if you would like to start learning a programming language, C# would be a great place to start. As of writing Brackeys is creating a tutorial series on programming for Unity.
BasicsData types:
- Boolean – true or false
- Int – an integer
- Float – a decimal
- String – a collection of characters
[Note that ints in C# are 32-bit, which means they have a limit of ~2.1 billion, positive or negative. Exceeding this limit will result in overflow, which will cause errors.]
[Alternatively you can use the community-developed UdonSharp. It will translate C# script into Udon Behavior. It is more reliable, and if you have basic coding experience I would recommend using it over Udon’s visual script.]
Version ControlIf you are putting a lot of time and effort into a world, version control is a must (lest you end up like me and lose your work). Version control tracks the changes you make to your project and allows you to revert your project to previous states (indispensable if something goes wrong).
Working on a world, you are most likely going to be one person on a single computer, so I would simply recommend using Sourcetree[www.sourcetreeapp.com].
Optimization (Review)World Creation, Optimization, and Community Labs Tips[docs.vrchat.com]
Quest Content Optimization[docs.vrchat.com]- Set everything that is static to static [will allow for lighting and occlusion culling to be baked]
- Make all lights baked
- Bake occlusion culling
{World work in Blender}
You can greybox your basic level design and shapes in Unity using Probuilder, and using Probuilder’s export feature or the FBX exporter (download in package manager) you can export your assets for further modification and detailing, with the scale intact.
{You could also make interiors completely in Blender using ArchViz add-ons, like Archimesh!}
Custom bevel profiles will be extremely useful for detailing (from chairs to stairs, baseboards and columns, etc.). [link]
You can move around the viewport in fly/walk mode in Blender using SHIFT+`, similar to the scene navigation in Unity.
{
If you want to create a scene in Blender to match a photo (REFERENCE PHOTOS ARE SUPER IMPORTANT!!), using the free fSpy is fantastic to do the first thing, which is lining up the 3D camera!
}
Blender now has support for VR scene viewing, with support for Oculus and Windows MR. You can view it with a Vive or Index by opting into the SteamVR beta. [Blender uses OpenXR, a standard SteamVR only just started supporting in its beta.]
Topology is important; if you have bad topology on your mesh, it will be unnecessarily difficult to work with.
[link]
Plenty of meshes you find online will have horrible, unworkable topology.
{
There are programs/addons to remesh, including (surprisingly good) free ones: [link]
}
Unlike avatars, the assets you will model for a world use a different workflow, known as hard-surface modelling.
(SUPER IMPORTANT) learn the difference between destructive and non-destructive modelling:
[link]
[link] – just watch this one. It uses paid add-ons called HardOps and BoxCutter but they are not necessary to understand the concepts and techniques taught in the video.
– YT playlist, Requires familiarity with Blender
[
Bake normal maps for high-poly meshes in Blender, then lower the poly count (advanced) [link]
[link]
[link]
]
Conclusion
You’ve made it this far, don’t give up! Stay curious and never stop learning new things!
The best way to improve your art is through practice and taking all feedback into account, learning what you should keep doing and what you should avoid!
Creation can be incredibly satisfying, but not when you don’t know what you’re doing! Keep taking in educational and informational resources!
VRChat Documentation[docs.vrchat.com]
(Not VRChat specific)
Unity 2018.4 Manual – Unity general info[docs.unity3d.com]
Official Unity Tutorials (not HDRP, URP/LWRP, 2D, ECS nor DOTS)
https://www.youtube.com/user/Brackeys/playlists – concise Unity tutorials
https://www.youtube.com/channel/UCy1f4m64dwCwk8CBZ_vHfPg – Entertaining and concise Blender tutorials
https://www.youtube.com/user/DigitalFoundry – In-depth game technical analysis
https://www.youtube.com/user/McBacon1337 – Game design analysis
Exert a valiant effort in looking it up (first check official documentation)
Post to the Unity[forum.unity.com]/VRChat forums[ask.vrchat.com]
I would like to make my own concise scripted video tutorials (inspired by some of my favorite tutorial creators like Brackeys & CGMatter) if there is the demand for it.
If you want to make your own tutorials, I would recommend watching these videos first: [link]
[link]
I’ve been working on a bar/pub world, called The Good Goat. It features everything I’ve discussed in this guide, from physically accurate textures and lighting to subtle Udon integrations like satisfying collision audio[vowgan.booth.pm] (thanks Vowgan[vowgan.booth.pm]!)! All that packaged in a great performing VRChat world, due to conscientious optimization, like baking all lighting and (ab)using Unity’s occlusion culling through purposeful level design.
But why listen to me advertise when you can visit it yourself![www.vrchat.com]
(It is currently in its alpha stage; the Unity project got corrupted in mid-June. I hope to recreate it, with more complex geometry, more decorations, and better materials, etc., and release its full version in December!)
In my experience learning how to create worlds and avatars for VRChat, I was unsatisfied with the lack of concise and up-to-date resources that follow best practices. In asking many creators on VRChat how they learned their skills, none gave me a satisfying, replicable method.
Many in VRChat I have spoken to wanted to create their own models, but had not a clue how to start. It seemed to me that what those people needed was a holistic guide, not segmented ones. That was my intention in writing this compendium.
If you can translate this compendium into another language, please do so and link to this English original.
I believe that constructive criticism is the most useful type of feedback one can receive; it doesn’t criticize you, it critiques your actions or your work, it tells you exactly what you’re doing wrong and gives you ideas on how to improve. If you can comment on how to improve this guide I implore you to do so and may incorporate your suggestions and/or information into a revision. We’re all learning together.
This compendium and the written content within is not affiliated with VRChat Inc.