
Overview
A walkthrough, guide to maps, and how to unlock gallery entries.
Walkthrough (contains spoilers)
Until you get to day 2 you can’t really do much wrong:
Against the bandits, either hold out for 15 rounds or lose.
Make your way through Borak Ridge, past the Gnath River bridge, and through the Marlbara Desert.
In the city, do all available things at every location to unlock the next location.
At the start of Day 2, talk to Cless and Salman.
Go to the Harbor and get your money back from the Man in a Blue Turban.
Go to Church to see a scene with Cless.
Go to the Main Slave Plaza and talk to the Buyer.
Go to the Stage in the Main Street and Watch the dance.
Go the Silver Goblet Bar and talk to the Barkeeper.
Find and talk to Zahadola in Qanat B2.
Go to the Dawn Shephard Bar.
Get Wine from the Barkeep.
Talk to the Taciturn Man.
Talk to Slave Broker Batil (optional: betting for exhibitionist and a H scene).
Exotic dancing and prostitution are now unlocked.
Selling Luna’s virginity will get you 200k right away, avoiding the need to make money in other ways.
Go to the Harbor and talk to the Grim Sailor.
Go back to the Dawn Shephard Bar.
Bet and win as many times as you can (aim for 80-100k).
Do other jobs to make the rest of the money (arena/dance/hunt/prostitution).
After getting enough money, Batil will ask you to get him a clue.
Go out of the city to Balsa Wilds and find the ambush spot in the North area.
(optional: trade 2×5 black furs for the hunter’s mark, which unlocks the harbor shop)
Take the clue back to Batil, and then return to Salman’s house to sleep.
Next morning, clear the Sapphire Ruins with Cless and Salman.
Note: if you don’t enter the Underground Market before the end of day 8 it’s game over.
Enter the Underground Market and face Rahad on B4.
Defeat leads to the Chaos Route, otherwise continue to the Law Route.
Defeat the Choker Guard on B6.
Get back Luna’s stuff from the Storeroom on B5.
Defeat Rahad on B4 (loss is gameover).
Go the Silver Goblet Bar in Main Street and ask the Barkeep about Cless.
Go to the Church and break into the Church Basement B1 with Airi’s help.
Go to the Harbor and talk to the Devout Youth.
Go to the Silver Goblet Bar in Main Street and talk to the Drunkard.
Go to Qanat B2 and talk to Big G.
Go to Qanat B3 and find Cless.
Continue into Church Basement B4.
Dancing – how to max out audience size, hype and tips
A dance consists of 7 moves. For the 4th and 6th move, the audience will always demand for Luna to strip.
Audience size
Before 2.30pm: 10-27
Between 2.30pm and 5pm: 20-35
Between 5pm and 7.30pm: 50-70
Between 7.30pm and 8pm: 20-35
Airi will comment:
0-14: “There aren’t many people in the audience today.”
15-24: “I guess this is passable?”
25-44: “An average-sized crowd.”
45-64: “The crowd’s pretty big.”
65+: “There are so many people here!”
Hype
Initial hype: half audience size +10. Every turn it’s increased by 4.
Reacting to the audience
If you respond with the right move, hype and tips will increase.
Tips is increased by 3-5×hype×(1+experience) + 6-8×audience.
Hype is increased by 4-6.
Prance around
– God, your t*ts are the best. Shake ’em for me! The audience’s eyes follow my chest.
– I can’t take this! Shake the goods!
Lean forward
– Man, she’s spilling out of that outfit. That bra’s basically a string. I can practically see her nipples!
– That’s it, give us a good look at your t*ts!
Shake hips
– Hehe, now she’s a good dancer. Wish I could just grab that *ss and plow right in.
– That’s it! Turn your *ss this way and shake it!
Spread legs
– Oi, spread your legs! I want a good look at your crotch!
– Oi, spread your legs! Show us what’s up there… Hehe!
Stripping
Stripping greatly increases hype and tips.
Bra:
Tips is increased by 7-10×hype×(1+experience) + 12-20×audience, +1000 if it was demanded.
Hype is increased by 4-6, +6 if it was demanded.
Panties:
Tips is increased by 9-14×hype×(1+experience) + 20-26×audience, +2000 if it was demanded.
Hype is increased by 4-6, +10 if it was demanded.
End
At the end you’ll get a final tip of hype×5×(audience/10)+1000. This is increased by 20% if you danced 5× before, or by 44% if you danced 15× before.
After the 4th dance you’ll get the title “Novice Dancer”.
After the 7th dance you’ll learn the passive skill Dancer’s Footwork (10% chance to evade normal attacks).
After the 15th dance you’ll get the title “Popular Dancer”.
Prostitution – how to get the perfect price
Wait for a customer – Price ranges
Well-Dressed Merchant: 15,000 to 20,000, +3000 if they recognize you
Middle-aged Citizen: 13,000 to 17,000, +3000 if they recognize you
Young Traveler A (f*ck in alley): 10,000 to 15,000, +3000 if they recognize you
Young Traveler B (blowj*b): 5,000 to 8,000
Man with Bulging Eyes: 4,000 to 18,000
+3000 if done prostitution at least 20 times (times Luna sold her body in sexual encounters window)
Note that before 2.30pm and after 8pm there’s a 25% chance to get no customer.
Approach someone – Price ranges
Middle-aged Citizen: 8,000 to 12,000
Young Traveler A (f*ck in alley): 8000 to 10,000
Sharp-eyed Man: 4000 to 6000
Heavily Bearded Man: 4000 to 6000
Young Traveler B (blowj*b): 4000 to 7000
+2000 if done prostitution 10-19 times
+4000 if done prostitution at least 20 times
Responses
“He looks about uncomforable”: too high by 1000 or 2000.
“He asks you to lower your price”: too high by 3000, 4000 or 5000.
“He shakes his head”: too high by 6000 or 7000.
“The moment he hears your price, he shakes his head.”: too high by 8000 or more
“He seems satisfied with your price.”: too low by 1000 or 2000.
“He nods with a smile”: too low by 3000, 4000 or 5000.
“Surprised, he instantly agrees.”: too low by 6000 or 7000.
“He asks you to repeate the price”: too low by 8000 or more.
Borak Ridge
Enemies
Grey Wolf (HP:110, weak to Fire)
Weak Goblin (HP:100, weak to Fire, 30 D, 20% Heal Drop)
Tough Goblin (HP:120, weak to Fire, 30 D, 20% Heal Drop)

1 Heal Drop (HP+120)
2 Grey Wolf (tutorial)
3 Weak Goblin
4 Sign about goblins
5 Heal Drop Tree
6 4×Tough Goblin (gameover)
7 Clear Drop (Recover status debuffs)
8 Weak Goblin Ambush, learn Vigilance (can’t be surprised)
9 Grey Wolf (level-up battle)
A Dungeon movement explanation
E Grey Wolf
F Weak Goblin
G Grey Wolf
H HP and MP fully restored
 0 Chest: Small Mana Ring (MaxMP+1)
1 Chest: Wind Sprite Staff (ATK+20 M-ATK+10 M-DEF+35 <Wind>)
2 Jill scene “Torture at the Enemy Base”
3 4×Tough Goblin (gameover)
4 Chest: Heal Drop
5 Heal Drop Tree
C 3×Weak Goblin
D 2×Tough Goblin (gameover)
E Grey Wolf
F 2×Tough Goblin (gameover)
G 3×Weak Goblin
H Grey Wolf
I Grey Wolf
J Weak Goblin
Either bribe the guard, or defeat the Kraken (HP:500, weak to lightning / wind. Use magic arrow to escape the tentacles)
Marlbara Desert
Enemies
Scorpion (HP:150, poison attack, 80 D, 10% Scorpion Tail)
Ghurab (HP:100, weak to lightning)
Sand Worm (HP:500, weak to water. Use lightning on self to get rid of small worms. 150 D, 40% Clear Drop)
Zahaf Scorpion (HP:160, poison attack, 20,000 D, 10% Scorpion Tail)
Slave Hunter (HP:430, counter attack, 1000 G, 100% Analyzer)
0 Merchant (advice on Sand Worms)
1 Chest: Mana Drop (Recover 5 MP)
2 Chest: Clear Drop
3 Chest: Farih’almashi (+20 HP and +1 MP for every 5 steps, surrounding squares guarded by Sand Worms)
4 Chest: Heal Bottle (+250 HP, surrounding squares guarded by Sand Worms)
5 Chest: Heal Drop
6 Quicksand
A Scorpion
B Ghurab
C 2×Ghurab
D Scorpion
E Scorpion, Ghurab
F 2×Scorpion
I Zahaf Scorpion

1 Chest: Mana Drop
2 Chest: 2000 Dinar
3 Chest: Clear Drop
4 Heal Bottle
5 Heal Drop Tree
6 Shortcut
7 2×Ghurab, Scorpion
8 Sand Worm
9 3×Slave Hunter
A Ghurab
B 2×Scorpion
C 3×Ghurab
D 2×Scorpion, 2×Ghurab
E 3×Scorpion
F Quicksand
G Quicksand
H Quicksand
J Zahaf Scorpion
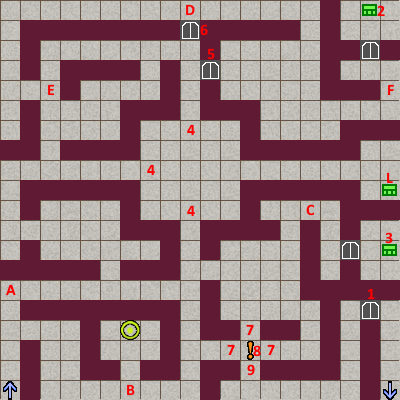
Qanat
Enemies
Scorpion (HP:150, poison attack)
Green Slime (HP:400, DEF:250, weak to fire)
Farasha (HP:190, weak to fire, paralysis attack, 30 D)
Viper (HP:270, 100 D, 30% Heal Drop)

1 Chest: Awareness Amulet (Blocks sleep and confusion)
2 Chest: Heal Drop
3 Chest: Heal Bottle
4 Switch, opens 6
5 Locked Door
6 Drawbridge
7 Airi event, unlocks 5
8 Man
9 Man
A Farasha
B Scorpion
C 2×Farasha
D 2×Viper, Farasha
E 2×Farasha, Scorpion
F Viper, Farasha
G Exit
H Airi event
I Green Slime
J Green Slime
K Ground: Life Seed (Revive and recover 40% of HP)
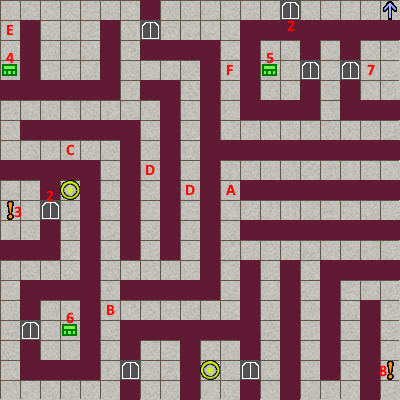
1 Chest: Water Guardian (Airi: ATK +34 DEF+18 <water>)
2 Chest: Heal Bottle
3 Ground: Mana Bottle
4 Locked Door
5 Big G (unlocks 4 during Law route)
6 ! Drawbridge
7 ? Switch (opens 6)
8 Zahadola event
9 Farasha, 2×Viper, Scorpion
A Viper
B Scorpion, Viper
C 2×Farasha
D Green Slime
E 2×Viper
F Viper, Farasha
G 2×Farasha
Balsa Wilds
Enemies
Alwald (HP:250, weak to fire, poison attack, paralysis attack, 250 D)
Giant Snail (HP:410, weak to wind, physical counterattack, 220 D)
Black Wolf (HP:360, 300 D, 55% Black Fur)
Mirror Egg (HP:200, magic reflect, 100 D, 15% Reflect Ring)
Mandragora (HP:1300, weak to fire, poison attack, 5000 D)

1 Chest: Life Elixir (+10 Max HP)
2 Chest: Spirit Pill (0 MP consumtion for 3 rounds)
3 ? Heal Drop Tree
4 Shortcut
8 ! Monster Warning
9 ? Man taking 10 Black Wolf pelts for Hunter’s Mark (Raises drop rate slightly)
A Alwald
B Giant Snail
C Giant Snail, Alwald
D Black Wolf
E Black Wolf
F Black Wolf
G 2×Alwald

1 Chest: Clear Drop
2 ? Heal Drop Tree
8 ? Sealed Pot
9 ! Ambush area
A Mirror Egg
C Giant Snail
E Black Wolf
F Black Wolf
G Giant Snail, Mirror Egg
Sapphire Ruins
Enemies
Green Slime, Farasha, Viper, Mirror Egg
Wisp (HP:100, DEF:250, weak to dark, no physical attack)
Mummy (HP:400, weak to fire, undead, 100 D)
Creeping Coin (HP:50, ATK:215, weak to lightning, floating, 2000 D)
Bandit Boss (HP:350, 1000 D)
Underling 1 (HP:270, 750 D)
Underling 2 (HP:180, 750 D)
Machine Golem (HP:1200, weak to lightning, magic counterattack, 2500 D)

1 Chest: 25,000 Dinar
2 Chest: Empty
3 ? Remains of a fire
4 ? Caved in staircase
5 Ground: Life Seed
6 ! Switch (opens wall near 9)
7 ? Strange wall
9 2×Wisp, Viper
A 3×Viper
B Wisp, Farasha
C Wisp
D Wisp, Viper
E Viper, Wisp, Farasha
F Creeping Coin
G ! Elevator pipes
H ? Elevator Cless dialog
I ? Elevator Salman dialog
J ! Elevator

1 ! Luna switch
2 ? Caved in staircase
3 ? Broken down door
4 ! Cless switch
5 Reunited
6 Chest: Empty
7 Chest: Flare Javelin (ATK+40 <Fire> Additional Damage(S))
8 Green Slime
9 Bandit Boss, Underling 1, Underling 2
A Wisp
B Green Slime
C Wisp
D Mummy, Wisp
E Wisp, Mummy
F Mummy
G 2×Mummy, Farasha
J Chest: Fire Staff (ATK+47 M-ATK+8 <Fire> +Additional Damage(S))
K 3×Mummy
L Ground: Heal Bottle
0 Chest: Life Seed
1 Chest: Lucky Ring (LCK+10)
2 Ground: Life Elixir (+10 Max HP)
3 All walls unlocked
4 Professor Salman
5 ! Elevator
7 Archive room
8 Wisp, Mummy, Mirror Egg
9 Machine Golem
A Wisp, Mirror Egg, Farasha
B Mirror Egg
C Creeping Coin
D Mirror Egg, Mummy
E 2×Mummy, Wisp
Underground Market
Enemies
Crimson Elite (HP:300)
Choker Guard (HP:1300, physical counterattack, 10% Life Elixir)
Rahad 1 (HP:1600, skill counterattack, 10,000 D, 100% Yaqut (-1MP cost of Shortcut 1 (Fixed in battle)))
Rahad 2 (HP:2100, skill counterattack, 10,000 D, 100% Yaqut (-1MP cost of Shortcut 1 (Fixed in battle)))
Shadow Eater (HP:1100, weak to earth, magic counterattack, 2500 D, 5% Mana Crystal)

2 Chest: Mana Bottle
3 Chest: Heal Bottle
4 Chest: Heal Bottle
9 Crimson Elite
A Crimson Elite
B Crimson Elite
C Crimson Elite
D Crimson Elite
E Crimson Elite
F Crimson Elite
2 Chest: Yaqut (-1MP cost of Shortcut 1)
3 Chest: Unlimited Heal & Mana Bottles
4 Rahad
5 Oneway Door (east to west)
6 Oneway Door (north to south)
8 Airi (chaos route)
A Crimson Elite
B Crimson Elite
C 2×Crimson Elite
D Crimson Elite
E Crimson Elite
F 2×Crimson Elite
L Chest: Life Elixir

1 Storage Room
2 Chest: Mana Drain (Enemies M-ATK restores MP)
3 Chest: Heal Bottle
4 ! Shadow Eater
5 3×Crimson Elite
7 Crimson Elite
A 2×Crimson Elite
B 2×Crimson Elite
C 2×Crimson Elite
D Crimson Elite
E Crimson Elite
F 2×Crimson Elite
G 2×Crimson Elite
3 Choker Guard
4 Chest: Mermaid Tears (Revive and recover 100% HP)
5 Chest: Heal Bottle
6 Chest: Unlimited Heal Drops
7 Crimson Elite with Jail Key (unlocks 2)
8 Luna’s Cell
A Crimson Elite
B Crimson Elite
C Crimson Elite
D Crimson Elite
E Crimson Elite
F Crimson Elite
Chapel Basement
Enemies
Believer (HP:550, weak to wind, 750 D, 30% Heal Bottle)
Evil Book (HP:370, weak to fire/holy, 660 D)
Skull Fencer (HP:1500, weak to holy, physical counterattack, HIT+, undead, 5000 D, 10% 2257)
Bishop (HP:2300, 15,000 D)
Last Dungeon
Tower of Trials
Luna – Main Scenario
Use the ceremonial spear to survive for 15 turns.
Lust Worm Progress +1%
Number of Sexual Encounters +1
Times Penetrated +1
Times Ejaculated Inside Of +1
Number of Times F*cked (Humans) +1
Lust Worm Progress +5%
Run into Jidarl 4× in Underground Market B2
Number of Sexual Encounters +1
Times Penetrated +1
Times Ejaculated Inside Of +1
Number of Times F*cked (Humans) +1
Lust Worm Progress +1%
Lose in Underground Market
Number of Sexual Encounters +1
Times Penetrated +1
Times Ejaculated Inside Of +1
Number of Times F*cked (Humans) +1
Lust Worm Progress +1%
Number of Sexual Encounters +5
Times Penetrated +5
Times Ejaculated Inside Of +5
Number of Times F*cked (Humans) +5
Lust Worm Progress +2%
Number of Sexual Encounters +100
Times Penetrated +30
Times Ejaculated Inside Of +30
Number of Blowj*bs +30
Number of Times F*cked (Humans) +30
Number of Times F*cked (Monsters) +5
Lust Worm Progress +10%
Reply “…” to Airi
Game Over
Luna – Town Events
Progression 1
Progression 2
Lust Worm 100%
Lust Worm (0~49%)
Lust Worm Progress +1%
Lust Worm (80%~)
Main Street – Silver Goblet Bar – Boorish men
Number of Sexual Encounters +1
Times Penetrated +3
Times Ejaculated Inside Of +3
Number of Times F*cked (Humans) +3
Lust Worm Progress +5%
Main Gate – Reward the Old Beggar for giving information
Normal Equipment
Damaged Equipment
Number of Sexual Encounters +1
Number of Times F*cked (Humans) +1
Lust Worm Progress +1%
Tights
Damaged Tights
Naked
Church – Ask the bishop to help you with the Lust Worm.
First time
Lust Worm Progress +1%
Second time
Lust Worm Progress +1%
Third time
Fourth time
Game Over
Number of Sexual Encounters +1
Times Penetrated +1
Times Ejaculated Inside Of +1
Number of Times F*cked (Monsters) +1
Lust Worm Progress +1%
Dawn Shepherd Bar – Keep Betting
Wh*re District – Register as a prostitute
Virgin
Experienced
Number of Sexual Encounters +1
Times Penetrated +1
Times Ejaculated Inside Of +1
Number of Blowj*bs +1
Number of Times F*cked (Humans) +1
Lust Worm Progress +7%
The ‘2’ events are with Lust Worm Progress at 80% or higher
First Prostitution
Well-dressed Merchant
Well-dressed Merchant2
Middle-aged Citizen
Middle-aged Citizen2
Young Traveler A
Young Traveler A2
Young Traveler B
Young Traveler B2
Man with Bulging Eyes
Man with Bulging Eyes2
Sharp-eyed Man
Sharp-eyed Man2
Bearded Man
Bearded Man2
Luna – Field Map
Number of Sexual Encounters +1
Times Penetrated +1
Times Ejaculated Inside Of +1
Number of Times F*cked (Monsters) +1
Lust Worm Progress +1%
Lose to Tough Goblins.
Game Over
Convince the Gnath River bridge guard to let you pass
Number of Sexual Encounters +1
Number of Blowj*bs +1
Number of Times F*cked (Humans) +1
Lust Worm Progress +1%
Swim across Gnath River
Number of Sexual Encounters +1
Times Penetrated +1
Times Ejaculated Inside Of +1
Number of Times F*cked (Monsters) +1
Lust Worm Progress +1%
Number of Sexual Encounters +1
Times Penetrated +1
Times Ejaculated Inside Of +1
Number of Times F*cked (Monsters) +1
Lust Worm Progress +1%
Game Over
Game Over
Jill
Borak Ridge East (14,12)
After day 2
After day 3
After day 4
After day 5
After day 6
After day 7
After Underground Market
Follows scene Sex Slave End
Game Over
After day 8
Game Over
Cless
While playing as Cless in the Sapphire Ruins, get defeated by a Slime.
While playing as Cless in the Sapphire Ruins, get defeated by the Raiders.
Game Over
Airi
Visit the back alley in the wh*re district
Watch Airi’s performance on the Main Street Stage.
Event in Qanat B1