Overview
This guide is geared towards newer players of 7 days to die, but I hope some vets will enjoy reading it as well. It was first written when alpha 18.4 was current and alpha 19 is expected soon. We use a lot of words, and some pictures. There are no videos associated with this guide. It should remain roughly valid for future versions, but the game isn’t done yet so there will be changes over time.I’ve been playing 7 days to die since 2014, not sure exactly what version because none of my screenshots from back then have version numbers, I think maybe they didn’t add the version number in the upper right corner of the screen until later. It may have been alpha 5 or 6, maybe. Whatever it was, I died more than once because I ran out of stamina near a hill and got cornered. You see, you couldn’t go up hill without stamina, because it required jumping up the square blocks like in minecraft. It was old. But somebody might point out that I said 2014, and the current date is in 2020, so, that’s not 7 years yet. But it will be soon, and then later, it will be more.I would like to thank everyone I have ever played the game with, and especially the participants on our server Doing Science. This guide would not be possible without the science we have done together over the years, and I thank everyone whether or not they wrote any particular words in this guide.
About the game in general
Well, I’ll assume you’ve at least viewed the store page on steam and got the elevator pitch, but if not here’s the link:
[link]So yes, in a nutshell the game has zombies and crafting and building bases and survival and role playing elements, but is kind of a first person shooter, but there are some tower defense type things in it too.
Oh yeah, and all of that is in a world (either the handcrafted Navezgane map, or a map randomly generated when you begin the game) that is entirely made up of voxels that can be destroyed, crafted, placed, harvested, upgraded, and a lot of other past tense verbs.
The game at first glance seems to be about zombies, but once you play it enough, the zombies are just a component of the game like the terrain, the weather, the building and crafting systems, etc. I have a very close friend who I’ve known for 20 years, who HATES anything related to horror stories or horror-related fiction. But she’s spent hundreds of hours with me playing this game. So, if the background/story isn’t your cup of tea, you still might be able to find something you enjoy in the game.
Or there’s me, I HATE first person shooters. I’ve never played one I enjoyed unless you count Jedi Academy which I eventually got around to mastering. But for me, even though 7 days to die has guns and lots of shooting, it’s not what I would call a shooter. For my personal playstyle, it’s an architecture game, about building in hostile environments and the engineering considerations you have to solve about that. 🙂 And yes, sometimes that means shooting zombies in the face, but other times it is more about exploration, problem solving, and experiencing the tremendously large volume of CONTENT this game has.
How you solve the how-do-i-enjoy-this-game problem is an individual preference, but I’ve found that most people find this game to be pretty easy to enjoy, one way or another, even if it’s not the kind of game they usually play. I will now proceed to imagine you are a new player and provide all the advice that I think would be helpful. There won’t be any spoilers in this guide, except for the contents of the tutorial quest you get when you first spawn into the game.
A word about modding and mods for 7 days to die
Mods are great and I’m glad they exist. For this game, I’ve played with some mods, on some versions of 7dtd, but certainly not a representative sample of the available mods, nor even just the ones everybody talks about the most. And most of the time, I don’t play with mods at all.
So this guide contains my overall advice for players of 7 days to die, if they want to enjoy the experience of the game-as-designed. If you want to play with mods, go for it! But if you do, some of the things in this guide might not be as applicable to your case.
Also, I would like to endorse the idea, at least for this particular game, of giving it a go without any mods, first. Then when you have learned what you like and dislike about the core experience, you can proceed to mod it into perfection. I see people often on forums posting “Hey I just bought game_x, what mods should I install for my first playthrough?” and there are certainly some games for which the answer is almost certainly at least a few mods long.
But for 7 days to die, which is STILL IN ALPHA, there are two problems with that approach.
1) Each alpha release of 7dtd includes game mechanics changes, user interface changes, map changes, item changes, you name it changes. It’s all a very rapidly moving target. Which makes things very difficult for mod developers, until the particular alpha version gets a few patches and becomes stable, but then the next alpha deletes, adds, and rearranges all the features again. This aspect will improve a lot when the game finally releases, likely in 2021.
2) It seems to be common knowledge that adding mods to 7 days to die increases RAM usage more than one would expect. The game, with the voxel-based engine, is already a heavy consumer of RAM. So exercise caution.
As alpha testing draws to a close across alphas 19, 20, and 21, I expect this churn to decrease until by the time Beta and 1.0 or Gold or whatever they call the final version, we’ll have a better modding target. Co-owner of the company Rick Huenink noted in a recent livestream (Friday Jun 12) that “[while working on Alpha 19]… we haven’t had to redo as much, like, framework gutting, kind of, as we’ve had [ to ] in the past.”. This was his explanation for why it was “Jam Packed with content” (which he illustrated with hands about …………………………………………………….. this wide) and if content generation is speeding up for the Fun Pimps, no doubt it will speed up doubly so for the army of modders. And so with the engine stabilizing, things will improve.
DRM, EasyAntiCheat, SpyWare, and other nastiness
Good news: At this time, there is no DRM. You can run the game without steam if you prefer, you just won’t be able to host or join multiplayer games because, well, those depend on steam functionality.
Bad news: The game is equipped with stupidware called EasyAntiCheat. I strongly suggest disabling it. It has been known to be unreliable, in various ways, in various versions. The most common complaint is when it kicks you out of the game entirely, but its also been blamed (with various degrees of credibility and rigor) for other problems.
The sole consequence of disabling EasyAntiCheat, is that you will not be able to play on multiplayer servers which require you to have it enabled. But, the best servers are password protected, whitelist protected, or both, and have only trusted groups of friends playing on them. In such cases, anti-cheat software is not really required.
There is software being added to the game for Alpha 19 going forward to collect information about your in-game behavior, such as what inventory items you drop or scrap, etc. While an occasionally-vigorous conversation was had on that subject at [link] , in the end it turned out to be completely benign and an opt-out was added to the launcher (just like with easy anti cheat). So you can turn it off if you want, but I suggest leaving it enabled unless you have some very specific special need or concern, because it really helps the devs balance the game better as it gets closer to release.
The game launcher

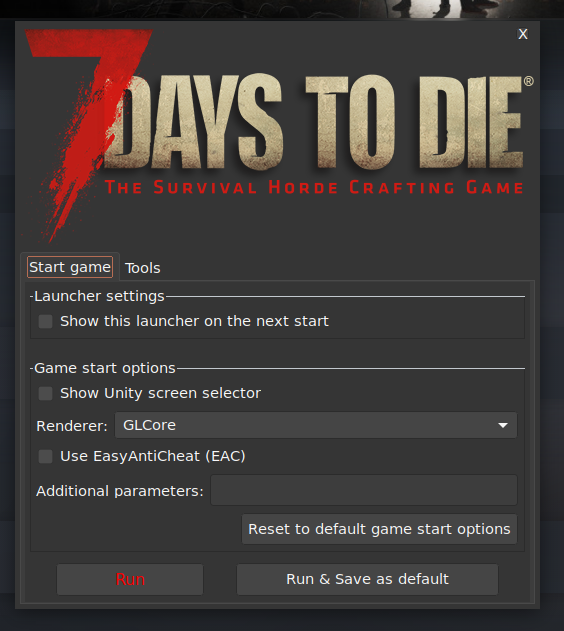
This is also where you would disable EasyAntiCheat if you wish to follow my advice from above that you do so.

The other, more official manual: The in-game journal.
In game, the journal is filled with detailed information about game mechanics, certain items that have special behaviours, and just about anything else you need to know to play the game. However, when you are a new player, too much information can be overwhelming all at once. You don’t know what is important, you don’t want to read a book, you just want to play.
So, what the game does is it adds entries to your journal singly or in small groups, in a context aware way, when you need them. Once added, journal entries are never removed; however the list will reset each time you begin a new game.
There is usually a short barrage of journal entries at the beginning of day one when you first start the game, because some things you need to know right away. So, after you complete your initial tutorial quest (because it takes a few seconds pause, between each journal-entry-add, and doing your intro-quest gives that time to happen) during your first few games, take the time to read all of your current journal entries.
After that, read them when they arrive. For example, an entry is added about the wire tool, the first time you obtain a wire tool. And entries are then added for a bunch of other electrical-related things, the first time you are holding a wire tool in your active toolbelt slot.
But, you know, it might not be obvious that you have to put the tool in your hand, in order for the game to grant you access to knowledge about it. So, that’s part of what this guide is for.
Really you will end up using the in-game journal for most of your quick-reference to remind yourself of specific game mechanics. This steamguide manual is here for when you DO want to read a book, as opposed to reading little isolated snippits of information in no particular order. 🙂
Hard earned wisdom.
The following are some maxims about 7 days to die.
- Expect random deaths until you have memorized all POIs (POI, or Point Of Interest, is the 7 days to die jargon for “building”, usually, but could also mean a cave or other location built by a level designer). Some of them have surprises.
- Zombies are not the enemy. Time is the enemy. Think about time management.
- Landmines suck. This is a real-life maxim, too. [link]
Hidden conveniences
openbook-closedbook icon on books to show if you have read it.
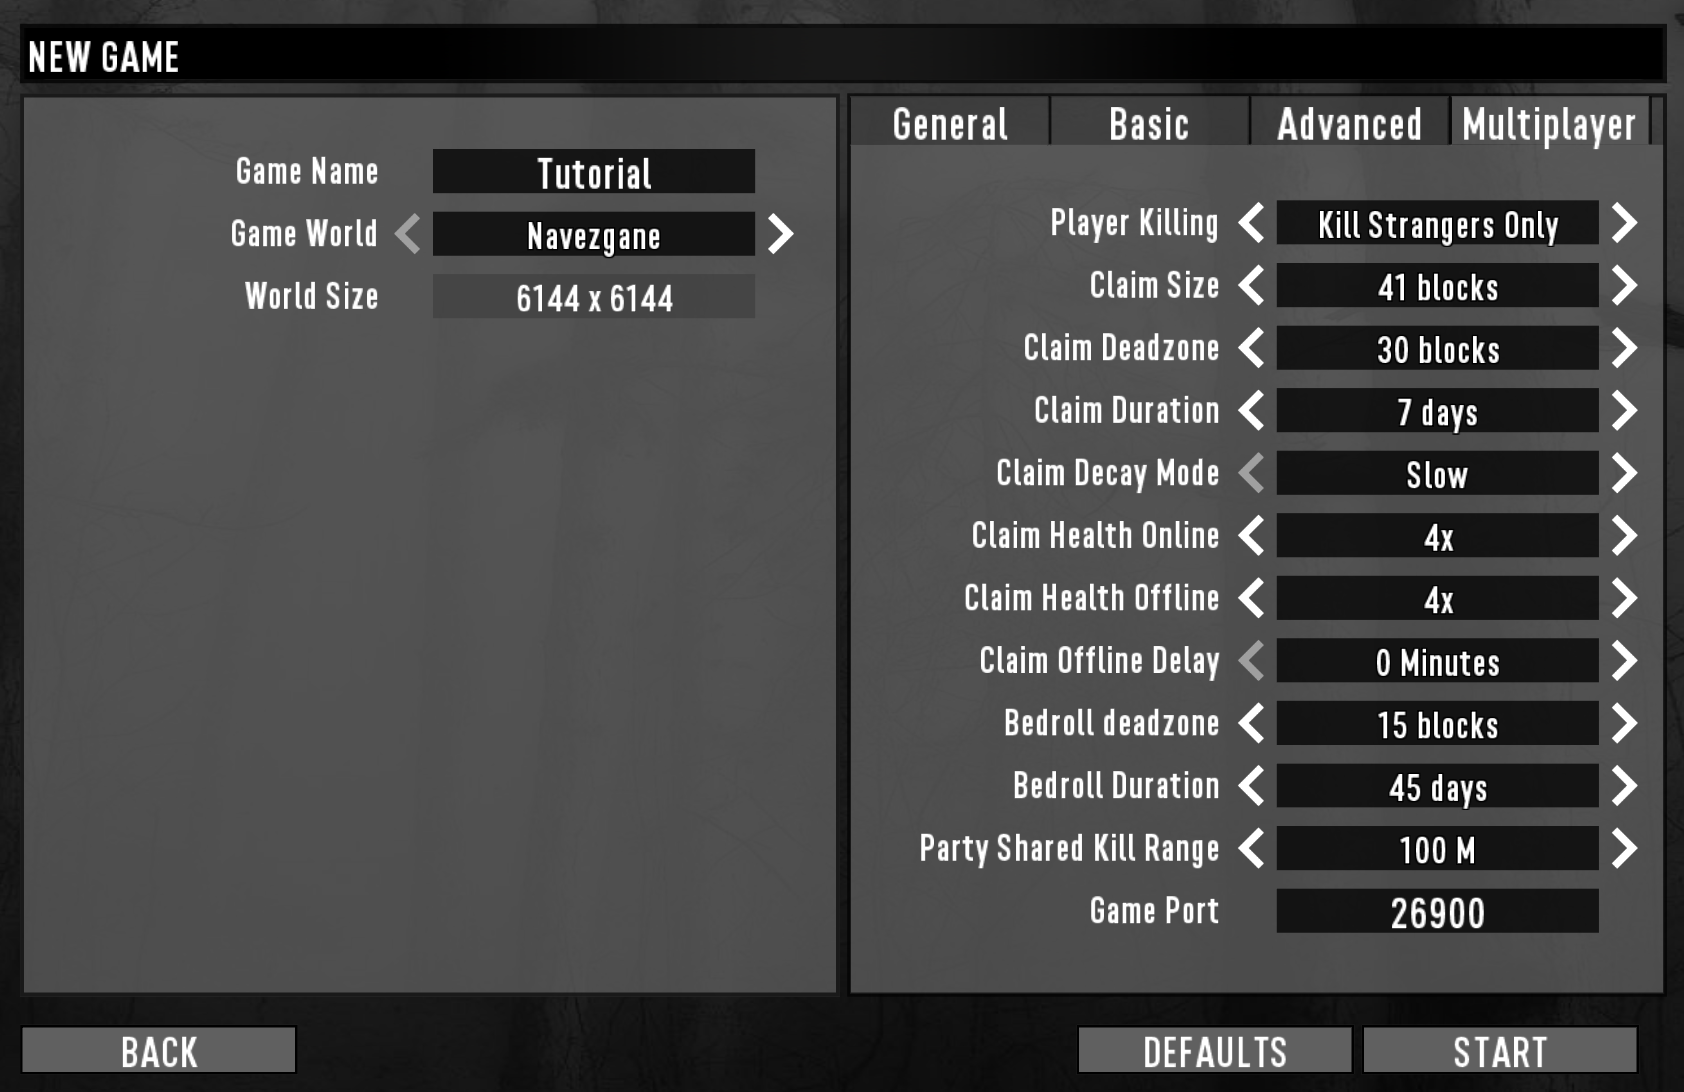
Main Menu -> New Game selections

Starting a new game is pretty simple, for this example we will use the hand-crafted Navezgane map because there are changes in the random gen map system for Alpha 19, and I don’t have screenshots for that yet. The appearance of these menus may change until 1.0 finally comes out, but the meanings for most of the options should stay roughly the same so let’s go over them.
The first tab (“General”) ought to really be called “Security” because all the options here are about who can join your game! Set them as appropriate. Note that if you want to play co-op on a regular basis, it’s MUCH better (for performance and play-logistics reasons) to join or create a dedicated server, which is this whole other process I won’t get into here. But the peer-to-peer hosting can work if it’s just 2-3 people playing. Especially if the host has fast internet access and lots of RAM.

The second page is where a lot of the meat is. The only “Default” that is not also the “Recommended Value”, is difficulty. The lower and higher difficulties are there to help people fine tune the experience, but if you want to be at the “true default” difficulty, play on “Nomad”. The “actual default” of Adventurer is presented instead for new players, for whom it is often the right choice. Start at any difficulty that seems reasonable to you, just remember it’s an option you can change later and that Nomad is considered the “base” level of difficulty against which all the others are scaled.

I won’t describe every option because the Fun Pimps put in tool tips describing each. But I will comment on the possible unanticipated side effects that certain choices can have.
- “24 hour cycle” multiplied by “blood moon frequency” is how often (in real world minutes) the zombies will go insane with energetic killing rage and learn your precise GPS coordinates and track your movements in realtime while running full speed and destroying whatever is required to make a path to you so they can eat your brains. Until in-game morning. We’ll talk more about blood moon hordes later in the guide. Just keep in mind that they are a big event, consume a lot of your time and energy, and having them too frequently or not frequently enough are things that a lot of players hate, so it’s important to find the pace that keeps things fun for you. Try the default to start. Personally, I like a little slower pace so I can explore for a few extra hours each in-game “week”, so I turn up the 24 hour cycle. One thing we tried on our server for Alpha 18 was to change the blood moon frequency to 10 instead of 7, because that both gives a little more relaxing pace, and also stops people from needing to log into the server and ask “ok, so it’s day 184, is tomorrow a horde day?” Obviously if you are a master of divide-by-seven, this aspect will not bother you, but most humans are better/faster at determining does-it-end-in-zero. 🙂
- The daylight length setting is linked to the zombie day/night speed options. So if (as in the defaults) you set it up for the zombies to move faster at night, this setting is pretty much all about how long that period of faster-running lasts. Also, you know, it’s easier to see in the daytime, mostly. Also remember that horde nights start at dusk and last until dawn, so if the dawn/dusk times are adjusted, it will have an impact there.
- The “feral” zombie option is talking about the fact that some minority of the zombies are tougher than average, and (by default) run, even during the daytime when other zombies merely shamble.
- If you want to be able to change your character’s appearance at-will, leave persistent profiles off. If you want to lock your appearance (for example, you want a different character for each of several single-player games that you bounce around between, but you want each one to remain the same) turn it on. Changing appearance can only ever be done from the main menu -> options -> profile.
- XP Multiplier: LEAVE THIS ALONE unless you really, really know what you are doing. Yes, it does the fairly obvious thing of applying a multiplier to earned experience points. That, in turn, will make you gain levels faster. And that, in turn, will make the zombies the game throws at you tougher because some difficulty and loot-quality related things are linked to your Gamestage, a very important game variable we will talk more about later, and having a higher-than-normal XP multiplier essentially drives the gamestage up too fast, which results in tough zombies before you have a chance to locate/craft weapons effective enough to deal with them. Don’t be one of the people who cranks up XP Multiplier, then complains the game is too difficult. Play with the default values first, then adjust once you have a few playthroughs completed and a really solid understanding of how the game is working for you.

It is possible to turn Enemy spawning off, which will result in a game with a few hostile animals, possibly (bears, wolves, snakes, etc.) but zero zombie population. This can be a VERY GOOD ENVIRONMENT for learning the game and I strongly recommend you try it if you need some quiet from the zombies so you can figure out the block shape menu the first time, or whatever, or peruse the crafting recipes.
When an air drop happens (always at noon, and even if set to “every three days” the first airdrop is on day 4), a plane flies overhead and drops a crate with a parachute. The crate trails orange smoke until it lands, at which point the smoke stops and the parachute canopy vanishes. The crate contains survival supplies such as canned goods, or painkillers and antibiotics, or if you are lucky a weapon, some ammunition, or a schematic to teach you a new crafting recipe. The loot does scale with your gamestage (and the Lucky Looter skill, if you have it, and the Lucky Goggles, if you are wearing them) but I find that in the late game, it’s just “more canned goods” or “some medical stuff” to me because I already have most of what I need, out of the things that airdrops provide. Other playstyles might have different experiences, and the fun pimps are likely to continue to adjust balance things, so my late-game-airdrops-are-meh feeling might change eventually.
Early game, though…. those crates are amazing. I mean, canned goods and medical supplies are LIFE, essentially. So when the airplane flies over and drops it, you abandon whatever you were doing, jump out a window of a building you were looting, leave the base without ammo/food/water, or do whatever other crazy things are required to catch sight of the orange smoke before it vanishes from view. Then you run at full speed over the terrain, around buildings, across the countryside until you get there, and are presented with loot! It’s a fun minigame, I think. Too many people sort of ruin it for themselves by turning airdrop markers on. When you do that, the same airdrop happens, but the crate gets a big orange marker on your map so you don’t have to rush, you can just go get it later. There’s no risk of losing track of it, so there is not any motivational pressure to make you go get it. So just…. evaluate what would ACTUALLY be the most fun. 🙂
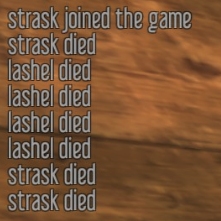
You will die.
My little “branding image” on this guide says it all.

As of Alpha 18.4 (which is very stable at this time, while A19 experimentals are expected to begin soon and last a few weeks), the results of dying are as follows:
- Your possessions, clothing, tools, weapons, etc, fall to the ground, neatly packaged in a light blue backpack object. It is, from the game engine point of view, an “entity” I believe, so it is possible-but-not-usual for it to move after being created — for example, by rolling down a hill. This backpack object will de-spawn after a timer expires, but that timer won’t BEGIN until some human player, presumably the owner, looks inside. And the timer is generous, I think more than an hour but I can’t swear to it because I never want to gamble AND be patient, both of which good science would require. So the advice is: Go back and get your things when you can, but you don’t need to panic about it — they will be there (absent any kind of bug, or massive area-effect damage killing the backpack) until you arrive. Once you do find the backpack, however, get everything out of it promptly. The backpack also de-spawns when empty.
- An experience point penalty is applied, effectively increasing the total amount of XP you need to get to the next level by about 10%. If you die again, another amount is added (I think maybe enough to bring it back to 10%?) but there is definitely a cap on the total penalty that you can have applied to you before the game figures you have been punished enough. 🙂 So the main problem with dying several times in short succession will be losing track of where your various death backpacks are so you can recover the loot, more on that below.
- You will be shown a death screen which may include your zombie attackers nibbling on your body… at least you won’t go to waste! 🙂
- You will respawn into the game in a fresh new body. This body is uninjured and not exactly hungry or thirsty, but not super full of food or hydration either. Any diseases or de-buffs you had before you died will be removed, although at this point you of course have a little de-buff representing that experience point penalty. The new body looks identical to the old body; to get a new appearance you need to exit out to the main menu, go to options, choose profile. The only thing you have after respawning will be your underwear and a backpack, which is sort of attached to your body and not a separate thing anyway. 🙂
- The location you respawn at is randomly selected much like when you start a new game, unless you have placed down a bedroll object (bedroll, old bed, or king sized bed) which still exists. If your bedroll DOES exist, you’ll spawn there instead of anywhere random. So it’s a good idea to HAVE a bedroll so you spawn in a known location, unless you are in the mood to explore. You can “un-set” your bedroll position at any time by picking it back up or destroying it, or putting another one down later (because only the most recenly placed one counts, all others are not destroyed, but are forgotten).
- A new marker is placed on your map and compass, representing the location of the bag containing whatever you dropped when you died. This marker is fragile — it will go away when you take the things out of the death bag, or when you die again. So a good habit is to go to your map (M is the default keybinding) and immediately place a more permanent marker where your backpack is, in case it takes you a long time to recover it. Don’t ever just trust “I won’t die again before I get there”, even if it’s close. Anything can happen.
- That’s it, the entire death experience. And if it happens early enough in your new game, you won’t even get any kind of XP penalty, so there’s no need to start a new game if you die right away, just respawn and proceed. 🙂
Things that kill you.
The most common cause of the first death an individual player experiences in 7 days to die, comes from seeing a boar wandering around on the afternoon of day one, when they are realizing they are hungry, and thinking it won’t fight back, very hard, if at all. If you don’t believe me, go fire a stone arrow at one from a day-1 primitive bow and see how long you can run from it. I’ve seen them break down wooden doors to gore me. A day one character isn’t equipped unless played with the benefit of a LOT of experience. Good luck, though, because if you can do it, the meat and leather and bones and fat are all going to be significantly useful to you.
Other things that may kill you include:
- The typical humanoid-ish zombies you might expect, of course. Most of them shamble during the day and run at night, punch hard enough to dig surprisingly quickly (although, not instantly) through typical building construction materials, and stay interested for about a minute of searching for prey they lost track of before they give up. There are variations, including
haha just kidding, this isn’t that kind of guide, the one that is trying to be a wiki. Nope, I won’t catalogue everything that way. I’ll actually catalogue it all this different way:
- Health going to zero kills you, it can be from incoming damage directly: zombie punches and bites, sharp things you rub up against, impact at high speed due to physics from falling yourself, or things falling on you, or driving at high speeds into stationary objects… the list goes on. But it can also come from food or water levels in your character’s body being below certain low levels, which is the usual way that hunger or thirst kill you (but not the only way, read on). To avoid this kind of death, wear armor to mitigate damage (more info in gear section) and don’t get hit.
- Food or Water bars going to zero kills you. There are no actual bar graphs in version 18.4, it’s a long tragicomic romance about the absurdity of pasta for breakfast, so I won’t even try to summarize why this is the case; for the moment you can see your food and water levels in the character screen (B keybind by default, or via icon above the map or inventory screens) but you have to first click a little icon above the paper doll armor display, and then after looking at the numbers for food and water you have to click another little icon if you want to see your armor and clothing again. The good news is that the actual little healthbar-like bars are returning in A19. Both of these numbers go down at variable rates based on game conditions like your stamina usage and the weather and stuff, and go back up when you eat or drink as appropriate.
- Debuffs, Maluses, Negative Status Effects, etc… whatever you want to call them (“debuff” is the official 7dtd jargon) they are things like having a broken leg, being too hot or cold, being infected, having food poisoning, and so on. None of them kill you directly, that I am aware of… although I’m also not aware of a way to survive eating broken glass, which gives you an internal bleeding debuff with such a high rate of damage I don’t think you can apply healing items fast enough to counter it. But it wasn’t the debuff that killed you, it was your health going to zero. That’s your suicide option, by the way, if you ever need one. Scrap a glass jar and eat the glass. Anyway, you’ll notice when you have some debuff going on, because of icons on the main screen user interface; they are near the health/stamina bars in 18.4 and we’ll see if that remains true for A19. To find out what the icons mean, you can go to your character screen (again, this is the one with your armor/clothing, you can get to it with B by default or via icons at the top of map or inventory) and they should be listed prominently. At first you see only the name of the debuff and a timer, but if you Left Mouse Button select the debuff on the list, then a more detailed description shows up to explain what the debuff is, where you got it, how to get rid of it, or maybe just an snide remark (I’m looking at you, snowberry poisoning).
- The weather kills you by applying debuffs when you are too hot or too cold, as measured by the “feels like” temperature you can see on the map (Defaults to degrees f because the game setting is in the USA, I guess, but can be switched to degrees c by pressing F1 and using the “settempunit c” command), and a couple other screens. Like any debuff you will see the icons on the main user interface near your health and stamina bars. When too hot, your water bar goes down more quickly than usual. When too cold, your food bar goes down more quickly than usual. Extreme cold or heat can also apply additional penalties to your stamina regen rate or even cause health damage. The most common final cause-of-death is going to be health bar at zero, but if you try to survive by applying medkits or bandages to heal your dehydration damage (funny, the things that are effective in video games) the water bar reaching zero will eventually kill you anyway. Likewise for food.
It is also possible to die due to bugs in the game, although that hasn’t happened to me personally that I recall in 18.4. But you know, sometimes something weird is going to happen, you might be mining and pickaxe a hole through the fabric of the universe, fall infinitely to your doom. The biggest problem if this occurs, is that when your possessions get put in the “dropped loot” death backpack object, you won’t be able to recover it because it’s not in the map. If you do ever find yourself falling out of the world for some reason, I’ve had the best luck by logging out / quitting the game quickly. When you log back in or load your game, you’ll likely be deposited back at ground level above where you fell out of the world. But it is likely a trivial, videogame-oriented version of PTSD (which in other forms is a serious disorder that many people struggle with and I do not mean to make light of it) that has me mentioning this at all. The design of the game still allows that bugs like this could occur in the future, but they haven’t been happening recently that I can think of, and I’ve noticed several background things happening behind the scenes in the engine that attempt to detect and correct situations like getting stuck or falling out of the world. Early access, bugs happen, but it’s getting better with every release.
All about stamina
Character Development and Improvement
The White River Settlement. It’s real, and it’s safe. And it’s closed at night. And Rekt is an ass.
Biomes and environments
Firstly. The most important thing is to appreciate the in-some-ways-horrific beauty of the environments. While doing so, we may then proceed to simultaneously think about gameplay. 🙂

While it is certainly possible to live in any one biome permanently, I don’t recommend it. The differing challenges and resources and Places of Interest (POIs) and enemies available in each biome are a key part of enjoying the content available in this game. The sections below will go into more detail about living in each biome.
A caveat, however. Just because we are presenting all these places as areas you may wish to live in, doesn’t mean you always have the option to do so.
When you spawn into the game, you might be in the middle of some particular biome, and have no idea what direction to walk in to find other biomes at all, much less some particular biome you are seeking. And, having a place to live is important, it can’t always wait for exploration. So you often just have to settle where ever you find yourself, at least to start with.
Why I love living in the forest. (As told by Turtle)
There are many benefits that come from living in the forest and typically this is one of the most comfortable places to settle so to speak.
The forest tends to be moderate in temperature which means you should encounter fewer instances of “oh what is that debuff I am experiencing” or “where did all my hunger and thirst go?”. Especially as a new player it can be very helpful to live in this temperate zone while gathering the appropriate garments for various weather conditions and exploring the other biomes.
The forest in my experience also tends to have the highest quantity of animals (however this may be a bias I experience from living here so often and being in the areas more often). You can typically find an assortment of wildlife in the Forest zones varying from passive to aggressive (with Boars being the one “Neutral” creature that will not provoke a fight but will fight back if attacked). Do keep an eye out for Bears in particular which are quite deadly due to sheer strength and the size of their health pool. One can be killed with a few shots to the head from a good hunting rifle but make sure you engage from an adequate distance or from some safe position.
The Forest of course has more than a few trees. Wood will rarely be an issue if you replant the seeds from the trees you chop. It can be nice to relocate far away stands of trees closer to home for convenient farming. But always keep in mind what a wall of trees will do to the visibility of your area, or the temperature of your GPU. It can be convenient to plant these trees in lines going to/away from your base rather than parallel to it to mitigate the visibility issues trees can pose.
There are so many shrubberies! You will be able to find wide patches of Cotton, Goldenrod, and Chrysanthemum. Until you start farming these yourself it can be an extremely valuable resource to have close by. The flowers improve the total hydration of water along with other tertiary benefits. Cotton is absolutely essential throughout most game stages for crafting cloth, which then may be used to craft bandages and splints.
Typically there are small bodies of water dotting the forested areas so you should be able to find a stable source of fresh water without going far from home.
There are disadvantages to any given biome however and I will highlight a few of the pain points you may experience:
- There is no source of Aloe for production of healing items as it is unique to the desert.
- The short grass that covers this biome can interfere with your ability to spot small game and bird nests. Some players like to adjust the grass display range in graphics settings to mitigate this, or simply to improve performance.
- You will see bears and wolves and they will likely see you as well. Prepare to gather your dinner or become dinner. (Or ride away in style if you have a vehicle to outrun them.)
- There tend to be a lot of hills in these areas and you get fewer of the nice flat stretches of ground than you may see in some other biomes.
- In later stages of the game you may find yourself wishing you settled somewhere with Oil Shale but by this time you should have some form of vehicle which should allow you to carry enough Oil Shale home in one trip so that this isn’t a huge pain point.
Many of the pain points you would experience can be mitigated (if not totally negated) by settling reasonably close to a desert that adjoins the forest you are settling in. In a perfect world you would be able to find a cross section where all the biomes meet and you could settle in the one of your choice with easy access to all others. More realistic is to find a position that is reasonably close to 2 biomes besides the one you are settling in.
Why I love living in the Desert
Why I love living in the Snow
Why I love living in the Burnt Forest
Why I love living in the Wasteland
Why I love living in cities
Why I love living away from cities
Why I love renovating vs building (As told by RasaNova)
A survivor’s home is their castle. And this game indeed offers SO many ways to build an impressive castle! If you can imagine it, you can build it. But, what if you’re not a builder? What if you don’t feel you have the creativity, time, or willingness to spend the effort in constructing a 10-level unbreachable tower of doom? The answer is easy, find one that’s already built and make it your own! I am not a builder, and that’s ok because there are points of interest all over the map that are ready to go, they only need a little TLC (or a LOT of TLC, depending on your needs…)
For my own needs, I want a POI near resources. This includes trees, water, animals for hunting, oil shale for fuel, and aloe for healing. I also prefer not to deal with extreme temperatures. And the winner is…. Forest biome, close to desert. And, ideally within 1.5km of at least 2 traders. So now I know where I want to be, how do I pick the best poi? There are so many pre-built fortresses to choose from! Maybe one of those well fortified military bases or bunker complexes, or huge imposing factories? Or take over a high school, police station, or strip mall? No. Bigger isn’t better, it’s only more expensive in terms of resources and effort.
For starters, like many others I don’t stay home during a blood moon horde night, I prefer not to risk losing everything I have due to a string of mishaps leading to a demolition zombie followed by a pile of rubble and regret. I’ll deal with them at a horde base, which will change based on game stage and is a totally separate topic. Since I’m not worrying about the effect of a horde at my door, my base only needs to withstand occasional wandering zombie packs or the mini-hordes resulting from a scorned screamer.
So I prefer something on the smaller side. Less building footprint means less resources to upgrade. If I need space, I go vertical. One of the perfect spots for me are those small boxy shops that are often found outside of towns. Right off the bat, they offer 4 levels to work with, including basement, 1st & 2nd floor, and a flat roof. I’ll clear away all the junk, take out walls as needed (but am sure to leave enough support!) and decorate as desired. Forges & chemistry in the basement, storage on ground level, main living area on the upper level and crowned by a rooftop garden. The smaller size makes it easy to build an upper level catwalk around the perimeter for sniping at unwelcome unbreathing visitors, and I can fence in the property without needing a lot of resources.
There are several other options that work as well. There are some small houses, chapels, or cemeteries which have robust brick or stone construction with pre-built walls around them. Any of these could be moved in to after evicting the current tenants, and can then be upgraded, tailored,reinforced and decorated to fit your individual needs – all without having to deal with the hassles of planning and zoning a new construction project!


Good loot, bad loot. (It’s all good loot.)
What to eat
Where to build
I need somerandomthing, where do I get it?
Wheels, wings, and moving things.
Mining
Crafting
Gear
A note, upon initial publication of this guide.
I planned and wrote the bulk of what I wrote in this guide some time ago, before A19 even went live for experimental testing. And I recruited some friends to assist, and assist they did. And then I failed to ever hit the “publish” button, because initially we were too busy playing A19 and later I got distracted with research, analysis, and synthesis of unrelated information which lead to me playing video games a little less. And I’m sorry that the work my friends did, did not see light of day until now.
For reference, here is how to research, analyze, and synthesize information.
How To Approach Research (add ideas to your brain for later use)
1) What are you thinking about? _______________________________ (should fit in blank)
Choice)
Are you thinking of it in isolation? Like the core truth of the thing, examining just it? If so, try going to step 2.
Are you thinking of it as it interfaces with, pokes or is poked by, notices or is noticed by, some other thing? What? _______________________________ (should fit, and try step 3)
Are you feeling your intense like or dislike of the thing? That’s what I meant by thinking of it in isolation. Step 2.
Are you feeling confused about what the thing means? That’s probably because you are considering it in two ways. Meet me at step 4.
2) When considering something in isolation, you have to sort of draw fence posts around it, define what you are thinking about. And you named it above, but any name can mean several different things, even when it’s naming an idea rather than a person. So ponder where your idea begins, and ends, and let’s just examine the part in the middle, for now. We’ll continue this during step 5.
3) Now that you know the main thing, and the other thing, we are trying to think about how they relate to each other. We do this by first thinking about the place where the two concepts meet, interact, or touch each other.
4) Considering two meanings or interpretations of the same idea is the same as considering two completely different ideas, because that’s what they are! So here the path from step 1 and the path from step 3 meet back up. And we think about the two things as they relate to each other, at the juncture, the place where they touch. And keep zooming in on that until you realize you don’t understand the interface because you don’t understand one of the two things.
5) You are now considering something in isolation, and are zoomed in with your fenceposts so you know the “thing in the middle” that you are considering is EXACTLY the bit that is blocking your understanding of the item from step 1.
6) google that thing. Read about it. Read the whole of everything related to that. Sleep on it. Store it all in long term memory. Relate it to other things. And if google doesn’t have the answers you seek? Congratulations. You have advanced from doing research, to doing analysis.
How to do analysis (take ideas apart)
Define what it is.
Define what it is not.
Figure out WHY it is what it is, and not the things it’s not.
Do this recursively for all the things you need to think about along the way.
Exercise 1: Analyse yourself. (most students fail to ever complete this exercise, however the attempts are often instructive and rewarding)
How to do synthesis/creativity (put ideas together)
Step 1. Take two things that you have done in-depth research and analysis of, and which you care about, but which don’t “go together”, that is, you usually wouldn’t think of them at the same time because they are completely different topics.
Thing: _________________________________________
Thing: _________________________________________
Step 2. Communicate, to yourself, as effectively as you can, using all of your possible internal communication skills, how those two things are the same. Sing a song. Paint a picture, Direct a movie, write poetry, so on and so forth. Just combine those two things in every way possible in your head. But they have to be things you KNOW VERY WELL. They have to be things you know so INTIMATELY that you can flip EITHER ONE OF THEM them inside out, put them in blender, AND juggle them behind your back before scooping up the pieces, drawing two from a hat, and be able to INSTANTLY have an idea of how they relate and apply to each other. And when you know two different topics THAT WELL, you can combine them in any way you please, and get fun results.
Step 3. Take the best results from step 2, and communicate them to other minds as effectively as possible.
Exercise 2: In parallel with exercise 1 above, analyse any thing or person until you fall in love. Falling in love is easy, but frequently interrupts both self-analysis and analysis of everything not yet loved, so take breaks from the love for more analysis, and take breaks from the analysis for more love.
Exercise 3: Repeat exercise 2 enough (with new ideas and objects and people) to realize that everybody and everything and every idea and all of creation are the same. Every word means every thing. We are all one.