Overview
Pixel Game Maker MV Guide 2 Adding Assets & Creating Animations
Adding Assets & Creating Animations
Part 1: Adding Visual or Other Assets
- From the main screen after selecting a project, click on “Resources”.
- By default, the “Images” section is selected.
- Right-click a blank space in the “Image List” and select “Add Image” or click the “Add Image” button at the bottom of the list to open a file select dialog box.
- Select the desired file to add it to the project as an image resource. PNG, JPG, TGA, and Webp are supported.
- The image should now be displayed in the “Image list”.
- If the image is a sprite sheet containing assorted sprites for animation, you can also assign the default number of partitions (sprites) within the image using the “Initial Partition Default Value” setting. The image will then be divided into an equally-sized sections when creating an animation. Images are cut into tiles automatically based on the assigned tile size when assigned as a tile via the Tile tool.


Note: The “Reference Source” file path is the initial path where the image was pulled from, not the current location of the image or other asset included in the game data. The actual data used in the game project is located with the game project folder.
Part 2: Creating An Animation
- Now that you have assigned an image file, let’s create an animation from a sprite sheet. If you haven’t added a sprite sheet yet, please do so before proceeding.
- From the main menu, select “Animation”.
- If using an empty project, nothing is displayed here, as shown in the image above.
- Once again, either click the “Add Animation” button, or right-click and select “Add Animation”.
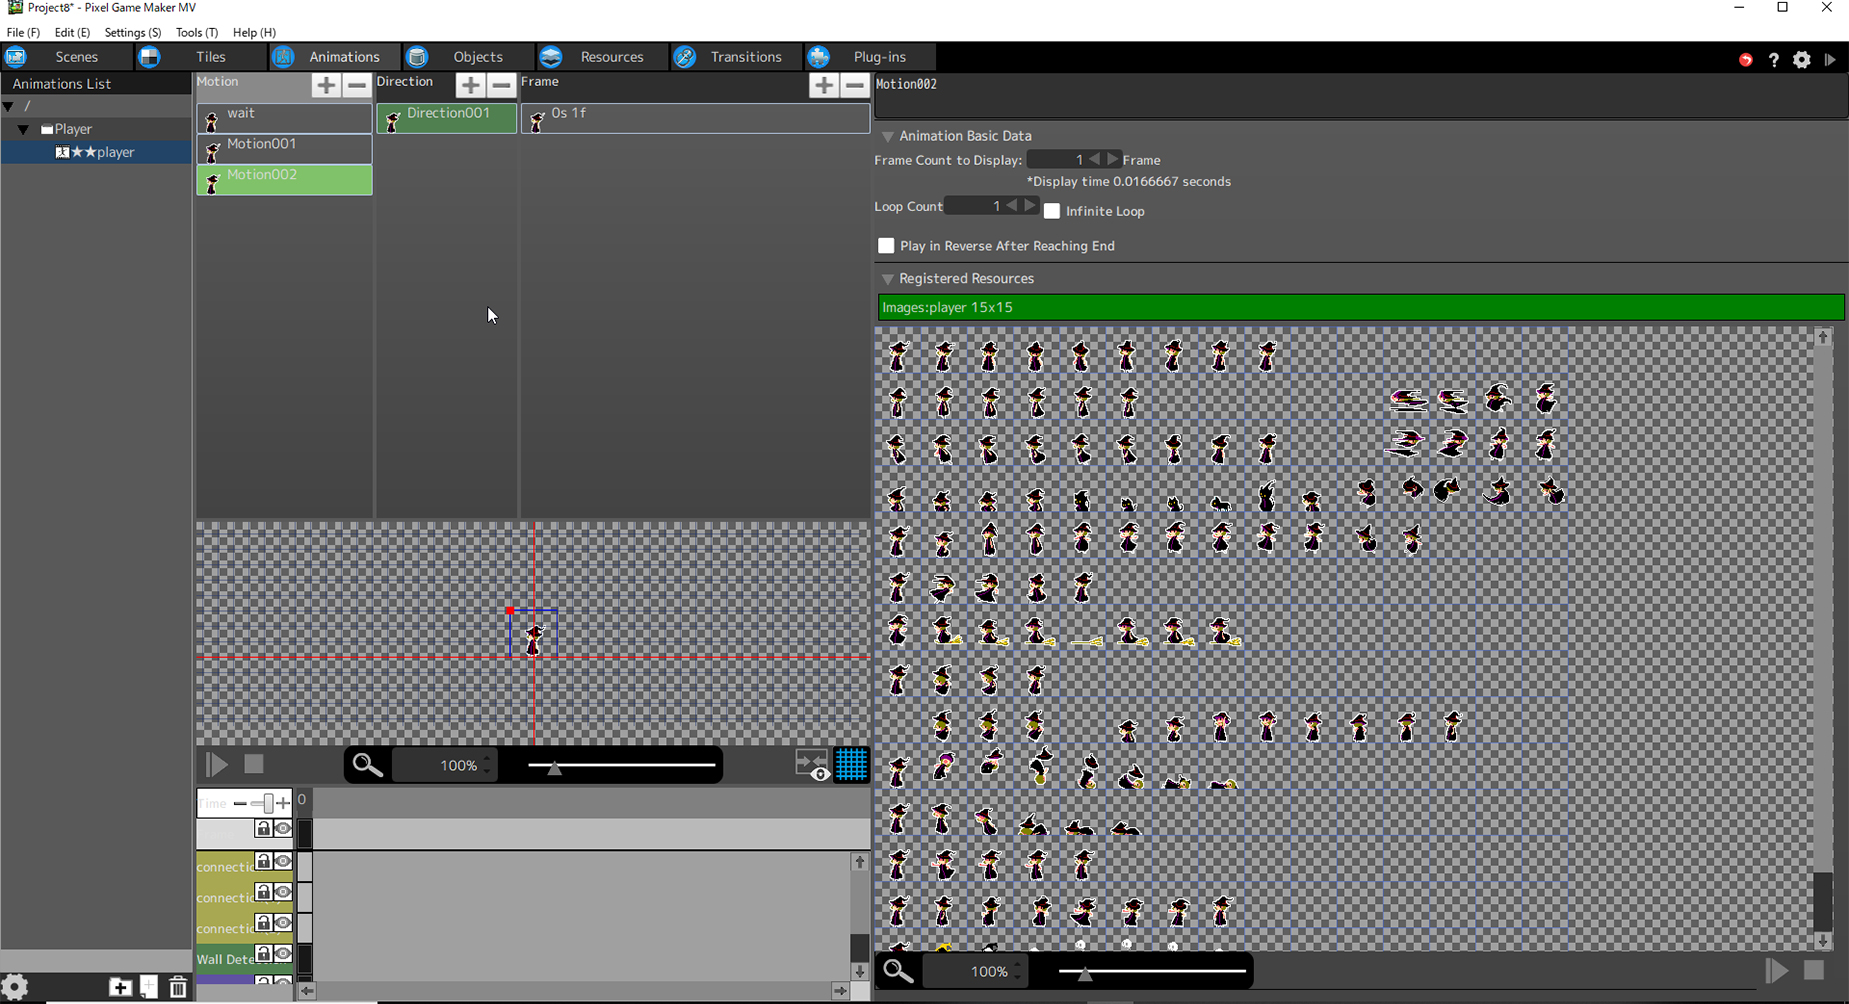
- The Animation settings screen will now appear on your screen.
- For the purposes of this guide, we will create a “Motion” animation. Effects and Particles will be covered in a different guide.
- Click the + icon select the sprite sheet to be used from the currently registered image materials. Multiple images can be selected.
- Confirm that the preview shown on the right is correct, and adjust the image division settings until the sprite sheet is divided into the correct size. The current divisions are shown and adjust in real-time.
- Clicking OK to close these screens will auto-generate a single motion, display direction, and frame using the first (from top-left) sprite in the sheet (based on the assigned divisions.
Note: An item in the “Animation list” should be thought of as a group animations designed to apply to a single object. Thus all animations for a single “Object” (that is, player, enemy, or map doodad) should be unified within a single Animation list “animation” group. - Now that the default animation is ready, create as many motions as needed. If you character needs idle, jump, and attack animations, click the “+” button in the Motion section twice to create 2 additional Motions.
- Click on the items in the “Motion” section of the UI, and then click the text box on the right side of the screen and rename the Motions from their default names.
- Next, select a motion from the Motion list, then click the “+” button on the Frame panel to add as many animation frames are needed for the desired animation.
- Click on a specific frame to display the Frame Settings panel on the right side of the screen.
- Default, the image selected for each frame of animation is the top-left image. Select the image needed for each frame of animation by simply selecting the frame and then clicking on the desired image displayed in the Frame Settings panel. You can also adjust for how many frames the animation is displayed for. The number of seconds the frame is displayed for is calculated based on the game running at 60 frames per second.
- If needed, you can change the offset, transparency, and color value for each frame of the animation independently using the other tools located in the Frame Settings panel.
- While here, be sure to configure your hit boxes for each frame of animation.
- The Wall box is used when calculating collision with the stages tiles.
- Hit Area determines where the character can be hit for purposes of damage calculation. Hitting an area of the sprite not covered by a Hit Area box will count as a miss.
- Attack Area is the area where in the animation that counts as an attack for purposes of damage calculation. Any overlap of an Attack Area box on to a Hit Area box results in damage.
- A Connection is used to connect 2 animations together. For example, if you have separate your attack effect sprites from your player character’s sprites, then you can adjust where an attack appears from based on where the Connection is on both the player sprite & on the attack sprite. Yes, a Connection is needed on both animations.
Note that hit boxes can be updated as needed by right clicking a point in the animation sequence panel and selecting Add Keyframe from the displayed list. Also, if an unusual shape must be covered, you can add additional boxes by right clicking and selecting to add the desired additional track to the sequencer. A black box represents a keyframe or sprite change, and a gray box represents no change.
- Once you have your animation frames & keyframes adjusted, you can go ahead and add sound effects and even voice files to play once a specific frame in the animation is triggered. Simply select the frame to serve as the trigger, and every time that frame is displayed the assigned sound effect or voice file will play.
- Additional tip: if you need left & right versions of each animation, and your sprites rotate perfectly perfectly, you can simply copy & paste the entire animation using the “Display direction” panel and then updating each frame using the “Flip horizontally” setting. This will save you the effort of reconfiguring your frame settings & hit boxes.
- Once all your Motions, Directions, and Frames are configured, your Animation group is complete! But if you need to make any changes, they will be automatically applied to any objects that rely on that Motion.