Overview
These are tips and helpful insights into combat and management you can learn when playing the missions in Phoenix Point: Year One Edition. I cover all the basic subjects in this tutorial like action points, movement, free and normal aim-targeting, vehicles, cover, destruction, weapon attacks, reloading, ammunition system and more.
Topics covered in this guide
Topics covered:
- How to track enemies in battle and chose your targets
- What are actions points and how they are spent
- How movement works
- Which types of cover there are and how to use it
- The specifics of Basic and Free aim attack
- How ammunition reloading works
- Inventory management
- And use of vehicles in combat
If you would rather watch, video format here:
How to track enemies in battle and chose your targets
The first thing to note is that the list of enemies at the button of the screen shows both enemies your currently selected soldier can engage and also all the enemies on the map your team can see. Depending on which soldier you have selected he can only attack enemies whose icons are in red. Greyed out ones represent enemies which are out of his line of sight.
The reason why this is important is because you need to stay aware of the fact that you have to look through each soldier’s individual line of sight to the enemies before you come up with an action plan for your turn. This is especially true because of how your default camera is the bird’s eye view which can confuse you and make you forget about the individual soldier’s point of view which limits which enemies he can shoot at.

What are actions points and how they are spent
The second important thing is the action points poll of each soldier. Those action points are divided into 4 separate bars, but each of those can be further divided when it comes to movement. This is additionally complicated by the fact that different actions spend different amounts of these points.
And even different weapons spend different amounts. A sniper rifle or an autocannon will spend 3 while a shotgun or an assault rifle will spend 2 for one attack. Additionally, you can move after shooting so take that into account when planning your moves.

How movement works
On this subject it pays to keep an eye on the color of the highlighted movement area and the movement icons. Blue tells you that any movement inside that area will leave your character with enough action points to use his currently equipped weapon/device and it’s basic attack/use.
[Credit to Oxiras for the correction of the original text]
An orange icon and area mean that after moving to that point you will not have enough action points to use your basic attack of the currently active weapon once you get there. I say currently active, because you can have more than one weapon on a soldier, but you have to activate it to see how far you can go and still fire with it.

And the reason I keep saying basic weapon attack is because there are multiple ways you can reduce the action cost of a weapons attack with special abilities which spend different amounts of action points. More on this in a follow up guide.
Which types of cover there are and how to use it
When it comes to the cover system in Phoenix point it works very much like in every other similar game. Low cover offers partial protection while full cover offers much higher protection but only from specific directions and of course only from range attacked.
Melee enemies have no problems running up to your soldiers and clawing, biting or basing them behind cover. Low cover can be vaulted over reducing movement distance and also allowing for jumps over certain objects and between floors.

Additional info about the Cover system thx to u/lurkinglurkerwholurk from Reddit
In most modern XCom-clone games (semi-realistic turn based gunplay on a battle-grid), when there’s a 50%/100% cover system, what the game does is to decrease the calculation to hit the target in cover. The shooter shots becomes less accurate just because there’s a low wall that the target is right next to, for example, and if it’s a building corner instead the gun gets a lot of negatives to its to-hit.
Which makes sense as it “simulates” a guy crouched behind cover actively using it to avoid enemy fire.
But that also means that a 50% cover is no different from any other 50% cover, and a 100% cover made of a single column of concrete works the same way as a 100% cover behind a tricycle. No exceptions.
What also happens is that all these bonus magically goes away if the wall the target is crouching beside is on the other side from the shooter. Which also makes quite a lot of sense: from the other direction the target is completely out in the open, right?
Phoenix Point however uses the old-school XCom philosophy to shooting and cover, as used by some games with no small amount of nostalgia googles (such as Xenonauts), and it goes something like this: the accuracy of a shot has everything to do with the soldier and his gun, and nothing to do with the target. And “cover” is just everything in between the gun and where he hits.
What this means is, if a shot is calculated to hit, it WILL hit. If said shot is calculated to miss, as the XCom meme goes it will fly everywhere and manage to hit a friendly behind two windows and crouched beside a low wall…
But that’s only because due to the limitations of the past, both the “accurate”/“missed” shots and all the cover it is flying across are abstracted.
What the original UFO defense (and others) does is to make ALL your shots 100% accurate dead center/floor of that block… but for a “miss” the shooter is only aiming at the wrong block around/behind the target. And cover is merely some calculation on whether the bullet will hit terrain as it passes through, basically by using some calculation of how much the terrain “blocks” and occupies the square it is in and through that if it occupies space the bullet is passing through.
Everything is still abstracted. It’s just abstracted differently.
“But lurker,” I can already hear you say, “that’s not how it works!”
And you’re correct. Phoenix Point may be using the style of hit probabilities that older XCom games uses, but what it actually does in practice is very different: It uses a first-person-shooter engine to get rid of (most of) the abstraction.
Think towards your favorite first person shooter, whether it is Counterstrike, Overwatch, one of the many Battle Royals, etc. What does shooting and cover mean in those games?
Simple: if you can see it you can hit it, and cover is merely just a solid block of something in the way of your shot.
And that is what happens in Phoenix Point. The shooting cone/circle is the only abstraction you have to deal with, a randomness to represent inaccuracy. But once the bullet angle is decided, the bullet WILL hit what it is aimed at.
And that is also what the opponent does with THEIR shots.
This also means the 50%/100% cover you get in Phoenix Point is not like other game’s 50%/100% cover. Because what they do in PP is only this:
you crouch if you’re beside 50% cover, and get to stand up to shoot.
But if your unit is crouched beside one of the rusty street lamp pyramid bases (HATE those things) your soldier is still mostly exposed. Because that “cover” covers almost nothing.
you lean a little closer against the wall if you’re beside 100% cover, and get to step out to shoot.
But if your solid cover is a Synedrion wall corner (ALSO hate those things), because of how rounded those buildings are they cover a lot less from a lot more angles than you’d expect.
This means you have to think differently in how you approach cover (and shooting) in Phoenix Point. Here are some personal, IMO tips:
50% cover is actually stronger than 100% cover in a lot of situations, simply because your soldier CROUCHES. His hit profile becomes lower and smaller, and he is covered by more terrain around him, even those terrain behind him.
that said, 100% cover behind something really solid is just cheating (watch your back thou); your opponent can’t shoot what they can’t see…
… except when your soldier shoots at a target, he stands up/steps out from cover, and will be fully exposed to overwatch and counter fire shots. Plan accordingly. (Also, only standing up means his legs are still covered by the low cover, another plus point for 50% cover)
and last but not least, you don’t need to stand “in cover” to be in cover. Don’t hug terrain in a more disadvantageous spot just because the game’s UI marker says it has 50%/100% cover; you don’t actually get bonuses against enemy shots standing there. You can still hide behind an obstacle diagonally and some squares away from it if you know where the shots are from.
So, now that you know, you can now abuse cover with impunity, hiding in proper and secure spots as you laugh at how the opponent AI actually thinks the 50%/100% cover they picked (or somewhat less laughably, their shields) will actually save them even when those cover are actually full of holes and angles to shoot them with.
Then order your troops to 180 no scope their exposed asses… except most of your soldiers are TERRIBLE shots compared to every first person shooter games out there. Good luck.
The specifics of Basic and Free aim attack
Free aim is another advanced feature in this game and it allows you to choose which body part will your soldier target. While the basic attack is always at the torso, this way you can manually choose to attack other body parts like the head or extremities.
The main idea is to place the middle aiming circle on the part you want to attack because 50% of the shots will land in that area. The other 50% will land in the outside circle and this creates a problem if you are far away from the target because most of those shots won’t be on target, which is exactly why the base attack is always aimed at the torso as that is usually the largest or central part of any enemy.
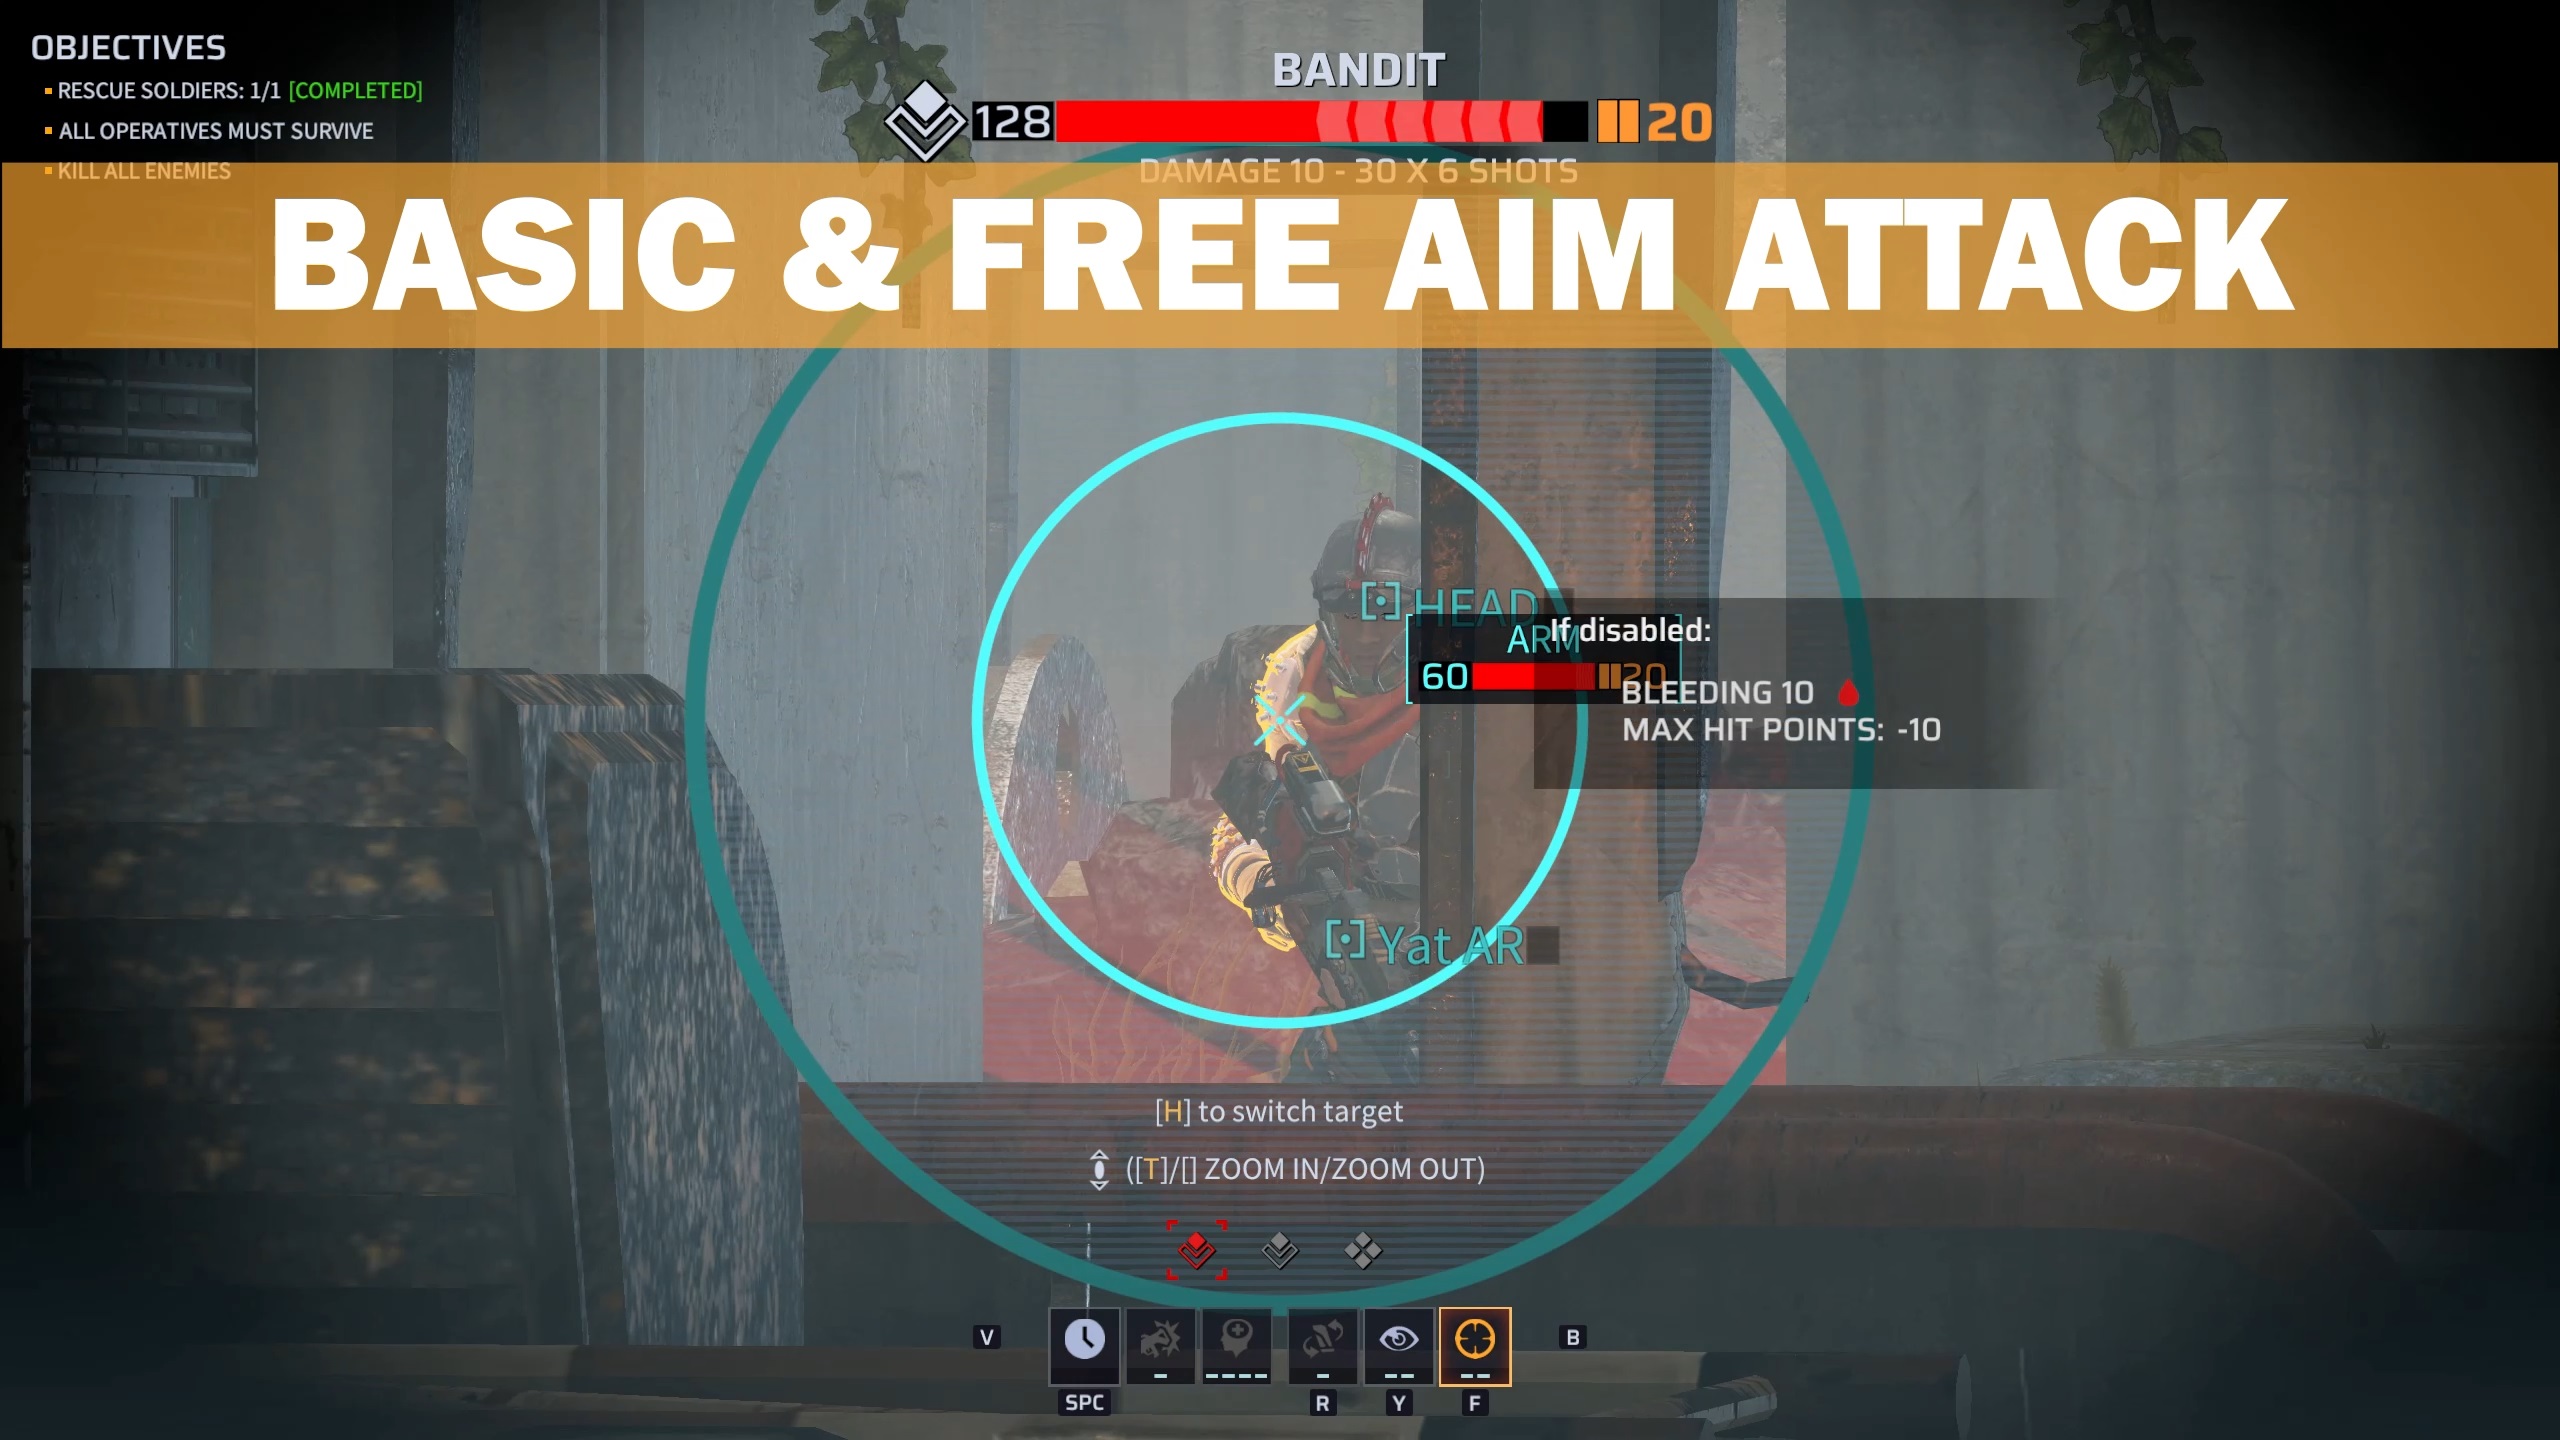
The thing to keep in mind is that every enemy has different strong and weak body parts. Some enemies are best shot in the arms to disable their attacks, some into the legs to slow them down and other to headshot for maximum damage. A nice trick you can use with Free aim is that when enemies are stacked close enough to each other you can target one but hit two or more with the shots which go into the outside aiming circle.
Another use for free aim mode to check for obstacles along the path to the enemy.
[credit to: Oxiras]
How ammunition reloading works
Now back to basics with another very important note. When you reload a weapon in Phoenix point you through away all the ammunition remaining in the old clip. There is no recycling of old clips in this game. This means you have to think before reloading.
Do you want to keep going on the ammo you have or throw away that ammo to have a full clip available. This adds to tactical thinking and inventory management and I personally love it!

Another point worth mentioning in reloading section is that ammo on your ‘hands’ cost no actionpoint to reload with while in backpack cost one. Yes, the tutorial do mention it but it worth reminding you about it.
[Credit to Oxiras for extra info]
Inventory management
Speaking of inventory management this is something you have to think about both in and outside of battles. Each soldier has the same limited inventory space while his maximum carry weight is based on his stats, this being mainly strength.
You can fill each soldier’s inventory to his maximum item capacity but if you go over the current weight maximum then the soldier will have a reduced combat efficiency because of it. There is a lot more I need to explain about inventory space and item usage but I will cover it in one of my next guides.

Use of vehicles in combat
Another subject the prologue covers is the use of vehicles in combat. Specifically the ground armored and armed vehicle called a scarab. It is capable of transporting up to 4 soldiers inside and has a powerful missile launcher for long-ranged artillery support.
This weapon has a limited ammo capacity which cannot be reloaded in battle. The area of effect is quite small because it fires only 2 unguided missiles for each attack. They do deal a lot of damage and destroy cover very effectively so even if they miss the main target they will often leave it exposed and out of cover.

Regarding vehicles there is no cost in action points to enter one with your soldier, this open up tactics with unload troops, shoot and hop back in again.
[Credit to Oxiras for extra info]
A cool tip here is that you can also just drive the vehicle straight through soft cover and break it down allowing your soldiers to take direct shots at enemies.
If you liked this guide or have any comments please tell me and I will make sure to add your ideas to next writeups.