100% Orange Juice Guide

100% Orange Juice | Modding Documentation for 100% Orange Juice

100% Orange Juice | Modding Documentation

Overview

A documentation on how to use, install, and create mods for 100% Orange Juice.

Welcome!

Welcome to this brand new guide which will guide you through the process of the installation and creation of various mods for 100% Orange Juice.

If at any time you have questions, you can refer in our Discord modding channel[discord.com], in the Workshop forum, or in this guide comment section.

You can get started at the section: First time preparations & Tips.

Check out mods on the Steam Workshop here: [link]

Legal Notice

Game resources described in these instructions may only be extracted and used outside of the game itself for the exclusive purpose of generating custom graphic mods for the game 100% Orange Juice. They cannot be used for any other purpose, or in any way that demeans the game or the characters, or hurts the rights of the copyright holder. It is the responsibility of all mod creators to obey local laws and respect trademarks.

Fruitbat Factory, Ltd. may announce further restrictions to the way these game resources may be used, or revoke the right to use these resources to create mods at will by posting an announcement about it on Twitter, Discord, Steam or other public venue and encrypting the listed graphic archives.

Before making any mod public, it is the responsibility of the creator to refer to the latest version of this document to make sure their mod is compatible with the current mod guidelines and use limitations.

Limitations

Unit and card textures alongside BGM, voices, and sound effect can currently be modified.

Textures are located in units, alphamasks, hats, hairs, and cards game packages. (Note: You can open those with any archiver software (7-Zip, WinRAR, WinZIP …).

Important notice: only files that are provided in unencrypted archives can be modified for the purposes of modding. In particular voice files can be replaced with custom voiceovers, but existing voice files may not be modified or reused in any way.

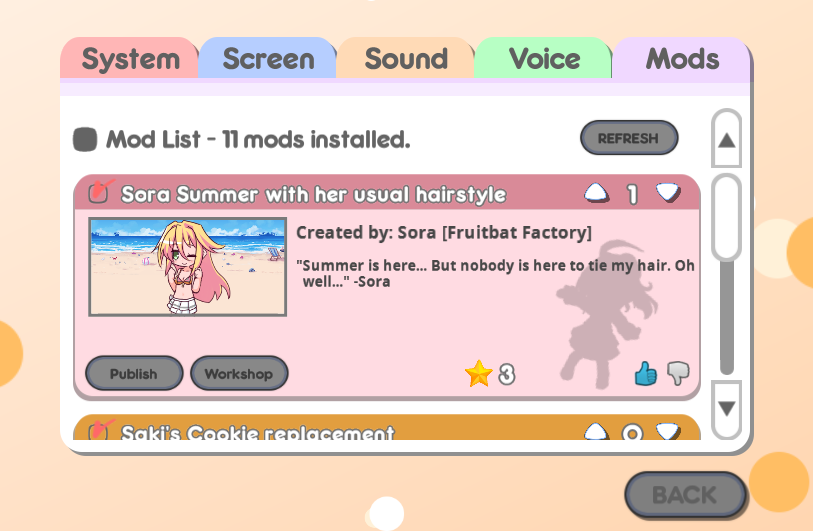
The result can be seen in the Config screen, in the newly added Mods tab.

System Version

Guide Updates

Here you can see the changes to the guide.

Date
Change
06.07.2021
Added 2 missing sound effect IDs.
05.07.2021
Added Lone Rider and Merchant. One new music event added.
04.05.2021
Added Cook and Halena.
24.03.2021
Added important notice in the Limitations tab.
26.02.2021
Added new unit IDs.
23.02.2021
Added sections for panels, homestops, and custom languages.
23.02.2021
Added a notice for Kiriko Miko costume modding.
23.02.2021
Updated music section with new events.
23.02.2021
Updated music section with a new parameter: volume.
25.12.2020
Added Chris and Kyupita.
08.11.2020
Added a new music event for the “Final Stage” music played in Tomomo’s Hell (campaign).
23.10.2020
Added Arnelle and Maynie, as well as a new music event.
06.10.2020
Updated “System voice filenames” section.
03.10.2020
Guide Updates section added.
02.10.2020
Small typo fixes.

===============================

First time preparations & Tips

Before jumping into making your mods, there is a few things you need to know.

The mods folder

A “mods” folder at the location of 100% Orange Juice’s executable is where you will put all your locally saved mods. You can find it by going in your Steam Library > Right clicking 100% Orange Juice > Properties > Local Files > Browse Local Files, then by moving to the “mods” folder.

To begin, create a new folder in “mods”. Give it any name. This is where you will place your assets.

Extract the game files

The modding system is all about replacements. You can extract our game packages that contains textures by navigating to the “data” folder in the game directory. From there you can open the following PAK files with any software capable to open archives:

  • alphamasks
  • cards
  • hats
  • hairs
  • units

You can extract their content somewhere on your computer to make it easier for you to search and browse through our assets.

As your mod need to point to a path that the game expects it, you must have a proper structure for your mod.

Structure

Your mod should be having this structure, if you want to replace the textures for Suguri for example:

100 Orange Juice | mods | your mod directory | units | suguri_00_00.png | suguri_00_01.png | suguri_00_02.png | suguri_00_03.png | suguri_00_04.png | suguri_00_05.png | preview.png | mod.json

Make up your mod definition

The mod definition file is how you will tell the game about what your mod should do and replace.
To begin, go to your mod folder, and create a new file named “mod”. Make sure that the file extension is JSON.

Here’s below an example you can use.

{ “ModDefinition”: { “name”: “Cuties Ft. Sora Alone”, “description”: “loved mod”, “author”: “Sora [Fruitbat Factory]”, “system_version”: 2, “changelog”: “Initial release.” }, “ModReplacements”: { “textures”: [ “units/cuties_00”, “units/cuties_01”, “units/cuties_02” ], “music”: [ { “unit_id”: “sorasp”, “file”: “music/grayhued”, “loop_point”: 796411 } ] } }

You can also checkout hexundev’s mod generator: [link]

To see the legacy way of making mod definitions, please refer to its dedicated section. But keep in mind it is recommended to stick with the new format!

The following guide sections will cover the explanation of the different modules you can use.

Mod Definition Section

This section is not compatible with the legacy version.

Parameter
Data type
Effect
Required
name
string
The name of your mod, used for display purposes in the mod list. This will also define the title for your Workshop item.
description
string
The description of your mod, used for display purposes in the mod list. This will also define the description for your Workshop item.
author
string
Who made this mod, used for display purposes in the mod list.
system_version
int
This always need to be defined and updated to the current supported version. If at any point the mod definition process changes drastically, you will need to update your definition in order to load the mod. Refer to the System Version section to know the current version.
contest
bool
Would this item be considered as a contest submission? The value can be either true or false. If not defined, the default value is false.
changelog
string
The latest changelog of your mod. It will appear as the change note when you update or submit your item to the Workshop.
color
string
Requires a hexadecimal color. This will modify the color of your mod box in the list. Not defining it will default to a orange color.

Mod Replacements Section

Note: Each replacements now have their own subsection. You will need a different array of data for textures and sounds for example.

You can combine multiple subsections in a single mod.

The following sections in this guide will bring more details about them.

Textures

The texture replacement array only require strings to the replaced paths.
This currently include:

  • alphamasks
  • hats
  • hairs
  • units
  • cards
  • field

Textures must be using the PNG format and have the same dimensions as the original texture.

To replace a texture in the game, you must place your file in your mod where it originally appear in the game files. For example, the texture for the neutral pose of Nico is located in units/nico_00_00.png. You must place your replacement in your mod at the same path in your mod folder, like this: 100 Orange Juice/mods/my mod for nico/units/nico_00_00.png.

Unit related texture size : 256×256
Card artwork texture sizes: 256×256 & 128×128 (need two versions.)
Homestop texture size: 256×256
Panel texture size: 128×128

The game will now handle simple paths as a complete set. This means you do not need to add paths for all poses in a specific color, accessory, hair, ect. in your mod definition file.

Example:

“textures”: [ “units/cuties_00”, “units/cuties_01”, “cards/cuties”, ]

For the game, all poses of Cuties default color & color 1 has been included in only 2 lines instead of 12.

Panel textures are an exception, since they are not part of a set. You can still use this method for them though.

For cards, it will also include automatically the 128 & 256 texture variant. Only the ID is necessary here. If you wish to add a custom name and flavor text, see advanced textures below. (Note: For cards, you only need to define it once, even if it is an advanced texture. It’s not the case for unit related textures.)

If you need to only include single files, and not enjoy the pleasure of auto-filling, you can rely on advanced textures with a special parameter. See below.

Advanced Textures

Advanced textures can have special parameters, such as Face Coordinates for units, or Custom Names & Flavor text for cards.
Face coordinates will change how a texture is centered when taking up the face of a unit. The most obvious example would be the in-game HUD.

Parameter
Data type
Effect
Required
path
string
Path to your texture.
face_x
int
X coordinate, from 0 to 256.
face_y
int
Y coordinate, from 0 to 256.
costume_id
int
The ID of a eventual costume. Not defining this parameter will default to no costume.
custom_name
string
Enforce a custom card name. Only works for card paths.
custom_flavor
string
Enforce a custom card flavor text. Only works for card paths.
single_file
bool
If this texture is a single unit-related file that shouldn’t automatically add all poses. Can be “true” or “false”. Default is false.

Face coordinates must be a position X & Y on the center of your unit’s face.


On the example above, my coordinates would be X116, Y129.

In our JSON file, it would look like this:

“textures”: [ { “path”: “units/alicianrone_00_05”, “face_x”: 116, “face_y”: 129 } ]

Costumes have their own coordinates. You can define a costume by their number identifier.
See the section about costumes to know which one is which.

“textures”: [ { “path”: “units/suguri_02_00_00”, “face_x”: 116, “face_y”: 129, “costume_id”: 2 } ]

This will add the coordinates X116 Y129 to Suguri Summer’s costume idle pose.

Advanced textures can be used alongside regular textures in one go just fine. So don’t hesitate to mix them as you need.

Only unit textures and card textures can be treated as Advanced textures. Hairs, accessories ect do not need it. You can simply define them for the default color, and set regular path for the unit color options.

Example:

“textures”: [ { “path”: “units/sora_00_00”, “face_x”: 125, “face_y”: 140 }, { “path”: “units/sora_00_01”, “face_x”: 123, “face_y”: 138 }, { “path”: “units/sora_00_02”, “face_x”: 122, “face_y”: 145 }, { “path”: “units/sora_00_03”, “face_x”: 126, “face_y”: 141 }, { “path”: “units/sora_00_04”, “face_x”: 124, “face_y”: 170 }, { “path”: “units/sora_00_05”, “face_x”: 125, “face_y”: 137 }, “units/sora_01”, “units/sora_02”, “units/sora_03”, “units/sora_04”, “units/sora_05”, “hairs/sora_b00”, “hairs/sora_h00”, “hairs/sora_m00”, “hairs/sora_s00”, “hats/sora_00”, “hats/sora_01”, “hats/sora_02”, “hats/sora_03”, “field/homemark_00”, “field/mass_bonus0” { “path”: “cards/cookie”, “custom_name”: “Sora’s cookie”, “custom_flavor”: “You’re not the only one who enjoy cookies… ―Sora” } ]

Note about Kiriko Miko costume
As the naming it uses is unique, you can only rely on using advanced textures with the “single_file” parameter.

Music

The music replacement array require a few parameters described below.
Music must use the OGG format.

Parameter
Data type
Effect
Required
unit_id
string
The unit ID which will have its theme modified.
event
string
Define a specific event to trigger this music on. See below for more details.
file
string
Path to your music file. It can be in any directory. Do not include the extension.
loop_point
int
If you wish, you can set a loop point, by the number of samples. It will play the whole music once, then rewind to the loop point. To get the amount of sample you need, you can use Audacity for example. If this is not defined, it will always read your music from start to end.
volume
int / double / float
An additional volume gain or reduction will be applied. Numbers you seek would be around -20 to 20.

Example:

“music”: [ { “unit_id”: “sorasp”, “file”: “music/grayhued”, “loop_point”: 796411 } ]

Events

Events can be defined to affect a music to a specific place. You cannot have both a event and a unit_id defined in a single entry, however. If a unit_id is specified with an event, the unit_id parameter will be prioritized.

The list of events can be found below.

Event identifier
Where is it played?
main_menu
The main menu music.
standby
The music played when waiting in a multiplayer lobby, or on the campaign screen.
dialog1
A music played in dialogs, often when a campaign or event starts.
dialog2
A music played in dialogs.
dialog3
A music played in dialogs, battle themed.
conclusion
A music played in dialogs, often when you reach the end of a campaign or event.
ending1
A music played in the credits roll.
dialog4
A music played in dialogs, in the campaign of Arthur and Nico.
final2
A music played in dialogs, in the campaign of Arthur and Nico.
ending2
A music played in the credits, actually only used when you finish Arthur and Nico’s campaign.
idol_duet
A music played when Cuties use their hyper.
idol_instrumental
A music played when a unit that is not Cuties or Poppo use the Special Stage hyper.
idol_poppo
A music played when Poppo use the Special Stage hyper.
dialog5
A music played in Mio’s campaign. It’s the default dialog song.
dialog6
A music played in Mio’s campaign. It’s Kai’s appearance song.
ending3
A music played in Mio’s campaign. It’s the credits song.
tomomo_sweeteater
A music played when Tomomo (Casual) plays her hyper.
maynie_ragingmode
A music played when the Raging Madness hyper is active.
finalstage
Tomomo’s Hell music, played in the campaign.
field_wintertown
Beginner Town (Winter) Intro Music
field_desert
Lonely Railway Intro Music

Example:

“music”: [ { “event”: “standby”, “file”: “music/menu”, “loop_point”: 614400 } ]

The lobby music will be replaced that way.

Voices

Voice replacement mods require either of these 2 parameters, depending on which types of voices you want replaced:

  • character: Array of paths that files to replace character voices will be attempted to be loaded from.
  • system: Array of paths that files to replace announcer voices will be attempted to be loaded from.

Before loading the sound files from the .pak, the game will try to find files in the paths listed here and attempt to load those instead.

Format example:

“voices” : { “character”: [ “voice_cha_qp”, “voice_cha_suguri”, “voice_cha_kai” ], “system” : [ “voice_sys_suguri”, “voice_sys_kai” ] }}

If you want to only replace Kai’s system voices, it’d look like this:

“voices” : { “system” : [ “voice_sys_kai” ] }}

That’s cool, but what do I place in these folders?

The files that are meant to be in this folder also have to match with what the game’s expecting. The “Dice roll 1” voice line file is named “0_0.wav” (required filenames listed below), so the sound you want to replace the voice line with must be named the same and be located in the character folder you want to replace the voice of. The same also applies to system voices. For best results, make sure your sound files have a 44100Hz sampling rate.

Here’s a folder structure example of a mod replacing QP’s Dice roll 1 and 4 voice lines, along with her “100% Orange Juice” and “Warp” announcer voices:

cute qp mod (Folder name) |__ voice_cha_qp |____ 0_0.wav |____ 0_3.wav |__ voice_sys_qp |____ title.wav |____ warp.wav |__ mod.json

For information on how to name the files, check out the Character voice filenames section.

Character Hair Color

The character hair color replacement array will only accept arrays of data.
You have several techniques of hair coloring to choose from:

  • texture : Rely on a external texture to draw the hair.
  • singlecolor : Define a base, shadow, and additional color to draw the hair.
  • gradient : Define a base, secondary, shadow, and additional color to draw the hair.

The module only read the following parameters:

Parameter
Data type
Description
Required
unit_id
string
The unit ID that will have its hair data changed. See the Unit ID section of this guide to know about them.
hair_color
int
The hair color number to change. It can be from 1 to 12.
technique
string
The technique of hair drawing to use. See above for a list.
base_color
string
An hexadecimal color value. If not defined, it will default to white.
secondary_color
string
An hexadecimal color value. If not defined, it will default to white. It’s only used with the gradient technique.
shadow_color
string
An hexadecimal color value. If not defined, it will default to RGB: 128, 50, 50.
add_color
string
An hexadecimal color value. If not defined, this color won’t be added.

You can also specify an alpha value for your color:
#ff000000 : ARGB (255, 0, 0, 0)
#000000 : XRGB (0, 0, 0) (the alpha is always 255.)

Texture

Textures do not need any specific parameter. You’ll need to include your texture in the dedicated module (see the earlier section Textures) by following our naming:

Example:
hairs/sora_00_00 : It will change the hair color 1 of Sora’s idle pose.
hairs/sora_02_00_00 : It will change the hair color 1 of Sora’s Summer costume idle pose.

Note: Even if the hair color file is not present in the official files, you can still define yours to be read by the game. As long the name of the file is the same as what the game is expecting, you’re all set.

JSON example:

“hair_color”: [ { “unit_id”: “sora”, “hair_color”: 3, “technique”: “texture” } ]
Single Color

The single color technique depends on the base color you’ll define to draw the hair.

JSON example:

“hair_color”: [ { “unit_id”: “sora”, “hair_color”: 1, “technique”: “singlecolor”, “base_color”: “#000000”, “shadow_color”: “#ff0000” } ]

Gradient Color

The gradient color technique depends on the white & black hair textures to draw the hair. The base color being the black part, and the secondary color being the white part.

JSON example:

“hair_color”: [ { “unit_id”: “sora”, “hair_color”: 2, “technique”: “gradient”, “base_color”: “#000000”, “secondary_color”: “#ffffff”, “shadow_color”: “#ff0000” }, ]

The hair textures used when using gradients or single colors are the following:

For Alicianrone (applies to all units)

  • hairs/alicianrone_b00_00 (base color)
  • hairs/alicianrone_h00_00 (hair highlight)
  • hairs/alicianrone_m00_00 (gradient)
  • hairs/alicianrone_s00_00 (shadow)

Sound Effects

To add a custom sound simply create an entry in ModReplacements with the name sound_effects. This is a list of the sound effects your mod is replacing. These sounds must be in a folder named sound in your mod’s root directory. For best results, make sure your sound files have a 44100Hz sampling rate.
Below is an example definition in your mod.json file:

“ModReplacements”: { “sound_effects” : [ “cancel.wav”, “cardget.wav”, “decision.wav” ] }

This suggests that your mod folder structure should be something like this:

poppo mod (Folder name) |__ sound |____cancel.wav |____cardget.wav |____decision.wav |__ mod.json

What will this do? This will replace the “Player selects something”, “Player cancels a selection” and “Card get” sound effects with whatever these files are. A list of all the sound effects used is located at the end of the guide, so you can use that for reference whenever you need it.

Custom Languages

The Custom Language array only take one member called “directories”.

{ “ModDefinition”: { “name”: “French Jus d’Orange”, “description”: “This mod add the french localization.”, “author”: “Sora”, “system_version”: 2 }, “CustomLanguages”: { “directories”: [ “french” ] } }

Your mod structure should look like this:

French Jus d’Orange (Folder name) |__ french |_____<define, font files, etc> |__ mod.json

You need to put the directory name with all the define files inside your mod folder, and set the name under directories.
You can include multiple languages, and you can mix this module with other ones (textures, music replacements…)

This will add the “french” custom language along all the included font files.
For existing translations, it will only be a matter of moving your folder to a dedicated mod folder and copy pasting the JSON code above.
For new translations, you can refer to the file located here: 100 Orange JuicelanguageCustomLanguages.txt to get started.

===============================

Customized Preview

You can include a customized preview with your mod.
This is a requirement if you wish to publish your mod to the workshop.

Create it at the root of your mod’s directory, named preview.png.

The preview should preferably be following a 16:9 aspect ratio, and use the PNG format. It will automatically be read if the game detects the file, so there is no need to do anything else!

The preview must be less than 1 MB in size to be uploaded to the Workshop.

Submit your mod to the Workshop

In order to send your mod to the Steam Workshop, you must ensure the following conditions are fulfilled:

  • Your mod definition file must use the JSON format.
  • Your mod must have a valid preview. Jump to the Customized Preview section of this guide for more information.

Once the conditions are met, you can then jump in-game and click the Publish button.

If any error during the upload occurs, a message will show up giving more details.

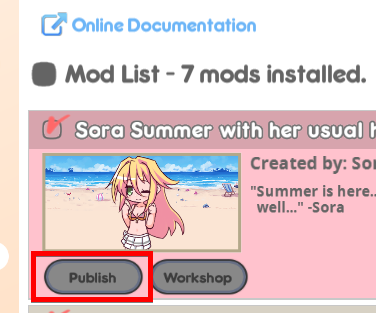
Once the mod is done uploading, you’ll be redirected to the page of your workshop item, ready to be used for everyone.
Note that all submitted items have their visibility set on public by default.

Contest Participation

In order to participate in our official contests, you’ll need to declare the flag

“contest”: true

in the mod definition, alongside the other required parameters.

Doing so, you will have to ship all the assets required in your mod folder.
Once your folder is ready, hop in-game and publish, like any mod.

Note: When no contest are available, or if time ran out, you won’t be able to send or update any item.

Tip: As it is considered a mod, you can treat your entry as it was one and have users subscribe to it so they can have a direct preview of your entry in their game.
Placeholder cards will be added in the in-game binder when a contest is up and running.

Please make sure to include full resolution artworks in the submission folder, even if the mod won’t read them.

===============================

(Legacy) Mod definition

This method is discontinued!

To make your first mod, you need to create a new folder in “mods”, which will be your mod’s name.

Inside this folder, you will need a mod definition file, called mod.txt. The content should follow this format:

< MOD_NAME > The Cuties, but Sora is alone < MOD_DESCRIPTION > This mod made Sham quite upset. < MOD_AUTHOR > Sora [Fruitbat Factory] < MOD_AUTHOR_CONTACT > [link] < MOD_REPLACEMENTS > units/cuties_00_00 units/cuties_00_01 units/cuties_00_02 units/cuties_00_03 units/cuties_00_04 units/cuties_00_05

This syntax is the same as a localization define file.
Make sure the encoding of this file is UTF-8.

Here’s a quick recap of what those values means:

< MOD_NAME >*
The name of your mod.
It can be different from the folder’s name, and is only used for display purposes.
< MOD_DESCRIPTION >
The description of your mod.
< MOD_AUTHOR >
Your name!
< MOD_AUTHOR_CONTACT > (Facultative)
A way to contact you, steam profile link, e-mail…
< MOD_REPLACEMENTS >*
These should be all file paths that you want to replace with your own texture (omitting file extension.)

*Those values must be added in your mod.txt. If they are missing or having bad data, your mod might not be loaded by the game.

Only textures can be modded with this method.

===============================

Avoid JSON errors!

In order to be loaded, you must make sure your JSON file can be fully parsed. If there is any error, the game will not load your mod.

You can use the following website to check your data:

[link]

It will as well highlight the potential issues if there is any.

Alphamask Helper

In order to make the modding process more easy for you, here below are a few helpers to figure out for example what file is what, due to our naming using identifiers.

#
Alphamask
00
Pumpkin head, no xmas outfit, applied to body + hair
01
Pumpkin head, with xmas outfit, applied to body + hair (only hair if default color)
02
Pumpkin head, with xmas outfit, applied to the actual pumpkin head (used for Krila due to her doll)
03
Xmas outfit, non default hair color applied to the hair
04
Crowns: body + hair
05
Xmas hats: body + hair
06
Halloween costume: body + hair
07
Halloween costume 2017: body + hair
08
Xmas 2017 (Rein Kigurumi): body + hair
09
School Crashers: hair
10
Halloween 2018 costumes (Leo Kigurumi): body + hair
11
Halloween 2018 costumes (Trick & Treat): body + hair
12
Santa scramble costumes
13
Pigformation
14
RPG Costumes 2019
15
Miusaki volleyball – Festa Junina – QPD Sundress
16
Halloween 2019 costumes (Operation Halloween)
17
Summer 2020 (Yukata costumes)

Unit IDs

You can find below our internal names for units.

Name
Unit ID
Alicianrone
alicianrone
Alte
alte
Arnelle
arnelle
Arthur
arthur
Aru
aru
Aru (Scramble!)
arus
Robo Ball
ball
M10 (Coop Boss)
bball
Big the Haruo (Coop Boss)
bchicken
Turnislime (Bounty Hunt)
blob
Poppo (Boss)
bpoppo
Summer Beast (Coop Boss)
bqp
Shifu Robot
brobo
Flying Castle
castle
Ceoreparque
ceor
Chicken
chicken
Chris
chris
Cook
cook
Cuties
cuties
Cuties (Sora, different due to separate hair color options)
cuties_sora
Haunted Doll (Bounty Hunt)
doll
Ellie
ellie
Fernet
fernet
Moss Golem (Bounty Hunt)
golem
Star Devourer (Coop Boss)
gpoppo
Halena
halena
Heliseed (Bounty Hunt)
heliseed
Hime
hime
Halloween 2019 Pumpkin
hw2019pumpkin
Iru
iru
Islay
islay
Kae
kae
Kai
kai
Kiriko
kiriko
Krila
krila
Kyousuke
ksuke
Kyoko
kyoko
Kyupita
kyupita
Bunnizard (Bounty Hunt)
lizardit
Lone Rider
lonerider
Lulu
lulu
Marc
marc
Marc (Pilot)
marcpilot
Manager
master
Maynie
maynie
Mei
mei
Merchant
merchant
Mimyuu
mimyuu
Mio
mio
Mira
mira
Miusaki
miusaki
Mousse (Bounty Hunt)
mpoppo
Nanako
nanako
Nath
nath
Natsumi
natsumi
Nico
nico
NoName
non
Poppo (Mixed)
npoppo
Peat
peat
Poppo
poppo
QP
qp
QP (Dangerous)
qpd
Ropochi
ropochi
Saki
saki
Seagull
seagull
Big the Jonathan
seagullboss
Sham
sham
Sherry
sherry
Sora
sora
Sora (Military)
sorasp
Star Breaker
starb
Suguri
suguri
Suguri (46 billion years)
suguri46
Suguri (Ver. 2)
sugurib
Sumika
sumika
Sweet Breaker
sweetb
Syura
syura
Teotoratta
teotoratta
Pirate Crew Minion
teq_minion
Tequila
tequila
Tomomo (Casual & Sweet Eater)
tmsw
Tomato
tomato
Tomomo
tomomo
Trollite
troll
Tsih
tsih
Yuki
yuki
Yuki (Dangerous)
yukid
Yuuki
yuuki

The Harbinger
evilguardian
Guardian
guardian
Wolly
fluff
Terrawyrmer
snek
Ruffshroom
shroom
Gost
ghost
Emerangler
mole
Globbu
magma
Aurora
fae

Card IDs

You can lookout for the great guide written by Zomoroko:
[link]

Character voice filenames

This list is to help with naming sound files for replacing character voices. Use the prefix with an underscore and then the variation of the line (starting the count from 0) to name the file, you can use the in-game Gallery section for help.
For example: Replacing Warp 3 would need a file named 10_2.wav and replacing Drop panels 4 would need a file named 21_3.wav

It’s important to note that entries marked with * only have one variation, and replacing subsequent lines require changing the prefix. For example: The sound replacement for Special Line 3 needs to be named 52_0.wav.

Prefix
Usage
0
Rolling dice
1
Use card
2
Trap card
3
Battle card
4
Hyper card
5
Revived
6
Revive failed
7
Attack
8
Effect Damage
9
Healing
10
Warp
11
KO
12
Challenging enemy
13
Being challenged
14
Attack in battle
15
Damage
16
Major damage
17
Evasion
18
Winning a battle
19
Losing a battle
20
Bonus panels
21
Drop panels
22
Stepping on a trap
23
Encountering a boss
24
Star Norma
25
Win Norma
26
Selecting character
27
Game starts
28
Winning games
29
Obtaining new stuff
30
Unused
31 to 45 *
Generic Line
46
Enemy Hyper
47
Alternative Version Hyper Card
50 and onwards *
Special Line

System voice filenames

Below is the list of system/announcer voice sound files that can be replaced. Just name the sound file you want to use accordingly.

Filename
Usage
1.wav
Unused
2.wav
Unused
3.wav
Unused
4.wav
Unused
5.wav
Unused
6.wav
Unused
battle.wav
Battle start if no character voice was played
bonus.wav
Bonus roll
check.wav
Norma check
connected.wav
Connected to lobby
connectfailed.wav
Failed connecting to lobby: Generic error
connecting.wav
Chose a lobby to connect to
draw.wav
Card draw, Playground! Draw 2 reward
drop.wav
Drop roll, Playground! Drop penalty
fruitbatfactory.wav
Unused
ko.wav
Unused
lobbyfull.wav
Failed connecting to lobby: Lobby is full
move.wav
Move panel
newitem.wav
Unused
norma1.wav
Level 1 Norma clear
norma2.wav
Level 2 Norma clear
norma3.wav
Level 3 Norma clear
norma4.wav
Level 4 Norma clear
norma5.wav
Unused
norma6.wav
Final Norma clear
ojandfbf.wav
Orange Juice & Fruitbat Factory splash screen
orangejuice.wav
Unused
player1.wav
Player 1 turn start
player2.wav
Player 2 turn start
player3.wav
Player 3 turn start
player4.wav
Player 4 turn start
playerjoin.wav
A player has joined the lobby
playerleft.wav
A player has left the lobby
revive.wav
Unused
shindenken.wav
Shindenken splash screen
skip.wav
Player’s turn was skipped
start.wav
Unused
stop.wav
Player actives Immovable Object’s effect
title.wav
Title screen
trap.wav
Trap card activated
warp.wav
Warp panel, Playground! Warp reward
warpmove.wav
Warp-move panel
win.wav
Battle win if no character voice was played

Costumes IDs

You can find below the costumes identifiers.

#
Costume
0
No costume.
1
Suguri & Hime Winter costume
2
Summer 2018 Bikinis costume (Suguri – Sora – Hime)
3
Pig chibi costume
4
Summer 2019 Bikinis costume (Marc – Fernet – QP)
5
Star Devourer Poppo costume
6
Kiriko Miko
7
Kiriko Miko (Original)
8
Mousse costume
9
Tan QP costume
10
Summer 2020 Bikinis costume (Saki – Kae – Nath)

Sound effect filenames

Below are the sound filenames the game attempts to load along with a brief description of where they’re used in-game. Just add one to your mod’s sound folder under any of the filenames of the sound you want to replace.

Filename
Usage
decision.wav
Player selects something
cancel.wav
Player cancels selection, going back in a menu
page1.wav
Scrolling through pages (Forward)
page2.wav
Scrolling through pages (Backward)
trapset.wav
Trap card set
cardget.wav
Card obtained
carduse.wav
Using a card
traptrigger.wav
Trap card has been activated
powerup.wav
Battle boosts, fireworks, dialogue
healing.wav
Recovering HP
ko.wav
Unit has been KO’d
throw.wav
Throwing dice
normaclear.wav
Norma has been cleared
normamiss.wav
Norma clear conditions weren’t met
chapterstart.wav
Chapter start
star.wav
Obtaining a star
hit.wav
Battle light hit
warp.wav
Warp
turnstart.wav
Player turn start, countdowns
rebound.wav
Dice bounce
encounter.wav
Battle start
miracle.wav
Miracle
miracle2.wav
Revival of Stars, Lulu’s Lucky Egg, Arcade animations
discard.wav
Card discard
stockeffect.wav
Stock effect applied
win.wav
Win a game
alert.wav
Boss appears on the field
battlewin.wav
Either side wins or flees from a battle
criticalhit.wav
Battle strong hit
evasion.wav
Battle evasion
cannon.wav
Explosions, Marc’s rockets
blaze.wav
Blazing!, bomb explosions, hand discards
status1.wav
Battle status effect
status2.wav
Battle status effect
chain.wav
Binding Chains
airraid.wav
Air Raid field event
shield.wav
Battle star-guard, several card effects
electricity.wav
Turbo Charged, Delta Field
sugurihyper.wav
Hyper sound from SUGURI series
lockon.wav
Bomb ticking, Extended Photon Rifle’s and Rocket Cannon’s animation
qps_damage.wav
Summer Beast KO, Workshop Mod downvote
synth-sweep2.wav
Melting Memories’ animation
synthsweep_wind.wav
Cutscene
propeller.wav
Cutscene, Rival’s and Rocket Cannon’s animation
wind.wav
Cutscene
qps_hyper.wav
Melting Memories’ animation, cutscenes, Arcade
synthsweep_new.wav
Extension, Lulu’s Lucky Egg
item_get.wav
Getting chocolate or snow from panels
cardflip1.wav
Playground! minigames, flipping a piece in Build-A-Castle
cardflip2.wav
Playground! minigames
crash.wav
Cutscene
crash2.wav
Cutscene
destruction.wav
Cutscene
schoolchime.wav
Cutscene
se_quake.wav
Cutscene, Unforgiving Avenger
se_sea_waves.wav
Cutscene
wind2.wav
White Christsmasher’s animations
food_crunch.wav
Cutscene
gulp_once.wav
Cutscene
gulp_3times.wav
Cutscene
phone.wav
Cutscene
sms.wav
Cutscene
jingle01_full.wav
Cutscene logo
jingle01_short.wav
Unused
throw01.wav
Snowball throwing
throw02.wav
Snowball throwing
throw03.wav
Snowball throwing
snowball_ground01.wav
Snowball land
snowball_ground02.wav
Snowball land
snowball_ground03.wav
Snowball land
lighter.wav
Cutscene
laser.wav
Extended Photon Rifle’s animation
clang.wav
Metallic Monocoque’s effect
launch.wav
Indiscriminate Fire Support’s and Rocket Cannon’s animation
missilehit.wav
Indiscriminate Fire Support’s animation
place_cup.wav
Cutscene
sip.wav
Cutscene
pour_water.wav
Cutscene
explosion.wav
Cutscene, Bounty Hunt smoke bomb
ags_weaponattack.wav
Full Speed Alicianrone’s animation
ags_weaponswing_1.wav
Full Speed Alicianrone’s animation
ags_weaponswing_2.wav
Full Speed Alicianrone’s animation
ags_weaponswing_3.wav
Full Speed Alicianrone’s animation
ags_weaponswing_4.wav
Full Speed Alicianrone’s animation
ags_whoosh.wav
Full Speed Alicianrone’s animation
fishsplash.wav
Splash from Fish-a-Fish minigame
se_fire.wav
Cutscene
cicada_short.wav
Cutscene
mudblup.wav
Step on a Goo panel
trainpass.wav
Unused.
motorcycle.wav
Lone Rider Hyper
SteamSolo.com