
Overview
Takes you through the process of setting up an Empyrion server with Game Server Manager – which automates things & provides a host of useful tools & features to make setting up & running your server easier.
Summary
This guide differs from others you may have read because of one important factor: the Game Server Manager program. This program automates things for you as a server owner and provides a host of useful tools and features to make setting up and running your server so much easier.
Game Server Manager features – an overview
– Automatic update checking and applying via SteamCMD (with configurable delay and server warning message)
– Players online graph
– Built-in Telnet and RCON client, which can be used manually or set to automatically send messages and commands (such as shutdown and shutdown notices) to the server
– Auto-restart if server goes down
– Message/command broadcast system
– Discord message broadcasting for server state and player changes.
– Player list showing everyone online, including ping, score, team and time online.
– INI File Parser, which displays a list of all ini file settings (across multiple files) in a list that you can sort, filter, edit, import and export as you wish.
– CPU and RAM usage display, with graph
– Network bandwidth monitor, with graph
– Ability to output status, players online and server name to a file – formatted however you want
– Single-click access to configuration.
– Detailed server information
– Internal and external IP address display
– Server up-time display
– Optional timed daily server restart.
– Timed incremental backups. Perform a daily backup of game data to a zip file.
– Automatically update game – Ability to run a maintenance / update program between restarts. e.g. SteamCMD to perform daily updates automatically. The server will start back up again when this program finished / ends so you minimise downtime.
– Option to delay timed restarts. i.e. The server will be turned off and the program will wait X seconds before attempting to restart it.
– Telnet to server
– 1 click backup and maintenance
– Remote commands to start, stop, backup, update and send commands to your server.
– Game Profiles – Multiple instances of the program can be run with multiple configurations.
– Designed to be “universal” and work with a multitude of games.
Initial Setup
It probably goes without saying that you first need to download the game. If you haven’t, do that now! You can do that via the main Steam GUI (under the tools section, since the dedicated server files are seperate from the main game) or using SteamCMD and the “app id” 530870.
I should also add that you will need to forward the following ports (usually performed from your router’s admin page):
30000-30004 UDP and TCP
These are the default ports. If you alter them then don’t forget to alter the port forwarding rules as well.
Remember, if you are hosting a game on your LAN only then port forwarding is not required. If you wish other users to join over the internet or get your server listed in the main server list then this will need to be performed.
If you alter the game port then do not forget to update your port forwards to match. You need to forward the game port + the next 4. E.g. If your game port is 29600 then you need to forward 29600, 29601, 29602, 29603 and 29604.
Head to this [www.jimbobslimbob.com]website to download my Game Server Manager[www.jimbobslimbob.com] program.
Extract the zip file to a location of your choosing and run the program.
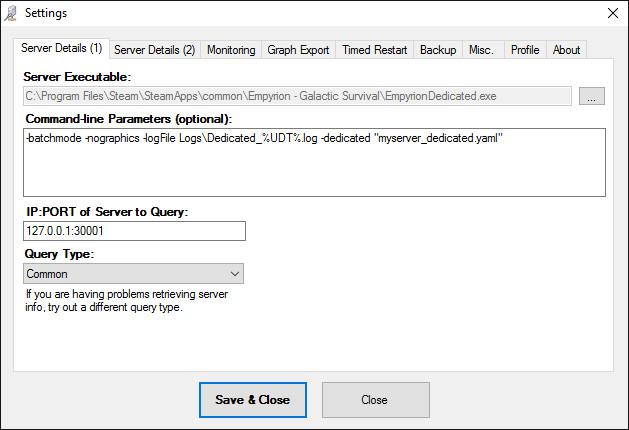
Upon opening the program you will be asked the location of your server executable file. In this case, it is “EmpyrionDedicated.exe“. This is normally found in “C:Program Files (x86)SteamsteamappscommonEmpyrion“. if you installed the game to a different location, simply locate the required file from there.
No GUI:
GUI Version
There is more information on additional command-line arguments on the official Wiki page[empyrion.gamepedia.com].
To get the program to correctly query it, enter the IP address of the server and the query port in the relevant field. If you are running your own server this would normally be “127.0.0.1:30001“. If you have altered the default ports, you may need to do so here as well. The query port is 30001 by default. If you alter the game port then the query port will be the game port + 1.
Tick “Detect via query” in the “Monitoring” tab if you want the status of the server to be detected by a server query, rather than seeing if the program is running (recommended with Empyrion).
Further server configuration, such as the server name, password, max players etc. are all stored in the “yaml” (dedicated.yaml by default) file, which you can edit with a program like Notepad. It is worth making a copy of this file and calling it something else, then adding “-dedicated “xxx.yaml”” (where xxx.yaml is the name of the copy) to the command-line parameters. Failure to do this can result in the file being overwritten with updates.
Tip: It can be handy to set the server configuration file in the program’s settings via Server Details > Server Config File (optional) to allow you quick access to it via Game Server Manager.
You should then be good to go.
General Use
To start the server simply click on “Start Server” on the “Main” tab. To stop the server, use the button next to start.

It is recommended that you tick “Check server status, every” in the “Monitoring” tab under settings. You may want to increase the interval at which the check is performed if your server takes longer than 10 seconds to be “ready”. This actively monitors the server and updates the “Main” and “Players Online” tabs and gives you access to the following:
- Automatically restarting the server if it goes down/crashes
- Players online graph
- Performance (RAM and CPU) graph
- Network bandwidth graph
- Ability to output the status to a file (to share or embed, for example)
If you want to set up quick access to your server config file (normally “dedicated.yaml” by default), go to Server Details (2) tab under “Program Settings” and select it as your server config file. You will then be able to access the file at any time by going to the “Settings/Tools” tab of the main screen and clicking “Server Settings“.
If you want to set up quick access to telnet then you must first set your “putty” (Telnet) executable under the “Misc” tab of the “Program Settings” screen. Then head to “Server Details (2)” and enter your telnet port in the relevent field. You can download a free copy of Putty here[www.chiark.greenend.org.uk]. You will then be able to Telnet to the server at any time by going to the “Settings/Tools” tab of the main screen and clicking Telnet to Server.
Setting Up The Built-in Telnet Capabilities
Empyrion can make use of the built-in Telnet features of this program in several ways:
– It can use the command “saveandexit 0” to shutdown the server
– It can send messages to players on the server before a timed restart (10, 5 and 1 minute before)
– It can log and export Telnet data on the fly
– It can be used to quickly send Telnet commands to the server
To set this up you must ensure the relevant configuration options are enabled in the server settings file, namely:
You must remove the “#”‘s to enable the feature and restart the server. Change the password to something unique to avoid anyone logging in and messing with your server.
Remember that whenever an update is performed, the default configuration file is overwritten. Hence, it is a good idea to make a copy of the configuration file and launch the server with the additional command line “-dedicated “xxx.yaml””, where xxx.yaml is the name of your personal server configuration.
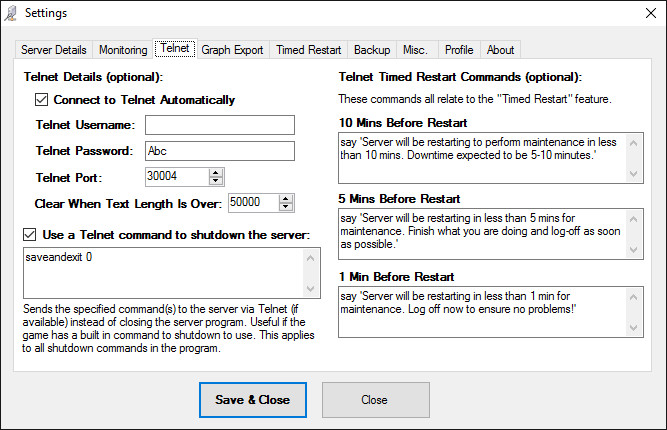
Once it is all setup, you should be able to connect to the server via the “Telnet” tab on the main screen. You can alternatively set the program to automatically connect when it sees the server is online.
For a full list of Empyrion Telnet commands, please see here[empyrion.gamepedia.com], under “Server and Console commands”.
Backing up game data [Optional]
The program has a built in incremental backup system for game files. To use this you must set up the locations first.
Go to “Settings/Tools” and click “Program Settings“. Navigate to the “Backup” tab. Click the button to the right of “Folder to backup” (“…”) to browse for the Empyrion gamedata folder.
The default folder for Empyrion game data is “C:Program Files (x86)SteamSteamAppscommonEmpyrion – Galactic SurvivalSavesGames<game name>“.

Next set the location that you want the backups to be saved to in the box below.
Optional: if you want the program to automatically backup game data daily, you can set the relevant option in this screen. Simply tick “Backup data, at” and enter a time (24-hour clock).
You can then manually perform a backup by clicking “Backup Game Data” under the “Settings/Tools” tab.
Updating and timed restarts [Optional]
The program has a built in feature to restart a server at a specific time of day. This can be found in the “Timed Restart” tab under the program settings.
Set up the time you want this to be performed and tick the “Timed restart, at” tickbox if you want to do this.
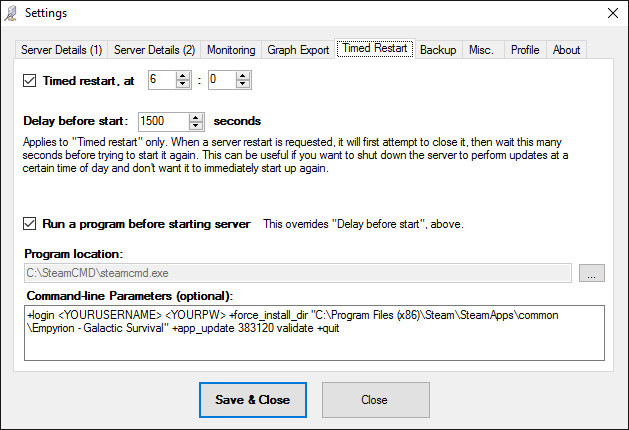
Even if you do not wish to set a timed restart, you can still make use of this screen. By selecting a program and entering any optional command line parameters in the “Run a program before starting server” section, you can enable updating the server – either manually or automatically.
For example, if you use SteamCMD to update your game, select the SteamCMD executable here and enter any command line details in the relevant box (e.g. “app_update 530870 validate” – to update Empyrion). More information on SteamCMD in the next section
Once this is set, you now have the option to perform this action on timed restarts. Great huh? It will do it all for you!
You can then also use “Run Maintenance Program” under the “Settings/Tools” tab to run this program manually at any time.
Additional tip: if you have also set a backup location you can use “Perform Maintenance Now” under the “Settings/Tools” tab to perform the following sequence:
1. Back up game data
2. Stop Server
3. Run the “maintenance” program
4. Start the server back up again.
Using SteamCMD to update your game [Optional]
NOTE: As of v4.0, the server files are separated from the main game, under the appid “530870”, not “383120”
Regardless of whether you installed the game via the Steam client or some other method, you can still use SteamCMD to update Empyrion. As long as you point SteamCMD to the location of your Empyrion installation, it will update it from there.
Download SteamCMD from here.
Head to the “Program Settings” and navigate to “Timed Restart” tab. Select the SteamCMD executable under “Program Location”. Next, you need to tell SteamCMD what game we are updating – and where it is. To do this, we can add a number of commands in the command-line parameters field. Here are some of the ones you may need to use (put spaces between seperate commands – and omit any < and > shown in the commands):
+login <username> <password>
This will log you into Steam and allow the game to be downloaded.
Please note: The first time it is performed on the machine, you may need to enter a “Steam Guard Code” before being allowed access. This is Steam’s additional security layer where it will send you an e-mail with a code to input. Input it when prompted by SteamCMD.
+force_install_dir “<path>”
Tells SteamCMD that the game is located here. Enter the full path of Empyrion here (e.g. “C:Program Files (x86)SteamSteamAppscommonEmpyrion – Galactic Survival”).
+app_update 530870
Will tell SteamCMD to go ahead and update Empyrion
validate
Validate that the game files are all present and correct. Tag this at the end of the above statement, without a “+” sign.
+quit
Tells SteamCMD to quit – this should always be the last command on your list.
So, an example command line could be:
+login MySteamUsername MySteamPassword +force_install_dir “C:MyGameLocation” +app_update 530870 validate +quit
Once this has been set up you can use both the “Run Maintenance Program” (simply runs the program) and “Perform Maintenance” (will Back up game data, stop server, run the “maintenance” program, and finally start the server back up again) buttons under the “Settings/Tools” tab to update the game. Moreover, if you have set a timed restart, it will update the game before starting the server back up!
Once you have the above set, you can also tell the program to check for game updates at a regular interval. When an update is found it will automatically stop the server, update it and restart it again.
To do this, head to the “SteamCMD Auto-Updates” tab under “Program Settings” and fill out the details on this screen. You will need to enter your Steam username and password here, along with an “appid” (530870) and “branch” (public).
Once entered, select a time frame for how often the program should check for updates and tick the “Check for game updates, every” box. You are now good to go!
You can even make the program delay an update once found, for a configurable time period, in order to broadcast a message to players on your server, warning them of the impending update.
Remote Commands [Optional]
This will allow you to start, stop, backup and run maintenance (update) your server remotely (regardless of any built in features a game has).
To do this you will need to have access to the folder that the program is running in via VPN, FTP or some other means. I will not cover how to do that here, since that is really another topic altogether. I will assume that for this guide, you already have access to the folder.
How to do it
The program periodically looks to see if any of the files listed below are sitting in the folder with it. If it sees any of them it will perform the corresponding actions (and remove the file). So, to perform any of the actions listed below all you have to do is create/copy a file into the Game Server Manager folder with the corresponding name (contents of file makes no difference). The program will see the file and perform the action. Simple as that!
Start the server
File: start.txt
Stop the server
File: stop.txt
Perform a backup
File: backup.txt
Full maintenance cycle (backup, stop server, run maintenance program, start server)
File: update.txt
Restart the server
File: restart.txt
Restart the server with command-line parameter set #1
File: parm1.txt
The command-line parameter for this is set in the “Telnet Commands” tab. You can also access this feature via the “Quick Tasks” dropdown button on the “Main” tab.
Restart the server with command-line parameter set #2
File: parm2.txt
The command-line parameter for this is set in the “Telnet Commands” tab. You can also access this feature via the “Quick Tasks” dropdown button on the “Main” tab.
There is also another way of triggering remote actions within the program…
It is possible to set it up the Game Server Manager to listen for specific commands while logged into Telnet and then perform actions after seeing them. You can then, for example, “say” the command in-game and the program will perform the desired action.
To achieve this you must first ensure that you can correctly connect to the server (see “Setting Up The Built-in Telnet Capabilities”).
To use this feature, first tick the box at the top of the screen to enable it. You can then enter specific commands to look for in the Telnet session. When the program sees the command, it will perform the designated action.
IMPORTANT NOTE: Be very careful with this feature – it can be dangerous on public servers with simple commands. For example: it is possible for anyone in the game to say a command which might trigger the action, so make sure they are unique and not easy to guess. The commands are case-sensitive.
The only commands which are a little more complex are the two near the bottom of the screen (“Restart Server With Specific Command-Line Parameters – Setup #1” and the one below it). Enter the command, just like the others, in the left-hand box. Then enter your desired command-line parameters in the right-hand box. Once done, you will have the ability to quickly switch between two different sets of command-line parameters (for example: different game configurations). When triggered, the server will restart with the parameters set. You can also access this feature via the “Quick Tasks” dropdown button on the “Main” tab.
Basic Port Forwarding Guide [Reference]
NOTE:You only need to perform port forwarding if your server is going to be accessed over the internet or you want it to be listed in the multiplayer main server list. If you are hosting a LAN game then it is not required.
NOTE 2:If you alter the game port then do not forget to update your port forwards to match. You need to forward the game port + the next 4. E.g. If your game port is 29600 then you need to forward 29600, 29601, 29602, 29603 and 29604.
1. Find your hosting machine’s LAN (internal) IP address – displayed on the “Main” tab of GSM.
2. Log into your router’s admin page in a web browser. This is variable – but most router’s by standard, have the details written on the device itself somewhere (a sticker). It will be something like 192.168.0.1 or 192.168.0.255… or whatever. You will undoubtedly require a password, which is no doubt also on the sticker. If there is nothing on the router itself then you may have to get in contact with your ISP (if it’s an ISP’s router) or Google for the default login details of your specific router model.
3. Once you are into the router’s admin pages, search for something called “port forwarding” amongst the menus. Difficult to say exactly where it would be, since all routers are different. Again, Google may be your friend here.
4. Set up a “rule” under the port forwarding screen to direct UDP and TCP traffic from the required ports to the LAN address you found in #1.
5. Save the rules and you should be good go go.
Final Note: If your hosting machine is set up to dynamically retrieve a LAN address on your network then it is possible that subsequent boots will alter your LAN address and cause port forwards to be pointing to the wrong machine. If this happens, you can either alter the port forwards again, or, even better, change your LAN address to static (and set an address manually). Another Google[www.google.co.uk] can help you with this.
Friend (F) wants to connect to your server (S). To do this (since they are at another location other than your internal LAN) they have to “talk” to your server machine. Your router (R) is the first point of contact for anyone outside your LAN. So the router needs to know where the request from (F) is meant to go to. That’s where port forwarding comes in. It’s a rule, set on your router that tells it to route/forward all communication (on the specified ports) from (F) to (S). Without it, the router does not know where to send it and the data is “lost” – hence – no connection.
With port forwarding:
(F) Requests to join your server —-> (R) Tells it to forward data to (S) [Connection established]
Without port forwarding:
(F) Requests to join your server —-> (R) Has no idea where to send the data [Connection fails]
With port forwarding pointing to the wrong place:
(F) Requests to join your server —-> (R) Sends data to the wrong computer (not your server) [Connection fails]
Connecting via LAN (no port forwarding required):
Y = You (over LAN)
(Y) Requests to join your server with a LOCAL (LAN) IP address —-> (R) Knows where it should go straight away (you provided info) [Connection established]
Legend
(Y) = You
(F) = Friend
(S) = Your server
(R) = Your router
Troubleshooting
My friends cannot join the game
If you can connect locally but your friends cannot, it is almost always a firewall, AV or port forwarding issue. Ensure all is configured as it should be.
Things to check:
1. Have you let the server executable through any firewalls you have (Windows, router etc.)? Remember that Windows firewall has 3 different “profiles” (Domain, Private and Public), so ensure you have the correct ones ticked – or tick them all. Also ensure it is allowed through in both directions (incoming and outgoing).
2. Have you port forwarded all the required ports to the correct internal IP address of the server? Remember you need to forward the game port + next 4 ports.
3. Is your server’s local IP static? If not, it is liable to change on reboots and mess up your port forwarding rules. You should ideally set it to static to prevent any further changes. Either way, check to ensure your local IP has not altered and subsequently nullified your port forward rules.
4. Do you have any other software (Anti-virus or VLAN software like Hamachi) that could be interfering with network communication for the server?
5. Is IPv6 disabled? Leaving it enabled can cause hosting problems. This can be changed via your NIC properties.
6. Have you configured the game to be publicly visible via the configuration file?
7. Are you running the server on the same machine that you play on? If so, you may need to choose a different port range (and update port forwards as necessary), since the Steam client interferes with the default ports.
Game Server Manager says my server is “Offline” when it is not
Ensure you have entered the correct IP address and port under Server Details (1) for the IP:Port of server to query. This should be “127.0.0.1:30001” by default, but if you have altered ports or are hosting on another IP address then you will need to change this.
I cannot connect to my server from the same machine I host on
You must alter the ports of the server (for example, you could use 29600) to be able to play on the same machine as the one you host on.
Troubleshooting Flowchart

Final Words
I hope this guide and the Game Server Manager was useful to you.
It may interest you to know that the program has been tried and tested not only with Empyrion – it works with Avorion, 7 Days to Die, GRAV, Medieval Engineers and Space Engineers too. Infact, any game that uses the standard querying language should work with it.
I have also used it to a lesser capacity in hosting servers for Project Zomboid, Neverwinter Nights, Evochron Mercenary, Planet Explorers, Void Expanse and many more that I am sure I have forgotten.
Hopefully now you have read the guide, you will have a good understanding as to how it works if you want to try it out on other games.
The Game Server Manager program is being updated regularly by myself. It has all been done in my spare time, to aid server hosters.
I hope you enjoy your Empyrion server!