Overview
Max difficulty Oblivion can seem insanely tough to new players, and without proper knowledge, you’re going to have a very hard time. This guide provides an in-depth look at the best strategies for max difficulty, what skills you should be focusing on leveling, and which ones to skip. This guide is intended for more advanced players, so you may want to brush up on the gameplay basics first (although note that this guide has many strategies that make other guides obsolete).
Introduction
It’s 2020 and you’ve finally exhausted everything else you could possibly do in quarantine, so that means it’s time to play a junky old game from 14 years ago on one of the most unfair difficulty settings ever created. I admire your courage. Max difficulty Oblivion can seem intractable, especially to newer players. Most will turn it on once, see how little damage their attacks start to do, and immediately turn the slider back down. But armed with the right knowledge, you can beat the entire game on max difficulty without too much trouble, and even thrive and completely dominate every challenge the game throws at you.
The key to beating Oblivion on max difficulty is in the skills you decide to use, and whether you know how to use them. Here, again, many players will experiment with skills for a bit, decide that they’re worthless, and never use them again. This is a mistake. Many skills only get good with serious investment, or if you know exactly what makes them good.
This guide is going to be pretty long winded, because to explain how and why each skill is where it is, I go in-depth into pretty much every useful thing you could ever do with the skill, and how it relates to other similar skills. I actually ran into the character limit in several sections, so that’s why they’re split up the way they are, and had it not been there I would’ve included way, way more information.
What does max difficulty entail?
Oblivion’s difficulty is set on a sliding scale. In the default position, in the exact middle, you deal 1x damage, and enemies deal 1x damage to you. If you hit an enemy with a weapon, it will deal exactly the number of points of damage listed under the dagger-shaped icon in your inventory, minus the enemy’s shield percentage, and spells deal exactly as much damage as advertised.
However, on max difficulty, all health damage you deal to enemies is reduced to 1/6th of the usual amount, and enemies deal 6 times as much damage to you as on normal. The following sources are affected by difficulty:
- All weapon damage, Fire, Frost, Shock, and Damage Health magical effects
- Drain Health effects
- Reflect Damage (you will take 6x what you would’ve taken if you hit the enemy on normal, and if you have Reflect Damage the enemy takes 1/6th what they would’ve taken on normal)
- Reflected spells
From a purely numerical standpoint, it would seem the game is 36 times harder. However, there are many things that are not modified by difficulty:
- Damage dealt by creatures and NPCs to other creatures and NPCs
- Damage dealt and received by summoned creatures and followers
- Poison damage
- Fall damage
- Environmental damage and traps
- Damage/Absorb/Drain Fatigue, Damage/Absorb/Drain Magicka, Damage/Absorb/Drain Attribute and Damage/Absorb/Drain Skill
- All spell effects that do not have anything to do with health, like burden, weakness, etc. etc.
Bearing all of this in mind, there are certain skills and strategies that will be more effective on max difficulty compared to other difficulties. In general, direct damage and healing become much less effective, forcing you to adopt a playstyle that is more based around crowd control, damage mitigation, support to followers and conjured creatures, and clever use of the environment. Sure, battles take a while and a lot of enemies can be pretty annoying on max difficulty, but in my personal opinion, it’s the most fun you can possibly have with this game.
The Ranking System **PLEASE READ**
Oblivion’s skills are very diverse and pretty difficult to rank objectively. Additionally, different skills become more and less useful relative to each other as you level them up and unlock new perks, meaning there is no one real tier list for the entire game. Taking all of that into account, I have decided to split the tier list up into five sections, grouped by skill rank: Novice (0-24), Apprentice (25-49), Journeyman (50-74), Expert (75-99), and Master (100). I will be assuming that you will not be powerleveling/grinding skills in isolation, but rather leveling up your character alongside your skills at an optimal rate through playing the game, and I will not be taking into account how fast a skill is to raise and what attributes are tied to them. Skills will be grouped based on how useful they become when they reach that level. The central question that I hope this guide will answer is: “How worth it is it to level this skill up to this level?”
S Tier: USE THIS SKILL. While it may be possible to get by without it, it will significantly improve your experience if you use it.
A Tier: Very useful overall. If you level these, you will find yourself using and benefiting from them quite frequently. However, you can skip them if you really don’t want to level them.
B Tier: Useful in many situations. Good to have against certain enemies or obstacles. They can be very powerful, even approaching the level of an S Tier skill, if used in the right hands and if you have supporting spells and equipment.
C Tier: Occasionally useful/alternative options available. These skills can be quite useful in the right scenario, and there may even be situations where they are the best option. However, they can be pretty safely skipped on.
D Tier: Niche use only. While you certainly can be successful if you invest in these skills, they are significantly overshadowed by other, more useful skills.
Obsolete: There is no benefit to investing in these. There is a strictly better option in pretty much every situation you would need them.
And please, keep in mind that this is my opinion. I have a lot of experience in this game, especially on max difficulty, but I can’t say that I’ve fully experimented and delved into the full possibilities of every single skill and build combination, because that would take many, many playthroughs. Nevertheless, I believe I have a lot of valuable knowledge about this game that I want to share with the community.
Novice (0-24) (S-C Tier)
This section is going to be a little bit different from the others, because you don’t actually have to put in any work to reach Novice level in any skills. In fact, at least seven of your skills will already start out at the Apprentice level. So, this section is going to be more of a “How good is this skill without putting any work into leveling it?”
A Tier: Alchemy, Illusion, Destruction
B Tier: Blade, Hand to Hand, Marksman
C Tier: Light Armor, Blunt, Mysticism (Atronach), Conjuration
D Tier: Acrobatics, Athletics, Alteration, Block, Heavy Armor, Mysticism, Sneak
Obsolete: Speechcraft, Mercantile, Armorer, Security
1. Restoration
So, why is Restoration the best skill in the game right out the gate? It’s actually not for the reason you’d expect. Restoration is good because it renders so many other skills obsolete. You can access a doomstone that gives you Fortify Skill and get into the Mages’ Guild as early as level 1, and none of the quests are very difficult at all with the possible exception of the Skingrad quest. Once there, you can go in right away and start making custom Fortify spells. Strapped for cash? Fortify Mercantile 100 pts. for 1 second. On your last repair hammer? Fortify Armorer 100 pts. for 1 second. Running out of lockpicks? Fortify Security 100 pts. for 1 second. These spells make leveling these skills completely unnecessary unless you want access to certain perks. They’ll let you build up a ton of money in the early game very quickly, which will allow you to buy powerful unique items like Apotheosis without having to do much combat at all. As for Restore Health, the main reason why people use this skill, it’s actually pretty useless on max difficulty. It’s simply not efficient given how much damage enemies do and the time and magicka you’ll spend casting it. Besides, waiting for an hour restores all of your health, and if you change zones and immediately quicksave and quickload, all enemies in the previous zone will break combat with you, making Restore Health outside of combat pretty useless. The other ultra-powerful Restoration effect is Fortify Fatigue: if you cast enough Fortify Fatigue spells that your Fatigue exceeds your base Fatigue, your weapon damage will continue to scale upward indefinitely. This tactic is even more effective if you have a low base Fatigue.
2a. Destruction (Apprentice)
If you picked the Apprentice birthsign (which you shouldn’t have), congratulations! You get access to Weakness to Magic, the best spell effect in the game, right out the gate. Not only will all your offensive spells be twice as effective if you put 100% Weakness for 1 second before all other effects, but you can Weakness-stack with touch spells or daggers right away.
2b. Alchemy
Alchemy might seem pretty weak starting out. You have a pretty limited array of potions available to you. That being said, many of them are actually pretty useful. Damage Health is your go-to for max DPS in the early game because poison ignores difficulty scaling, and Restore Health and Restore Magicka are useful when you need them. Restore Fatigue potions are also pretty underrated. They’re easy to make, and they’re downright essential if you’re playing a melee fighter, which is one of the stronger archetypes early game, because they help keep your fatigue topped off. Additionally, they’re pretty useful for farming gold, because the merchant with the lowest Mercantile in the game, Ahjazda, buys potions.
3. Illusion
Illusion is the premier crowd-control skill in Oblivion, and believe me when I say you’ll want it early-game. At Novice level you get access to powerful effects like Calm, Frenzy, and Command Creature if you’re a Bosmer. Illusion gets comparatively stronger on max difficulty than many other skills, because it can prevent enemies from even getting a chance to hit you with their absurd damage. Additionally, becaues NPC-to-NPC damage does not scale with difficulty, getting enemies to turn on each other with Frenzy and Command is going to be one of your best damage options.
4. Destruction
Destruction is the best of the straight-DPS options early game. You can deal a lot of damage in a short amount of time, and because enemies are slow early game you’ll have a pretty easy time of getting a lot of lightning bolts in before they reach you (I recommend shock spells because the projectile travels faster). If you progress the Knights of the Nine questline or if you become addicted to Felldew (both of which you need to do if you want to level optimally), or if you’re an Orc, you also get access to Drain Attribute, the best use for which are Drain Speed. Creatures with 0 Speed cannot path to you and can be sneak attacked, and many creatures have low speed.
5. Blade
Why is Blade so high above Blunt? One reason: Umbra. This is the highest-dps weapon in the entire game in terms of physical damage, and you can get it at level 1 if you know how to cheese the boss. The biggest early-game threats are going to be melee fighters because you don’t really have the capacity to run away from them, so having an up-close damage option is nice.
6. Hand to Hand
This might seem like a meme pick, but Hand to Hand is more useful than you’d think. In the early game most of your melee weapons are probably going to do 1 or 2 damage anyway, so the fast attack speed on fists actually lets Hand to Hand keep up pretty well. You can steal the Bands of Kwang Lao for an additional 20 point boost, at which point they will probably be your best melee DPS option outside of Umbra. Plus, if you can bait an enemy into exhausting themselves, and then punch them right afterward, you’ll score a guaranteed knockdown, which you can use to lay in with the DPS.
7. Marksman
Marksman is a decent early-game option for ranged damage. It’s the only way you’ll be getting sneak attacks at this point so it’s a good idea to open fights with a poisoned arrow from stealth. However, it’s overshadowed by Destruction because the DPS it can put out is much more limited, although I personally find it easier to aim arrows than bolts.
8. Light Armor
In the early game, the difference between the protection provided by Light and Heavy Armor is pretty negligible. In fact, armor in general isn’t that helpful early game, as you’ll get about a 10-15% damage reduction at most. That being said, early-game Light Armor is so light that it’ll barely encumber you at all, and it probably won’t encumber you at all if you have even a weak Feather effect, in which case there’s no reason not to wear it.
9. Blunt
Blunt is the worst of the three melee skills early-game. The highest-DPS Blunt you can get at this point is Calliben’s Grim Retort, which, while decent, is overshadowed by the other melee skills. Blunts are definitely still usable though.
10a. Mysticism (Atronach)
This is a weird pick, but I genuinely believe the synergy between Mysticism and the Atronach birthsign is great enough, even at low level, to warrant it. If you picked the Atronach, you’ll have a 50 point base spell absorption, and you can pump it up to 80 for 120 seconds if you locate the Atronach doomstone. At that point, you have just enough to get it up to 100 very briefly with a custom Spell Absorption spell, letting you do a cheeky PSI Magnet type strategy against spellcasters.
10b.Conjuration
At Novice level, you don’t have access to any summon effects. All you have are Bound Gauntlets, Boots, and Helmet (which all count as Light Armor), Bound Dagger, and Turn Undead. All of these can see use: Light Armor is better than Heavy Armor early game, Bound Dagger is the highest-DPS blade outside of Umbra, and Turn Undead is crowd control, which is good. Conjuration is usable if you have the setup for it but overall I’d say you can do without it.
Novice (0-24) (D-F Tier)
11. Acrobatics
There’s not much practical use to jumping early game. You can’t attack in the air, and you have pretty much no air control. The most use you’re probably getting out of this is in the tutorial to get onto the ledge during the very first encounter with the rats. If you know what you’re doing, though, you can cheese a few tough encounters with it even at this stage alongside paintbrush laddering.
12. Athletics
This is a weird skill to rank, but simply put you’re not dodging or outrunning anything during the early game. You want to keep your back to a zone change door and make enemies take as long as possible to get to you, and you certainly don’t have the freedom to run past enemies, because they’ll just catch you on your way out.
13. Alteration
Early game, the only Alteration effects you’ll have are Open Lock, Shield, and Burden. Open Lock is overshadowed by Fortify Security, and Burden is worse than Drain Speed for reducing movement speed. I should note that damage mitigation is comparatively better than healing on max difficulty, but Shield will probably only take you from 10% defense to 20% at best: just over a 10% reduction is not good at all. You can be cheeky and do something like 70% shield for 2 seconds to avoid a high damage burst but it’s just not useful in practice, especially because taking too many physical attacks will get you stunlocked anyway. Feather can also be useful because it reduces your run speed reduction due to encumbrance, but it’s not the most significant thing in the world.
14. Block
Blocking with a shield reduces damage by a percent equal to your Block skill. So, when you have a mere 5-24 Block, it really doesn’t do that much for you, plus you’re likely to get staggered anyway. If you’re in melee range it’s much more efficient to just swing away with a Restore Fatigue potion popped.
15. Heavy Armor
The higher damage reduction doesn’t justify the massive hit to your movement speed. You’ll get about 6-7 more points of protection but you’ll be unable to avoid or outrun anything due to your already poor move speed. Light Armor is better at this stage.
16. Mysticism
At Novice level without the Atronach birthsign or doomstone or extensive questing, you’ll have access to Detect Life and Dispel. Detect Life is useful if you want to know where your enemies will come from and it’s good to have a Dispel handy just in case, but you’ll need it so rarely that you can really do without it.
17. Sneak
At Novice Sneak enemies will hear the tendons in your ankles creaking from across an entire room and be onto you immediately. In many cases you won’t even be able to get a ranged stealth attack. Use it only in the situations where you can. The secondary use for this skill is pickpocketing, but casting a Fortify Sneak 100 pts. for 1 second spell right beforehand will make Sneak useless for that purpose.
Obsolete: Speechcraft, Mercantile, Armrorer, Security
I already explained why these are bad, but to reiterate: with a few restoration spells, you can get the best prices in the game outside of 100 Mercantile, your repair hammers will never break, and unless you’re abysmal at the lockpicking minigame, you’ll never break a pick either.
Speechcraft is bad because you can make a cheap Charm 100 spell, but I don’t think that fully encapsulates how truly awful this skill is. So, for the next few sections, I will devote a small section to a fun Speechcraft fact to illustrate why you should never, ever use this skill.
Apprentice (25-49) (S-B Tier)
All of your major skills start at this level automatically, and the minor skills you want to use should be at this level around the 5-10 level range.

A Tier: Illusion, Destruction (Apprentice), Block, Restoration
B Tier: Athletics, Marksman, Mysticism (Atronach)
C Tier: Heavy Armor, Sneak, Alteration, Light Armor, Acrobatics, Blade, Blunt
D Tier: Destruction, Hand to Hand, Mysticism
Obsolete: Speechcraft, Armorer, Security
Downgrade: Mercantile
1. Conjuration
Welcome to the skill that defines max-difficulty Oblivion until endgame. Summoned creatures completely ignore the penalties to damage due to difficulty scaling, making them by far your best DPS option. If you have the Magicka for it, you will want to have a summon up at all times. There is literally no reason not to use this skill, because the only other method for consistently summoning is the Sanguine Rose and the Skull of Corruption, but they don’t take up your summon slot so they fill a different niche. Learn your summons and learn them well: figure out how they move, their AI patterns, their damage, and most importantly, how to support them. Because Conjuration is so important I’ll make a mini-tier list of all the summons you get at each level when we get to them.
A-Tier: Scamp, Hunger
B-Tier: Ghost, Skeleton
C-Tier: Zombie
Scamps have the highest melee DPS out of all these summons, but their AI is really stingy about using melee attacks, often opting for a very low-damage Flare with a long animation. Sometimes they just stand around like an idiot. Ideally, you want to bait the enemy in close to get the Scamp to do their shoulder ram, then keep them close so that they get shredded by its fast claw swipes. If you have a Staff of Silence, use it on the Scamp so that they go in for melee.
Hungers are Shivering Isles exclusive. They do less damage than the Scamp if you’re at least level 3, but they’re more aggressive and have more health. They can also drain their target’s Fatigue, which is useful if you’re using Hand to Hand or against melee fighters.
Ghosts have two pretty strong frost spells, one on touch and one on target. However, many enemies are resistant to frost, and unlike enemy ghosts, the summoned versions are not completely immune to normal weapons. They’re the only summon at this level with a good ranged attack, though.
Skeletons have very low health and don’t deal much damage. However, they have the highest melee range of all summons, allowing them to land hits consistently, and they’re so cheap to summon it’s hard to fault them.
Zombies are slow, weak to fire, and are easily staggered by physical attacks. However, they’re pretty effective meatshields, and are great in closed spaces. Besides, any summon is better than every other damage option.
2. Alchemy
Alchemy is still going strong at this stage. Like Conjuration, poison damage does not scale with difficulty, so if you really want something to die, poison your weapon in between every swing with a different damage effect. Unlike with spells, potions and poisons with identical effects will stack. The potions you could brew at Novice are significantly more powerful, and you also get access to powerful new effects like Resist Fire, and Shock, Attribute damage, Feather, Shield, Fire Damage, and Frost Damage. You also get access to Silence by combining Vampire Dust and Rice. Use it against enemy spellcasters or even against your own Scamp to motivate it to run in for melee. You should still be using Conjuration, though, as it is the best way to spend your Magicka.
3. Illusion
You get some new toys once you hit Apprentice Illusion. Command Creature and Command Humanoid become available to all characters, along with Rally and Demoralize. Demoralize is usually better than Calm, because it costs only slightly more, does not break on a single hit, and causes the target to run. Command is also very useful against groups, because your enemies can kill each other better than you can kill them. At this point, you can probably visit the Jone Stone, which will unlock Invisibility, which can trivialize many stealth sections.
4a. Destruction (Apprentice)
Destruction is still pretty strong at this stage with Weakness to Magic. While the Magicka-to-damage ratio is still far outclassed by summons, you can deal some pretty good damage with weakness stacking, and it’s especially powerful in combination with the Ghost summon and Weakness to Frost.
4b. Block
With summons being far and away your best damage option, you’ll want to shift to a more defensive playstyle. To get the maximum damage out of summons you’ll want to stay right in the enemy’s face to push them towards their melee attacks, and this just so happens to be the point where blocking gets good. Now that your damage no longer depends on you being actionable, being staggered isn’t as bad, and blocking will also push your attacker back, potentially right into your Scamp’s claws. The perk of no longer losing stamina while blocking is just the cherry on top.
5. Restoration
Restoration gets quite a few new tricks once you hit 25. You can now cast Fortify Skill up to 100 pts. for 2 seconds, which, if you include a minor touch effect, is just long enough for you to cast another spell before the duration runs out. This means that, if you want to cast a powerful spell, you can cast Fortify Skill for that school just before, which might reduce the total Magicka cost. Casting Fortify Agility and Marksman before making a sneak attack will greatly increase your damage output, and Fortify Speed can greatly increase the speed of your horse, or allow your summons to get into melee range faster. The ability to cast more powerful Fortify Fatigue spells is also greatly helpful.
6. Athletics
At this level of Athletics, you have enough speed to avoid most strong attacks if you’re not too encumbered. You can dance in and out of melee range and you will likely never be hit by a power attack unless you’re cornered or staggered. Against ranged attacks you can shimmy from side to side repeatedly to throw off their aim: as long as you do it fast enough and aren’t at point-blank range you should never be hit by an arrow or targeted spell. Damage mitigation is supremely important on max difficulty, so it’s good to be able to avoid even being hit at all.
7. Marksman
Marksman’s DPS is pretty underwhelming unless combined with Restoration. Before taking a shot, you can cast a high-magnitude, short-duration Fortify Marksman, Fortify Agility, and Fortify Fatigue spell. If you shoot your shot before the duration runs out, you will deal massive damage. Again, this is more effective if you’re running a low-fatigue build. That being said, if you do not have Magicka available to cast this spell, the damage will be underwhelming. Additionally, it takes a ton of time and Magicka in order to cast enough Fortify Fatigue spells to make the damage come anywhere close to the damage of a summon.
8a. Mysticism (Atronach)
The increase in maximum spell power due to reaching Apprentice helps immensely here. You should be able to briefly get to 100% without using the Atronach doomstone Greater Power. A little-known trick is that you can actually absorb your own Telekinesis spells. At 34 or greater Mysticism, this will actually return more Magicka than you spent to cast it. It’s pretty slow, but if you’ve got nothing better to do it’s a good way to keep your Magicka topped off.
Apprentice (25-49) (C-F Tier)
8b. Heavy Armor
You’ll probably want to be staying in close to assist your summons, and Heavy Armor helps a lot with that. It begins to set itself apart from Light Armor in terms of defense in this stage. Additionally, Shield effects from Alchemy and Alteration become more effective the greater your base defense is: If you cast a 25% shield spell at 25 base defense, it’s effectively reducing your damage by 20%, and if you cast it at 15 base defense, it’s effectively reducing your damage by 17.6%. Besides, if you ever need to run or want to have maximum spell effectiveness, you can always strip it all off then put it back on as needed.
9. Sneak
This is probably the best Sneak’s ever going to get. Your sneak attacks deal 1.5x as much damage as Novice, making the Restoration-Marksman combo much more deadly. It’s still highly difficult to one-shot enemies, though, and if you don’t land a one-shot you’re going to have to deal with not only that enemy, but all of their nearby allies. You probably won’t be able to sneak past encounters, but you should be able to open some chests without being noticed if you play it smart.
10. Alteration
Alteration synergizes wonderfully with the heavily armored warrior archetype. Feather will let you carry more and limit the penalty to move speed, and Shield gets much more effective the higher your defense is. You also get Fire, Frost, and Shock Shield at this stage, which are the only elemental-specific defense spells you can cast if you’re not a Nord or Dunmer. It’s not the best way to spend your Magicka, though, and it just doesn’t provide enough utility to be universally useful.
11. Light Armor
There’s still a legitimate choice to make between Heavy and Light Armor. Heavy Armor doesn’t provide a huge benefit over Light, and a bit of extra mobility helps against enemies like bears and zombies. In most situations, though, you should have enough health to tank through with Heavy Armor until your summon kills the enemy, making Light Armor a less consistent option.
12. Acrobatics
At this stage, jumping becomes practical in more and more scenarios. You probably won’t be able to skip sections of dungeons, especially not in the middle of combat, but it will allow you to traverse many areas more efficiently. You also get the ability to attack in midair, which lets you do some crazy trickshots, but overall it’s not that practical and puts a drain on your Fatigue.
13. Blade
Blade falls off pretty heavily at this stage. The damage just doesn’t compare to how much summons can do, and you’ll generally want to play defensive and avoid drawing aggro to yourself. The only way to do decent damage is by stacking up Fortify Fatigue, but the Magicka cost ends up making it impractical compared to Conjuration. However, you should have the capital to buy and maintain some unique enchanted Blades, life the Akaviri Sunderblade and Akaviri Warblade.
14. Blunt
Like Blade, Blunt falls off in usefulness at this point. The unique Blunts available to you are arguably better than the Blades, especially the Truncheon of Submission, Battleaxe of Hatred, Destarine’s Cleaver, and Perdition’s Wrath. That being said, the main reason you’re using these unique Blunts is not for their physical damage, which is the only thing your Blunt level affects.
15. Destruction
With direct DPS not being as useful and most of your Magicka being reserved for Conjuration and Illusion, Destruction becomes a much worse option. You’re better off using Marksman for ranged attacks even though the sustained DPS is lower, and the utility effects aren’t efficient enough without Weakness to Magicka to justify spending Magicka on them.
16. Hand to Hand
Hand to Hand suffers from the same problems as Blade and Blunt. The biggest drawback, though, is that using Hand to Hand prevents you from using a shield. Even if you have a one-handed weapon equipped and not drawn, you receive the defense bonus of your shield and can block with it, but the same does not apply to Hand to Hand. Additionally, the quality of your magic weapons will start to outclass Hand to Hand pretty severely.
17. Mysticism
You gain access to Soul Trap and Telekinesis at this stage, but Soul Trap is pretty useless when you have Umbra and Telekinesis has almost no use outside of self-absorption. Alchemy also has Dispel on self, so targeted Dispel is the only reason you’ll want to use this skill, and there’s plenty of staves with a targeted Dispel effect.
Obsolete: Speechcraft, Armorer, Security
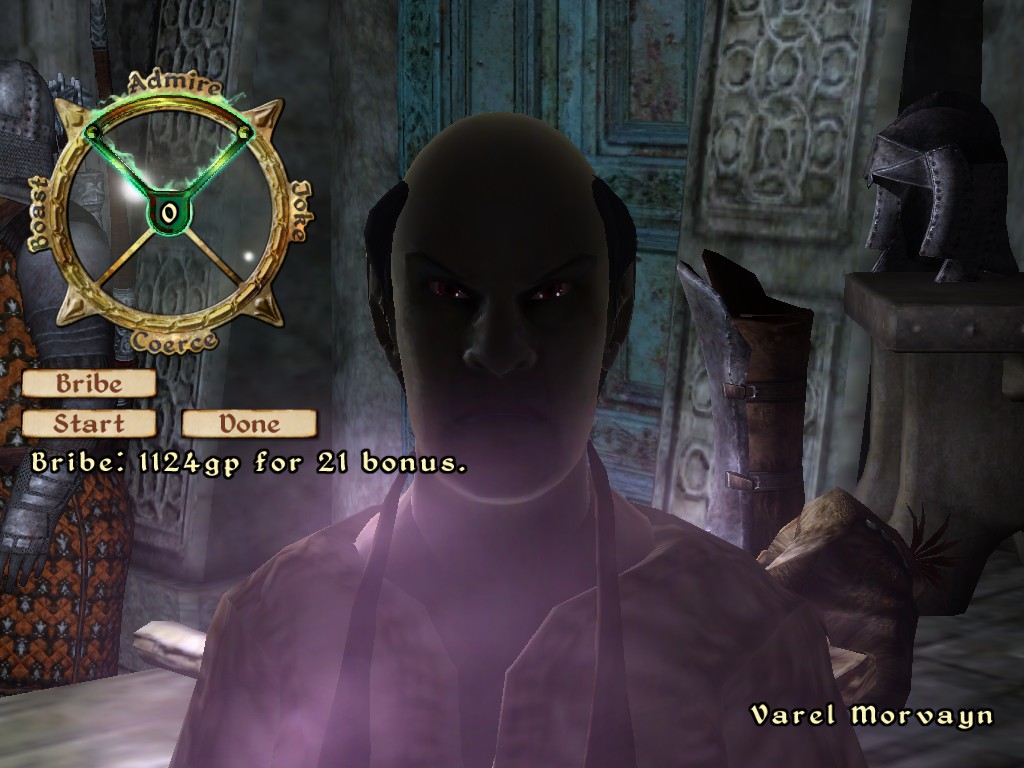
Armorer and Security don’t get any better in the face of Restoration, and Speechcraft is still as useless as ever. In fact, even if you don’t use Charm, the Speechcraft minigame is overshadowed by bribing, as it lets you reach a higher maximum disposition that Speechcraft. But did you know that Speechcraft actually reduces the cost of bribes? That’s right, just take a look at this:
Here’s my level 104 character with 1 Speechcraft:

Downgrade: Mercantile
At Novice Mercantile, your sell price for weapons and armor is proportional to their remaining durability. At Apprentice Mercantile, this is no longer the case. Sounds good, right? Well, as we’ve already established, repairing items costs nothing because you’ll never need more than one hammer, and once you hit 50 Armorer, you can repair any item in the game. Once you hit 75 Armorer, you can repair items to 125% durability, in which case you’ll actually earn 25% more gold from each sale! Considering how fast you can (and should) level Armorer if you repair after each fight, you’ll almost certainly get to 50 Armorer before Mercantile hits 25 unless it’s a major skill, and there’s a good chance you’ll hit 75. Considering how much gold you get for weapons and armor already, I’d actually argue you’d want to avoid leveling Mercantile to 25 if you don’t want to miss out on profit.
Journeyman (50-74) (S-A Tier)
This is where the real Oblivion starts. Many skills come into their own at this tier, and you’ll start to gain access to some truly broken tactics.
 S Tier: Conjuration, Illusion, Destruction, Alchemy
A Tier: Restoration, Mysticism (Atronach), Block, Heavy Armor, Alteration
B Tier: Acrobatics, Armorer, Athletics, Light Armor
C Tier: Marksman, Destruction (Apprentice), Sneak, Blade
D Tier: Blunt, Hand to Hand, Mysticism, Mercantile
Obsolete: Speechcraft, Security
1. Conjuration
Conjuration is still the king. Some of this tier’s summons are pretty underwhelming, but all of them are better than the Apprentice-level summons, and you should definitely be using them.
S Tier: Gluttonous Hunger
A Tier: Skeleton Guardian
B Tier: Headless Zombie, Decrepit Shambles
C Tier: Flame Atronach
D tier: Dremora
Gluttonous Hungers are stronger versions of the Hunger. They retain their aggression, high melee damage, Absorb Fatigue spell, and high health. The only drawback is they cost more than any summon in this tier besides the Dremora.
The Skeleton Guardian is like a normal Skeleton but much beefier. They’re only slightly more expensive than a Scamp, and while they deal low damage they have a fast attack speed and good range.
Headless Zombies are like Zombies but stronger. They deal the most damage out of any summons of this tier and have the second-most health. Try casting Fortify Speed on them so that they can chase down faster opponents.
Decrepit Shambles are Shivering Isles exclusive. They deal less damage and have less health than the Headless Zombie, but they have a much greater attack range and speed and cost a bit less. They’re also the largest summon you have access to at this point, which is great for blocking passages.
Flame Atronachs are actually pretty underwhelming when it comes to fire damage. They’re the best option you have, but unless you’re fighting zombies, any of the summons above them will probably put out more damage. They do have a Reflect Damage effect, though, so if they draw aggro enemies will likely hurt themselves pretty badly trying to kill them.
Dremora, despite having by far the highest casting cost of any Journeyman summon, have the least health and deal the lowest physical damage. They also come with two random Destruction spells, so if you’re fighting something with an elemental weakness you can try to play for RNG and hope they get the right spell, but it’s doesn’t justify the high casting cost.
2. Illusion
You get a bevy of new Illusion effects at Journeyman tier, all of which are incredibly powerful. Invisibility lets you skip past entire dungeons and dump aggro onto your summons, and with good Willpower you’ll be able to maintain 100% up time. Chameleon can render you undetectable if you have the Ring of Khajiiti and some Chameleon potions brewed, and infamously, the game is virtually unloseable once you reach 100% Chameleon. Silence can completely cripple spellcasters, especially if you’ve stacked Weakness to Magic to extend the duration. Finally, Paralyze is one of the best effects in the entire game, as even a 1 second Paralyze will stop any enemy that’s not immune or resistant in their tracks, then force them to go through the long standing-up animation. Paralysis can even be used to topple enemies off cliffs or into lava. Every single one of these spells is powerful and fills a role that no other skill can.
3. Destruction
If you didn’t pick the Apprentice Birthsign, you’ll want to level your Destruction to 50 as soon as possible. At that point, you can unlock what is quite possibly the strongest effect in the entire game: Weakness to Magic. It amplifies all negative spell effects by a certain percentage, including Weakness to Magic. This means that if you cast Weakness to Magic on a target already affected by Weakness to Magic, the effect will increase exponentially. There is no upper bound as far as I know. Additionally, all positive effects will also be amplified by Weakness to Magic as long as they are on a target or touch spell with one negative effect (which can be Weakness to Magic). Weakness to Magic will even amplify other effects on the same spell as long as you put it before other spell effects. If you cast Reflect Spell on that target beforehand, then cast your buff spell on it, you can buff yourself to a ludicrous degree, for example, giving yourself enough Speed to phase through walls or enough Magicka to cast absurdly powerful spells. You should be putting Weakness to Magic 100% for 1 second first every single time you make an offensive or targeted buff spell. Destruction is worth it for this effect alone.
4. Alchemy
You unlock some ridiculously powerful effects at this tier, including Invisibility, Chameleon, Paralyze, Shock Damage, and Fire and Shock Shield. You can have Damage, Resist, and Shield potions of every type, and you can pop a single Restore Fatigue potion and be fairly confident you’ll never run out. The best part about Alchemy is you can use it as much as you need it, when you need it, because it’s a resource-based skill: if you’re in a really bad situation, you can pop up to eight potions at a time, and if you really need something to die, you can use as many poisons as you need. All you really need is the resources to sustain it, which really aren’t that difficult to obtain: most of the alchemy shops have everything you’ll ever need. and at higher levels you can even make powerful potions from common food items.
5. Restoration
Restoration is as strong as ever. At this level, you definitely have access to Fortify Magicka, which will allow you to cast spells you normally couldn’t. However, unless you have a spell skill at 100 your maximum spell power will be limited, so the usual Fortify Skill, Attribute, and Fatigue shenanigans are still the main reason you want to use this skill.
6a. Mysticism (Atronach)
The Telekinesis-Absorption gimmick becomes a legitimate strategy once you reach this range. Not only can you pretty reliably keep Spell Absorption 100 up most of the time, making spellcasters nothing more than a nuisance, you will gradually restore Magicka by doing so. And let’s just say there’s a reason why there’s no Restore Magicka spell in this game.
6b. Block
Block just keeps getting better and better. The cap for damage reduction by blocking is 75%, and you want to reach that cap as rapidly as possible. Given that your defense should also be approaching the cap of 85%, you will take almost no damage from physical attacks whatsoever as long as you keep your Shield effects up. This makes a huge variety of enemies pose a greatly diminished threat to you.
7. Heavy Armor
You will start to feel the benefit of every single point of Heavy Armor. If your defense rating increases by 5 points from 0 to 5, you’re only taking 5% less damage than you were before. If it increases by 5 points from 80 to 85, you’re taking a whopping 25% less damage than you were before. The more you invest in defense, the more it becomes worth investing in, and Heavy Armor lets you advance along that exponential curve faster than Light Armor.
8. Alteration
Alteration synergizes wonderfully with Heavy Armor, and this is probably the height of its usefulness, where the amount of protection provided by armor and the potency of your Shield spells converge. You’ll probably also have found some strong elemental resistance equipment, which, when combined with the appropriate elemental Shield, can trivialize enemies like Wraiths and NPCs with enchanted weapons that would otherwise be tricky to combat.
Journeyman (50-74) (B-F Tier)
9. Acrobatics
This is where Acrobatics gets real good. You can jump fairly high and have enough air control to direct yourself exactly where you want to go. Through creative use of the environment combined with Fortify Acrobatics, you will find yourself regularly cheesing your way through encounters by getting on top of pillars and the like.The Journeyman perk also has some use, as it allows you to do moving power attacks. If you’re really skilled, you can advance towards an opponent with a neutral, sideways, or backwards power attack, and then back away to a safe distance while you’ve still got air time.
10. Armorer
If you’re leveling Armorer, it’s to get to 50 and then to 75, because all that matters in this skill are those two perks. At Journeyman Armorer, you gain the ability to repair magic items. At this point, all of your equipment should be magical, and if it’s not, it’s probably because you didn’t have the ability to repair it. If you’re using any sort of weapons or armor at all (which you should be), you want this perk.
11. Athletics
Athletics continues to stay relevant at Journeyman. Enemies tend to move faster as you level up, and you want to stay on pace with them. But more importantly, their attacks don’t get any faster, and many enemies have a problem with tracking or staying close to you while attacking. The higher your Athletics, the more enemies you can dance around by baiting attacks and backing out of their range or circling around to their back side. The effectiveness of these tactics varies from enemy to enemy, so adjust your movement accordingly.
12. Light Armor
Light Armor is fairly lackluster. It doesn’t provide enough defense to make you feel safe taking on physical powerhouses, but it encumbers you enough that you’ll get smacked more times than you should. It’s still the better option if you primarily want to maintain mobility but protect yourself in case you get hit, but I personally find that the risk of getting hit by something you don’t anticipate is too great.
13. Marksman
If you’ve been leveling your Acrobatics and Athletics, you’ll be able to consistently kite or safe-spot most enemies. In a situation like this, Destruction is probably the better option if you have the Willpower to support it or are taking the Mystic Atronach route, but Marksman can be a fine source of ranged damage as long as you keep stocked up on arrows. The Restoration assassin strategy doesn’t work quite as well because your Marksman and Agility should already be pretty high, forcing you to cast a bunch of Fortify Fatigue spells that would be better off boosting your melee damage.
14a. Destruction (Apprentice)
This might seem like a strange pick, but remember, these rankings are based off of how worth it it is to increase your skills to this level. And if you already have Weakness to Magic, there’s not a whole lot that justifies raising your Destruction this high. You’ll get stronger spells, sure, but just applying another stack of Weakness to Magic is going to make an Apprentice spell more effective than a Journeyman one. Illusion is also better if you want to go for crowd control.
14b. Blade
Blade still isn’t the best option for damage. At least at this point you should be getting your hands on some powerful level-dependent Blades like Sufferthorn and the Ebony Blade. Once again, though, the main reason you use these weapons isn’t for the physical damage unless you’re running a crazy low-fatigue build, and the disarming power attack you get from the perk is too inconsistent to justify using.
15. Hand to Hand
Despite not having the best damage, Hand to Hand does have a niche use compared to the other melee skills. Whereas the other melee skills get access to newer and more powerful weapons, Hand to Hand gets greater Fatigue damage. As far as I can tell if your Hand to Hand damage is at least 8 and you keep punching them, it will deal Fatigue damage on pace with the maximum Fatigue regeneration, making it inevitable that they fall over eventually. You usually need a setup to unleash max DPS so being able to consistently incapacitate your opponent is great, and not having to use magic is a plus against late-game enemies who often have Spell Absorption and Reflection.
16. Sneak
There’s no real reason to level Sneak to this point when it’s so severely outclassed by Illusion spells. Sure, Illusion spells cost Magicka, but Magicka shouldn’t be an issue outside of combat unless you picked the Atronach sign. This level’s perk eliminates the extra sound when sneaking due to your equipped boots, but you could always just deequip your boots when sneaking and reequip them if you’re spotted anyway.
17. Blunt
Blunt gets the short end of the stick compared to Blades when it comes to unique weapons. There’s only a handful of leveled Blunts, none of which are particularly great. The Mace of Molag Bal is one of the worst Daedric artifacts, and it’s probably the one you’ll want to give to Martin for Blood of the Daedra. Volendrung is the best unique Blunt but it has relatively low physical damage, so leveling Blunt for it isn’t the best idea.
18. Mysticism
Mysticism gets no new effects at Journeyman tier. You will have Spell Absorption if you found the Atronach Stone, but without the 50% innate Spell Absorption from Atronach, the Telekinesis strategy isn’t very efficient. You won’t have Reflect Spell unless you’ve completed enough quests to get 60 fame, and you don’t get Reflect Damage unless you picked the Tower Birthsign (why?) or you’ve progressed a good way into the Shivering Isles main quest. Even if you do, they won’t be particularly useful without other good sources of Reflect Spell and Reflect Damage, which are only attainable from high-level quests and drops.
19. Mercantile
Mercantile actually gets a usable perk at this level! You may now sell any goods to any merchant. This is useful because you can now sell anything to Ahjazda, who will give you a much better price than other merchants (unless she doesn’t have enough gold). You can also buy a few unique items that weren’t available before, but only two are any good: the Birthright of Astalon and the Quicksilver Boots. Considering how much you’ve had to sell to get to this point, though, and that you’ve been getting prices you’re not supposed to be able to get, you really should have no money problems by this point and the perk is mostly useless.
Obsolete: Speechcraft, Security
Some things never change. Security is as bad as ever, but to make matters even more laughable, at level 10 you can get the Skeleton Key, which is basically a lockpick that never breaks. You can no longer fail to pick a lock if you tried, unless you need to break out of jail.
Did you know that if a guard arrests you, and their disposition is greater than 90, they’ll remove your bounty for you as long as it’s less than 1000? This will let you get away with any single crime except for murder. I guess Todd expects you to butter them up beforehand then commit your crimes, but if you resist arrest, cast your Charm spell and then yield, they’ll forgive your crimes right then and there, which you could never do with Speechcraft.
Once, I snuck into the private quarters of Castle Leyawiin to steal a particular book. The count noticed me and called for his bodyguard. Naturally, I didn’t want to give up the book, so I resisted the arrest and both the count and his man attacked me. I Charmed the guard to exonerate me of my crimes, and seeing that his Lordship was now attacking an innocent man, his guardly instincts activated and he cut Count Leyawiin down on the spot. So there’s that.
Expert (75-99) (S Tier)
At Expert level, your skills have almost reached their maximum potential. If you’ve been leveling your Luck, which provides an effective bonus to all your skills equal to 0.4 times the number of points it is over 50, you will very quickly reach the maximum effectiveness of every skill at this level, meaning the only way they can get any better is if you level them all the way up to 100 for the Master perk.
S+ Tier: Conjuration
S Tier: Marksman, Heavy Armor, Alchemy, Armorer
A Tier: Mysticism (Atronach), Restoration, Illusion, Mysticism, Light Armor
B Tier: Acrobatics, Blade, Blunt, Athletics
C Tier: Block, Hand to Hand, Destruction
D Tier: Sneak, Alteration
Obsolete: Speechcraft, Mercantile, Security
1. Conjuration
You get some beastly summons once you hit Expert level. Let’s get into them:
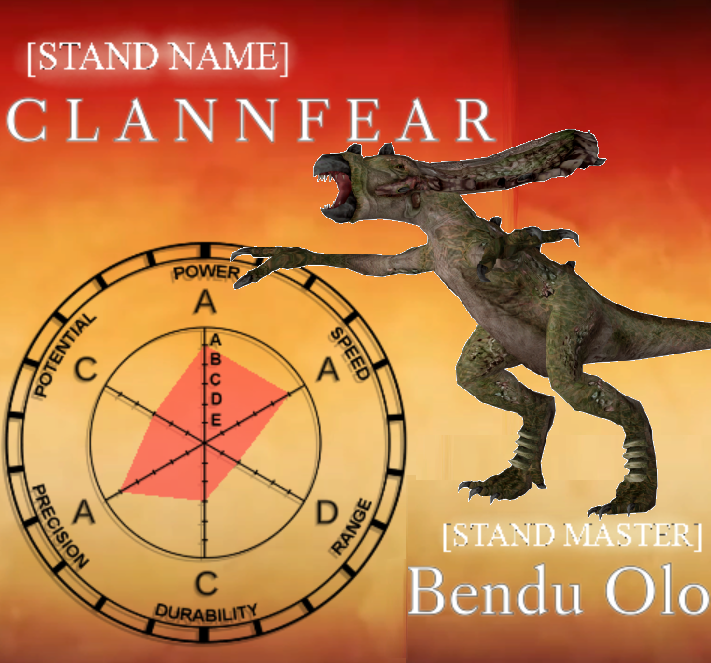
S Tier: Clannfear, Daedroth
A Tier: Ravenous Hunger, Faded Wraith
B Tier: Skeleton Champion, Frost Atronach
C Tier: Shambles, Skeleton Hero
F Tier: Spider Daedra, Black Bear
The Clannfear is a godly summon. It’s fast, cheap, incredibly aggressive, and deals 36 points of damage, just 4 less than the Daedroth and Frost Atronach’s 40. Many of its attacks move it forward, allowing it to land hits very consistently, and it will shred opponents if it can corner them. The only drawback is its low health, but it has a 20% Reflect Damage effect that makes it much more survivable.
The Daedroth is like a bigger, bulkier, slower Clannfear. It’s relatively slow and it’ll usually open with a Shield spell that may just end up wasting time. But when it gets in, it deals insane damage. it has massive attack range and a much faster attack speed than you’d expect. It’s also the widest and tallest summon in the game, making it excellent for cornering opponents and controlling space. It even has a fireball that it can use while walking forward, unlike most other summons who have to stop to cast spells.
The Ravenous Hunger is everything you love about the Gluttonous Hunger enhanced. It deals 33 points of damage and has the most health of any Expert level summon. It costs as much as a Daedroth and will likely get similar mileage to a Clannfear, but it’s pretty small, making it ineffective for space control.
The Faded Wraith has a lot of powerful tools. It’s got a decent melee, two highly damaging Frost spells, can drain Strength and Endurance, and can Silence enemies. What’s more, it actually has 100% Resistance to Normal Weapons, so if it draws aggro, it’ll have most enemies futilely swinging away for the duration of its effect.
The Skeleton Champion is an RNG check. It has a chance of spawning in with an enchanted or a non-enchanted claymore. If it’s enchanted, it’ll deal some nasty split damage and may have utility effects. If not, it’s still going to put in some consistent physical damage with its amazing range and decent attack speed. It is pretty expensive for what it does, though.
The Frost Atronach seems good on paper. It deals damage on par with the Daedroth, is pretty big, and has some good Frost damage spells. However, it’s held back by its weird, slow attack animations and passive AI. The Faded Wraith is better if you want Frost damage, and the Daedroth is better if you want a big body physical attacker. It does have a funny clap move, though.
The Shambles is similar to its Decrepit version, but it’s just not good compared to the other summons in its level. It deals disappointing melee damage compared to the Clannfear (which is cheaper than it), and it has a pretty anemic Frost Touch spell. It would be fine if there weren’t summons that just did its job better.
The Skeleton Hero is yet another cheapo Skeleton buddy. It comes with a random Battle Axe that will slightly impact its damage, which is a bit worse than an unenchanted Champion’s. It’s supposed to be the budget option if you don’t have the Magicka for the other Expert Summons, but Magicka is not a huge issue at this level, and the vastly superior Clannfear is almost as cheap.
The Spider Daedra is awful. It’ll always open with a Shield spell that’s worthless because it’ll never draw aggro. It deals melee damage on par with a Journeyman summon, and has two offensive spells. One is a decently damaging touch spell that it’ll never use because it’s too focused on using its Shock spell, which deals the same damage as the Daedroth’s fireball but with a slower animation. And for some reason, it’s the most expensive Expert summon by far! It can’t even summon its Spiderling, which is the main reason these guys are annoying as enemies in the first place. Only use it if you really want a ranged attacker against enemies that are resistant to Frost.
The Black Bear is only available with the Spell Tomes DLC, and it’s basically a Journeyman-level summon that you need Expert Conjuration to cast. I don’t have the DLC myself, but it deals damage on par with the Gluttonous Hunger, is cheaper than most Journeyman summons, and judging from fighting enemy bears, it’s decently aggressive. If this were available at Journeyman level, it would be an easy S Tier, but it just doesn’t compare to the other Expert summons.
2. Marksman
Once you hit 75, the role Marksman plays completely changes. Before, Marksman was good only for chipping away at range and an occasional high-setup assassination. Now, it is a premier crowd control tool that’s useful in nearly every situation. At 75 Marksman, every shot now has a 5% chance to send the target into a ragdoll state. They will also be sent flying back a short distance if you hit them at the right angle. This is a powerful crowd control tool because it is not reliant on Fatigue damage and it will even affect creatures immune to Paralysis. 5% might not sound like much, but you have the opportunity to shoot a lot of arrows. And the duration they are incapacitated may be brief, but it will keep them still long enough for a summon to shred through their health, or for you to go in with a Weakness-stacking dagger or a Fortify Fatigue-powered rush. Given how effectively you can kite enemies around at this stage, there’s no reason why you shouldn’t be playing evasive while fiending for knockdowns.
3. Heavy Armor
At this point, you should be able to reach the cap of 85 defense with a full set of overrepaired Heavy Armor and some Shield enchantments, rendering physical attacks significantly less effective against you. Additionally, the equipped weight of all heavy armor is reduced by half, which benefits both your movement speed and your carry weight. Not only will you be able to shrug off physical attacks like they’re nothing, you’ll still have enough mobility to consistently evade attacks that can still give you a hard time. Additionally, there are some ridiculously powerful pieces of Heavy Armor out there, such as the Boots of the Atronach, the Hands of the Atronach, the Ice Cuirass, the Escutcheon of Chorrol, and Spell Breaker. Many of these pieces provide significant magical resistances and are good enough to use even if you haven’t invested in Heavy Armor at all, so you might as well put some levels into it so you can reap the full benefit.
4. Alchemy
At 75 Alchemy, you unlock all four effects of all ingredients. This might sound good, because it allows you to make multiple-effect potions more easily, but in reality it’s not the most useful thing in the world. You don’t really need multiple-effect poisons and potions when you can make many potions with single effects split across them. Nevertheless, your maximum DPS with poisons will continue to escalate, which allows you to kill anything that isn’t immune very quickly.
5. Armorer
Armorer gets a godly perk at Expert level. You get to repair items to 125% durability, effectively boosting your weapon damage and defense by 25%. If you’re using weapons and armor at all, which you should be, get Armorer to 75 as soon as possible.
Expert (75-99) (A-F Tier)
6a. Mysticism (Atronach)
The higher your Mysticism, the more cost-effective the Telekinesis-Absorption strategy becomes. At maximum effective Mysticism, spells cost 1/5th their base cost, meaning if you have 100% Absorption and cast Telekinesis, you’ll regain 4 times the Magicka cost, allowing you to restore yourself from 20% to full Magicka.
6b. Restoration
Restoration continues to be powerful. You’re getting to the point where you can keep up a lot of Fortify Fatigue effects for a long time and still have it be cost-effective. Additionally, Fortify Magicka is starting to get more and more cost-effective as well. You should already be left with more Magicka after you cast it than before, so now all you need is a way to accelerate your Magicka regeneration. Fortify Willpower is an option if you’re not running an Atronach build, but there’s a more powerful option out there…
7. Illusion
Illusion benefits greatly from becoming more cost-effective. Your Calm, Demoralize, and Command spells will all last longer. However, once your level hits the mid-20s, you will have to start stacking Weakness to Magicka for them to work against many enemies. You may start to regenerate more Magicka over the course of your Invisibility than you spent to cast it, which is great for being able to let your summon do the work while you stay safe. Paralyze and Silence are still monstrously powerful if you have the Magicka to keep them up.
8. Mysticism
The Telekinesis Absorption strategy gets so effective that I believe even non-Atronachs can benefit from it. You should have some Spell Absorption items at this point, and you should be able to top it off to 100 for long enough to cast some good Telekinesis spells. Additionally, you can now buy both Spell Absorption and Spell Reflection. There’s even more great Reflect Spell equipment than there is for Spell Absorption, like Spell Breaker or the guaranteed Mundane Ring dropped by Raven Camoran above level 22, so it’s even easier to get 100% Reflect Spell. Reflect Spell is not nearly as useful as Spell Absorption in my opinion, but at least it makes you immune to magic.
9. Light Armor
At Expert level, Light Armor no longer encumbers you at all, leaving you with full maneuverability. The only drawback to wearing Light Armor now is that it limits your Spell Effectiveness to 95%. It still comes nowhere close to the protection provided by Heavy Armor, but with a good Shield spell you should be able to maintain 85% defense for an extended period of time. It’s not at all a bad thing to invest in if you want to.
10. Acrobatics
Acrobatics gets a pretty good perk at this level. All your jumps cost half as much Fatigue, which is great if you like doing flying power attacks and trickshots. Additionally, you now have the ability to jump over many enemies’ heads, which can help you cross them up or escape if they’ve got you cornered. You continue to unlock new skips and cheese spots, but you do start to get diminishing returns in this aspect.
11. Blade
The Fortify Fatigue strategy gets more and more effective the more Magicka you have to spend on Restoration, and at this level your Magicka is starting to become pretty unlimited. While Umbra is still the best weapon for maximum physical DPS and stealth strikes, enchanted generic blades can also put in a lot of work, and of course the strongest weapon in the game is still the Weakness-stacking dagger, although you don’t need a high Blade skill to reap the benefit of that kind of weapon.
12. Blunt
You should be getting equipment that deals physical damage almost on par with Umbra, and with some good enchantments a Blunt can go toe to toe with any Blade. Overall, though, Blades are slightly better than Blunts due to the variety of the attack speed of daggers, the range of claymores and longswords, and the better variety of unique weapons.
13. Athletics
You should already have had the mobility to evade pretty much any attack. Now, any investment in Athletics is primarily to allow you to run past enemies. This can be very useful if you want to speedrun your way through dungeons and snag boss chests quickly, and can be powerful if combined with a high Acrobatics, but it’s not quite as useful for combat purposes as it was before, because your ability to dodge is now limited more by your awareness, reaction time, and positioning than your movement speed.
14. Block
The percent of damage reduced when blocking with a shield is capped out at 75, so the only reason to get Block to this level is for the perk or if you plan on blocking with a weapon. The perk is decent, giving you a 25% chance to perform a shield bash every time you block an attack that stuns the opponent. This is pretty good for opening the opponent up for damage, but it’s nothing game-breaking, and you have to actually wait a bit for the shield bash animation to come out, which reduces the amount of time you have to lay in with damage if you don’t get the shield bash.
15. Destruction
While you will likely continue to use the occasional Destruction spell, it’s hard to recommend grinding it up to this point. Destruction is your worst option for direct health damage at this point, so you’ll be using it exclusively for crowd control, for which there are better options, particularly Marksman, Illusion, and Hand to Hand for Fatigue damage. You’ll continue to use Weakness to Magic, but high Destruction is not necessary to reap its full benefit.
16. Hand to Hand
Hand to Hand begins to fall off relative to Blade and Blunt when it comes to melee. Unlike weapon damage, Hand to Hand damage is actually hard capped at 15, meaning you cannot use Fortify Fatigue to pump your damage up to obscene amounts. You also get a block counterattack similar to the shield bash from Block, but it’s not as good because blocking with your fists doesn’t reduce damage.
17. Alteration
Alteration falls off pretty heavily once your armor starts to get good enough that you don’t need Shield. You’ll probably still cast the occasional Feather spell if you need to carry a lot of loot out of a dungeon, or cast a weak Shield spell if your armor gets too damaged for you to reach 85 defense, but you won’t be feeling the need to level it to Expert or beyond.
18. Sneak
At Expert level, running while sneaking does not affect your chance of being detected, which would be great if Illusion didn’t exist. Magic is more powerful than ever, making Sneak a decidedly inferior option to Illusion.
Obsolete: Speechcraft, Mercantile, Security
Surprisingly enough, Mercantile actually gets a good perk at Expert level, allowing you to invest 500 gold in stores for better sell prices. Unfortunately, due to a glitch, you get this perk if you Fortify your Mercantile past 75, making it useless.
If, for some reason, you leveled Speechcraft up to this level, you’ll want to seek out Master training. Before receiving it, though, you must speak to every single beggar in the game. There are 19 of these guys, and your compass does not tell you where they are. Your quest guide doesn’t update whenever you talk to one, either, or when you’ve spoken to them all, meaning you have to return to the trainer every time to check. If a single beggar dies during the quest, you will fail, and of course the quest guide doesn’t tell you when this happens. If a beggar dies before the quest, though, you don’t have to talk to them. making the quest easier. So if you want to level Speechcraft, you’re actively encouraged to murder the homeless.
Master (100) (S Tier)
This is it. This is as far as Oblivion can be pushed. When it comes down to it, what skills are the most powerful in the game?
MSF: Mysticism
XS: Restoration
SS: Illusion
S+: Destruction
S: Alchemy, Marksman
A: Conjuration, Blade, Blunt
B: Heavy Armor, Light Armor, Sneak
C: Block, Athletics, Acrobatics, Alteration, Hand to Hand
D: Mercantile, Speechcraft
Obsolete: Security, Armorer
1. Mysticism
This is it. The absolute strongest skill in Oblivion is Mysticism 100. Let’s break down why.
First of all, all spell skills get a massive boost once you hit 100, because there is no longer any limit to the power of your custom spells. Once you get one spell skill to 100, it shatters the limit on all your other skills as well, because as long as the most powerful effects on a custom spell are from a particular school, it only checks whether your level in that one school is high enough to cast a spell that powerful, allowing you to sneak in some effects from other schools that you wouldn’t normally be able to cast.
Secondly, Mysticism has the most broken spell effects in the entire game. Not only do you have access to Spell Absorption and Reflect Spell, but if you picked the Tower birthsign or if you pick the Heart of Wound Sharing during the Shivering Isles quest Rebuilding the Gatekeeper, you get access to Reflect Damage. If you have Reflect Damage 100%, you become immune to all melee physical damage. With supporting equipment you can easily keep up both Spell Absorption/Reflection 100% and Reflect Damage 100%, making you IMMUNE TO ALL DAMAGE except for bows, environmental damage, and poison, all of which are pretty rare and not really a threat at all.
Thirdly, you have a Restore Magicka button. No matter how much Magicka you have burned, you can almost instantly get it back with a single Telekinesis spell. And because there is no limit to your spell power, you can instantly restore your Magicka to full even if you’ve pumped it up to absurd amounts, as long as you make a custom spell that’s strong enough. You might as well put a Telekinesis effect on every single spell you make from now on, because it will effectively make it cost no Magicka. You truly have all the power with 100 Mysticism.
2. Restoration
While Mysticism may allow you to replenish your Magicka instantly, it helps if your maximum Magicka is as high as possible. That’s where Restoration comes in. Restoration has access to Fortify Magicka and Fortify Intelligence, which both raise your maximum Magicka. If you make a bunch of custom Fortify Magicka/Intelligence spells, and include a weak on touch effect on all of them, they will use the faster touch spellcasting animation. Additionally, blocking will cut off some of the end lag of the animation. I haven’t precisely timed it, but you seem to be able to cast one spell about every 1 second using this method. If you put Fortify Magicka and Intelligence 100 pts. for 120 seconds on every single spell you cast, you could theoretically have a cumulative Fortify Magicka effect of 36000 on you at all times, whereas the maximum base Magicka you can have is around 1000. It’s not like you even need to go all the way with it; you can annihilate enemies even with spells that cost considerably less than 37000 Magicka. Fortify Fatigue is still broken, and even if all your skills are maxed out, Fortify Athletics and Fortify Acrobatics will continue to increase your run speed and jump height, if you really need it.
3. Illusion
Illusion benefits greatly from having no limits on spell power. Want to paralyze and silence an enemy for 2 entire minutes? Sure. Want to lead around an entire dungeons’ worth of bandits as a personal army with Command Humanoid? Go for it. Want to Charm an entire city into letting you commit murder in broad daylight? Whatever you say. Really, there’s nothing more to it than Illusion already being one of the strongest skills in the game, then layering virtually unlimited Magicka on top of that.
4. Destruction
Previously, Destruction was a pretty lackluster skill due to the Magicka investment not being worth the damage you got out of it. Now that there are no limits on Magicka, though, you’re free to sling around the biggest spells you can imagine. Weakness to Magicka 100 pts. for 1 second plus Shock Damage 100 pts, Fire Damage 100 pts, Frost Damage 100 pts, and Damage Health 100 pts. on Target for 10 seconds costs a modest 3780 Magicka, but will do a decent 1333.3 damage over its duration on max difficulty if your enemy has no weaknesses or resistances, enough to kill a Daedroth several times over.
5. Alchemy
The Master perk for Alchemy allows you to create single-ingredient potions, which really just cuts down on the amount of ingredient hunting you have to do. At maximum effectiveness, poisons will all do well over 100 damage, allowing you to kill many enemies with just two or three hits, but it falls off compared to magic because it just doesn’t reach the same level of ludicrous power.
6. Marksman
Marksman is like that cool sophomore in high school that all the seniors let hang out with them. You’ll want to use this even once your spell skills are maxed out. At 100 Marksman, in addition to having a chance to knock down, all your shots have a 5% chance to paralyze for a significant period of time. This actually bypasses Resist Paralysis, making Marksman an even better tool for crowd control. If you’re fighting Liches, Xivilai, Flesh Atronachs, or anything else with Spell Absorption or Reflection, you will want to use this. Additionally, at higher levels you can get access to a bunch of trick arrows by stealing from NPCs with leveled arrows like Philip Franc, allowing you to deal some pretty strong elemental damage if you enchant your bow with Weakness effects.
Master (100) (A-F Tier)
6. Conjuration
Wow, Conjuration sucks now. In all seriousness, it’s actually still pretty good, but there just aren’t any effects that really benefit from having unlimited Magicka apart from Turn Undead. What are you going to do, summon a pair of gloves for two minutes? You do get some good summons this level, though.
S Tier: Lich
A Tier: Gloom Wraith, Voracious Hunger
B Tier: Xivilai
C Tier: Replete Shambles, Storm Atronach
D Tier: Dremora Lord
The Lich is the premier magic-using summon. It comes with a ton of spells, including Dispel on target and three leveled Destruction spells. If your level is high enough, these spells can do up to 110 points of damage per hit, leading to some crazy DPS. The only drawback is it might run out of Magicka, but in that case you can give it some Spell Absorption and cast any powerful spell on it to restore it to full. It also comes with a leveled staff, which lets you farm staves if you disarm them.
The Gloom Wraith takes everything good about the Faded Wraith to 11. It deals massive Frost damage and can Silence multiple foes, allowing it to decimate Spider Daedra especially.
The Voracious Hunger will likely replace the Clannfear as your aggressive melee summon. It deals Daedroth levels of damage and has health second only to the Gloom Wraith, meaning you’ll always get mileage out of it.
The Xivilai’s main strength is its highly damaging fireball. Apart from that, it’s mediocre at best, and it doesn’t have the ability to summon a Clannfear like enemy Xivilai. The Lich is better.
The Replete Shambles is like a worse Daedroth that costs more. It deals less damage than the Daedroth and less Frost damage than the Frost Atronach. Don’t use it.
The Storm Atronach deals less physical and elemental damage than the Frost Atronach. It can cast its Shock spell while moving, but its damage output just isn’t worth it.
The Dremora Lord has pitiful health and damage and can cast Journeyman-level Destruction spells at best. It’s just not worth it at all.
7. Blade
With unlimited Magicka at your disposal, you can start casting Fortify Fatigue spells left and right. At max level your Fatigue will be around 450, meaning every 9 Fortify 100 spells will double your damage. As we saw with the Fortify Magicka example, you can keep up to 80 going at a time if you’re really meticulous. This will let you do damage like you’re on Normal difficulty, and it’s even more effective at lower base Fatigue levels. The same applies to Marksman and Blunt.
8. Blunt
Blade is only slightly better than Blunt at max level due to its weapon variety. After reaching 100 in either your forward power attack now has a 5% chance to paralyze, and like with Marksman, this paralysis effect ignores Resist Paralysis. Marksman is still better for crowd control because you can fire shots about as fast as you can perform power attacks, and they have a chance to both knock down and stun, but Blade and Blunt are your go-tos for maximum physical DPS.
9. Heavy Armor
At 100 Heavy Armor, you are no longer encumbered at all by it, allowing you to zip around at maximum speed. You should almost certainly be able to reach 85 defense if you have Armorer 75, meaning you’ll take minimal damage from enemy archers, which are the only remaining threat to you once you’ve reached Mysticism 100. Honestly, you’ll probably want it just so you can wear powerful unique Heavy Armor pieces without your move speed being hampered.
10. Light Armor
At 100 Light Armor, you get a 50% defense boost if you’re wearing a full set of Light Armor. This means a full set of Light Armor will provide the same protection as a full set of Heavy Armor. The skills are basically interchangeable at this point, with the only differences being unique armor pieces, durability, and weight while you’re not carrying it. Heavy Armor has more durability, which makes it better in longer fights, and better unique armor pieces, which makes it the slightly better choice.
11. Sneak
Sneak gets a usable perk at 100: your stealth attacks will now completely ignore armor. This isn’t super useful, because the majority of enemies don’t wear armor, and the ones that do usually don’t have a full set, meaning you won’t deal too much more damage. It definitely helps with one-shotting humanoid enemies with Fortify Fatigue strats, though, and it should be noted that if you drain an enemy’s Speed to 0, you can repeatedly stealth attack them for maximum DPS.
12. Acrobatics
Acrobatics continues to get you places that you couldn’t before, but evasion and kiting aren’t quite as necessary with how much raw power you have. The perk is nice for letting you traverse water more quickly, and it can even let you hop across lava while taking minimal damage, but it’s mostly just for fun.
13. Athletics
You don’t really need to be able to dodge or outrun enemies because you’re already a juggernaut, so leveling Athletics at this point is mostly for convenience. Additional run speed does let you perform more skips, though, and there’s always a chance that an enemy arrow could stun you out of your spellcasting animations and get you stunlocked (enemies get the Marksman perks as well), so it’s nice to be able to avoid enemies.
14. Alteration
Poor, poor Alteration. You can cast some ridiculously powerful spells, but unfortunately there’s just no place for it in the face of already-ridiculous armor and magic resistances. You’ll occasionally cast a weak Feather spell if you need to carry a few more things, but at any rate it’s not worth leveling to 100.
15. Hand to Hand
The hard cap on unarmed damage really kills this skill. It’s still fine if you want to go for Fatigue damage strats on magic-absorbing or reflecting enemies, but it’s overshadowed in terms of both damage and crowd control by other skills. You do get a chance to disarm your opponent when you block, but it’s not that good and Block gets the same perk.
16. Block
The only thing leveling Block to 100 gets you is slightly better effectiveness with blocking with two-handed weapons and a new perk. You have a 5% chance of disarming your opponent every time you block. I believe you have to get a shield bash for this to happen, but you don’t need to wait for the shield bash for them to be disarmed. Melee fighters already don’t pose much of a threat to you so this is mostly a gimmick, but it’s much more efficient at disarming than sideways power attacks.
18. Mercantile
Mercantile gets a usable perk! All shops now have 500 more maximum gold when selling items, and you can buy and sell items at the exact price they’re listed at in your inventory. But again, if you somehow leveled Mercantile to this point without specifically grinding for it, you should be rolling in septims already.
19. Speechcraft
Speechcraft also gets a useful perk! The cost of all your bribes is reduced by half, which helps in situations where you want to increase disposition for an extended period of time, like if you want NPCs not to report your crimes or join you in combat. That being said, many NPCs have high responsibility anyway and will always report crimes. Most NPCs are also useless for combat, and Illusion can do both of these better with Charm and Command anyway. I don’t think there’s anything else that illustrates just how horrible Speechcraft is. You spend all this time grinding this garbage skill, even though you know how bad it is, only to find out that the one thing it’s good for, Illusion can still do better.
Obsolete: Security, Armorer
At 100 Armorer you get a perk that makes your repair hammers unbreakable, but you get this perk if you Fortify Armorer to 100 as well. How sad.
Well, as it turns out, Security is the worst skill in the game. You’ll never want to level this skill, but I still find Speechcraft to be more pitiful, because you will end up using Security, it just doesn’t matter if you level it, whereas you can do everything there is to do in the game without seeing the Speechcraft wheel once.
Final Remarks/Possible Improvements
So there you have it. If you were wondering how all the skills progress through the tiers throughout the game, here you go:
*w/ Apprentice birthsign
^w/ Atronach birthsign
There are a lot of things I could’ve mentioned or gone into in more depth in this guide. For example, I didn’t mention that you can permanently increase your Athletics and Acrobatics above 100 through use of a glitch. I didn’t explain what a Weakness-stacking dagger was, and I left out a pretty significant strategy involving Fortify Fatigue. Let’s talk about those.
Once you’ve leveled a skill to 100, you can head to a trainer and cast a Drain Skill effect on yourself. If you drain that skill below the trainer’s skill, they will still be able to offer you training, allowing you to increase your skills above 100 all the way up to the cap at 255. The only skills that actually have a benefit above 100, though, are Athletics and Acrobatics. I could’ve included alternative rankings for Athletics and Acrobatics 255 in the Master section, in which case they probably would’ve gone in the S and B tier respectively (above a certain point Acrobatics can actually start causing problems for you). But I decided not to, because only players going for a crazy optimal build are going to exploit the trainer glitch, and I didn’t know how to make it a fair comparison since you have to not only level both skills to 100 first, but then put in a significant amount of additional work over 60+ levels to get them to this level.
A Weakness-stacking dagger is a weapon that exploits the Weakness to Magic effect and the high attack speed of a dagger. If you get a bunch of hits in quick succession, you can build up Weakness to Magic very quickly and deal insane amounts of damage, stunlock an enemy with Damage Fatigue, or Command any enemy in the game without leveling Illusion. It lets you do insane DPS and all you need is one Grand soul to make it and some souls to keep the enchantment charged. So, does this make Blade one of the best skills in the game because it contributes additional minor damage whenever you use it? Or does it make all skills useless other than those that allow you to get in with the dagger? Well, I think my rankings actually take all of this into account. I rated Blade slightly above Blunt and I rated Destruction very highly at Journeyman tier mostly because it gives you access to Weakness to Magic, and, by extension, this strategy. I also rated crowd control skills very highly, because most enemies can block, which will interrupt your Weakness multiplier. I assume this strategy is fairly well-known, and that if people see I mentioned it, they will look it up for themselves.
While doing research for this guide, I found a post by The Flying Rodent (shout-outs) where they mentioned how broken Fortify Fatigue was. I didn’t know this before, and after doing some testing, I agreed: it’s broken. Funnily enough, it’s also more effective at lower Fatigue, making the Blade, Blunt, and Marksman skills better on a low-Fatigue build. If taken to its logical extreme, you could precisely lower your Attributes by baiting enemies into hitting you with a weapon you’ve poisoned with Damage Attribute, so that you’re left with a single point of base Fatigue. At that point, every Fortify Fatigue 100 pts. spell is going to increase your weapon damage by fiftyfold. I tested it, and it works. But this comes with serious drawbacks. If you’re not an Atronach, your Magicka will regenerate painfully slowly or not at all. You’ll have to cast Feather (not Fortify Strength) spells to even be able to move, you’ll have low health unless you’ve used exploits to level very high, and you’ll get staggered by nearly everything. Given the extreme glass cannon nature of this strategy, I decided to omit it entirely because it would warrant a completely different tier list, and it’s not the way most people are going to want to play.
Ultimately, Oblivion is a game about freedom, and that extends to which skills you want to use. You can play a pacifist that lets their followers and the environment do all the dirty work. You can intentionally tank your Fatigue to 1 and one-shot everything with Fortify Fatigue. You can play a Speechcraft-Mercantile pure than doesn’t touch a single weapon or spell and does all their damage with scrolls. All of these strategies are perfectly viable as long as you put in the work and creativity to support them. All I’m trying to do is demonstrate the strategies that will let you be effective in the most situations and complete every quest and challenge in the game with the least possible resistance. I think I’ve done that job pretty well, but I’d appreciate any and all feedback. Does it need images? Rewrites? Let me know!