Overview
One stop Walkthrough for all 10 dimensions leading to the Warrior’s Dimension. Originally created by u/KyrosQF on Reddit.
Introduction
This guide is a one stop Walkthrough for all 10 dimensions leading to the Warrior’s Dimension (which is just infinite progression).
Disclaimer: This guide was originally created by u/KyrosQF on reddit. The original google doc can be found here[docs.google.com]. I merely formatted this guide.
Lots of spoilers obviously exist here and an entire fully recorded run was done to analyze the easiest methods and minimum requirements to deal with each boss. This guide was created from version 1.0.3 and 1.0.4
- All runs try to fight the boss with the minimum requirements, even under the requirements to show the boss can still be defeated. Some fights naturally go over those requirements only because some bosses are undertuned in my opinion.
- Runs try to avoid using rare weapons and gear for the most part. I use just high drop rate items and easy item crafts (iron/bronze/silver ore) to further show that you don’t have to spend extra time farming the gear to push.
- Runs don’t buy the clock to simulate F2P playthrough to reach D11. Only the 15 battles from the trial clock are used. A full runthrough is also altered by how many battle credits are used too.
- My runthrough involved less than 30 hours over the course of 1 week to get to the 11th dimension without a clock. This included additional time to try to explore D7 boss’s additional attacks and such.
- “HP requirement” also includes effective HP gained from damage reduction gear.
- Many rare items intentionally omitted from my runs can make runs much easier such as the Skull Blade, Ossein Armor, Star Gems, Vampire Armor, and many more.
First Dimension
- As you go through the tutorial runs and unlock the base structures, you’ll want to get several stool, table and bed upgrades from the Tavern.
- For healing/sustain you’ll use the Heal Stone on your characters. At a 20 hp heal base for 1mp, it is excellent for the first three dimensions.
- Don’t buy or care about miners, they are mostly useless for progression until Dimension 10.
- Don’t bother with carpenters either, they only get strong after Dimension 6 when their ability gets x4 through a quest.
- Nurses are useful as their base MP is high which makes Heal Stone get a lot of uses.
- Mystics deal very high base damage with their Area of Effect damage at this point of the game, dealing about 20-21 damage to all targets.
- I use 4 mystics and 2 nurses with heal stones equipped which clear the waves up to 100 easily.

Recommended HP = 30-31
Recommended Team → 4 Mystics and 2 Nurses
1. He has an aoe attack that hits everyone for 20 damage and a single target attack that hits for 29. Recommended HP is at least 30-31.
2. If you have plenty of MP, you could use 1mp from each group member to heal themselves on the Dark Lord’s AoE, thus trading turns and then dealing damage to him whenever he uses his single target skill as you would only need 2 healing stone abilities to heal that.
3.This fight shouldn’t be difficult after that.
Winning this will unlock your dimension transfer, just make sure to buy whatever upgrades you can from the tavern. It’s more important to just get your first relic than farm gold for upgrades, so head off as soon as possible.
Second Dimension
- Get the Damage Relic. It makes an insane difference in clear speed and gets you to dimension 3 extremely quick which means you can take the HP relic anyway. Also you will get every relic eventually, so this order makes the most sense in my opinion.
- When flying through levels with the mystic, bail out around level 160. Your Mystic should be level 9 at least and will get +2 mp regen passively. This is enough for them to sustain themselves without the use of fairies or any other crutch.
- Go back in with updated gear to clear to 191, then bounce.

Recommended HP = 40
Recommended Team → 6 Nurses
1. Recommended HP is 40 hp to survive his single target attack which hits for 37-38 hp.
2. Multi Target Attack hits one side (position 1, 2 and 3 OR position 4, 5 and 6) for 30 hp.
3. He also uses a turn to boost his evasion significantly. Physical and Spells have no impact on this dodge chance and there’s no other way to counter it other than just attacking him over and over.
4. I use 6 nurses for this fight solely for their base MP and ability to heal this damage without needing to use heal stones.
If you want you can run an arena with 3 mystics for easy essence. There will be a limit set to the number of arena resets you can do but the added boost should be useful. On “Warrior” difficulty, no one seems to be running problematic dodge or reflect builds, so triple AoE should be plenty to clear the 10 levels cleanly using Auto.
In addition to tavern upgrades you can get at blacksmith upgrades of 1 key per run and the ability to bring some of the materials to the next dimension. It’s very useful to get at least 1-2 levels of this (10-20%) so you can clean out the blue upgrade stones from the blacksmith and sell them back in the next dimension.
Third Dimension
- Immediately I take the HP relic here and these two relics are the only important relics you’ll take all the way to Dimension 11. The status resist one much later can be useful but everything else is mostly useful AFTER you reach Dimension 11. So just know that the 2 most important relics for Dimension 1-10 are in your inventory right now.
- To start things off I just run 6 junkies to level 101 and bounce.
- Then I swap to 6 mystics with heal stones to level 201+ and bounce.
- At this point your HP relic should be getting a few levels and you should have at least 80-90 hp.
- If you have battle credits, run 4 mystic 2 nurse teams until your mystic is level 25.
- With a level 25 mystic, Darkmages actually become relevant.
- Push to 300 using a team of 1 Mystic, 2 Nurse, 3 Dark Mage.

Recommended HP = 75
Recommended Team → 1 Mystic, 2 Nurse, 3 Dark Mage
1. He has relatively low poison resistance which means nurses and darkmages and apply it to him to get additional 200 damage ticks alongside their damage.
2. Rock Toss hits 2 targets for less than 70 damage. The HP relic trivializes this threat.
3. Standard attack hits for less than 60 damage.
Defeating this boss should be easy, which causes you to fail the “Don’t be a big idiot” quest. You should be able to get at least a 2nd level in the blacksmith bag upgrade and make your way for Dimension 4.
Fourth Dimension
- I start things off with 6 junkies to level 101 then bounce.
- I follow up with 1 Mystic, 2 Nurse, 3 Darkmage. Important note with this group is that the Mystic is in position 1, nurses in positions 3 and 5. This is a very efficient auto team for progressing floors.
- Mystic’s MP Refresh should be at the top of the script – “Ally” → “!= Positive Status” → Use Recharge
- Make Darkmages use Noxin and do nothing else. Stone is generally good to use manually if you want to top off your group hp/mp and setup for the next level.
- Scripts can be accessed under the arena menu and they can be applied to party members by setting their script in the character menu (found on the book icon in the upper left corner of the screen)
- Sabres are very easy to get and are worth leveling to 2 or 3. Each dodge can net you an extra turn, so these weapons get you lots of value quick.
Fourth Dimension Boss (Darker Lord) 2800 hp
Recommended HP = 125
Recommended Team → 1 Mystic, 2 Nurse, 3 Dark Mage
1. I normally run 1 mystic, 2 nurse, 3 darkmage. It helps to have Mystic at level 25 but it’s not required. Make sure your HP relic has a few levels and level up several gear pieces to level 3, it’s a very low cost easy way to get extra hp.
2. Boss has high resistance to poison. Application does 280 damage ticks.
3. Blazing Stomp 100 dmg applies burn (ideally you want at least 125 hp to survive this)
4. Dark Slash 100 dmg to two targets
5. Crag Stomp does around 120 dmg and applies stone (stone wears off eventually so it won’t be insane unless he does it on both nurses back to back)
6. Sometimes he attacks twice in one turn which can be brutal. I just put a saber on each character to increase the possibility of dodging one of them.
7. His 2800 hp is kinda low for Dimension 4, so even if you get unlucky with his attacks, the damage output of putting poison on him constantly should kill him before he kills you.
Make sure to buy up blue upgrade stones and upgrades before moving to the next dimension.
Fifth Dimension
- By selling blue upgrade stones you should be able to get the mystic and nurse sodas and craft some iron swords and shields right off. You can run 4 mystic / 2 nurse all the way to 350+
- After this, get Thief and use battle credits to run Thief, 2 nurse, 1 mystic, 2 darkmage several times until you get Nurse to 25. If you don’t have battle credits, then just run 201 to 301 autoing with that group.
- Group heal is very powerful with the recent buff from 75 base to 110 base for early dimensions. In late game, it seems only first aid is useful but group heal is strong all the way to the Warrior’s Dimension.
- At this point you could either farm essence by doing arena a few times (recommend Warrior difficulty level 9 for 60 essence) or more 201-301s with a thief if you need more HP.

Recommended HP = Over 250 if possible
Recommended Team → 1 Mystic, 2 Nurse, 3 Damage Dealers
1. This boss is immune to poison so Darkmage would seem to be a bad idea, although having 2 accessory slots means it can use 2 Silver Necklaces which can be great for getting them over the high 250 damage taken requirement. (They provide 10% damage reduction each). Huntress can also fit this role.
2. He has a single target lazer that hits for 250 hp. If you meet this requirement, he is a pushover.
3. Cunning Tiger Slash does about 150 to one side of the field (up to 3 targets)
4. Even with low party hp (under 250) and bad luck with the lazer, it’s still possible to just cycle down his 4100 hp with brute force.
Sixth Dimension
- This is the dimension where Carpenters get their x4 upgrade to their “Nailed it” skill, making it the best single target ability overall.
- Use the same team and strategy as Fifth Dimension to get to 350-400 auto. This should get you the quest for the Carpenter upgrade which requires 50 uses of “Nailed it”.
- Set the script for Carpenter to be “Enemy -> Weakest -> Nailed it” and have no other triggers.
- Run 1 Mystic, 2 Nurse, 3 Carpenter starting floor 201. Auto to 260 should be more than enough for the quest. Turn the quest in and now Nailed it should be able to one shot most of what is in Dimension 6.
- Run the same team. Mystic in slot 1, Carpenter slot 2, Nurse slot 3, Carpenter slot 4, Nurse Slot 5, Carpenter Slot 6. Run this all the way to 501 and rebuild the team if the 500 janitor lazer beams someone with less than 250 hp. Then go 501-599.

Recommended HP = 200
Recommended Team → 1 Mystic, 2 Nurses, 3 Carpenters
1. The game wants you to craft a back protector to counter the mechanic of the boss’s turnaround ability. Crafting takes way too long to farm and there’s a better workaround.
2. Craft/Make/Get Sabres. Put them on a character in slot 1, 2 or 3. The boss has a high chance to miss one of its 6 attacks on the 3 characters at least once.
3. The boss uses an aoe attack that turns everyone around and then 2 cleave attacks that strike characters in positions 1, 2 and 3.
4. ALWAYS use the defend ability on the character in position 1, 2 or 3 that survived. The defend ability cuts the damage received in half at the cost of their turn.
5. I keep only one person in position 1, 2, 3 alive so that you only need one First aid on that character, then 2 nailed it per turn.
6. Boss will always do 2x cleave attacks on positions 1, 2 and 3 (which means the one person defending will be the only one taking damage).
7. Repeat this process till GG.
I avoided using a strategy that involves setting up on Level 599. You can leave the last enemy alive, use defend on your character with over 200 hp in position 1, 2 or 3 then wipe out the enemy using characters in positions 4, 5 or 6 allowing the defend to carry over until the Dark Lady finishes her opener, removing the RNG completely.
Seventh Dimension
- I picked up the HP regen relic here as it helps counteract poisons and burns and is nice against reflect damage in the arena.
- It is still recommended to do 1-401 as Mystic, 2 Nurse, 3 Darkmage due to the MUCH faster animations of the AoE abilities versus the slow animation of “Nailed it”.
- Can use battle credits if you have any to update gear/gold/levels of carpenters to make them catch up a little.
- Swap to Mystic, 2 Nurse, 3 Carpenter to go all the way to 700.
- The 600 Janitor uses the D6 abilities one at a time and randomly, so it’s not really a threat and can be wiped out via auto.

Recommended HP = Already Achieved in 6th Dimension
Recommended Team = 1 Mystic, 2 Nurse, 3 Carpenter
1. This is a really interesting boss with 2 attacks.
2. Primary Attack “Dial it up” is a group AoE that does about 140 to your party. Nurse Group Heals (Level 25) can counter this.
3. Secondary Attack “Wrong Number” is a random attack that reminds me of Mr. Game and Watch’s 1-9 hammer. Different status effects and damage values are attached to a random single target attack. This attack actually has a very low chance of happening.
4. A few examples are 2s (deal less than 80 damage), 6s (deal 80 damage and burn), 8s (deal 100-120 damage and apply stone)
5. His stats are very undertuned for this dimension and would have been much more interesting if EVERY turn was a “Dial it up” and a “Wrong Number”.
Eighth Dimension
- It is still recommended to do 1-401 as Mystic, 2 Nurse, 3 Darkmage due to the MUCH faster animations of the AoE abilities versus the slow animation of “Nailed it”.
- Going 100 levels at a time after 401 with Mystic, 2 Nurse, 3 Carpenter will catch things up quest-wise. The boss is a nice guy and gives you some materials and 500 essence.
- Currently the 500 essence quest does give you the essence, it just doesn’t update the essence number until you spend some of it.
- You can go 601 till 791 with the same team after everything is updated.
- At this point you just prepare for the boss.
Eighth Dimension Boss (The Lord of Light) 10,000 hp
HP requirement = 315 hp
Recommended Team = 1 Mystic, 3 Nurses, 2 Darkmage
1. Smite Damage was reduced by 37% in an earlier update making the HP requirement about 315 hp instead of 500 hp. This attack still hits 3 people which is why 3 Nurses make sense here.
2. This boss has a high resistance but not immunity to poison which is excellent as he will take 1,000 damage ticks over time when it’s applied.
3. Self-heal value was reduced to 2.5k from 3.3k in an earlier update making this effect reverse a lot less from your damage per turns.
4. This boss has 33% damage reduction which means Carpenters are NOT recommended here as poison and burn bypass this mitigation entirely.
5. He will eventually be worn down as his meditate heal is completely random at lower hp. This means he will eventually not even use it and go down.
Ninth Dimension
- Craft some long swords and shields then take 4 mystics and 2 nurses for an auto run to 201.
- Update team to 1 mystic, 2 nurses, 3 darkmage then auto run to 501. After running some Thief, Mystic, 2 nurse, 2 darkmage runs with battle credits use the original mystic, 2 nurse 3 darkmage team with updated gear to go to 701 then 891 auto.
- All of your essence investment at this point should be going to the HP relic to make sure you can pass this. The good news is that if you meet the HP requirement for this boss, you’ll meet the requirement for the 10th Dimension Boss also.
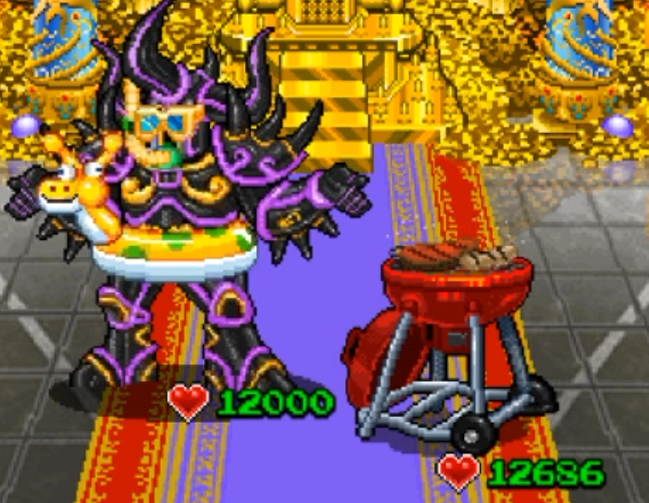
Recommended HP = 410
Recommended Team → 1 Mystic, 4 Nurses, 1 Carpenter
1. This very high HP requirement is due to the Dark Lord using Deluge that does 180-185 damage to the party alongside the Grill’s attack on 2 characters for 180-185 damage applying a burn for 10% of the player’s max HP. To survive this combo, you’ll need about 410 hp (or 372 hp with 1 silver necklace or 331 hp with 2 equipped)
2. All of this consistent AoE damage is further mitigated by using a Sabre on each character. Enough dodges convert to extra turns you can use to damage the boss instead of heal.
3. All Nailed it attacks will target the Grill until it is defeated.
4. After the grill is down, you can top the team off with healing and spam biohazards on the Dark Lord to take him down with poison damage. He has a moderate but not very high resistance to poison.
Tenth Dimension
- This is the last boss before you go on an infinite journey and it’s the Darkest Lord from the start of the game.
- We start this trip off by grinding floors with a slightly different team. Using 1 Mystic, 3 Miners, 2 Nurses. The initial floor grind is easy, so we are aiming to find and collect copper and silver to craft a few things for later. Auto is set up to use keys on mineshafts. Bounce at 201.
- At level 201 we adjust the team using 1 huntress, 1 mystic, 2 miners, 2 nurses. The adjustment is done so we can enter every portal that isn’t a mineshaft and have a high chance of it being useful (or another mineshaft). Bounce at 301
- Keep running this comp if you need more bronze as the boss will need you to use the status resist of the bronze bracelets.
- When done and ready to push floors, swap to Mystic, 2 Nurse, 3 Darkmage and start autoing to 991. Stopping every 100 or 200 floors to update gear and spend gold/essence.
- You met the HP requirement in Dimension 9, so just spend any essence on this Dimension on the Status Resist Relic for an extra few points of status resist.
The Darkest Lord – 12000 hp

Recommended HP = Completed in Dimension 9
Recommended Team → 1 Mystic, 2 Nurses and (3 Darkmage or 3 Blademaster)
1. Has a moderate Poison resist chance which gives value to any nurses and darkmages in the group. Ideally you want to use Carpenters but the extra accessory slot is important.
2. Has a single target attack which he throws a spiked ball for about 200 damage.
3. And SD1 ptsd sets in as he uses Dark Dreams, which deals 90-100 damage to everyone with a high chance to apply sleep and poison.
4. AoE sleep debuff is really dangerous because status effect durations don’t use full turns, but a certain number of character actions before fading. And debuffs like stun, stone and sleep skip the turn and not count towards the sleep duration.
5. There are a few options for dealing with this. And I’m not going to recommend farming the anti-sleep charm. If you ever do farm a couple, put them on the nurses so they can heal while the other party members shake off the sleep.
6. The recommended option is to run Bronze Bracelets in ALL accessory slots (with 30% status resist and 60% for any Darkmages that run two slots). This has a chance to resist the poison and the powerful stun effects of phase 2. Additionally, run Level 5+ sabres on all characters, getting you an additional 24% chance to evade the attack outright, avoiding the damage and the status.
Blademasters can get value here too as they have another weapon slot to add another Sabre for additional evade chance.
7. If you avoid these attacks, 2 nurses and 1 mystic keep your hp/mp up while the 3 Damage Dealers you choose (Darkmage or Blademasters) DPS the Darkest Lord down.
8. Ideally it would make sense to use Carpenters instead of Darkmages or Blademasters, but the extra slot for another bronze bracelet is important for both phases.
The Darkest Lord – 13000 hp

1. This phase boss is outright immune to status like poison or burn.
2 His most used attack is Oblivion which deals about 160-170 damage to the party. (That’s it lol)
3. He also randomly uses a cleave attack that hits one of the 2 sides of the screen for 80-90 damage.
4. The scary attack he has is a 3 target Stun Bolt attack which does 160-170 damage and applies Stun to the targets. Having resistance and dodge instead of the sleep charm helps against this significantly.
5. The good news is that he uses many different attacks and doesn’t spam Stun Bolt.
6. Aside from that, the recommended HP is already met upon entering this dimension as you needed more HP to survive the burst from Dimension 9’s boss.
That’s it! You get a satisfying ending which has you end up in a dimension where you can fight and grow forever.

