Overview
How to port a model made in Fuse/Mixamo into a Source Engine game using Blender
Requirements
- Mixamo Fuse or Mixamo Fuse Basic
- Source Filmmaker, Installed and ran at least once
- Blender 2.69[www.blender.org]
- The Blender Source Tools, Installed (compatible with Blender versions 2.66 and up)
- These Scripts[www.dropbox.com]
- Nem’s VTFEdit[nemesis.thewavelength.net]
- A basic understanding of how the Source Engine’s Backend works (.mdl’s, .vtf’s, .vmt’s, etc.)
When a person is familiar with the process it can take as little as 5 – 10 minutes to convert a downloaded .dae file on get it into SFM. (Of course it can take a lot longer depending on how much you want to play with or change the model while in Blender!)
Creating and Rigging the Model
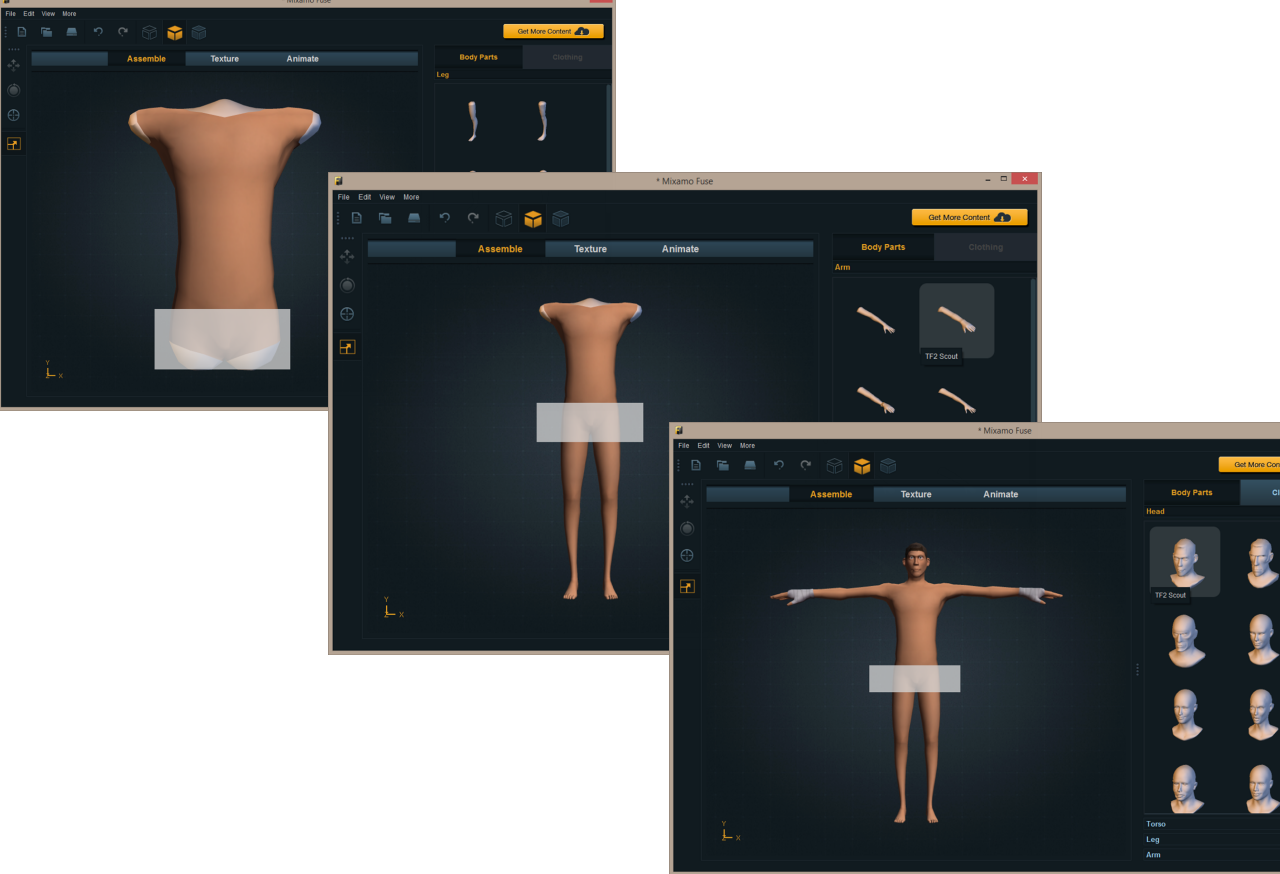
So we’ll start by creating a model in Fuse. Select the body proportions you wish to use. In this tutorial, we will be using the Scout from Team Fortress 2 as our base.
For each body part, select the TF2 Scout option. You are not required to select these certain body parts, but it’s good to stay in proportion.
Now, select the Clothing tab and start adding whatever clothes you want on your Scout. We’re going to put him in the Spy’s suit and a new hairpiece, to imitate his clothes in A Smissmas Story. We’ll have to do some modifications as Fuse does not handle the TF2 characters perfectly. Go into the “Texture” tab and modify the settings so that he is missing the buzzed hair and using the proper TF2 Scout Eyebrows with a proper color. Once you feel happy with the model, save the .fuse file somewhere safe.
The model is now ready for submission to Miamo for rigging and optional animating. This process normally costs money, but if it’s your first time you get two free rigs and then one free rig a week after that.

In Fuse, click File->Animate with Mixamo. You will have to log into Mixamo.com to continue. In a minute or two the required files will be packed and uploaded to Mixamo, Fuse will open your web browser and it will connect to the Rig site. NOTE: at the time of this writing, the Mixamo Unity Web Plug in DOES NOT support Windows Internet Explorer Version 11.x. in either Full or Compatibility modes. Mixamo is aware of the problem and is working to resolve it.
Now that you’re on Mixamo.com, follow the prompts to rig your model. Make sure to activate symmetry because Fuse’s models are symmetrical and you are safe to do so. For elbows and knees, you’ll have to play it by eye to find where they are, you can usually find those based on where there are wrinkles. This is my setup:
Now test out your model. Make sure that it’s rigged well enough to where the elbows and knees are where they should be, and that the head moves how it should. If you’re happy, click the green “Finish” button and on the next page, hit “Download.” If you have run out of free rigs, you will be asked to purchase it here, but otherwise a discount should be applied and you should not have to pay more “credits” to get it.

Click on your model from the list (it will be something like FuseModel-I10412) and ask for the T-Pose version, and then from the drop-down next to download, select Collada as your file format if you are using Blender.[/i]

Setting Up Organization (Blender)
Before we move into Blender, we should set up our system to organize our files, so that we don’t lose anything. We are going to create our directories using a script that mimics the Valve setup for models, based off of the Maya SFM tools.
Our script works off of the Windows environment variables SFM sets whenever you start the SDK, so make sure you’ve done that at least once and can run Hammer or Model Viewer properly (you should also click on “usermod” or your equivalent as the selected mod to make sure it sets the environment’s properly.)
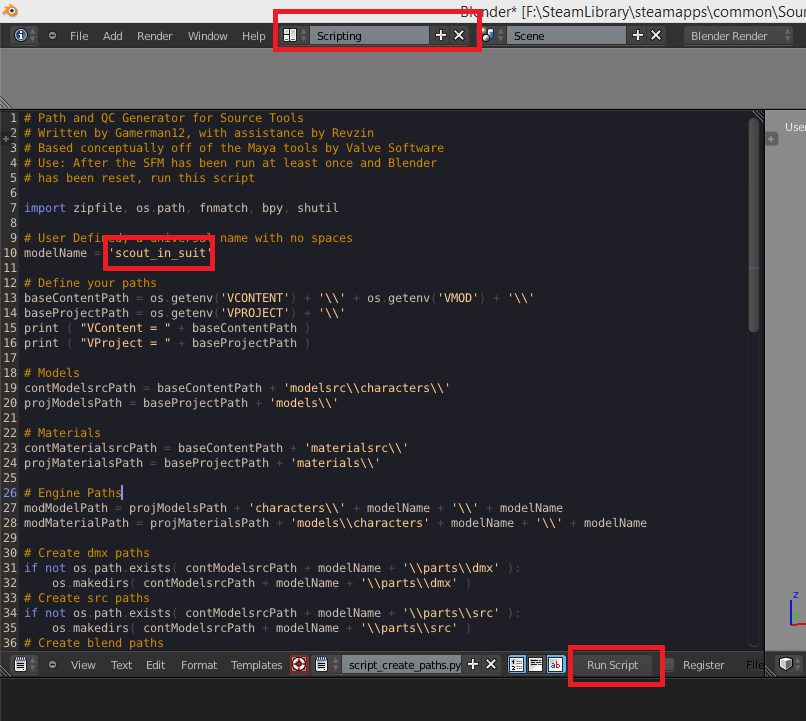
Download these scripts[www.dropbox.com] if you haven’t already and open Blender. Go into the “Scripting” layout and click on the text editor. Type ALT+O and open up the “script_create_paths.py” file. Find the line that defines modelName (line 10) and change ‘modelname’ to what you want to call your model (i.e. ‘courthouse_scout’.) This script will put your model sources into common/SourceFilmmaker/content/modname/modelsrc/characters/modelname, and set up an auto .qc for compiling. Click “Run Script” when you’re ready.
Preparing the Model for Source (Blender)
Now, navigate back to Blender. Import your .dae file into the scene.
The first thing you’ll want to do is select the bones of your character. Open your scripting tab again and open the script_rename_bones.py file. What this script will do is rename the bones from the Mixamo standard to the Valve standard. This way, we can make a rig easily for the model and it’ll make the bone gizmo’s colored and connected inside the SFM.


Creating the Textures using VTFEdit
Now navigate to your mod folder, i.e. SourceFilmmaker/game/usermod, and into your materials folder. We’re gonna take our Mixamo textures using VTFEdit[nemesis.thewavelength.net] and make them work in the engine. Using this[dl.dropboxusercontent.com] template, create a .vmt file for each diffuse texture and input the correct information inside $basetexture and $bumpmap, and change any of the phong parameters if you want. Make sure the .vmt is named based on what you gave Blender earlier for each texture.
You may also notice that, if you used the Animate with Mixamo plugin directly from Fuse, you might be missing your Normal Maps. This is a glitch that Mixamo hasn’t fixed yet. If you want these, go back into Fuse and use the .obj export feature. This will export the normal maps, so place those back into the folder with the rest of the model’s textures. Make sure that, whatever you do, the filenames are pointed to whatever you named them in the .vmt.
Now, in VTFEdit, go up to Tools->Convert Folder, and in the input folder, navigate to the content folder for your textures (probably modelsrc/characters/modelname/parts/src) and for the output, navigate to the game materials folder, or whatever you set your material path to back in Blender. Make sure that it’s set to VTF conversion, and that it converts whatever file type you have for your diffuse and normals (*.png). Click convert and you’ll be golden.

Compiling the Model and Wrapping Things Up
Now we’re going to compile the model. You can optionally use this[dl.dropboxusercontent.com] batch file to compile it or you can simply drag your qc file onto the “studiomdl.exe” app inside your SourceFilmmaker/game/bin folder. This will compile the model into the Source Filmmaker!
Now if everything went well, you should be able to load up the model using the SFM. As a test, open up the SDK and access the model viewer, and load up your model to make sure things are working. Then, you can open up the model in the SFM to make sure that your model works properly.
If you want to use a rig with him, you may be disappointed to find that the default rig_biped_simple does not work with him. This is because Mixamo authors their models without a 4th spine bone, unlike Valve, so Valve’s script doesn’t work with it. However, you can use this[www.dropbox.com] script and place it in the folder usermod/scripts/sfm/animset. Then run rig_biped_mixamo on the model in SFM so you can use a rig on it.
For Older Versions of the Source Engine (Source SDK, GMOD)
For those of you building on older versions of the Source Engine (Source SDK Base 2013, GMOD) the process may be a bit different.
For the Source SDK Base (a Source Mod) instead of using a .dmx, you must export an .smd. This is due to a crash that happens with older versions of the engine and the .dmx file. Also, instead of using the bat file for compiling, you must use the studiomdl.exe file available in Source SDK Base 2013 Singleplayer/Multiplayer/Half-Life 2 to compile. Alternatively, you can use Crowbar for compiling, as it gives you a GUI and will allow you to compile to any available Source game (even SFM!)
If you want to import your model into GMOD, you will be able to use the SFM compiler as GMOD’s model format is compatable with the SFM’s model format. However, you may want to create a proper physics ragdoll out of it, in order to manipulate it in GMOD.
What’s Missing and Conclusion
This tutorial is still heavily in WIP. We need to still work on things like adding flexes to the characters, eyes, using other programs like Maya or 3DS Max, or adding anything else that is needed for a “fully functioning” model in the SFM. With a bit of work left out of here, you can achieve some great things with Fuse, Mixamo, and the SFM!
