100% Achievement Guide: Fallout - New Vegas
Introduction:
Lonesome Road, Gun Runners’ Arsenal (Included in Ultimate Edition)
It is possible to unlock all 75 Achievements in a single playthrough, we just have to be deliberate with when we make certain Saves so that we can reload our game to complete different Endings. There are 4 different Main Factions we have to side with in Fallout – New Vegas, each with its own associated Ending. To make things easiest on us, we will complete as far as we can into the game before making a final decision on our Factions; making a permanent Save we will reload back to play out the other 3 Endings (saving the Ending you want to be “cannon” last).
The 4 Main Factions are: New California Republic, Caesar’s Legion, Mr. House of New Vegas, & Yes Man of New Vegas.
There are a lot of other minor Factions in the game that have associated Achievements or contribute to the Endings, these Factions are: Boomers, Brotherhood of Steel, Great Khans, Chairmen, Omertas, White Glove Society, & the Kings. Basically, try not pissing off any Faction if you do not have to. Except the Powder Gangers… nobody likes them, unless of course you are doing a “Raider” playthrough.
On top of these “time bending hacks” to get all Achievements in a single playthrough, we will also have to beat the game on Hardcore Mode. Hardcore Mode needs to be selected at the start of the game & cannot be turned off until we beat the game… at least once that is. After unlocking our first Ending, we will unlock Hardcore Mode’s associated Achievement & you can switch it off for the rest of the game. Honestly though, Hardcore Mode is ridiculously fun & turns New Vegas into the ultimate survival game. There is no associated Achievement for Difficulty, so feel free to play Hardcore Mode on Easy to make things… easy.
In Hardcore Mode, Stimpacks heal over time instead of giving you health instantly, as well they no longer heal crippled limbs & we will have to use Doctor’s Bags. RadAway also heals over time instead of instantly removing radiation. Ammunition now has weight, so we cannot hoard infinite amounts of bullets. Our Character will also get dehydrated, hungry, & sleepy, so be sure to pack lots of food & water with you. If you have the Ultimate Edition (more specifically the Courier’s Stash DLC), we will be given the Vault 13 Canteen. Our Character will automatically take sips from it every 5 minutes & our dehydration will be reduced by 25. It is very useful for Hardcore Mode.
The majority of the Achievements in the game come through natural progression & by completing specific Side Quests. It should be noted that there are 7 Achievements for causing over 10,000 points of damage with Guns, Energy Weapons, Explosive, Melee, Unarmed, (& for the Gun Runner DLC) damage with GRA exclusive Weapons as well as Unique Weapons. Keep this in mind as you play, you’ll want to keep your eyes open for good damage dealing Weapons in each of these categories. When you unlock one of these Achievements, switch to a different Weapon type until all 7 Achievements are unlocked. It should be noted that both Unique Weapons & Gun Runner Weapons can be Melee, Explosive, Gun, or Energy Weapons & they will count towards both Achievements. Rack em’, stack em’!
For those interested, here is an organized list of all the Achievements/Secret Achievements. This is how I derive my Achievement Breakdowns & the first reference I create before I begin my 100% journeys.
https://steamcommunity.com/sharedfiles/filedetails/?id=2523650299
Due to the nature of open world games, you may unlock Achievements sooner or later in the game than I do. Do not worry, the only “missable” Achievements are tied to Side Quests & Endings. When in doubt, always complete collected Side Quests & do not anger any of the Main Factions. It is very easy to piss off Caesar’s Legion & extremely difficult to regain good Favour with them. Never kill any members of that Faction until the end of the game. The game will even warn you if progressing a Faction’s Questline will make other Factions hostile, so keep that in mind. If a Side Quest makes you kill members of a Main Faction, reload your Save & save that Side Quest for later on.
Open world games are really weird for me to do guides on. If you are familiar with my guides, they are fairly linear as I lead you through a games Achievements as they appear chronologically. With open world games, chronological is a very loose term. Basically, what I am saying is, do not let me railroad you into playing the game exactly as I do to unlock the Achievements. Fallout – New Vegas is an amazing experience & should be played however you deem fit. In each Sequence I will outline at the top where I am going & what I will do. Use this as a reference; I will try my best to flag anything missable, so you are aware of it ahead of time.
*Guide contains major spoilers.
Before You Play: A very important disclaimer for this game. While using Mods will not disable Achievements like in Fallout 4 or Skyrim, opening up the Developer Console (use the ~ Key) will temporarily disable them for that session. If you need to use the Developer Console to enable certain Mods (or open it be accident), you can undo this by Saving/exiting the game completely & restart it to re-enable Achievements again.
If you own the DLC’s of Fallout – New Vegas, be sure to turn them on from the Start Up Menu before you launch the game, or they will not appear. They can be found in “Data Files” below “Play” & “Options”.
Sequence 1: A Whole Lot of Nothing
1. Goodsprings
- Snow Globes: 1/7
- Companions: 0/8
- Sunset Star Bottle Caps: 1/50
- Locations: 3/125
- Level: 3/30
-----------------------------------------------------------------------------------------------------
Building Your Character: Create your Character however you like, we will most likely be reaching Level 50 by the end of this without trying so we will essentially be jacks of every trade regardless of how we begin. In my opinion, Intelligence is the greatest Fallout SPECIAL Stat as it will give us extra points to spend on our Skills.
Keep Speechcraft in mind when making your Character, not only is it useful, but the earlier you start chipping away at the Speechcraft Checks the easier it will be (we need to successfully complete 50 Speechcraft Checks). Lockpicks (25), Terminals (25), Repair (30), & especially Pickpocketing (50) basically have infinite instances we can complete for their Achievements, while Speechcraft is a lot more specific as it pertains to dialogue events. Terminals are a bit more finite, just be sure not to lock yourself out of any of them just in case. Speechcraft, Lockpick, & Science are high priority Skills for our 100%.
Luck is also weirdly necessary for this game. There are a few Achievements tied to Casino games in New Vegas & having a higher Luck will increase your odds of success. It isn’t mandatory to put any SPECIAL points into it though, as long as you leave it at 5, there is Armor in the game that can increase that Stat while wearing it as well as Implants we can purchase at the New Vegas Medical Clinic. The caveat is we need a high Endurance, for each point of Endurance we have, we can buy an Implant. You can buy all Implants if you have a 9 in Endurance, but I wouldn’t recommend putting all your points into Endurance at the very beginning. The Perk Intense Training can raise any SPECIAL attribute by 1 if you choose it on a Level Up.
In terms of Traits, they are usually more trouble than they are worth. Early Bird can be incredibly useful for that +3 Bonus to SPECIAL Stats… but you have to really pay attention to the time of day. Great for roleplaying & immersion… not so good in any other sense.
Just for reference this was my Character Build:
Strength: 6 (For equip load)
Perception: 5
Endurance: 6 (For an extra Implant slot)
Charisma: 5
Intelligence: 8 (For lots of Skill Points early on)
Agility: 5
Luck: 5
For Skills I chose to put 30 in Guns, Sneak, & Speech to match my preferred play style. Aside from Speech, your other two choices do not matter as much. The only Trait I chose was the Wild Wasteland Trait… because why not? When we reach Levels 2-3, try & having at least 25 in Speechcraft, Science, & Lockpicking so we can start chipping away at their instances for the Achievements.
Terminals can be annoying to hack but be patient. Choose a word ending in “ing” first to help narrow down your searches. If you get more than 3 letters right, it usually means the word ends in “ing”. If you get less than 3 letters right, it means that the word does not end in “ing” & will eliminate a lot of your word choices. Keep an eye out for “{} [] () <>” symbols in the word results as well, clicking these can remove dud words or even reset your attempts!
After making our Character, we will speak with Doc Mitchell one last time at his front door where we will have the option of turning on Hardcore Mode. Do so.
Explore everywhere, loot everything, & talk to everyone. We need a lot of Caps to purchase Weapons & Consumables. We need to fight a lot of enemies to deal Weapon damage & we even need to TAKE a lot of damage to then heal ourselves with Food & Stimpacks. Go slow & prepare for a long journey. As a side note, this is my absolute favourite Fallout game in the series…

Achievement #1 – Ain't That A Kick In the Head: Complete Ain't That A Kick in the Head.
Story Related. After speaking with Doc Mitchell at his front door we will complete the Main Quest Ain’t That A Kick in the Head & unlock the Achievement.
DLC Quests: If you have the Ultimate Edition or just own all of New Vegas's DLCs, we will receive four new Quests: Sierra Madre Grand Opening!, Happy Trails Expedition, Midnight Science Fiction Theatre!, & The Reunion. I cover these at the very end of the guide after we beat the Main Campaign; while you are more than welcome to start them whenever (being aware of the Sequences I cover them in for Achievements) note that they are high level DLCs & pretty difficult. I do recommend saving them all for later...
Snow Globe #1 – Goodsprings: North of Goodsprings will be the Goodsprings Cemetery location; just follow the road up the hill North of the saloon if it is not already marked on your map. When you enter the cemetery, head to the far left corner of the lot just in front of the large water tower to find the Snow Globe in front of an unmarked grave.
Aside from the Snow Globes, we also need to keep our eye open for Sunset Star Sarsaparilla Bottle Caps for The Legend of the Star Achievement. We will need to collect 50 of these Star Caps over the course of the game, so loot everywhere you can to find them. Drinking Sunset Sarsaparillas also has a 5% chance to give you a Star Cap instead of a regular Bottle Cap, so hoard these drinks as well just in case.
Before we leave Goodsprings, be sure to complete the Tutorial & the two Side Quests that unlock after it for helping Ringo with the Powder Gangers. He will reward us with a Caravan Deck if we speak to him about it, giving us a head start on our deck. We need to keep our eyes out for Caravan Cards in merchants’ Inventories to purchase. We will need a good deck built for when we start chipping away at winning 30 games of Caravan…
After your business is finished, we can set out South towards the Primm location.
Sequence 2: Patrolling the Mojave
1. Primm, Mojave Outpost, Nipton, Novac
- Snow Globes: 1/7
- Companions: 1/8
- Sunset Star Bottle Caps: 18/50
- Locations: 17/125
- Level: 7/30
-----------------------------------------------------------------------------------------------------
Companion #1 – ED-E: Enter Primm & you will see a building with “Mojave Express” in neon red lighting on its roof to your right. This is the Nash Residence.
Inside the building we can find a damaged Eyebot, this is our first Companion, ED-E. We have 3 different options on how we can fix it, have a: Science of 55 or higher, Repair of 65 or higher, or if we have 3 Scrap Metal, 2 Sensor Modules, & 1 Scrap Electronics. It is highly unlikely you have the Skill Points for Repair or Science, so we will do the “repair with parts option”. Quite easily too.
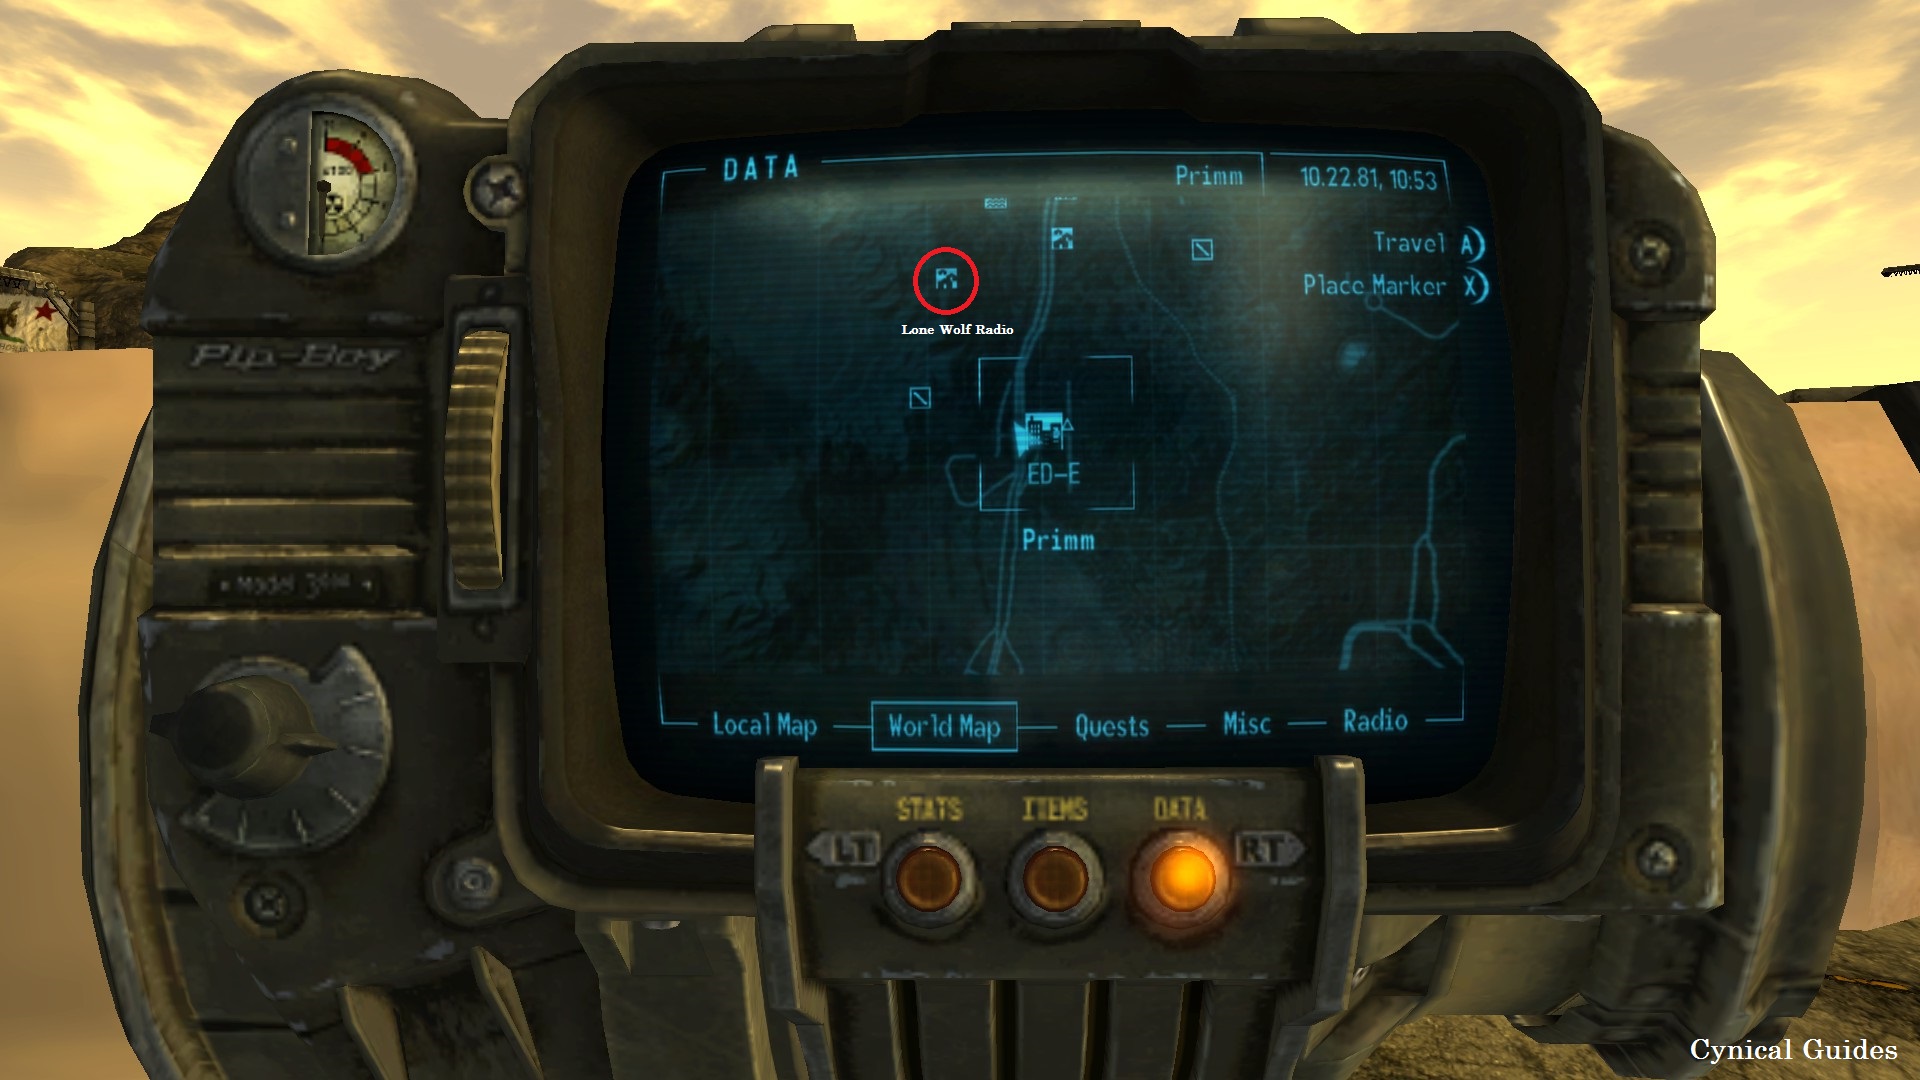
In between Goodsprings & Primm to the West is the Lonewolf Radio location. We can find the 2 Sensor Modules & 1 Scrap Electronic inside the large trailer here. The Sensor Modules will be on a shelf with a bunch of broken radios & the Scrap Electronics will be resting on top of some consoles to the left of the entrance. The remaining 2 Scrap Metal can be found back at the Nash Residence next to ED-E.
With the necessary parts, return to ED-E & select “Try to Fix It, Repair With Parts, Fix It With Parts” & we will unlock our very first Companion.

Achievement #2 – Ol' Buddy Ol' Pal: Recruit any Companion.
We will unlock this Achievement after we boot up ED-E (or recruit any of the other 7 Companions). On Hardcore Mode, Companions can be killed permanently instead of being knocked unconscious. Party up with ED-E so we receive its super useful Enhanced Sensor Perk then tell it to “Wait Here” … indefinitely. We will still have the Perk, but ED-E will be safe from harm. Occasionally, it may override your command & you will find it waiting outside a location for you randomly. If this happens, just lead it back to a safe location & tell it to wait again.
It should be noted that there is a bug for The Whole Gang’s Here Achievement, that makes it so all we actually have to do is “party up” with 8 Companions (meaning we can just dismiss & “party up” with the same Companion 8 separate times) & the Achievement will unlock. You do not actually have to go around & locate all 8 Companions if you do not want to or if you somehow failed one of their Recruitment Quests. This only works if you do not have Patch Mods however, but regardless, I have all Companions locations/Quests laid out in the guide, so the bug is not necessary at all.

Achievement #3 – Jury Rigger: Repair 30 Items.
This is an easy Achievement to unlock early on. Loot the corpses of Convicts, Powder Gangers, or Fiends to grab their Weapons & Armor. Then Repair any of the Items with multiple copies of itself until you have done that 30 times. The Bison Steve Hotel in Primm is full of Convicts & are a good source of repairable Items early on.

Achievement #4 – Crafty: Craft 20 Items.
This is another easy Achievement to unlock early on. When you have collected 20 9mm Rounds, use ED-E or go to the Ammo Bench in Goodsprings & dismantle 20 bullets. Any ammo will do, this is just the most plentiful resource we have access to early on. There are many different easy Recipes that can be done without any Skills. Simply Craft or Dismantle 20 Items to unlock the Achievement, it can be done in a stack as well, it does not have to be 20 individual Crafts or Dismantles.
Before we carry on in the Main Quests & make our way over to Novac, we will make a quick pit stop at the Mojave Outpost. It can be found down South West of Primm along the highway. It is hard to miss, there will be two large wire statues shaking hands at its entrance. We will encounter one of the four Main Factions here at the Outpost called the NCR.
Companion #??? – Cass #1: We can find Cass in the Mojave Outpost Barracks, sitting at the canteen counter. If you are anything but Very Evil Karma she will offer us her Recruitment Quest Heartache By the Number. It will be a while before we can get started on it however since it is a ways away still. If you are currently Very Evil, we can come back here at anytime to collect the Quest if our Karma ever increases.
When you are ready to carry on, take the highway East over towards Nipton. Along the way, we should encounter an NPC named Tomas not too far outside Nipton who gets attacked by his companion. Turns out, Tomas is carrying a necklace with 7 Sunset Star Sarsaparilla Caps on it. Either complete the Speech 50 Check… or just kill him to collect these Caps. Might as well, gives us a boost towards the 50 we need to accumulate.
When we enter Nipton, we will encounter our second Main Faction we need for the Endings, Caesar’s Legion. For the moment, try balancing out Side Quests for the Legion & the NCR. If you have too many Quests from one Faction, hold onto them until you get more from the other. The NPC Vulpes Inculta is a Main Quest giver for Caesar’s Legion… so don’t piss him off. So long as we eventually get higher Favour than Neutral (Accepted, Liked, Idolized) with each Faction, we should be alright.
Side Quest – Come Fly With Me #1: When we enter the town of Novac, track down the NPC No-Bark Noonan. He can be found wandering the streets or in his hovel at the edge of town. Ask him if he has seen anything interesting happening in the area & he will tell that there have been sighting of Ghouls near an abandoned building. This will activate this Side Quest for us; we will need it for an Achievement.

Achievement #5 – Know When to Fold Them: Win 3 games of Caravan.
If you have been purchasing Caravan Cards from merchants, you may have enough cards to begin playing Caravan. No-Bark Noonan is a great NPC to play against as… he isn’t great & has a lot of Caps on him for some reason.
Caravan is “simple”: get three stacks of 26 (or as close to it) to win. Kings will double a cards value, Jacks will remove a card from yours or your opponents’ side, & Queens/Jokers… I have no idea honestly; they are more complicated than they are worth. You must have at least 30 cards in your Caravan Deck to play.
For a more in depth explanation on Caravan, here is the official description from the Fallout Wiki.
https://fallout.fandom.com/wiki/Caravan_(game)
My favourite Caravan Deck consist of: 5’s, 6’s, 10’s, Jacks, & Kings. That’s it. You play a 6, play a 10, put a King on the 10 & boom you have 26. Since it is unlikely that we can make a Deck solely of those cards at the moment, adding Aces or 5’s also works as they can work pretty well with 10’s & 6’s if need be.
Beat No-Bark 3 times, or any other Caravan player, to unlock the Achievement. Definitely keep your eyes peeled for merchants selling 6’s, 10’s, Jacks, & Kings.
Sequence 3: In Solar
1. Novac, REPCONN Test Site, Helios One
- Snow Globes: 1/7
- Companions: 2/8
- Sunset Star Bottle Caps: 19/50
- Locations: 22/125
- Level: 10/30
-----------------------------------------------------------------------------------------------------
Companion #2 – Boone: Make your way over to the large dinosaur statue near the West end of Novac & enter the Dino Bite Gift Shop. Head up the stairs to the roof & we should be able to find the NPC Boone. He only works nights up here. If it is daytime, he can be found in his motel suite on the far right side of the bottom floor, near the stairs leading up. Speak with Boone, & he will ask us to help him locate the person responsible for having his wife kidnapped by Caesar’s Legion. We will then receive his Recruitment Quest One For My Baby.
The culprit can be found in the Dino Dee-Lite Front Desk, the main reception building for the motel in Novac. Spoilers… it is Jeannie May Crawford. For evidence, crack open the Safe behind the front counter to collect a Bill of Sale from the Legion to Jeannie of Carla Boone… & her unborn child. You will need a Lockpick Skill of 25 to open the Safe. Alternatively, you can try picking the Safe Key off of Jeannie’s pocket.
With the evidence in tow, wait until 10pm so Boone is on watch & speak with Jeannie telling her that there is a little something-something we would like to show her in front of the dinosaur statue. As you walk to the spot with her, put on Boone’s Beret. Return to Boone afterwards & report to him of Jeannie’s doings to complete the quest. Convince him to “party up” & we will have recruited our second Companion. Unless you are feeling confident however, I would consider leaving him behind in Novac in case he is killed.
Note that having Boone in our party will make any members of Caesar’s Legion become hostile towards us, even if we have Neutral or higher Favour with them, so be careful. We cannot piss them off yet so watch your Saves & where you are going if he is in tow.
It should be noted that, if you have recruited a Companion & they die afterwards, it will not void The Whole Gangs Here Achievement. It will only be void if the NPC dies before we have had a chance to complete their Recruitment Quest/“party up” with them at least once. After we have them unlocked, they are technically no longer relevant. Granted with the exploit for that Achievement, it will not be void regardless, we just need at least 1 Companion to “party up” with 8 separate times.

Achievement #6 – Come Fly With Me: Complete Come Fly With Me.
Either speak to No-Bark Noonan or Manny Vargas in Novac to receive this Side Quest. Make your way West of Novac over to the REPCONN Test Site. When we enter the building, we will be instructed to head upstairs to meet up with the Ghouls hiding up there. When we link up with them, we will be directed to speak with their leader, Jason Bright. Agree to drive away the “demons” from the facility & get the Nightkin to abandon the basement… one way or another.
After the Nightkin are defeated, we must help the Followers of Bright fix their rockets up. The Atomic Fuel can be found South East of Novac at the Clark Field location on a Scavenger’s corpse. We can find the Rocket Thrust Control Modules at the Gibson Scrap Yard just North of Novac. Speak with Old Lady Gibson & collect the Modules from her. Return the parts to Chris Haversam back at REPCONN & witness the rockets launching off into space (ideally that’s what happens) to complete the Side Quest & unlock the Achievement.

Achievement #7 – No Tumbler Fumbler: Pick 25 locks.
If you have been diligent with your lock picking & have around 25-50 in the Lockpicking Skill you may have unlocked this Achievement at some point during the last Side Quest. If not, not to worry, we are not even 2/10 of the way through the game yet so we have plenty of time to unlock this. Refrain from trying to force the lock open in case you break it. You can always return to locks later on when you are a higher Level to open them up; they do not de-spawn.

Achievement #8 – You Run Barter Town: Sell 10,000 Caps worth of goods.
This will come naturally as you playthrough the game. If you are diligent with your looting, you may unlock this early on like I did. If not, keep looting. This is a massive game, especially if you include the DLCs. We are likely to make 10,000 Caps ten times over by the end of it all.

Achievement #9 – That Lucky Old Sun: Complete That Lucky Old Sun.
North of Novac, past the Gibson Scrap Yard, we can find the Helios One location. Convince Lt. Haggerty to let you inside the building (nicely), & we will receive this Side Quest. Speak with the “scientist” Fantastic & we will be given our objectives for bringing Helios One back online.
Connect the two Reflector Controls then enter the Solar Collection Tower. Fight your way through the building & get up to the second level. To access the mainframe, we need to repair the Auxiliary Generator. To do this, we need a Repair of 35 or higher & some Scrap Metal. Alternatively, if you found a Poseidon Energy ID Card in the Solar Collection Towers lower floor, we can activate the PYTHON Mr. Handy here on the Observation Level to fix it for us. Either way, with the generator up & running, access the mainframe & select McCarren & Las Vegas Strip to divert the power to. Do not arm Archimedes Plant Defence System or the NCR will get real pissed off.
After accessing the Terminal, head outside & use the Reflector Control Panel to redistribute the power. Return to Fantastic to complete the Side Quest & unlock the Achievement.

Achievement #10 – New Kid: Reached 10th Level.
This will come naturally as you play through the game. Since the game Levels with you, you do not technically need to be a certain Level to access areas (maybe aside from Quarry Junction…)
With all the DLCs, our Level Cap is set at 50, which we have a very good chance of reaching by the end of our 100%...
Sequence 4: Bright Lights
1. Camp Forlorn Hope, 188 Trading Post, Boulder City, Freeside
- Snow Globes: 2/7
- Companions: 5/8
- Sunset Star Bottle Caps: 25/50
- Locations: 44/125
- Level: 12/30
-----------------------------------------------------------------------------------------------------
Side Quest – Return to Sender #1: Before we carry on towards New Vegas, head East from Helios One over towards Camp Forlorn Hope.
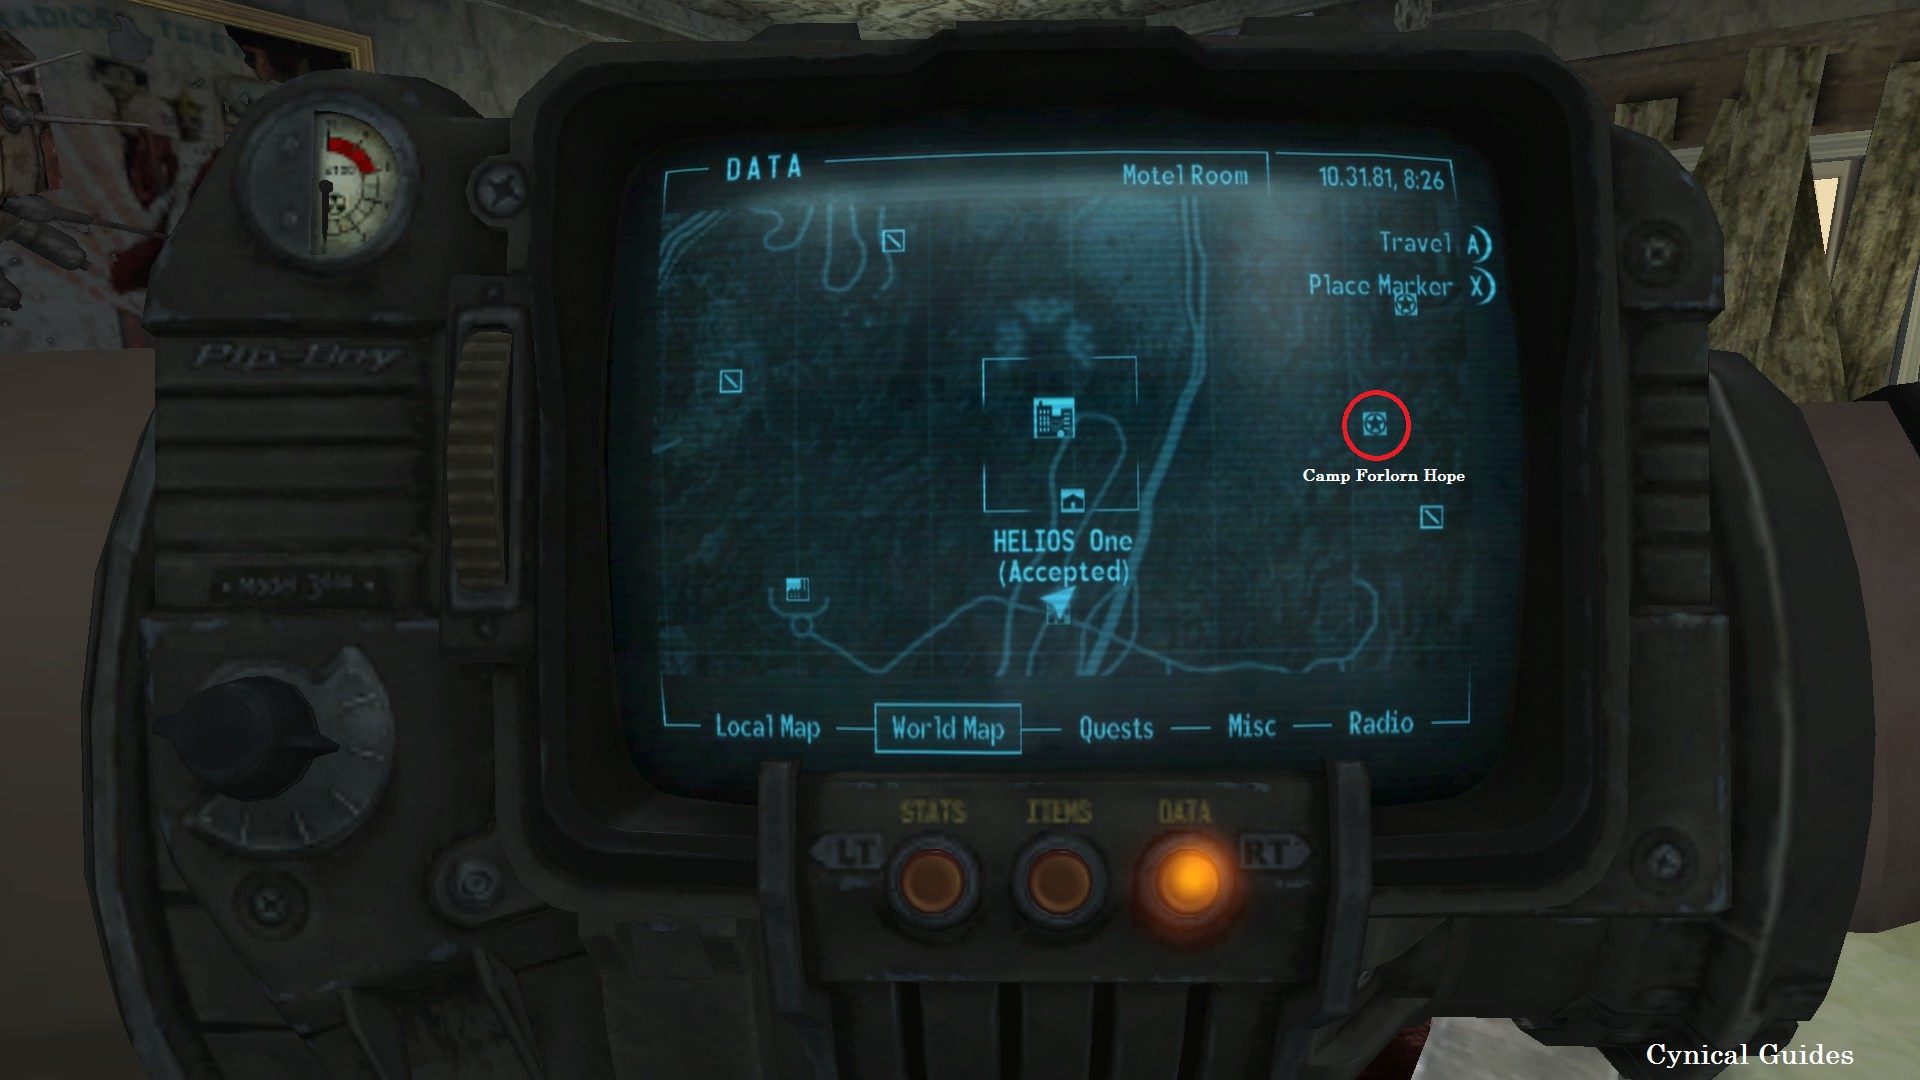
Enter the Command Center Tent & speak with Tech Sergeant Reyes & ask her if she needs any help. She does. Agree to help her & we will receive the Side Quest Return to Sender to update the 6 Ranger Stations. We will chip away at this quest as we come across these stations; Delta, Charlie, & Echo can be located pretty easily but the other three we will get to later.
There are non-Achievement related Side Quests here at Forlorn Hope, one being the Side Quest Restoring Hope. Refrain from doing this Side Quest as we will have to fight members of Caesar’s Legion, reducing our Favour or making them permanently hostile. It is very hard regaining Favour with the Legion after it has been lost.
On this note, Ranger Station Charlie has been taken over by the Legion, so do not bring Boone here or the soldiers will become hostile & make us lose Favour if they are killed.
If you go to Ranger Station Echo & speak with Comm Officer Green, exhaust their dialogue & the Cottonwood Cove location will appear on our map. This is a primary base for Caesar’s Legion; consider dropping by there (without Boone) so we can Fast Travel here later on. If you bring the camp leader Aurelius of Phoenix NCR Dog Tags, we can gain some Favour with the Legion. Though we have to come by them conventionally without killing NCR Troopers.
Companion #3 – Veronica: Make your way North from Novac along the highway & you will reach the 188 Trading Post.

We can find the NPC Veronica at the end of a bridge close to the canteen. Simply chat her up & she will ask to join our party, if we have room for her. There are no prerequisites, simply dismiss Boone or ED-E if you have them both in your party & we will have 3/8 Companions unlocked.
Veronica is my personal favourite Companion. She is tanky & deals some serious damage when equipped with a modded Power Fist (GRA).
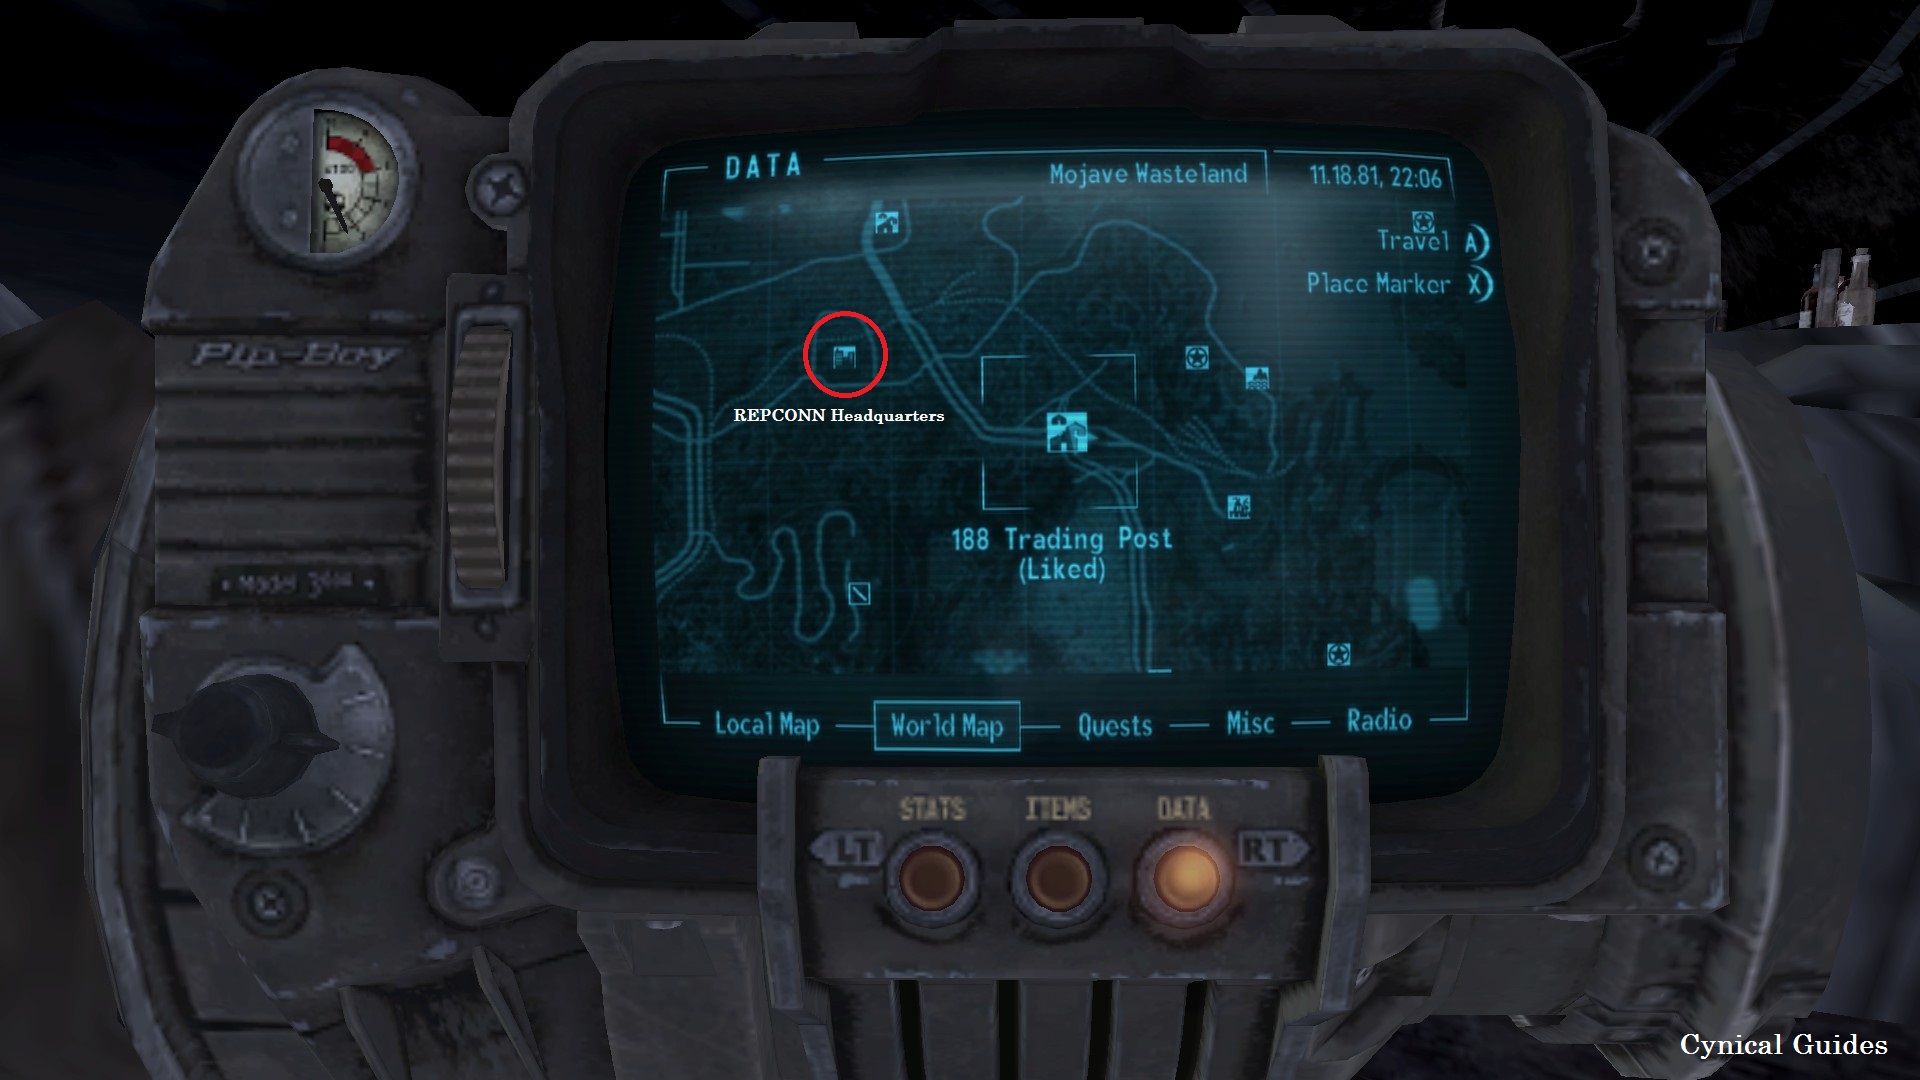
Depending on where you explore, there is a location North West of the 188 Trading Post called the REPCONN Headquarters. Ignore this location for now, it is a great location for farming two Gun Runner Challenges & we will want the enemies there alive for it.

Achievement #11 – They Went That-A-Way: Complete They Went That-A-Way.
Story Related. If you spoke to Manny Vargas in Novac after “getting rid of the Ghouls” at REPCONN, he will have told us that the Great Khans we are looking for were headed to Boulder City. Head East from the 188 Trading Post along the highway to Boulder City where we can speak to Lieutenant Monroe. The Great Khans are held up in the Boulder City Ruins. Enter the Great Khan Hideout & speak with their leader, Jessup, to unlock the Achievement. Be nice, we need the Khans for later…
If we complete the Side Quest Boulder City Showdown by getting the Great Khans out of the town safely, we can instantly become Accepted amongst them as well as gaining a bit of NCR Favour (This Achievement also instantly unlocks if you travel all the way to the Tops Casino in the New Vegas Strip & bypass the entire Main Quest leading up to that point. It cannot be missed no matter how you approach it.)
Companion #4 – Cass #2: Make your way over to the Crimson Caravan Company to speak with Alice McLafferty. Along the way, be sure to stop at the Gun Runners location to pick up some really good Weapons, if you have the spare Caps. Consider getting a 5.56 Pistol (GRA) as we need it for two different Gun Runner Challenges.
After speaking with McLafferty, complete the first task of the Side Quest You Can Depend On Me by reporting to Camp McCarren. When the invoice has been delivered, return to McLafferty & the Recruitment Quest Heartache By the Number will be progressed.
It should be noted that if you collect the Side Quest There Stands the Grass from Dr. Hildern while in Camp McCarren, Recruitment Quest Heartache By the Number will become glitched & will never complete. This will not affect us recruiting Cass, but we will miss out on the XP reward for completing the quest. Something to keep in mind.
Return back to Cass at the Mojave Outpost to convince her to join our party. We either need a Barter Skill of 50 or 75, or a Speech Skill of 50 or 75. Make either Skill Check, & we will be able to recruit Cass.
Companion #5 – Arcade Gannon: Enter Freeside in New Vegas & make your way over to the Old Mormon Fort inside. In the fort, search around for an NPC wearing a lab coat named Arcade Gannon. There is no Recruitment Quest involved for him, but we will need to have a Speech Skill of at least 75 to get him to “party up” with us. Complete the Speech Check, & we will have collected another Companion.
Snow Globe #2 – Mormon Fort: While still in the Old Mormon Fort, head into the tower directly to the right of the gates we entered the fort through. Take the stairs all the way up to the top floor & we can find the Snow Globe on top of a shelf in the room here.
Make your way over to the Strip entrance now. To enter the Strip, we either need to pass the credit check of having 2000 Caps in our Inventory, or by purchasing a Passport for 500 Caps from Ralph at Mick & Ralph’s in Freeside.
Sequence 5: What Happens In Vegas
1. The Strip
- Snow Globes: 4/7
- Companions: 5/8
- Sunset Star Bottle Caps: 25/50
- Locations: 44/125
- Level: 13/30
-----------------------------------------------------------------------------------------------------
Main Quest – The House Always Wins I #1: When you enter the Strip, follow Victor over to the entrance to the Lucky 38. Speak with him there & ask to meet his boss, Mr. House. The doors will open & we will be able to enter the legendary casino. Get Victor to take you up to the Penthouse where we can speak to Mr. House, Main Faction #3. Be civil with him & we will progress the Main Quest The House Always Wins I. There is an Achievement associated with this Main Quest, but completing it will make us join Mr. Houses Faction, which we do not want to do just yet.
After meeting Mr. House, we will now gain access to the Presidential Suite inside the Lucky 38. This will be our new base of operations; we can even go around & get all our previously met Companions to all relocate there so they can all be in the same place. If you are Very Evil though, Cass may permanently quit our party so be careful. It won’t void The Whole Gang’s Here Achievement if that happens though since we have had her in our party at least once.
Snow Globe #3 – Test Site: While still in the Lucky 38, get Victor to take us to the Cocktail Lounge. Follow the bar counter along left or right until you get to the wall on the other side of the elevator; we can find the Snow Globe tucked behind a cash register here.
We can take our collected Snow Globes to the Securitron Jane on the Penthouse Floor. She will give us 2000 Caps per Snow Globe & they will be put on display in our suite.

Achievement #12 – Ring-A-Ding-Ding: Complete Ring-A-Ding-Ding.
Story Related. When you are ready, make your way over to The Tops Casino. When you enter, track down Benny & speak with him to progress the Main Quest. (If you skipped the Main Quest They Went That-A-Way & went straight for The Strip, that quest/Achievement will instantly unlock for you when you see Benny). While we do have the option to kill Benny, doing so will make the Chairmen at the Tops become hostile & it will void a Side Quest we need to complete for an Achievement here.
Speak with Benny & meet up with him in the Presidential Suite. If you have a high Speech Skill you may be able to convince Benny to actually show up in the room. If not, we will be ambushed by some Chairmen (which happens even if he does show up). Collect Benny’s Suite Key off one of the Chairmen & make your way to Benny’s room. Inside, we can find the Yes Man, the Main Quest giver for the fourth & final Main Faction. Ask him if he has seen Benny & the Main Quest Ring-A-Ding-Ding will complete, unlocking the Achievement.
Main Quest – Wild Card #1: Exhaust Yes Man’s dialogue & we will receive a whole slew of Main Quests we need to complete for his Faction. We have to complete these same Main Quests regarding the Minor Factions for the other three Main Factions so we want to collect each instance of it so we can complete all of them simultaneously. For the Main Factions, we have to either destroy or have join us the Minor Factions of the game. These are: The Brotherhood of Steel, The Boomers, The Great Khans, The White Glove Society, & The Omertas.
Dealing with these Minor Factions will be our second order of business, first though, we will do some Achievement mopping up & complete some random Side Quests.
Side Quest – Talent Pool #1: While still in The Tops Casino, head up to The Aces Theater on the second floor. Here we can speak to Tommy Torini & receive this Side Quest. There are four NPCs we have to track; they fortunately all have Quest Markers on them & will not be very difficult to find.
Main Quest – Render Unto Caesar #1: When we exit The Tops, we will be intercepted by Vulpes Inculta. This is a very important encounter as we will receive this Main Quest as well as the Mark of Caesar, unlocking Caesar’s Legion as a Main Faction for us. Accept Caesar’s invitation; we will be meeting up with him shortly to receive his factions Main Quests.
Snow Globe #4 – The Strip: Carry on into the next area of The Strip past The Tops Casino & enter the Vault 21 Gift Shop. Make your way down the stairs & enter Vault 21. From the doorway, take a left down the stairs into a large common room. Take another left through a doorway & follow the hall straight down. There will be an unlocked door to our left with a locked one directly afterwards on our left. To get inside, we need a Lockpick Skill of 50 or higher. Pick the lock, & we can find the Snow Globe on an end table in between the two beds in the room.
Vault 21 is a bit of a maze & getting lost is unfortunately easy.
Main Quest – For the Republic #1: In the same area of The Strip as Vault 21, make your way over to the NCR Embassy. Track down Ambassador Dennis Crocker & accept the Side Quest Things That Go Boom to deal with the Boomers. Unlike Yes Man’s Faction where we get all Side Quests at once, we have to complete the Side Quests individually for the NCR.
Now we just need to meet Caesar & we can begin chipping away at the Minor Factions.

Achievement #13 – Talent Pool: Complete Talent Pool.
With the Side Quest Talent Pool from Tommy Torini at The Tops Casino, go speak to Billy Knight on The Strip, Hadrian at the Atomic Wrangler, Bruce Isaac at the Novac motel, & The Lonesome Drifter who is South down the highway from the 188 Trading Post. After speaking with them all & giving them Tommy’s card, return to Tommy & the Side Quest will complete unlocking the Achievement.
Sequence 6: Chicken Dinner
1. Freeside, The Strip
- Snow Globes: 4/7
- Companions: 6/8
- Sunset Star Bottle Caps: 25/50
- Locations: 44/125
- Level: 16/30
-----------------------------------------------------------------------------------------------------

Achievement #14 – G.I. Blues: Complete G.I. Blues.
Head over to the King’s School of Impersonation in Freeside & speak with Pacer so you can meet with The King. Accept this Side Quest from The King & follow it through. Diffuse the situation between The King’s & the NCR & complete the quest to unlock the Achievement.
Companion #6 – Rex: Speak with The King about his dog Rex to receive the Recruitment Quest Nothin’ But A Hound Dog. Speak with Julie Farkas at the Old Mormon Fort & report back to The King to tell him that Rex can be healed. If you do not have ED-E in your party, we can recruit Rex.
To progress his quest further, we need to go all the way over to Jacobstown which is a long ways away. For now, dismiss Rex to The Lucky 38, we can complete his quest later. As of now, he is officially unlocked as a Companion if you received his Companion Perk at least once.
Consider doing some Side Quests around Freeside for some Favour & XP while we are here.

Achievement #15 – Outstanding Orator: Make 50 Speech Challenges.
Try getting your Character to Speech Skill 100 as soon as you can so you do not miss out on Speech Checks. I got to 100 around Level 10 & had quite a jump on these Checks. There are well over 50 Speech Checks in the game, but they are limited instances. This Achievement can technically become missable if you progress to far without completing a lot of them.
Fortunately, there are Speech Checks in all 4 DLCs which will count towards the Achievement as well.

Achievement #16 – The Courier Who Broke the Bank: Get banned from the Strip's 3 casinos.
This is a very fun Achievement to get, if not a little bit grindy. It can either be very easy or very, very grindy depending on how much Luck you have. Ideally, you will have created your Character to have at least 5 in Luck or higher (I chose 5). There are a few ways we can boost this Attribute; the Intense Training Perk can put a point in Luck every time we take it but that in theory is a waste of a Perk.
To start, let’s get the Luck Implant from the New Vegas Medical Clinic, though it will cost us 4000 Caps (I highly recommend saving Caps to purchase as many Implants as you can afford, they are very handy). The other piece we will collect is the Naughty Nightwear which can only be purchased from Mick, at Mick & Ralph’s for 200 Caps. This will give us a 7 in Luck, what we need to start influencing Blackjack. If you do not have 7, keep Leveling Up & use some Perks on Intense Training for Luck. You may also have boosts to Luck from Traits you chose at the start of the game like Early Bird.
Once you have 7-8 Luck, we can begin racking in the Caps. We need to get banned from the three major casinos of The Strip: Gomorrah, The Tops, & Ultra-Luxe.
To get banned from Gomorrah, we need to make 9,000 Caps.
To get banned from The Tops, we need to make 10,000 Caps.
To get banned from Ultra-Luxe, we need to make 15,000 Caps.
Start at Gomorrah & work your way through the casinos. Blackjack is the fastest way to do this. Purchase 1000 Chips at a casino, Save your game, & hit the tables. Bet the max every time you deal yourself in. If you are on a winning streak, Save your game, if you lose more than 2000 Chip in a sitting reload your Save. I like Saving after every 1000 Chips for a sense of progression. If you reload your Save, you must wait a whole 60 seconds for the tables to reset; this can get very tedious.
For Blackjack, if your cards total 2-15 choose Hit or Double Down depending on how skilled you are at Blackjack. If your cards total 16-21, choose Stay. The goal is to get your cards to total 21 or as close to it as possible without going over. Kings, Queens, & Jacks equal 10 while Aces are either 1 or 11 depending on what your total is. Once you get a feel for the game you will learn when is best to Hit, Stay, or Double Down. It is a bit of a science, but you will get the hang of it over time.
After we get banned from all three casinos, the Achievement will unlock & we will have a tidy sum of Caps. Consider spending them on other Implants at the New Vegas Clinic or on some epic Weapons from Gun Runners. See the Achievements below for some other things to chip away at while we are on our gambling spree at the casinos.

Achievement #17 – Double Down: Play 10 hands of Blackjack.
This will come naturally as we work towards getting banned from the three casinos. You do not have to win 10 hands, only play them which definitely helps. After playing 10 hands, the Achievement will unlock.

Achievement #18 – One Armed Bandit: Play 10 spins of Slots.
While we are working towards getting banned from the three casinos, take a break from Blackjack & head over to the Slot Machines. Simply play (not win) 10 spins on any Slot to unlock the Achievement.
You can reload afterwards, but if you have a good amount of Chips on you, consider Saving afterwards for the XP we will get for completing this Challenge.

Achievement #19 – Little Wheel: Play 10 spins of Roulette.
While we are working towards getting banned from the three casinos, take a break from Blackjack & head over to the Roulette tables. Simply play (not win) 10 rolls at any table to unlock the Achievement.
You can reload afterwards, but if you have a good amount of Chips on you, consider Saving afterwards for the XP we will get for completing this Challenge.
Sequence 7: High Tech, Low Life
1. The Fort, Nellis Airforce Base, REPCONN Headquarters, Crashed Vertibird
- GRA *: 1/3
- GRA **: 0/3
- GRA ***: 1/3
- Snow Globes: 5/7
- Companions: 6/8
- Sunset Star Bottle Caps: 30/50
- Locations: 55/125
- Level: 18/30
-----------------------------------------------------------------------------------------------------
Render Unto Caesar #2: Before we carry into the “next Chapter of the game”, we need to meet Caesar himself. Travel to Cottonwood Cove & speak with Cursor Lucullus to take us over to The Fort. Head up the hill & enter Caesar’s Tent & speak with him to progress The Legion’s Main Questline. We will be tasked with blowing up Mr. House’s Bunker beneath The Fort. Do not do this yet! The Bunker is a clincher location for all four Main Factions!
We will receive the Platinum Chip after speaking with Caesar, but we will be unable to take it with us unless we either kill him or do as he asks. Benny is here as well, but again, we cannot do anything with him unless we destroy the Bunker or make the Legion hostile. Leave Benny & the Chip be for now, we progressed the Main Questline for The Legion & unlocked Cottonwood Cove & The Fort as a Fast Travel locations.
While we are here, collect the Side Quests The Finger of Suspicion & I Hear You Knocking from Caesar’s Tent. These will help us gain hard to earn Favour with The Legion. Fight in the arena at The Fort as well for extra Favour. We want to become Accepted by them as soon as possible.
Side Quest – Volare #1: Now head to Nellis Air Force Base & make contact with The Boomers. Getting to their base can be a bit tricky; hang left along the rock walls & sprint to their base. Reaching the fence will stop their bombardment. Consider leaving your Companions behind somewhere safe, it is unlikely they will survive if you take them with you. Once contact with Mother Pearl has been made, we will receive this Side Quest. Help out The Boomers with their tasks & increase Favour with them. We need to reach Idolized Reputation with them to progress the Side Quest.
Snow Globe #5 – Nellis AFB: We can find this Snow Globe inside the Nellis Boomer Museum on a table to the right of the entrance.

Achievement #20 – Volare: Complete Volare!
After we are Idolized among The Boomers, return to Mother Pearl & progress the Side Quest. Agree to lift the B-29 Bomber from Lake Mead for them. Make your way to the Crashed B-29 & attach the ballast underneath it. Raise up the plane & report back to Loyal & Mother Pearl to complete the quest & unlock the Achievement.
The Boomers are now on our side & will join us with any Faction we decide to side with at the end of the game. Report back to Yes Man & Ambassador Crocker back at The Strip & tell them the good news. After completing the Side Quest Things That Go Boom, hold off on starting the next Side Quest King’s Gambit so as to not progress the NCR Main Questline too far.

Achievement #21 – Walker of the Mojave: Discover 50 locations.
This will come naturally as we progress through the game. We need to discover a total of 125 locations so do not be shy when we are exploring. Fortunately, locations from the DLCs will count towards this.
GRA *** Challenge #1 – Man-Machine Interface: Kill 10 Mojave Wasteland Mr. Gutsies &/or Sentry Bots with Brass Knuckles, Spiked Knuckles, Tire Irons, &/or Lead Pipes.
While we are at Nellis, search around the base to locate 5 Mr. Gutsies. These Gutsies can only be safely destroyed if you took the Robotics Expert Perk. You need to be Level 12 & have a Science Skill of 50. It will allow you to sneak up & disable any Robot enemy letting you destroy them without retaliation. Making the Gutsies aggressive will make The Boomers hostile gaining you Infamy. Only attempt this if you have Robotics Expert. These Gutsies will respawn here every 72 hours if you wait somewhere other than Nellis making them an infinite source for this Challenge. I recommend using Brass or Spiked Knuckles so we can work towards our 10,000 damage dealt with Unarmed Weapons.
If you do not have the Robotics Expert Perk, see the below Challenge for other locations we can find Mr. Gutsies or Sentry Bots.
GRA * Challenge #1 – Benefit or Hazard: Kill 15 Robots with 5.56mm Pistols.
This Challenge can be done on any type of Robot in the game. Mr. Handies, Mr. Gutsies, Protectrons, Sentry Bots, or Securitrons. If you do not have the Robotics Expert Perk this is a good Challenge to do in tandem with GRA *** Challenge – Man-Machine Interface. Swap between Weapons as necessary.
A good source of Robotic enemies can be found at the REPCONN Headquarters located North West of the 188 Trading Post. I recommend leaving your Companions outside the building, so they do not steal your kills. Lowering the Difficulty will also drastically improve how hard this is for you.
Outside the Headquarters: Kills for 5.56 Pistol – Maintenance Robot x3
Office Main Floor: Kills for 5.56 Pistol – Maintenance Robot x1, Tour Guide x1, Mobile Facial Recognition Scanner x1. Kills for Spiked Knuckles (or other) – Set off the alarm by attacking any Robot on this floor to summon 4 Sentry Bots.
Office Second Floor: Kills for 5.56 Pistol – Maintenance Robot x2, Mobile Facial Recognition Scanner x3. Kills for Spiked Knuckles (or other) – Set off the alarm by attacking any Robot on this floor to summon 5 Sentry Bots.
Office Top Floor: Kills for 5.56 Pistol –Mobile Facial Recognition Scanner x2. Kills for Spiked Knuckles (or other) – Set off the alarm by attacking any Robot on this floor to summon 3 Sentry Bots.
You probably will not have the required amount of kills for one or both Challenges. The next location we can farm some kills from is the Crash Vertibird. This area is much, much more difficult than REPCONN; be sure to lower your Difficulty to Very Easy for this one if you have not already…
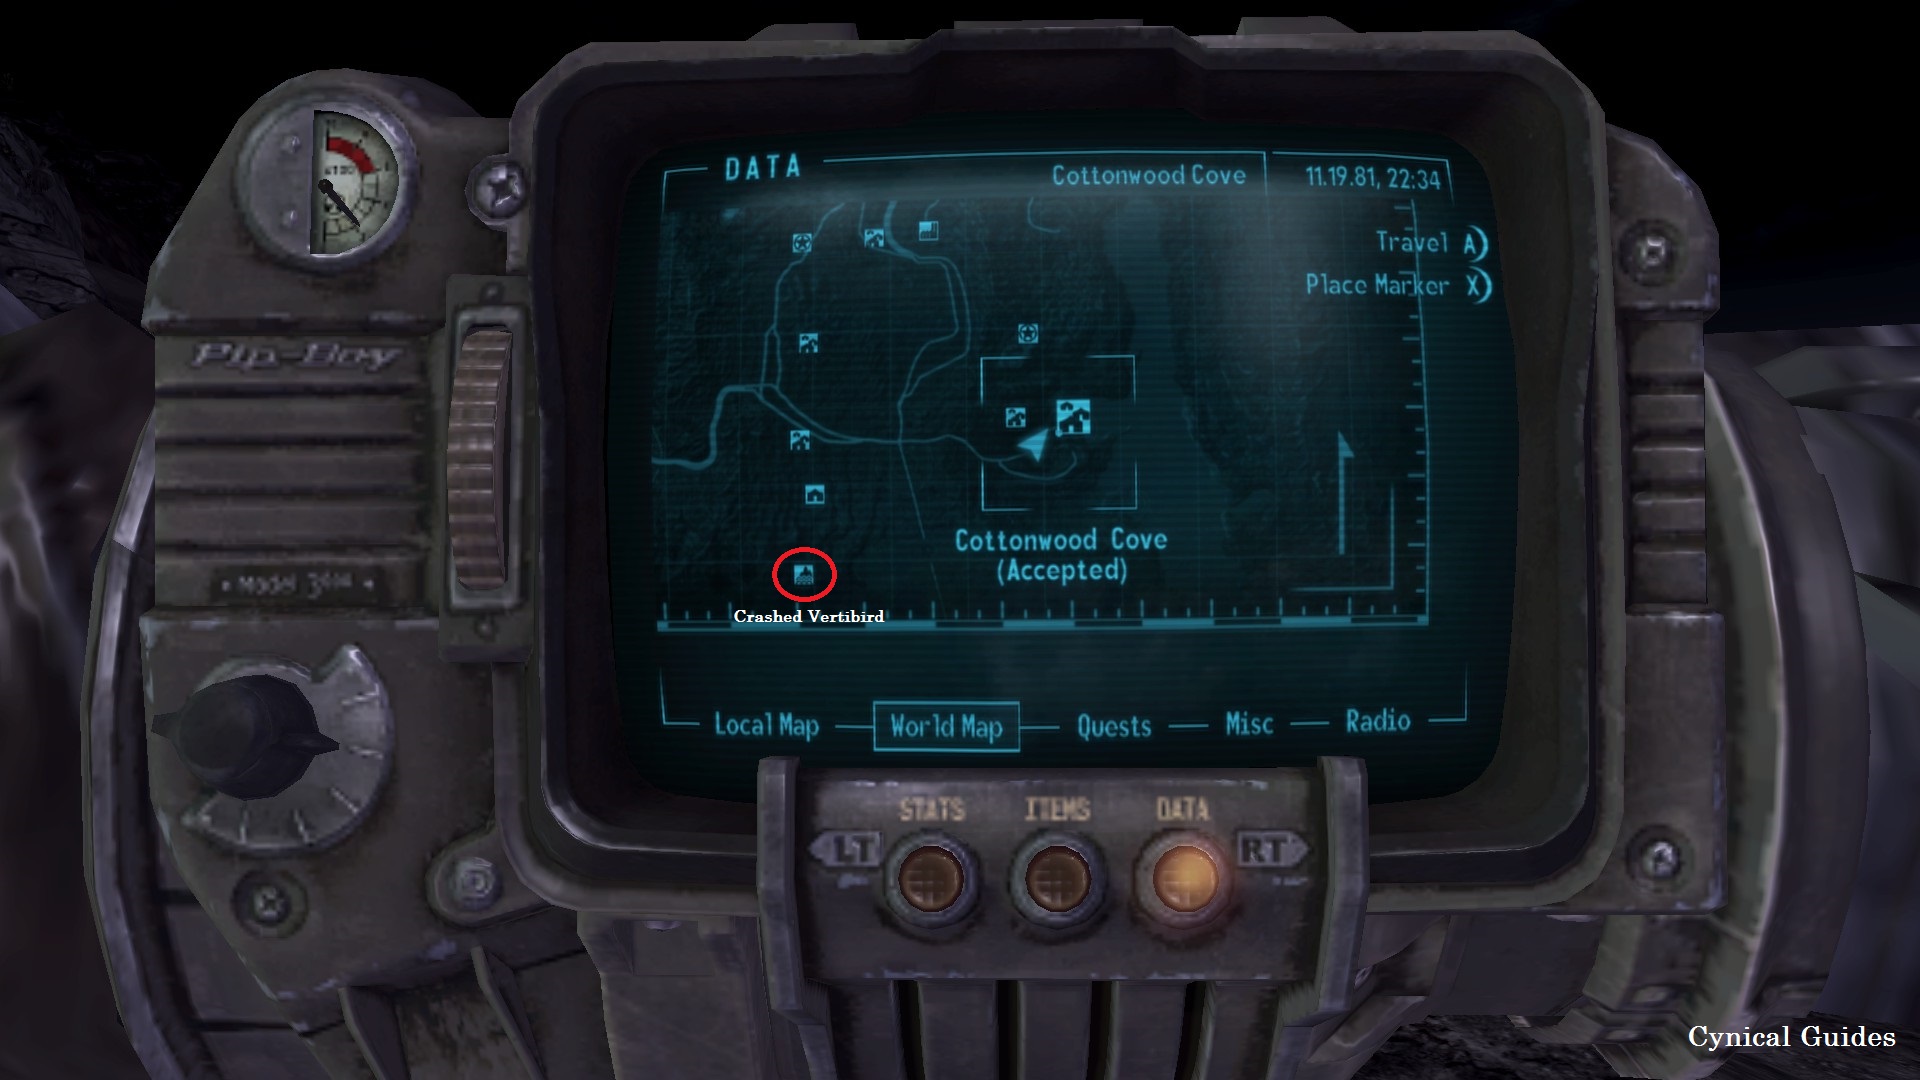
Mr. Gutsies x4 Sentry Bots x4
If the Crashed Vertibird is too difficult, then save GRA *** Challenge – Man-Machine Interface & try to unlock the Robotics Expert Perk ASAP so you can farm it back at Nellis with ease. We can get the final Robot kills we need with the 5.56 Pistol at the Sunset Sarsaparilla Headquarters…
Sequence 8: Wish For A Nuclear Winter
1. Sunset Sarsaparilla Headquarters, Vault 3, The Strip
- GRA *: 2/3
- GRA **: 2/3
- GRA ***: 1/3
- Snow Globes: 5/7
- Companions: 6/8
- Sunset Star Bottle Caps: 31/50
- Locations: 60/125
- Level: 20/30
-----------------------------------------------------------------------------------------------------
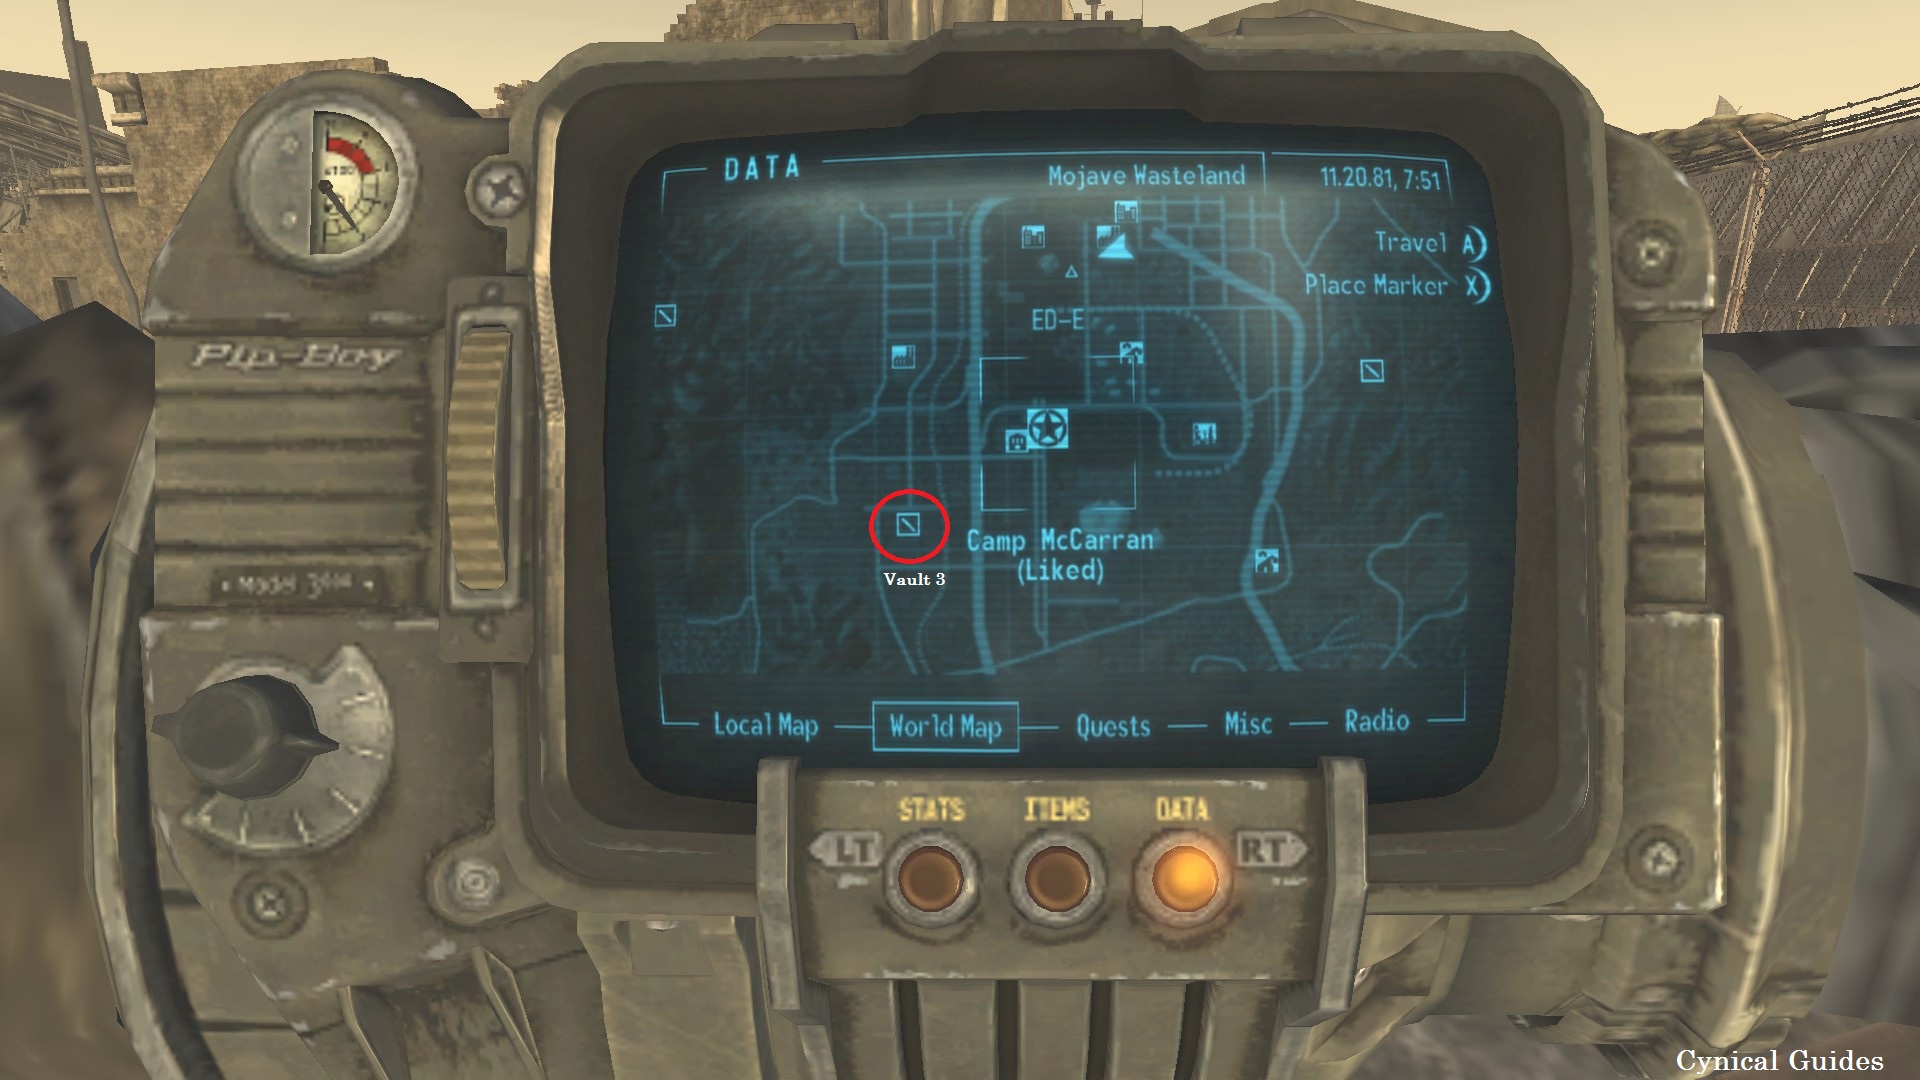
If you still need some Robot kills with the 5.56 Pistol, we can get the last few we need at the Sunset Sarsaparilla Headquarters, West of Camp McCarren.

Side Quest – The Legend of the Star #1: Enter the headquarters & look to the left of the front desk to find an animatronic cowboy in a booth named Festus. Speak with him, & we will unlock this Side Quest. We need to bring Festus 50 Sunset Star Sarsaparilla Caps to complete the quest & unlock the associated Achievement. These things can be found all across the Mojave & have a 5% chance of dropping when you consume a bottle of Sunset Sarsaparilla. Always collect these drinks & consume them whenever you can for a chance to get a Star Cap. It makes grinding them a lot easier the sooner we chip away at them.
I would hold onto your Star Caps until we have 50 of them before depositing them with Festus. That way, we know exactly how many more we need to collect before we turn them in.
There are two GRA Challenges we can complete here at Vault 3 due to the sheer number of Fiends here. Again, leave your Companions behind so they do not steal kills from us. For these Challenges, pick yourself up a Sawed-Off Shotgun & then either a Machete, Baseball Bat, Tire Iron, Lead Pipe, or a .44 Magnum Revolver. The Sawed-Off Shotgun is a must, but you can use all the other Weapons as well for the other GRA Challenge.
GRA * Challenge #2 – Ne Ne Ne Ne: Cripple 5 Right Arms with Shotguns.
Pretty straightforward, with our Sawed-Off Shotgun locate some Fiends & simply Cripple their Right Arms. This is easiest done in VATS. Technically any Shotgun will do (except for the Sturdy Caravan Shotgun!), but since we also have to kill Fiends with a Sawed-Off, this just makes our lives easier.
GRA ** Challenge #1 – White Line Nightmare: Kill 20 Fiends, Vipers, or Jackals with Tire Irons, Baseball Bats, Lead Pipes, Machetes, .44 Magnum Revolvers, or Sawed-Off Shotguns.
Bring over any assortment of these Weapons to Vault 3 & go ham on the Fiends here. There should be the majority of your kills in Vault 3 itself or in the general vicinity around it. If for some reason you are missing a few kills, just always pack one of these Weapons around with you for when you stumble across these enemy types.
South of Vault 3 is an unmarked Fiend camp that is swarming with enemies led by a unique Fiend named Driver Nephi. He drops a unique golf club called Nephi’s Golf Driver. We need to hold onto this Weapon for the GRA * Challenge – A Slave Obeys for killing Mr. House with any Golf Club (9-Iron works as well). There are not many Golf Clubs in the game, so if you find one be sure to store it somewhere safe…

Achievement #22 – Lead Dealer: Cause 10,000 damage with Guns.
If Guns are your primary Weapon type, then this Achievement will unlock naturally for you over the course of the game. Between using that 5.56 Pistol & Sawed-Off Shotgun for the GRA Challenges, I capped off the last damage I needed. Obviously, the more powerful the Gun you are using, the faster you will accumulate damage for the Achievement. These damage Achievements can be unlocked during the DLCs as well, so we have plenty of time to chip away at them.
After you unlock a 10,000 damage with X Weapon Achievement, move on to the next one to maximize your time. We need to do this for Explosive, Energy, Melee, Unarmed, GRA, & Unique Weapons.
GRA ** Challenge #2 – Nyah! See?: Kill 10 Chairmen, White Gloves, or Omertas with any Submachine Gun, Light Machine Gun, or Minigun.
This Challenge will align for having to deal with the White Glove Society & the Omertas. We will be unable to take any of these Guns with us inside, so we have to find them inside the casinos. I would leave your Companions outside the casinos as well, so they do not steal kills.
To start, let us go to Gomorrah & complete the Side Quest How Little We Know. Be sure to bring in lots of 10mm ammo inside with you as a 10mm Submachine Gun can be collected from a Gomorrah Dealer. Whatever happens with the Omertas at this point in the Main Questline will not affect the results of the four Main Factions very much. Caesar’s Legion are allied with the Omertas, but there is a loophole for us to do this without effecting our Favour with them. It will not become relevant until later on.
Complete the Side Quest How Little We Know however you like & that will be all our business we have in Gomorrah. Of course, be sure you have unlocked The Courier Who Broke the Bank Achievement, or at least be banned from gambling at Gomorrah or our Achievement will be void. It is highly likely we will be gunning down the Dealers on the casino floor in our rampage...
When our business is finished, either locate a Omerta Thug who is carrying a 10mm Sub Machine Gun (I found mine on a Dealer on the casino floor) & kill them for the Weapon, or just walk in with one & do not give your Weapons up when your asked for them. Either way, take out 10 Omerta Thugs, Dealers, or Unique Omerta NPCs with any of the appropriate Guns to complete the Challenge.
You may gain 1 point of Infamy on The Strip for attacking the Omertas, but it should not be damning. You’ll know when you leave Gomorrah. If done right, you should leave & no one will react… like it never even happened. When you are no longer in combat & you become Hidden again, you should even be able to walk back into Gomorrah & no one will be hostile… whoever is left standing that is.
With the Omertas dealt with, go over to the Ultra-Luxe & complete the Side Quest Beyond Beef however you like to deal with The White Glove Society. When both casinos are dealt with, report back to Yes Man with your decision on what happened or if they should just be ignored.

Achievement #23 – Up & Comer: Reach 20th Level.
This will come naturally as you playthrough the game. If you have been completing Side Quests, Lockpicking, Hacking, Speech Checks, & kill most things in your way then you should be either very close to Level 20 or past it. We will get well beyond Level 20 after completing all the DLCs…
Sequence 9: Legend of the Courier
1. Hidden Valley, Black Mountain, Jacobstown, Red Rock Canyon
- GRA *: 2/3
- GRA **: 3/3
- GRA ***: 1/3
- Snow Globes: 6/7
- Companions: 8/8
- Sunset Star Bottle Caps: 35/50
- Locations: 86/125
- Level: 25/30
-----------------------------------------------------------------------------------------------------
Side Quest – Still In the Dark: The Brotherhood of Steel does not have any Achievements associated with them, but a decision over their Faction is needed for all 4 Main Factions depending on how we decide to finish this Side Quest.
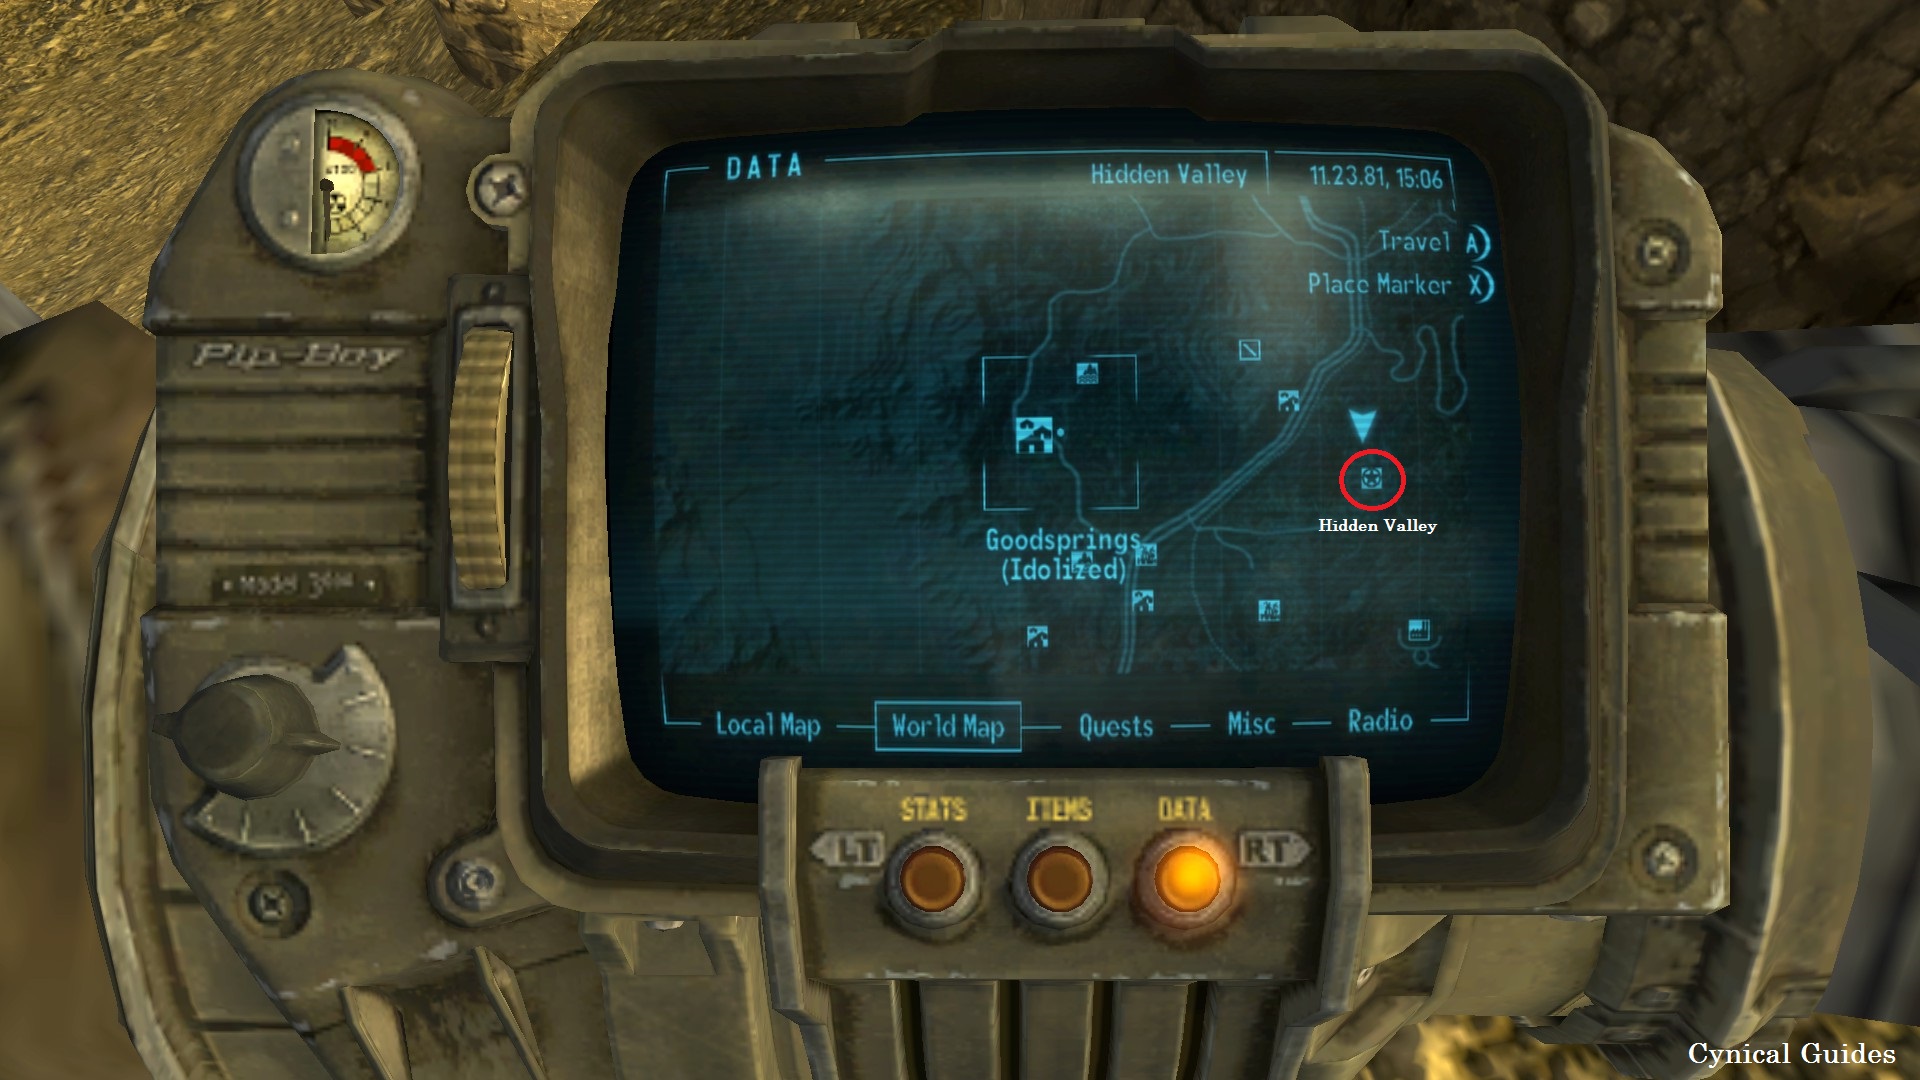
We only have the Brotherhood of Steel & Great Khans left as Minor Factions we have to deal with before we can begin our Main Faction grind. We will take care of the Brotherhood now, mop up a few things, & work our way over West to find the Great Khans.
Keeping the Brotherhood alive will let them aid us at Hoover Dam. Destroying the Brotherhood… well, will eliminate the Faction which is needed for Caesar’s Legion & Mr. House. To be safe, saving the Brotherhood is best, as later on even if we have saved them, we can still walk into their base & blow them up when we go down Caesar’s/House’s Endings.
We can find Abominations near Hidden Valley & Spore creatures in Vault 22 which we can kill with Katanas, Machetes, Dynamite, or Throwing Weapons to complete GRA * Challenge – You Do Not Belong In This World. I sometimes complete this, but usually wait to kill Mr. House with a Golf Club for my final GRA * Challenge.

Achievement #24 – Master of the Arsenal: Caused 10,000 damage with Gun Runners' Arsenal (GRA) Weapons.
Around Level 15-20 you probably will have money to begin purchasing GRA Weapons. For the most part GRA Weapons are just alternate versions of the Base Game Weapons that just deal extra damage. Very valuable. GRA Weapons can also stack with Guns, Energy, Explosive, Melee, & Unarmed Weapons & will contribute to all associated damage dealing Achievements.

Achievement #25 – Blast Mastery: Cause 10,000 damage with Energy Weapons.
After dealing 10,000 damage with Guns, I swapped to Energy Weapons to start chipping away at; unlocking it after Vault 22. The more powerful the Weapon, the more damage you will deal. Your Energy Skill Level also contributes bonus damage to your attacks as well. I used GRA Energy Weapons to speed this Achievement along…
GRA ** Challenge #3 – Vault 13’s Revenge: Kill 15 Super Mutants with 5.56mm Pistols, Plasma Defenders, Plasma Grenades, Power Fists, Rippers, or the Bozar.
For this Challenge, take any of these 6 Weapons along with us to Black Mountain (I advise leaving any Companions behind, so they do not steal our kills). There are two Side Quests we can complete on Black Mountain as well; Crazy, Crazy, Crazy if you talked to the friendly Super Mutant Neil, or if you completed the Brotherhood of Steel questline we will have access to the Side Quest Eyesight to the Blind from them.
We can find 14 Super Mutants to kill here at Black Mountain which includes Tabitha. There are not enough Super Mutants here to complete the Challenge, unless you got kills else where. Our next location will be Jacobstown, which is a Super Mutant village; we should be able to get the remaining kills we need for this Challenge there. The Super Mutants do respawn here at Black Mountain after 72 hours, but not as many as when we first came through here.
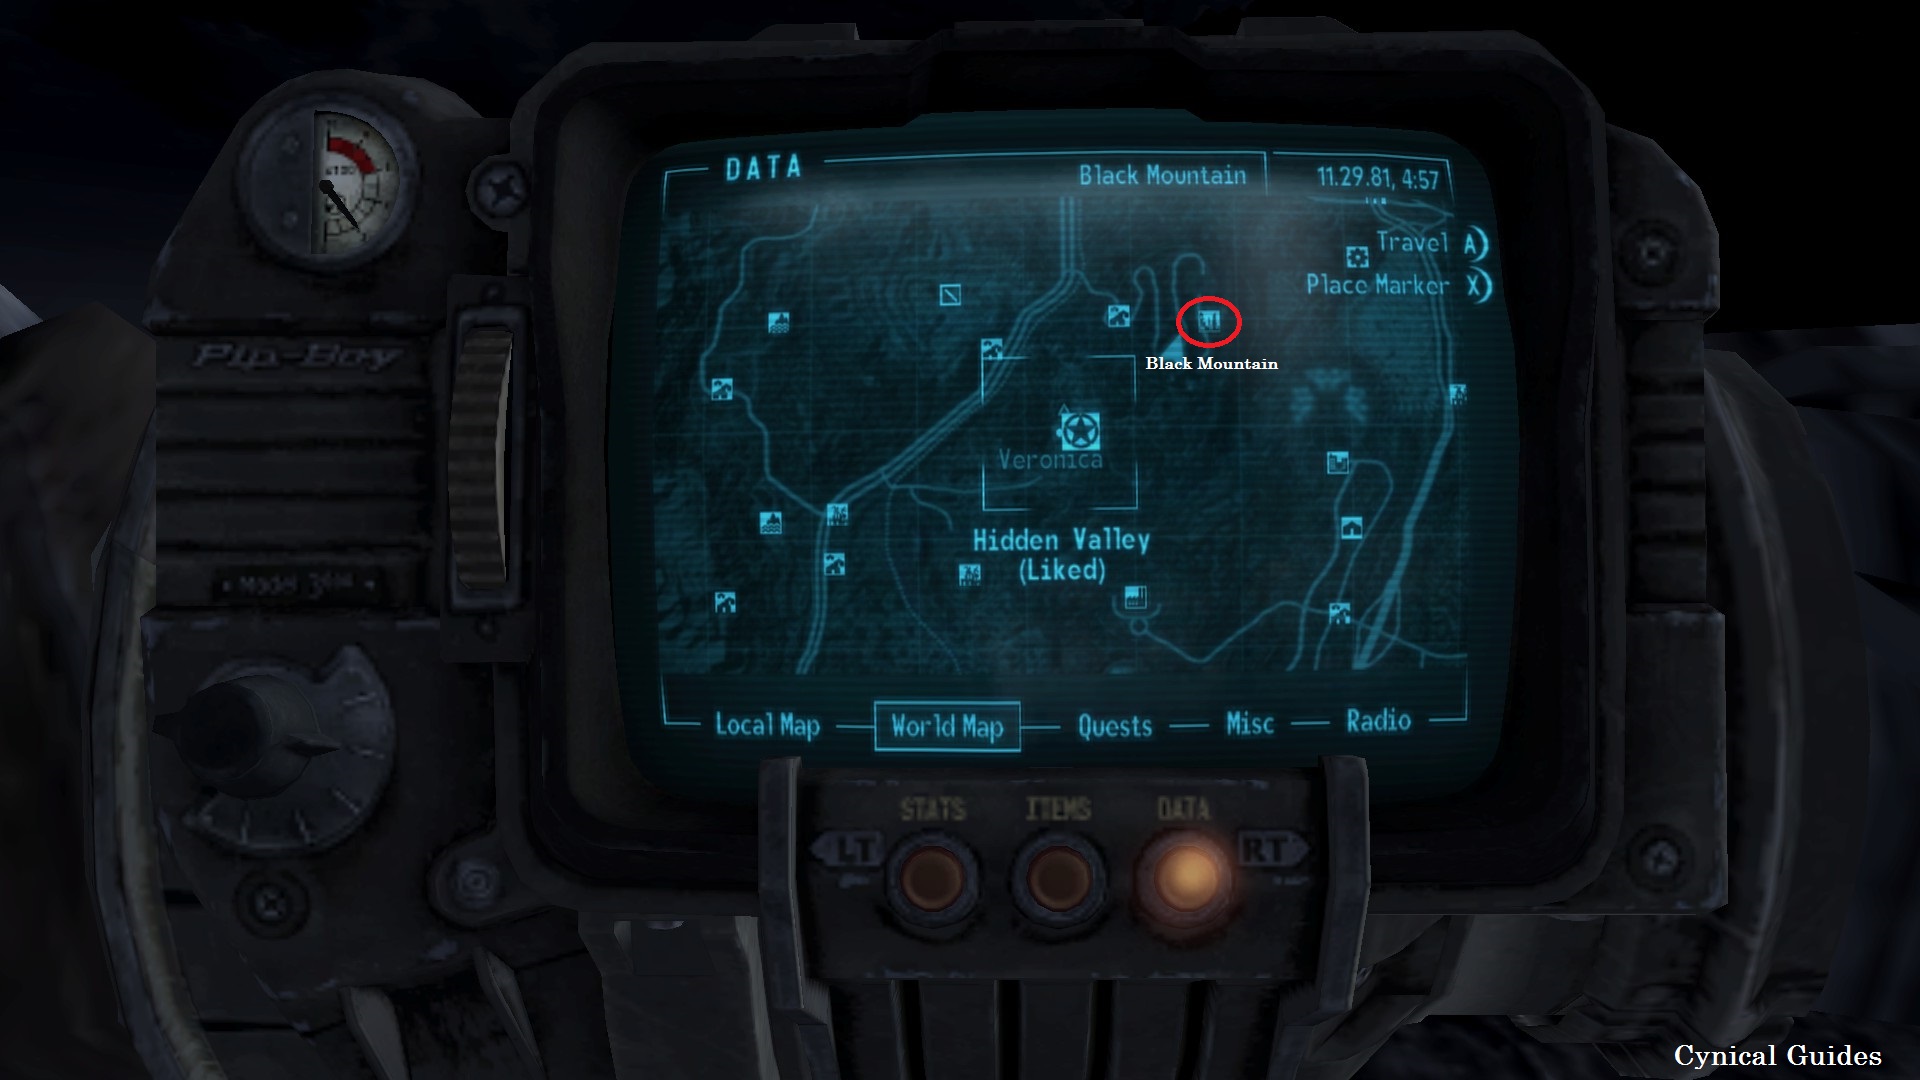
Companion #7 – Raul: We can find Raul locked in the Prison Building at the summit of Black Mountain. Simply locate him & use the terminals inside to release him from his cell. Speak with him & ask him to join our party. As simple as that.

Achievement #26 – Old-Tyme Brawler: Cause 10,000 damage with Unarmed Weapons.
If Unarmed is not your main form Melee damage, than this Achievement may take you a little bit. I pretty much exclusively got my damage for this Achievement doing the GRA *** Challenge – Man Machine Interference with Spiked Knuckles & GRA ** Challenge – Vault 13’s Revenge with a fully Modded Power Fist. Just keep on killing. The more damage the Weapon does as well as the more Skill Points you have in Unarmed; the more damage you will accumulate for the Achievement.
Snow Globe #6 – Mt. Charleston: Head to Jacobstown & enter the Jacobstown Lodge; we can find the Snow Globe sitting on top of the reception desk as soon as we are in the building.
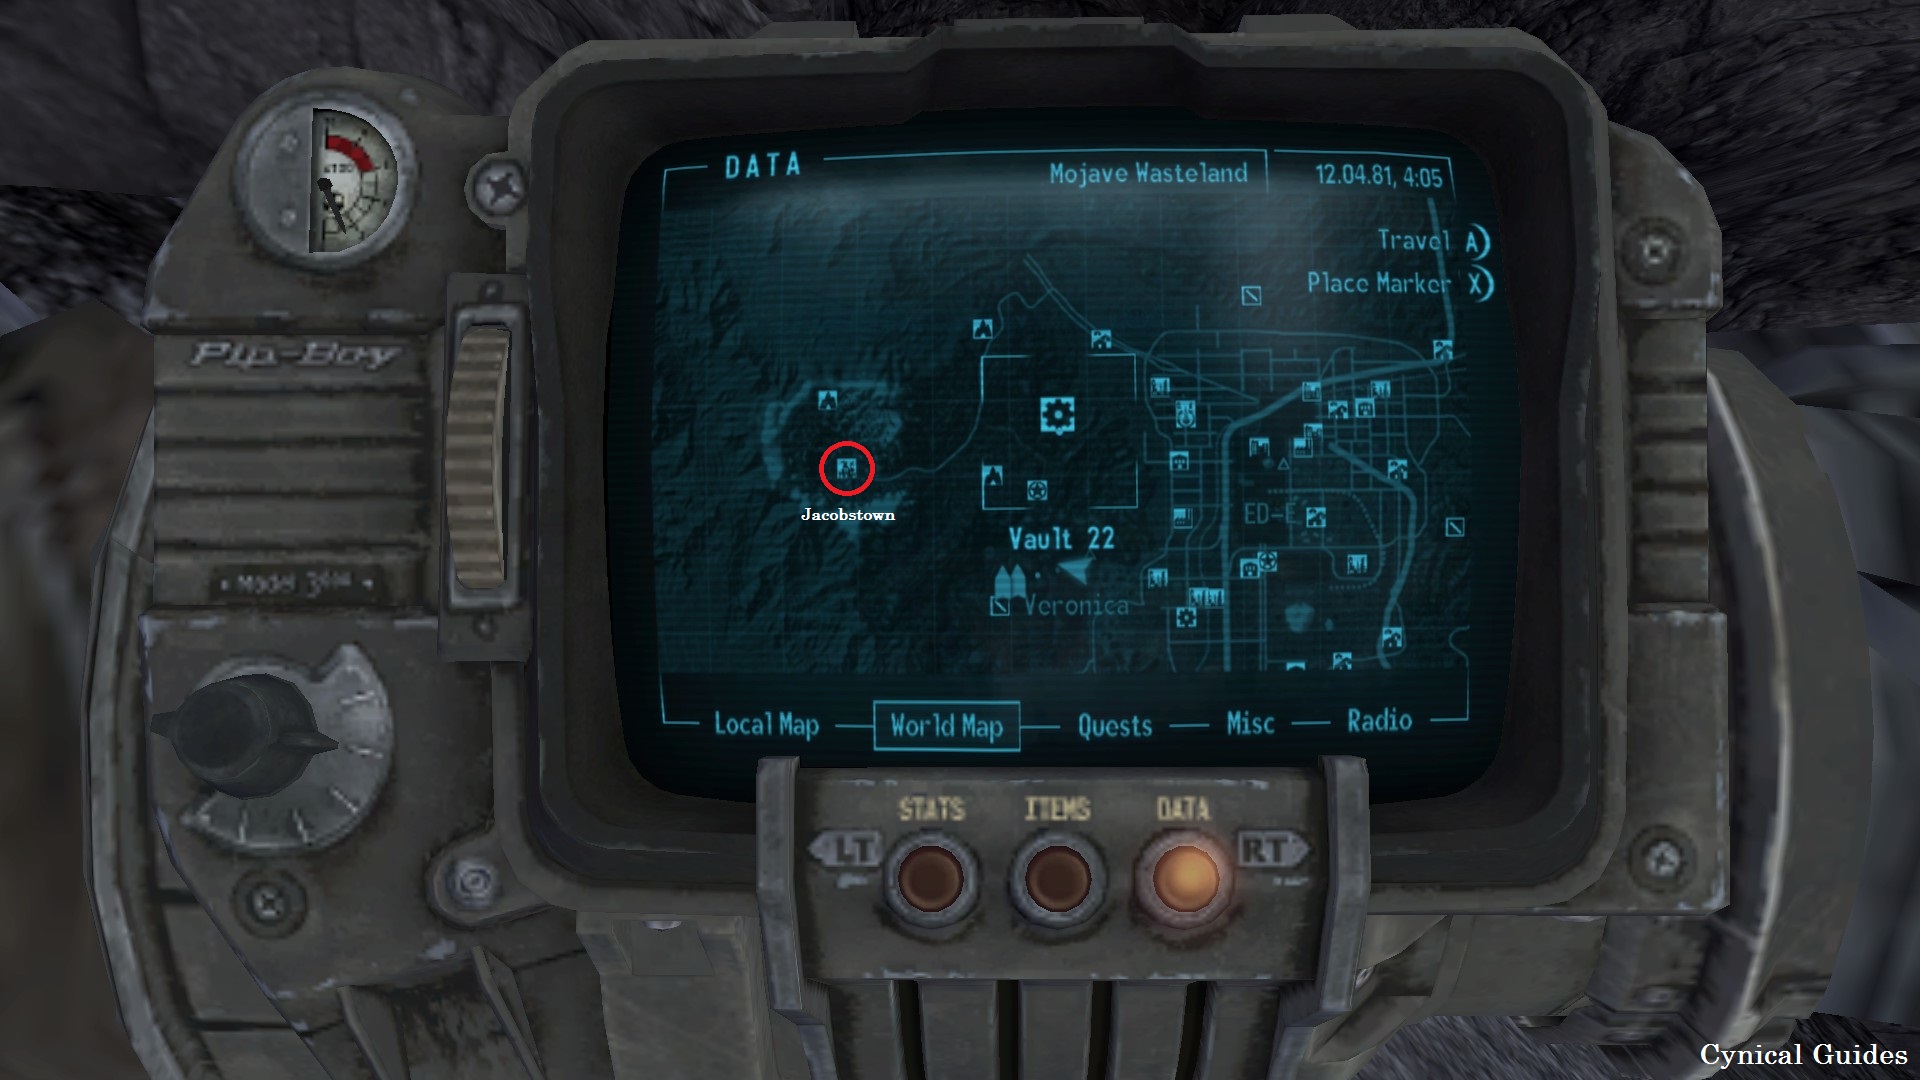
Companion #8 – Lily: While in the Jacobstown Lodge, speak with Dr. Henry to receive the Side Quest Guess Who I Saw Today. Ask for the Super Mutant Lily’s help in the quest & we will unlock her as a Companion.
We do not have to finish the Side Quest for her to count as a Companion.

Achievement #27 – The Whole Gangs’ Here: Recruit all 8 Companions.
After unlocking our final Companion & “partying up” with them, the Achievement will unlock.
This Achievement may have unlocked for you much early if you purposefully or accidentally got the bug to work by simply “partying up” with your Companion(s) 8 separate times.

Achievement #28 – Combat Veteran: Completed any three Gun Runners' Arsenal (GRA) two star (**) Challenges.
After you got the last few Super Mutant kills you need in Jacobstown you should have this Achievement unlocked.
There are 8 GRA ** Challenges in the game. White Line Nightmare, Nyah? See!, & Vault 13’s Revenge are farmable with respawning enemies & cannot be missed. The other 5 Challenges fall under very specific conditions & can be difficult to pull off/very easy to void if you kill Caesar or Benny a different way than required.
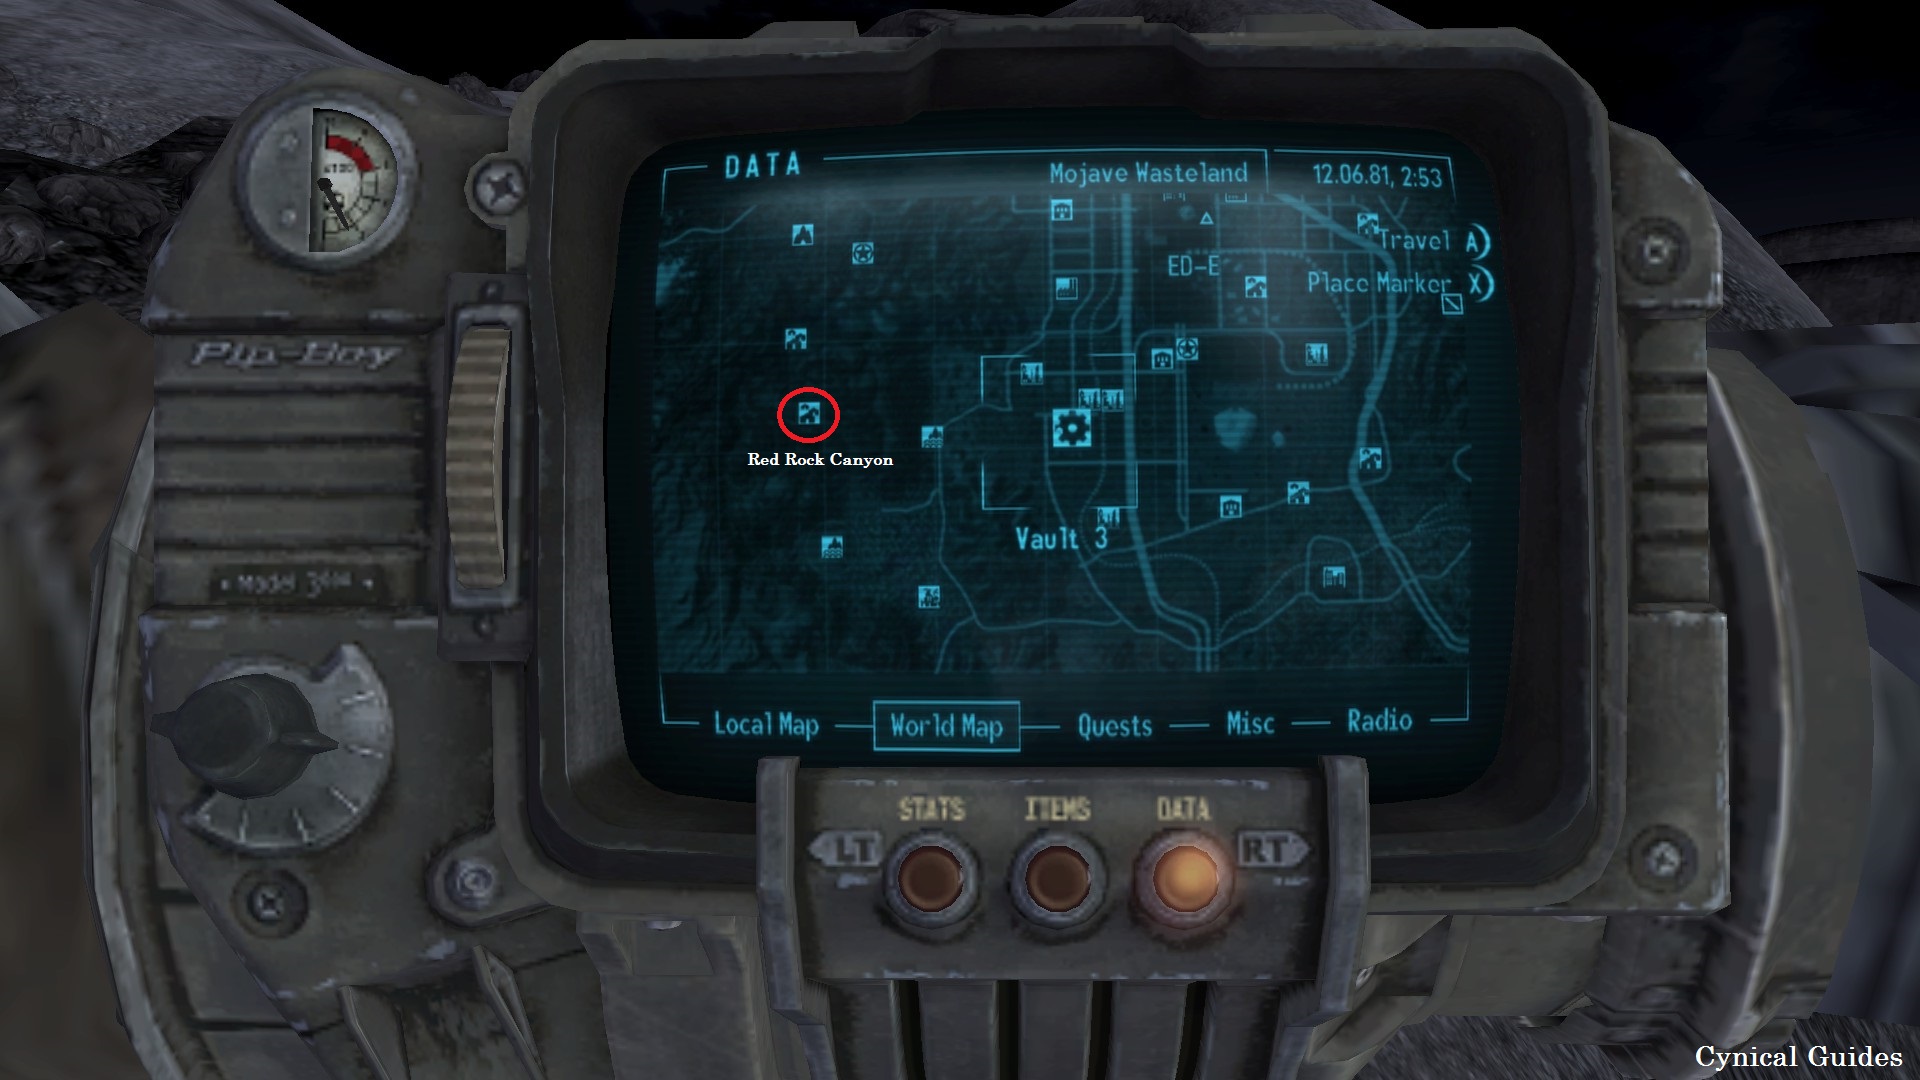
Our last Minor Faction we have to deal with is the Great Khans found at Red Rock Canyon. There is the Side Quest Oh My Papa associated with them, but it is meant for the NCR convincing the Khans to stop supporting Caesar. We are mostly here to unlock Red Rock as a Fast Travel location & being able to tell Yes Man we can ignore them.
If the NCR is going to be your “cannon” Main Faction, feel free to complete the Side Quest. If you do, Caesar will become mad like he will if we take out the Omertas. We get one free-bee to confess our wrongdoings to him, however. When this option pops up, we just have to tell him about dealing with both Minor Factions & we will be in the clear.

Achievement #29 – New Vegas Samurai: Cause 10,000 damage with Melee Weapons.
This unlocked for me as I was completing the Side Quest Oh My Papa; this will probably come naturally to you as you play through the game unless you are a sole ranged fighter or use Unarmed Weapons for melee (which sounds confusing). Melee Weapons are blades (Machetes, Katanas, Shishkebabs, etc), blunt (bats, pipes, hammers, axes, etc.), Chainsaws or Rippers. The more damage the Weapon does as well as the more Melee Skill Points you have in Melee; the more damage you will accumulate for the Achievement.
Sequence 10: Fear & Loathing
1. Hoover Dam, The Strip, Crimson Caravan Company, Quarry Junction, Camp Golf, Sunset Sarsaparilla Headquarters
- GRA *: 2/3
- GRA ***: 2/3
- Snow Globes: 7/7
- Sunset Star Bottle Caps: 50/50
- Locations: 93/125
- Level: 28/30
- Achievements: 35/75
-----------------------------------------------------------------------------------------------------
We will use this Sequence for our Achievement mop up of the Base Game. Take this time to complete Side Quests & work towards all the random Achievements you still have not gotten. As you do this, keep your eyes open for Caravan players & work towards the Caravan Master Achievement.
Keep an eye on how much healing you have done with Food & Stimpacks for their associated Achievements. These take a while to chip away at. Playing on harder Difficulties can make you take more damage as well as playing without Companions. It’s weird trying to deliberately take damage… usually you try to do the opposite.
Snow Globe #7 – Hoover Dam: We can find our final Snow Globe at Hoover Dam.
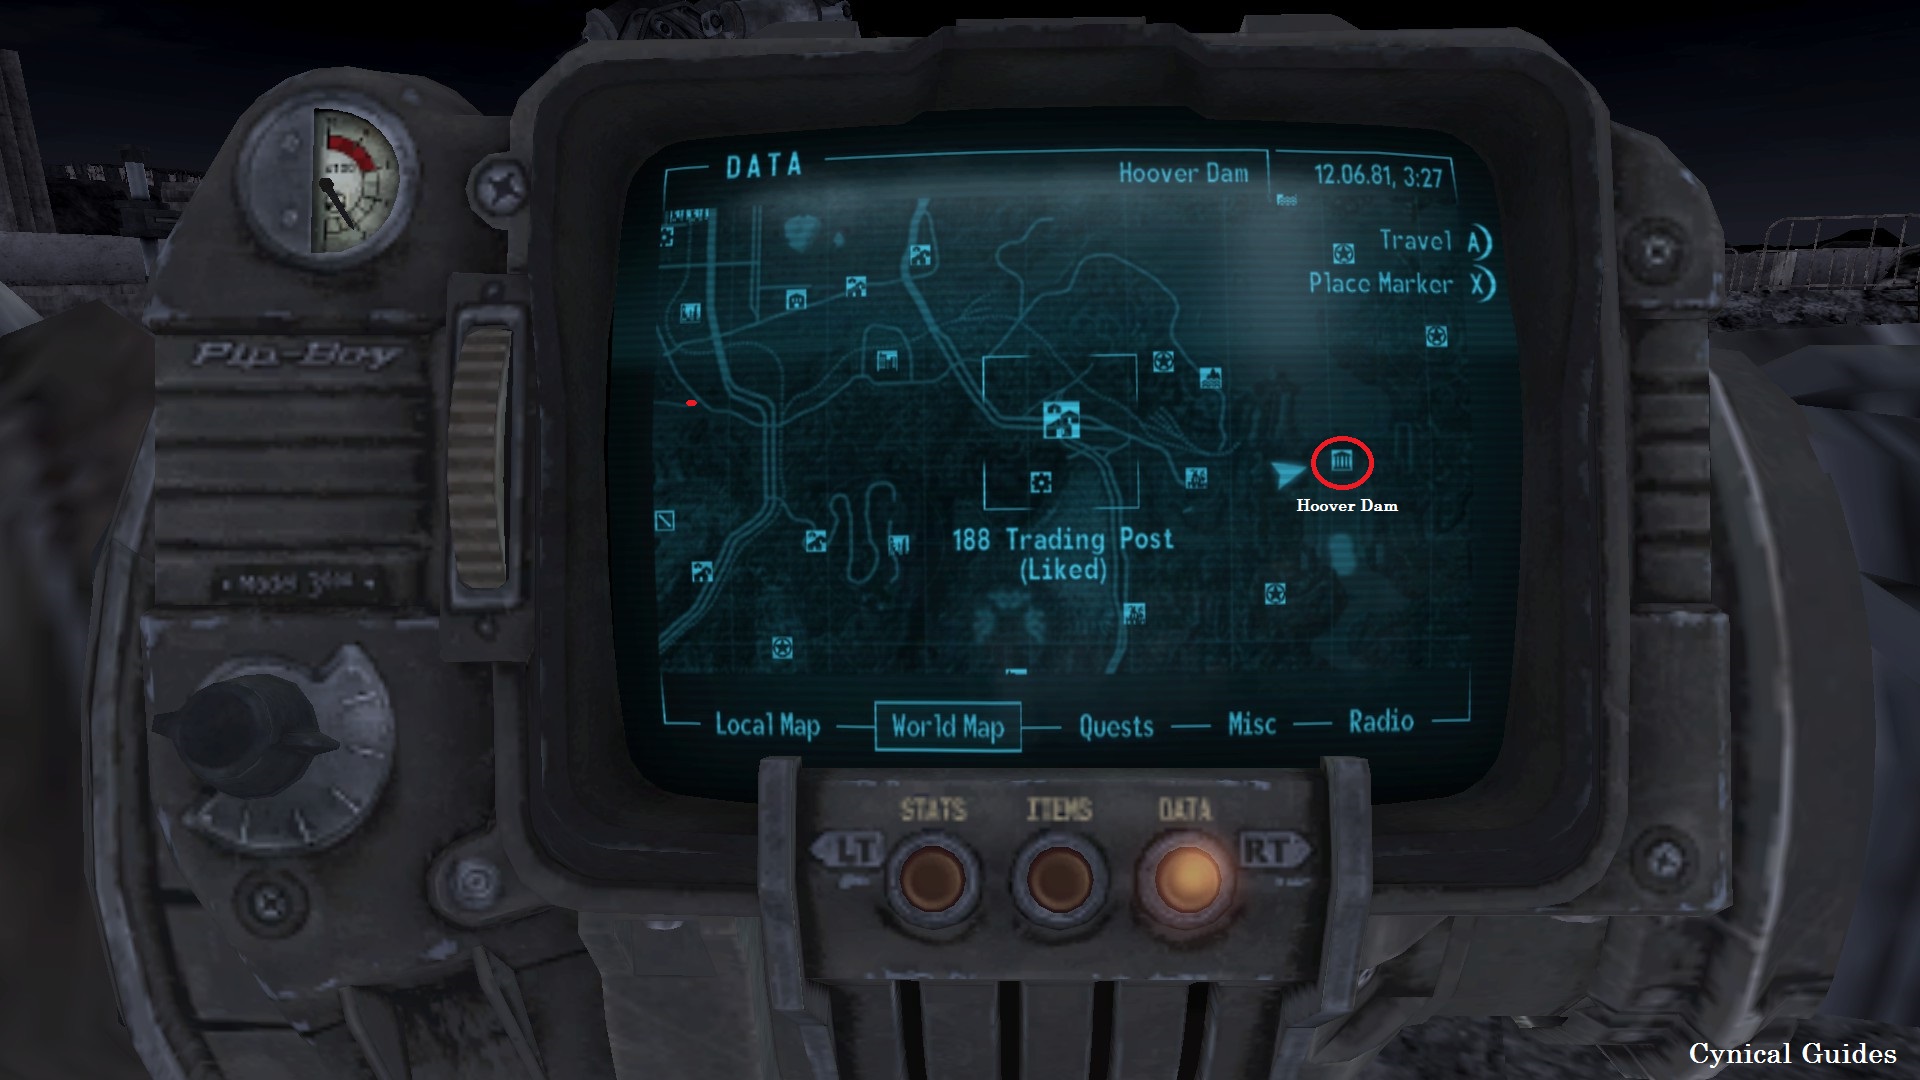
The Snow Globe can be found inside the Visitor Center on the reception desk. We now have Hoover Dam unlocked for Fast Travel as well which makes things convenient for later…

Achievement #30 – Globe Trotter: Discover all 7 Snow Globes.
After collecting the final Snow Globe, the Achievement will unlock. We do not have to bring them all to Mr. House to unlock the Achievement.
The Snow Globes are located at: Goodsprings Cemetery, Old Mormon Fort, Vault 21, Lucky 38 Casino, Nellis Air Force Base, Jacobstown, & Hoover Dam.

Achievement #31 – Artful Pocketer: Pick 50 pockets.
The classic "Sarah Bubblegum glitch" has been patched so we can no longer use the exploit. However, we do have a plan B. On the Strip, we can find a rancher named Walter Phebus wandering around. While he does have a Side Quest, he also has a glitched bottle of Whiskey & a glitched Brahmin Steak. These Items cannot be removed from his Inventory but will count as a successful Pickpocket if you select either of them & exit.
We cannot stay in his Inventory & spam collecting the Items; only individual Pickpocket attempts count towards the Achievement. Simply keep entering his Inventory & “collecting” one of the two Items 50 times to unlock the Achievement. Save often in case you are detected & have to reload. I like Saving after every 5 successes; you can check your progress in the “General Tab” of our stats.

Achievement #32 – Mod Master: Install 20 Weapon Mods.
This may or may not come naturally for you depending on the Weapons you use. As you progress through the game, keep your eyes peeled for Weapon Mods for sale. 9mm Pistol, Varmint Rifle, Cowboy Repeater, Power Fist, or Service Rifle Mods are pretty common to find for sale. Purchase the Mods & equip them to their designated Weapon; a single Weapon can only have 3 Mods attached.
Vendertron at the Gun Runners, Blake at the Crimson Caravan Company, Michelle at the 188 Trading Post, Gloria Van Graff at the Silver Rush, & Chet at Goodsprings are common Venders to find Mods for sale.

Achievement #33 – Caravan Master: Win 30 games of Caravan.
This Achievement can be a bit of a grind. For a rundown on how Caravan works, see the Know When To Fold Them Achievement near the end of Sequence 2. I was not smart & had not been playing Caravan this whole time, so I had to grind out 27 wins in Caravan all at once. Ringo at the Crimson Caravan Company is the easiest to beat since he has the most basic deck. Grinding from the same Character will not net you a lot of Caps, but at least you can get the Achievement relatively quick.
Other Caravan players are: Isaac at Gun Runners, Johnson Nash at Primm, Lacey at the Mojave Outpost, Little Buster at Camp McCarren, Quartermaster Mayes at Camp Forlorn Hope, or No-Bark Noonan & Cliff Briscoe at Novac.
GRA *** Challenge #2 – Deathclaw Pro Hunter: Kill 5 adult Mojave Wasteland Deathclaws with .22 Pistols, Switchblades, Boxing Tape, Recharger Rifles, or Dynamite.
This Challenge is pretty difficult, but not impossible; you will definitely want to switch the Difficulty down to Very Easy for this. Only adult Deathclaws (not Young Deathclaws) count towards this Achievement, their name simply appears as “Deathclaw” which is how you will know its an adult.
The best place to kill Deathclaws is at Quarry Junction. I found it easier walking all the way around the outside the Quarry’s walls rather than head right into the middle of it. There are waaaay too many Deathclaws inside along with the Deathclaw Mother & Deathclaw Alpha which are very difficult. Walk down the road from Sloan past Quarry Junction & follow the walls outside of the Quarry. When you find a Deathclaw, whittle down their health to one or two bars with a good damage dealing Weapon, then switch to one of the Challenge Weapons to finish it off. Bring lots of healing Items & Save after every successful kill. I used a Switchblade for its attack speed.

Achievement #34 – Return to Sender: Complete Return to Sender.
After going to all 6 Ranger Stations & reconfirming the faulty messages, head to Camp Golf & finish the Side Quest to unlock the Achievement.

Achievement #35 – The Legend of the Star: Complete The Legend of the Star.
This is the final Side Quest that has an Achievement associated with it. To complete this Quest, we need to give Festus 50 Sunset Sarsaparilla Star Caps. These can be found in fixed locations across the game as well as in random locations. We even have a 5% of receiving one of these Caps just by drinking a bottle of Sunset Sarsaparilla.
For the full list of fixed locations, check out the Fallout Wiki page. There are well over 50 Star Caps that can be collected in the game. This Side Quest can be done at anytime; feel free to save it until the very end if you want to try getting the rest of your Star Caps naturally.
https://fallout.fandom.com/wiki/Sunset_Sarsaparilla_star_bottle_cap
When you do turn in the 50 Star Caps, we will actually fail the Side Quest The Legend of the Star. Do not panic! Complete the next Side Quest we unlock, A Valuable Lesson, in the Sarsaparilla Headquarters. Collect the Holotype next to the corpse of Allen Marks to complete that Side Quest & unlock the Achievement.
After completing this Side Quest, we have now reached the beginning of the end...
Sequence 11: The Real Game Begins
1. The Fort, The Strip, Hoover Dam
- GRA *: 3/3
- GRA ***: 2/3
- Locations: 94/125
- Level: 30/30
- Achievements: 44/75
-----------------------------------------------------------------------------------------------------
Complete all of the Side Quests, GRA Challenges, & collect all the Gear or Levels you want; once you are finished, we will begin playing out all 4 Main Faction Endings. Before we attempt any Ending, be sure to make a permanent “Hard” Save that you will not delete or Save over! We will be reloading to this Hard Save 4 times so we can unlock all Endings/Achievements with the same Character. Since the first 3 Endings we will be reloading from, it will void whatever progress we make in them; to make this go faster, consider lower the Difficulty down to Very Easy.
For myself, I completed the Endings in this order: Yes Man, Mr. House, Caesar’s Legion, NCR. Feel free to re-order this list anyway you like; obviously choose the Faction you want to be “cannon” as the final Ending you play through. Our final two GRA Challenges will also come into play during these Endings so pay attention!
For Yes Man’s Ending, we need to complete the Main Quests: You & What Army, Side Bets, Change In Management, & Finishing Touches. We will have the option of dealing with President Kimball, but for speed, I suggest ignoring him. Kimball is mandatory for the other 3 Main Factions so we will have opportunities to get his two associated Achievements.
GRA * Challenge #3 – A Slave Obeys: Kill Mr. House with a 9 Iron or Nephi's Golf Driver.
For Yes Man, we must kill Mr. House. While we do this, we might as well complete this GRA Challenge. Nephi’s Golf Driver can be found on the Fiend Driver Nephi close to the South Vegas East Ruins Entrance. 9 Irons are more common, often held by Fiends. They can also be purchased from Lacey at the Mojave Outpost. Hack into Mr. House’s chamber in the Lucky 38 Penthouse & tee-off Mr. House’s head.
“A man chooses…”

Achievement #36 – Up to the Challenge: Completed any three Gun Runners' Arsenal (GRA) one star (*) Challenges.
There are 6 GRA * Challenges in the game. Benefit Or Hazard, Ne Ne Ne, Overkill, & You Don’t Belong In This World are farmable with respawning enemies & cannot be missed. The other 2 Challenges fall under very specific conditions but are not too difficult to achieve. For The Same Could Be Said of All Religious Weapons, just make sure you collect Benny’s unique 9mm Pistol, Maria, & it will become a farmable Challenge as well. Of course, for A Slave Obeys, just make sure you take any Golf Club Weapon with you to kill MR. House.

Achievement #37 – Wild Card: Complete Wild Card.
Story Related. Complete all of Yes Man’s Main Quests & the Achievement will unlock just before we leave for Hoover Dam for the final confrontation.

Achievement #38 – Love the Bomb: Cause 10,000 damage with Explosives.
I had been working on this Achievement for a while & unlocked it during Hoover Dam. I did this slow, basically relying on Frag Grenades & Dynamite for my Explosive damage. If you are smart, stockpile Missiles & Mini-Nukes to fire from Fat Mans for maximum damage. Gun Runners sells a good supply of Mini-Nukes; Quarry Junction provides a good supply of targets to use them against. Obviously, the higher your Explosive Skill, the more damage you will deal with these Weapons.
If you are like me & can only be bothered to use throwable Explosives, keep your eyes peeled for Big Horns. For whatever reason, they make good targets for Grenades. They start off stationary/non-hostile, & there are usually lots of them around. The forests around Jacobstown are full of them & Giant Mantises.

Achievement #39 – The Boss: Reach 30th Level.
This will come naturally as you playthrough the game. I unlocked this during Hoover Dam, but if you took points in the Swift Learner Perk this will have come much faster.

Achievement #40 – No Gods, No Masters: Complete No Gods, No Masters.
Story Related. Complete the final Yes Man Main Quest No Gods, No Masters to unlock this Achievement & beat Fallout New Vegas. Basically, just breeze through Hoover Dam & dispatch Legate Lanius as quickly as possible.
After we unlock the Ending, reload back to your Hard Save & get ready to do this all over again…

Achievement #41 – Hardcore: Play the game from start to finish in Hardcore Mode.
If you chose to play on Hardcore Mode at the very beginning of the game after leaving Doc Mitchel’s House, we will unlock this Achievement after beating the game for the first time. After the Achievement is unlocked, feel free to disable Hardcore Mode as we no longer need it anymore. If you are like me though, & thoroughly enjoy what Hardcore Mode brings into the game… leave it on.
For Mr. House’s Ending, we need to complete the Main Quests: The House Always Wins I, II, III, IV, V, VI, VII, VIII (though some of these will be auto-completed since we dealt with all the Minor Factions ahead of time).

Achievement #42 – You'll Know It When It Happens: Complete You'll Know It When It Happens.
This Main Quest is also obtained through the NCR Main Questline. Be sure to bring a Stealth Boy before accepting this Quest! To protect Kimball, we must wait until his Vertibird lands & he takes the stage. When he does, a Legion sniper will kill the Ranger in the guard tower directly behind the stage & take up a position there. Climb up the ladder to the tower & kill the sniper.
The next thing we must do is disable the bomb that was placed on Kimball’s Vertibird. To gain access to it, either use a Stealth Boy to sneak past the NCR Soldier, or persuade him with a Speech Check of 50. Once the bomb is disabled, tell Ranger Grant to evacuate the President to safety. There is an Engineer in the crowd who placed the bomb, but if it’s disabled, he won’t be able to activate it. If you steal the detonator if him, be prepared to gun him down as he sometimes bull rushing the President with a Combat Knife!
The Achievement will unlock after the Vertibird safely disappears over the horizon with the President.

Achievement #43 – The House Always Wins: Complete The House Always Wins.
Story Related. Complete all of Mr. House’s Main Quests & the Achievement will unlock just before we leave for Hoover Dam for the final confrontation.

Achievement #44 – All Or Nothing: Complete All Or Nothing.
Story Related. Complete the final Mr. House Main Quest All Or Nothing to unlock this Achievement & beat Fallout New Vegas. This Quest plays out identical to Yes Man’s, outside of some different dialogue when you reach General Oliver.
With this Ending under our belt, reload back to your Hard Save & get ready to do this all over again… again.
Sequence 12: War... War Never Changes
1. The Fort, The Strip, Hoover Dam, Cottonwood Cove, Nelson
- GRA ***: 3/3
- Locations: 94/125
- Achievements: 51/75
-----------------------------------------------------------------------------------------------------
Next on the list is Caesar’s Legion. We must complete the Main Quests: Et Tumor Brute?, Arizona Killer, Render Onto Caesar, & Vini Vidi Vici.
Be very careful with your Saves regarding Caesar, he is very fickle! Even if you have made it this far without making the Legion hostile, there are still ways we can accidentally set him off. Depending on how you dealt with the Omertas, White Glove Society, & Great Khans could make Caesar react very poorly. When he confronts us about any of these Minor Factions, be sure to tell him about all that you have done regarding them, so he forgives us. He will only forgive us once though; if he finds out later, we disposed of one of these Factions without his prior forgiveness he will become hostile voiding his Questline for this playthrough.
Caesar can also become hostile if you speak to him too many times after he becomes tired & goes to bed. Again, just be very careful with your Saves & make a lot of back up Saves just in case.

Achievement #45 – Arizona Killer: Complete Arizona Killer.
This is the inverse to the Main Quest You’ll Know It When It Happens. For this Side Quest, put on the NCR uniform & sneak into Hoover Dam. You can be creative with how you kill Kimball, or you can just gun him down when he arrives. No matter how you do it, steer clear of any NCR Troopers as if you get too close, even in disguise, they will sniff you out & become hostile which voids this Main Quest & the Achievement.
The Achievement unlocks immediately after killing Kimball & completing the Main Quest.

Achievement #46 – Render Unto Caesar: Complete Render Unto Caesar.
Story Related. Complete all of the Main Quests for Caesar’s Legion & we will be transported to the Legate’s Camp. Speak to Legate Lanius to complete this Main Quest & unlock the Achievement.

Achievement #47 – Curios & Relics: Caused 10,000 damage with unique Mojave Wasteland Weapons.
I unlocked this Achievement during the battle of Hoover Dam. Unique Weapons are any Weapon that has a Name instead of just a generic Weapon name. Typically/unfortunately these Weapons are really expensive, though some can be found in fixed locations around the Mojave. A Unique Weapon can double as a Melee, Unarmed, Gun, Explosive, or Energy Weapon so it will count towards both damage types.

Achievement #48 – Veni, Vidi, Vici: Complete Veni, Vidi, Vici.
Story Related. Complete the final Caesar’s Legion Main Quest Veni, Vidi, Vici to unlock this Achievement & beat Fallout New Vegas. Caesar’s Legion has a different take on the battle for Hoover Dam which makes for a nice change of pace.
Reload back to your Hard Save for the final, “cannon” Ending.
The NCR is a lot less stressful than beating Caesar’s Legion but there is quite a lot of Main Quests we still have to burn through before we can get to Hoover Dam. We must complete the Main Quests: Kings’ Gambit, For the Republic, You’ll Know It When It Happens, & Eureka.
GRA *** Challenge #3 – Against All Tyrants: Kill any 10 named Legion members with Hunting Revolvers, Ranger Sequoias, Brush Guns, Service Rifles, Hunting Rifles, or Cowboy Repeaters.
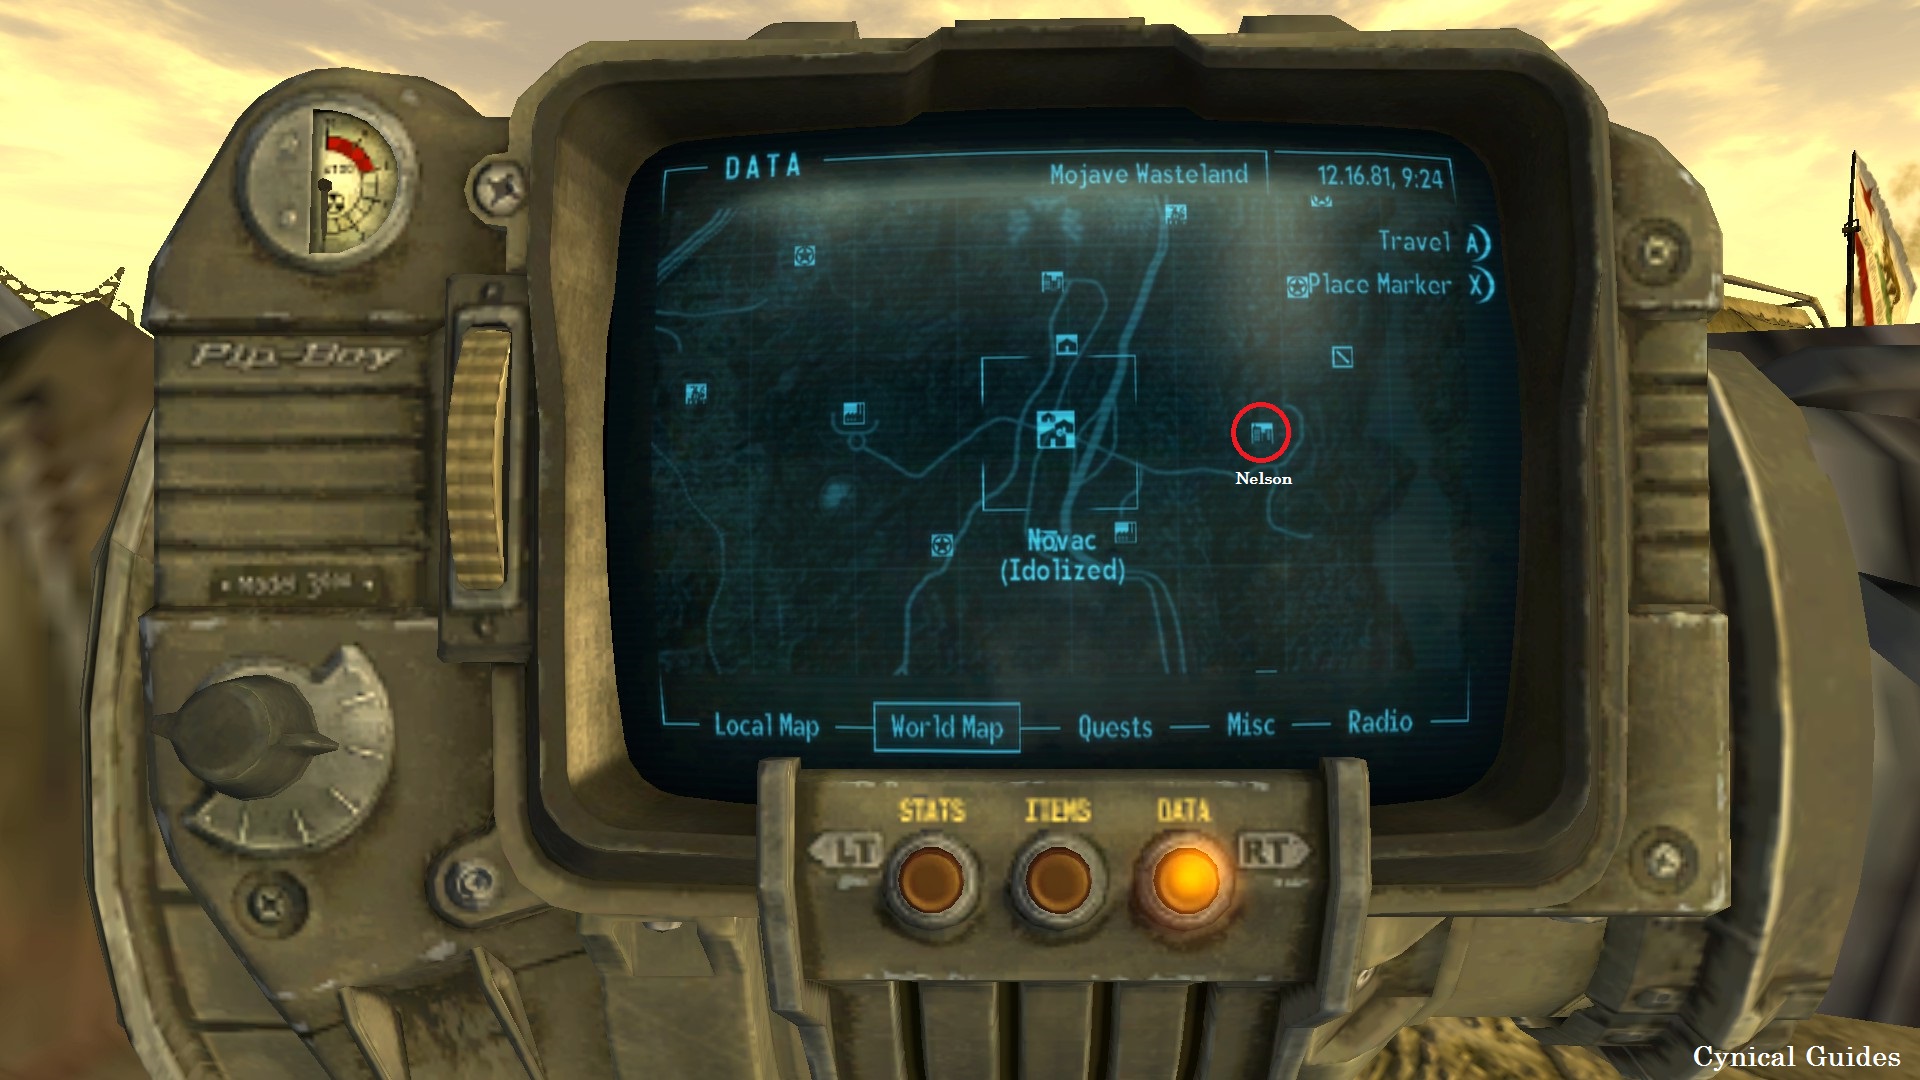
There are 20 named members that count towards this Achievement, but some are quest locked & hard to reach. We can kill Aurelius of Phoenix, Canyon Runner, Decanus Severus, & Cursor Lucullus at Cottonwood Cove. Dead Sea can be killed at Nelson. Lastly, Antony, Otho, Lucius, Vulpes Inculta, & of course Caesar at The Fort. Legate Lanius will count in the final battle as well.
Nelson can be found at this location.
This is a pretty clincher Challenge; alternatively, we can do the equivalent GRA *** Challenge – Armed For Bear if you reload your Save afterwards. Kill any 15 named NCR Rangers or commissioned officers (Lieutenant, Captain, Major, Colonel, General) with Machetes, Rippers, Chainsaws, Throwing Spears, or Ballistic Fists. We can find way more named NCR members than Legion; named NCR can be found at: Mojave Outpost, Primm, Novac, The Strip, Camp McCarren, Camp Golf, Camp Forlorn Hope, Bitter Springs, Hoover Dam, Boulder City, & Ranger Stations Delta, Alpha, Bravo, & Foxtrot.

Achievement #49 – Pros Only: Completed any three Gun Runners' Arsenal (GRA) three star (***) Challenges.
There are only 5 GRA *** Challenges. Technically, 3 are farmable & cannot be missed but some (especially Crackerjack Timing) are very difficult. Out of the other 2 Faction killing Challenges, Armed For Bear is much easier since there are way more named NCR members than named Legion members. Just reload you Save afterwards if your end Faction is the NCR or the Legion.

Achievement #50 – For the Republic: Complete For the Republic.
Story Related. Complete all of the Main Quests for the NCR & we will have to defend Hoover Dam against the Legion’s assault. Fight your way through the dam & over to the Legate’s Camp; dispatch Lanius & speak to General Oliver to complete this Main Quest & unlock the Achievement.

Achievement #51 – Eureka!: Complete Eureka!
Story Related. Complete the final NCR Main Quest Eureka! to unlock this Achievement & beat Fallout New Vegas. The NCR Ending is the inverse to Caesar’s Legion, though is slightly different & a bit longer.
With that, all 4 Endings have been obtained & we have fully completed Fallout New Vegas... the Base Game anyways. Unless you have been on top of it, you may not have unlocked the Hack the Mojave, Stim-ply Amazing & Desert Survivalist Achievements. Do not worry, we still have 4 DLC Campaigns to beat through & we can still obtain “Character”, “Slay” or “Miscellaneous” based Achievements in them.
Reload back to before Hoover Dam (because we have to) & prepare for the real game to begin…
68% Complete
Sequence 13: Honest Hearts
1. Northern Passage, Zion
- Desert Survivalist: 10,000/10,000
- Locations: 125/125
-----------------------------------------------------------------------------------------------------
All 5 Achievements in this DLC are all Story Related & are unmissable. 2 however, do pertain to two different Endings. We will make a Hard Save to reload to after completing one Ending much like we did in the Base Game so we can unlock all Achievements in a single playthrough.

Achievement #52 – When We Remembered Zion: Arrive at Zion.
Story Related. Head to the Northern Passage in the Mojave & speak to Jed Masterson. To go to Zion, we can only carry 75lbs of gear in our Inventory (100lbs if you have the Strong Back Perk). Tell Jed you are ready to go & the Achievement will unlock after the introduction cinematic & we complete the Main Quest Happy Trails Expedition arriving in Zion.
Complete the Main Quests Arrival At Zion, Roadside Attraction, Gone Fishin’, Tourist Trap, & Deliverer of Sorrows given by Joshua Graham.
“You must be some kind of lucky…”

Achievement #53 – Master of the Mojave: Discover 125 locations.
If you have not already unlocked this Achievement in the Base Game, it is bound to unlock for you at some point during the 4 DLCs. There are a lot of locations in the Honest Hearts DLC & they are fairly close together; I discovered my final 30 locations I needed while playing through it.

Achievement #54 – Desert Survivalist: Heal 10,000 points of damage with Food.
This Achievement takes a while to unlock. If you have been diligent, you have ideally healed a good sum of hit points with Food throughout the Base Game. Honest Hearts is the perfect DLC to polish this Achievement off as it is loaded with plant-based Foods all around the World Map. Harvest everything you find! Any Food, Dirt Water, or Purified Water count towards the Achievement; Nuka Cola or Sunset Sarsaparilla as well as a few random “Food/Drinks” do not count.
It should be noted that this Achievement is a bit buggy; bugged in our favor. So long as you have at least 1 point of damage, the game will track the total amount of hit points you heal with Food before exiting your Inventory. So, if you have 39/40 health for example, & you spam 20 Brahmin Steaks; the game will count all healing you could have gotten from all 20 Brahmin Steaks, even though you only needed 1 hit point.
I got the final 3000 points of Food healing I needed during this DLC by mass looting every plant I came across or killing Beasts for Food then overeating whenever I took the slightest amount of damage.

Achievement #55 – Restore Our Fortunes: Resupply Daniel & the Sorrows.
Story Related. Complete all the fetch quests & turn in the Main Quest Deliverer of Sorrows to Daniel at the Sorrows Camp to unlock the Achievement.

Achievement #56 – In A Foreign Land: Scout the Zion Valley for signs of the White Legs.
Story Related. Complete the Main Quests The Grand Staircase, River Monsters, The Treacherous Road, The Advance Scouts given to us by Daniel. Turn in the Main Quest Gathering Storms to Daniel to unlock the Achievement.
Now we need to make our Hard Save so we can obtain both Endings. Tell Daniel we need some time to think & make your Hard Save. Choose the Ending you do not want to be “cannon” first, saving the Ending you want to keep for last.

Achievement #57 – O Daughter of Babylon: Crush the White Legs.
Story Related. For this Ending, tell Daniel that you agree with Joshua & want to fight the White Legs. Complete the final Main Quest Crush the White Legs to complete the DLC & unlock the Achievement.
Once the Achievement unlock, reload your Hard Save & choose the other option.

Achievement #58 – May My Hand Forget Its Skill: Evacuate Zion.
Story Related. For this Ending, tell Daniel that you think leaving Zion is for the best. Complete the Main Quest Flight From Zion to complete the DLC & unlock the Achievement.
Return to the Mojave when you are finished here in Arizona…
77% Complete
Sequence 14: Dead Money
1. Abandoned BoS Bunker, Sierra Madre
- Sierra Madre Chips: 500/500
-----------------------------------------------------------------------------------------------------
Similar to Honest Hearts, most of the Achievements are Story Related for this DLC. 2 are unmissable with the other 2 being tied to the different Endings. Like before, we will make a Hard Save we will reload so we can obtain both Endings in one playthrough. The other Achievement is collecting 500 Sierra Madre Chips. When you are ready to start the DLC, travel to the Abandoned Brotherhood of Steel Bunker & head inside.

Achievement #59 – Sierra Souvenir Aficionado: Collect 500 Sierra Madre Chips.
This is a very simple Achievement, not requiring a location guide. Simply loot everywhere, which you probably will be doing anyways due to the lack of available resources. Be on the lookout for Cigarette Packs & Cartons to exchange at Vending Machines for more Chips. You can also find hidden Holo-Tapes around Sierra Madre that allow us to exchange other Items like Pre-War Clothing or Alcohol.
This Achievement is cumulative, meaning you do not need all 500 Chips in your Inventory at once. Feel free to cash these in at Vending Machines for Items when you need to.

Achievement #60 – Assemble Your Crew: Recruit Dean Domino, Christine & Dog.
Story Related. Complete the Main Quests Sierra Madre Grand Opening!, Find Collar 8: “Dog”, Find Collar 12: “Christine”, & Find Collar 14: “Dean”. The Achievement will unlock after recruiting our final Companion.

Achievement #61 – Hack the Mojave: Hack 25 Terminals.
I unlocked this Achievement hacking my last few Terminals during this DLC. This Achievement can technically become missable if you get locked out of too many Terminals. There are around 50 Terminals found in the Base Game; with more added in for each DLC (Old World Blues having the most I think).
For a full list of Terminal locations (including DLCs) check out the Gamepedia Fallout Archive.
https://fallout-archive.fandom.com/wiki/Fallout:_New_Vegas_terminals

Achievement #62 – Having A Ball: Complete the Sierra Madre Gala Event.
Story Related. Complete the Main Quests Fires In the Sky, Strike Up the Band, & Mixed Signals. The Achievement will unlock halfway through the next Main Quest, Trigger the Gala Event… when we do just that.
Enter the Sierra Madre Casino & complete the Main Quests Put the Beast Down, Curtain Call At the Tampico, Last Luxuries, & start the Heist of the Centuries.
When you approach the vault in the Sierra Madre basement, make a Hard Save we can reload back to after obtaining the first Ending. The final Ending can be tricky to pull off…

Achievement #63 – Cash Out: Confront Father Elijah in the Sierra Madre's Vault.
Story Related. This is the easiest of the Endings to obtain. Enter the vault & access the Terminal inside (be careful as if you access all of the Terminal’s files it will trigger a third Ending that basically traps you in the vault forever & kills you).
Speak with Elijah on the screen after accessing the Terminal & lure him down to the vault; to do this we will need to have 75 or higher in either Explosives, Science, or Repair! When Elijah arrives, attack & kill him. The Achievement will unlock as soon as Elijah hits the ground dead.

Achievement #64 – Safety Deposit Box: Trap Father Elijah in the Sierra Madre's Vault.
Story Related. Missable. This Ending is much harder to obtain than the first one, but it is still doable, even if your Sneak is not maxed out. Lure Elijah back down to the vault like we did previously. As soon as you finish speaking with him on the screen, sprint out of the vault & make your way back the way we came through the area towards the elevator. We cannot be detected by Elijah, otherwise blue barriers will block our path & he will become hostile, voiding this Ending & we will have to reload!
As we head through the area backwards, Elijah will end up trapping himself inside the vault & trigger the alarm system. When this happens, we know we have triggered the right Ending; the caveat is now we have to sprint to the elevator before we explode. Getting into the elevator without having Elijah become hostile will unlock the Achievement for us.
If you sprinted backwards through the level before Elijah has trapped himself in the vault, we will reach a Maintenance Door that is locked to us. When you get here, just wait for him to lock himself in the vault & the door will unlock for us; do not panic.
85% Complete
Sequence 15: Old World Blues
1. Mojave Drive-In, Big Mountain
- Sink Upgrades: 10/10
- Stim-ply Amazing: 10,000/10,000
-----------------------------------------------------------------------------------------------------
There are no missable Achievements in this DLC. 4 of the Achievements are tied to the Main Questline while the last 1 is associated with finding the 10 Sink Projects. Head to the Mojave Drive-In & interact with the Crashed Satellite at 12:00am to be sent to Big Mountain. Be sure to stock up on as many Stimpacks as you can so we can grind out the Stim-ply Amazing Achievement if you do not already have it.
Side Quest – All My Friends Have Off Switches #1: When we reach Big Mountain, we will have to speak to the five robotic scientists inside the Think Tank. After speaking with them & receiving a bunch of Main Quests, we will also receive this Side Quest as well to find all of the Sink Projects. This Side Quest is tied to the Making Friends Achievement. Fortunately, there is a Quest Marker leading you to all of the Sink Projects, so a location guide is not necessary. Chip away at these as we explore Big Mountain. We only get 3 Quest Markers at a time for the Sink Projects.

Achievement #65 – Spinal-Tapped: Recovered X-8 Vertebrae-Pulse-De-Sensitizer Frequency!
Story Related. Complete the Main Quest X-8: High School Horror to unlock the Achievement. We will complete the Quest after collecting an Audio Sample of Gabe’s Bark in the Residential Testing Facility.

Achievement #66 – Cardiac Arrest!: Search your feelings... for your heart.
Story Related. Complete the Main Quest X-13: Attack of the Infiltrator to unlock the Achievement. We will complete the Quest after collecting the extremely useful (if not extremely obnoxious) Stealth Suit in the X13 Research Facility.

Achievement #67 – Making Friends: Reactivate all 10 of the Sink's robotic assistants.
Follow all of the Quest Markers in the Side Quest All My Friends Have Off Switches to collect all 10 Sink Projects. Return to The Sink & install them all; installing the final Project will complete the Quest & unlock the Achievement.
1. Personality Chip: Story Related. Given by Dr. Klein after speaking with him in the Think Tank.
2. Sink: Found at the Magnetohydraulics Compound.
3. Auto-Doc: Found at the Y-17 Medical Facility.
4. Biological Research Station: Found at the X-22 Botanical Garden.
5. Light Switch 01: Found at the X-2 Transmitter Antenna Array.
6. Light Switch 02: Found at the Big MT North Tunnel.
7. Jukebox: Found in House #108 at Higg’s Village (best done after finding the two Light Switches as another Sink Project can be found in Higg’s Village as well once the next set of 3 Quest Markers are activated).
8. Book Chute: Found in House #101 at Higg’s Village.
9. Toaster: Found at the Cuckoo’s Nest.
10. Muggy: Found at the Securitron De-Construction Plant.

Achievement #68 – Stim-ply Amazing: Heal 10,000 points of damage with Stimpacks.
This Achievement follows similar principles as the Desert Survivalist Achievement but is much easier to unlock due to how much healing Stimpacks give you. Once again, so long as you have taken at least 1 point of damage, the game will track the total amount of hit points healed by Stimpacks before exiting your Inventory. Spamming 10 Stimpacks to heal 1 point of health will still track towards the Achievement as having healed 300 points of health. Since Stimpacks heal 30 points of health (without Perks), it will take a total of 333 Stimpacks to heal 10,000 points of health.
Old World Blues & Lonesome Road are good DLCs to work towards this… as we will be taking a lot of damage whether we want to or not. These DLCs can be challenging especially the latter.

Achievement #69 – Make Up Your Mind: Make up your mind... about your brain.
Story Related. After dealing with the X-42 Giant Robo-Scorpion during the final Main Quest Old World Blues, we will finally be reunited with our brain. Convince our brain to return with us & we will unlock the Achievement.

Achievement #70 – Outsmarted: Complete Old World Blues.
Story Related. Return to the Think Tank to complete the Main Quest Old World Blues. End the Quest violently or passively; both will complete the Quest & unlock the Achievement. Be warned that completing it violently will void any Side Quests given to us by the Think Tank scientists. None are Achievement related; this is more a note for completionists.
93% Complete
Sequence 16: Lonesome Road
1. Canyon Wreckage, Hopeville, The High Road
- Red Glare Mods: 0/3
- ED-E Upgrades: 3/5
- Warheads: 9/30
-----------------------------------------------------------------------------------------------------
This DLC is much more Collectible driven, & is the most tedious, destroying all 30 Warheads. Fortunately, there are no missable Achievements & we can return to The Divide even after completing the DLC. The 2 Story Related Achievements can be done on a single Save, no reloading required.
The only Achievement of note is the Rocket’s Red Glare Achievement. While the 3 Weapon Mods do have a random chance to spawn on enemies or in containers, it is a very rare chance. Alternatively, each Mod can be purchased at Commissary Terminals scattered around the DLC for a large sum of Caps. To save yourself some grief, try entering this DLC at least having 30,000 Caps. Big Mountain is a perfect place for making money as there are a lot of Locations close together with loot that sell for quite a bit of Caps. Since we can return to The Divide, you can fully complete the Lonesome Road DLC to see if any Mods spawn for you, THEN grind for Caps/purchase the rest of the Mods afterwards.
When you are ready to begin the DLC, travel to the Canyon Wreckage & enter The Divide.
Enter the Hopeville Missile Silo & track down our Eyebot friend ED-E shortly inside it. After he joins us as a Companion, he will unlock our first Commissary Terminal for us to Repair our gear as well as purchase Items. We can find the 3 Red Glare Mods for sale in these Terminals. Prices may vary depending on Barter Skill; at Barter Skill 50 each Mod costs this much:
Red Glare Alpha Strike – 14,244 Caps
Red Glare Auto Launcher – 13,572 Caps
Red Glare Far Sighting – 13,902 Caps
This totals 41,707 Caps. If your Barter Skill is at 100, this price gets shaved down to 34,624 Caps, so that is something to consider as we playthrough the DLC. For now, let’s wait to see if we are lucky & can get any of these randomly as we play.
Eyebot Upgrade #1: After ED-E restores power to the silo & we walk through the unlocked door; we will find a Destroyed Eyebot on the floor in the middle of the hallway just in front of a cave in. Loot the Eyebot to find the Circuit Board Upgrade.
From here, carry on out of the Missile Silo into Hopeville & fight your way through to The Marked Men Camp to collect the Laser Detonator. This will allow us to blow up the 30 Warheads hidden throughout the DLC. As well, we can collect the Red Glare Rocket Launcher directly to the right of where we pick up the Laser Detonator.
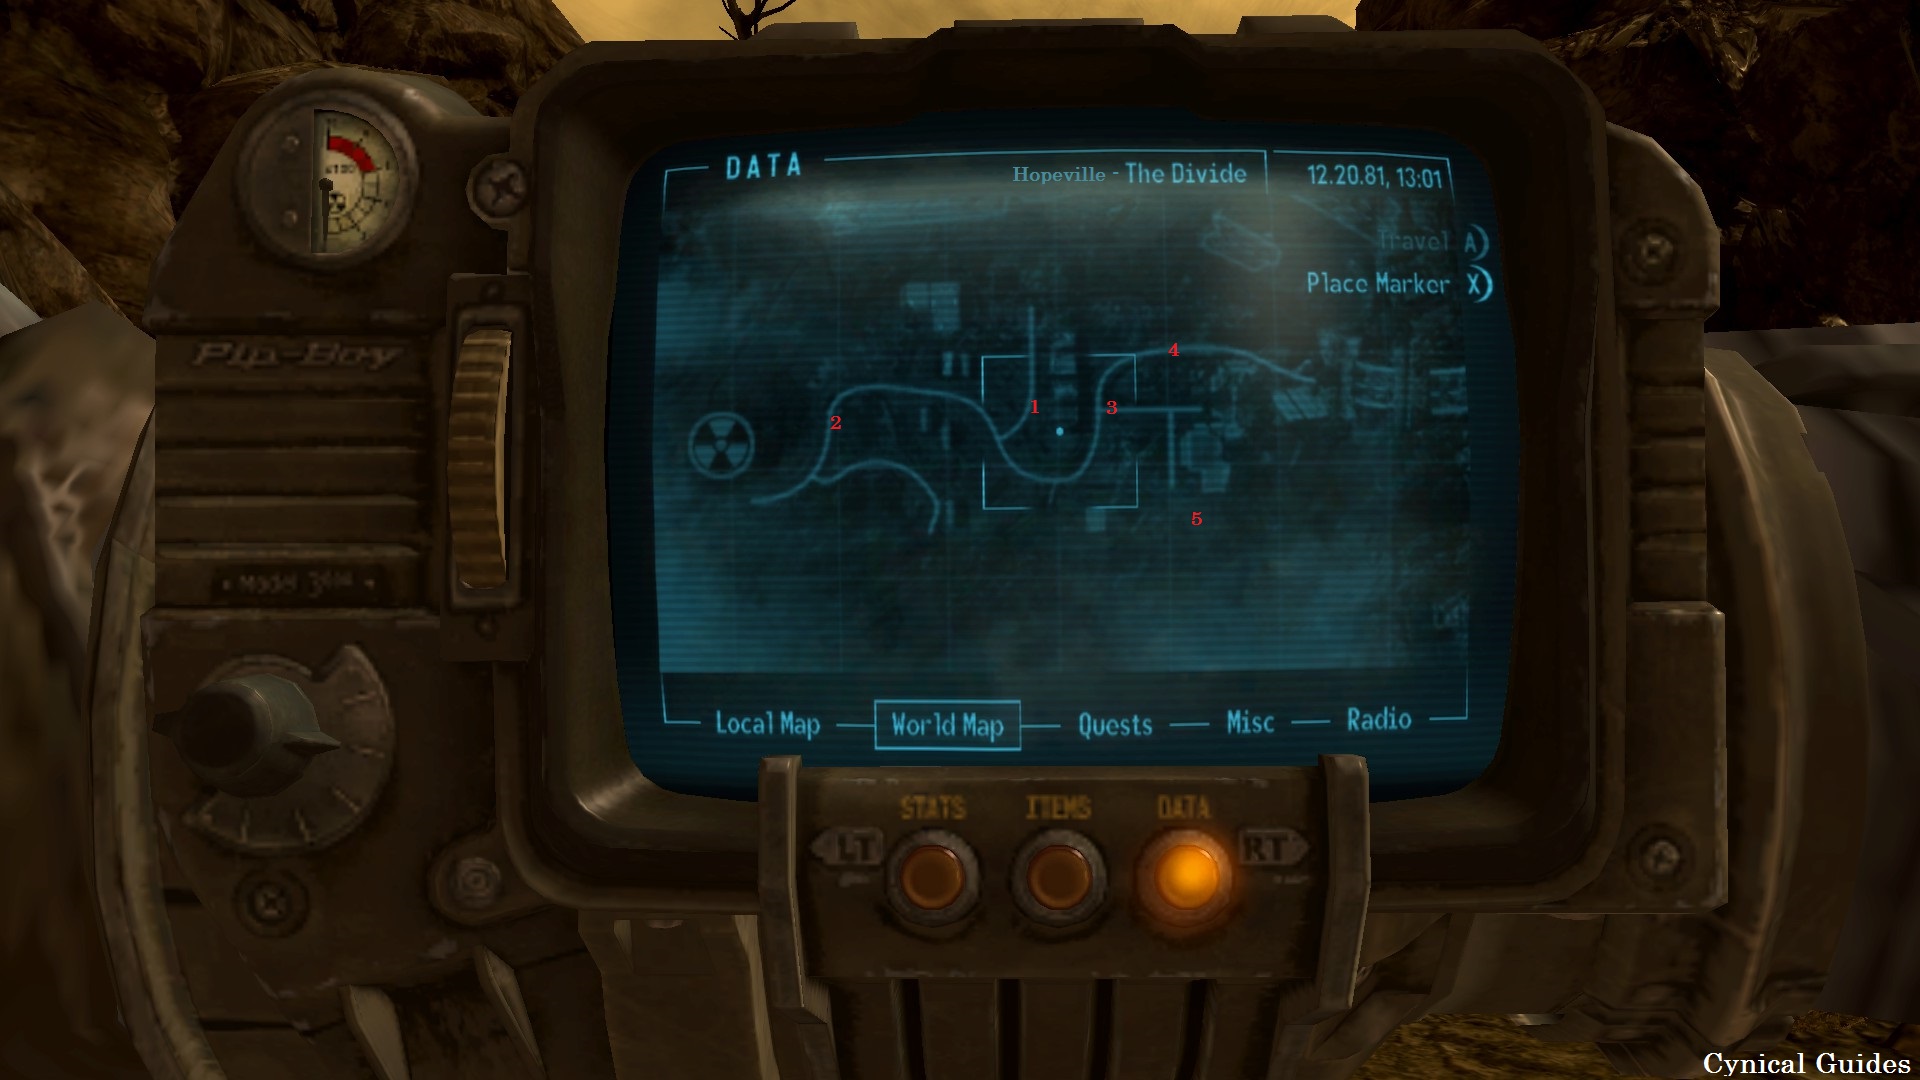
Warhead #1: With the Detonator, head South from the Marked Men Camp to find some stacked cars & a military truck blocking our way. We can find our first Warhead in the back of this truck. Use the Laser Detonator & blow up the Warhead.
Warhead #2: Now that the way is clear, follow the road down West back towards the Hopeville Missile Silo Bunker. We can find the Warhead straight across from a Solitare Gas Station found just below the entrance to the Silo Bunker entrance.
Eyebot Upgrade #2: Before we carry on, head to the Hopeville Missile Base Headquarters.

Enter the HQ building & head down the hall on the left; entering the first room on the left. We can find the next Destroyed Eyebot underneath a desk in the right corner of the room.
Warhead #3: Now return back down the road & carry on through Hopeville until we reach a locked gate. If you have a Lockpick Skill of 75, pick the lock or follow the wall down & slip through a hole in it instead. On the other side of the gate, keep following the road ahead & we can find a Warhead in the back of a military truck blocking our way forward.
Warhead #4: Head through the path we just opened up by destroying the last Warhead & follow this new road down. We come across another Warhead in the back of a military truck blocking our way once more.
Warhead #5: Instead of continuing down this road towards the Collapsed Overpass Tunnel turn around & return to the junction in the road we found Warhead #3 at. At the junction, follow the road down East then turn South to find the Marked Men Supply Outpost. Here, we can find a Warhead resting on top of a wooden crate in between two freight trucks.
We can now leave Hopeville through the Collapsed Overpass Tunnel & follow the tunnels until we exit out into The High Road.
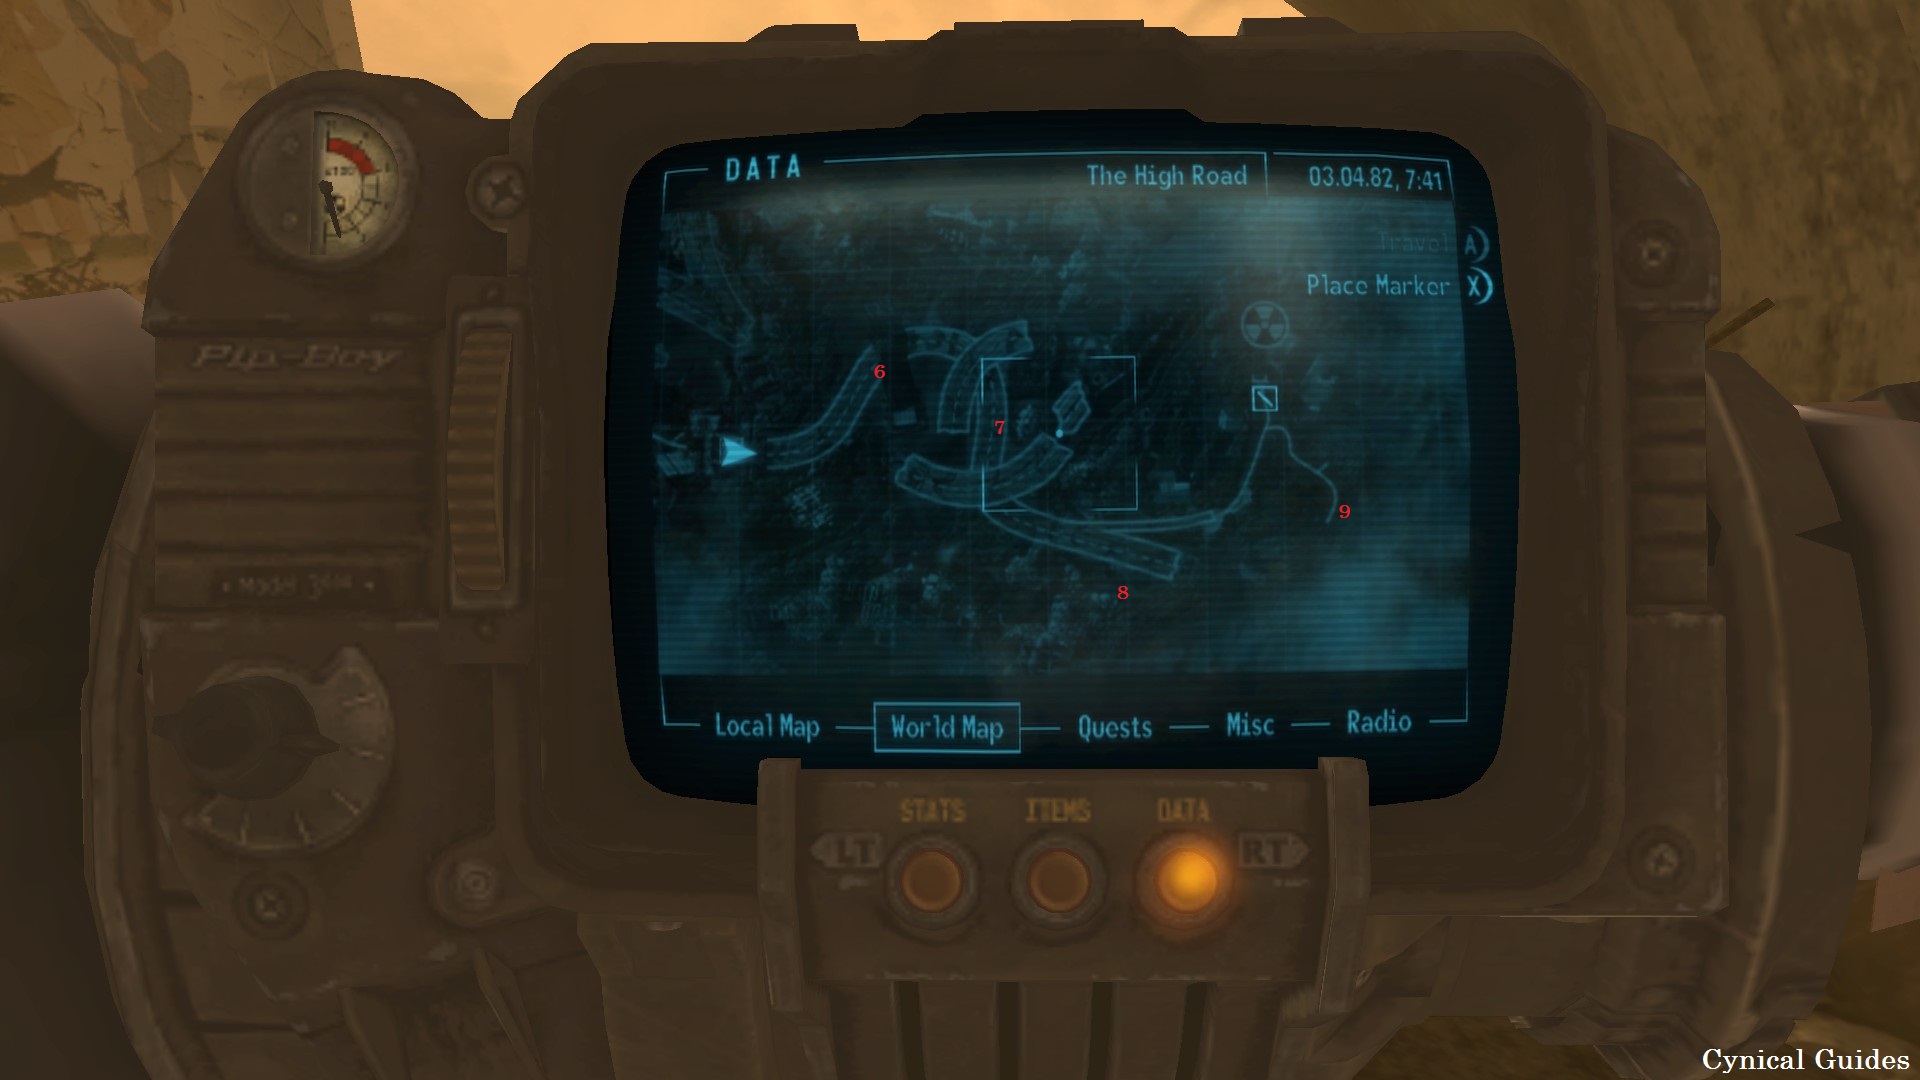
Warhead #6: Follow the highway along & we will come across our next Warhead right beside our second encounter of Marked Men underneath a tipped over building.
Warhead #7: Keep heading down the highway & we will pass underneath an overpass above us. Shortly after, we can find a Warhead in the back of a military truck in the middle of the highway near a group of Deathclaws.
Warhead #8: Eventually, the highway will end at an impassable overpass tunnel fully caved in. From the tunnel obstruction, turn right down a pathway off the highway down below it. We can find this Warhead in front of us just past the Smitty’s sign off our left.
Warhead #9: Return back up to the tunnel obstruction on the highway & this time take the path up above the tunnel to the left. Follow this path along & take a right at the road junction to find a Marked Men camp. In the distance, we can see a large yellow crane; the Warhead will be against the cliff wall behind a military truck to the right of the crane.

Achievement #71 – Condemned to Repeat It: Decided the fate of all the Divide dwellers.
Story Related. To leave The High Road & enter Ashton Silo Control Station, we must first fire a nuke. Get ED-E to initiate the launch & watch it explode in the distance to create The Courier’s Mile location. We will complete the Main Quest The Launch & subsequently unlock the Achievement.
Don’t worry about the nuke’s shockwave; we have Plot Armor…
Eyebot Upgrade #3: Enter Ashton Silo Control Station after the octane elevator section going down. In the Control Station, stay on the first floor & enter the large silo room. Across from where we enter, we can find a locked door that can only be opened by hacking the Terminal beside it. We need Science of 75 to do this.
Do not get locked out of the Terminal or it will void us being able to collect this Upgrade! If you are close to being locked out; exit the Terminal & try again. We can find the Destroyed Eyebot immediately to our right inside the room.
Leave through Sunstone Tower & enter The Divide.
Sequence 17: Courier 6
1. The Divide, Ulysses’ Temple
- ED -E Upgrades: 5/5
- Warheads: 28/30
-----------------------------------------------------------------------------------------------------
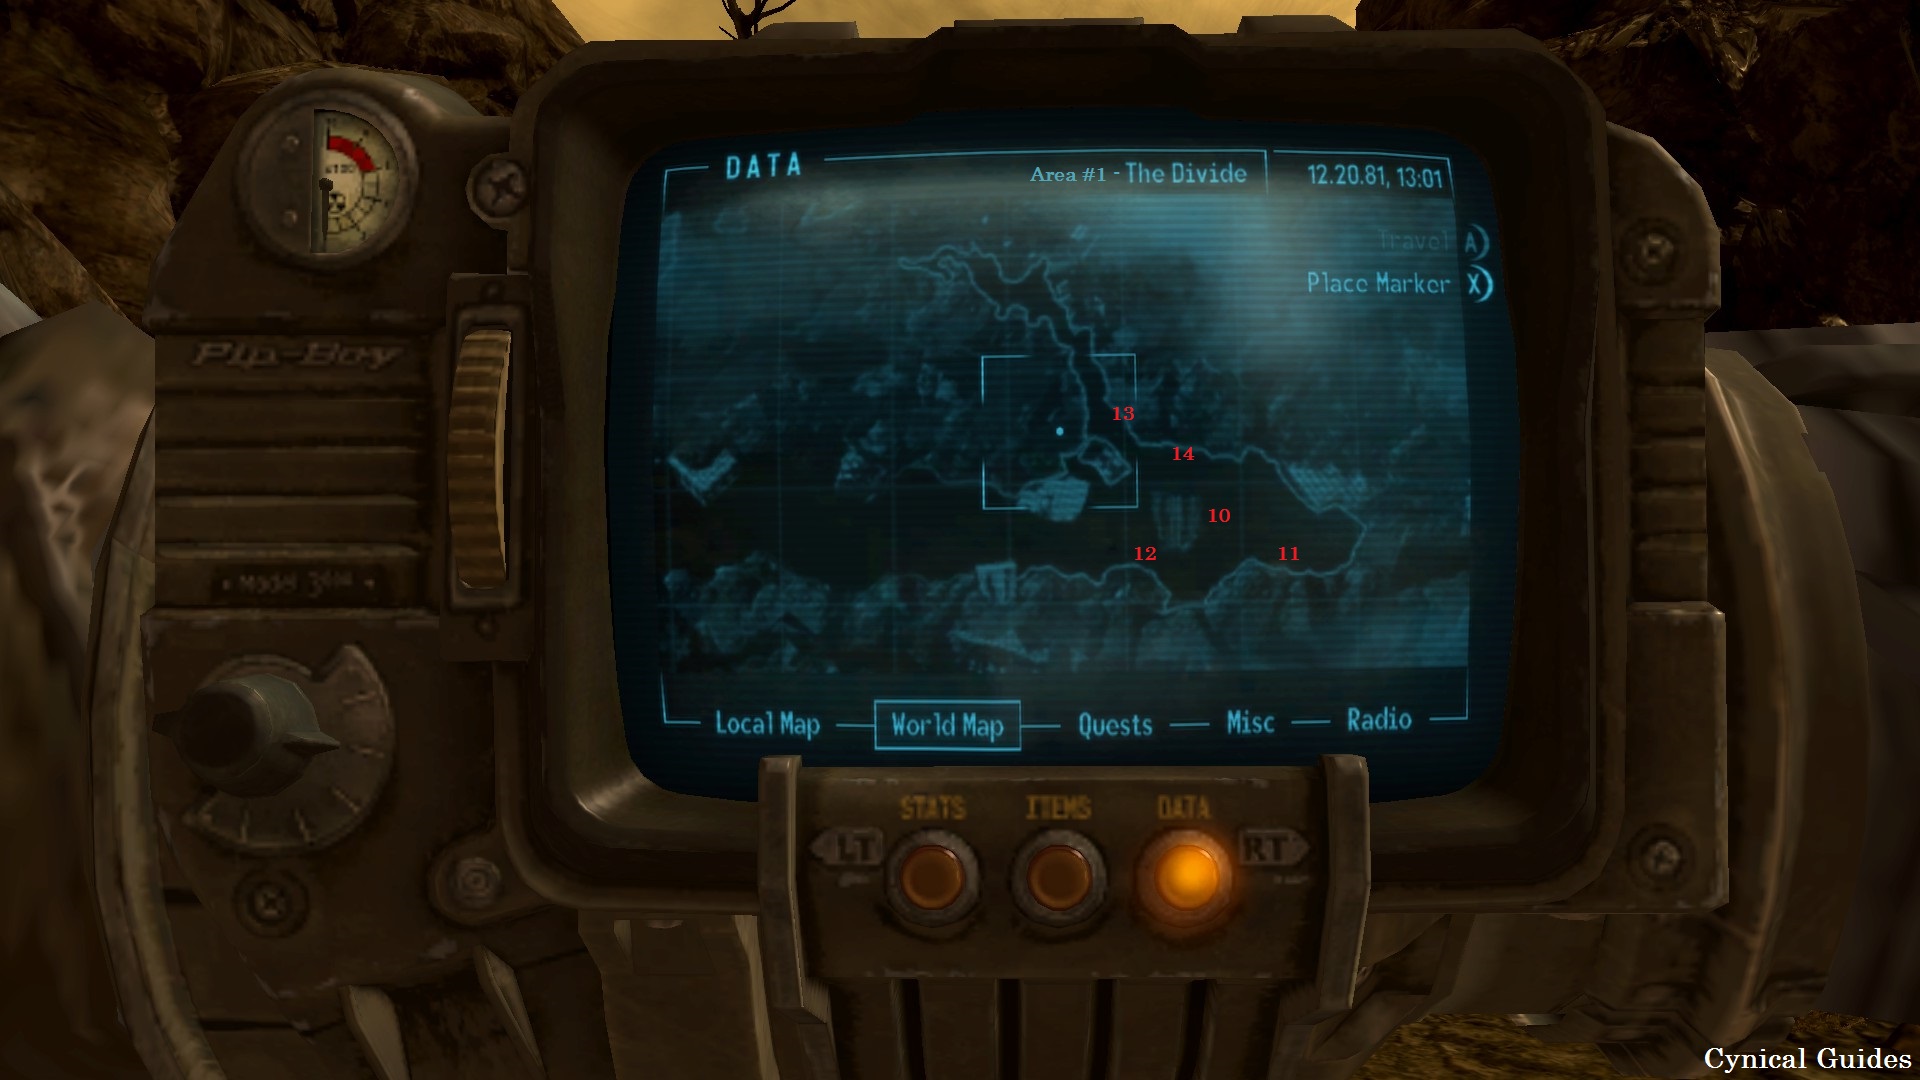
Warhead #10: When we exit onto the Sunstone Tower Roof, walk to the edge of the roof & look down. A Warhead will be directly below us, right beside a group of Marked Men.
Warhead #11: We can spot the next Warhead from this roof as well; look directly left of Warhead #10 to find the other pressed against the far left cliff wall.
Warhead #12: Fight through the Marked Men in the area & we will find that our way is blocked by some collapsed rocks. The Warhead will be directly in our path; blow it up to continue.
Eyebot Upgrade #4: When we blow up Warhead #12, walk through the rocks & take an immediate left on the other side of them up some rubble towards the Third Street Municipal Building.
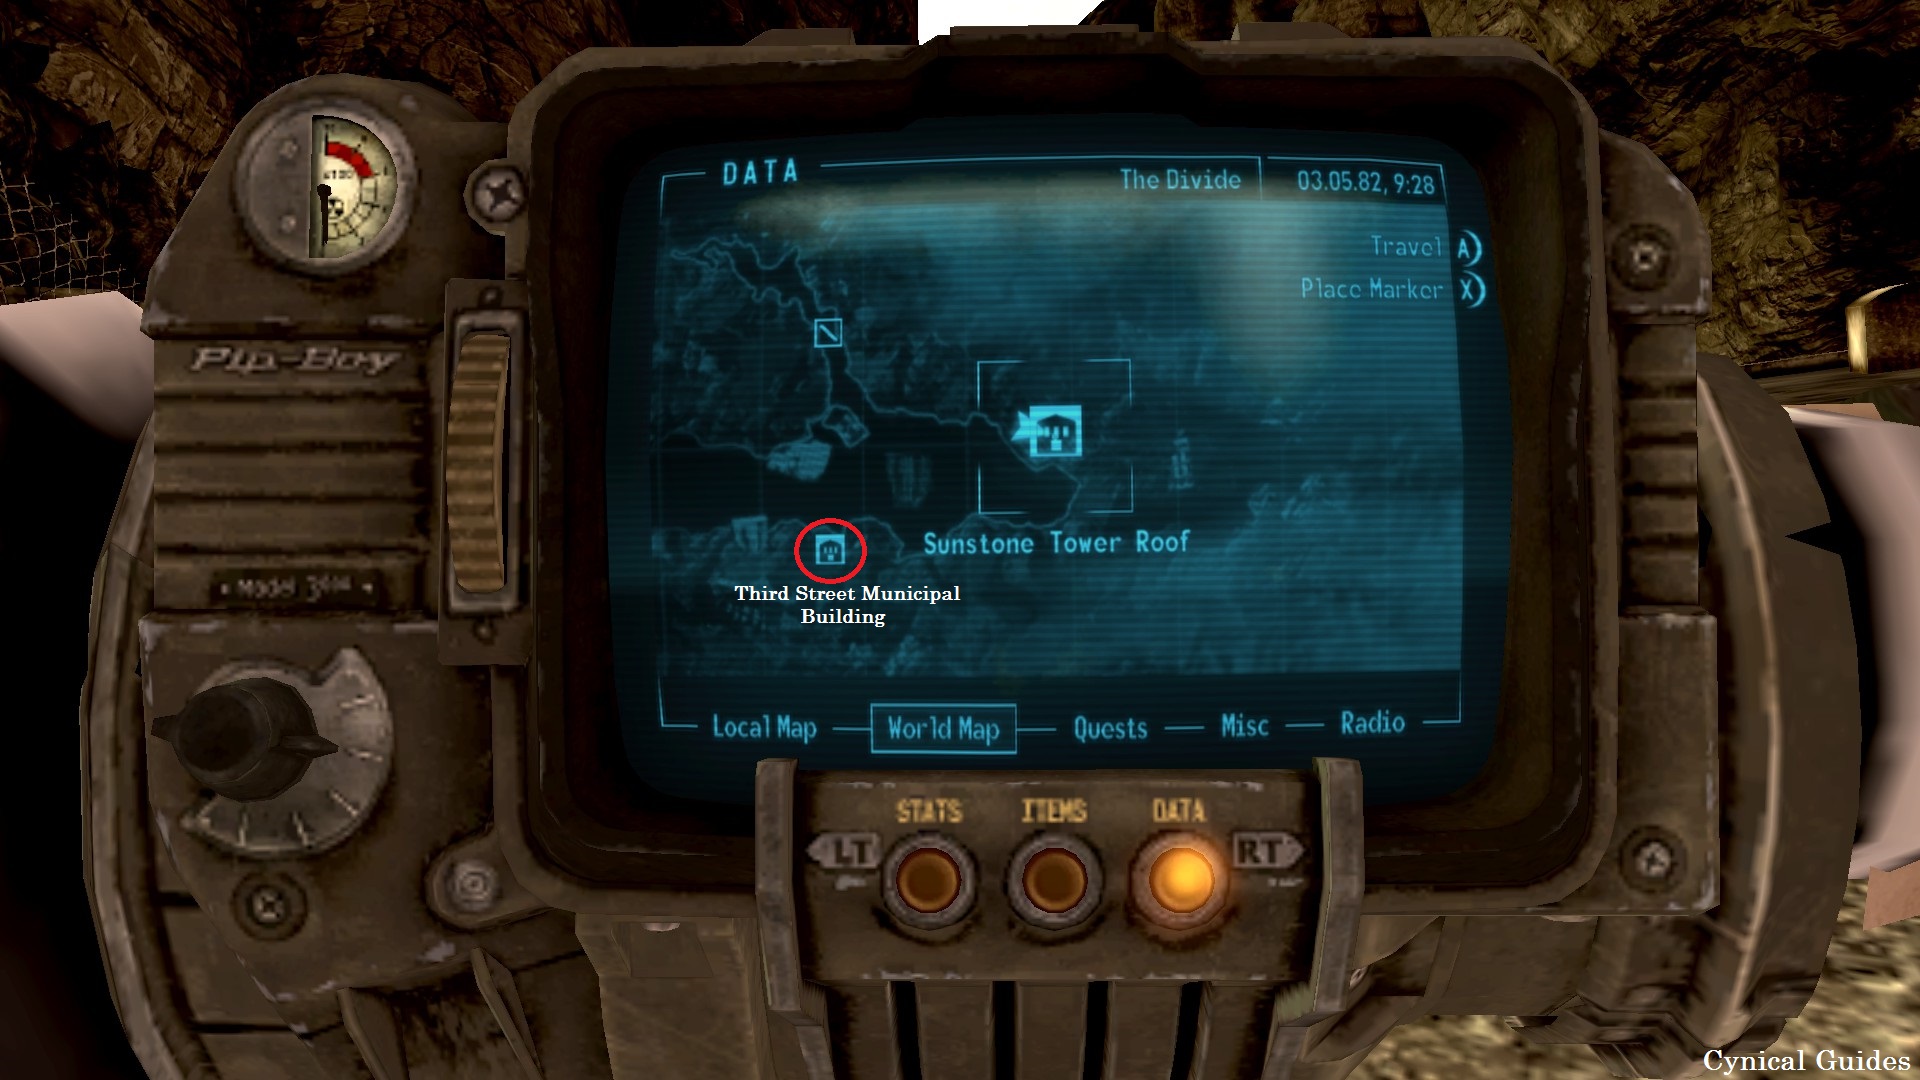
Pass through the building & we can enter a sewer grate on the other side into the Municipal Sewers. Inside, we can find the Destroyed Eyebot down the left passage just before the slope leading up to another exit back to The Divide (that exit takes you into a room overlooking the area we were just in; we can find the Elite Riot Gear Set on a dead Ghoul here).
Warhead #13: Exit out of the Municipal Sewers & begin making your way over to the Cave of the Abaddon. Before we reach it, we will find a Warhead in some rocks blocking our way.
Warhead #14: Immediately after blowing up Warhead #13, turn around & look South East to see another Warhead in some more rocks behind a ruined building to our left.
Eyebot Upgrade #5: Climb over the rocks to where Warhead #14 was & walk to the cliff wall off our left behind the broken building. We can find our final Destroyed Eyebot on the ground just in front of the cliff wall here.

Achievement #72 – ED-Ecated: Found all 5 of ED-E’s Upgrades in the Divide.
After we find the last Eyebot Upgrade Circuit Board, we will unlock the Achievement. This is the only Achievement in the DLC that is technically missable due to Eyebot Upgrade #3 being behind a Terminal we need to hack.
Pass through the Cave of the Abaddon & exit back into the second half of The Divide.
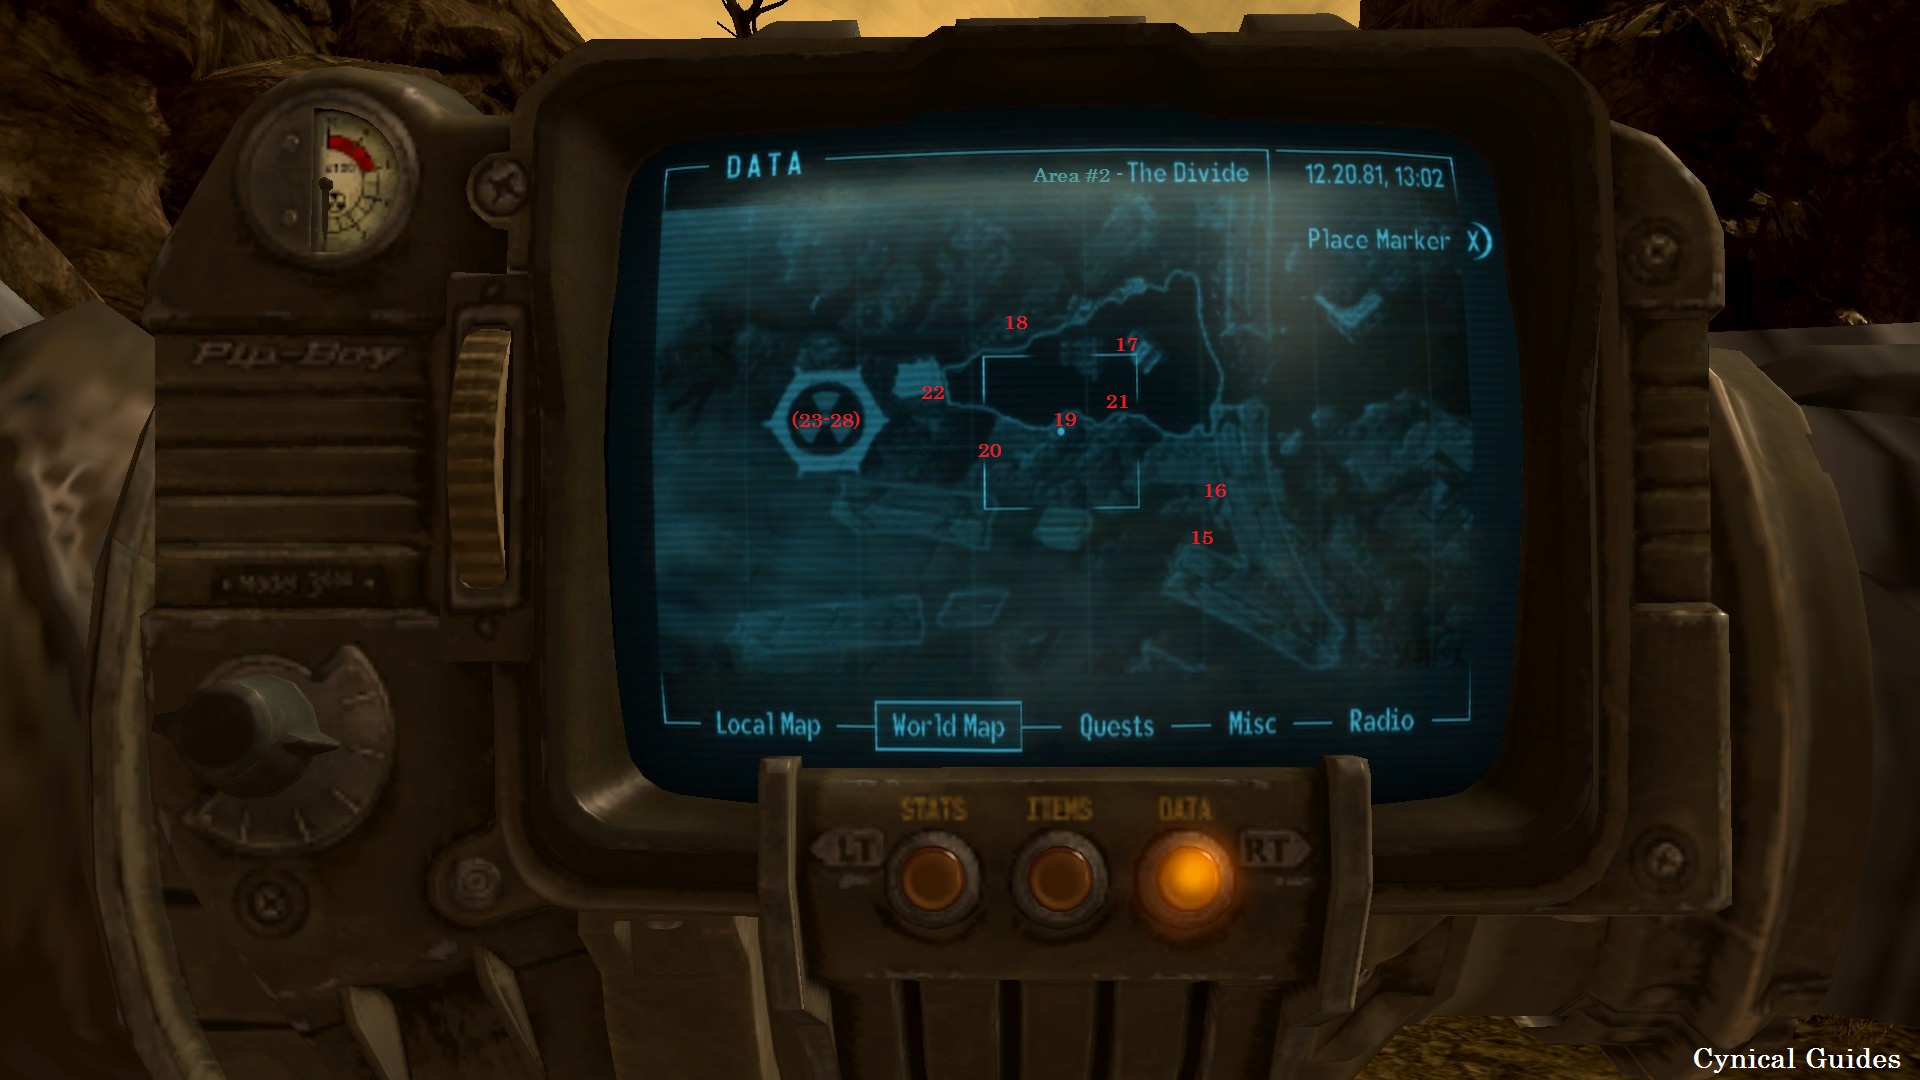
Warhead #15: When we exit onto the Boxwood Hotel Roof from the Cave of the Abaddon, head over to the left edge & we can see a sewer pipe gushing water out of it to the South. Head over to the pipe & go past it to find a passage leading into a cave hidden in the cliff wall. The Warhead will be stuck in the cave ceiling above us when we enter. Watch out for the unique Deathclaw Rawr…
Warhead #16: When we walk a ways into the cave, the entrance will collapse behind us. Conveniently, there will be a Warhead resting in the rocks for us to destroy…
Warhead #17: Leave the cave & carry on through The Divide. To continue, we will need to destroy a Warhead blocking our path against a wrecked building.
Warhead #18: Pass under the building we just cleared & look up to our right as soon as we are on the other side of it to find a Warhead lodged in the cliff wall above us.
Warhead #19: In this new area, walk around the pool of water to our left & look to the left of the broken building on the other side to find a Warhead stuck in some rocks. Blowing it up will open up the path for us to carry on.
Warhead #20: Before we head up the new path, look to the right of the broken building beside us. We can find a Warhead lodged in the rocks a little ways above the roof of this building.
Warhead #21: Now take the pathway we created from Warhead #19 up some rocks & onto a tipped over building. In the middle of this building, turn around & we can see a bunch of metal pipes sticking out of some rocks directly behind us. Walk off the building over to the rocks/pipes & we can find a Warhead hidden to our left near a destroyed freight truck.
Warhead #22: Return to the tipped over building & follow it across towards Ulysses’ Temple. As we approach the upper story of a broken building in front of the Temple entrance, look up & we can find a Warhead lodged in the cliff wall directly above it.
Warhead #23-28: No map is needed for the next 6 Warheads are they are out in the open inside the Temple itself. Enter Ulysses’ Temple & take the elevator down to the Temple Silo to finish the fight. There are 2 Warheads on the left side of the room & 4 Warheads on the right side of the room all before reaching Ulysses himself. Or perhaps he prefers to be called Odysseus…

Achievement #73 – Hometown Hero: Completed Lonesome Road.
Story Related. Now speak with Ulysses & finish the Main Questline of the DLC however you like. At the end, we will have some options on what we do with launching the nuke. We can disable it, fire it at the NCR, fire it at Caesar’s Legion… or both of them. Be warned that this will make whatever Faction you launch the nuke at hostile voiding your Faction related Ending Achievements for the Base Game if you have not already gotten them. If this DLC is the last thing you have to do… don’t be afraid to have some fun. Wherever the nukes fly, a bonus irradiated area like The Courier’s Mile is unlocked for us to explore back in the Mojave.
Whatever you deicide, take the elevator out of Ulysses’ Temple to end the DLC & we will be transported back to the Mojave after the Ending. Head back through the Canyon Wreckage into The Divide & we will polish this 100% off.
Sequence 18: In Memory of Paul...
1. The Courier’s Mile, Hopeville
- Red Glare Mods: 3/3
- Warheads: 30/30
-----------------------------------------------------------------------------------------------------
Once we arrive back in The Divide, Fast Travel to the Hopeville Missile Silo Bunker. From here we can find the location of The Path to the Courier’s Mile. Be sure to pack a lot of RadAway & Rad-X as… this place is (Censored by Steam) irradiated! As well, there are quite a few Deathclaws & Irradiated Marked Men here so pack lots of ammo. Good luck (this area is small fortunately)!
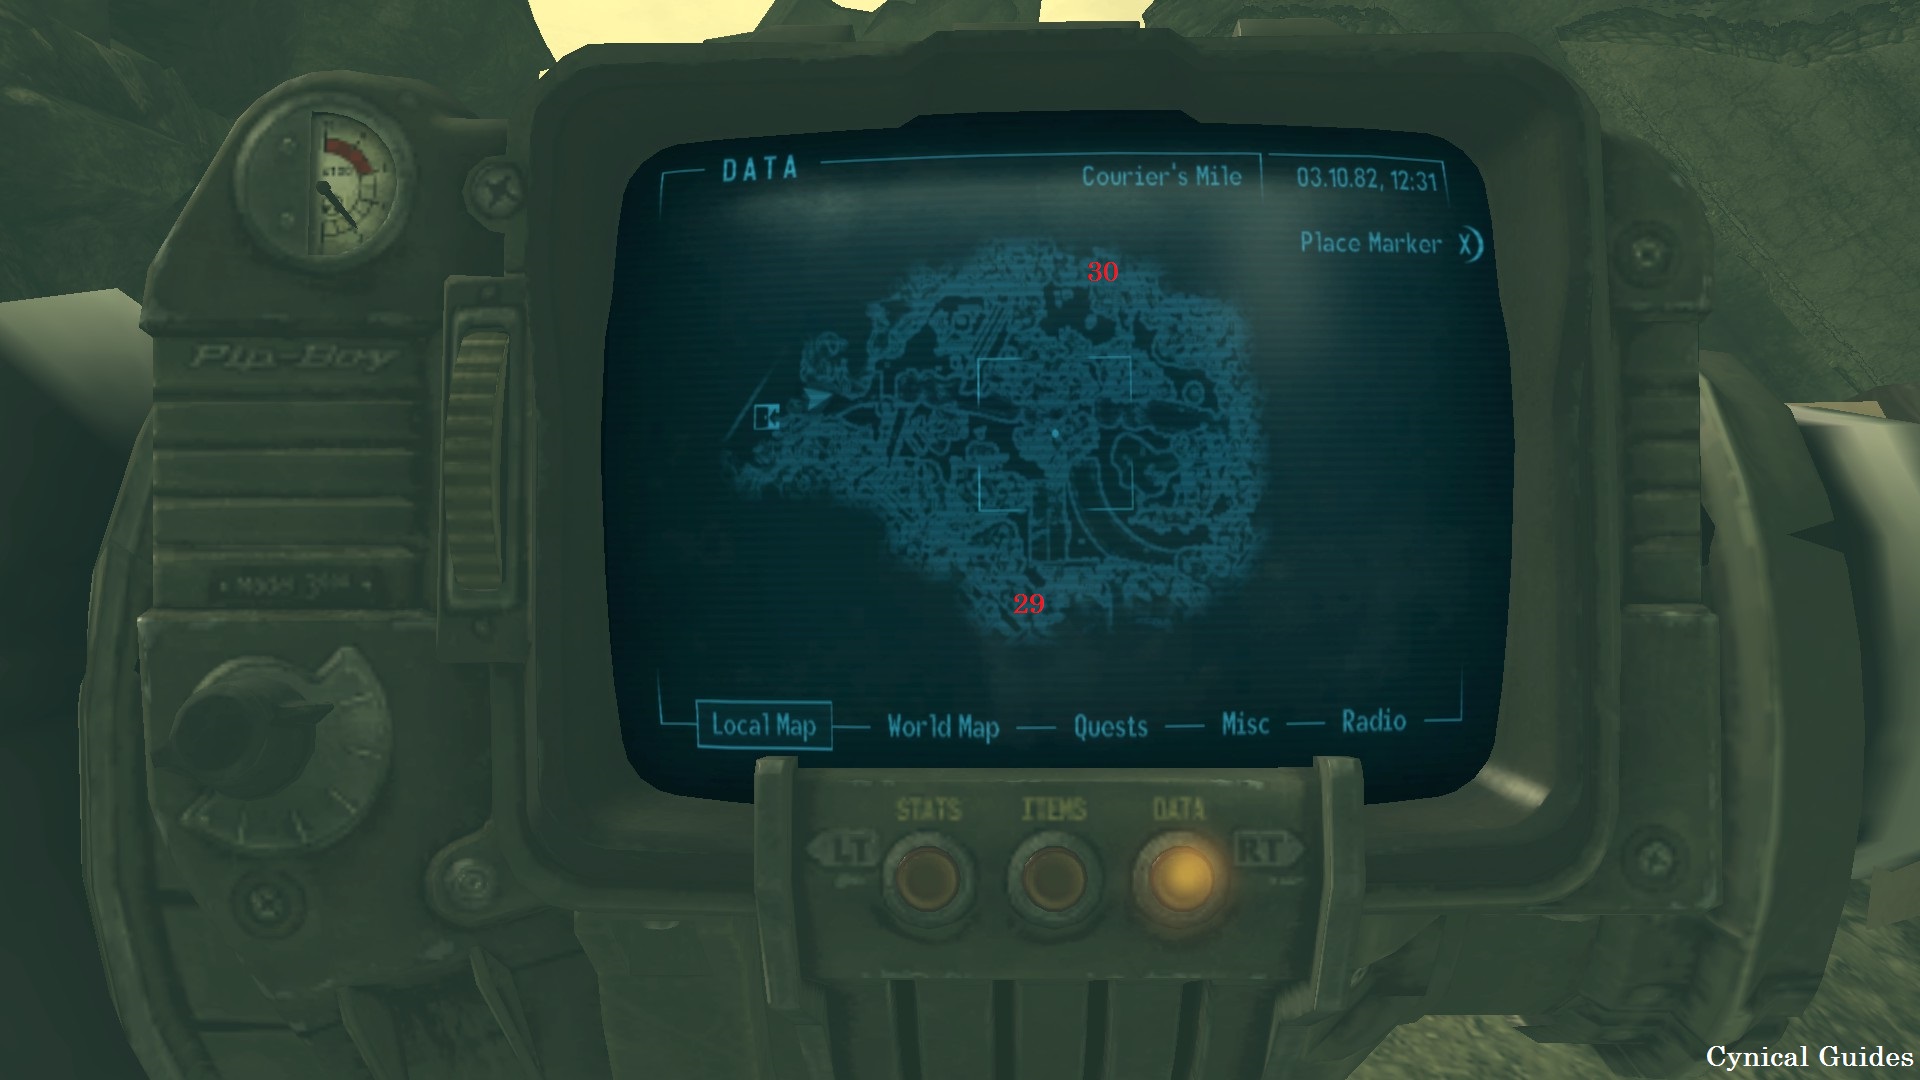
Warhead #29: Enter The Courier’s Mile & follow the road down until just before you pass under the remains of a destroyed bridge. From here, turn right & walk towards the building with a buried red restaurant sign to the South. Past that building, we can find a Warhead in some rubble along the area’s boundary walls.
Warhead #30: Return to the road we came down from & pass under the broken bridge now. Halfway under the bridge, look to your left & head North into an Irradiated Marked Men camp. The final Warhead will be straight ahead buried in some rubble here.

Achievement #74 – Warhead Hunter: Detonated all 30 of the Warheads in the Divide.
If you have been following along with the guide, the Achievement will unlock as soon as we destroy the 30th Warhead. None of the Warheads are missable & can be destroyed at any point before or after the DLC ends.

Achievement #75 – Rocket's Red Glare: Fully upgraded The Divide's signature weapon.
For the final Achievement all we have to do now is obtain the 3 Weapon Mods for the Red Glare. If you were extremely lucky, you may have been able to loot a Mod or two as we played through the DLC. If not (like me), we need to buy them from a Commissary Terminal. One can easily be found inside the Hopeville Silo Bunker or the Hopeville Missile Base Head Quarters.
With a Barter of 100, the 3 Mods will run you a heaping total of 34,624 Caps. Farming loot/exploring The Divide or Big Mountain can net you some good loot to sell for Caps if you still need them. Worst case is, you can return to the Lucky 38 (or wherever your base of operations is) & sell all your stuff until you have the amount needed. The Achievement will unlock as soon as all 3 Mods are in your Inventory. They do not need to be equipped to the Red Glare for the Achievement to unlock.
Conclusion:
This is definitely the best Fallout game in the series hands down. Apart from trying to juggle the 4 Main Factions in the Base Game, it is not too difficult unlocking all of the Achievements in the game. This took me around 65 hours to 100%. This really is an amazing game to explore & discover on your own, & I apologize if the guide was heavy handed with rail roading your playthrough. Again, open-world games are not the strong suit for my guides but I hope that this at least helped layout the Collectibles & sort of an "order of operations" for this 100%.
If this guide helped you achieve 100%, rate the guide or let me know in the comments. Helps me know if I am doing things right!
100% Complete
Thank you for choosing Cynical Guides, & I will see you in the next one!
If you are interested in a little bit of patronage, support my projects & consider buying me a coffee. If not, no worries; my guides are, & will always be free content. Achievement Hunting is my passion, & writing these guides is a way for me to give meaning to a life long hobby!
https://www.buymeacoffee.com/cynic0055
https://steamcommunity.com/sharedfiles/filedetails/?id=2934737227
Check out my profile for a full list of my works.
https://steamcommunity.com/sharedfiles/filedetails/?id=2992727030
Beat Fallout: New Vegas's 100% run?
Flex it — let your friends know you pulled it off.
- Simple Guide to Setting up New Vegas in 2026★ 5 (2.9k)122k views8k ♥9 minUpdated May 6
- New Vegas 2024 Essential Modding Guide★ 5 (1.4k)112k views3.9k ♥37 minUpdated Jan 19
- Fallout:NV Console Command List / Weapons / Armor / NPC's and World Objects★ 5 (948)67k views2.4k ♥33 minUpdated Aug 6, 2025
- Interactive Map★ 5 (614)27k views957 ♥1 minBulgarianUpdated 30 Jan
- Complete Achievement Guide (Includes DLC)★ 5 (808)23k views2.1k ♥26 minUpdated Aug 5, 2025
- A Game-Breaking (But Still Fun) Melee Build★ 5 (239)19k views862 ♥5 minUpdated Feb 25


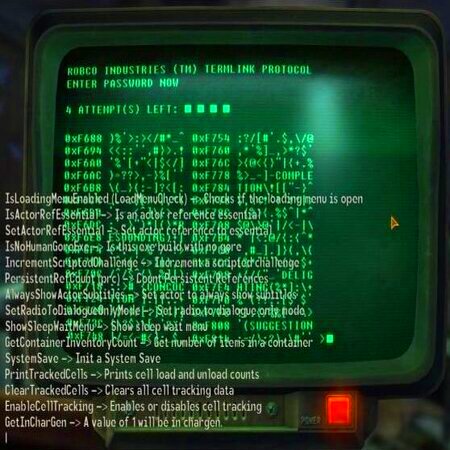

- Upgrading to PremiumTeam Fortress 2★ 5 (20k)1441k views11k ♥6 minUpdated May 11, 2022
- No More Room in Hell Official ManualNo More Room in Hell★ 5 (2.8k)569k views2.1k ♥29 minUpdated Apr 22, 2019
- NMRiH Community Hosting GuidesNo More Room in Hell★ 5 (526)351k views653 ♥1 minUpdated Aug 10, 2022
- ULTIMATE GUIDE FOR GAME DEV TYCOONGame Dev Tycoon★ 5 (5.8k)326k views10k ♥4 minUpdated 23 Jan, 2014
- How to 'Git Gud' Soon™MORDHAU★ 5 (2k)318k views3k ♥68 minUpdated Nov 16, 2024
- Лучшие кооперативные игры SteamPAYDAY 2★ 5 (1.5k)315k views2.1k ♥56 minRussianUpdated Apr 27, 2025


This guide was created by its original author on the Steam Community. Are you the author and want it removed? Request removal.