Overview
An accurate, detailed and complete guide on how to unlock every achievement in Lords of Xulima.
⠀⠀⠀⠀⠀

⠀⠀⠀⠀⠀⠀⠀⠀⠀⠀⠀⠀⠀⠀⠀⠀⠀⠀⠀⠀⠀⠀⠀⠀⠀⠀


Achievements (1/8)

Finish the game in Old-school Veteran difficulty mode.
Complete the game using the veteran difficulty to unlock this achievement. This is the recommended difficulty to play on for those trying the game out for the first time.

Finish the game in Hardcore difficulty mode.
Complete the game using the hardcore difficulty to unlock this achievement. Tougher enemies and the ability to die from starvation make this mode extra challenging.

Finish the game in Ironman difficulty mode.
Complete the game using the ironman difficulty to unlock this achievement. To select ironman, select “hardcore” and then select the ironman option. This is the hardest difficulty level in the game.

Win all combats in the Arena and defeat the Guardian Romegor.
In Sorrentia, you can wager gold to enter the arena and fight 1v1 against ever-increasingly difficult enemies. You can come back to it when you’re stronger, or chip away at it as you progress through the game; the choice is yours. Once you defeat the final opponent, Guardian Romegor, you’ll be rewarded with the Builder’s Scepter. DO NOT SELL THIS. You’ll need it for the “Blessed by the Gods” achievement.

Find the hidden lairs of the Four Sisters.
Defeat all four witches to unlock this achievement. They are located in the following areas:

“I’m coming for you…”
To access the witch’s hut, you’ll need to scout the west side of the forest. Find the lone skull and bones on the western treeline and follow it west to find this witch and a free energy sphere for your troubles. Yoranwa will have a pair of fire-based daemons guarding her when you enter the front door, so defeat those to gain access to her. Be prepared, as she will not go down easy.
Once you defeat her, flip the two switches behind her to unlock two hidden rooms. Here you’ll find some treasure and Caleb’s son, who was captured by the witch. Head back to claim your reward from Caleb who gave you the side quest and he’ll give you the Book of Life. However, DO NOT SELL THIS. You’ll need it for the achievement “Blessed by the Gods”.
Located at:
Longtitude: 107
Latittue: 110

Located deep in the Forest of the Ulrog, the second witch’s hut is guarded by several packs of enemies and the interior is protected by another group of daemons you’ll have to dispatch to gain access to the witch. Look for the light and the bird overhead and prepare for a tough fight. Obviously, this witch is much tougher than the previous one you fought, assuming you already defeated Yoranwa by now. Defeat Arwinzel and you’re half way done with this achievement.
Located at:
Longtitude: 61
Latittue: 155

Located north of the Venomous Lake, Wendofel’s cabin is covered in poisonous gases from the lake, so make sure you’re healed up before hiking to her location. Once inside, the cabin is locked up tight and littered with traps. However, only one mob spawn blocks your path from fighting her.
She can be tough due to her high defense and ability to spam bleed and poison. However, she overly uses her clumsy spell, giving you an advantage in the fight.
Located at:
Longtitude: 26
Latittue: 11

The strongest of the four witches, Vilowia is located in a secluded part of Nagira, accessible only via Vilak on the north side of the Great Fire Lake. Much like the three previous witches, she likes to spam her crow attack, stacking massive amounts of bleed. She also casts mental magic (crazed) and ice magic.
If you have high enough resistance to resist her crazed spell, she’ll have a tendency to overuse it, giving you an early edge in the fight. Stacking bleed and poison work like a charm, but stacking wounds doesn’t seem to be effective in slowing down her assault.
Achievements (2/8)

Kill 1,000 creatures in combat.
This achievement requires you to kill 1,000 individual creatures in combat to earn this achievement. Each individual enemy of any group will count towards this achievement. For example, this group would net you five enemies towards the achievement:


Defeat 300 enemy groups.

Keep in mind that each individual battle will only count one towards this goal, regardless of the number of enemies in said group.

Collect 1,000 herbs.

Just look for the scythe icon to know what you can and cannot collect. Time to dust off your inner botanist and get to gathering!
Do note that the cereal plants at the beginning of the game in Velegarn do not count towards this achievement. Your only reward for farming those is the gold given to you by the farmer.

Find all the erected statues of Yul scattered throughout Xulima.
There are a total of 11 statues of Yul in the game that you’ll have to find. To get each statue to count, simply interact with the statue. You can either pray or destroy it; both will count towards the achievement, but each action will reward you with different bonuses. Statues are located in the following locations:

Once you’re strong enough to defeat the enemies blocking the path towards the NE corner corner of the Velegarn, head all the way north and you’ll find your first statue sitting in front of The Temple of Febret.

Located at:
Longtitude: 178
Latittue: 50

The second Statue of Yul is located inside the well of Castle Nengorth in the Nabros Forest. It’s located behind a locked door that you’ll need to pick or force open. Specifically, in the room on your map labeled “Hall of Prayer and Supplication”. Defeat the group of enemies guarding it to claim your reward.
Located at:
Longtitude: 37
Latittue: 72

The third Statue of Yul will be immediately inside the Temple of Febret, once you defeat the first prince in the Castle of Nengroth. This one you practically can’t miss.
Located at:
Longtitude: 47
Latittue: 74

This statue is located inside the prayer room inside Castle Karraga, home of the second prince you’re required to defeat. Just make sure to dodge the copious amounts of guards that are way past your fighting ability and the various traps laid within to reach it.
Located at:
Longtitude: 32
Latittue: 39

You’ll first need the Light of Alnaet from the Tower of Time to even get close to this statue. Once you obtain it, you’ll be able to dispel the darkness that surrounds it and either pray at it or destroy it. Dealer’s choice. This statue is located on the roadside in Rasumra.
Located at:
Longtitude: 55
Latittue: 63

Once you gain access to the underground of Devonia Castle, you’ll find this statue just above the great hall in the middle of the room that leads from the underground caves. You practically can’t miss it. As always, pray or destroy it. Your call.
Located at:
Longtitude: 68
Latittue: 48
 Statue of Yul #7 & #8
In Rasmura you’ll find the Temple of Raznet. Once you obtain the key and enter it, head to the immediate left-hand door. Unlock it and you’ll enter the Hall of Blessings and the seventh statue of Yul. After that, head to the right and unlock the adjacent door to gain access to the Hall of Prayers and the eighth statue of Yul.
Located at:
Longtitude: 29/64
Latittue: 72/72

Located inside the Temple of Kersket, which you’ll gain entry for once you defeat the third Titan in the desert. You should come across this one through normal progression of the temple, as the room it is in is a necessary room to enter. Just make sure you pray or destroy it before you press onward.
Located at:
Longtitude: 44
Latittue: 58

Once you defeat the final Titan, you’ll gain access to the Temple of Valvet. Make your way to the teleporter as indicated on the map above to be teleported to the first statue inside the temple. Follow the teleporter back and you’ll be transported to the second statue of Yul in the temple.
Located at:
Longtitude: 35
Latittue: 10
Achievements (3/8)

Find the most powerful creatures that ever existed in the most remote places of Xulima.
Once you defeat all the four of the princes, you’ll obtain Taliet’s Eye, which will give you the coordinates to the first Titan, Nifonte, the Ocean Titan. As you might have guessed, Nifonte is located on one of the five islands outside Devonia. Taliet’s Eye will guide you there.


The fourth and final Titan is located in the center of the lake of fire, which you can enter on the southern shoreline. Defeating this final Titan will unlock the achievement.


As you progress through the game, you’ll encounter cursed hounds at regular intervals and as you level up, they’ll increase in numbers and in difficulty.
Once you gain access to Vilak and can safely trek the terrain without injury, head to the west side of the map and you’ll find a small cave that is home to Arrazgul. Pack plenty of defense against electricity and poison, some blessings, a handful of potions (magic and healing) and be prepared for a long fight.
Once you defeat the group, you’ll be awarded this achievement. Don’t forget to snag the energy sphere in Arrazgul’s lair before you leave!

Offer your most valued belonging to gain the favor of the Gods.
This achievement requires you to offer a specific item to each god. Once you offer the item, it will be removed from your inventory. Do NOT sell these. There are eight items in total and they are/can be found in the following locations:
Alnaet shrine is located in Sorrentia (+10 power points)
You’ll need the Book of Life, which you get for saving the boy named Brodo in Hadiros from Yoranwa’s (witch) cabin. You can find more information on that under the achievement for defeating all four witches for her exact location.

You’ll need the Golden Seed from Oldest Odendro tree in Rasmura (Muddy lake area). This is an enemy that you will need to fight. Once you defeat them, you’ll be rewarded with this item. They can be found in this location of the Muddy Lake area:
Hard hitting, spamming mass sleep and an immunity to fire, coupled with a high hit point pool makes taking down this tree a bit tricky, but not too difficult. If he’s too strong, double back at a later time to fight him; he’s not critical to the main story, just the side quest and achievement.

Golot shrine in Hadiros (+5% experience)
Builder’s Scepter for winning the Arena. By the time you start fighting Titans, you should be more than strong enough to take on the arena to completion. I essentially did the whole arena with just my paladin, finishing the arena when I was around level 50.
Once you defeat the champion, you will be awarded the scepter and can take it to Golot’s Shrine in Hadiros, which is west of the arena.
Valvet shrine in Vilak (+5 strenght)
The Horn of Xabraluz can be obtained from Xabraluz, the immortal demon located in the northern portion of Vilak. You can obtained it two different ways:
- Solve his riddle, which is answered in this order: Prince — Atherion — Uvatha — Thondraw — Mergante — Kariham . If you drank from the horn prior to the riddle, once you solve the riddle you’ll gain an additional skill point, hit point and magic point once he gives you the horn.
- Fight him. Xabraluz is the most powerful enemy in the game and will only net you 11,000 experience and the horn (drained).
Kersket shrine in Varaskel (+5 constitution)
The Amberian Diamond can be obtained from Embossed rock statue near Whispering rocks in Sorrentia. You’ll need to solve the riddle in order to obtain it. If you’re having particular trouble with the riddle, the solution is:
Spider>Snake>Lion>Rat>Horse>Vulture
Nalaet shrine in Nabros (+5 agility)
Blessed Water from statue/fountain puzzle in temple of Nalaet. You’ll gain access to this as you progress the story naturally, obtaining the key to the temple from defeating the second Titan.
Taliet shrine in Karraga (+5 speed)
Glass Owl from dead body behind Yotums at Mount Kurong in Geldra. Once you defeat the pair of Yotums, break the ice blocks to access the body and find the Glass Owl figurine.

(+5 defense and evasion)
Egg of the Golden Wyvern from golden wyvern nest on isle of Velionil. In order to sail to the island, you’ll need to use the boat in Devonia and will need to the appropriate coordinates to do so.
Each playthrough has different map directions, so you’ll need to search the ruins outside Devonia for stone plaques that hold the coordinates to one of the five islands. Once you make it to the island, the wyvern is in the upper-most corner of the island. Much like the ruby wyvern, she is fast and hits like a freight train. Protection against physical attacks and stacking wounds is highly advised.
Achievements (4/8)

This achievement requires you to obtain the keys to eight mausoleums (or pick the locks) and defeat the King’s Guardian within it, allowing you to gain access to the treasures within and this achievement. Note the these locks are unbreakable and cannot be opened via brute force. The mausoleums are located in the following areas, along with their respective keys.
**Note** – If you picked the locks without using the keys, you can simply sell the keys. If you’ve sold the keys by accident and haven’t used them on the locks, you’ll have to wait until you can pick the locks to enter the mausoleums.

This mausoleum is located outside the Arena of Sorrentia. To obtain the key, head all the way north and follow the road eastward. You’ll eventually see a small clearing north of the road; traverse this path going east to find a lone, dead human. They will be holding the key to the mausoleum.

Now head back south and go just before the guard post and to the right and around to locate it. A pair of terror birds will be blocking the entrance to it. Defeat them and unlock the door using the key, or pick the lock if you’re able to.
Located:
Longtitude: 82
Latittue: 156

This will likely be the first one you come across, being as it is right in the middle of the starting town, Velegarn, but it will be some time before you’re able to gain access to it, or be able to successfully pick the level twelve lock that hinders your advances.

Once you’re strong enough to defeat the enemies infesting the beaches, head over to the south side of the beach and wade through the thickets to find a skeleton that holds the key to the mausoleum in Velegarn.
Located:
Longtitude: 151
Latittue: 122

Northeast of the Village of Cunavarn lies this mausoleum. Locked behind a level seventeen lock that you’ll either have to come back to once your skill is high enough, or once you located the key to its doors.
To locate the key, head north along the path, then bank west until you run into a group of Ulrog Warriors. These guys can be tough, but if you’re able to defeat them, head to the sign that reads “To Karraga” and then head directly south. There will be a skeleton hidden among the trees; they have the key to this mausoleum, which are located at the following coordinates:
Located:
Longtitude: 128
Latittue: 27
If you invested or have the ability to use any spells/equipment that does double damage to undead, you should make quick work of the guardian in this mausoleum.
The Mausoleum of King Thondraw
Located in the mountains of Karraga, this mausoleum key isn’t well-hidden, so you should find it no problem. It will be located on the corpse of an unknown adventurer here –>
The mausoleum is located in the Forest of the Ulrog on the north side. It is protected by a another strong lock that you cannot use brute force to open. This mausoleum is protected inside by a plethora of traps, so walk slowly and make sure you have enough lockpicks to navigate through the locked doors.

Located in the Varaskel Desert, the Mausoleum of King Mergante is protected by a pack of four ravens, who, when striking you, will cause severe damage and bleeding. The key for this desert mausoleum is located in the following area, while the mausoleum itself is located here:
You’ll want to want to bring a scroll or two to extinguish the flames inside, as well as be prepared to disarm numerous traps and locate several hidden switches. The tomb is guarded by an ancient vampire, who deals massive physical damage, ice magic and steals health to replenish his own.
Located:
Longtitude: 142
Latittue: 131

Located in the swamps of Rasmura, this mausoleum is protected by a pack of five poisonous rats. Inside, you’ll want to be careful of the plethora of traps that might go undetected, as well as the lava pools, which will kill you instantly if you touch them.
Navigate the traps and find the switch to the secret door to gain access to the mummy who guards the queen’s tomb. Defeat the guardian, collect your treasures and check off another mausoleum done.
Located:
Longtitude: 119
Latittue: 9

Located in the far southwest of Devonia and to the west of the Varnalo River, this mausoleum is tucked away, while the key can be found within the local ruins as referenced on the map to the side.
The mausoleum itself has no enemies other than the lich that guards the coffin inside. The inner chamber is protected by flaming heads, but they can be deactivated manually if you get close enough.
The lever to open the door is located on the right side of the chambers.
Located:
Longtitude: 32
Latittue: 189

The final mausoleum you’ll find is located on one of the five islands, which you can transverse once you obtain the boat in Devonia. To locate the key, you’ll need to travel to the Isle of Velionil and defeat the Golden Wyvern. In her nest is a skeleton that contains the key. Travel back to the Isle of Kurukil to find the mausoleum.
The coordinates for the islands can be located on the stone plaques scattered around Devonia. You’ll need to acquire those prior to being able to travel there. If you already did that, click on your book and select the notes section for Devonia if you forgot the directions.
The mausoleum contains no enemies except the guardian. Instead, it is littered with tesla and spiked floor traps. Fun fun!
Achievements (5/8)

Note – Once a prince is defeated, don’t forget to talk to the townsfolk of the town you liberated, as they often will give tokens of their gratitude in the form of training, supplies or permanent blessings.
The first prince is going to be located in Castle Nengorth. You’ll need to obtain the throne room key from the library first, as the door to the throne room is locked behind a level 20 lock and you won’t be able to pick it at such a low level.
The first prince will deal damage both physically and with lightening based spells. He isn’t too tough and is easily defeated around level seven or eight if you play your cards right. Defeating him will grant you the Key to Febret. Don’t forget to scour the rest of the castle for hidden passageways and other treasures before you leave!

The third prince will be located in Devonia. The castle itself can only be accessed from the caves to the west. Once you defeat him, you’ll have access to the front of the castle from that point forward. Before facing the prince, make sure you clear out all the remaining enemies for the experience, since, like the others, once you defeat the prince they will all vanish.

There are no traps except for a few doors and chests, so you can roam freely.
The fourth and final prince will be located in Nagira. This castle is filled with electrical traps that have a timer set to the amount of steps you take. They are indicated on each trap as you take a full step. Navigate the electrical grid to get to Prince Ovengel by unlocking the doors that block the entrance to his thrown room. Once you defeat Prince Ovengel, you’ll finally unlock the achievement “Knight of the Light”. Well done!

Don’t forget to uncover the two hidden doors and their respective switches before you leave. They are shown on the map below.

Achievements (6/8)


For each sphere, I’ll provide a small map to help those that are visual (like myself) as opposed to just words and the coordinates of its location. Let the hunting begin!

The first sphere you’ll encounter is located just off the pathway to the Rat Cave. You can find it by exiting the Village of Velegarn and going to the right when you hit the Tower of Melancholy. There will be one enemy group blocking your path. Dispose of them to claim your rewards.
Located at:
Longtitude: 188
Latittue: 84
The second sphere is going to be found in the Rat Cave. Head north, following the middle fork to find it. You’ll encounter several rat groups blocking your path, but you shouldn’t have too much trouble locating this one.
Located at:
Longtitude: 25
Latittue: 6

The third energy sphere is going to be located in the NE corner of the Nabros Forests. You’ll have to navigate the maze-like forests, while avoiding all of the patrolling guards since you have no chance of defeating them right now (if you’re obtaining this in the early game).
Located at:
Longtitude: 140
Latittue: 50

The fourth energy sphere is located inside the jail cells of Castle Nengorth, in the northeast corner. It’s blocked by a pair of spiders and several spider webs that will severally injure you if you walk through them.
If you didn’t use the “incinerate air” scroll you found during your travels, or picked one up from the merchant (warning, these are expensive), you can use it to clear the path and collect the orb.
Located at:
Longtitude: 77
Latittue: 26

The fifth energy sphere is in the inner forest (what’s left of it) of the Temple of Febret. You’ll gain access to this location after defeating the first prince in Castle Nengorth. Enter the temple and head north to the gate.
Save BEFORE entering, or at least make sure you have enough power points to escape, as this forest is home to The Cursed Guardian, who you have no chance of defeating at this point in the game. Once you pick the locked gate, head west to collect the orb. Since the forest is nearly pitch black, you can’t miss the glowing blue light it gives off.
Located:
Longtitude: 35
Latittue: 37

The sixth energy sphere you’ll probably come across is in The Golden Woods of Sorrentia. This one is in the southeast corner, so you’ll have to navigate around the flowers, as they put you to sleep and send you back to the beginning of the forest. There are no enemies in the woods, so navigate it properly and the sphere is all yours.
Located:
Longtitude: 174
Latittue: 155

The seventh sphere of energy can be found inside The Tower of Melancholy, which is accessible once you successfully navigated the Golden Woods and obtained the key from the hermit that resides there. You’ll find this orb inside the Hall of Blood. Avoid the blood puddles to avoid the traps and claim your reward.
Located:
Longtitude: 47
Latittue: 36

The eighth sphere of energy can be found in the northeast corner of The Valley of the Whispering Rocks in Sorrentia. It is hidden deep in the woods, which can be accessed on the left side of the sphere.
Located:
Longtitude: 136
Latittue: 10

The ninth sphere of energy can be found in the frozen lands of Cunavarn. While following the path to the village, tank the northern pathway through the forest, head westward and you’ll find the orb there, dancing in the falling snow.
Located:
Longtitude: 18
Latittue: 109

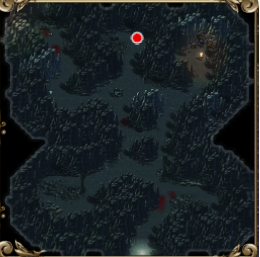
The tenth sphere of energy is located just west of the treeline in The Green Forest of Hadiros. Following the treeline until you find a skull and bones on the ground, then head west through the trees to reach the witch’s cabin and your tenth sphere.
Located:
Longtitude: 96
Latittue: 110

Though in the starting area, this energy sphere will be unobtainable for a while. It is guarded by an extremely strong ogre that, when you first start, will be part of a side quest you cannot hope to complete at your given level. When you’re strong enough, return and defeat him.
He deals strictly physical attacks, so stacking wounds is a great way to render him offensively useless, letting you pour on the damage, making short work of him in the process.
Located:
Longtitude: 25
Latittue: 53

This sphere of energy is located in the frozen mountains of Karraga, past the frozen plains and hidden among the trees. You’ll need to approach this one from the north entrance, as the path is blocked from the south side by a small mountain range.
Located:
Longtitude: 66
Latittue: 111

For this energy sphere, you will need to enter the Tower of Resilience, inside the Living Forest (shown below) you’ll need to navigate the teleportation pads to get to the correct room. When you start, take the west of the two pads, then the north pad, then the east pad and you’ll land in the room with the sphere.
Located:
Longtitude: 59
Latittue: 54


Located in the Forest of the Ulrog in the Karraga Mountains, this sphere is just west of Arwinzel the Witch’s cabin. There’s a few mobs protecting the general location, so be prepared and make sure to carry enough food, as wandering around in the snow can drain your resources very quickly.
Located:
Longtitude: 49
Latittue: 164

Once you’re strong enough to defeat the first witch, Yoranwa, you’ll be able to pick up this energy sphere that is floating just behind her in her cabin.
While you’re there, don’t forget to flip those inconspicuous-looking switches on the wall for some more hidden goodies.
Located:
Longtitude: 26
Latittue: 9

You’ll find this lonely little sphere hanging out in the charred remains of the city of Nagira, just south of the Tower of Vision. Make your way past the abandoned buildings to collect this floating orb and add it to your collection.
Located:
Longtitude: 75
Latittue: 103
Achievements (7/8)

This energy sphere is cleverly hidden across the river in the woods of the Nabros Forest. Just east of the Alter of Nalaet. Weave through the trees to find a camp with a few goodies and this energy sphere.
Located:
Longtitude: 170
Latittue: 169

For this sphere, travel southeast of the Temple of Kersket; in the middle of the Varaskel Desert, you’ll find this lone orb floating in the sands. Collect it to add it to your collection and mark another one off the list.
Located:
Longtitude: 37
Latittue: 39

Located south of energy sphere #18 and north of the Hall of Heroes, this sphere is also located deep within the Varaskel Desert. Don’t forget to loot the skeleton next to it, as it holds an important item!
Located:
Longtitude: 13
Latittue: 107

Found inside one of the many rooms inside the Tower of Time, you’ll have to navigate your way through the puzzle to access the room. Unlike many of the other rooms, the room containing the energy sphere does not have any traps inside of it, so walk freely to collect your findings.
Located:
Longtitude: 34
Latittue: 22

Located inside the Temple of Alnaet, near the city of Cunavarn, this energy sphere is located in the east corridor. Blocking your path are several ice blocks that you’ll have to remove before you can gain access to the sphere at the end of the hallway.Beware the icy winds, as they will periodically harm you due to the intense cold.
Located:
Longtitude: 66
Latittue: 43

Just like energy sphere #15, this one is located in Arwinzel’s cabin, next to her. You can claim this one after defeating her in battle.
Located:
Longtitude: 27
Latittue: 8

Make sure you’re sufficiently healed before heading out to nab this energy sphere, as it is at the far west side of the Venomous Swamp. You’ll continually lose health as you traverse the terrain.
Located:
Longtitude: 6
Latittue: 29

Located on the east side of Emerald Lake, this sphere is tucked away in the corner of the region and guarded by a few mobs of enemies, so make sure you are healed before heading out. Like the other lakes in the region, you can be injured by walking in it.
Located:
Longtitude: 168
Latittue: 82

This energy sphere is located in the far, northeastern corner of the once lush Garden of Hamaleth. Wade through the daemons that occupy the garden to collect this trinket.
Located:
Longtitude: 176
Latittue: 15

When you first enter Devonia, follow the initial path and then turn at the first right fork. Go past the field of herbs and head south to find a pathway through the jungle to find this waiting orb.
Located:
Longtitude: 148
Latittue: 179

When you first try to enter Castle Devonia, you’ll be blocked by several stationed guards, so you’ll have to find another way in. In the northeast corner of Devonia, you’ll find an entrance to the caves underneath the castle. In here, you’ll find another collectible orb.
Located:
Longtitude: 36
Latittue: 59

This energy sphere can be found on the road to Vilak Just before you are prompted to leave Devonia and head there, you should see a passage that is slightly obstructed by vegetation. Follow it south to find this orb.
Located:
Longtitude: 12
Latittue: 98

Just like the other energy sphere’s found in the witch’s cabins, this one is accessible once you defeat Wendofel. She is located on past the Venomous Lake outside Rasmura.
Located:
Longtitude: 24
Latittue: 9

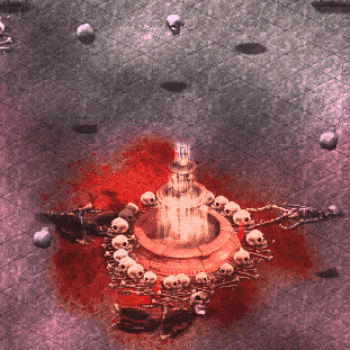
Inside the Temple of Raznet, once you enter the Hall of the Fountain of Courage, unlock the door to your right to find another energy sphere among a plethora of skulls. Navigate through them to claim your reward.
Located:
Longtitude: 63
Latittue: 45

Located inside the Tower of Rage in Devonia, this energy sphere is placed between several flaming skulls, so you’ll have to dodge and weave around them to collect this orb. Be careful.
Located:
Longtitude: 77
Latittue: 82
Achievements (8/8)

Once you’ve gained access to Nagira Castle, you’ll find this energy sphere among the many electrical spires that impede your path. Navigate the timers on them and you’ll find this one to the left of The Great Hall.
Located:
Longtitude: 39
Latittue: 46

After vanquishing the fourth prince, you’ll be awarded the key to the Temple of Golot. There is one energy sphere located in the main hall; you can’t miss it.
Located:
Longtitude: 27
Latittue: 43

When you ever Arrazgul’s lair, make your way to the north most part of the cave where he resides. In the main room, you’ll notice it off to the right side.
You can actually pick it up prior to defeating him so feel free to snag it even if you’re not able to topple him yet.
Located:
Longtitude: 37
Latittue: 11

This energy sphere is actually located in Nagira, but isn’t accessible until later in the game. As shown above, it is blocked off by a line of trees and only has one pathway, which is through Vilak and guarded by several groups of powerful demons.
If you’re strong enough to defeat them, make your way to the right of the witch’s hut and you’ll see it floating near a camp.
Located:
Longtitude: 77
Latittue: 144

You’ll need to accomplish a few things before going after this orb. First, you’ll need to gain access to the ship in Devonia, then once you do that, search around the ruins in Devonia for stone tablets that give out various coordinates (they are different each playthrough). One of the coordinates will lead you to The Isle of Lionelil. On the far end is the orb.
Located:
Longtitude: 22
Latittue: 151

You’ll need to accomplish a few things before going after this orb. First, you’ll need to gain access to the ship in Devonia, then once you do that, search around the ruins in Devonia for stone tablets that give out various coordinates (they are different each playthrough). One of the coordinates will lead you to The Isle of Alkuendil. On the far end, to the right, is the orb.
Located:
Longtitude: 57
Latittue: 78

This energy sphere is guarded by the fourth and final witch in the game. You can only obtain it by defeating her first. Her hut can be accessed through Vilak, through the entrance on the north side of the Great Fire Lake. This will lead you to a secluded part of Nagira you couldn’t access beforehand.
Located:
Longtitude: 22
Latittue: 7

Once you defeat the first Titan, you’ll earn the key to the Temple of Nalaet. Head to the center of the temple to find this orb. Easy enough!
Located:
Longtitude: 46
Latittue: 48

Found in the freezing region of the Great Geldra Glacier, you’ll find this orb floating all alone on the right-most side of the area. Make sure you’re strong enough to withstand the cold and have enough food to make the journey, as you’ll be constantly harmed by the freezing cold and can easily be killed or die of starvation on lower levels.
Located:
Longtitude: 163
Latittue: 127

Once you defeat the second Titan and obtain the key to the Temple of Taliet, you’ll have to navigate a serious of portal puzzles. The above picture will help guide you through the temple if you’re stuck. The energy sphere is indicated by the “P” on the map. Careful, as it is surrounded by several telsa traps.
Located:
Longtitude: 25
Latittue: 59

This energy sphere is located in the sweltering dunes of Pernitia. Make sure you have ample food reserves, as traversing this terrain will deplete it swiftly. You’ll find the sphere in the southwestern portion next to several chests and skeletons.
Located:
Longtitude: 75
Latittue: 159

Once you gain access to the Temple of Kersket, simply proceed through the rooms and when you come to the one shown above, the switch is just to the right of it. You shouldn’t have too much trouble locating it. There are no traps in the room that contains the orb.
Located:
Longtitude: 27
Latittue: 37

Found in the freezing region of the Great Geldra Glacier, you’ll find this orb floating all alone on the left-most side of the area. Make sure you’re strong enough to withstand the cold and have enough food to make the journey, as you’ll be constantly harmed by the freezing cold and can easily be killed or die of starvation on lower levels.
Located:
Longtitude: 44
Latittue: 90

This energy sphere is located in the sweltering dunes of Pernitia. Make sure you have ample food reserves, as traversing this terrain will deplete it swiftly. You’ll find the sphere in the northwestern portion next to several chests and skeletons.

This sphere of power is located on a small island within the lake of fire. Make sure you take the time to uncover all of the lake to collect the goodies strewn within, including this sphere.
Located:
Longtitude: 112
Latittue: 72

Found in the Temple of Valvet in the Trial of Fire room on the right. You’ll find this one in the center of the room. Can’t miss it.
Located:
Longtitude: 87
Latittue: 35

Located in Vilak, east of the Lake of Fire, this energy orb is hidden within the overgrowth of dead trees and is one of the more tricky ones to run across naturally. Make your way through the dead vegetation to claim your reward.
Located:
Longtitude: 164
Latittue: 52

This is one I actually missed and had to track down. It’s located in Cunavarn, hidden away in the trees of the Living Forest of Odendros, so make sure you don’t forget it before moving on.
Located:
Longtitude: 93
Latittue: 189

The final energy sphere was also one I had to backtrack and find, which took way longer than I’d have liked. It is located in the throne room of the second prince, inside Castle Karraga, tucked away in the corner.
Located:
Longtitude: 32
Latittue: 20