Overview
This guide aims to show you how to get up and running with a DST Dedicated server as easily as possible.
What you’ll need
- SteamCMD
- Dedicated Server Cluster Configuration
- 30m of your time
SteamCMD
SteamCMD in a summarized way is no more than a command line version of the steam client.
You can find the downloadable installer here.
Install it in the location that you want your don’t starve’s engine to be and note down its installation path.
For instance, mine is “G:DevdedicatedServerssteamCMDsteamcmd”.
If you don’t know the exact path of your instalation, simply go through your windows file explorer until you reach your steamCMD’s directory.
After that, you can simply click on your “location address” and it will display the full path of your current folder.
Such as:

Dedicated Server Cluster Configuration
Go to [link] and log into your Klei Account (you can login with steam)
On the top navigation menu click on GAMES
Then go into GAME SERVERS below Dont Starve’s image
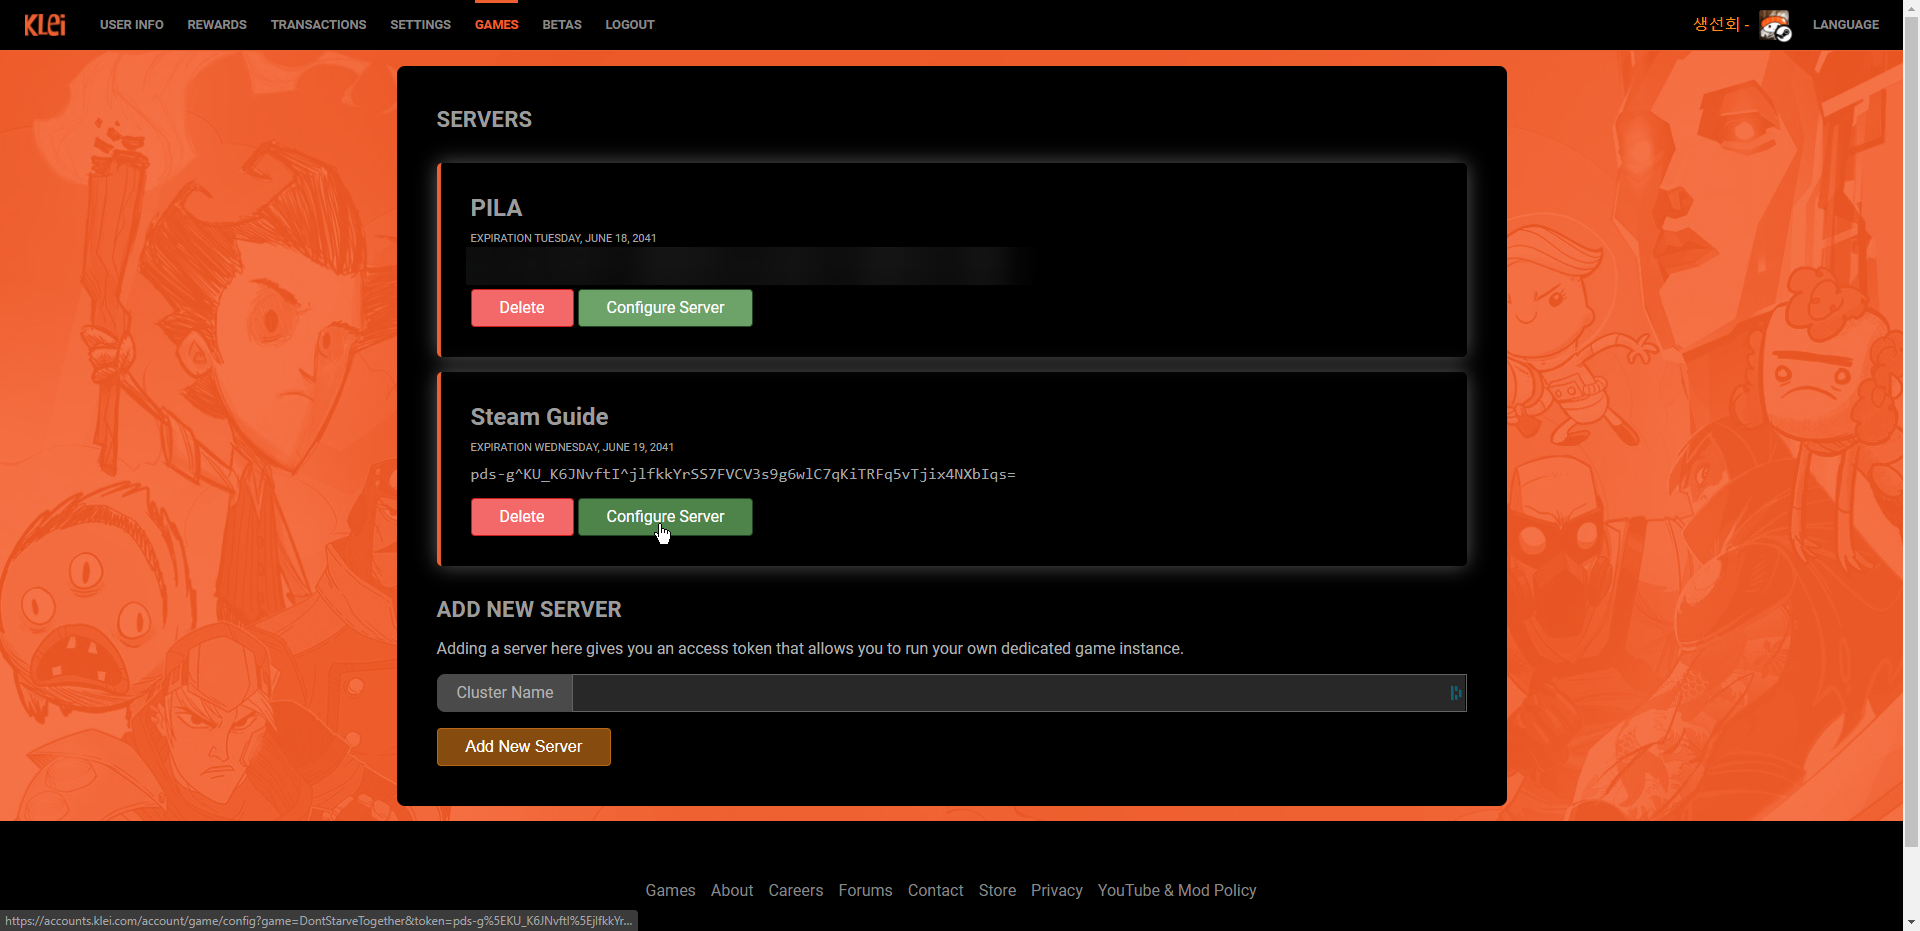
Then you will see a list of your current server configurations (if you’ve got any)
In ADD NEW SERVER fill the Cluster Name as the name you want for your server and press the add new server button like so
Then it should appear on your list.


NOTE below each of your server’s name and expiration date, there is a line with a bunch of characters. This is a token that represents yourself as an owner of your server. Don’t give this to anyone. For the sake of this guide, my personal server is blurred but not my guide server.
Click on Configure Server
Here you will see a page that allows you to change your server’s base settings
After you have made the changes you desire, click on the Download settings button.
This will download you a zip file.

Setting up the Server
Open your file explorer (shortcut = windows+E) and access your documents
Go to Klei
And finally, DoNotStarveTogether
Get your zipped file from earlier and extract it into this page. It should look similar to this
This folder contains all of the necessary information about your server, including saves.


Go back one folder.
Create a new text document
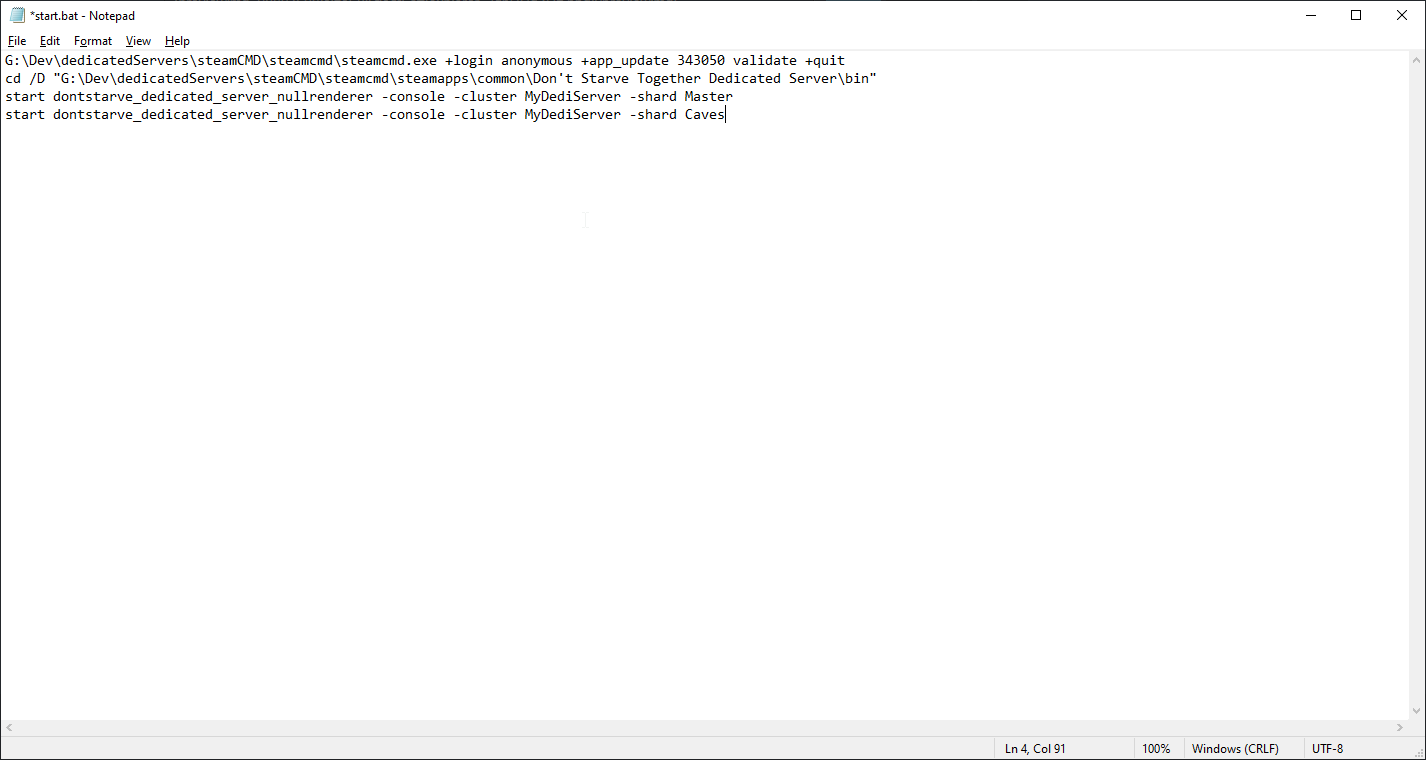
Paste the following code:
cd /D “STEAMCMDPATHsteamappscommonDon’t Starve Together Dedicated Serverbin”
start dontstarve_dedicated_server_nullrenderer -console -cluster MyDediServer -shard Master
start dontstarve_dedicated_server_nullrenderer -console -cluster MyDediServer -shard Caves
Now replace STEAMCMDPATH with your steamCMD path
And, if you switched the folder’s name, MyDediServer for your server folder’s name. If you did not change it, leave as is.
The final result should look something like this
Now go to file
Save As
Name your file “start.bat” and save as type to All files as shown below


Double click the start.bat file and a console will pop up. Let it run for as long as it needs.
After it has verified your installation, two new console windows will pop up. One is for the main server and the other one is for the caves server.
Once it finishes, both consoles should look like this:
Et voila! Your server is now running!

If you now enter dont starve together
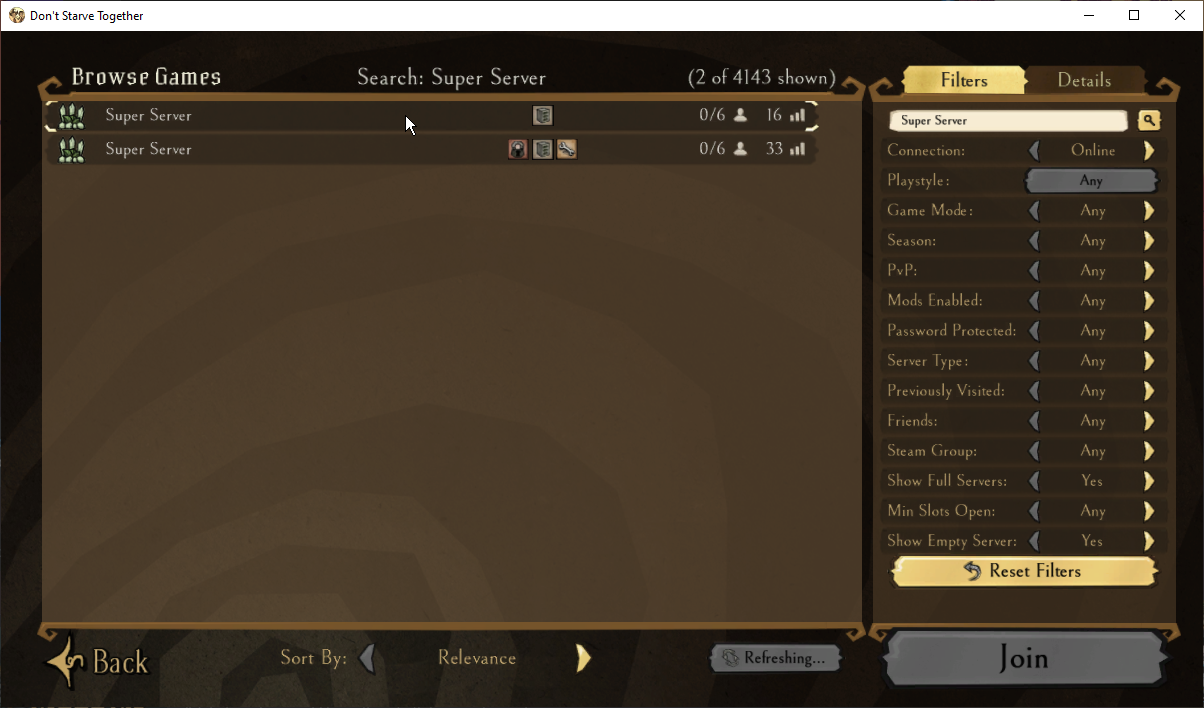
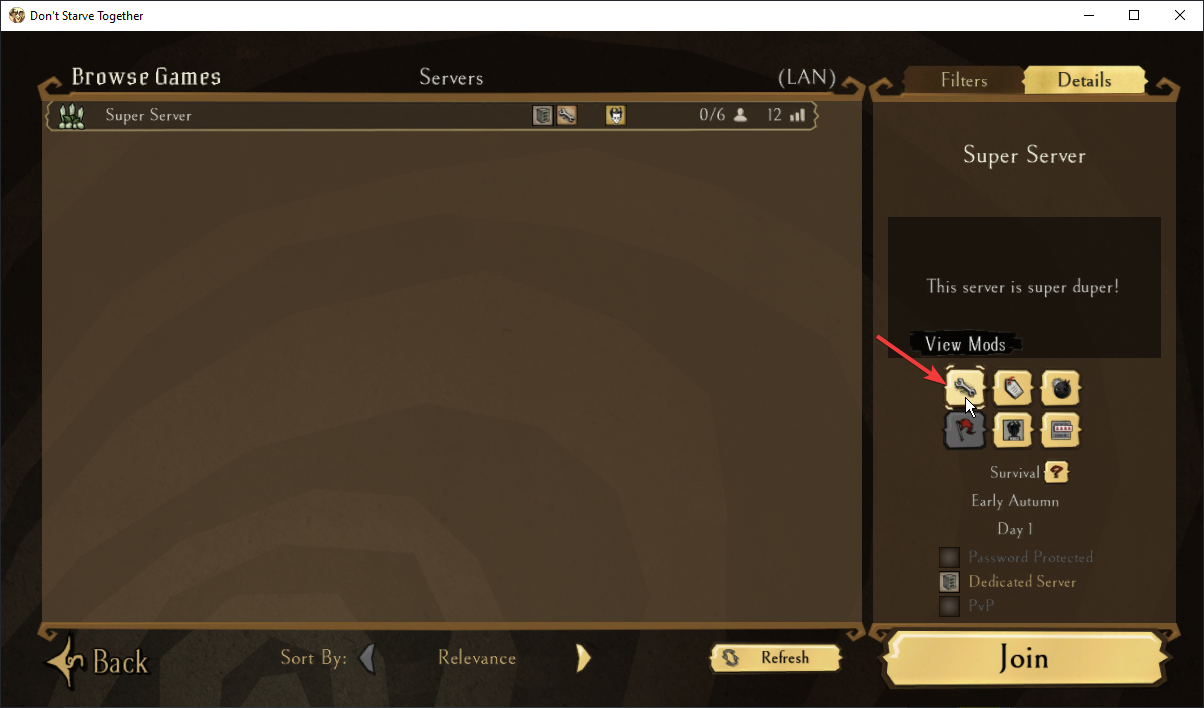
Go to Browse Games and filter by the name of your server.
In my case, Super Server
NOTE: Super server is the default name for the servers, therefore there could be more servers with the same name, as demonstrated in the picture. in this case, our is the first one. To avoid confusion I strongly suggest you to pick an unique name.
It should show up and be joinable by yourself and your friends!
Closing the Server
If, for some reason, you must close the server, open your consoles and press CTRL+C repeatedly until it closes. Do this for both consoles.
If you want to play again, simply run start.bat and everything will boot up the same as you left it!
Optional – Modding

There are two types of mods available
- Client
- Client mods are mods that are developed specifically to run in YOUR game. No one but yourself can see or take advantages of the mods you’ve installed. A good example for this would be a language mod.
- Server
- Server mods, on the other hand, are mods that are available to everyone in your server. Use these mods to shape your server into the play ability you desire across your server. These will apply and are mandatory to everyone joining your server.
In this case, we will take a look at server mods.
Access the Don’t Starve Together workshop
Scroll a little bit down and click the tag “server_only_mod”
This will present you with a variety of different mods created by our fellow players.

In my case, I will filter by Most popular of All time
For the sake of this example I will pick the first mod that shows
After entering the mod’s page, please look at the URL.


In the URL you will notice there’s a text that goes as id=SOMENUMBER.
Such as this:
Write down the number and the name of the mod.
Repeat this step for as many mods as you’d like.
Go to your SteamCMD path, steamapps, common, Don’t Starve Together Dedicated Server, mods.
In my case – G:DevdedicatedServerssteamCMDsteamcmdsteamappscommonDon’t Starve Together Dedicated Servermods
You should see a folder similar to this one:
Right click on dedicated_server_mods_setup.lua and click Open With
Click on More Apps
And finally, notepad.
NOTE: This also works with any other text editor you desire. I’m using Notepad as an example since everyone has it.


Your file should look like this:
Now, for each one of your picked mods, insert a line after the last written line of this document like so:

Replace MODNUMBER and MODNAME with your mods number and mods name.
After going through your mods, it should look similar to mine:
After doing this go to File – Save.

Right click your file and Select Properties
Click on Read Only, then Apply, and then OK
Now, every time you start up your server it will Download and/or update the game and the mods.


Now that we have the mods available in our computer, we need to tell which ones we want available in our server. (In my case, I want them all).
Once again, go into your Documents – Klei – DoNotStarveTogether
In case you don’t remember:
Open your file explorer (shortcut = windows+E) and access your documents
Go to Klei
And finally, DoNotStarveTogether

Open your server’s folder – In my case “MyDediServer”
Then Master
And create a new text document.


Here, we specify which mods, from the ones available in our system (that we downloaded before) do we want in our server.
To do this simply write
return {
[“workshop-MODNUMBER”] = { enabled = true} –MODNAME
}
Inside the return method, duplicate the line “workshop-MODNUMBER” for as many mods as you’d like.
In the end, it should look something like this:
Go to FILE – Save AS – And save it with the name modoverrides.lua as shown below
After Saving, you can delete the other “New Document”


Copy your newly created “modoverrides.lua” file and go back one folder
Go into Caves
And paste “modoverrides.lua” there.

Now, run start.bat.
Open Dont Starve together and search for your server.

If you followed everything correctly, your server now should show a little tool symbol as follows
If that’s the case, congrats! Your mods are now up and running!

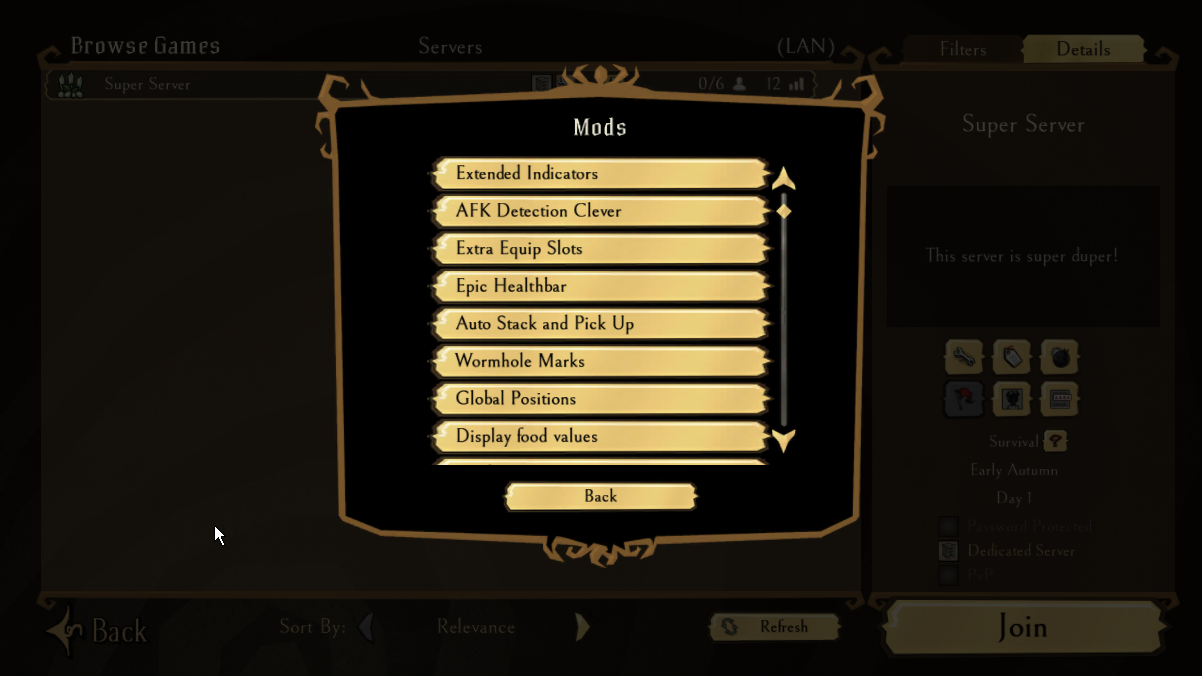
To confirm that our mods are all working correctly, click your server and then View Mods
This will show you all the mods that are installed in your server
Hopefully everything checks out.
Happy modding!
Optional – Advanced Configurations
After going through the previous sections you should have your server up and running with your desired mods.
But what if you want to change your server name, capacity, description or password?
This is fairly easy to do.
Go into your Documents – Klei – DoNotStarveTogether – MyDediServer
You’ll notice you have a file named cluster.ini.
Right click and Edit
Our files should look alike:
Here you can change a variety of settings to better tailor your experience.


In my case, i’ve changed the Max Players, server name and password as well as the tick rate.
Now, there are a ton of different settings you can change here and if you want to dive deeper, I would recommend you checking a Klei developer’s guide through these settings here[forums.kleientertainment.com]

Quoting, the explanations go as follows:
[MISC]
max_snapshots
Default: 6
Maximum number of snapshots to retain. These snapshots are created every time a save occurs, and are available in the “Rollback” tab on the “Host Game” screen.
console_enabled:
Default: true
Allow lua commands to be entered in the command prompt or terminal that the server is running in.
[SHARD]
shard_enabled
Default: false
Enable server sharding. This must be set to true for multi-level servers. For single-level servers, it can be omitted.
Must match in each cluster.ini (See NOTES)
bind_ip
Overridable in server.ini
Default: 127.0.0.1
Required: If shard_enabled = true and is_master = true
This is the network address the master server will listen on for other shard servers to connect to. Set this to 127.0.0.1 if all of your servers in your cluster are on the same machine, or 0.0.0.0 if the servers in your cluster are on different machines. This only needs to be set for the master server, either in cluster.ini, or the master server’s server.ini.
master_ip
Overridable in server.ini
Default: none
Required: If shard_enabled = true and is_master = false
This is the I.P. address that a non-master shard will use when trying to connect to the master shard. If all servers in a cluster are on the same machine, set this to 127.0.0.1
master_port
Overridable in server.ini
Default: 10888
This is UDP port that the master server will listen on, and that a non-master shard will use when trying to connect to the master shard. This should be set to the same value for all shards by having a single entry in cluster.ini, or omitted completely to use the default. This must be different from the server_port setting on any shard that is running on the same machine as the master shard.
cluster_key
Overridable in server.ini
Default: none
Required if shard_enabled = true
This is a password used to authenticate a slave server to the master. If you are running servers on different machines that need to connect to each other, this value must be the same on each machine. For servers running on the same machine, you can just set this once in cluster.ini.
Must match in each cluster.ini (See NOTES)
[STEAM]
steam_group_only
Default: false
When set to true, the server will only allow connections from players belonging to the steam group listed in the steam_group_id setting.
steam_group_id
Default: 0
Steam group id for steam_group_only / steam_group_admins settings. See here for instructions on finding your steam group id: [Server Admin] Associate your server with a steam group
steam_group_admins
Default: false
When this is set to true, admins of the steam group specified in steam_group_id will also have admin status on the server.
[NETWORK]
offline_cluster
Default: false
Create an offline cluster. The server will not be listed publicly, and only players on the local network will be able to join, and any steam-related functionality will not work.
Must match in each cluster.ini (See NOTES)
tick_rate
Default: 15
This is the number of times per-second that the server sends updates to clients. Increasing this may improve precision, but will result in more network traffic. It is recommended to leave this at the default value of 15. If you do change this option, it is recommended that you do so only for LAN games, and use a number evenly divisible into 60 (15, 20, 30).
whitelist_slots
Default: 0
The number of reserved slots for whitelisted players. To whitelist a player, add their Klei UserId to the whitelist.txt file (Place this file in the same directory as cluster.ini)
Master cluster.ini only (See NOTES)
cluster_password
Default: none
This is the password that players must enter to join your server. Leave this blank or omit it for no password.
Master cluster.ini only (See NOTES)
cluster_name
The name for your server cluster. This is the name that will show up in server browser.
Master cluster.ini only (See NOTES)
cluster_description
Default: empty
Cluster description. This will show up in the server details area on the “Browse Games” screen.
Master cluster.ini only (See NOTES)
lan_only_cluster
Default: false
When set to true, the server will only accept connections from machines on the same LAN
Master cluster.ini only (See NOTES)
cluster_intention
Default: Varies, depending on game mode.
The cluster’s playstyle. This field is the equivalent of the “Server Playstyle” field on the “Host Game” screen. Valid values are cooperative, competitive, social, or madness.
Master cluster.ini only (See NOTES)
autosaver_enabled
Default: true
When this is set to false, the game will no longer automatically save at the end of each day. The game will still save on shutdown, and can be manually saved using c_save().
[GAMEPLAY]
max_players
Default: 16
The maximum number of players that may be connected to the cluster at one time.
Master cluster.ini only (See NOTES)
pvp
Default: false
Enable PVP.
game_mode
Default: survival
The cluster’s game mode. This field is the equivalent of the “Game Mode” field on the “Host Game” screen. Valid values are survival, endless or wilderness
Must match in each cluster.ini (See NOTES)
pause_when_empty
Default: false
Pause the server when there are no players connected.
vote_enabled
Default: true
Set to true to enable voting features.
NOTES:
For multi-level clusters with servers running on more than one machine, you will have multiple copies of the cluster.ini file, one per machine.
Settings above that are marked “Master cluster.ini only” are only valid in the cluster.ini on the same machine as the master, and can be omitted from the cluster.ini on other machines, as they will be ignored.
Settings above that are marked “Must match in each cluster.ini” must be set to the same value in each cluster.ini file, or omitted from each cluster.ini file if you wish to use the default (for settings that have one).
Wrapping up
I hope you’ve enjoyed and had success with this guide.
I’ve decided to make this guide since i’ve had to go through trial and error multiple times and forums until I had everything working well together.
As this was my first guide, I truly appreciate your honest feedback.
Special thanks to @Drjak for helping me testing the guide and ensuring it works as expected.
Thank you